I’ve just laid out the second pile of diamonds from the Kaffe Fassett Collective. I’d cut them from the strips I’d cut for Diamonds II and added a few more from fabrics I picked up at Woolworks just outside of Mahone Bay when I was in Lunenburg for my regular bone density scan.
Tumbling Blocks Layout
I began by colour sorting the diamonds then sorting again for intensity. I laid out the blocks so I could get a colour flow from the yellows in the top left to blues in the bottom right. I haven’t taken time yet to sit with this array – I did my best to keep the dark diamonds aligned on one side of each “cube”, lighter diamonds on the “light side” with a medium intensity for the “top” of each cube. I now need to spend some time checking that the flow allows each cube to stand out.
In actual fact I began the layout with the blue diamonds (in part because I had more blues than other colours) but once I had the layout I decided the colour flow works better from the yellow to the blue, rather than the other way around.
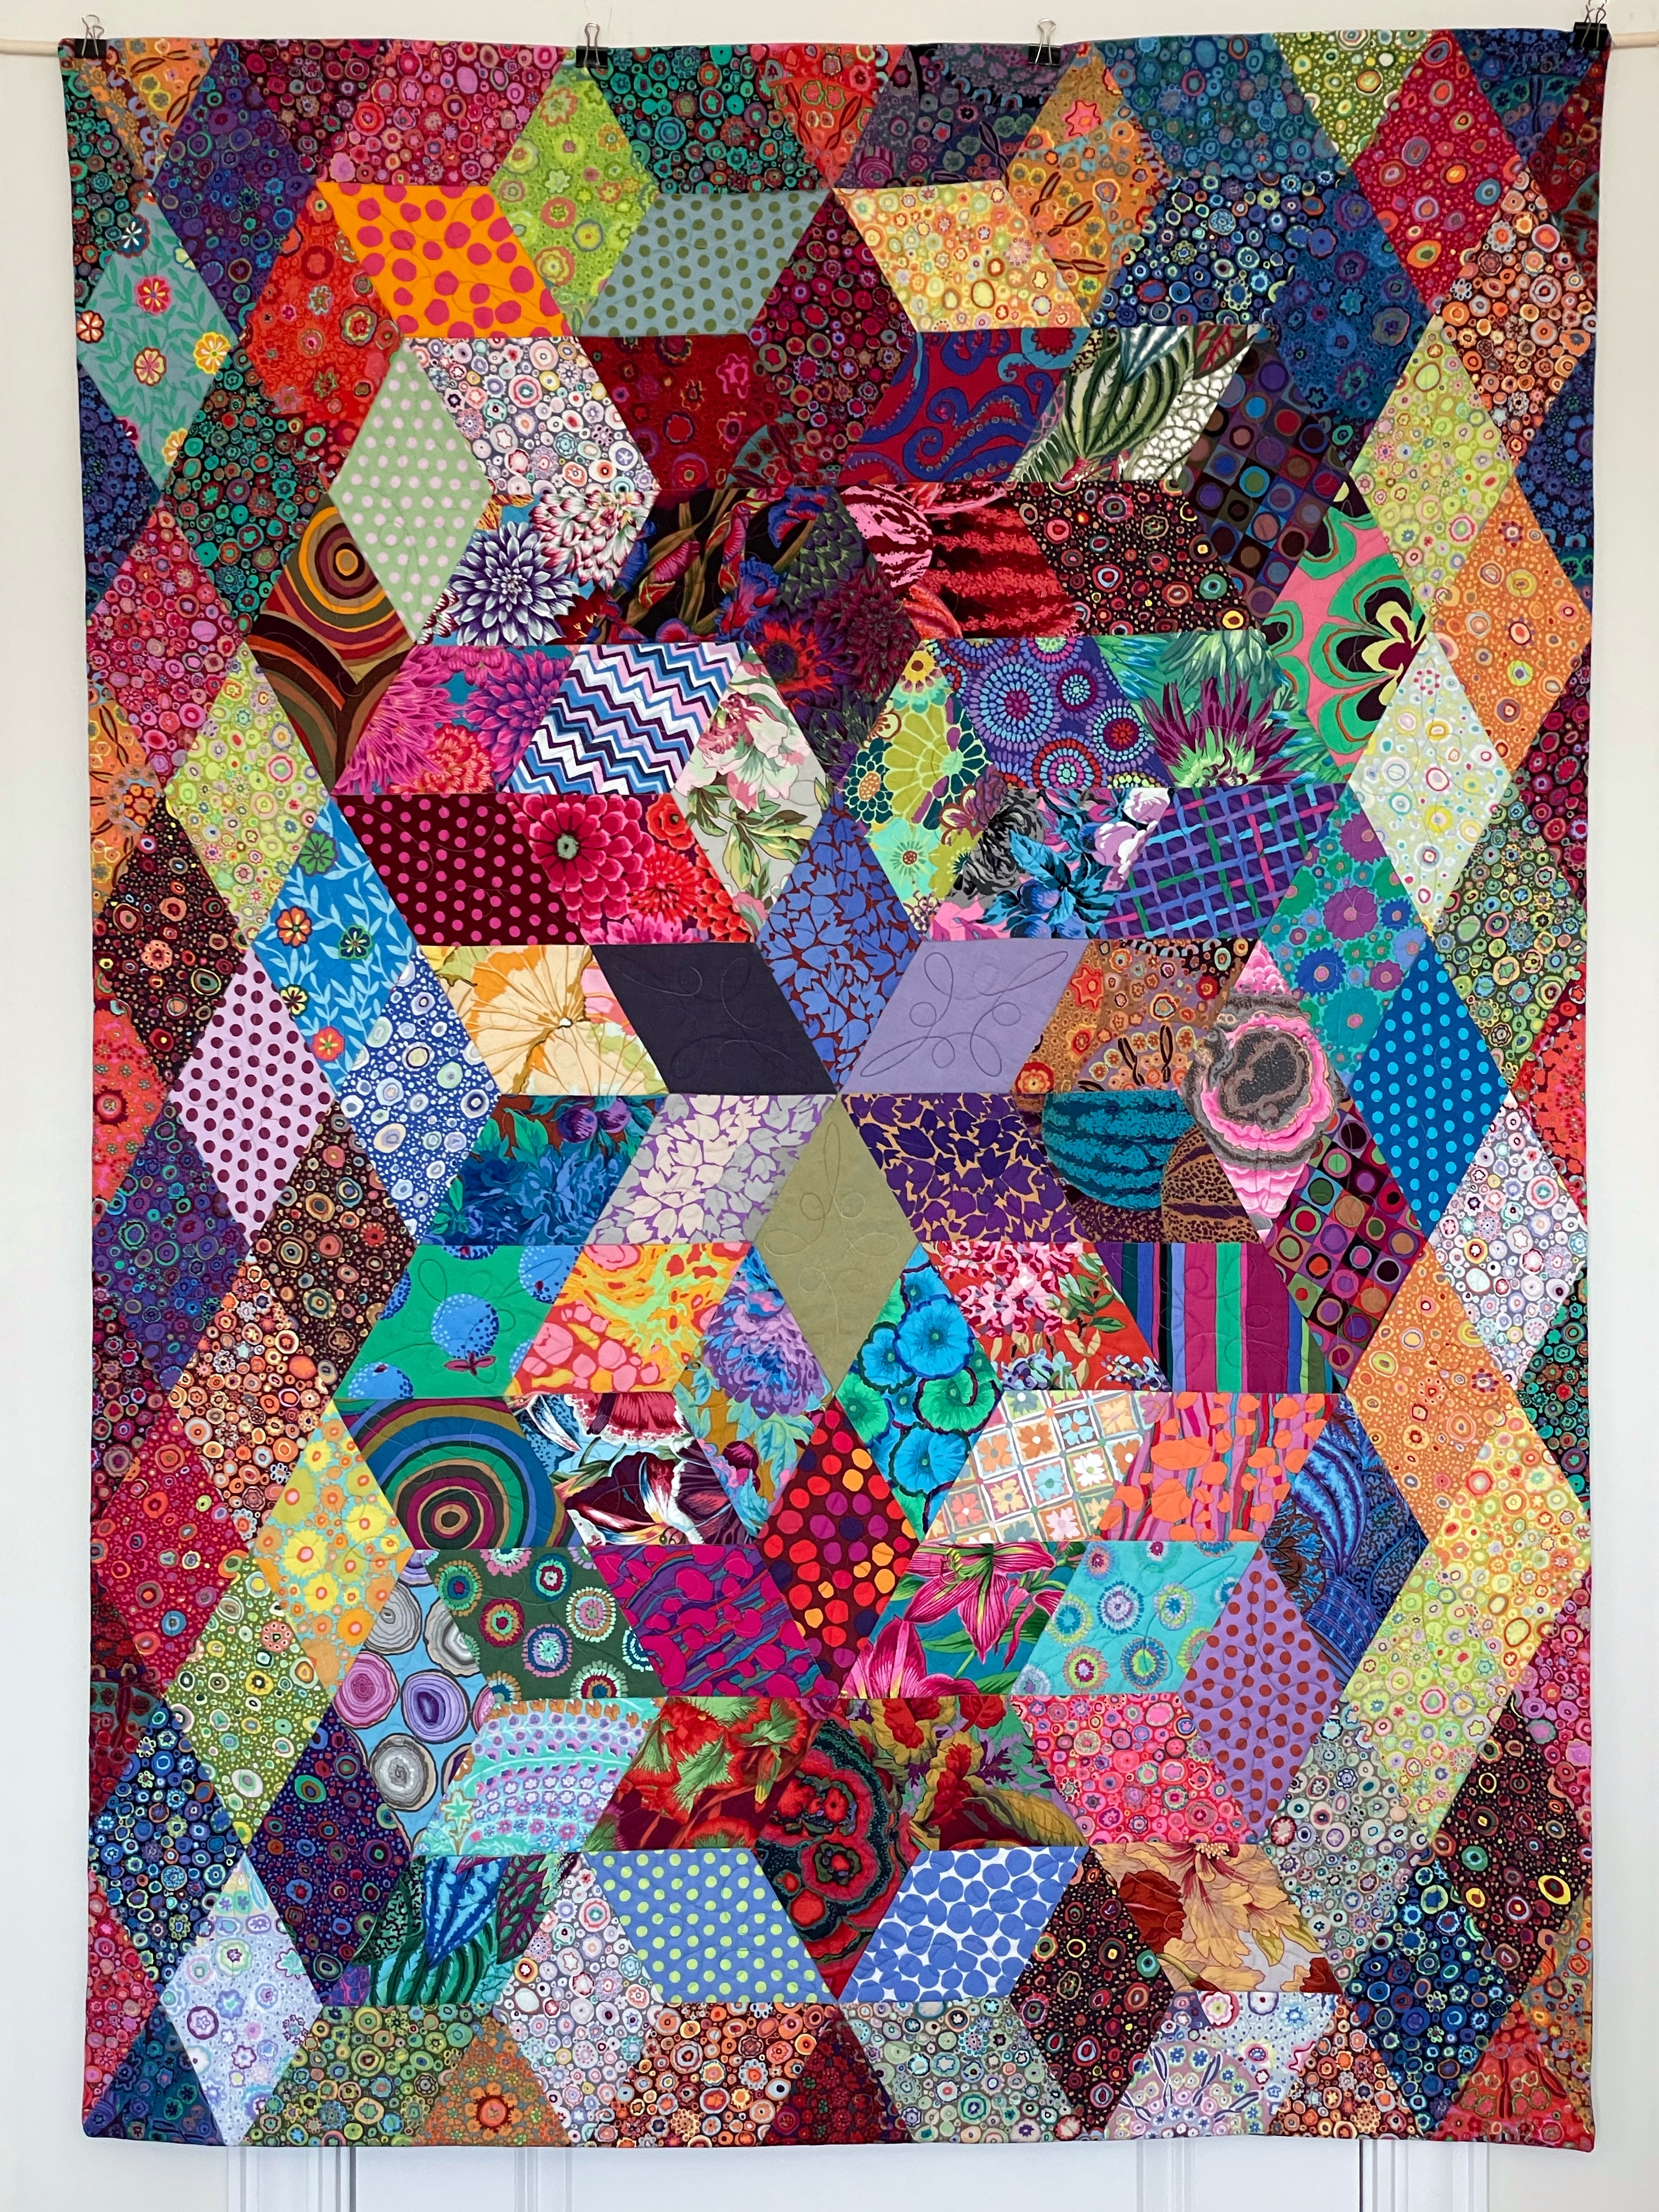
In this quilt I wanted the quilting to provide texture but not detract from the strength of the individual fabrics. I began at one edge stitching-in-the-ditch but I didn’t get far because I could anticipate running into trouble with the backing not distributing evenly. I switched to quilting the individual diamonds (I still haven’t counted them – there’s approximately 130-140 pieces in the quilt including the triangles and half diamonds at the edges).
Because I was quilting-in-the-hoop, I had to hoop each diamond separately as well as change the thread for each diamond. I was able to use the same variegated thread for several diamonds but to make sure the backing remained flat I started in the middle – that meant I couldn’t quilt every similar coloured block one after the other because they were distributed throughout the quilt top and I needed to work my way from centre to edge making sure the backing was taut with each hooping.
Once I had all the diamonds quilted I resumed stitching-in-the-ditch which now was straight forward.
I finished the quilt (final size: 48″ x 64 1/2″) with a hidden binding because I didn’t want to interrupt the flow of the diamonds at the edge of the piece.
Diamonds II – Quilt Back
Added a hidden binding and a label and the quilt is finished.
I just figured out something I should have figured out a long time ago!
Batting On Backing
When assembling the quilt sandwich, I’ve always used three 6′ pieces of 1 x 3 pine. (I prefer the boards to pool noodles because their weight makes smoothing the fabric/batting easier). I roll up each layer on a board, then open out some backing, position and roll out some batting, then position the quilt top on top.
Today, I realized what I should be doing is uniting the batting and backing into a single layer which allows me to smooth the backing on the batting before rolling the one layer onto a board! Before adding the quilt top, I know my backing is smooth. Now, why didn’t I figure that out before?
Once I have the smoothed backing/batting layer on a board, I can start rolling it out, then position the quilt top and start pinning.
Creating The Sandwich
Creating the sandwich this way means I’m not struggling to keep the backing smooth when I’m pinning because it’s already been “attached” to the batting and all I have to worry about is the pieced top.
I now have my quilt sandwich pinned and ready to quilt. First, stitch in the ditch, then embroider each diamond. I can’t group the diamonds to be able to do fewer embroideries because each is 9 1/2″ vertical length and double that is much too large for any embroidery hoop available. So it’s one diamond at a time, I’m afraid, for all 200+ diamonds. The design I’ve created is a simple single run design – it’s purpose is just to hold the layers together. Each embroidery will go reasonably quickly.
I also want to share a video I came across today from the Missouri Quilt Company – Seam Ripping 101. In the video Natalie Earnheart “walks through what a seam ripper looks like, how it works, and how to use it.” Take a few minutes to watch; you’ll discover things you didn’t know about ripping out seams.
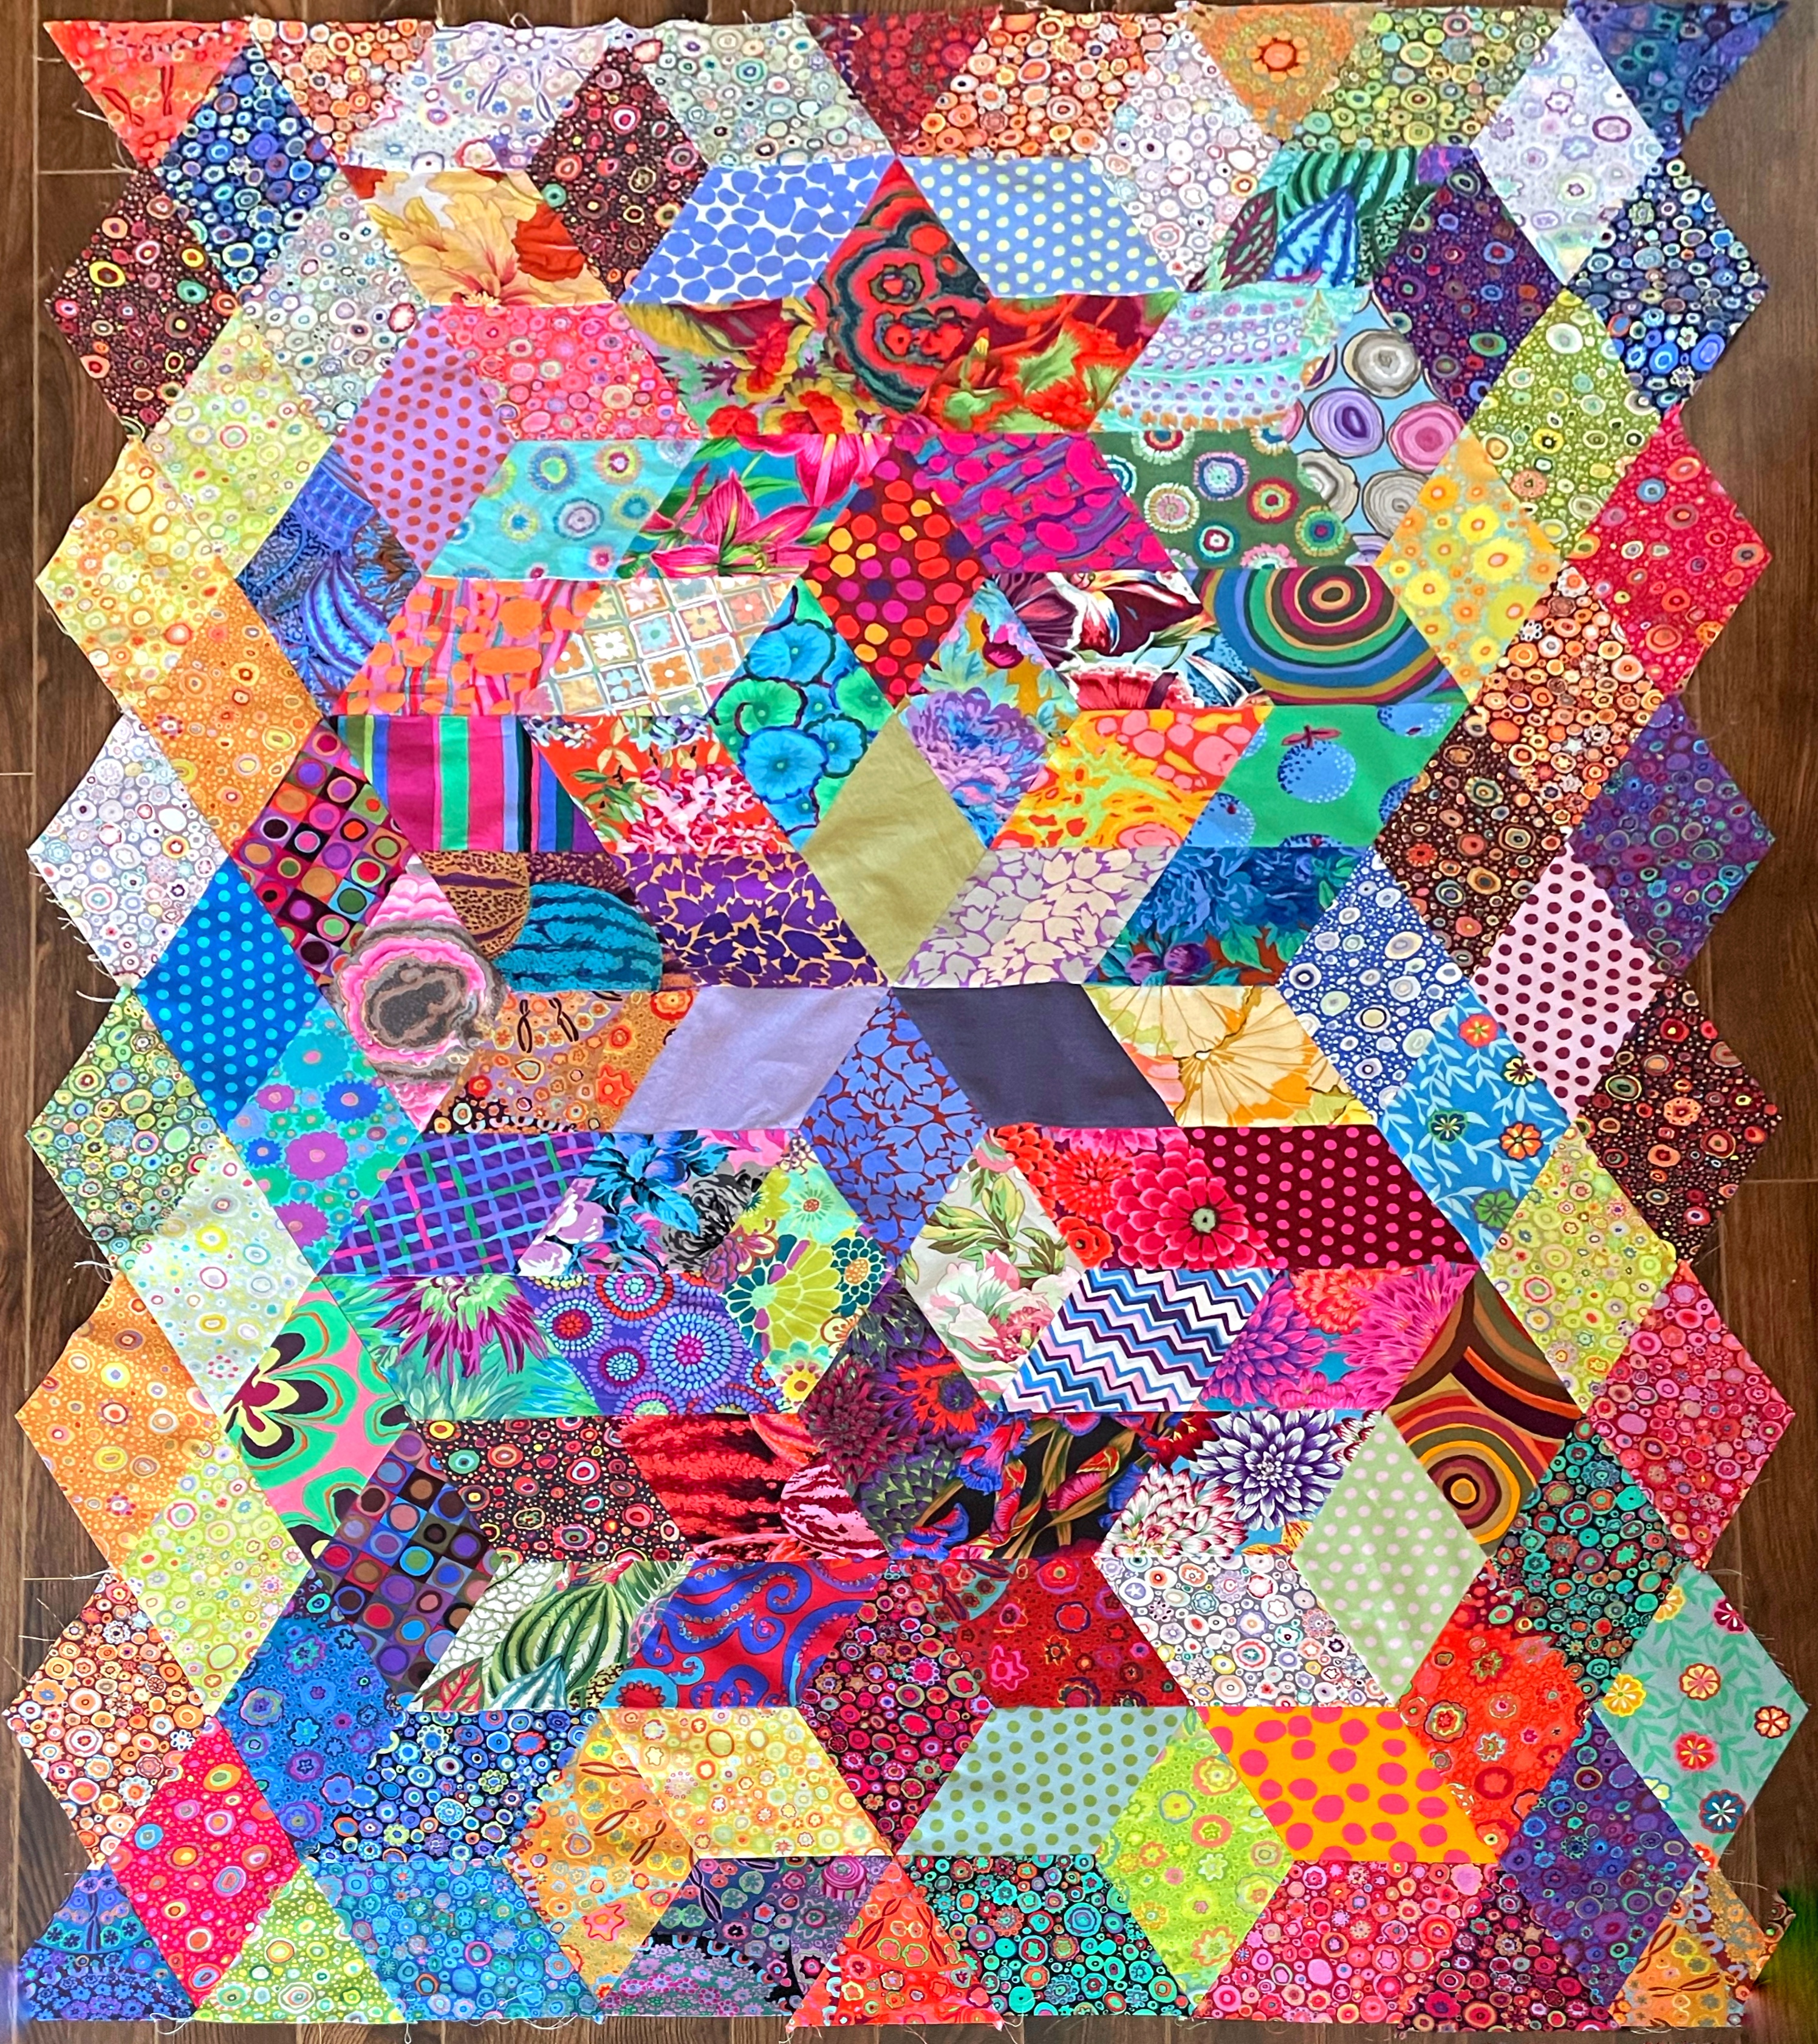
Here it is – the Diamonds II quilt top fully assembled:
Diamonds II – Assembled
The sewing process did get much easier as I went along. Once I’d figured out the sub-assembly groupings and sewed each segment, the parts went together very easily. I did very little taking apart and restitching.
I find it interesting that my original star in the centre is almost invisible. I chose to set up a star with those fabrics because there were three each of the solids and the leaf ombre – I couldn’t see where else to use them. However, although the colour of those diamonds is strong, it’s overpowered by the other fabrics and what pops out when you’re not looking at cubes are the two red six-point stars; you almost don’t see the star in the middle.
In any case, this is how the top is going to stay. If I trimmed the side diamonds I’d be able to get away with a single length of backing fabric (provided I find a fabric that complements the wild colour range of the top). Of course, I can always add a single strip with end to end diamonds which I would need to do were I to make the panel wider.
I just measured the finished dimensions: Length = 66.5″ (that’s a reasonable length for a throw or wall hanging); width = 43.5″ if I trim the outlying diamonds. If I add half diamonds in those spaces I can grow the width to 49.5″.
I think I have to add the half-diamonds. Which fabrics? Gotta think about that a bit.
The assembling is becoming easier. I’m doing the obvious diamond strip joins then nesting pieces and doing the Y seams. I’m finding I just have to mark the strategic corners with a tiny dot where I have to remember not to sew to the edge. My Y seams are pressing nice and flat.
Bottom Half Assembled
I incorporated the side elements; next I will assemble the top extended hexagon, fit that into the bottom segment and then all I have left to do are the four top segments.
The sewing isn’t taking as long as I thought it would but it will likely take another day to stitch all the remaining blocks.
I’m just carrying on (glad I printed out a photo – I’ve needed it to keep the colour placement consistent)….
I stumbled around yesterday trying to figure out how to assemble this quilt top panel – sewing some staggered diamond seams and some Y seams to get a small portion together (the point being to have as few Y seams as possible). I did three Y seams yesterday – today I can see how to put that grouping of diamonds together with just one!
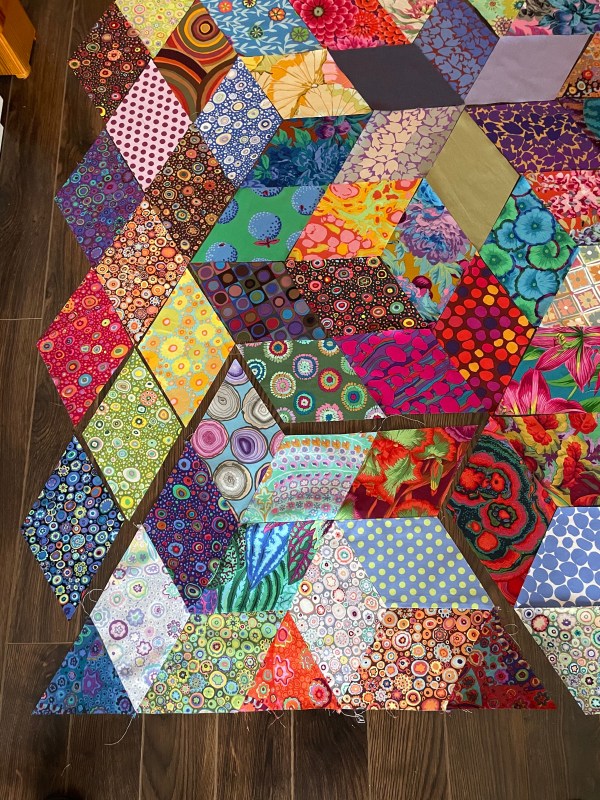
Left Corner Assembly
I picked up today where I left off and began adding diamonds on the right side of the bottom, making mistakes with the orientation of the cube, and having to redo quite a few seams. The Y seam – turns out it isn’t terribly difficult – I’m managing to get a nice flat join; the challenge is seeing some kind of logical way to assemble these various elements.
I think I have finally figured it out:
Assembling Units
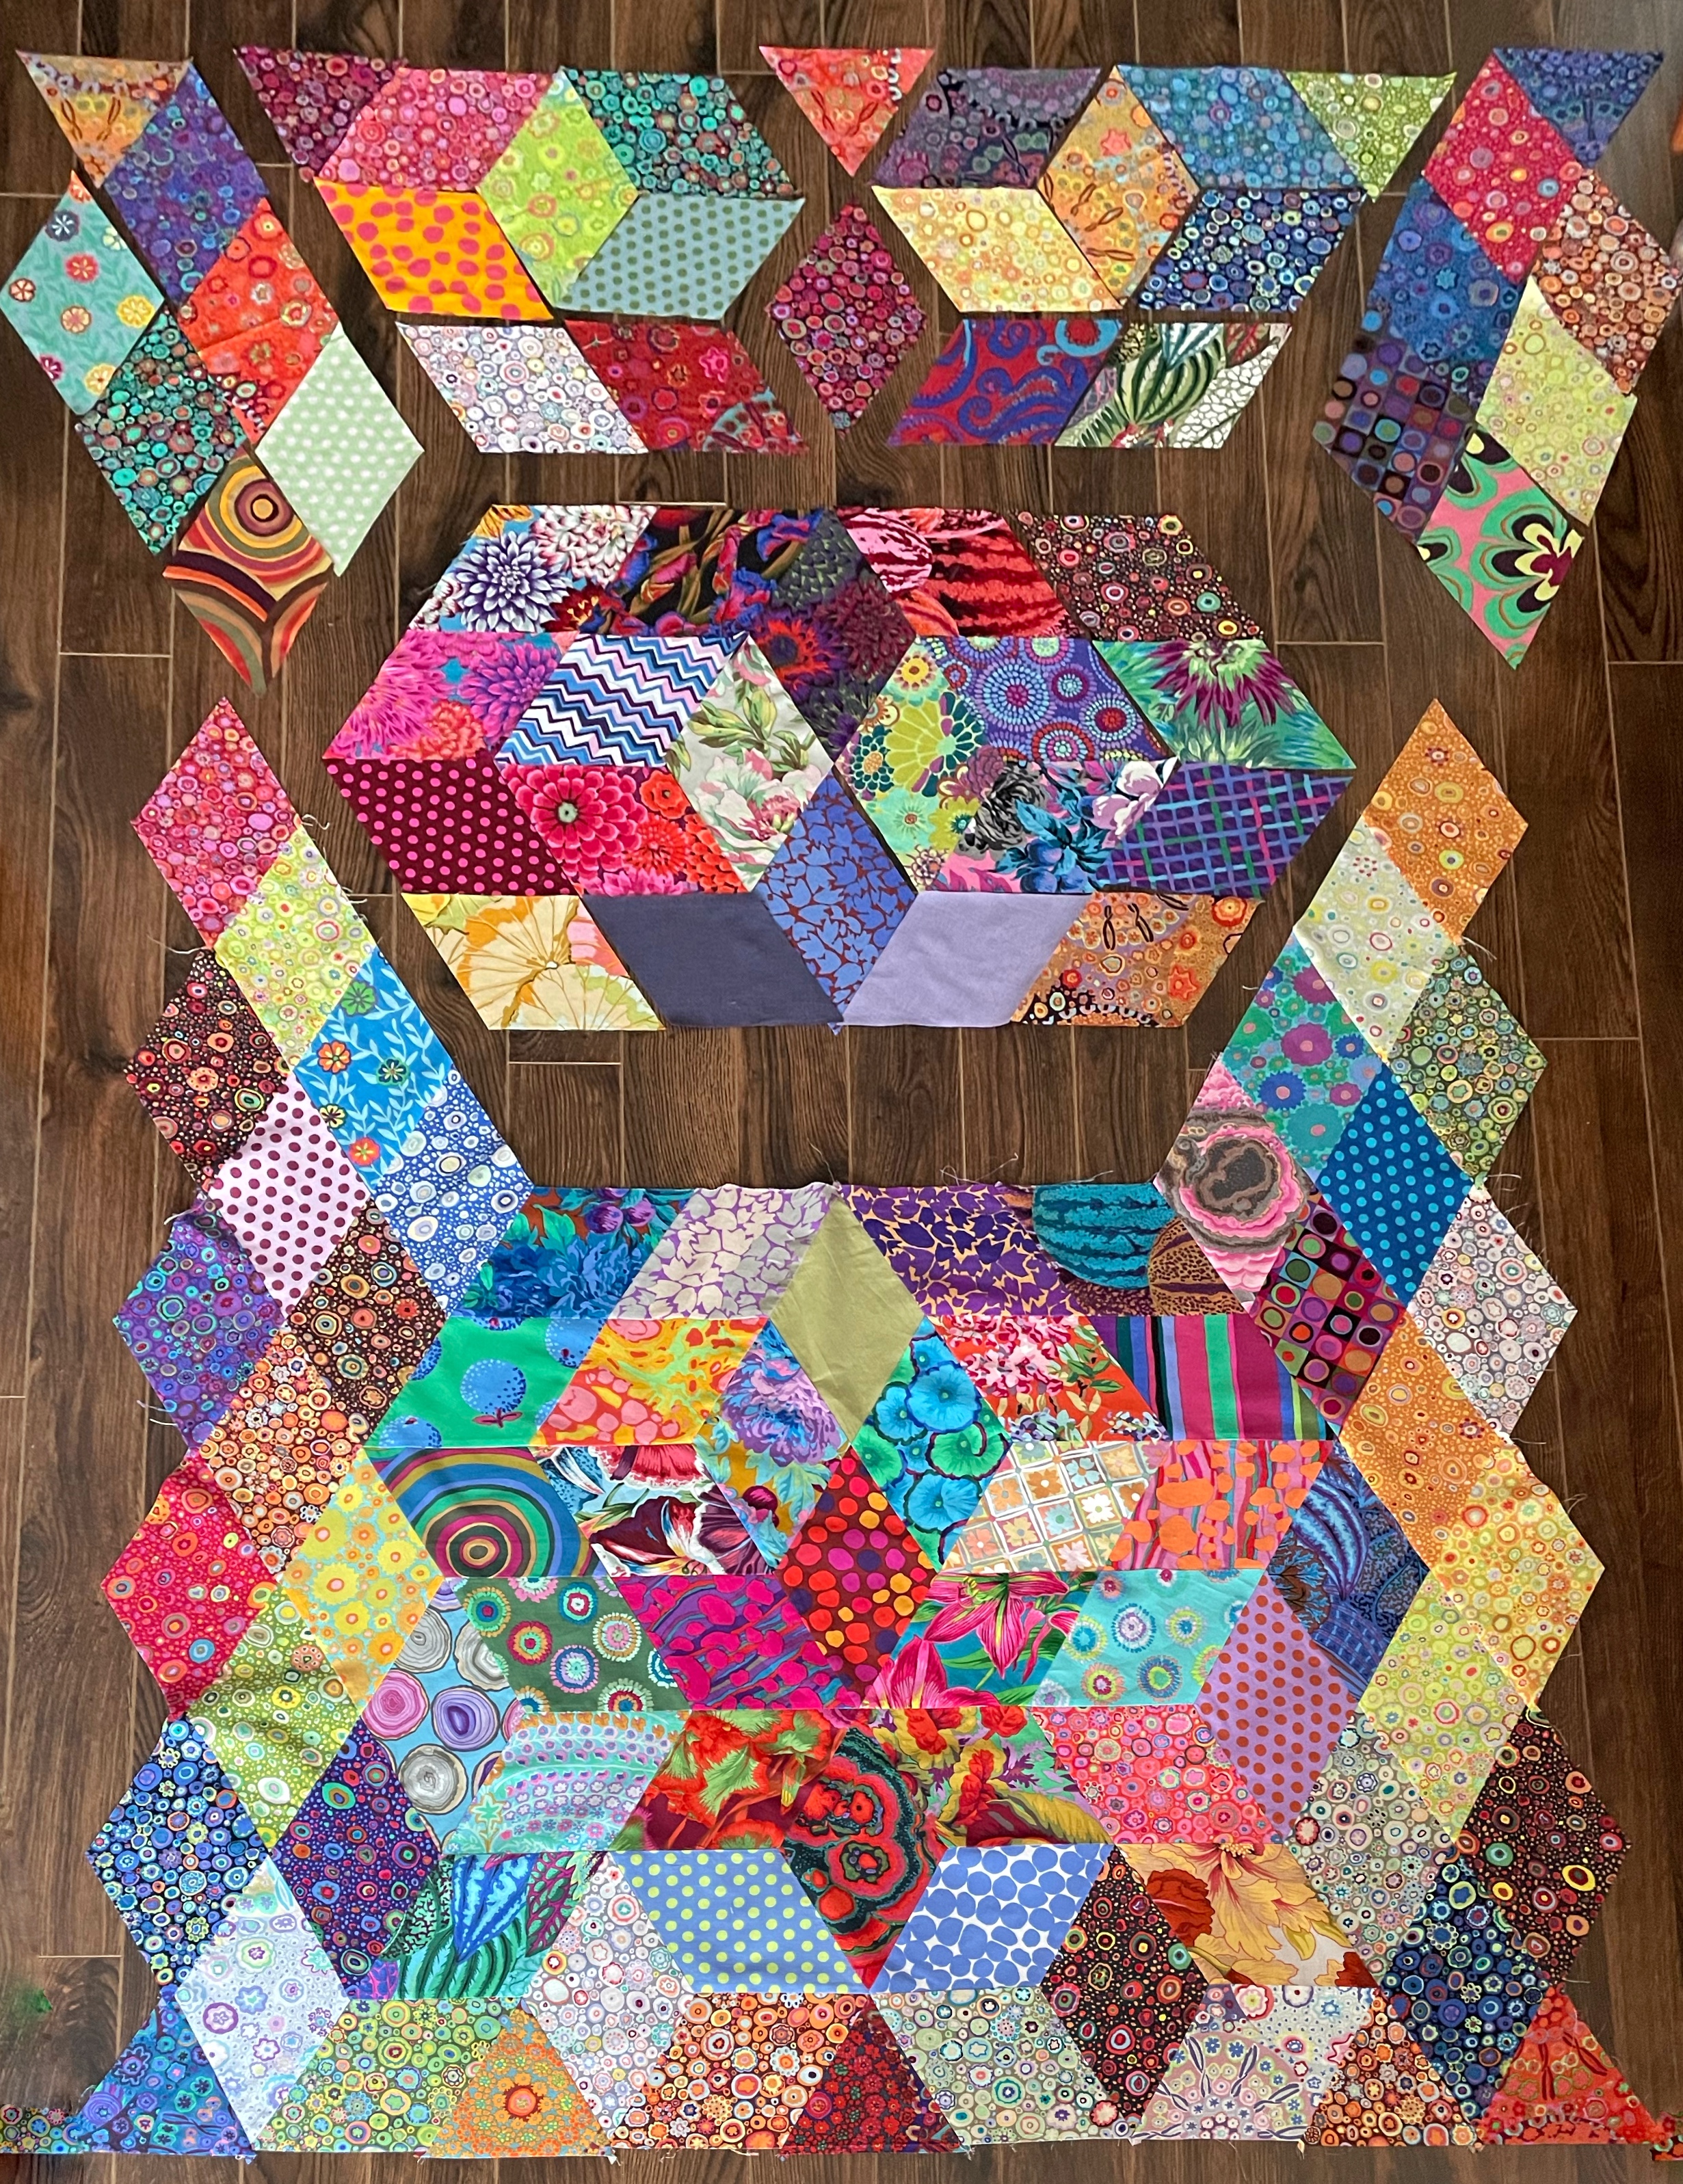
I now have the bottom assembled. When I stood back and looked at the array on the floor, I decided I could put the side diamonds together into more or less a triangle shape; so I did that.
I then grouped the block elements for the top part of the panel which leaves the middle in two symmetrical 6-sided shapes (which are still side-by-side on the floor).
Here’s how I plan to proceed – start by putting together the centre diamond in the bottom half of the centre block (khaki/blue, blue/red); next the four “diamonds” laying on their sides; finally put those five pieces together and attach them to the bottom piece – that gets me the full bottom half of the panel completed. All I have to do is repeat the process for the top. The final assembly involves adding the two side pieces (which can be accomplished with a single Y seam, each).
Looks like my panel is going to measure ~ 45″ wide – not quite wide enough. I can extend it a wee bit if I add in another set of diamonds down each side. I already have 75 diamonds cut out (which I’m planning to incorporate into a second version of this quilt top); or I could put a 2 1/2″ – 3″ border around the finished, trimmed panel – the question is what would I use as “framing” fabric – no idea at this point. Any decisions about how to extend the width/length of the panel will have to wait until I have the panel assembled and just before I trim the sides.
Depending on how long the panel turns out to be – I may have to remove the triangles at the top/bottom edges replacing them with diamonds which would let me to extend the length as well. Again, that decision will have to wait until the panel is fully assembled.
In all my years of quilting I’ve never had to sew a Y-seam! Well this assembly is going to require a combination of diamond overlap joins and Y-seams.
Assembly Started!
I did a bit of research to find out how to put this collection of diamonds together. The objective is to assemble the various hexagons where they occur (the cubes) using a Y-seam to add the third element; then joining diamonds in the usual way with the 1/4″ overlap.
This is what I’ve managed to assemble so far. I started with the cube with the yellow dots, then added the two edge triangles, next the pair of diamonds on the left, followed by the pair of diamonds with corner triangle that creates the left corner (half the triangle will be trimmed away when the sewing is finished), and finally adding the trio of diamonds immediately above with a Y-seam.
No doubt about it – it is finicky work – I’m assuming as I do more I’ll get better, and the sewing will go faster. The trick is marking the 1/4″ seam allowance join positions before sewing so you can run a pin through the dots to secure the overlap, then stitching “from dot to dot” as various people have suggested I do.
My 1/4″ eye is actually pretty good – I have marked some of the “dot” positions in what I’ve assembled so far, but I think I can do reasonably well by aligning a pin in the precise location I want to start sewing and finish sewing – I’ll see as I go along. The difficulty with marking dots on each diamond is that I don’t have a 60° diamond template with small holes in the corner start/stop seam allowance positions so I’m having to improvise using a ruler which is very cumbersome and time consuming.
I did print out a copy of the layout to work from – makes it much easier to keep track of where I’ve picked up blocks, how to align them, and then put them back where they belong.
This assembly is going to take a number of days because there are a lot of diamonds to put together but I’m underway.
Oh, and BTW, I cut 76 diamonds from the leftover 5 1/4″ strips (along with 45 triangles), colour sorted each pile, and put both aside. I try working on just one project at a time so I can actually finish it.
I’ve collected Kaffe Fassett fabrics over the years, made several quilts using them, but still had more than enough fabric remaining in my stash to use for many other projects.
Recently I bought three KF Collective fat quarter sets from Hyggeligt Fabrics in St. Mary’s ON to add to my collection. A month or so ago I also purchased a few more 1/2m pieces and another fat quarter bundle from Heidi Wulfraat’s woolworks studio in Mahone Bay (she carries the complete Free Spirit collection with quite a few out of print fabrics).
I spent most of yesterday pressing, then cutting a 5 1/4″ strip from each of the 98 KF fabrics I now have – the strip is long enough for at least 2 diamonds and a triangle.
Today, I cut out a single diamond from each fabric and began laying them out. I could have just placed diamonds in a row and then filled in below that row, but I decided to start with a “star” and work from the centre out. To begin with I had just a single 6-diamond star in the centre, but as the layout grew, I decided to add another star above and below the original star.
Then I filled in the remaining space.
Stars / Tumbling Blocks
The fabrics fell into several categories: there were “leaf ombre” and “solid” diamonds; there were large scale floral, fruit, wood, circle designs; there were a number of “dot” fabrics; and I had a lot of “paper weight” prints in a wide range of colours.
I used the three ombre/three solids as the centre star, then clustered six strong/similar coloured diamonds above and below that star. From there I filled in with the florals/fruit/wood patterns, finally I used the paper weight prints on the outer edges.
I’ve moved quite a few diamonds around already. To fill in the edges I had to cut 18 triangles and 12 more diamonds from some of the strips so there are some duplicate prints but in the centre of the panel each diamond is unique! The outer diamonds on the sides will be trimmed once the panel is sewn together – I don’t need the added width inserting half-diamonds would give me.
I didn’t try creating any kind of colour flow in this layout, although I could have. Instead, I just wanted to let each fabric speak for itself. What I find so interesting is the stars set up an optical illusion of tumbling cubes. When I look at the photo I can pick out the three stars; but as I look at the quilt, stacks of tumbling cubes keep popping out at me! The array of cubes keeps changing, the longer I look. I wasn’t expecting that to happen.
I like the optical activity this arrangement provides – I’m going to leave it pretty much as it is, I think. However, what I might do next is cut another set of diamonds from the remaining strips (and recut a few more strips from the pieces I put back into the stash) to develop a second array where I start with the stars but colour sort the fabrics to see what illusion might emerge. Wouldn’t take long at all.
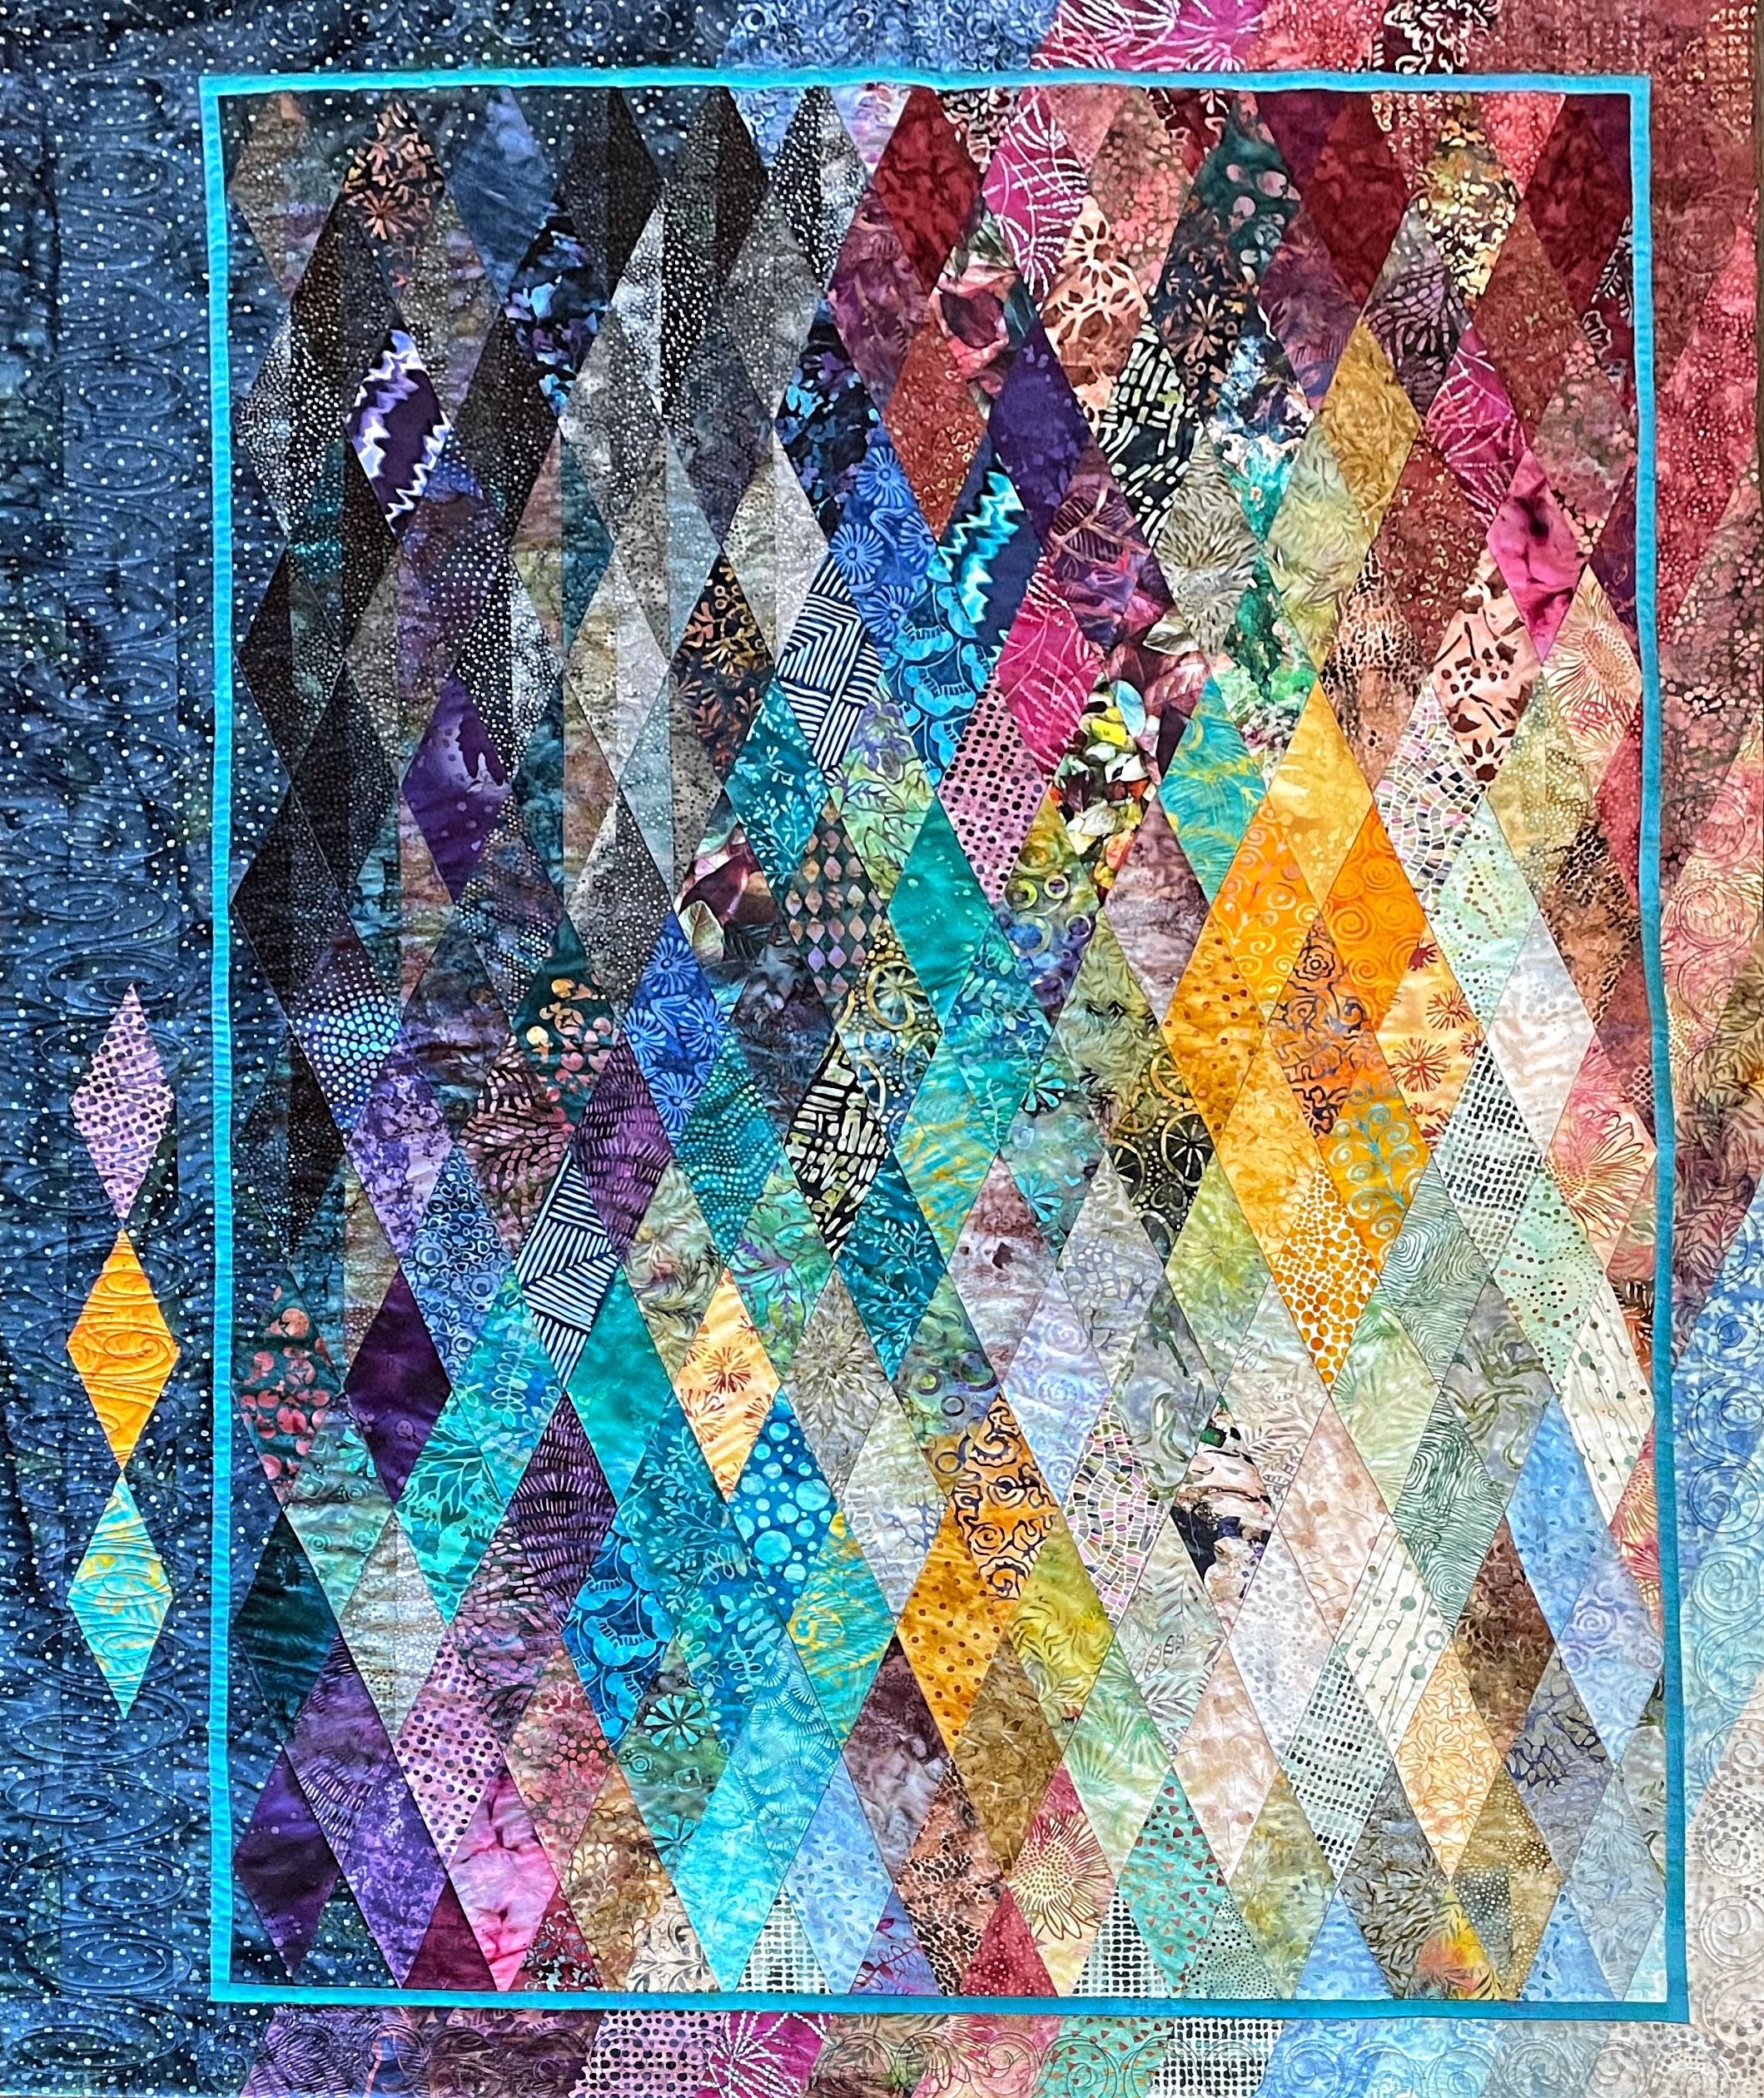
I never thought I’d actually finish this quilt. When I started back on Jan 1 (that’s when I brought out the first set of batik strips and considered using them to make diamonds) I had something completely different in mind. A month later on Feb 3 that first effort died. I didn’t pick up the project again until Mar 11 – it’s taken me three weeks to reimagine, rebuild, and complete this quilt. The photo doesn’t do the fabrics justice – the colours blend and just pop. The graduated border continues the flow nicely as well.
Quilt Top Finished
I used a ton of small scraps from the diamonds to construct a 12″ wide crazy quilt strip on the back which I sashed with the same turquoise I used to frame the diamonds on the front.
Finished Quilt Back
I used a hidden binding on the quilt – I hand stitched it down last night (using a small leather patch to protect the hole in my third finger).
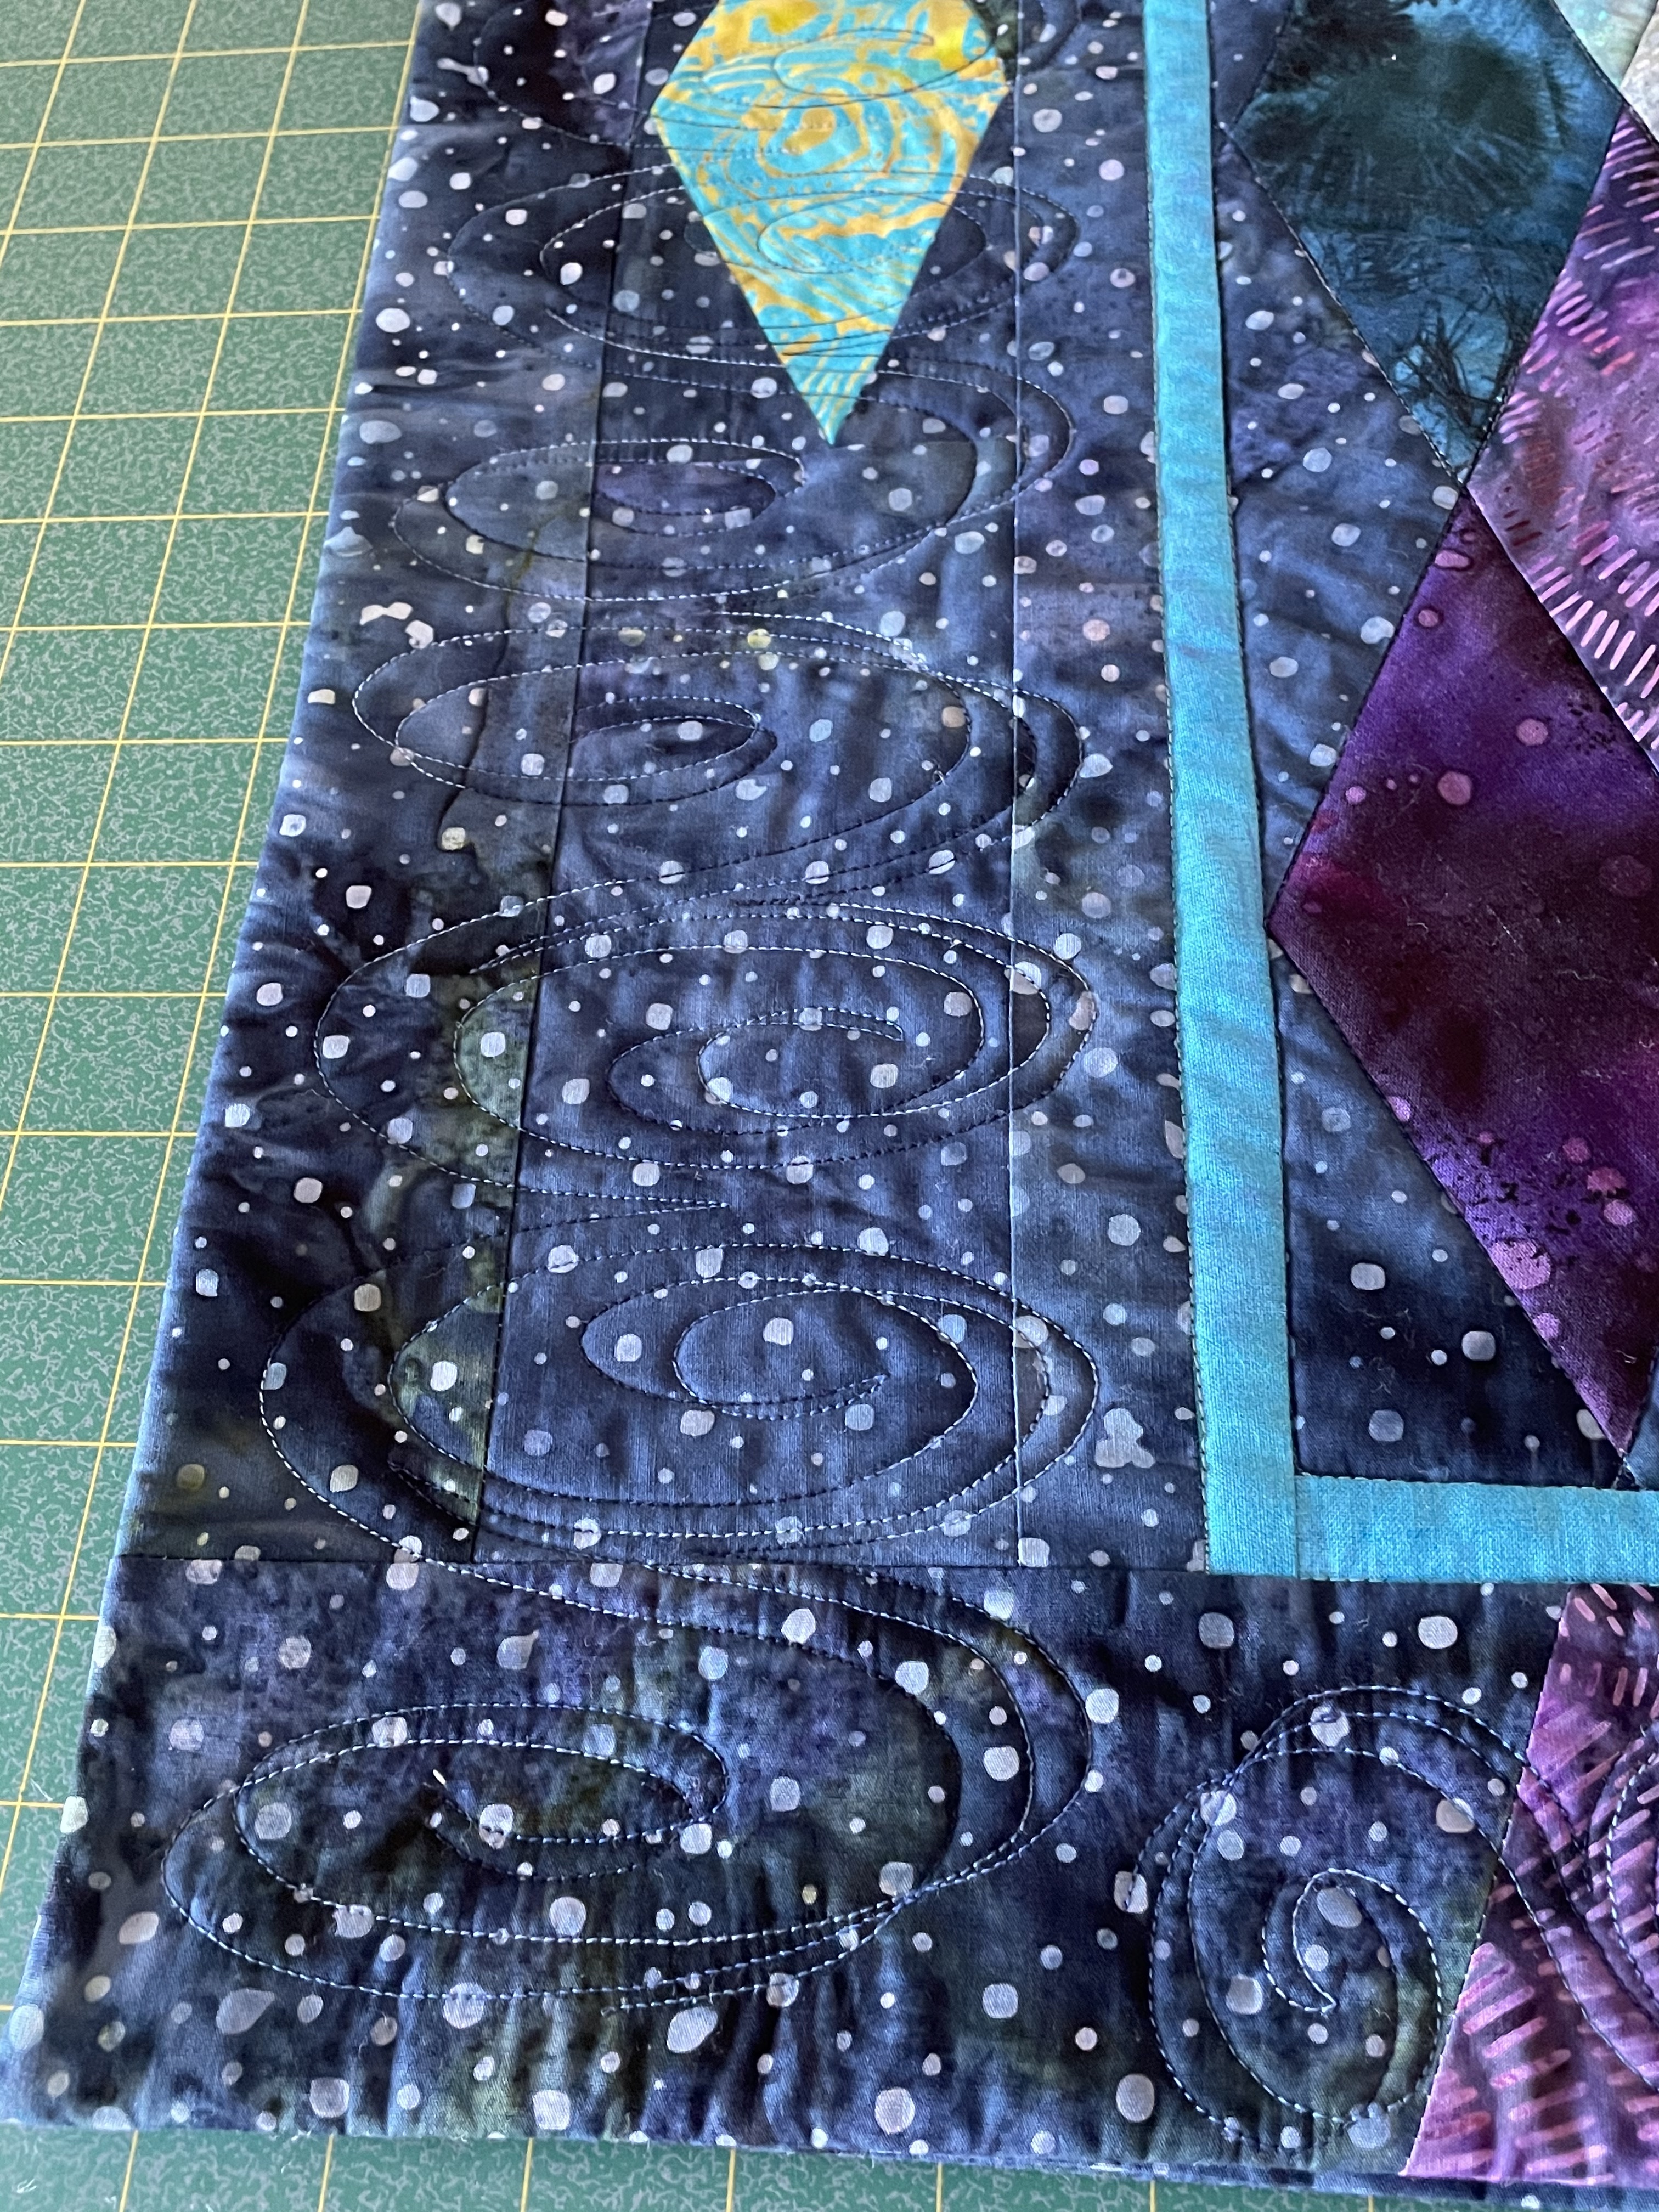
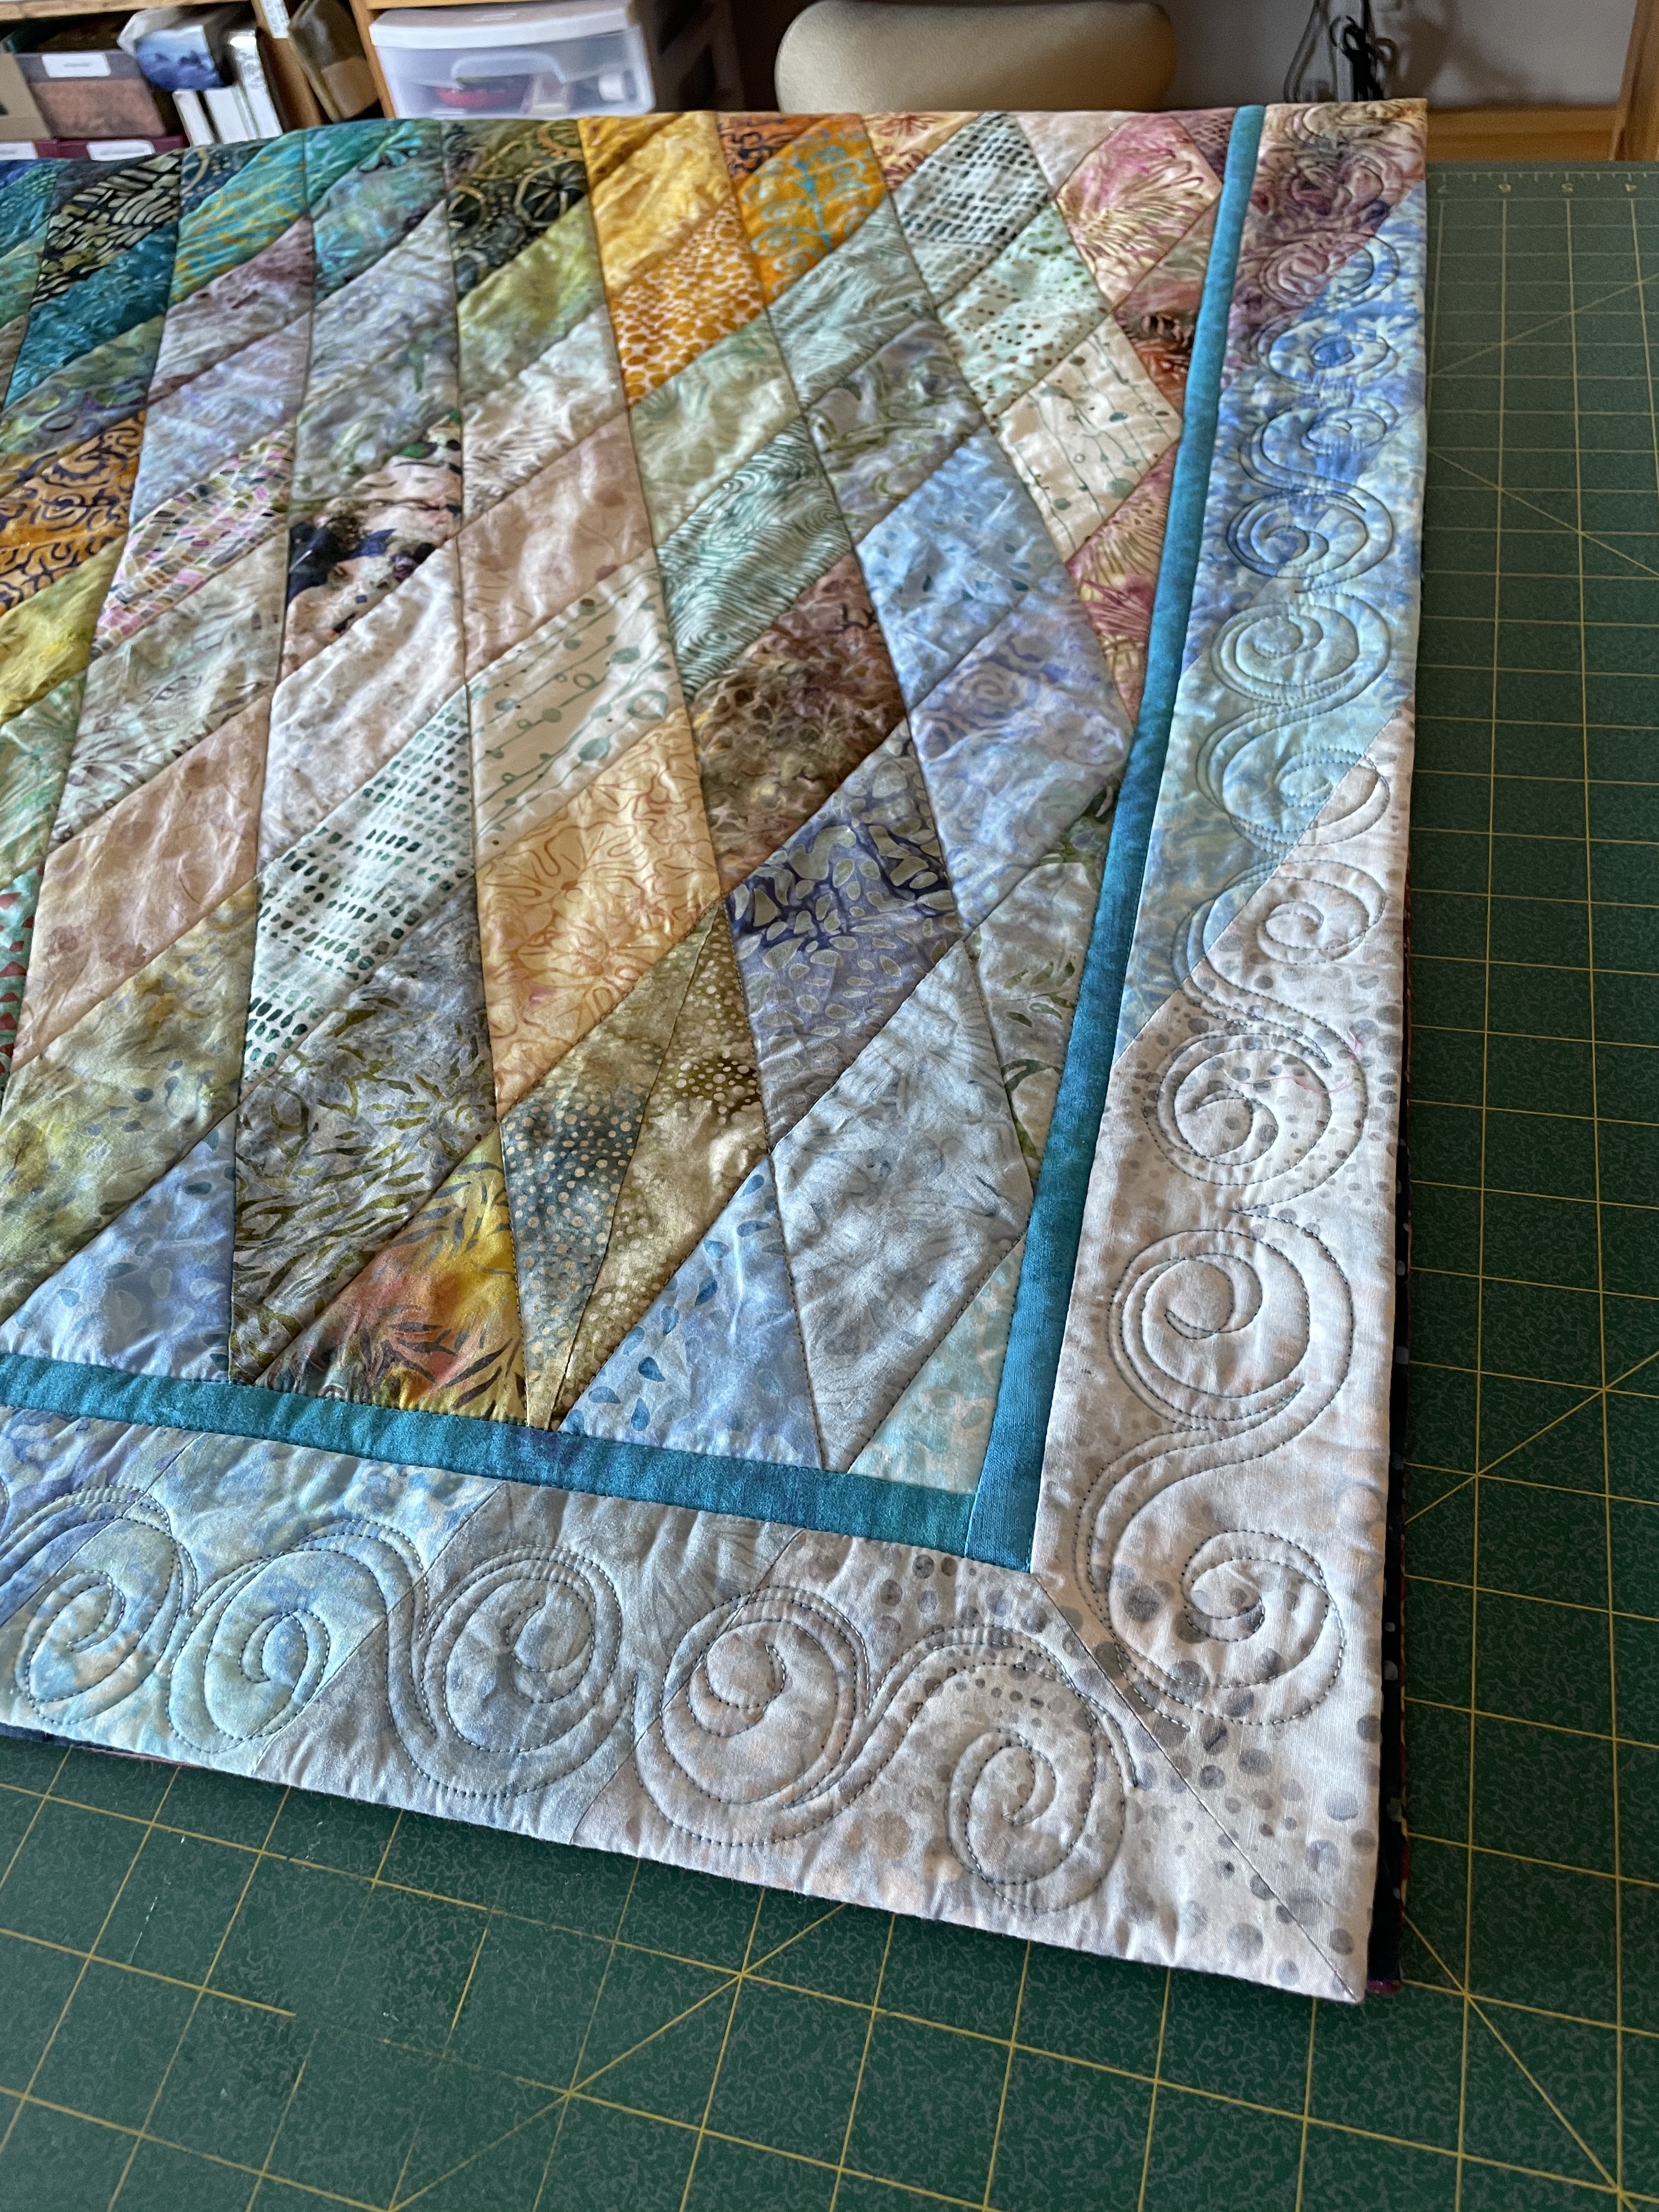
Detail of Border Quilting
In the end I decided to quilt the borders fairly densely. I created a swirl motif which I used on the narrow border; I widened it for the wide border.
I quilted most of the borders using the same dark blue variegated thread I used on the back of the quilt. However, when I reached the lighter colours, I switched to another which had pale blue values. You can’t really see where I made the transition – I was lucky that I could blend the lightest colour of the dark thread with the darkest colour of the light thread.
Detail of Narrow Border Quilting
Now, if you can believe it – I’m about to tackle another diamonds quilt – this time using my Kaffe Fassett fabric collection. Wild large prints in way-out colours. The diamonds will be larger and there will be fewer of them. What I’m planning at the moment would need 111 diamonds with bordering half elements. I don’t have 111 fabrics but I bet I have between 50 and 60. So the first thing I need to do is count the fabrics and begin planning from there.
Why diamonds, again? Well, I’m reasonably technically proficient with squares, rectangles,, flying geese, drunkards path blocks, etc. I figure I should also be good at diamonds – the only way to get there is to keep working at it.
It took me three hours today to build that bottom border – I must have spent an hour searching through boxes to look for bits of fabric large enough and in the colour range I needed. Then each piece had to be cut separately because the triangles at the bottom (inside the turquoise border) are all slightly different sizes. I had to measure and cut each piece, attach it to the previous piece, test the running length, then add the next piece.
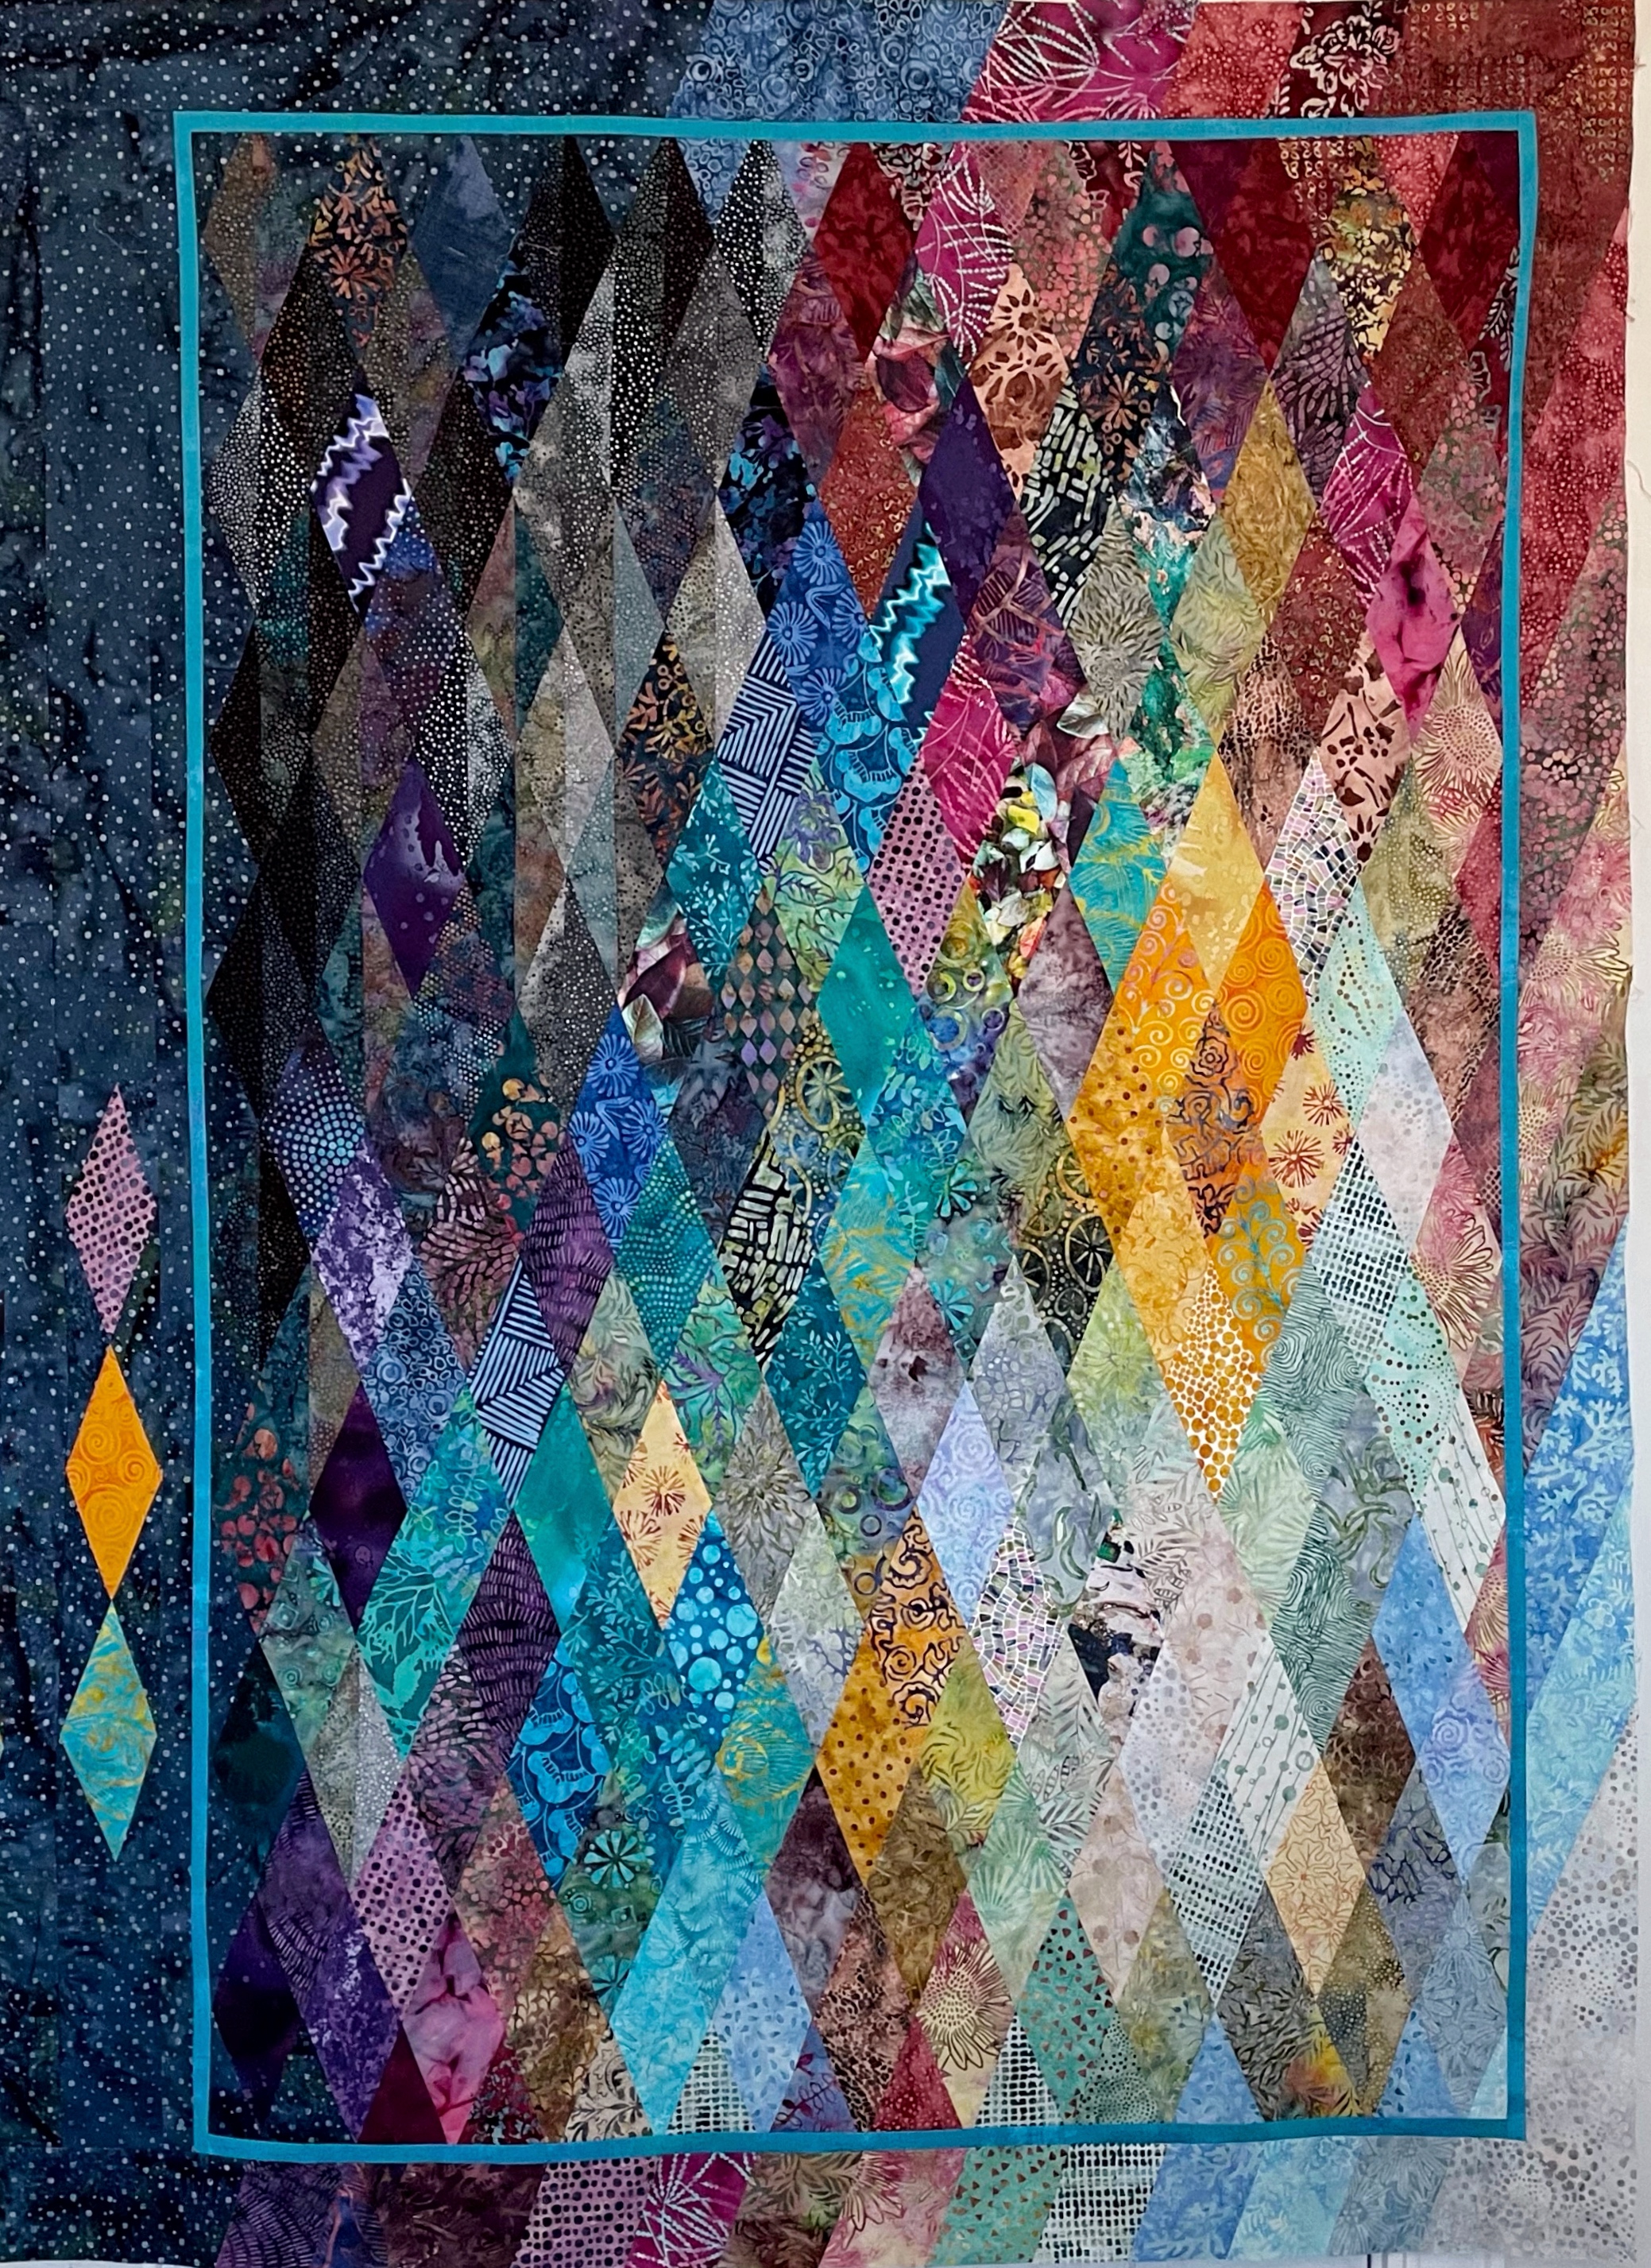
Diamonds Quilt Top – Finished!
I’d say the border came out all right! It reflects the colour flow on the top and right side pretty well. The turquoise sashing is perfect – separating but not interfering with the inner panel and the outer border.
I’m happy with the diamonds on the left. They could be lowered another two inches but I’m leaving them where they are. They invite the viewer to look for the turquoise, purple and the yellow. They say “look around, see what you can find here.”
From a disaster I’ve ended up with an interesting piece that I’m willing to put on display in the summer Parrsboro showing.
Now to gather up all the scraps and see what I can construct from them. I have a few diamonds among the bits and pieces but I think I’m going to crazy quilt a wide strip to insert into the back. I’m using the dotted dark blue for the backing and I will sash the strip insertion with the turquoise to offset it from the backing.
It’s interesting how the few original diamonds blend with the overall flow. You have to look hard to find them. I used mostly the darker ones although there are two of the original lighter ones – I have to stand right in front of the panel to actually find them, they blend so well.
I can’t imagine trying to make a quilt like this from a kit – how on earth would the directions make any sense? It’s the problem solving in a project like this that keeps me interesting in creating. I never know how the final product will turn out.
For a long while I thought this diamond project had taken me to a dead end, but after letting the problem percolate for a couple of weeks, I was able to break out of the original box and build something colourful and interesting.