Convergence 4 – Completed

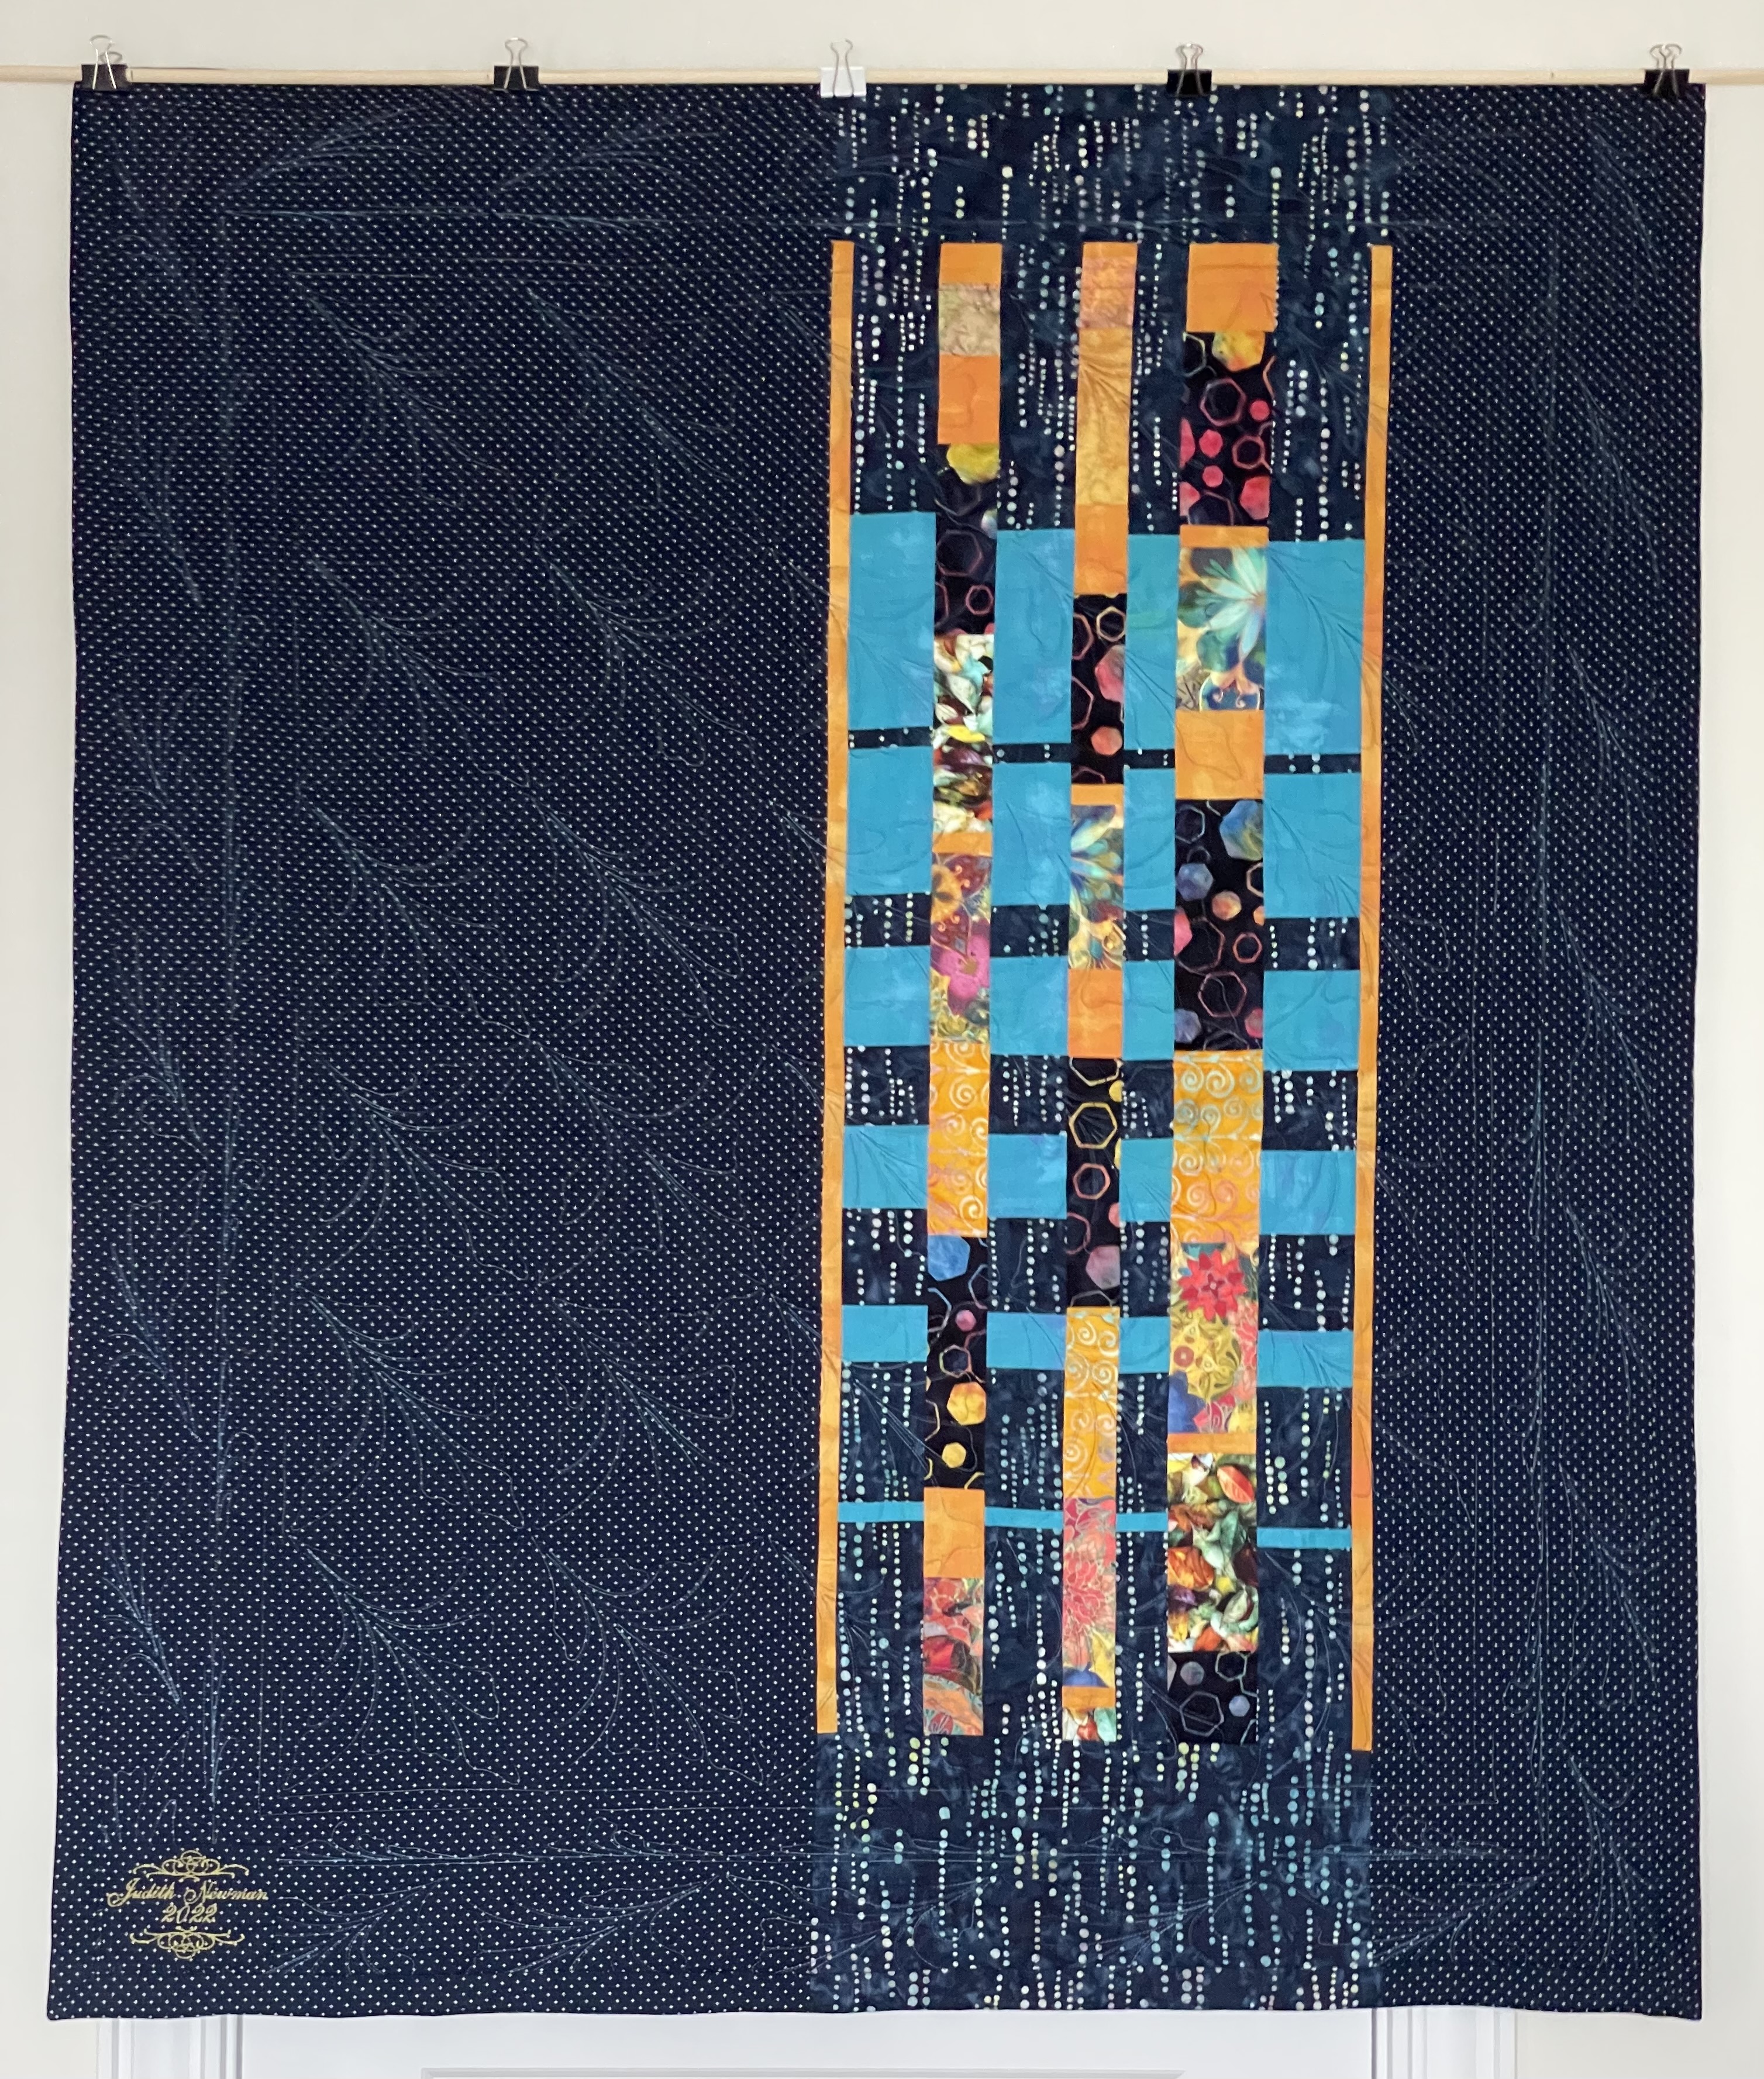
I finally finished the quilt yesterday. It’s taken days to decide what to do within the narrow turquoise border. It was just a tad too wide to leave unquilted but too narrow to mirror the quilt block embroidery. I finally set up a half block I thought would work and got it done. Adding the hidden binding took little time (including the mitred corners). I hand stitched it down last night.

With the two previous Convergence quilts in my collection I will have three possible quilts to show together next summer. I may not use all of them, that depends on what I manage to create between now and then.

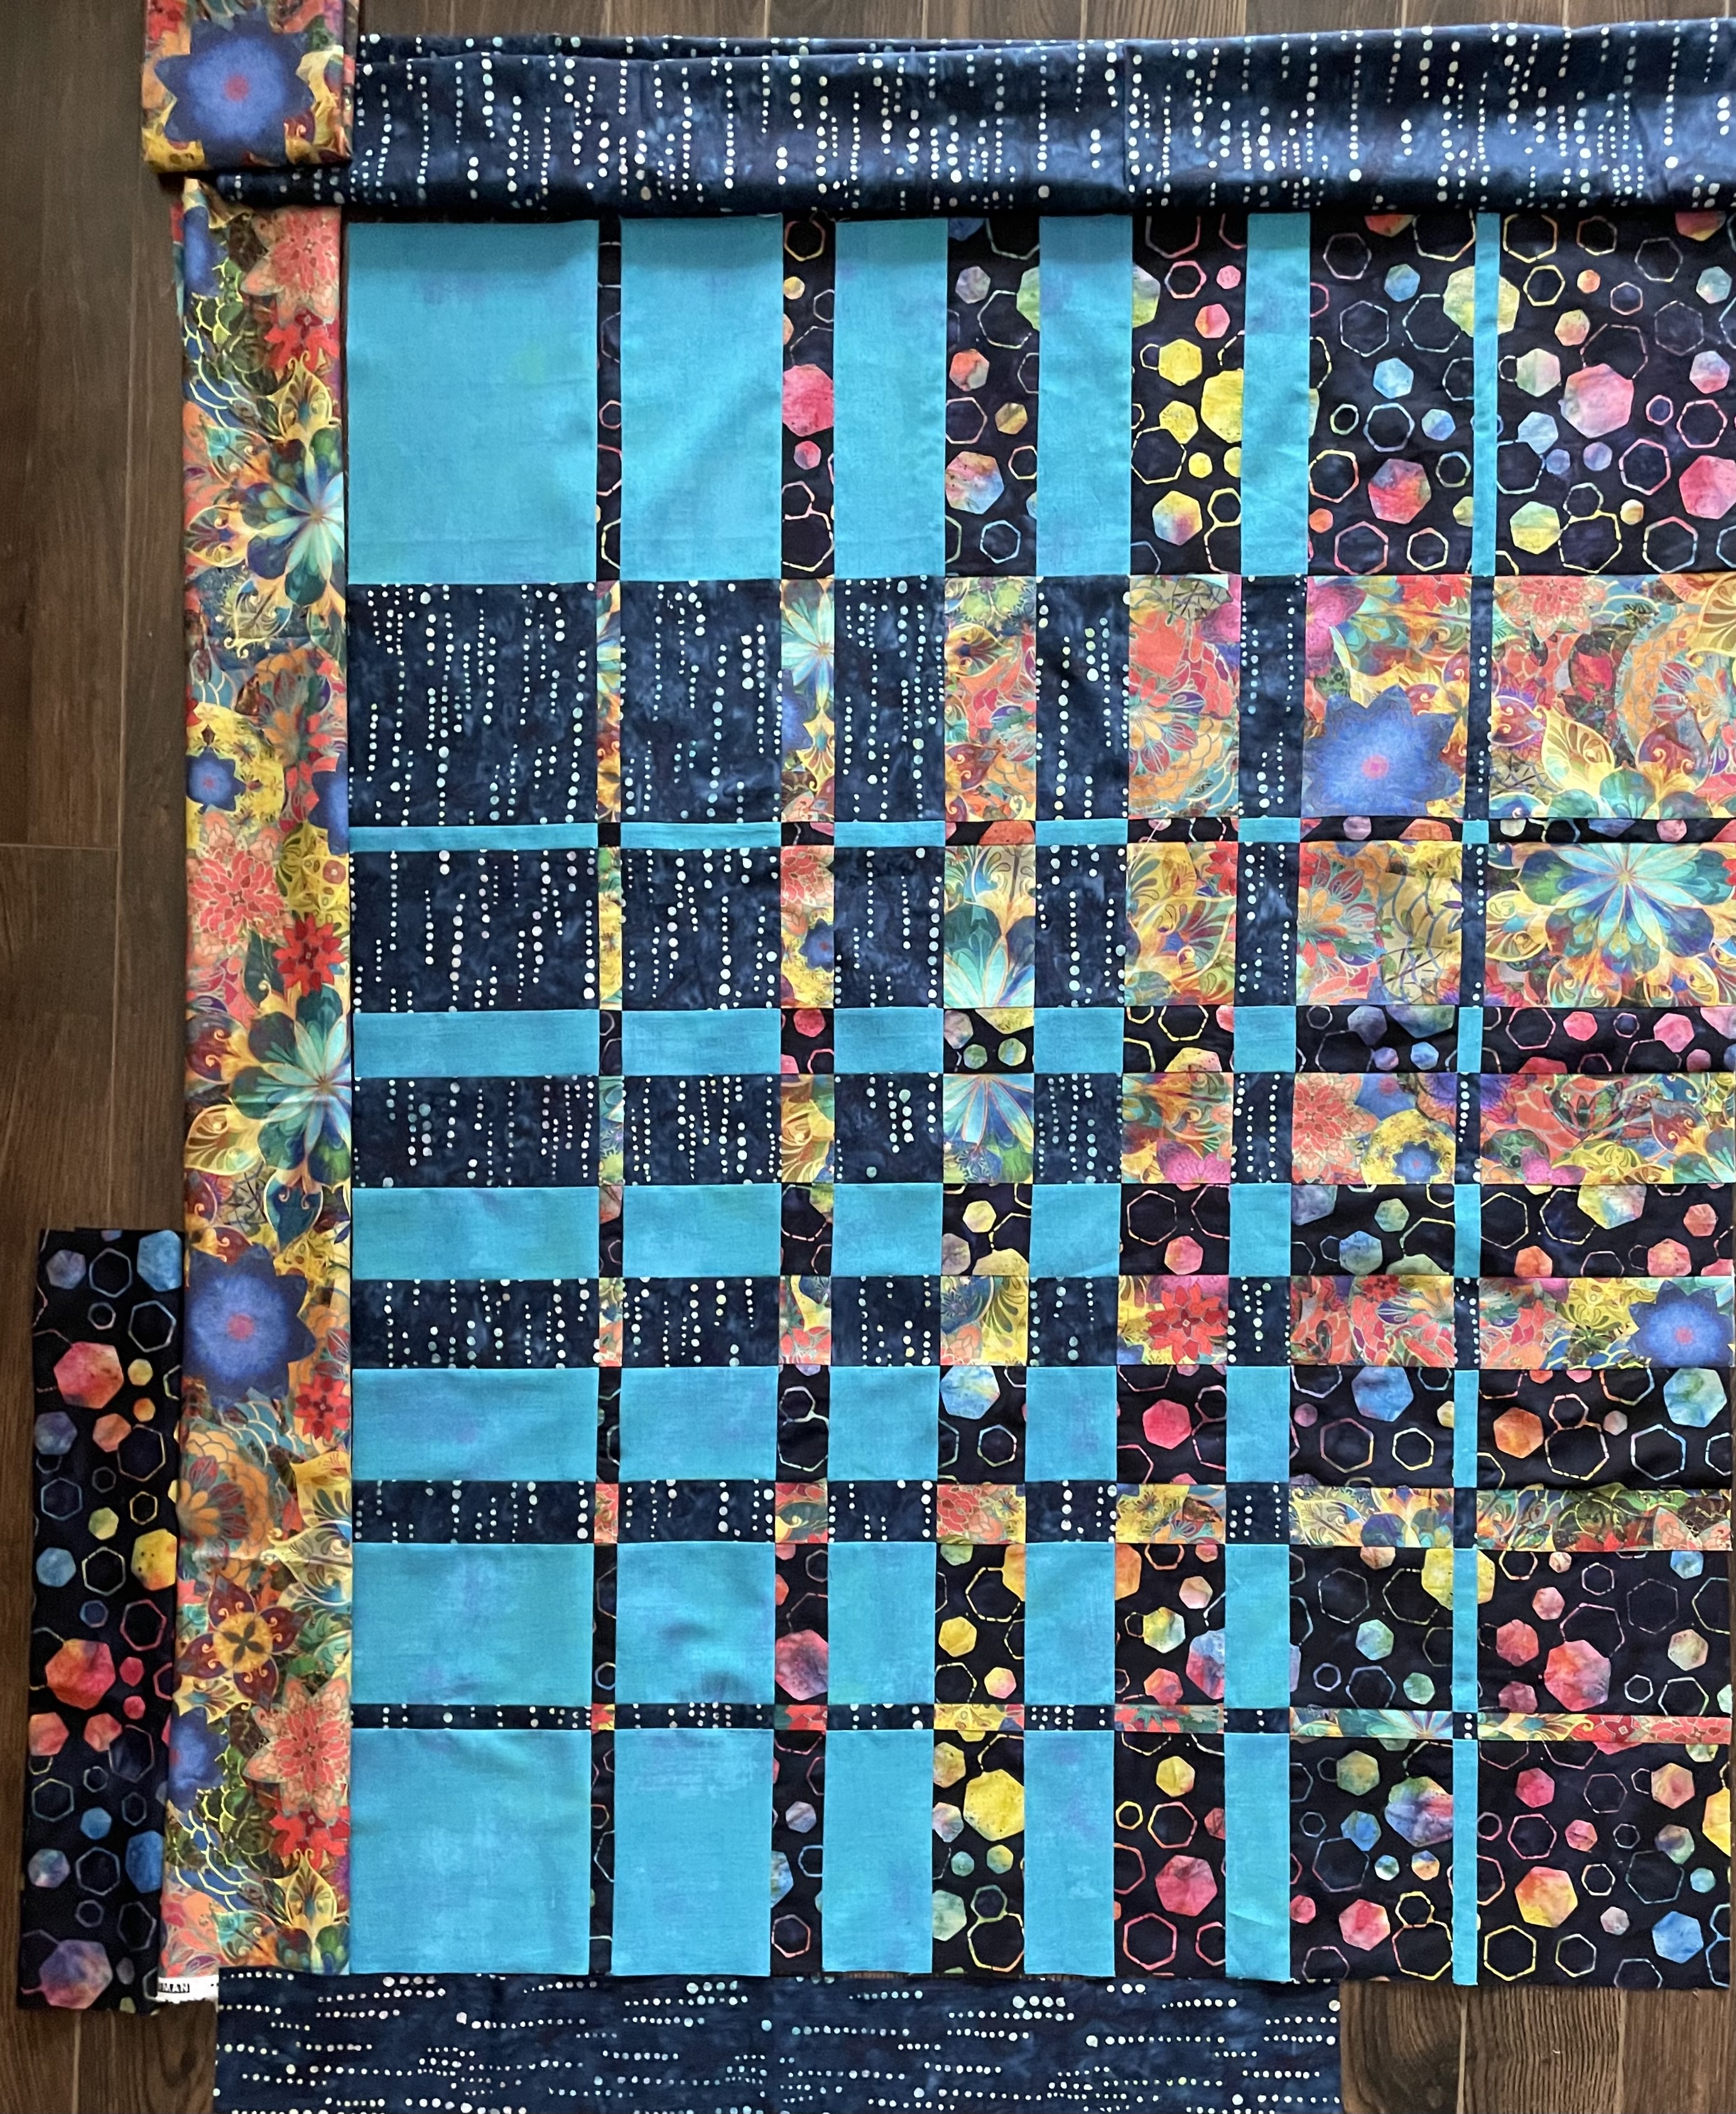
I’m happy with the appliqué work – the edge stitching is barely noticeable, you have to look very closely to see it. I like how it extends the bright colours to the the bottom right of the quilt without hitting you in the face, leaving the upper right corner the unadorned turquoise.

Appliqué Detail

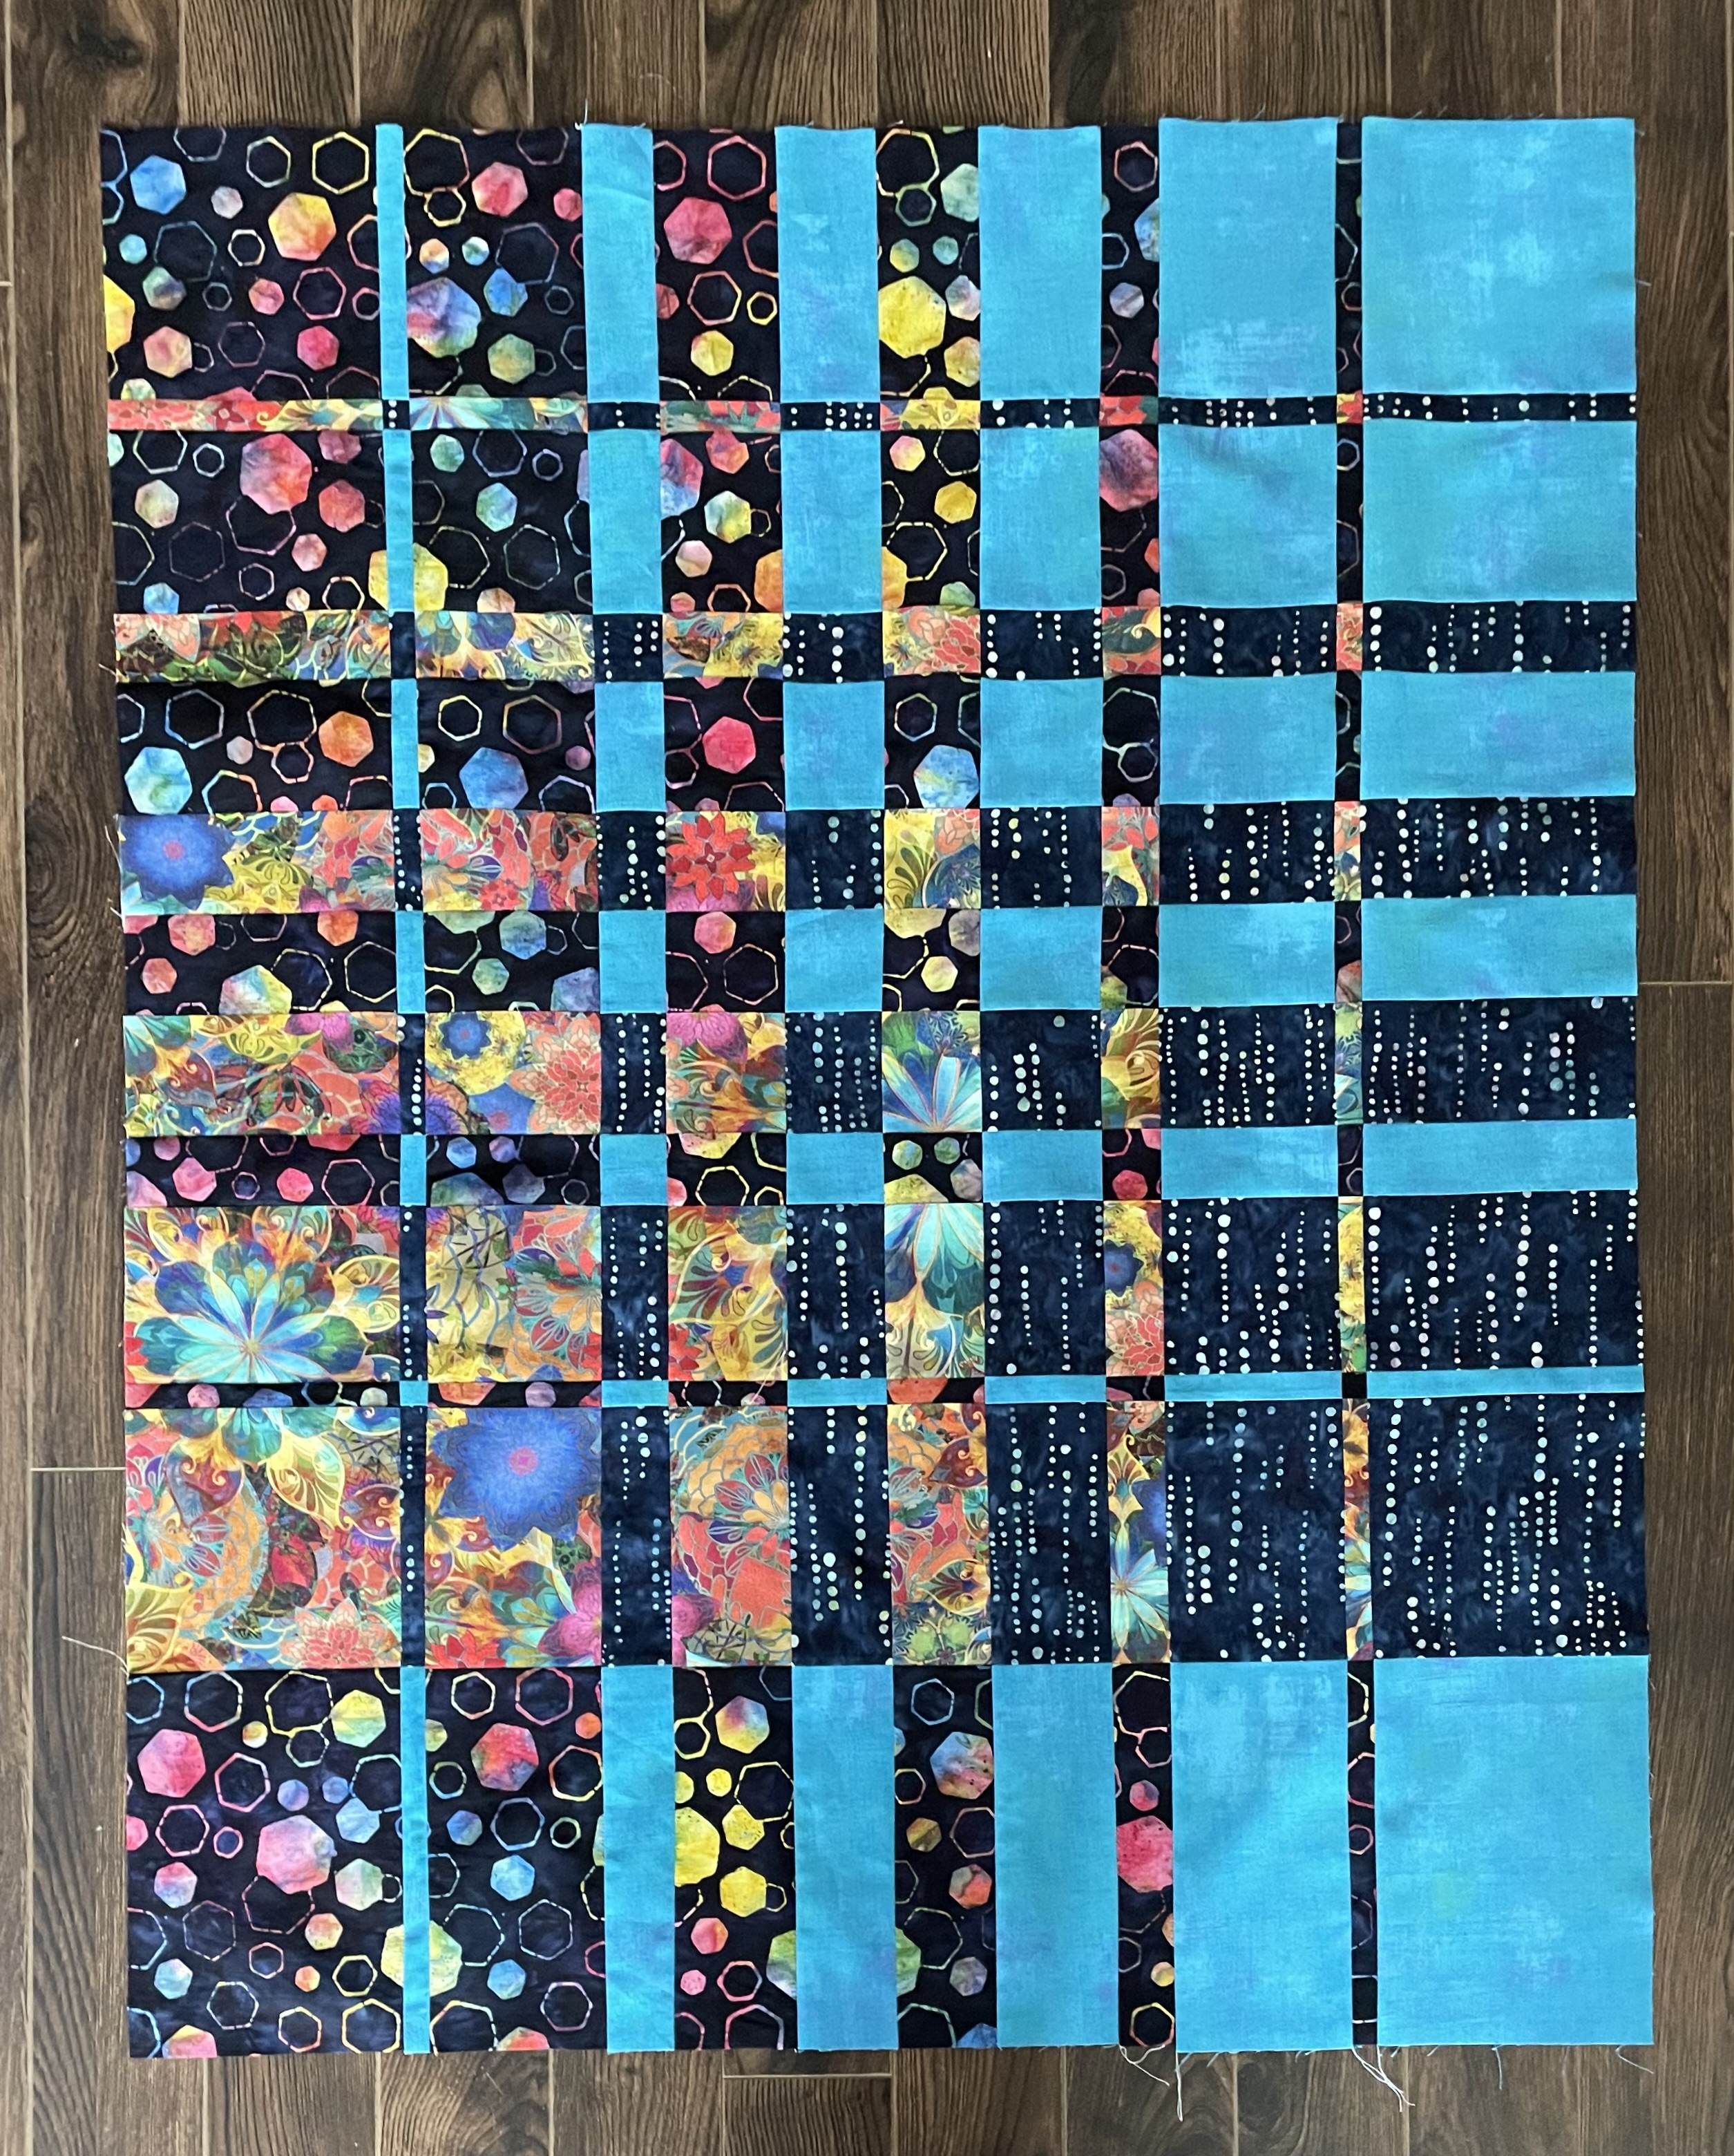
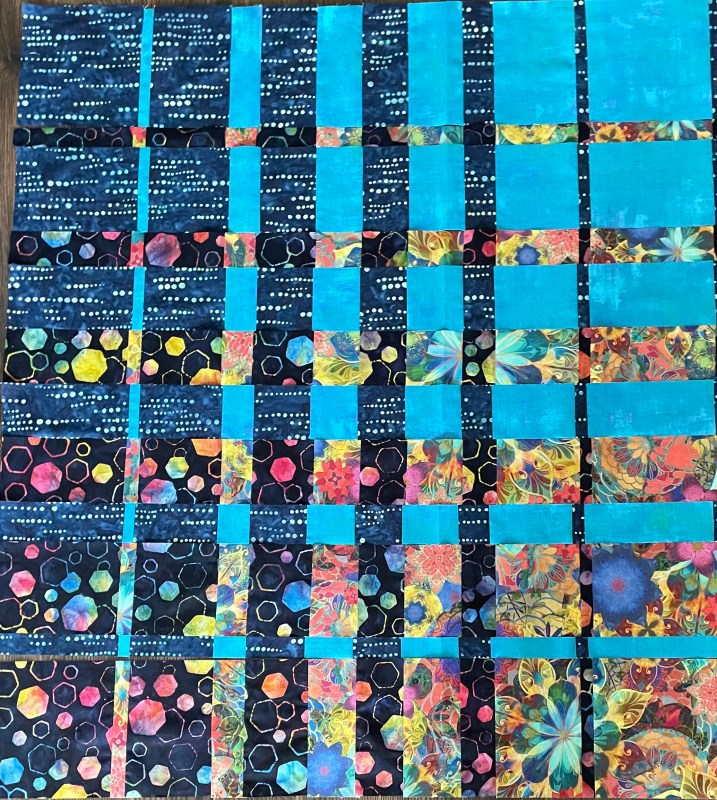
I’m also pleased that my extending the square into a rectangle worked. I might play with that again sometime.

Now onto a bunch of unfinished projects sitting in my studio needing attention. First the fleece pants for my friend Joan; next the Kantha jacket remodelling for my friend Marlene, third the stack of six unfinished zippered bags from nearly a year ago – I did two last week, I’ll finish the rest up in a few days. There’s an Heirloom sewing workshop on my calendar but I don’t think enough people have signed up for that – I still want to use the panel I made a month or so ago to complete a nightgown, so that’s also on my ToDo list.

When those projects are completed I want to move on to some new wall art – I’ve just lined up a second summer showing – this one in Truro – I’ll need six or so pieces to display. They won’t be hung, they have to be attached to something firm in order to “stand” on a wide shelf – either some foamcore board or thin plywood. I have no idea how I’ll do that yet, but I’ll figure something out.

Lots to get done. Better get moving.

Border Done

Just finished the borders (with mitred corners) and I’m happy with the colour flow they provide. The hexagons bring out the hexagon blocks / the dropping dots showcase the dots within the panel – and the many fabric joins don’t show and when the borders are quilted they won’t catch the eye.

Next step: edge stitch the appliqué – I’m going to use a pale grey Invisifil thread which should disappear into the fabric. I wish I had a golden shade but I don’t and it doesn’t make sense to order one online (even on Amazon.ca the cost is prohibitive!). So, the pale grey it is with a 60 universal needle – very fine (which I have in my needle collection).

I’ll start working on that tomorrow.

Borders – Underway

Yesterday, I added the gold and turquoise borders to the panel. Today, I spent a lot of time avoiding the next step because if I wanted the dots fabric to go in the right direction I was going to have to waste a lot of it and I didn’t have a whole lot to work with. I really wanted to border the whole panel with the dots – but I barely had enough to complete two sides and even then I had to do a lot of piecing to get enough length! That fabric is now attached with the mitred corner in the bottom left.

I’ve cut two strips of the hexagon fabric for the other two sides – I need one more to finish the corner. I have plenty of that fabric – not a problem.

I still have to decide at what point to edge stitch (and embellish) the appliqué – I could do it as soon as the borders are complete; I could do it after assembling the quilt sandwich – when I do it depends on how I think about quilting the whole project. The previous convergence quilts I’ve done were quilted overall in the hoop on the embroidery machine. I’m not sure how that will look with the appliqué, however. Stitching-in-the-ditch won’t do it, though because that leaves the larger blocks unquilted space. So I will probably choose to quilt in the hoop which means I should edge stitch the appliqué before assembling the back with what leftover bits of fabric I have.

Convergence – Ongoing

First thing I did today was to recreate the dots/turquoise pairing strips setting them up so when interleaved with the flowers/hexagons the dark fabrics would be opposite one another, not adjacent. My goal was to end up with a rectangular rather than a square panel. I accomplished that by adding a final 9″ row of the dots/turquoise pairing to one end to make the block longer.

I have just finished assembling the panel – 35 x 44 – not quite large enough for a lap quilt. I want to end up with something closer to 48 x 60. I can can obviously add borders – 7″ all around would give me a finished size of 49 x 58. If the borders were a bit asymmetrical I could fudge the final size closer to 60″ in length.

However, first I need to sort out a narrow framing border around the panel to set it off from the borders which I can then assemble by piecing the original four fabrics. So back to the stash to see what I have that might close off the panel in an interesting way.

I’m also going to appliqué some flowers from the yellow fabric over the turquoise blocks at the bottom to bring that colour to that bottom right corner (in the photo on the left – I must have stood on the opposite side of the panel when I took the second photo!).

Afternoon Update

Panel With Fused Appliqué

I couldn’t leave the panel as it was – I applied some fusible web to the back of floral fabric, fussy cut a bunch of elements, then fused them in place. Now I need to edge-stitch and embellish them before I can go further. I’m definitely happier with those turquoise segments at the bottom partially covered – the appliqués extend the bright colours beyond their quadrant.

Convergence

OK, I’ve played with Ricky Tims’ convergence quilt idea before. There are a bunch of subtleties to consider and I don’t always see them until I’ve sewn the strips together.

In Convergence #1, I didn’t realize how small the constructed block would be, so to make a decent size lap quilt, I used it on-point, filling the corners with the corresponding fabrics and bordering with something compatible but different. While constructing Convergence #2, I misjudged how the two light colours would go together, cut them the wrong way; but fortunately, I had enough of both fabrics to redo the panel and salvage the quilt. I used the miscut strips from Convergence #2 to construct Convergence #3 by interspersing them with a multi-fabric panel, cut in strips and interleaved with the greys. I lengthened the panel in one dimension to make the resulting quilt a rectangle.

In thinking about another convergence quilt panel I chose four fabrics I thought worked well together (two batiks/two prints):

I thought the convergence array would make a bright panel.

A Square Convergence – Laid Out

A square block works as you’d expect it to. However, I wanted a rectangular panel so I had added another dark 9″ strip to the contrasting end of each pairing:

Extended Panel – Laid Out

Here’s where I didn’t anticipate the fabric placement – instead of cutting the blue dots/turquoise grunge as I did, I should have reverse the fabrics. I’m going to redo that fabric pairing to see whether the overall panel doesn’t work better. Fortunately I have enough fabric to do that and I’ll set aside the strips I currently have and use them in another quilt top (as I did with Convergence #2 and #3).

I suspect this arrangement could be salvaged were I to choose a good contrasting narrow sashing fabric. I’d intended using the dark hexagonal batik for the outer border but I’m not sure that will work well with this array.

Next task – redo the blue dots/turquoise grunge strips and see what that looks like. Tomorrow!

Double Convergence Quilt Top

I’ve spent days looking at the double convergence panel not knowing how to finish it. I finally decided to add a narrow dark border, then complete the outer border using the four fabrics I used to construct the convergence.

I thought about a second narrow border bringing in another contrasting colour but I couldn’t find anything in my stash (and my stash is large) that felt right – red? pink? green? yellow? I had a grey batik with small yellow circles, that was as close as I could get to something that possibly worked. In the end I elected to stick with just the four fabrics.

Double Convergence Quilt Top With Borders

To construct the outer border, I was limited by the amount of grey and turquoise fabric I had left. I was able to find some of the ombre online and ordered a yard (at great expense!) so I had options with constructing the ombre corners but I had barely enough grey and turquoise left to make a 6″ border.

I thought about adding a bit of dark fabric where two fabrics met, but when I photographed the layout I didn’t like how that broke up the unity of the border.

Top Layout With Joins Marked

I also thought about using a mitre to make the joins but I didn’t have enough fabric to make that work.

Looking at the finished panel I’ve decided to finish the quilt with a hidden binding – I have no more grey batik or turquoise and I think using the ombre for a traditional quilt binding will just add unnecessary detail.

When completed the quilt will be a rather small throw/lap quilt or a largish wall hanging – it’s ended up an awkward size, but I can’t see any way of extending the “length” that wouldn’t mess up the symmetry, so this is it.

Possibilities #7

Finally finished this convergence quilt yesterday. Got the binding done and label sewn on. Two sets of mistakes that went together – totally unexpected and unplanned. It definitely worked out quite well.

Finished Quilt Top

I’m happy I took out the narrow vertical turquoise stripe – it disrupted the left-right movement of the convergence flow. Replacing it with the narrow turquoise border was a good decision. I didn’t have enough grey crackle fabric to complete the binding so I incorporated a turquoise piece I trimmed from the backing after I’d finished quilting. I ran out of binding as I was coming to the join and inserted another small piece of turquoise to complete it. I like where that insert landed.

Fiished Quilt Back

To create the quilt back I set up a “jellyroll race” using leftover bits of fabric from the top, with a narrow strip inserted and two unequal sashing strips. Using the turquoise for the backing sets up an interesting flow from top of quilt to the back. There’s enough turquoise in the top that when you flip the quilt over you retain the connection between top and bottom.

The ombre fabric I ordered online arrived Friday so I will now work on completing the double conversion quilt featuring the ombre fabric.

But before I can get to that, I’m have to work on the thread painting wall hanging.

Detail – Thread Painting Floral Wall Art

I started the thread painting last Tuesday as part of a class I’m teaching (I stitched the dark green parts of this and another leaf although you can’t really see what I’ve done in the photo). We meet again coming Tuesday and I have made no progress on the stitching work. Nevertheless I need to move on to framing the piece so I’ve trimmed it, I’m in the process of adding a bit more batting to the edges to allow enough background to balance the floral arrangement and provide support for the borders. Then I have to set up the marking (using Friction heat erasable pens) so I can apply the borders – have to get that process well underway before Tuesday – not completed, but started so I can demonstrate how I add borders. The framing of the piece won’t hinder the massive amount of thread painting I will still have to do.

Possibilities #5

Yesterday I removed the turquoise vertical strip and resembled the quilt top panel – much happier with the flow across the two sets of strips – they’re not interrupted with that contrasting element that really didn’t work well.

Hodgepodge with turquoise vertical stripe removed, sashing and borders added

The colour was right, though, and I used the turquoise fabric to sash the panel – the narrow contrasting sashing provides closure to the panel and brightens it.

The border – that was a challenge – I had several grey fabrics in my stash – I tried all of them. At one point I thought one of the taupier ones would look OK (I used two different Grunge taupe fabrics in the brightly coloured strips) but in the end I used wide strips from the grey Crackle (Moda) I’ve had in the stash for a while (I thought the fabric pattern was long out of stock but I just found more in a wide range of colours online so I bought two yards to replace the piece I’ve used).

Now on to a backing panel with a wide strip of some kind. How I choose to quilt this will also make a difference to how the final quilt will look – quilting design, thread colour should help tie the elements together as well.

Possibilities #4

Today, I looked at the two sets of discarded strips and decided they could go together and kind of work. The miscut ombre strips needed lengthening to match the pieced strips – I used my last bit of ombre (from the dark brown end) to extend them. I sewed the two sets of strips together this afternoon. The width proportions were the same so I put them together  wide/narrow, wide/narrow until they were assembled.

Hodgepodge

I don’t like the turquoise strip in there, however – I might actually take it out because it interrupts the flow of the strips in both directions. I’ve ended up with a panel 36″ x 43″ – reasonable proportion for a throw/lap quilt with narrow sashing and wide borders added.

Tomorrow I will take out the turquoise strip, then see what I can do about a narrow sashing and a wide border to get me to around 48″-50″ in width, 56″-58″ in length.

And here I am quilting when I intended to be making pants – the corduroy is sitting on the dresser waiting for me to get to it; the pattern is there, too. I wanted to get both pair done by the end of the holidays – nope! It’s quilts instead. Gotta follow the inspiration.

Oh, and I never work on more than a single project at a time, and here I am deeply engrossed in two.

Possibilities #3

This morning I constructed a new black ombre/batik panel (from the fabric I had left over yesterday) and then assembled the convergence. Yesterday when I cut the two parts into strips at the same time, my strips were exactly the same width. But cutting the second panel today meant there were slight variations in the pieced strips so assembling the large panel proved finicky because many of the joins did not align precisely…. I had to make lots of small adjustments.

Convergence Panel Assembled

However, now I’ve got the balance the way I want it with the two darker elements of the ombre opposing one another as are the two contrast fabrics.

The question is where do I go from here. I need a narrow sashing of some kind but I’m not sure what it should be. Also I have no more ombre (I’ve ordered 2m online but it probably won’t arrive for a couple of weeks) to set up wide outside borders to make a decent size throw quilt. Right now the panel is ~36″ x 36″ – I want to end up closer to 60″. That means more piecing of some kind – at the moment I have no idea where to go from here. Next question is whether there is a way to end up with a throw that’s longer than wide – that means doing something asymmetrical with sashing and borders.

The surprise with this piecing is while the ombre shading comes through due to the wider elements constructed from the darker ends of the fabric, it’s actually a rather weak colour flow. The turquoise livens up the panel but now the question is whether I should introduce more fabrics to build around this panel or wait till the ombre fabric arrives and see what I can do with that. Lots of possibilities….