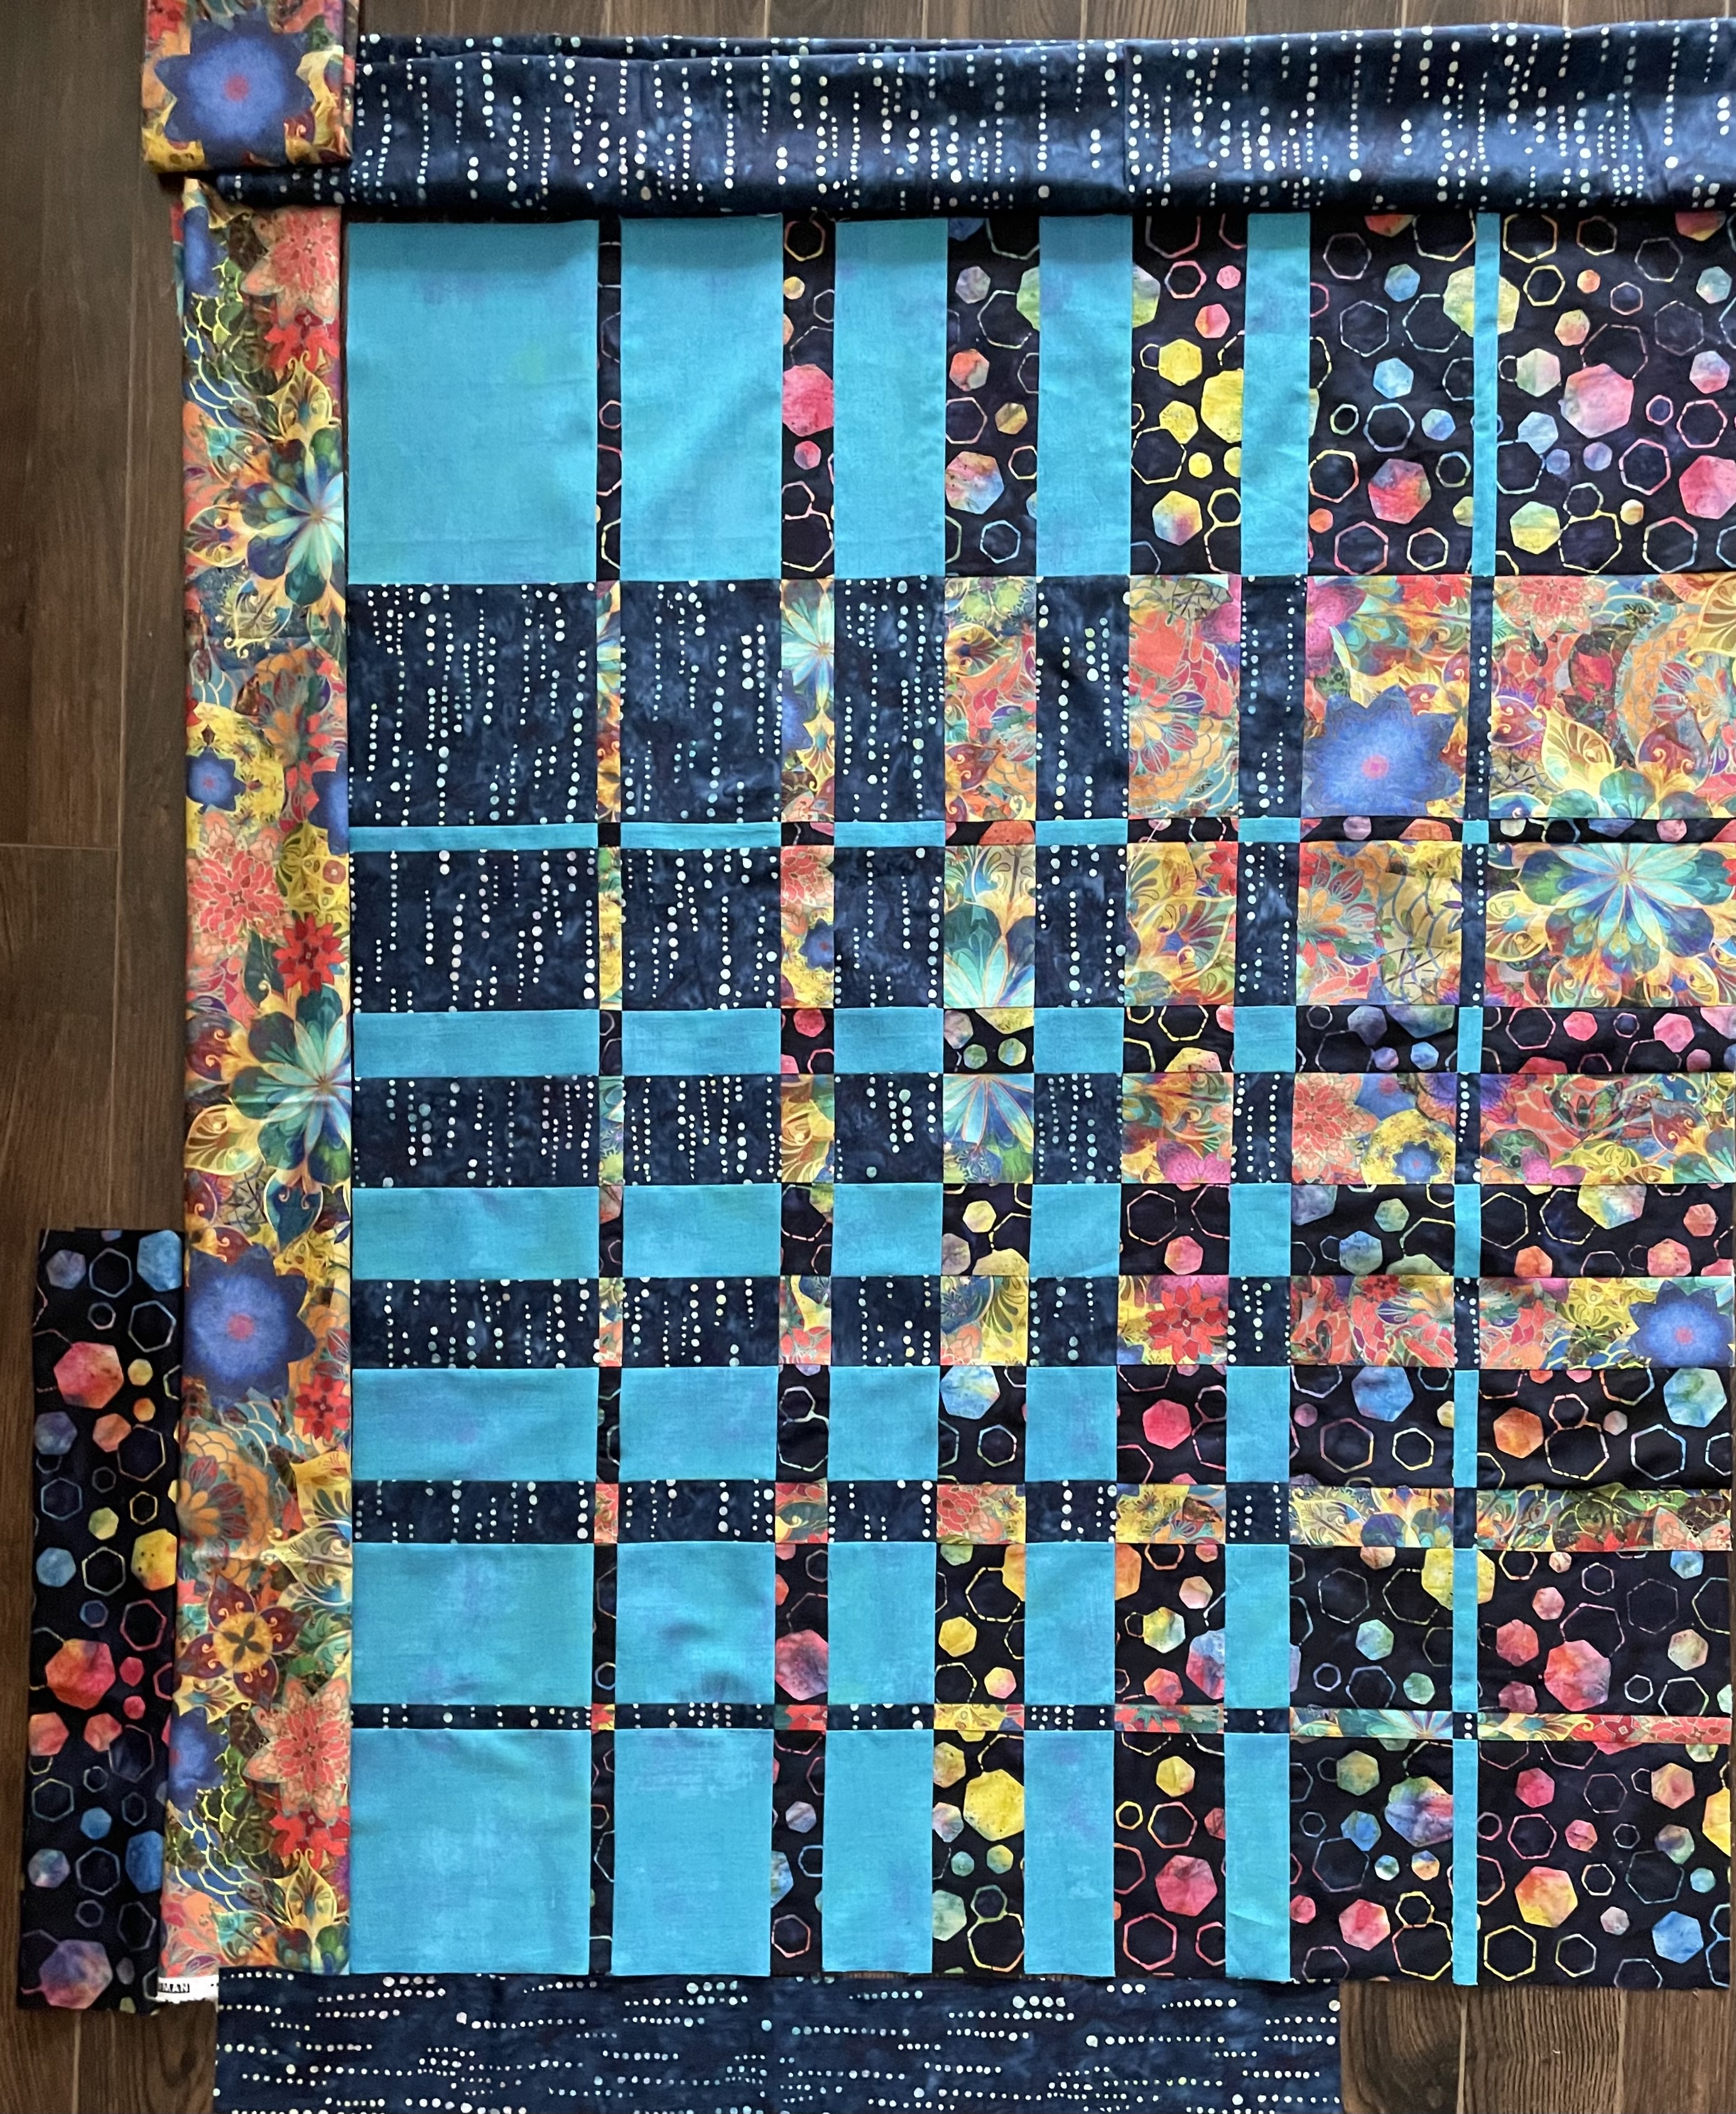
Just finished the borders (with mitred corners) and I’m happy with the colour flow they provide. The hexagons bring out the hexagon blocks / the dropping dots showcase the dots within the panel – and the many fabric joins don’t show and when the borders are quilted they won’t catch the eye.
Next step: edge stitch the appliqué – I’m going to use a pale grey Invisifil thread which should disappear into the fabric. I wish I had a golden shade but I don’t and it doesn’t make sense to order one online (even on Amazon.ca the cost is prohibitive!). So, the pale grey it is with a 60 universal needle – very fine (which I have in my needle collection).
Yesterday, I added the gold and turquoise borders to the panel. Today, I spent a lot of time avoiding the next step because if I wanted the dots fabric to go in the right direction I was going to have to waste a lot of it and I didn’t have a whole lot to work with. I really wanted to border the whole panel with the dots – but I barely had enough to complete two sides and even then I had to do a lot of piecing to get enough length! That fabric is now attached with the mitred corner in the bottom left.
I’ve cut two strips of the hexagon fabric for the other two sides – I need one more to finish the corner. I have plenty of that fabric – not a problem.
I still have to decide at what point to edge stitch (and embellish) the appliqué – I could do it as soon as the borders are complete; I could do it after assembling the quilt sandwich – when I do it depends on how I think about quilting the whole project. The previous convergence quilts I’ve done were quilted overall in the hoop on the embroidery machine. I’m not sure how that will look with the appliqué, however. Stitching-in-the-ditch won’t do it, though because that leaves the larger blocks unquilted space. So I will probably choose to quilt in the hoop which means I should edge stitch the appliqué before assembling the back with what leftover bits of fabric I have.
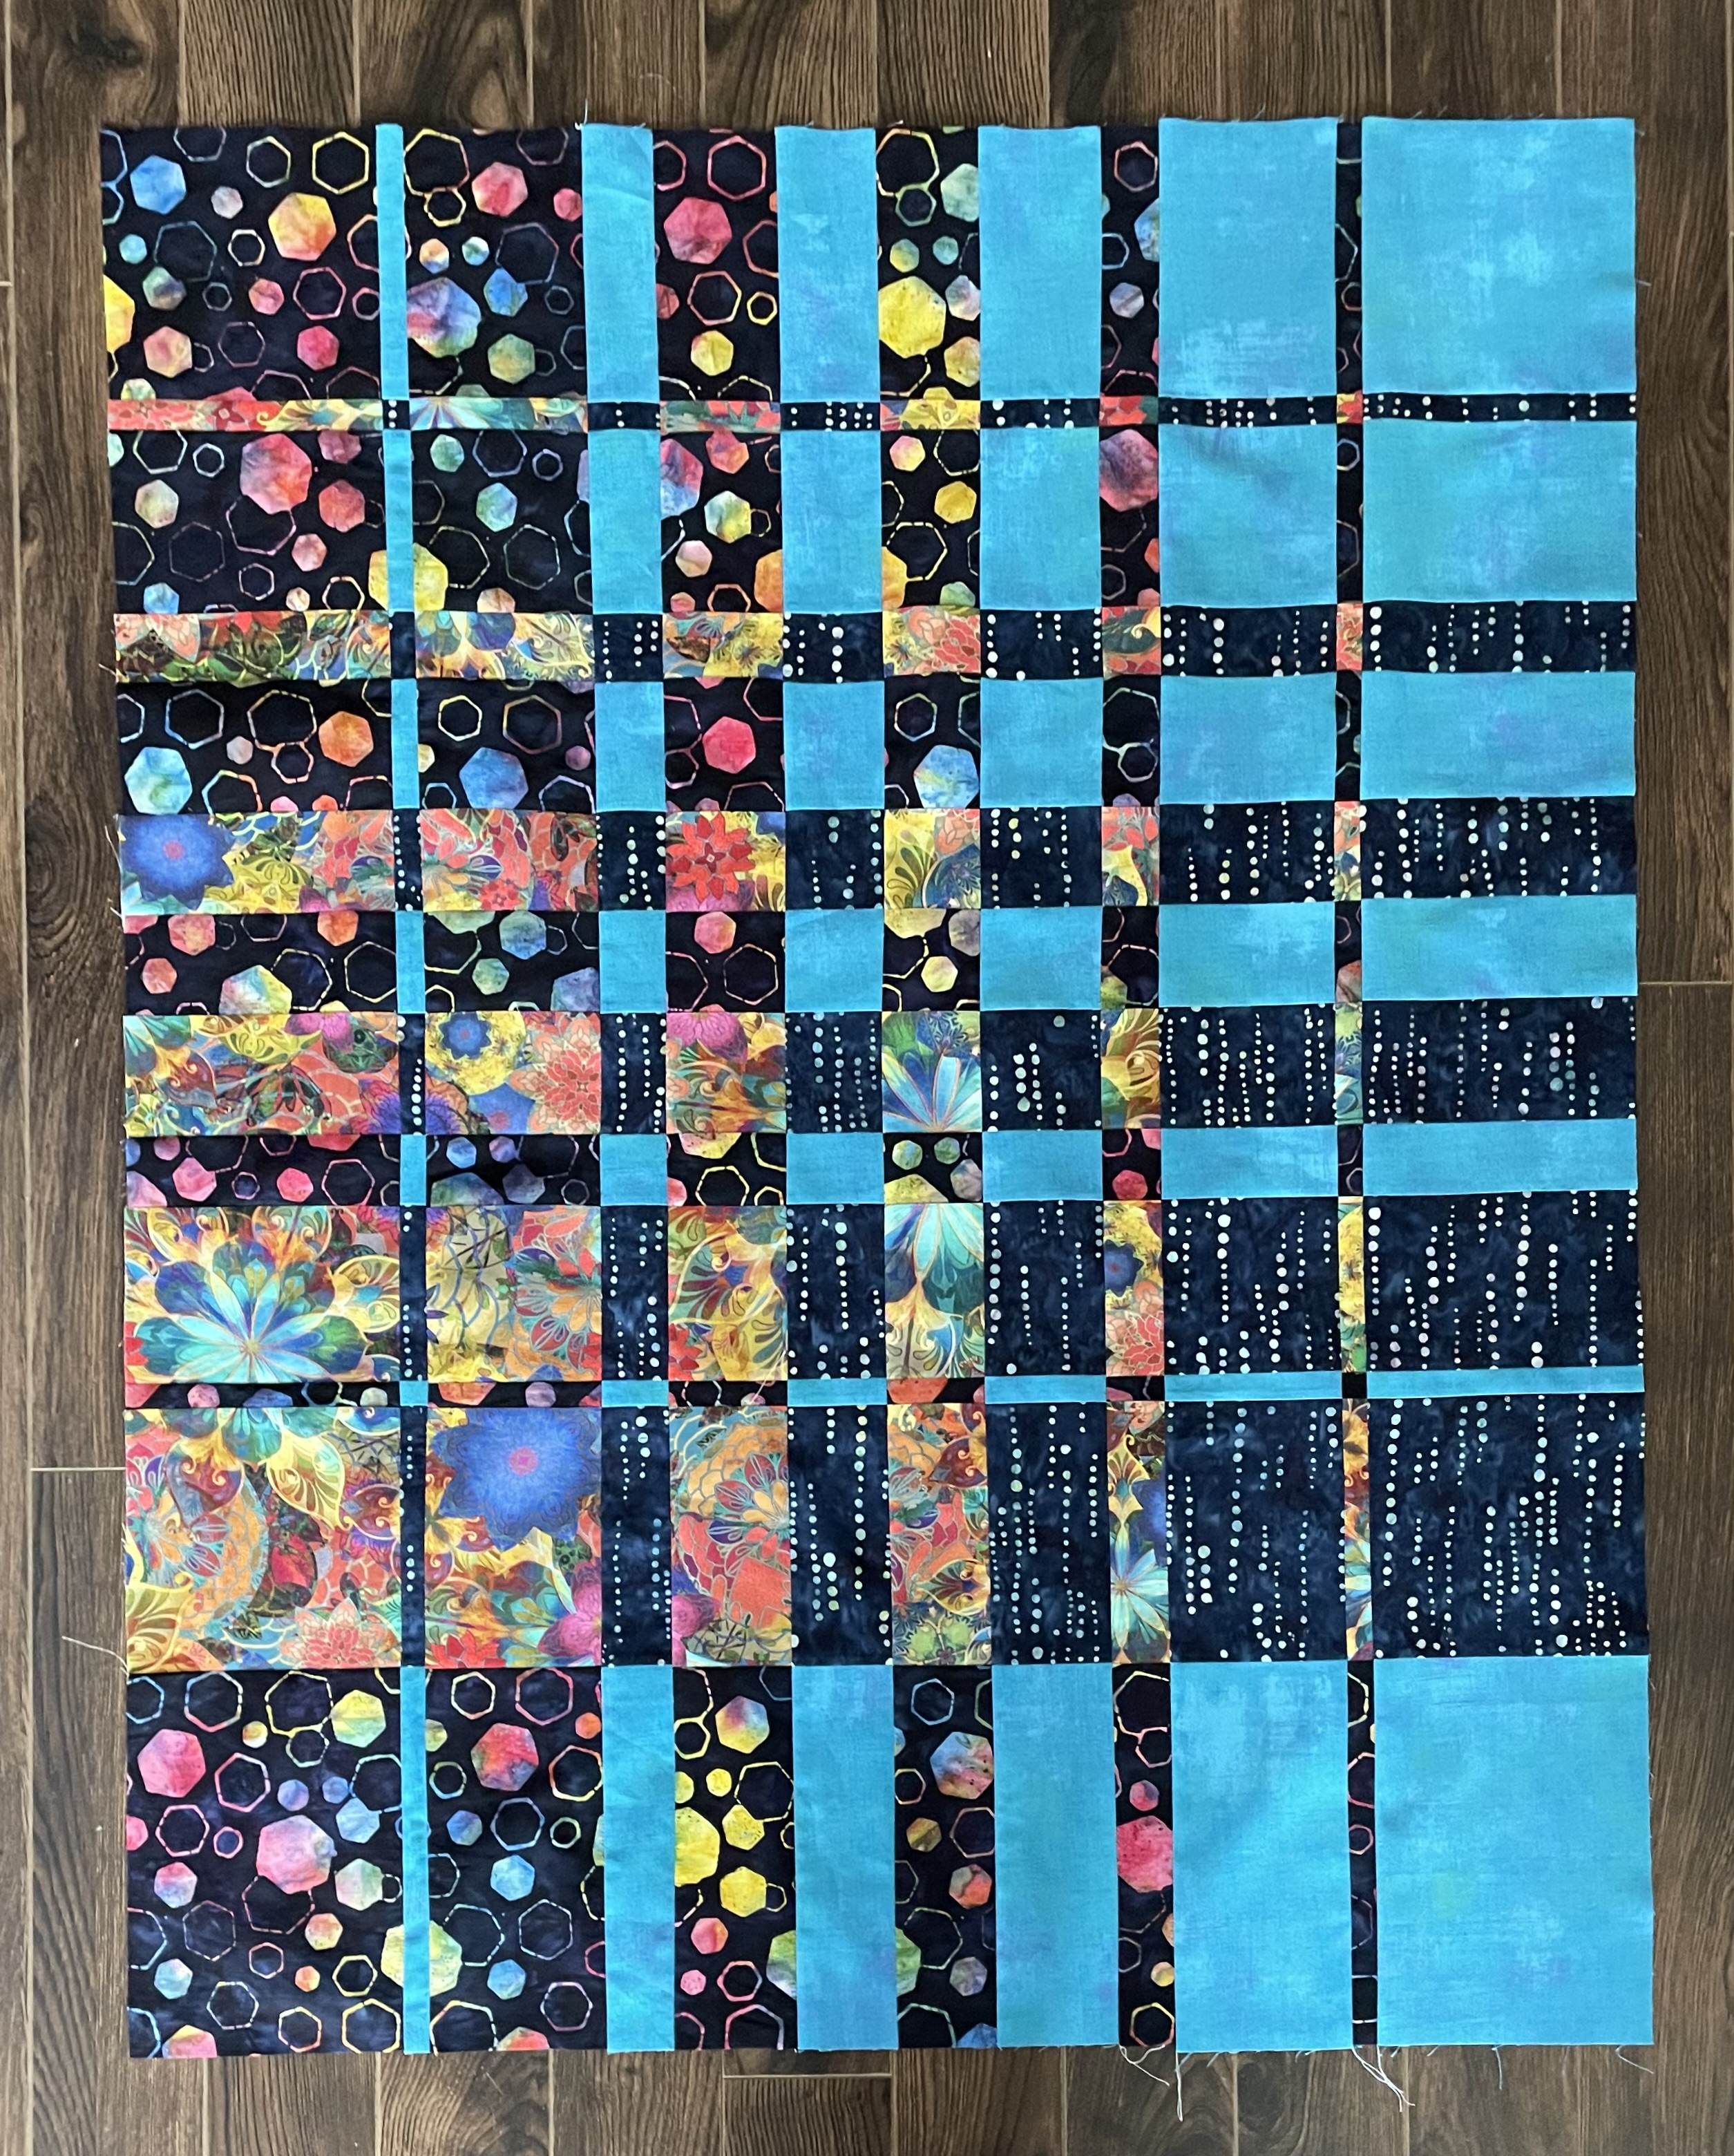
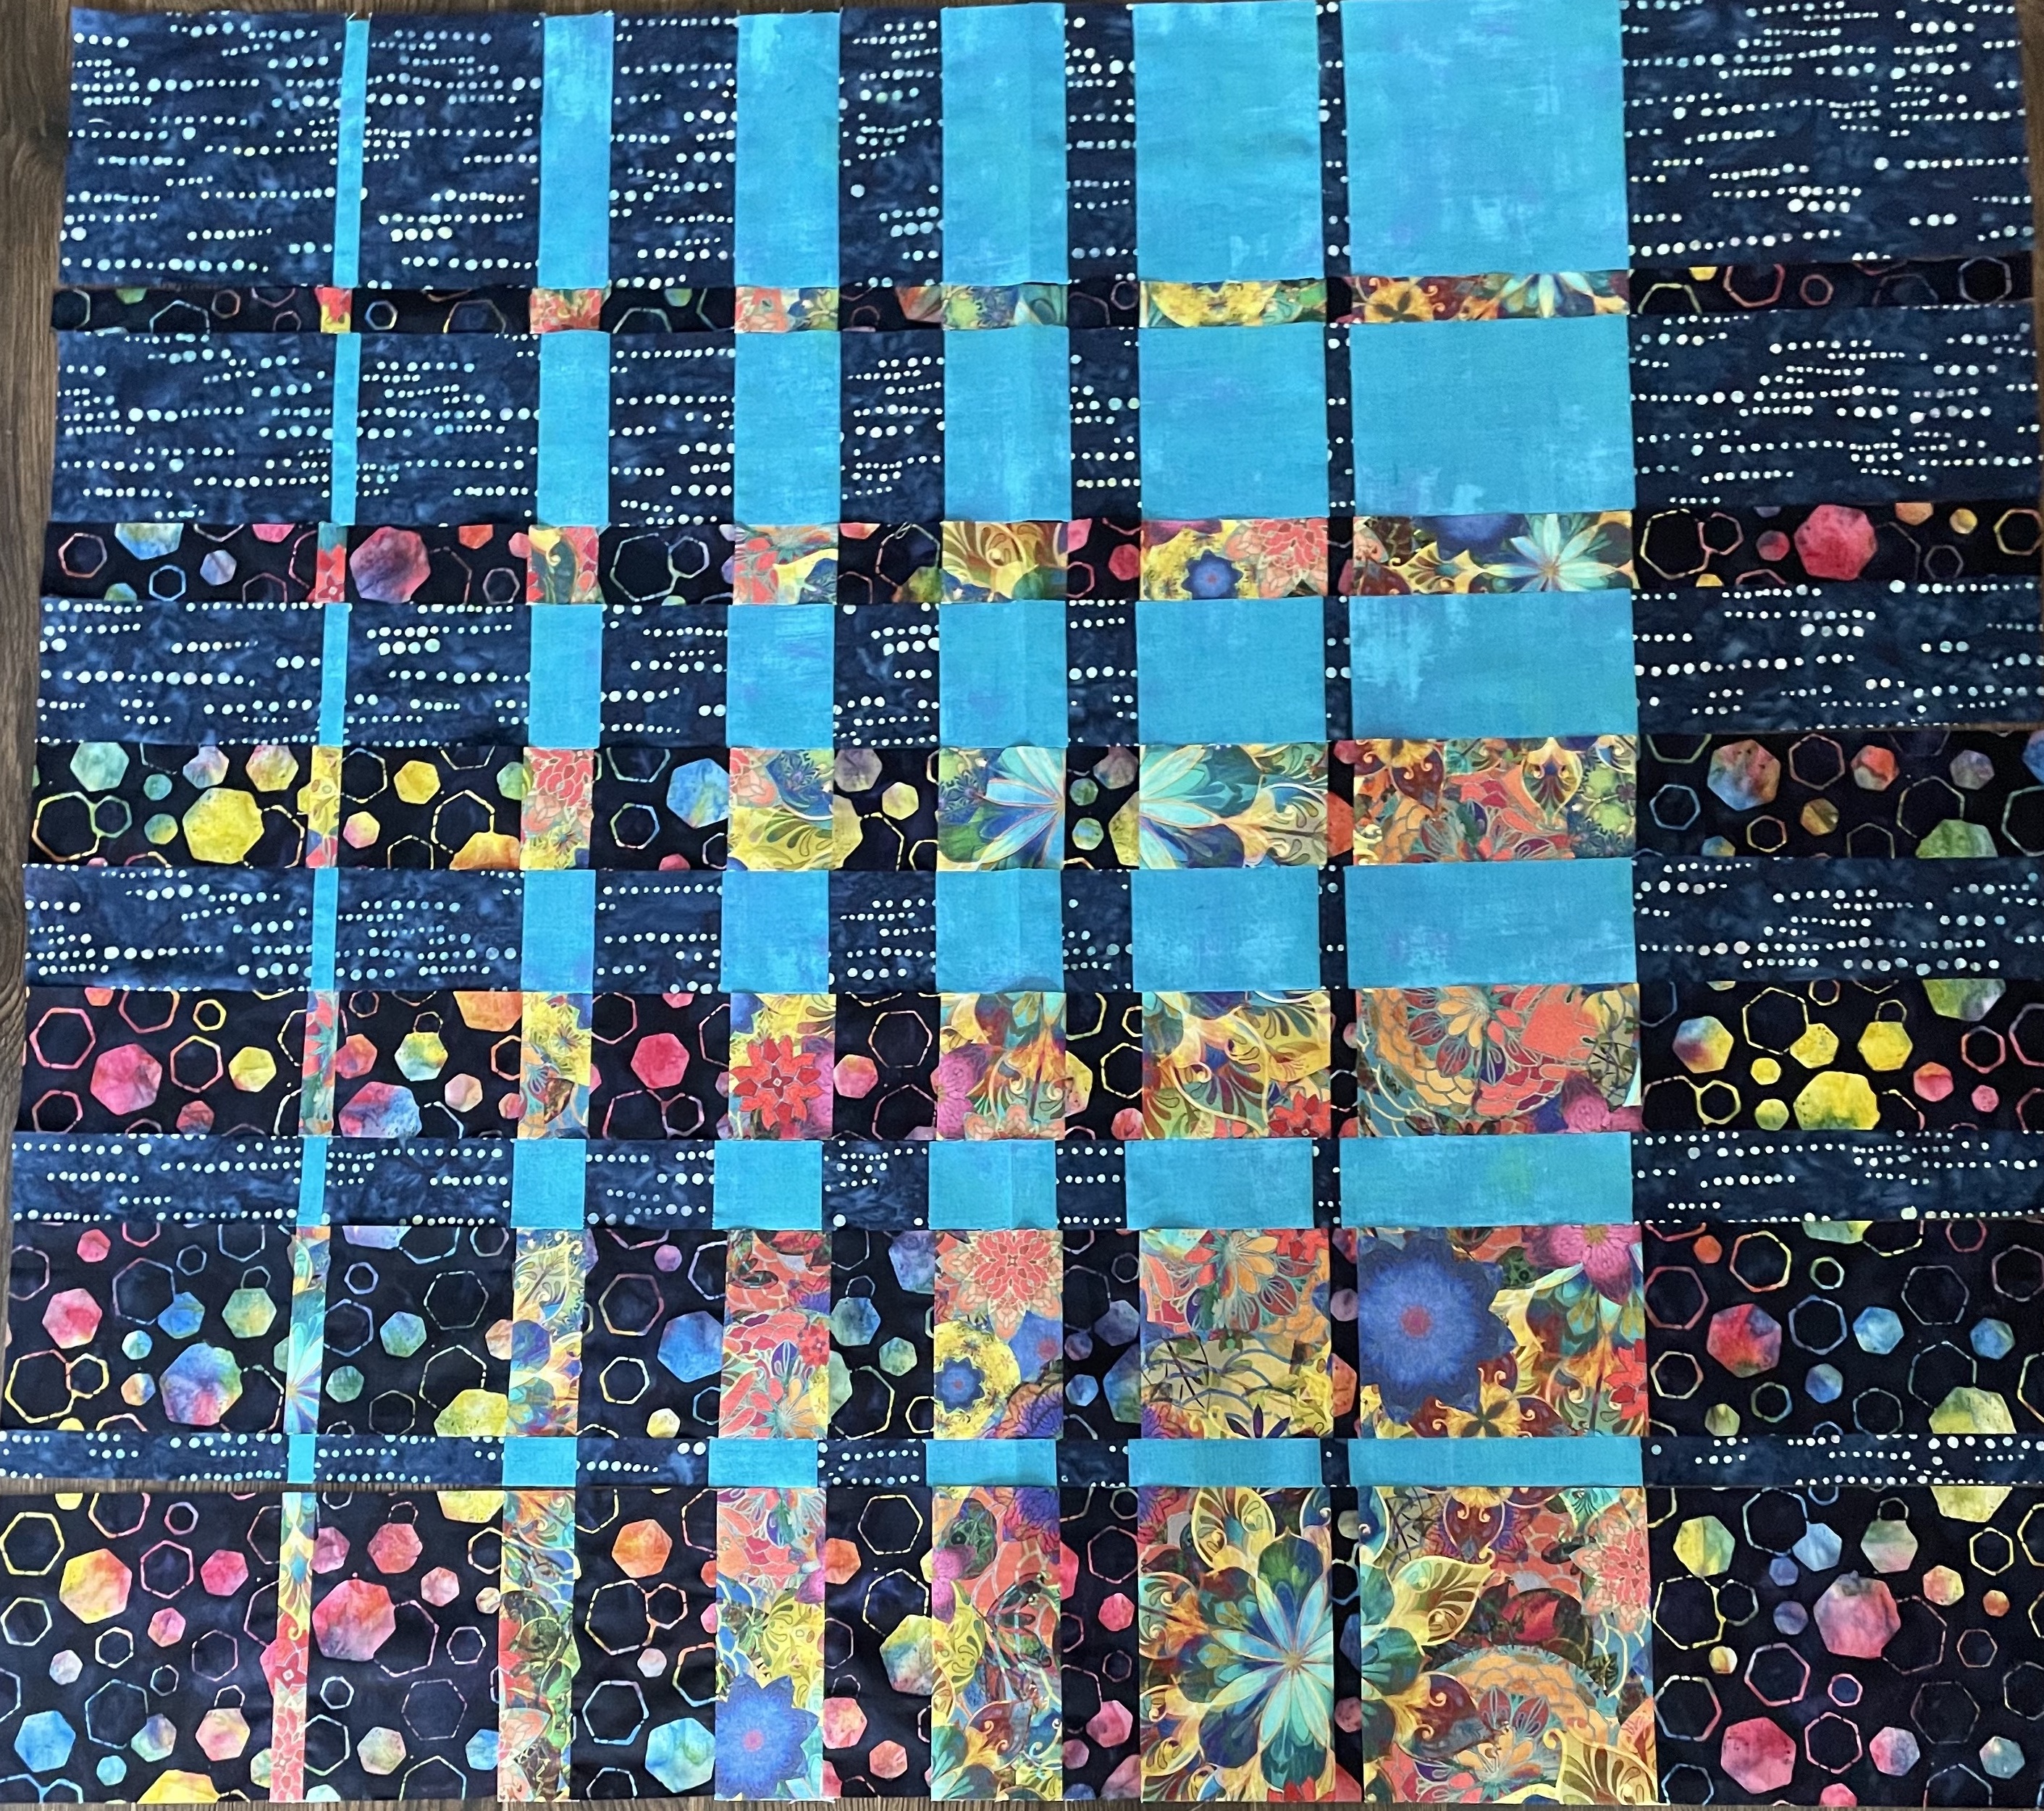
First thing I did today was to recreate the dots/turquoise pairing strips setting them up so when interleaved with the flowers/hexagons the dark fabrics would be opposite one another, not adjacent. My goal was to end up with a rectangular rather than a square panel. I accomplished that by adding a final 9″ row of the dots/turquoise pairing to one end to make the block longer.
I have just finished assembling the panel – 35 x 44 – not quite large enough for a lap quilt. I want to end up with something closer to 48 x 60. I can can obviously add borders – 7″ all around would give me a finished size of 49 x 58. If the borders were a bit asymmetrical I could fudge the final size closer to 60″ in length.
However, first I need to sort out a narrow framing border around the panel to set it off from the borders which I can then assemble by piecing the original four fabrics. So back to the stash to see what I have that might close off the panel in an interesting way.
I’m also going to appliqué some flowers from the yellow fabric over the turquoise blocks at the bottom to bring that colour to that bottom right corner (in the photo on the left – I must have stood on the opposite side of the panel when I took the second photo!).
Afternoon Update
Panel With Fused Appliqué
I couldn’t leave the panel as it was – I applied some fusible web to the back of floral fabric, fussy cut a bunch of elements, then fused them in place. Now I need to edge-stitch and embellish them before I can go further. I’m definitely happier with those turquoise segments at the bottom partially covered – the appliqués extend the bright colours beyond their quadrant.
OK, I’ve played with Ricky Tims’ convergence quilt idea before. There are a bunch of subtleties to consider and I don’t always see them until I’ve sewn the strips together.
In Convergence #1, I didn’t realize how small the constructed block would be, so to make a decent size lap quilt, I used it on-point, filling the corners with the corresponding fabrics and bordering with something compatible but different. While constructing Convergence #2, I misjudged how the two light colours would go together, cut them the wrong way; but fortunately, I had enough of both fabrics to redo the panel and salvage the quilt. I used the miscut strips from Convergence #2 to construct Convergence #3 by interspersing them with a multi-fabric panel, cut in strips and interleaved with the greys. I lengthened the panel in one dimension to make the resulting quilt a rectangle.
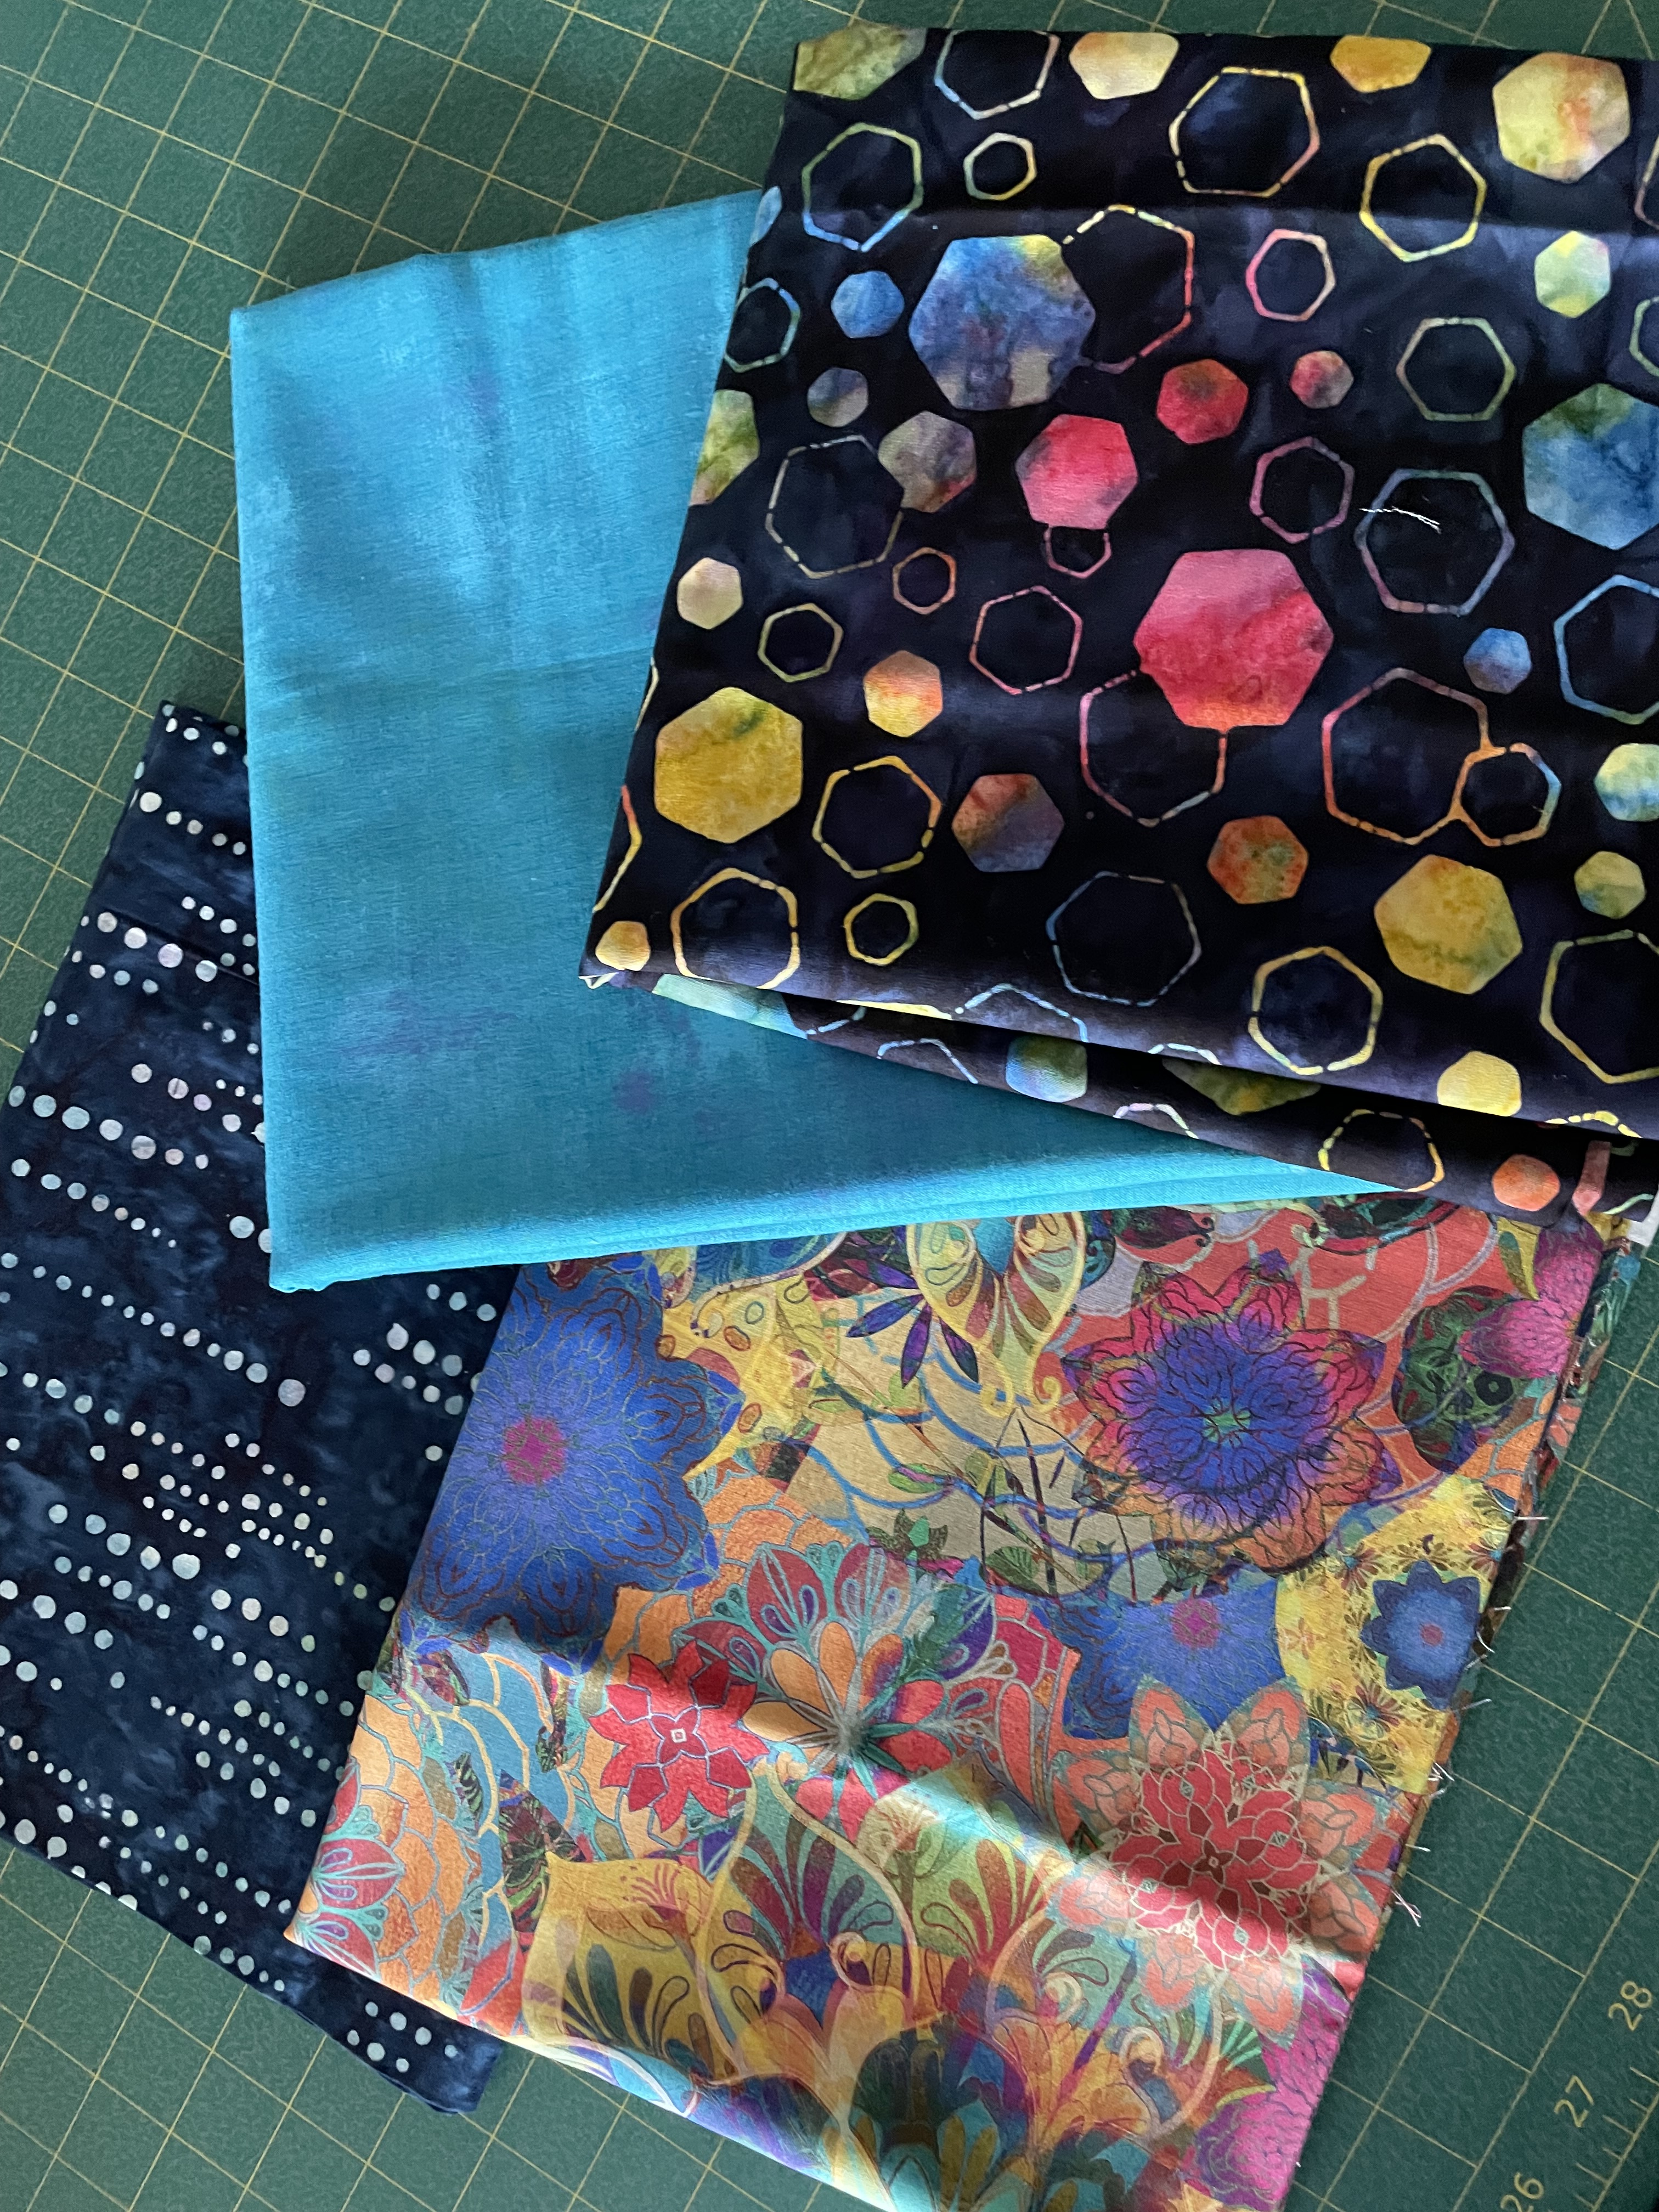
In thinking about another convergence quilt panel I chose four fabrics I thought worked well together (two batiks/two prints):
I thought the convergence array would make a bright panel.
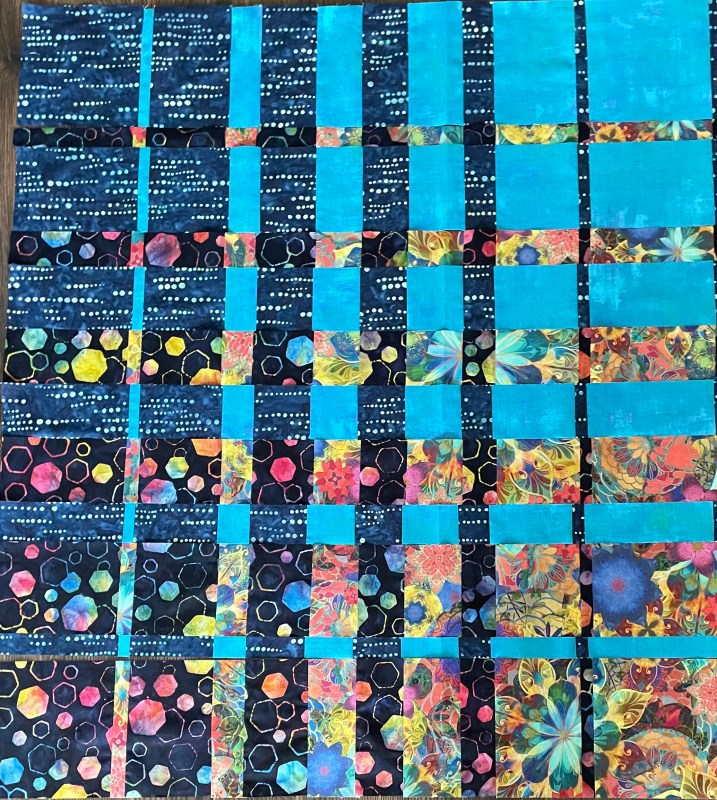
A Square Convergence – Laid Out
A square block works as you’d expect it to. However, I wanted a rectangular panel so I had added another dark 9″ strip to the contrasting end of each pairing:
Extended Panel – Laid Out
Here’s where I didn’t anticipate the fabric placement – instead of cutting the blue dots/turquoise grunge as I did, I should have reverse the fabrics. I’m going to redo that fabric pairing to see whether the overall panel doesn’t work better. Fortunately I have enough fabric to do that and I’ll set aside the strips I currently have and use them in another quilt top (as I did with Convergence #2 and #3).
I suspect this arrangement could be salvaged were I to choose a good contrasting narrow sashing fabric. I’d intended using the dark hexagonal batik for the outer border but I’m not sure that will work well with this array.
Next task – redo the blue dots/turquoise grunge strips and see what that looks like. Tomorrow!
I haven’t done much textile art for the past month or so – not since the 6×6 pieces. Nothing in particular has called out to me.
This morning I decided I had to start something. I keep a folder on my desktop “Wall Art” where I stick ideas. I looked at Charlie’s first swim photo – I’ve never been happy with my original piece created using raw-edge appliqué. I’ve wanted to print the photo on fabric and embellish it.
Charlie’s First Swim
The problem is his dad sent me a small version of the photo on his phone and when I attempt to enlarge it I get a very pixilated image. This morning, I printed an enlargement on paper – I’m going to try stitching that to see whether I can sharpen the image with some thread painting. If it works, I’ll print Charlie on fabric and carry on from there.
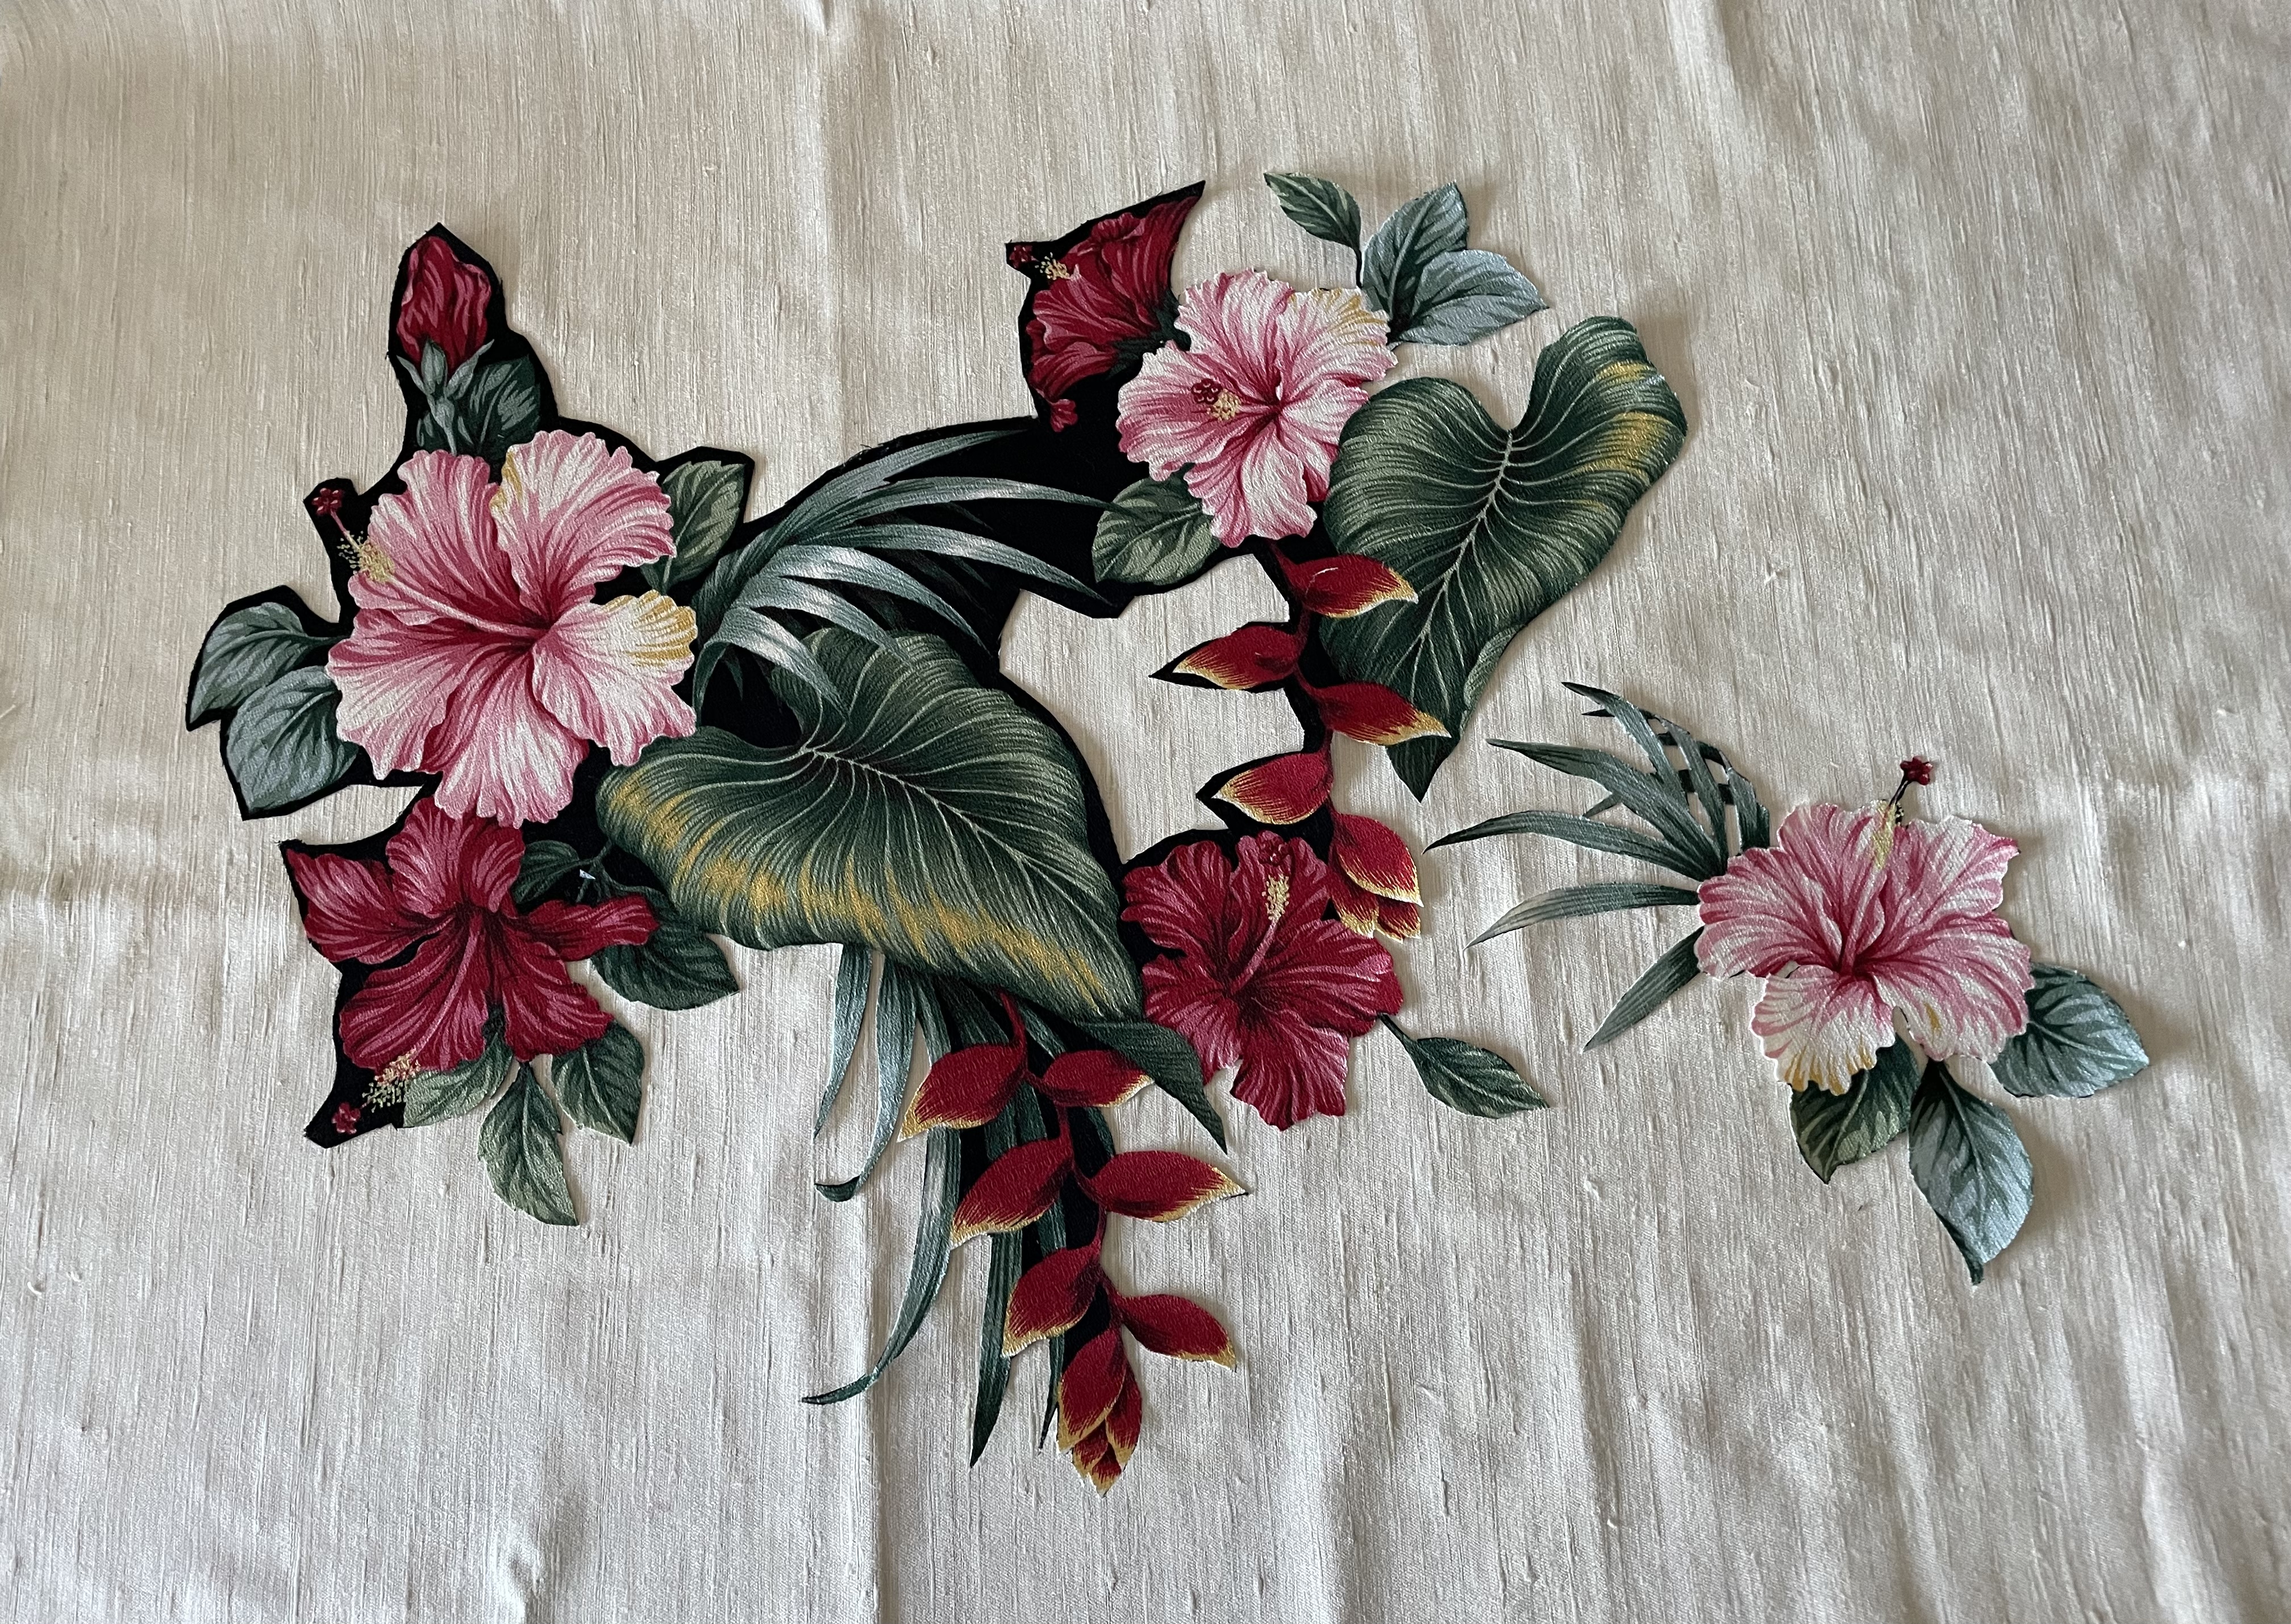
Another thought was to revisit the bark cloth in my stash. I selected an array of hibiscus and heliconia from the black fabric, pressed a sheet of Pellon 805 fusible web to the back, and started fussy-cutting the flowers.
Hawaiian Flowers
I’ll carry on trimming off the black. I plan to use a panel of natural raw silk as background. This may be a project I’ll work on while working on other things.
However, this doesn’t feel like a start – I definitely want to do some quilting – just not sure where to begin.
Imagine my surprise when I checked my latest Pinterest daily digest to find a synopsis with 8 quilt alongs linking to my description of how I worked out The Escher Quilt!
Have fun – I’d say this is an advanced intermediate quilt (definitely not for a beginner, even with instructions).
Another note you wouldn’t pick up if you didn’t read through the comments is this one:
Just keep in mind you need 25 fabrics – one solid for the “background” triangles and any borders you plan on adding; 24 patterned fabrics – 8 light, 8 medium, 8 dark (https://jmncreativeendeavours.ca/2021/05/08/the-escher-quilt-2/)…. You’ll likely do a lot of auditioning to build a collection of 24 fabrics. As for the background, I suggest a navy (which is what I used given the colour blend of my fabrics) but black is certainly a good option (that was the background colour in the original photo I saw). All the best with this quilt. One other thought, because trying to pull together a collection of 24 fabrics can be daunting you might consider a kit that has selected fabrics for you (these quilt kits are reasonably priced: https://www.quilt-agious.com/shop/Kits/p/Escher—Batik-x46838321.htm).
Finished this pair of socks last night – they’re a bit smaller than my standard sock. My massage therapist wears a size 7 shoe so while I made the legs with the same number of stitches as usual, I decreased from 64 to 60 stitches before the ankle and did fewer rows in the foot.
If you click on the image you’ll get an enlargement that lets you see the glitter.
Then a couple of days ago I got this image from a friend!
“Well Loved”
I have some leftover yarn from those socks but not enough I think to reknit the feet (and I imagine the heels are weakened as well).
These socks were made from an acrylic/polyester yarn because Heather can’t wear wool. So I checked Micheal’s online to see if they had any in stock – DISCONTINUED! And nothing similar available.
So I tried online to find this Loops & Threads yarn – I came across a single Etsy shop that seemed to have some. Since I couldn’t source a decent acrylic sock yarn anywhere else, I ordered two balls (the yarn was inexpensive; the shipping was out of sight). It’s what a good friend would do.
It’s mid-October – time to make the Christmas cakes.
Last week I bought the candied fruit, raisins, dried cranberries, dates, orange marmalade, a bottle of dark rum (the cost of everything had increased but I’m not complaining – I paid the bill and carried on).
Next I checked the recipe and made sure I had enough eggs, flour, brown and white sugar, baking powder and baking soda, vanilla, almond extract, spices (ground cinnamon, nutmeg, allspice, ginger, clove), molasses and baking chocolate.
I marinated the fruit in rum for a week – the amount of time it takes for a half-bottle of rum to be absorbed into the fruit (none left in the bottom of the big covered Tupperware container I use for that purpose). Today, I decided, was Christmas cake making day.
The IngredientsThe CakesA Testing PieceChristmas Cake 2022
I started by lining the pans with parchment (holding it in place with wooden clothes pins until the batter was added and smoothed). I measured out the dry ingredients, then the wet – both need large mixing bowls to hold the quantity I make.
I dumped the marinated fruit into my large lobster pot sitting in the sink (so I can reach in to mix the batter ingredients). I added half the dry ingredients but the mixture is so heavy that I called a friend to help (yesterday, she’d offered to do the mixing/stirring if I needed her – my right wrist can no longer handle the weight of the mixture – even wearing a splint my wrist becomes quite painful). The ingredients have to be mixed by hand because the mixture is way too heavy for a machine – it takes a sturdy wooden spoon or stiff spatula to do the job along with a lot of elbow grease). We added the rest of the dry ingredients, then poured in small batches of the wet until we had batter and fruit well mixed.
Last year I had a disaster – I’d overfilled the loaf pans and batter spilled into my oven creating a lot of smoke and a big mess. We were careful not to overfill the pans – looks like we put just the right amount into each – nine 2 lb loaf pans, six small ones. The cake bakes in a 300° oven for close to two hours – you can tell by the smell when it’s time to check on their done-ness. No spilling over this year.
I just had to cut a slice from one of the small cakes for quality control. Nice texture and nice taste.
I will now wrap the cakes in waxed paper, put each in a ziplock bag, and store them on the bottom shelf of my fridge for the next two months. That’s how long it takes for the moisture in the fruit to migrate into the cake. They’ll be given as holiday gifts!
Growing up, my mother made sure we understood summer clothes were packed away at the end of September and the fall and winter clothes came out. White pants, white shoes – all banished for the season.
Why do I mention this? I wear clog/mule style shoes – shoes that slip on without a back heel – comfortable with my lovely collection of wool socks, easy to wear and actually orderable online because fit is forgiving in this kind of shoe. However, clog/mule shoes are becoming scarce as hen’s teeth – about the only company that seems to continue to make them is a German firm – Finn Comfort. I have several pair of Finn Comfort sandals (for summer) and clogs (for winter) but I didn’t have a black pair (and I need one because my reliable, comfortable Clarks clogs are all wearing out and are irreplaceable).
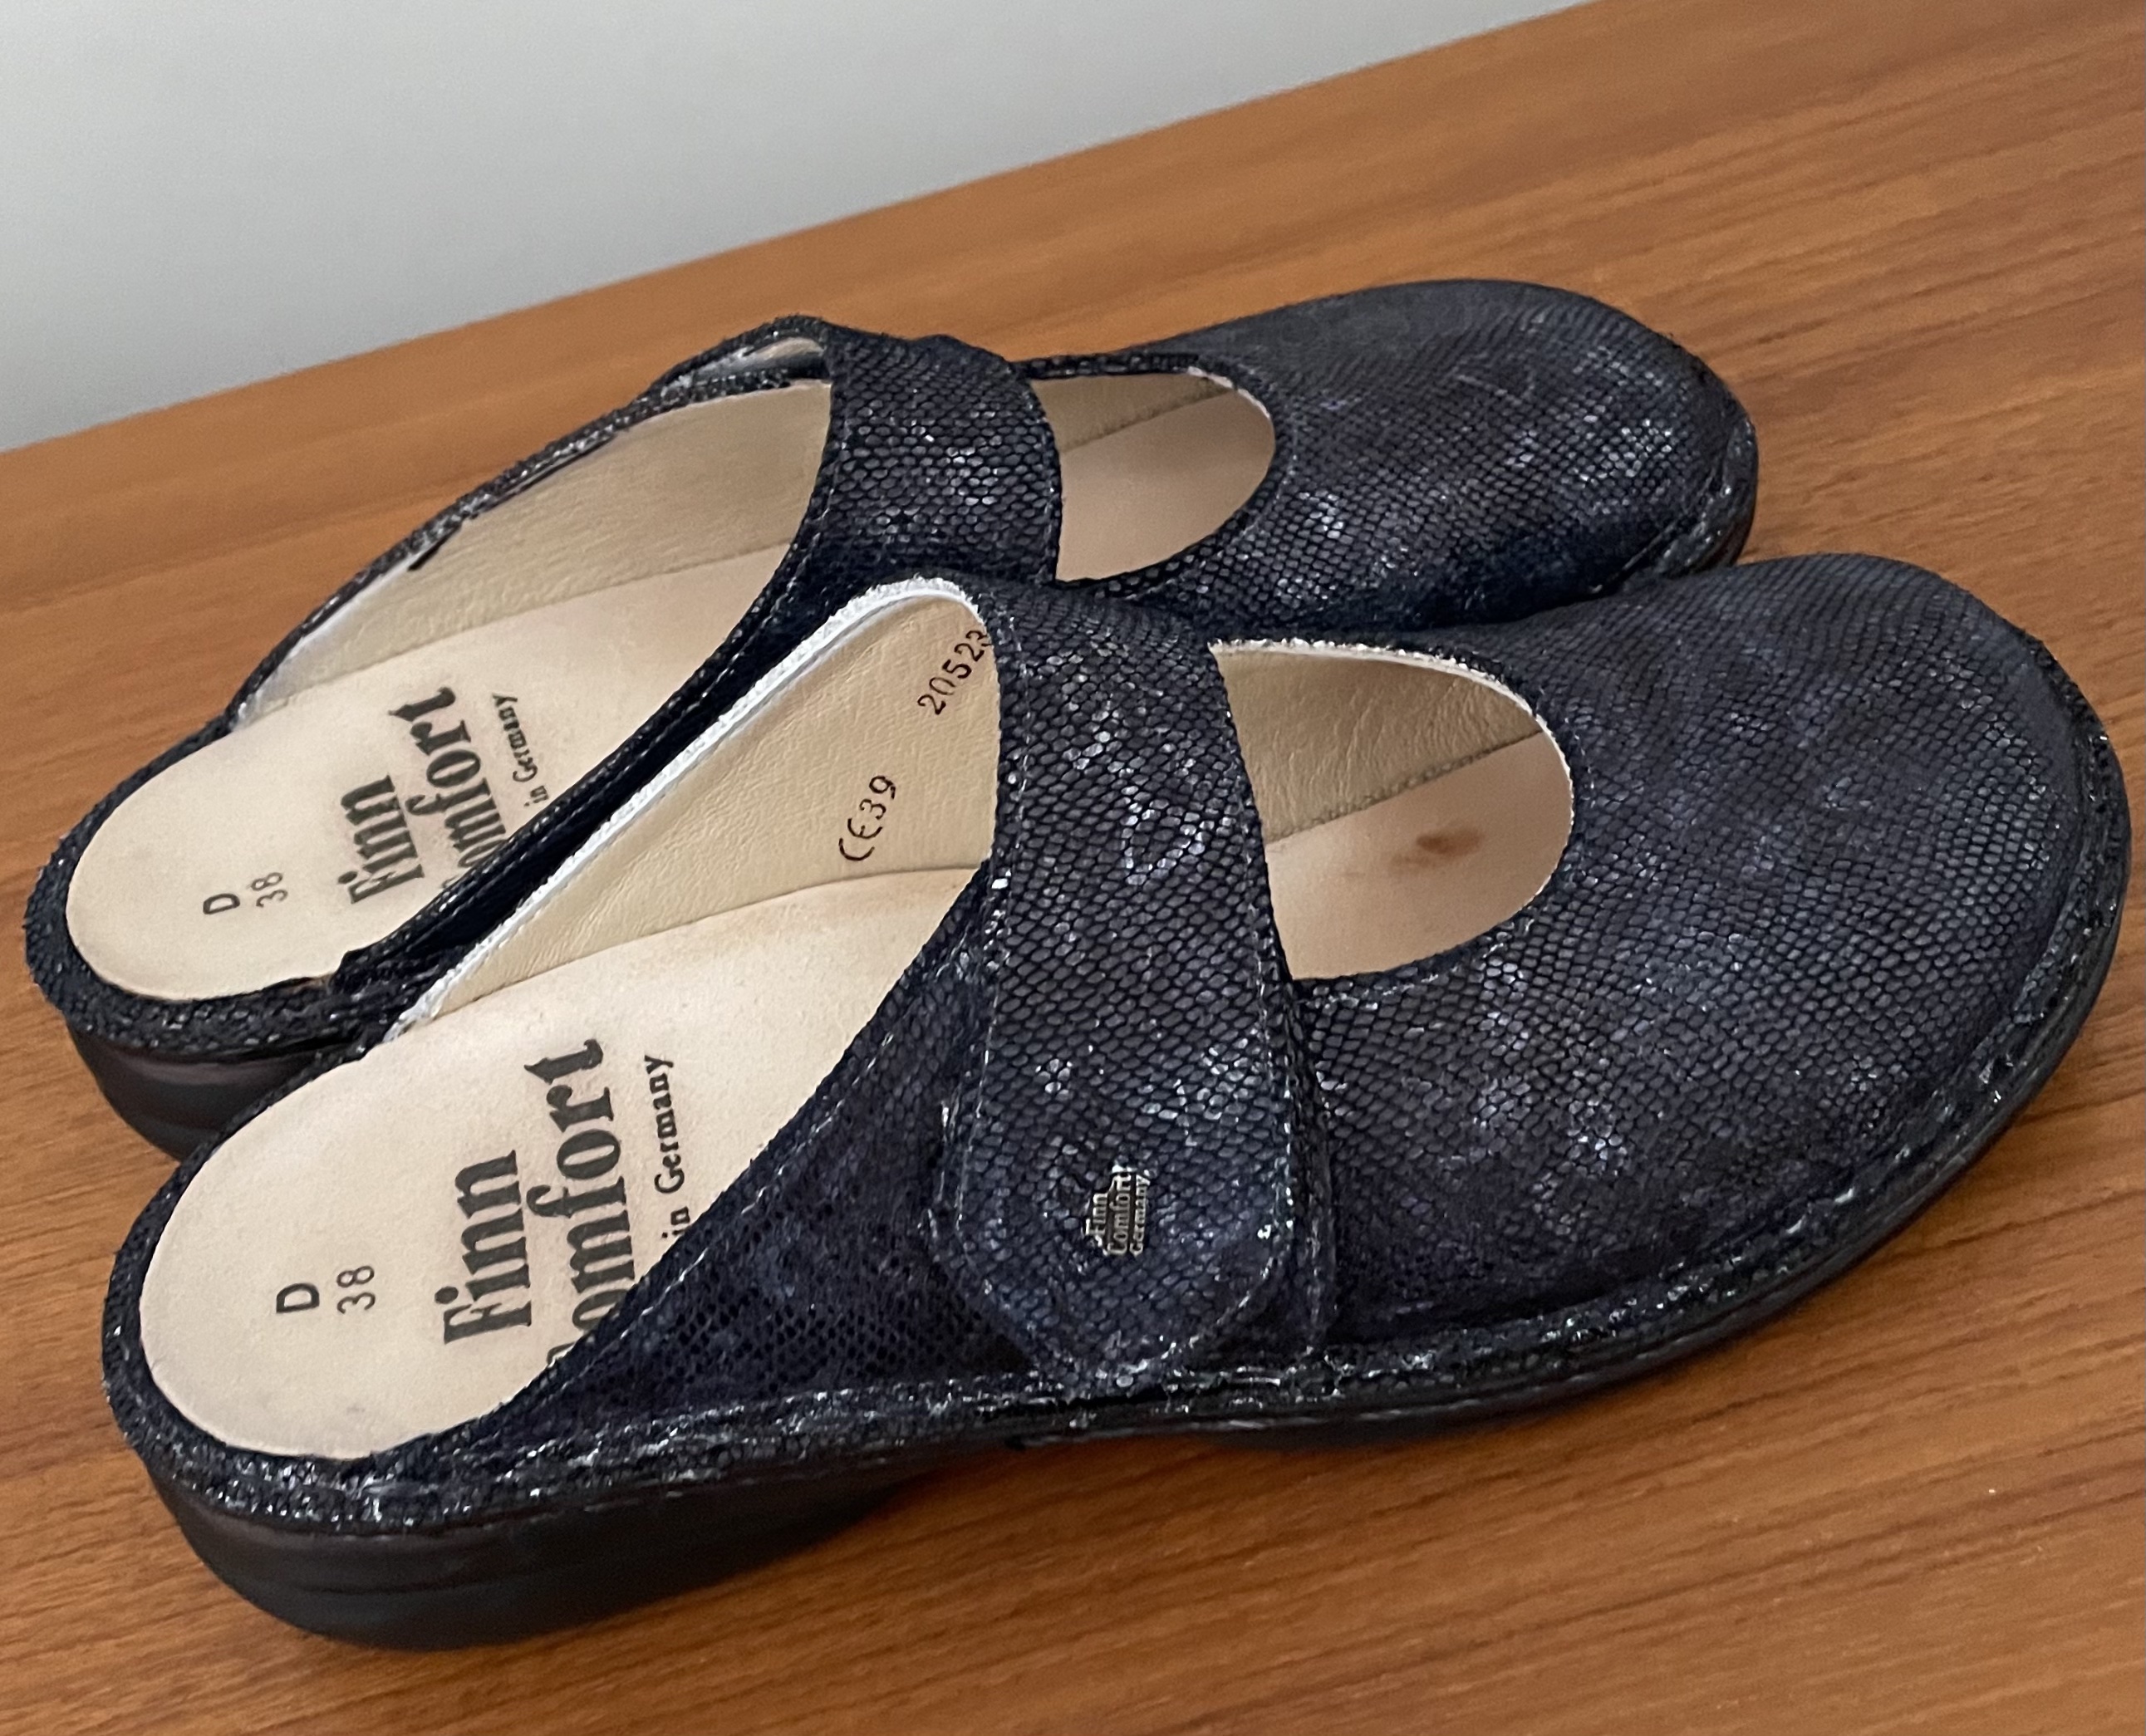
I had difficulty finding one of the textured black leather clogs in my size when I went looking but I found what I hoped would be “greyish” so I ordered a pair. When they arrived, however, they were definitely white.
So I did what any sensible person who knows they can’t wear white shoes during fall and winter (and even spring) would do – I bought a jumbo black permanent Sharpie to change the colour.
White ClogsDarkened Clogs
Worked well, wouldn’t you say? It’s interesting that the patterned elements of the white leather have come through in the darkened clogs. If I didn’t tell you what I’d done and you happened to see me wearing the shoes you’d never question their colour (even if you noticed it). The nice thing about the permanent marker is that it is absorbed by the leather and while it might fade a bit over time, all I have to do is colour them again.
The clogs didn’t actually turn out black but rather an interesting dark blue ink shade.
Two weeks ago I was asked by a local sewing guild to offer a day-long workshop for the members. “What are you wanting to learn?” I asked. “Whatever you’d like to do,” the gal answered. No help whatsoever. I gave her four suggestions – she wanted me to describe them for her in an email, which I did. She emailed me a week later asking me to consider doing heirloom embroidery with the group.
The challenge was this: I spent over an hour online trying to find suitable patterns with a reasonable size front yoke that would work well for displaying heirloom techniques. I could find none.
The Hawaiian muumuu pattern I have used for close to 50 years doesn’t exist any longer, can’t hardly find a photo of it on the internet! It has 5 different sizes (from XS to XL) and I’ve traced the pattern for each size on Swedish cloth so they’re copyable but I don’t want to spend a lot of time at the workshop tracing and adapting the pattern. So I spent a couple of hours earlier this week trying to find a suitable pattern and finally came across this Bowen Dress
Bowen Dress (Peppermint)
It has a yoke that extends into the sleeves (ditch the sleeve ruffles! and add a “cuff” with a lace join and some decorative stitching either side of the join) – the yoke has an overlap that can be worn front or back (I’m eliminating that), the dress is humungous but the fullness can be scaled down easily by narrowing both yoke and skirt. I will remove the button opening at the top and lengthen as well as curve the bottom of the skirt in the front to offset the pulling up by the bust – all straight forward modifications.
I printed out the PDF and assembled the pattern and have marked it up although I haven’t yet traced the modified pattern pieces (I’ll do that later).
What I did was measure the width and depth of the front yoke, cut a piece of white batiste and started working on an heirloom panel.
Heirloom Panel Start
So far I have a centre piece of lace, with tucks, hemstitching, and pin tucks on either side. I plan on extending the heirloom work into the top of the sleeve area, although not all the way to where I’ll add the cuff.
For now, I’ll carry on with the heirloom work. Once I have the yoke panel done, I’ll trace the modified pattern pieces, cut out and sew the upper part of the dress then figure out how narrow and long to make the skirt!
I figured if I was suggesting this pattern as a starting point for an heirloom nightgown, I should try making one myself to see where the pitfalls might be. Once I’ve figured out the modifications I want to make, I’ll prepare instructions for the gals. They can choose to make the dress as is, or to change it in whatever way they wish. I’ll be prepared with recommendations.