This is where I am at the moment – 21 1/2″ x 18″. There are four insert circles, the smaller circles are fused raw edge appliqué. Although I’ve ended up with an even number, the distribution and colour feel comfortable.
I’ve been auditioning fabric for a thin inner border and a wide outer border – no luck. Everything I’ve tried – light fabrics, medium fabrics, dark fabrics – all look wrong. I think the piece is telling me to end here and finish with a facing, not a binding!
The next question is whether to quilt or not. I need to do decorative stitching around the appliqué (and possibly outside the inset circles, as well) – I have to wait until I’ve finished the stitching the appliqué to decide.
The point of this effort was to expand my technical know-how – to see how difficult it was to do an insert circle. Definitely not a beginner skill. After five circles, I’ve decided the sewing works best for me with the background on top, just four pins to hold the 3/6/9/12 positions, sewing slowly, one small section at a time, so I can align the opposing curves as closely as possible and still maintain a 1/4″ seam.
I’m not giving up on this idea – I still want to make a table runner and a quilt using it – it’s a matter of deciding whether to use pieced backgrounds, as I’ve done here, or a subtle print/batik throughout. I have to audition some fabric to see what might work.
Four inset circles with appliqué? This is all an experiment. First, the blue background doesn’t add anything – it shows I want to stay with greys, lights and blacks. That block also shows I don’t want pieced circles – I want to use the large prints from my Kaffe Fasset collection – I like the statement each circle makes.
Second, three of those inset circles are not too bad, one is kind of wonky – an appliqué over the wobble would hide the imperfection. Also the piece is stark without the smaller circles – I can’t see trying to inset them, much too difficult – the bigger the circle the easier to inset, I’m finding. I’ve also been moving the circle around in the square, rather than place it at the centre. Will continue doing that.
I also wanted to sew four blocks together and inset a circle at the intersection – there aren’t enough blocks here to try that. I may have to add another couple, making the piece longer, to see whether I can add an inset circle at the intersection. This has become an experiment going in directions I wasn’t expecting.
I have enough here for a fibre wall piece. I want to replace the blue and see what I have . I haven’t nailed down precisely what I want this to be – stopping at this point and finishing the small piece will let me start over.
I’ve been scouring Pinterest for “circle” and seen a lot of very interesting ideas for quilts made with both insert and appliqué circles. I need to review the images I’ve collected and rethink where I’m trying to go with this project.
I finally finished this quilt this past week. It turned out to be a lot more work than I anticipated. I thought I was making a simple quilt block – square-in-square but that didn’t work out because of the colour flow I was after. In the end I had to construct each triangle element from scratch! Which took a lot longer.
The back took a lot of “walking around” time – I just couldn’t settle on an idea. One Tuesday evening when my friend Neha was here sewing with me (that’s another story) I made up five square in square blocks from leftover bits – that broke the log-jam and I was able to sort out a 15″ strip to insert in the backing fabric.
Then there was the matter of layout – I sewed most of the dark blocks together to begin with but then had to disassemble the partial panel because the colour flow wasn’t working. To get a decent colour flow, I ended up pinning triangles, and trapezoid pieces on top of the developing panel on a design wall I improvised in order to get a clearer colour placement. Then I had to take blocks apart to insert the new required piece.
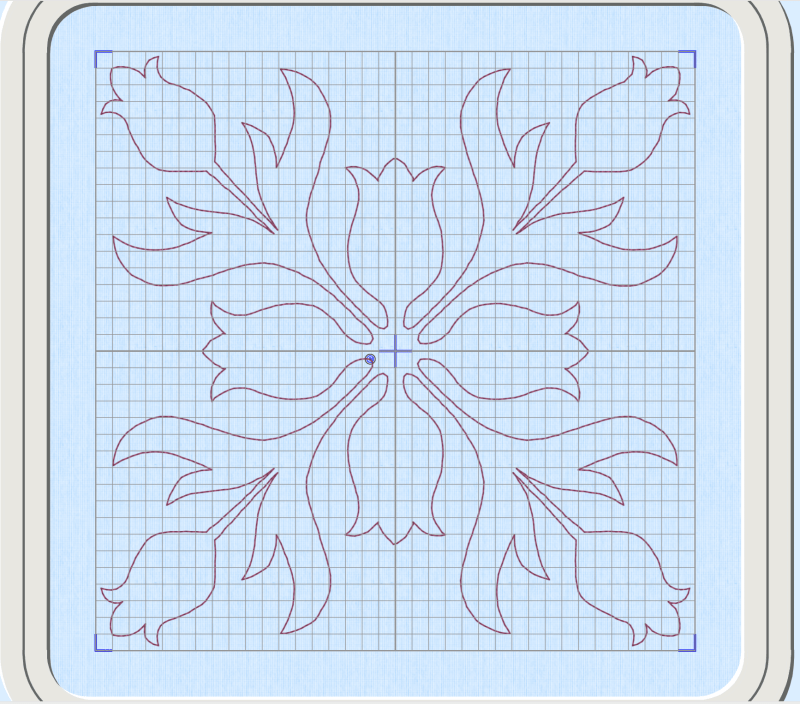
I put the layers together. I created two possible block patterns using my out-of-date Pfaff Premier 2+ software (it still runs on my Mac but not for much longer I’m expecting – then I don’t know what I’ll do, because the cost of a subscription for the software on MySewnet is crazy expensive!):
Block 1Block 2
I chose Block 1 after doing a test run with some muslin and batting. I wanted the simplicity of the curves in the first design; I will use the Block 2 design on another quilt sometime.
Because the blocks were placed in the quilt on-point, I had to quilt on the diagonal. When all 44 blocks were filled in, I still had 18 triangle half blocks along the sides with 2 quarter blocks at one end to complete the quilt.
I also changed thread colour to match the colour gradation – I stitched the dark corner with an almost black variegated thread, the top left corner I quilted using white; in between I used three different grey variegated threads to blend with the changing colour. I used a light variegated grey on the back throughout.
I used the off-cuts from the backing for binding – which allowed me to match up the design on the back. I finally added a label.
I finished yesterday by hand basting a hanging sleeve at the top so I can display the quilt. (I still have 8 quilts that need hanging sleeves – gotta get those done over the weekend.)
Been gone a month – I’ve been busy sewing and knitting, and engaged in my daily/weekly routine but for some reason I haven’t managed to sit at the computer and describe what I’ve been up to. So let’s get to it.
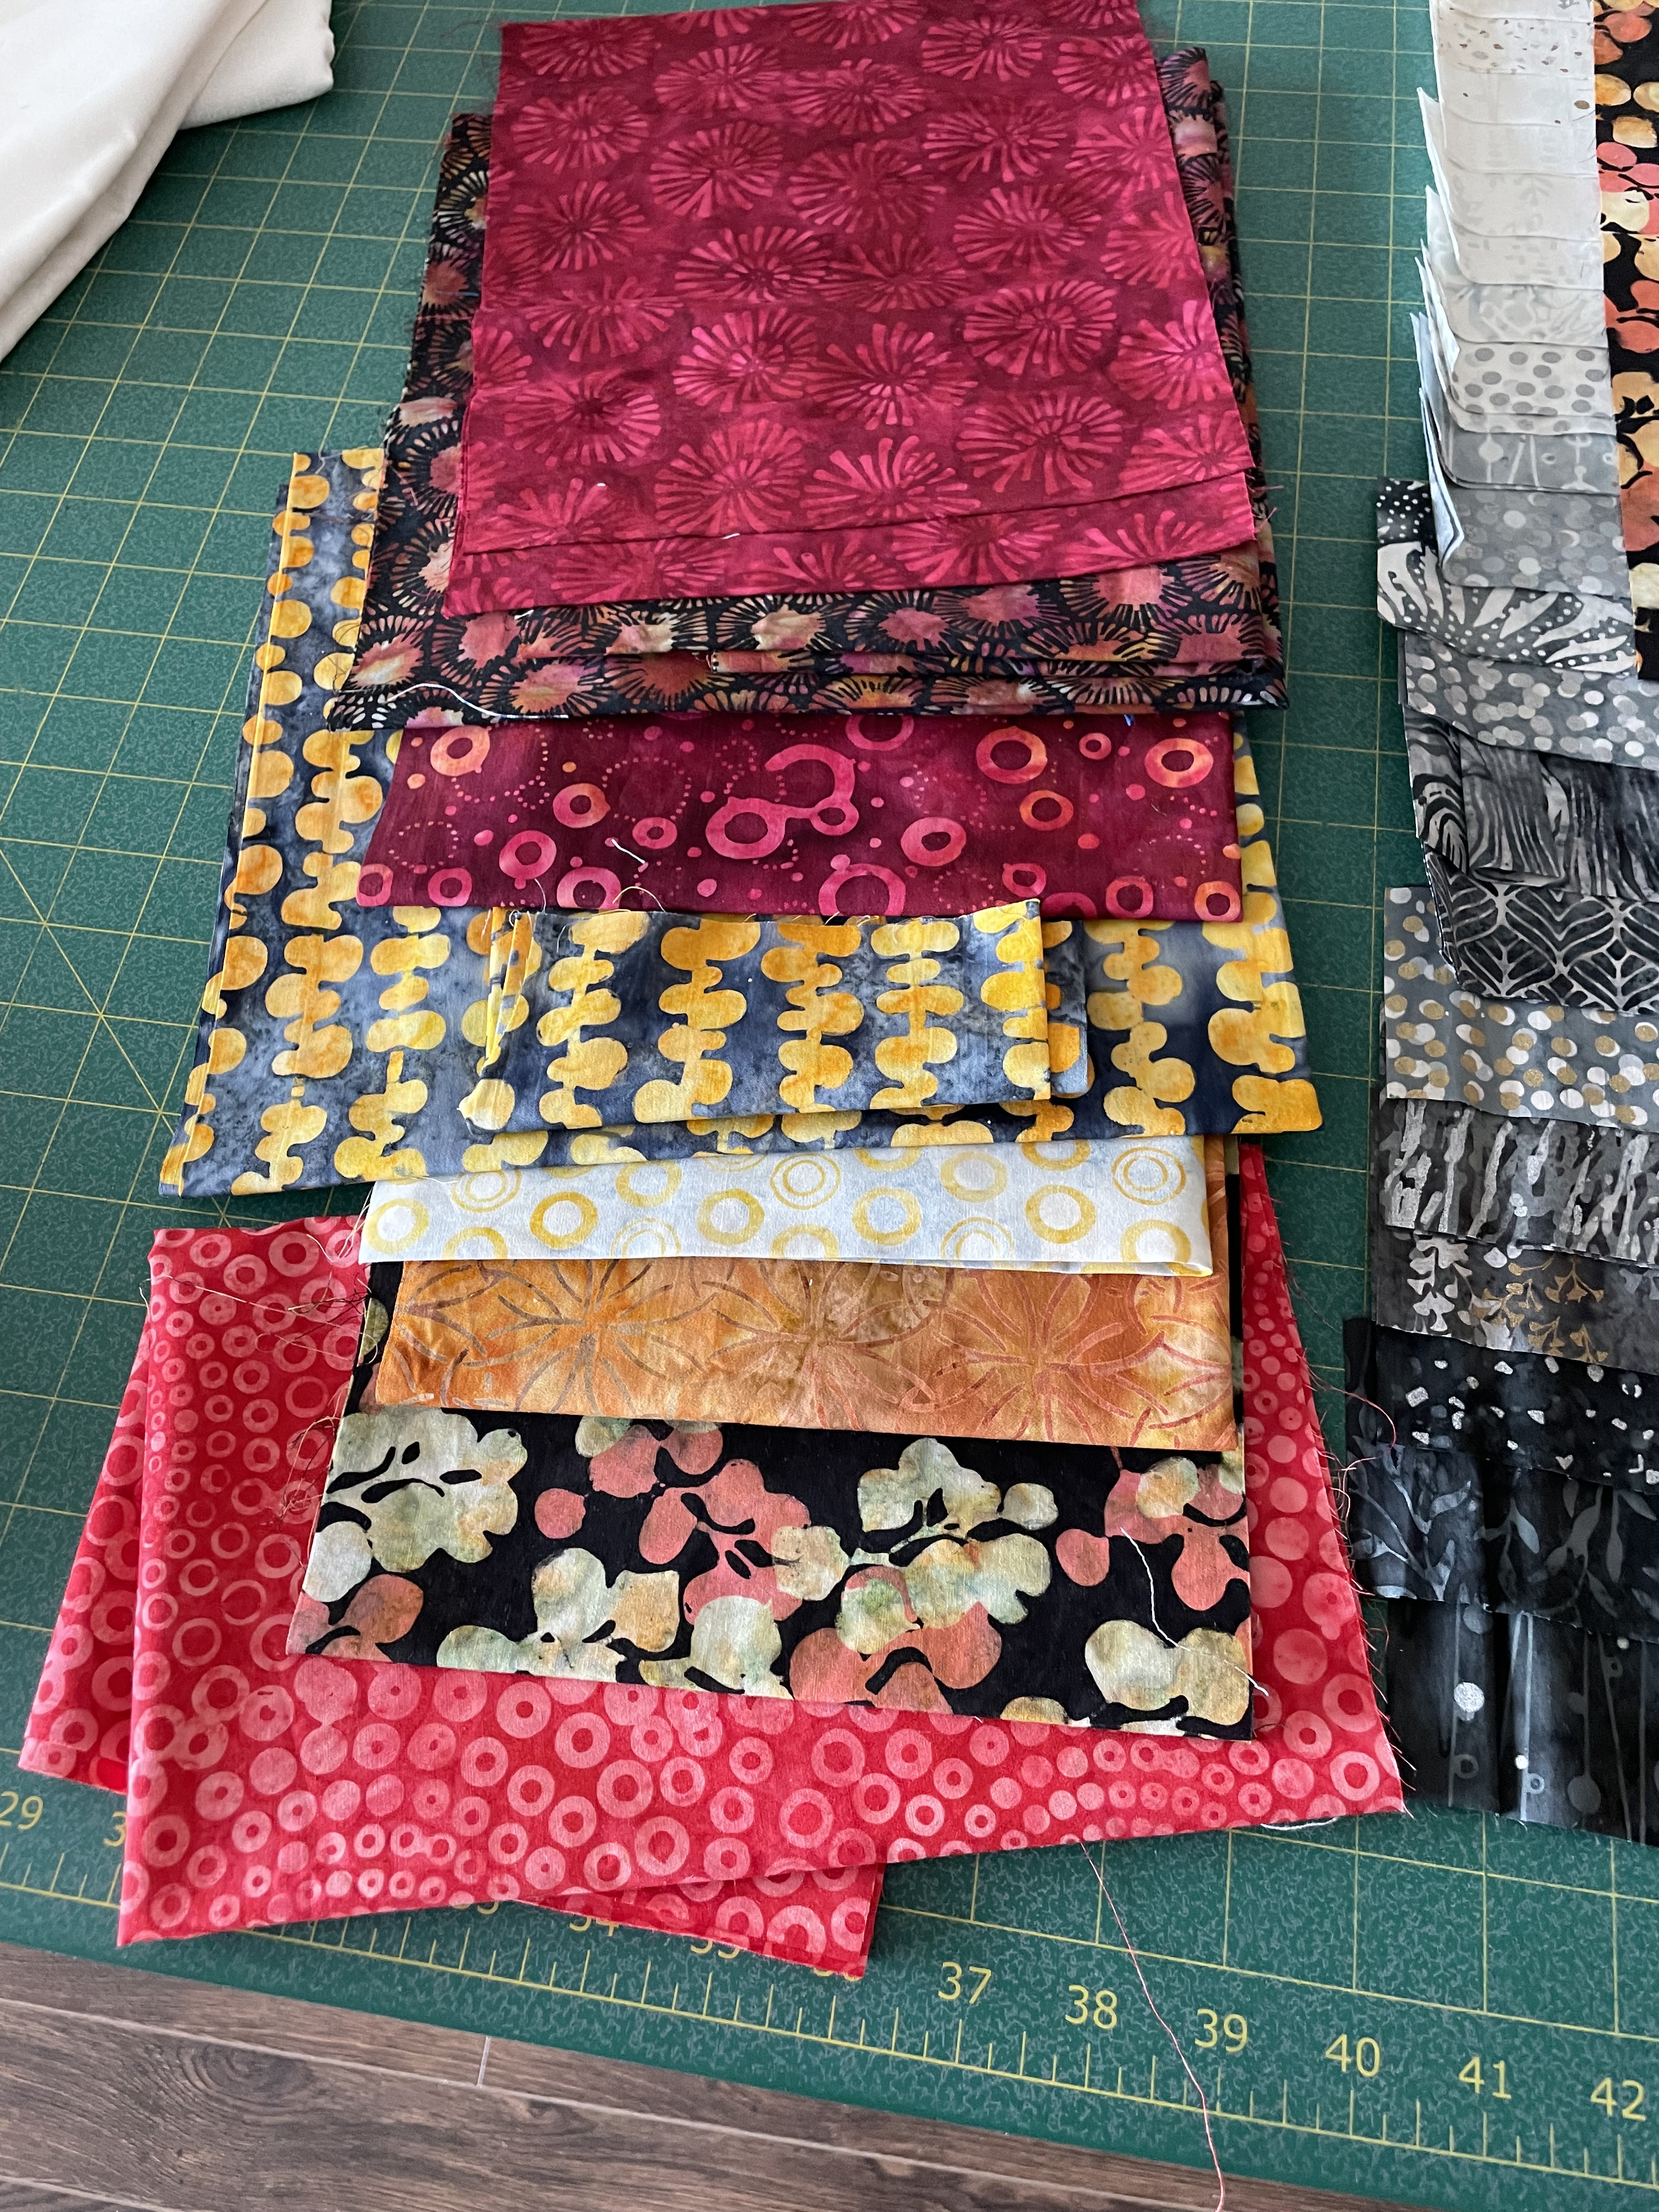
Mid August, I wanted to start a new quilt. I looked through my fabric stash and decided to use a jelly roll I’ve had for a couple of years.
Jellyroll Strips Laid OutContrast FabricsContrast Fabric With JellyrollSquares In Squares
The jellyroll fabrics (20 strips) ranged from black to white with many gradations of grey. Dull on its own – I decided I needed some strong contrasts. Because the strips were batik, I selected bright batik scraps to contrast with the black/white. I decided to make “square in square” blocks, cut them into triangles on the diagonal, then arranged them in squares again. All is fine, until I try arranging the resulting squares into a larger array only to end up with a hodgepodge I wasn’t happy with.
First Attempt
There’s a hint of a gradation from black to white but it doesn’t work overall because each of my blocks has light/medium/dark elements and to get a good colour flow I need some blocks that are very dark and some that are completely white. To make that happen I had to make many more blocks from scratch.
Second Array
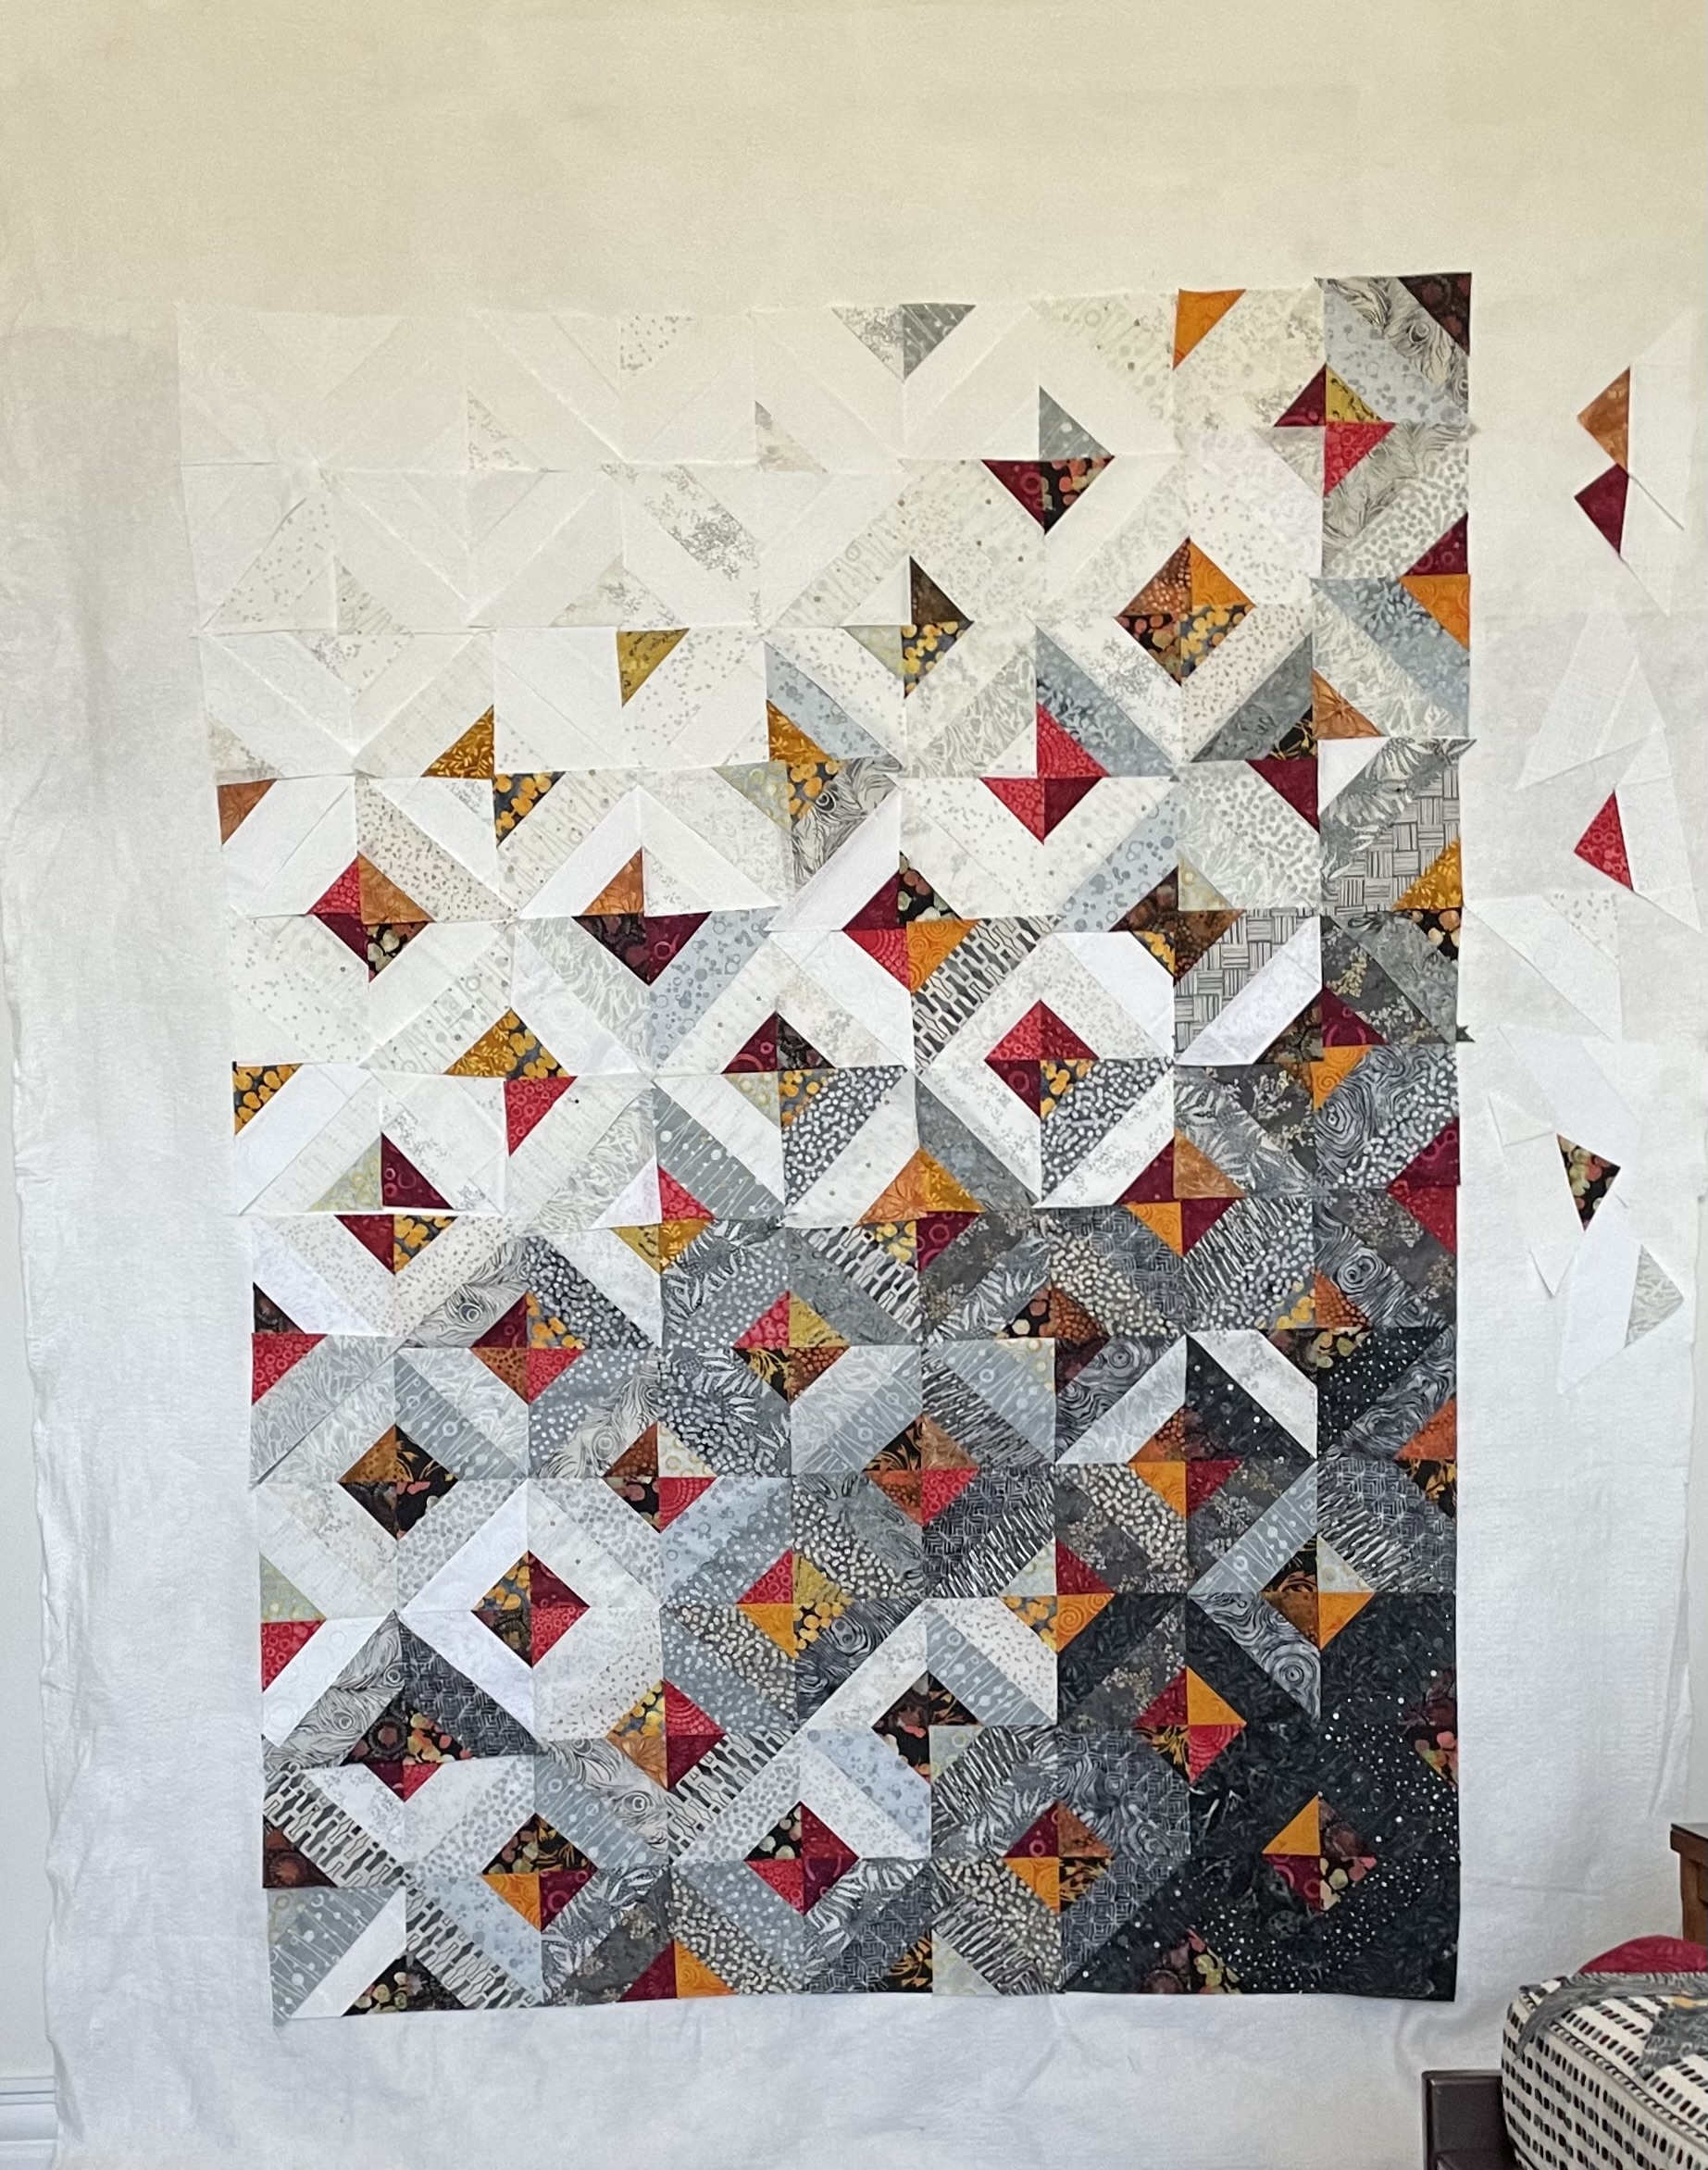
This time, I established a dark corner and a light corner and tried filling in. I was working on my cutting table, rather than on my floor beside the cutting table as I usually do, because I’d injured my right knee and couldn’t get up and down. It didn’t occur to me at that moment that I could set up a design wall using a length of batting hung from a rod in my spare room (in front of the closet door) to hold the triangles/squares to audition placement – that came later.
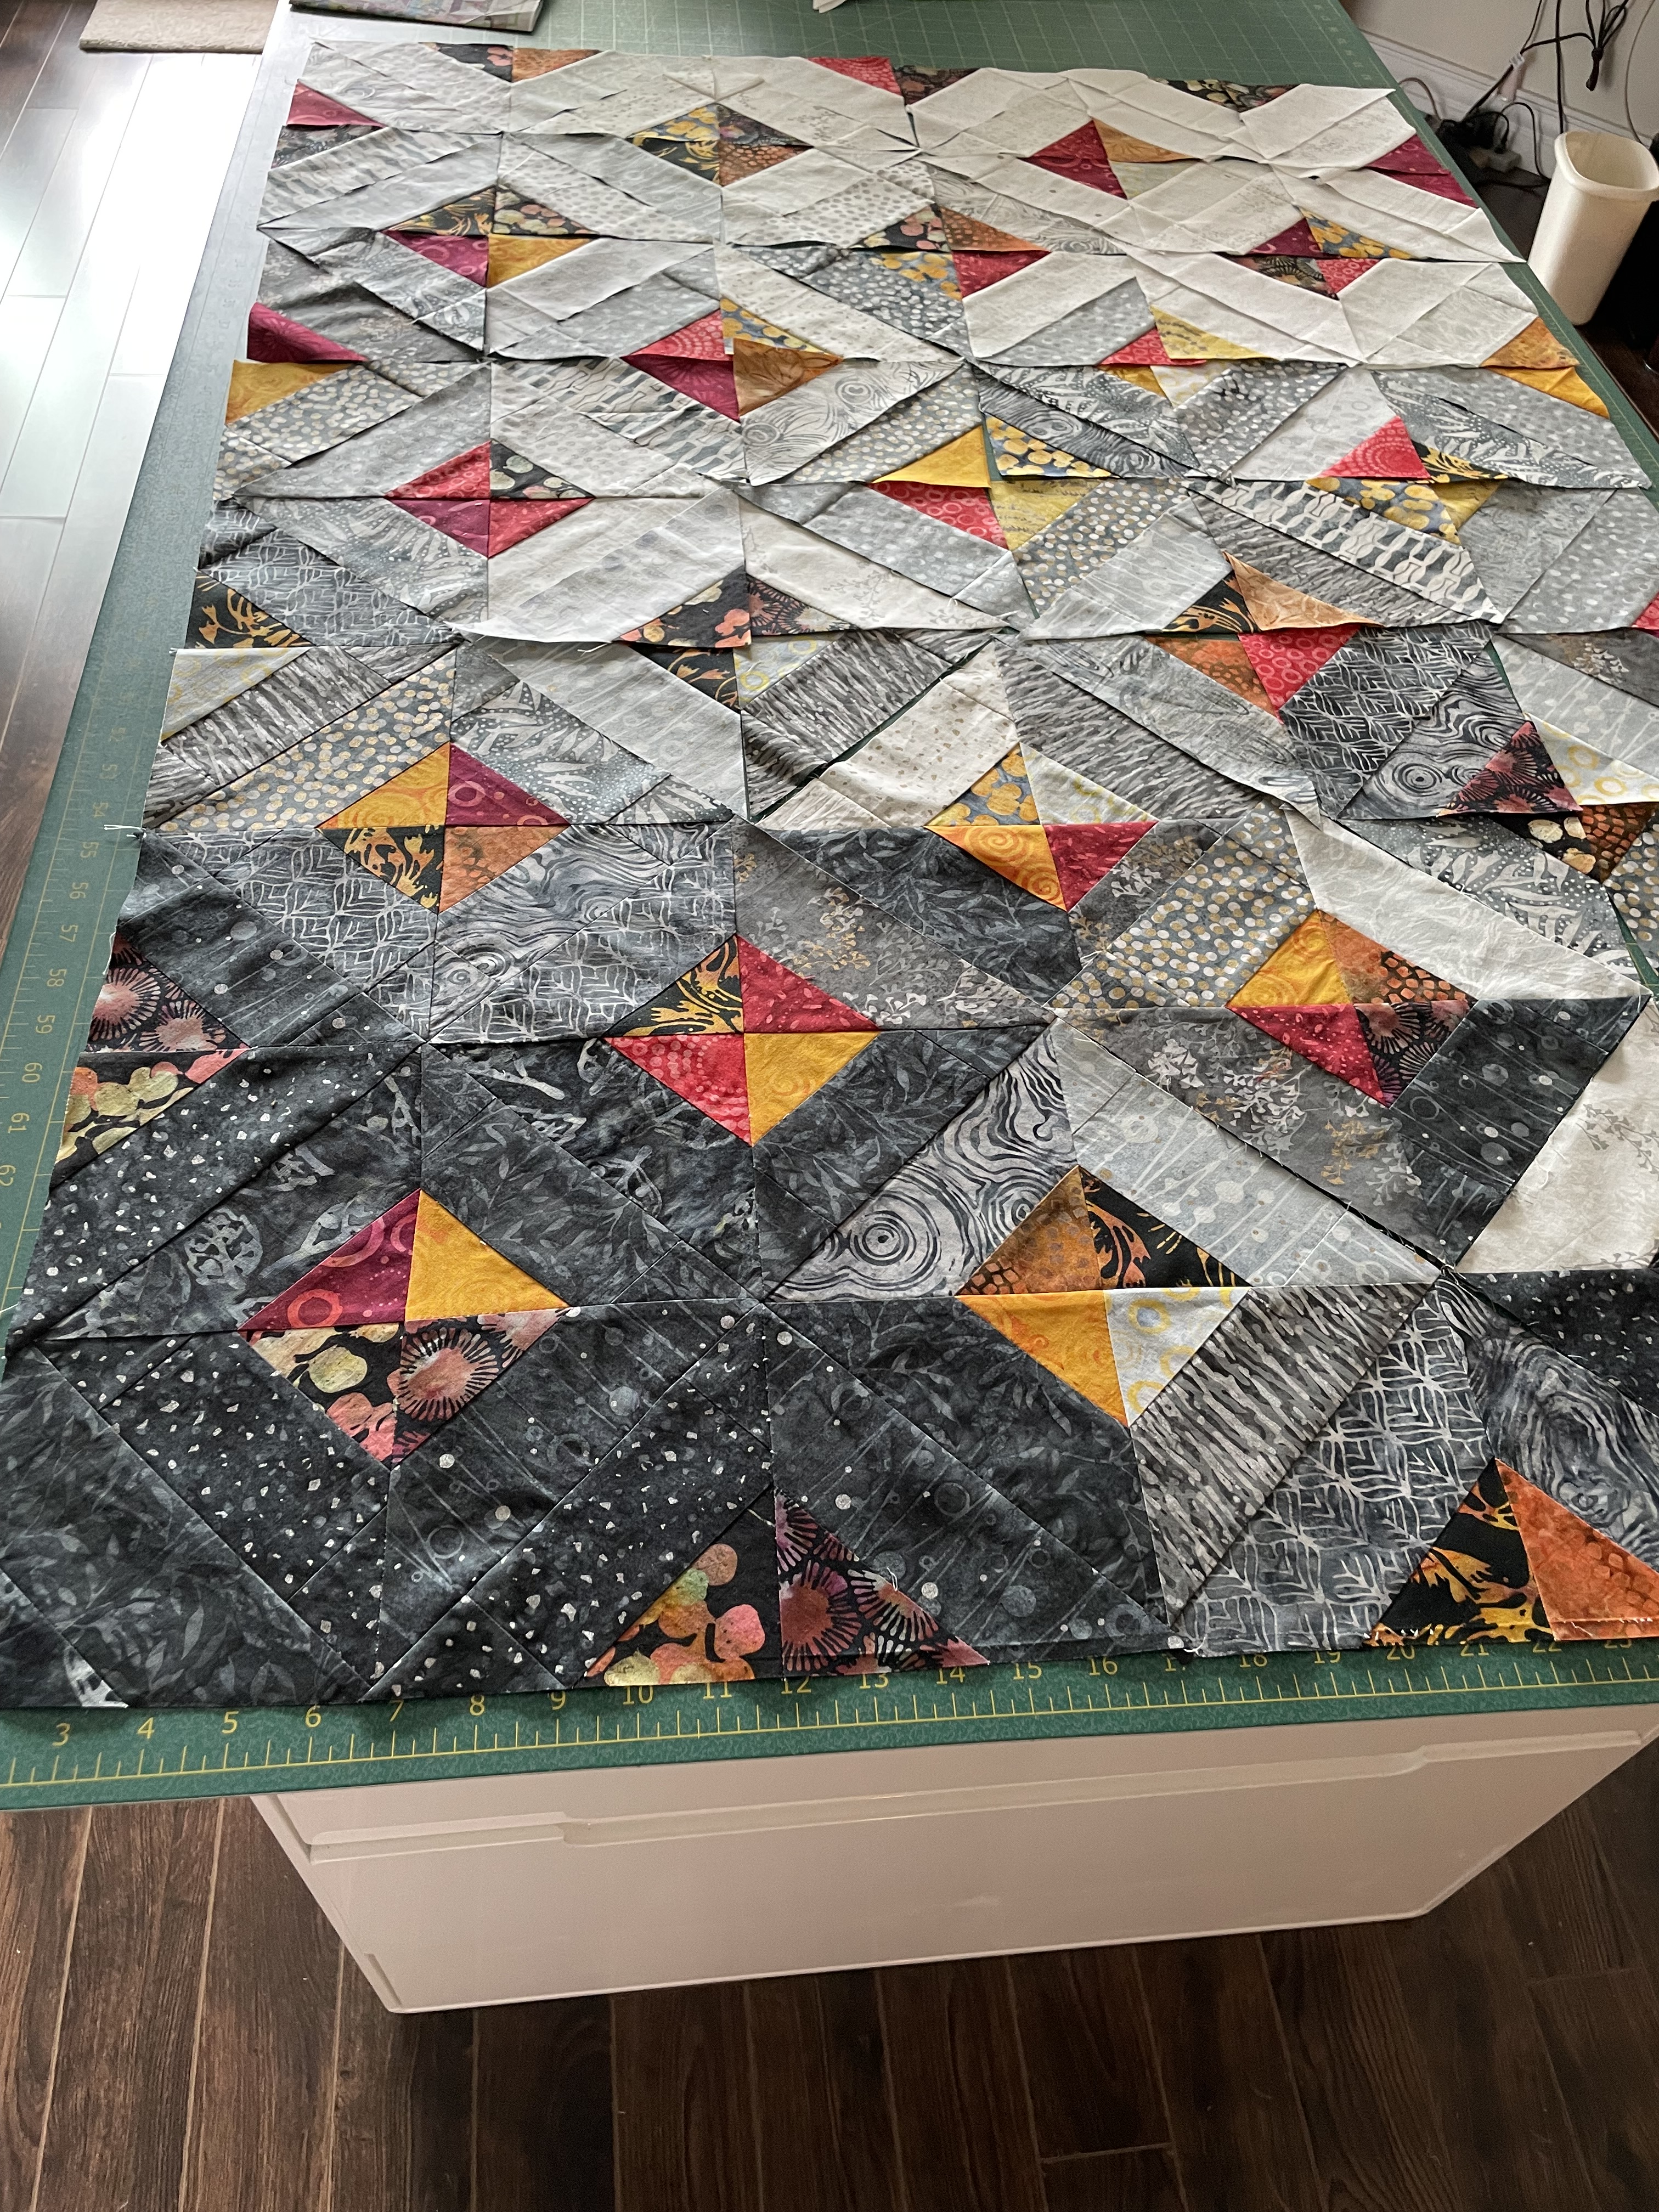
So I filled up my cutting table with a layout I thought would be the darker bottom half of the quilt top. I made the mistake of actually sewing these blocks together into a 6×12 array. I was planning on filling the cutting table again this time with the top half but then I couldn’t see what I’d already constructed. This was when I set up a design wall:
Array #3
I placed the assembled bottom half of the panel at the bottom of the wall and started laying out more blocks. Two things were immediately obvious: 1. I didn’t have enough “black” extending from the lower right corner and 2. the grey extended too far across in the middle of the emerging piece. I’d also run out of triangles at this point and needed to make another 60 or so.
By this time I had stopped making squares in squares and instead I cut trapezoids from the jellyroll strips (I had to open the second package I had on hand) as well as triangles from the contrast fabrics. I’d figured out that working with reassembled squares wasn’t helpful – I was better off constructing just triangles where I could control the colours I was juxtaposing and had more freedom when placing them.
Array #4
Close, I thought but I still wasn’t completely happy with the colour flow so I played with it over the next few days – shifting blocks in the top half, and pinning other triangles over existing triangles in the sewn bottom portion.
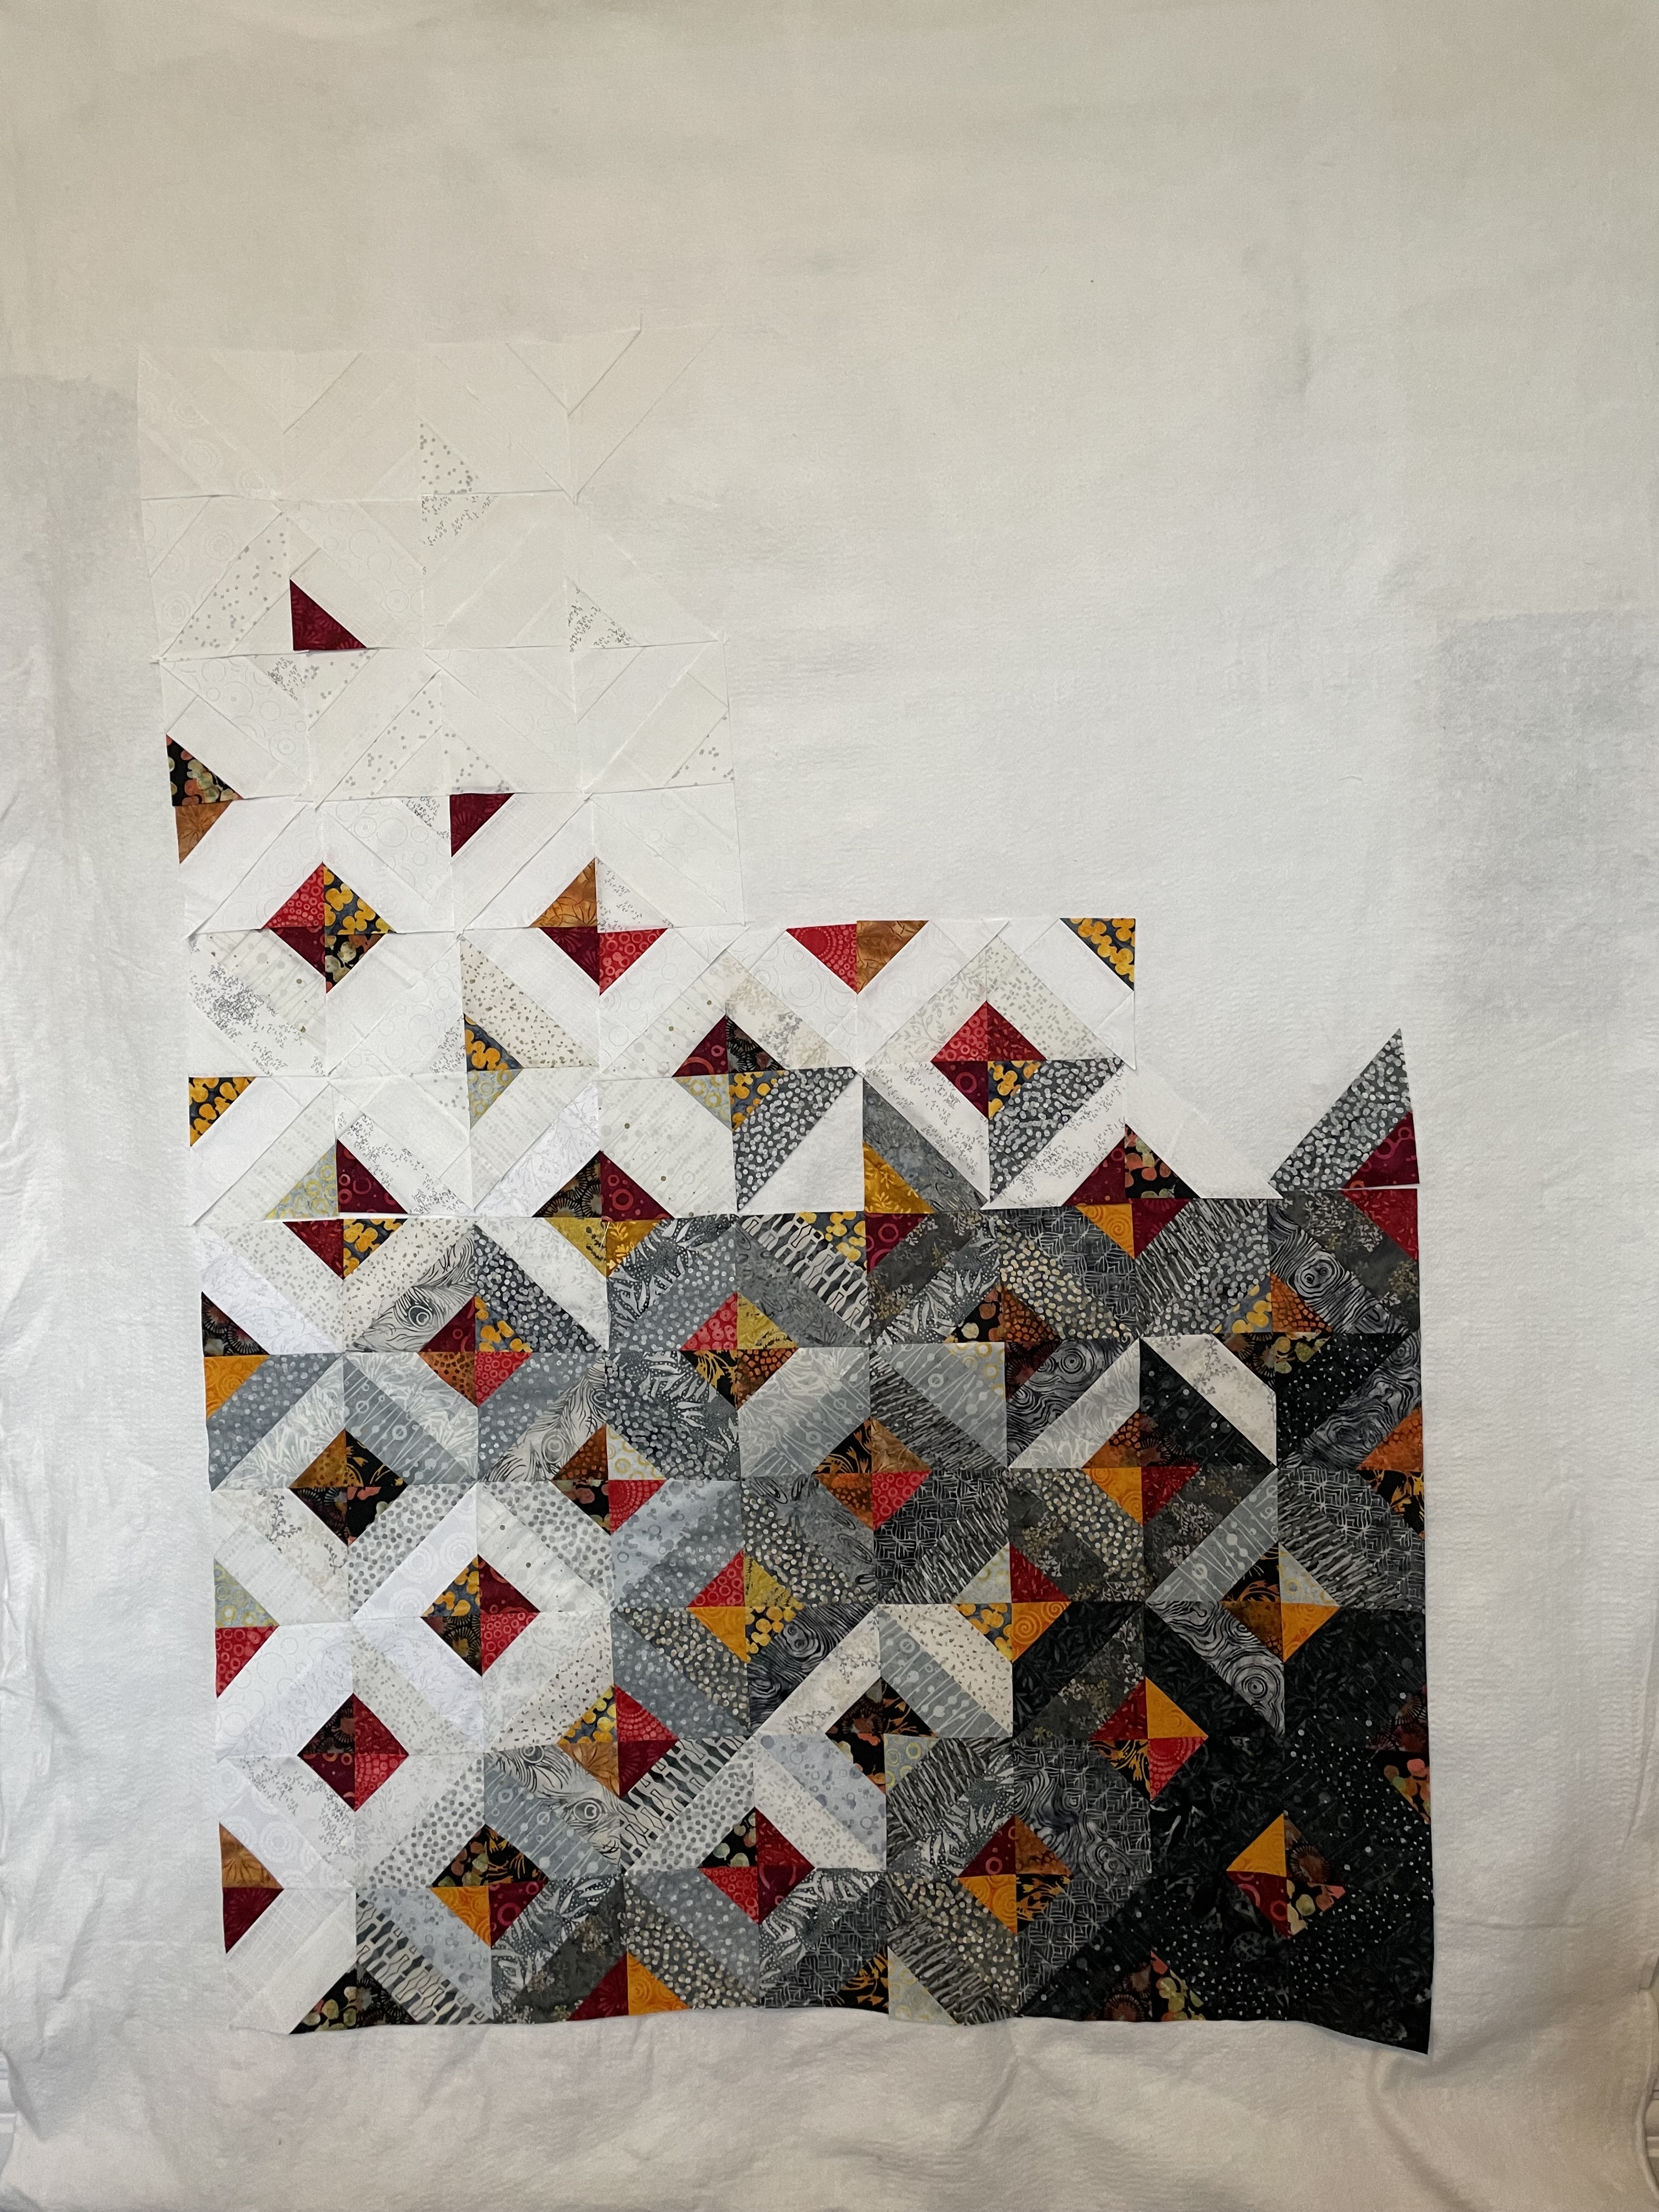
Final Array
It took a couple of days looking at the design wall and moving and pinning elements until I was finally satisfied with the look of my panel. Yesterday, I took a photo, then very carefully stacked the pieces in the top six rows, numbering each stack so I knew the order and orientation of the pieces in each stack. Then I carefully repinned and labelled the changes I’d made to the bottom panel – knowing I would have to take much of it apart in order to get the arrangement I wanted.
It’s taken the better part of two days to reconstruct the bottom half of the quilt top:
Reassembling In ProgressFinished Bottom Portion
Now I have the bottom portion of the array back together – many of the changes were subtle ones, mainly involving extending the darker batiks further across the panel, limiting the lighter, brighter trapezoids and triangles until the mid area.
Tomorrow I’ll start sewing the six top stacks together, row by row – it won’t take long because I’m not having to carefully unstitch many interlocked seams!
As you can gather, this whole process would have been much easier had I planned out on graph paper what I was thinking about, but that’s not how I seem to work. I much prefer just starting and building and designing as the project unfolds. I find improvising so much more interesting because I have no idea where I’m going to end up. Always a surprise and satisfying. It’s how I write as well – just get some words on the screen and see where they take me. I never know what I’m writing about until I get well into something and an ending emerges. That’s my creative process.
I have no idea what I’m going to do with the back – do I want to make another 36 of these triangle elements for an insert or do I want to try something else – still thinking about that.
It’s taken the entire day to piece this quilt back using the extra blocks, small scraps and other leftover fabric all because I didn’t have a backing fabric on hand. Looking at the panel I almost see it as another quilt – not quite, though, because the left side has a rather boring patch right in the middle. That was where I started piecing, trying to use the larger leftover pieces and wasn’t being concerned about placement or size. In fact, I was simply trying to create a 26″ x 72″ panel to use on the back and didn’t think I could actually be making a second separate quilt!
This is just the backing for the “boomerang” quilt (I don’t have a name for it, yet). Now to cut some batting, layer the three parts, and pin them together. I haven’t yet set up an embroidery for quilting the quilt – that’ll be tomorrow’s part of the project.
A blizzard outside today, so I’ve been sewing all morning. I just completed the quilt top with the pieced inner sashing and the border. I like how the border print brings the whole project together. There’s now enough colour movement and border fabric elements within the panel to invite the eye to look around.
I added the narrow sashing to the border before applying the border to the panel so I could do a single mitre including the narrow sashing – easier than mitring the two elements separately and trying to get them lined up.
Now I have to come up with an idea for the back. I have quite a few leftover blocks (with boomerang) and some rectangles I assembled from leftover triangles along with scraps from the blues. I don’t have any “backing” fabric, per se; my plan is to use the scraps to make as large a panel as I can, then fill in with something that goes with the blues in the top.
I liked the simplicity of the design, although I thought I’d try using print fabrics to create the blocks. I also didn’t want a square, a good lap quilt has to be a rectangle so it covers the body as well as the feet when you use it, even if it’s created as an art piece intended for hanging!
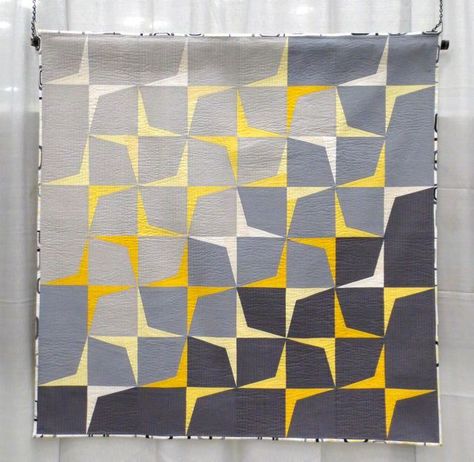
So from the beginning I was using this “trajectory” quilt for inspiration not to duplicate it. Also it’s a paper pieced work – I hate paper piecing so I constructed a set of templates (based on a 6 1/2″ block) to cut my block elements.
Then I went through the fabrics in my stash – came up with several shades of blue but nothing to contrast with it so I went shopping.
The FabricsIn Black/White
In the end I came up with more blue and some yellow/chartreuse pieces.
I cut the block pieces, matched the lighter yellows to the softer blues, the darker chartreuse with the stronger prints and navy pieces.
The Block Pieces Ready to Assemble
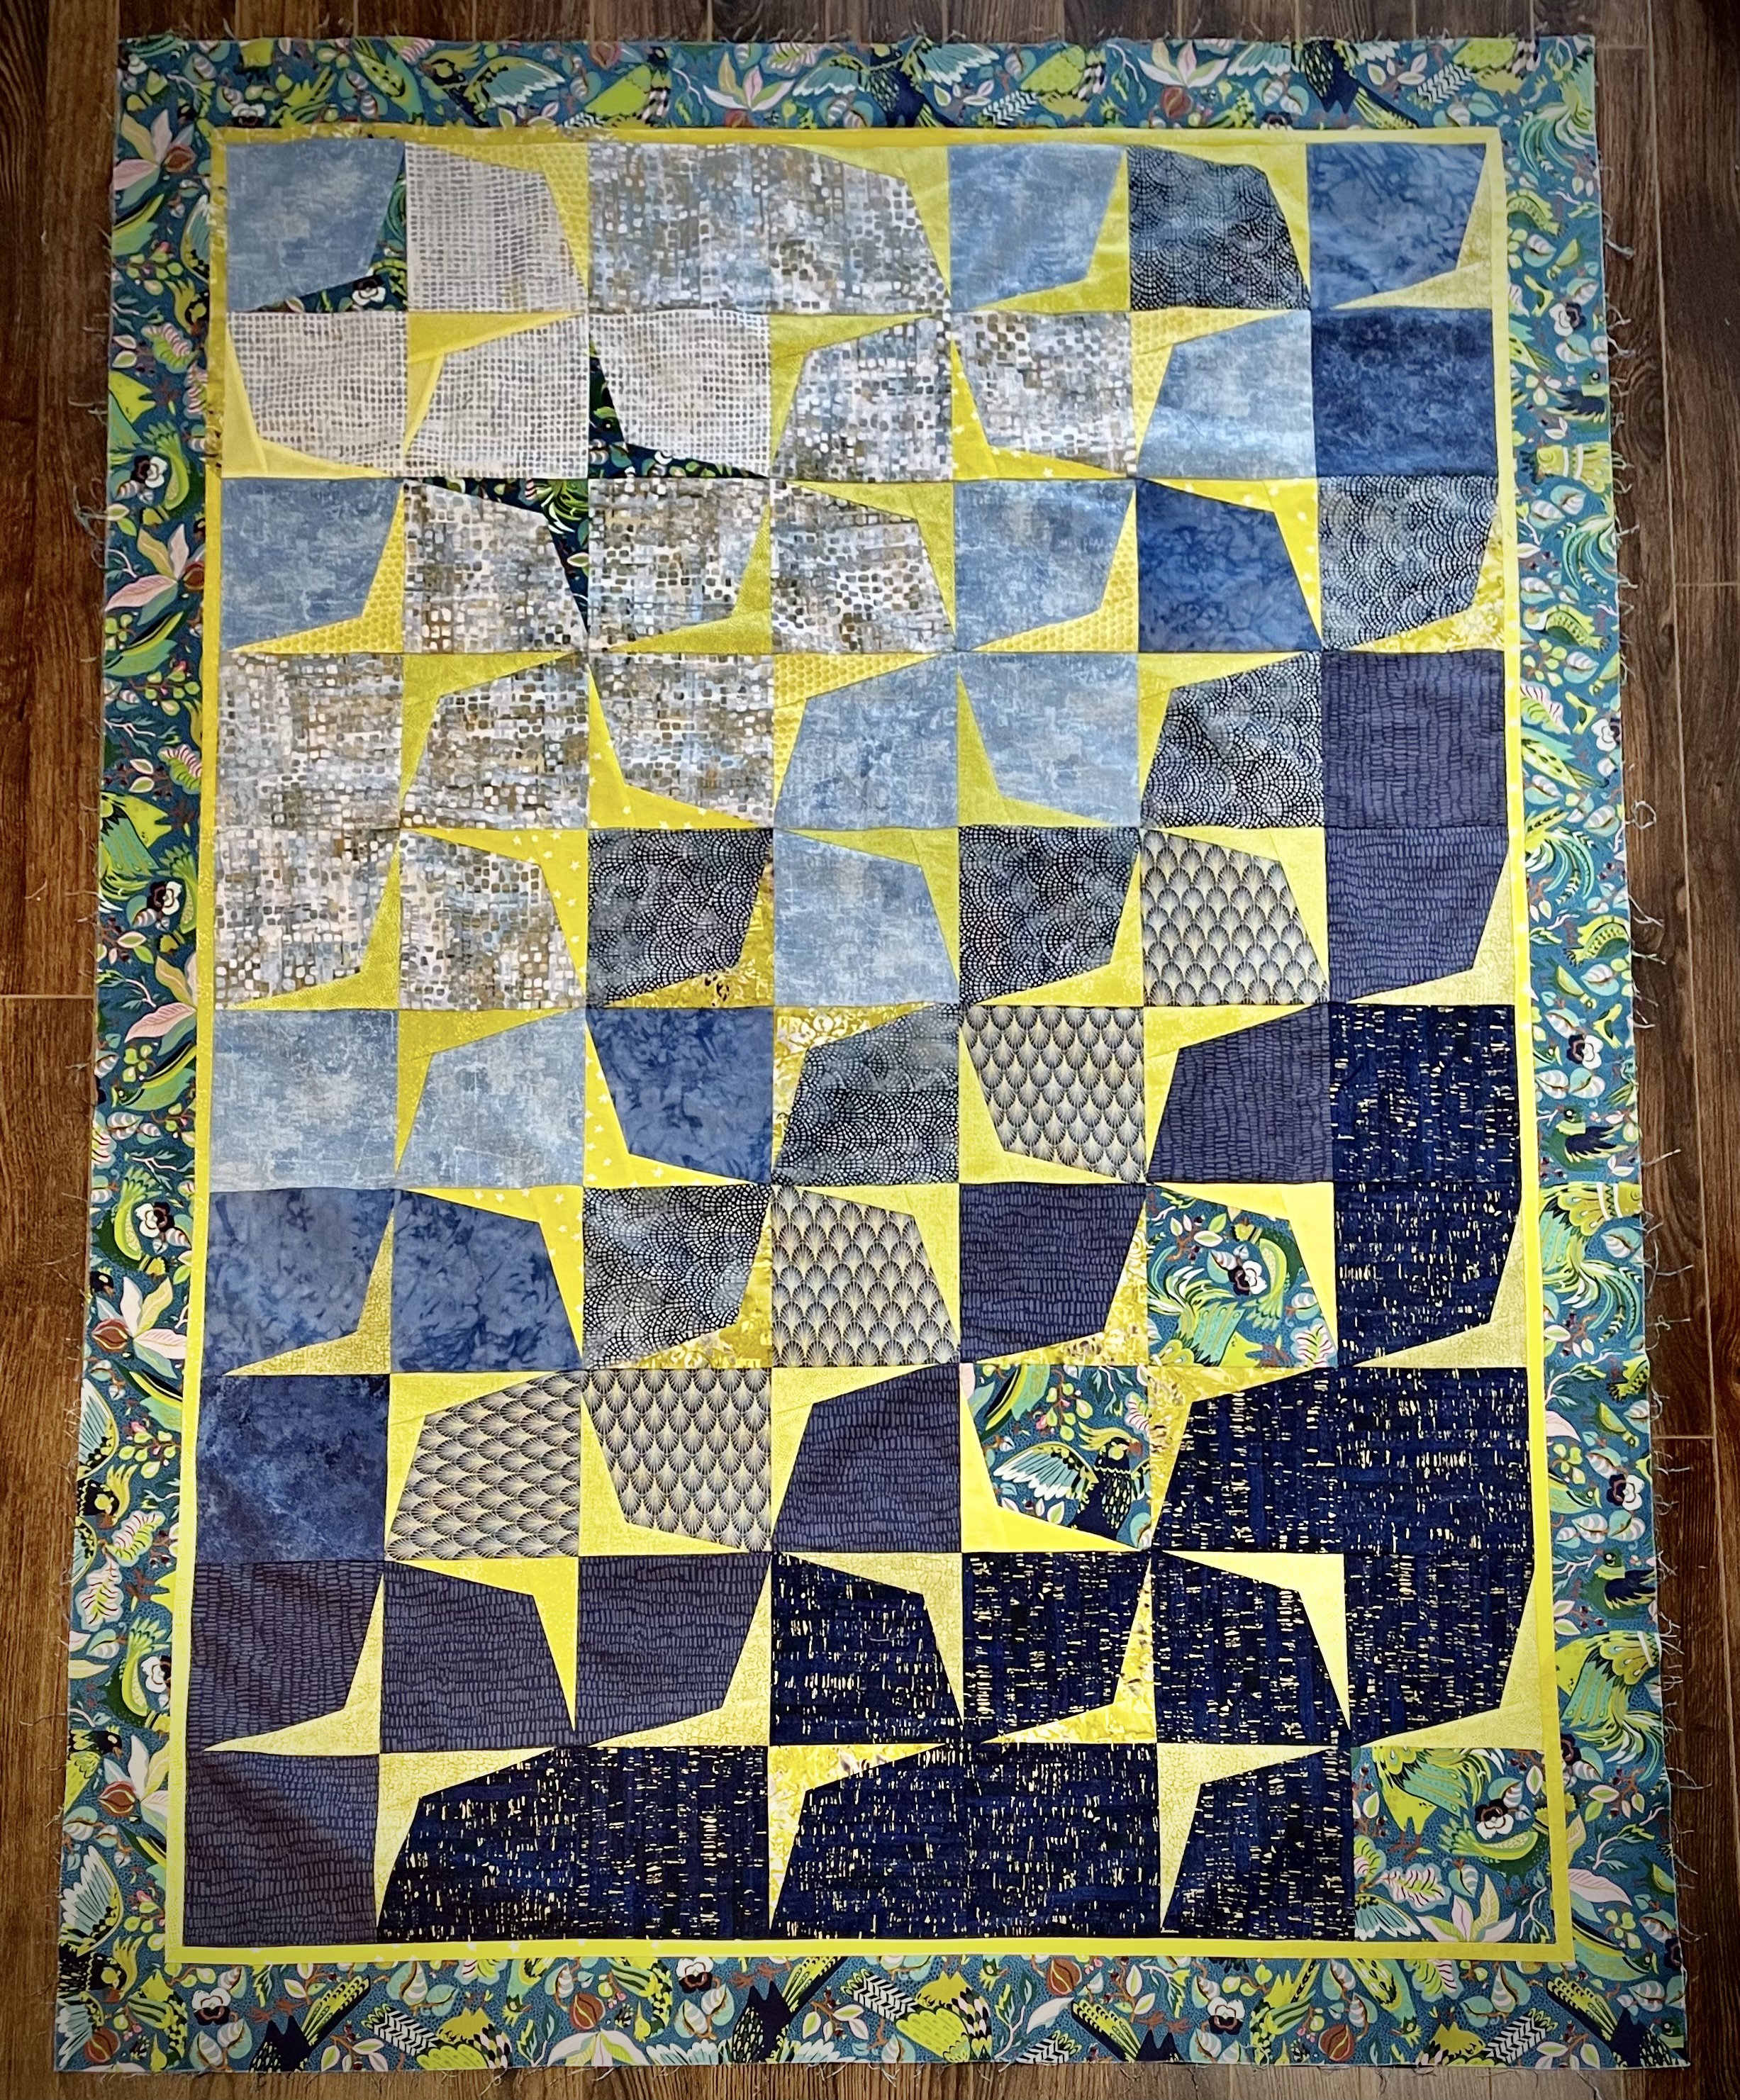
With the blocks sewn I laid them out – the challenge was establishing a gradient within a rectangle – not as easy as you’d think.
First Layout
Deadly!
My pale blues read beige and I probably should have reversed the pairings using the brightest yellows with the navy elements; the darker chartreuse with the pale elements – in any case an acceptable quilt but nothing outstanding about it. Here’s where I realized it’s much easier to make quilts that “pop” with strong, large print or batik fabrics!
I had bought a yard of a much larger print fabric which tied the blues/yellows, intending to use it for the border, but I decided I needed to incorporate some into the panel.
I made several new blocks using that fabric in the corner.
Second Layout
Not much better. You barely notice the large print. Nothing is moving your eye around the panel and the upper left corner just sits there.
I thought about my problem for four days while I sick with the norovirus and decided I needed both less and more of the larger print fabric. I made some new blocks this morning.
Third Layout
In addition to the few hints of large print, I took away several of the very pale blocks, replacing them with darker elements, I also moved other blocks around mixing up the array quite a bit more. After looking at this arrangement for a while I decided I could finally start sewing rows.
Final Layout / Partially Assembled
Still not one of my better quilts but at least I can live with this. When the panel is assembled, my intention is to insert a narrow gradient sashing (maybe 3/8″) using the yellow/chartreuse fabrics, ending with a 3 1/2″ border using the large print. Who knows, I may even decide to add some appliqué, although I have no idea what that would be – I can certainly break up those deadly light fabrics with small large print circles….
The original inspiration piece worked for a number of reasons: first the quilter used solids (four yellows, three greys), easier to match up than prints; she worked in an 8×8 square array which allowed her to establish a symmetry not possible with 7×10. (My reason for choosing 7×10 instead of 8×11 had to do with the finished size of the panel and with a wide border ending up too large for a lap quilt.)
While the centre panel is settled, the sashing/border is not (and I’ve not yet given any thought to the quilt back). There’s still a lot of sorting out to be done here.
I started playing with this quilt on Oct 12. Ten/eleven weeks ago. I just finished hand stitching the hidden binding on the back! Finally – my Christmas day project – to get this quilt done.
Quilt TopQuilt Back
Once I had the quilt top assembled I found I could move along again. I made the decision to use the Holtz fabric intact on the back rather than cut it up. I had to incorporate the two pieces I had in order to have enough to complete the back – that’s even after inserting a 14″ strip I assembled from bits and pieces leftover from the quilt top – a much better use of that very busy fabric!
I would have completed the quilt with a conventional binding, except I didn’t have enough of the bronze cork fabric to do that. So in the end I used the leftover strips from the backing to make a hidden binding.
I’m glad the quilt is finally completed. I kept avoiding it because I knew I wasn’t going to be happy with the finished project – nothing there that pops out to say “notice me!”. In fact, I may decided to showcase the quilt back, which I think is much more interesting, in upcoming exhibitions.
So on to the next project – a couple of wall art pieces which I’ve been thinking about for over a year! Time to start working on the first of them.
It’s days since I posted anything but I’ve been chugging along as always.
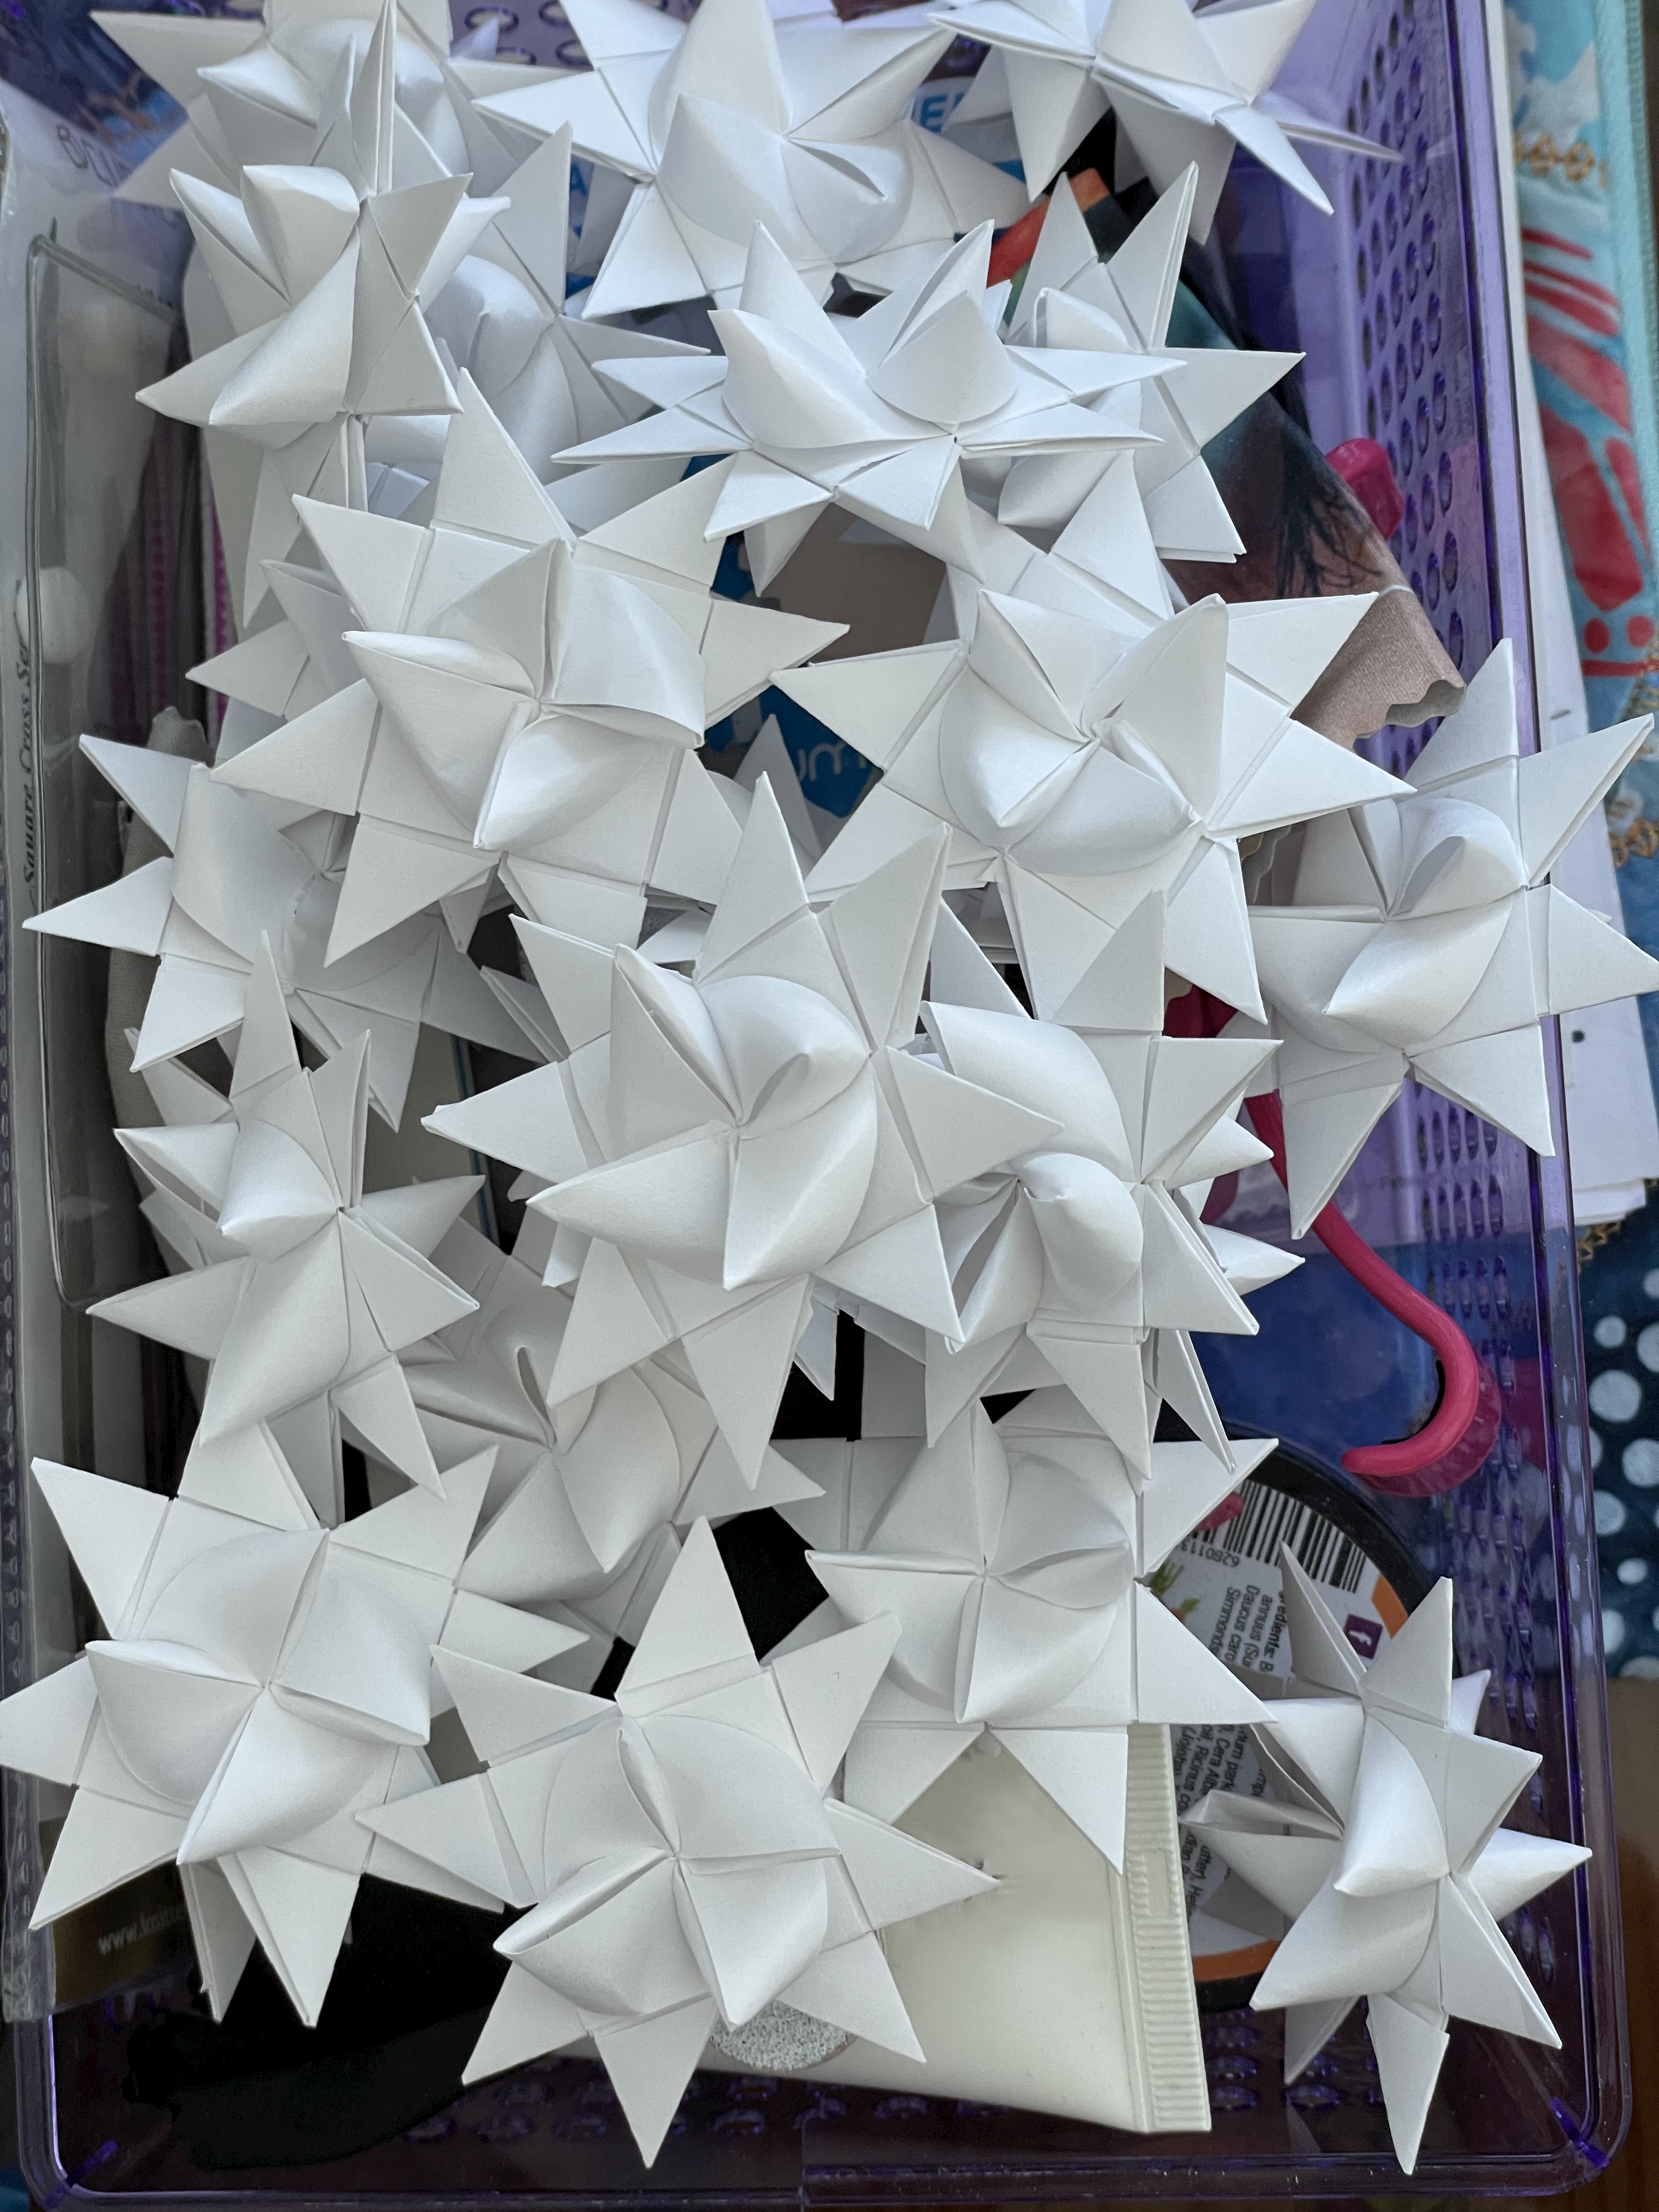
Danish Paper Stars
Danish Paper Stars – it’s become a seasonal tradition to make stars to share with neighbours and friends. I’ve made a total of close to 60 this year. I started with about 45 – which I distributed the other evening (one star per apartment). When I got home I realized I didn’t have enough left for friends so last evening I made another 15! That’s it for stars this year. It takes me about 8 minutes to make a star. [The website I found a couple of years ago describing how to make the stars is still functioning so click here if you want to try your hand at making a few!] [If that link doesn’t work try here.]
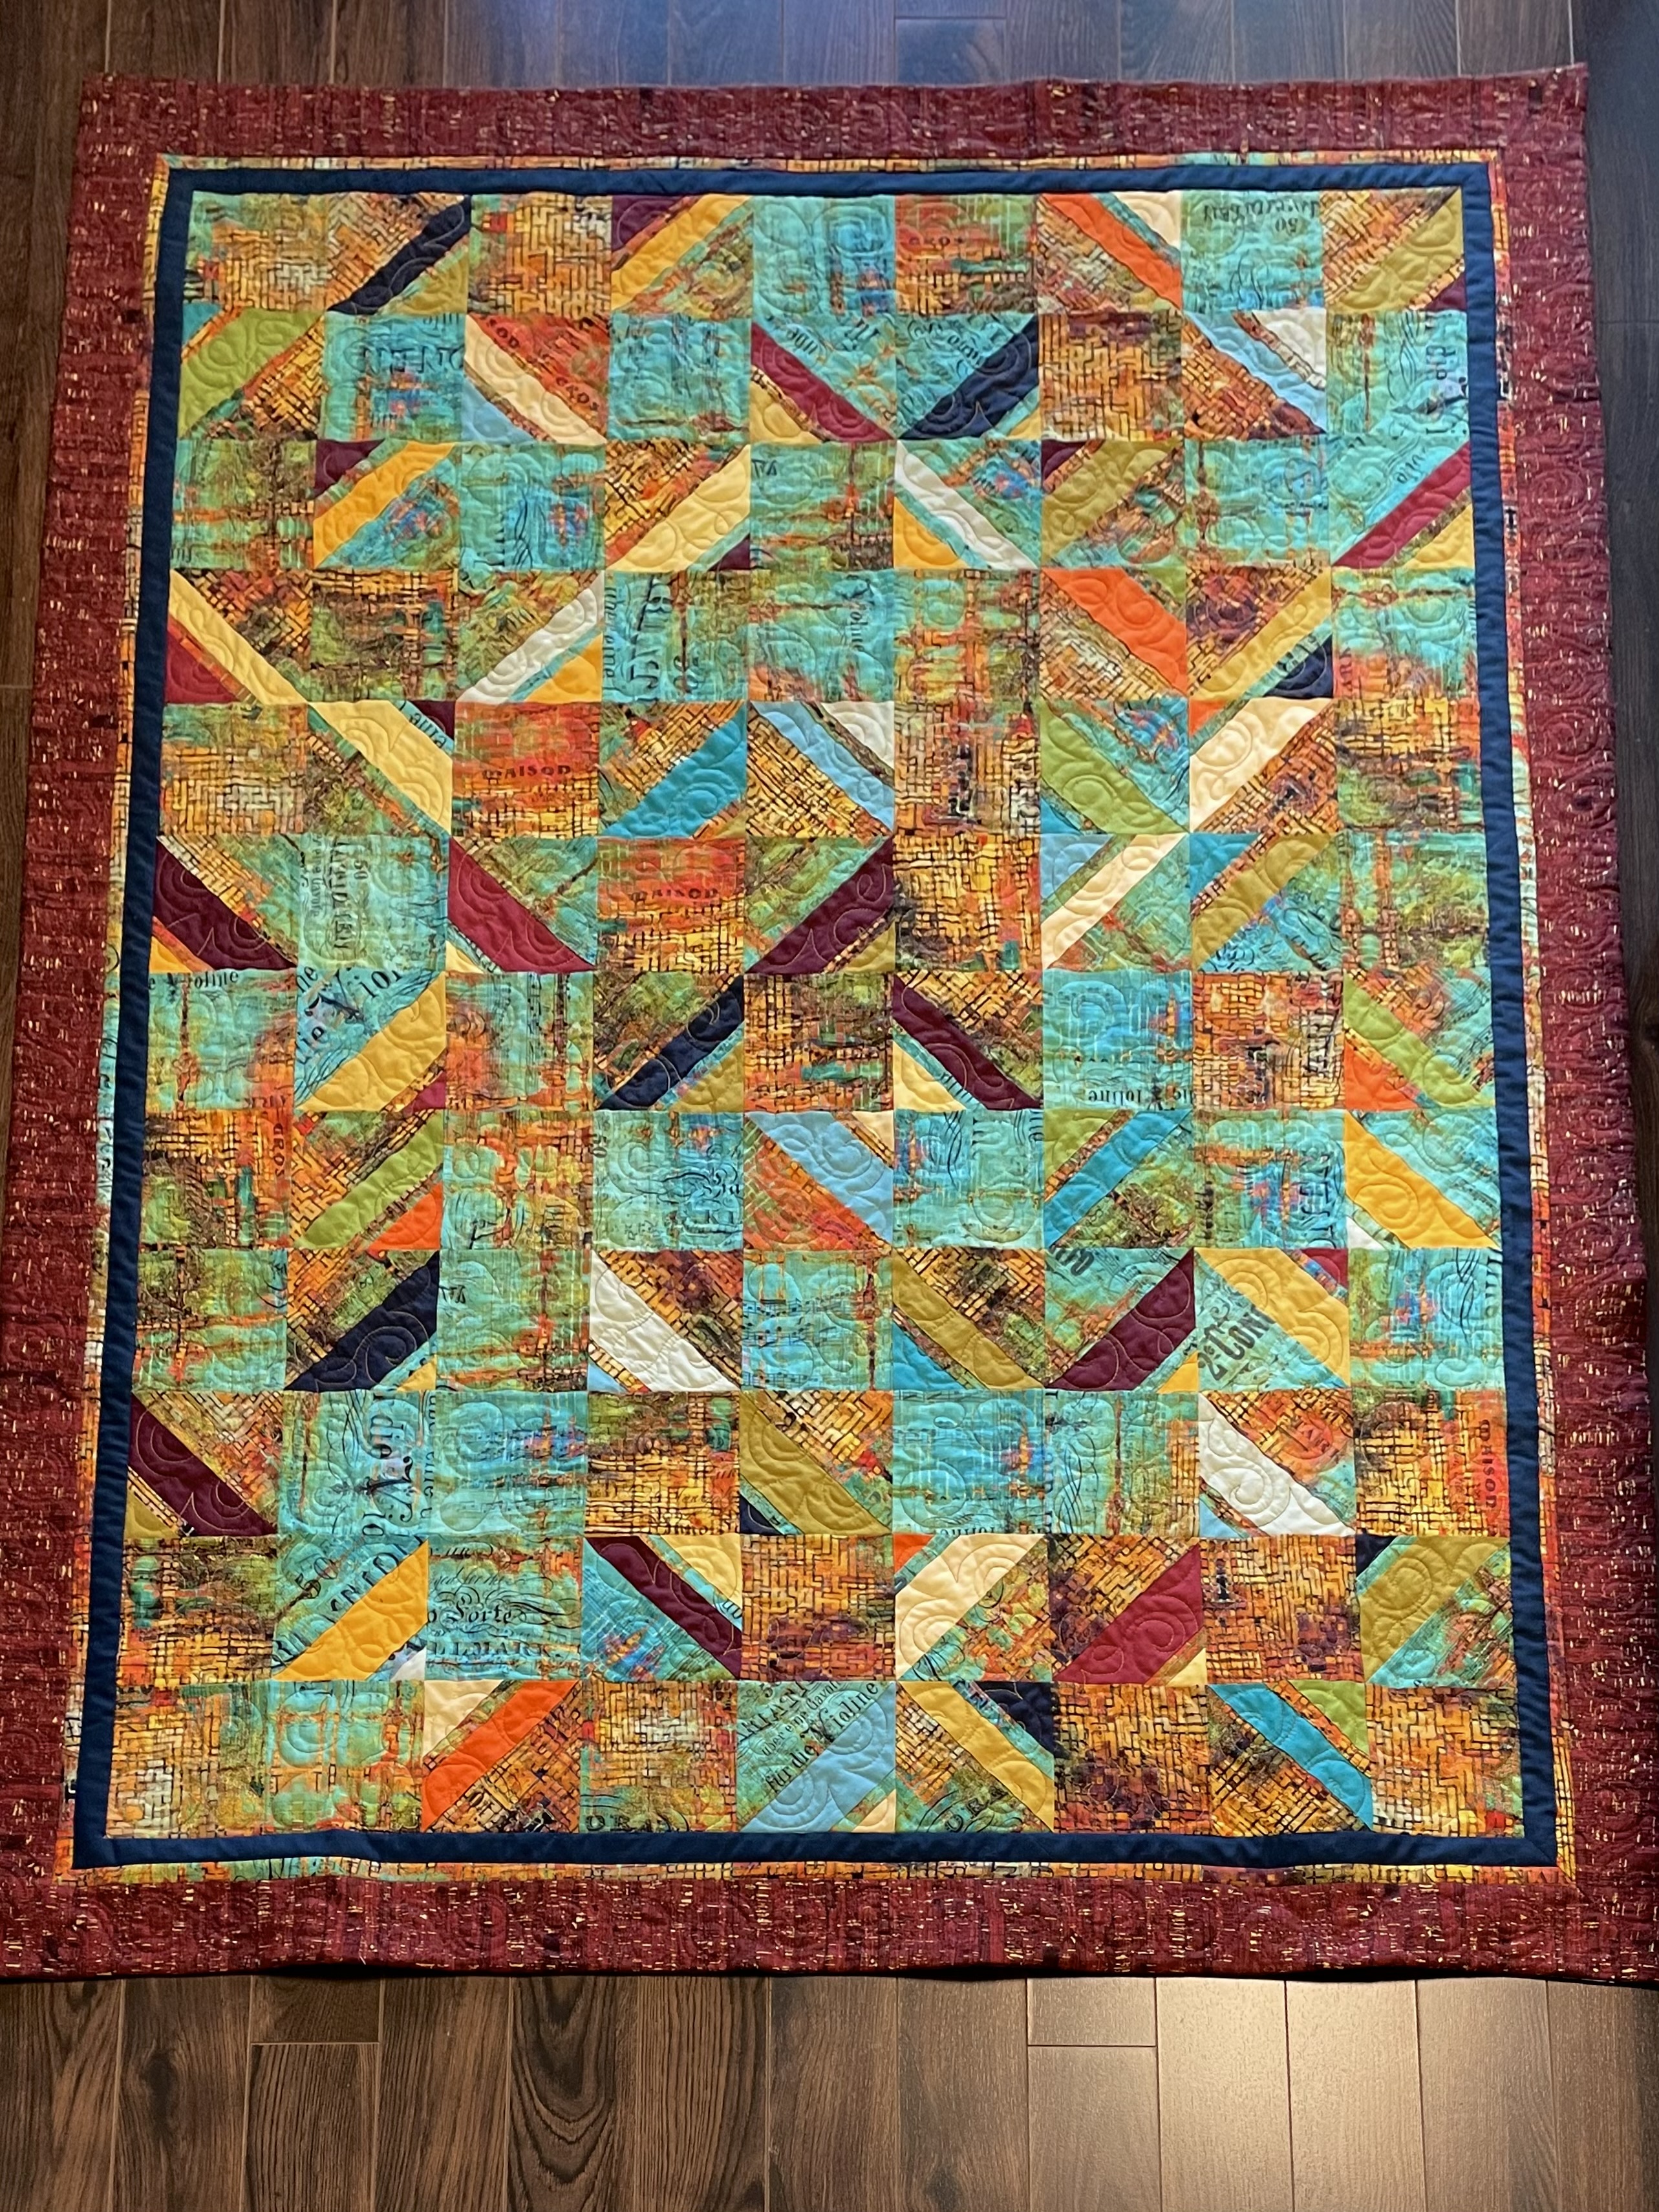
The Quilt Top – it’s been a chore but I finally managed to piece the panel together. I rummaged through my stash looking for fabrics to border it with. I came up with something.
Quilt PanelWith Border Fabrics
The challenge with the burgundy “cork” fabric is that it’s directional so I’ll have to consider how to use it on all four sides – it will require some piecing, I think. Deciding to include a thin strip of the backing fabric ties the whole thing together. It don’t see any appliqué that will enhance this panel which is already way too busy!
Can’t say I’m ecstatic about this creative effort – the background fabric [Free Spirit: Tim Holtz, Eclectic Elements, Abandoned, Rusted Patina PWTH126] turned out to be much busier than I anticipated. I loved the colour combinations, but cutting it up just accentuated the “busy-ness” and adding the solids as I did made the whole panel out of control. That’s the challenge of improvising – it doesn’t always work out as you’ve imagined it.
The Rusted Patina fabric should have been used as very large pieces which is what I’m going to do on the back. I managed to purchase enough from a number of online sources to do that. I want to see what making a small strip through the dominant backing fabric will do. In any case I want to use up what I have. I don’t intend doing anything more with it. Lesson learned!
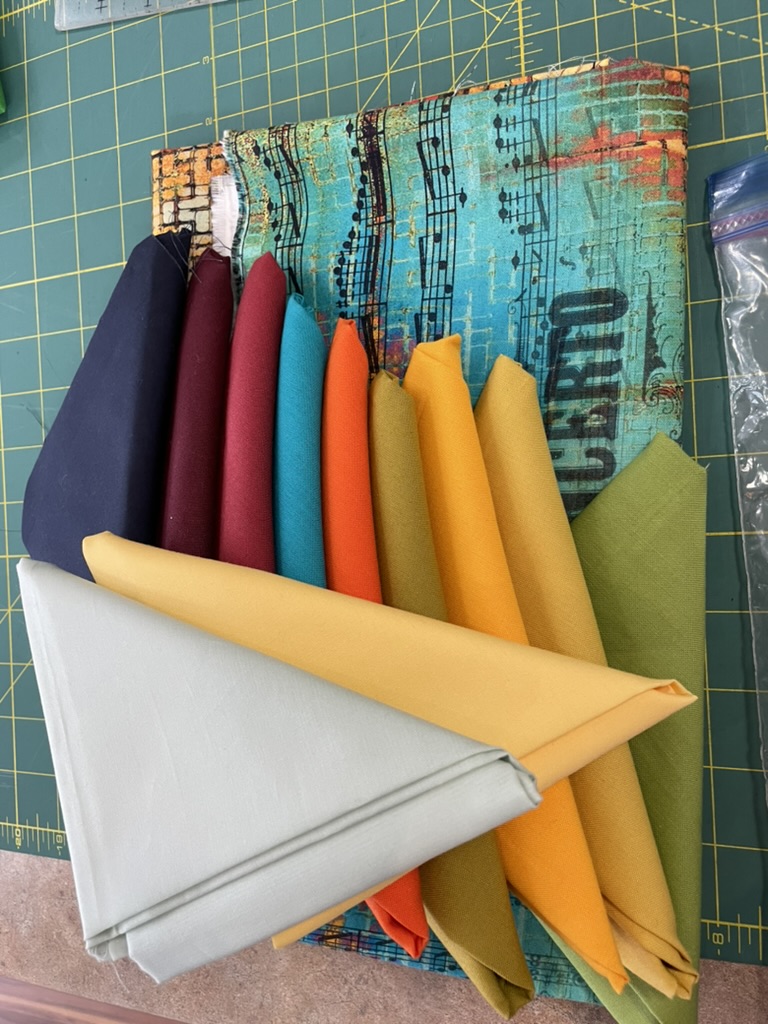
Remember when I started this quilt I had a wonderful bright fabric with yellows/oranges/ turqoises/blues. Because the solids weren’t quite light/bright enough, I added a couple more to liven the array.
The Original FabricsWith Some Lights Added
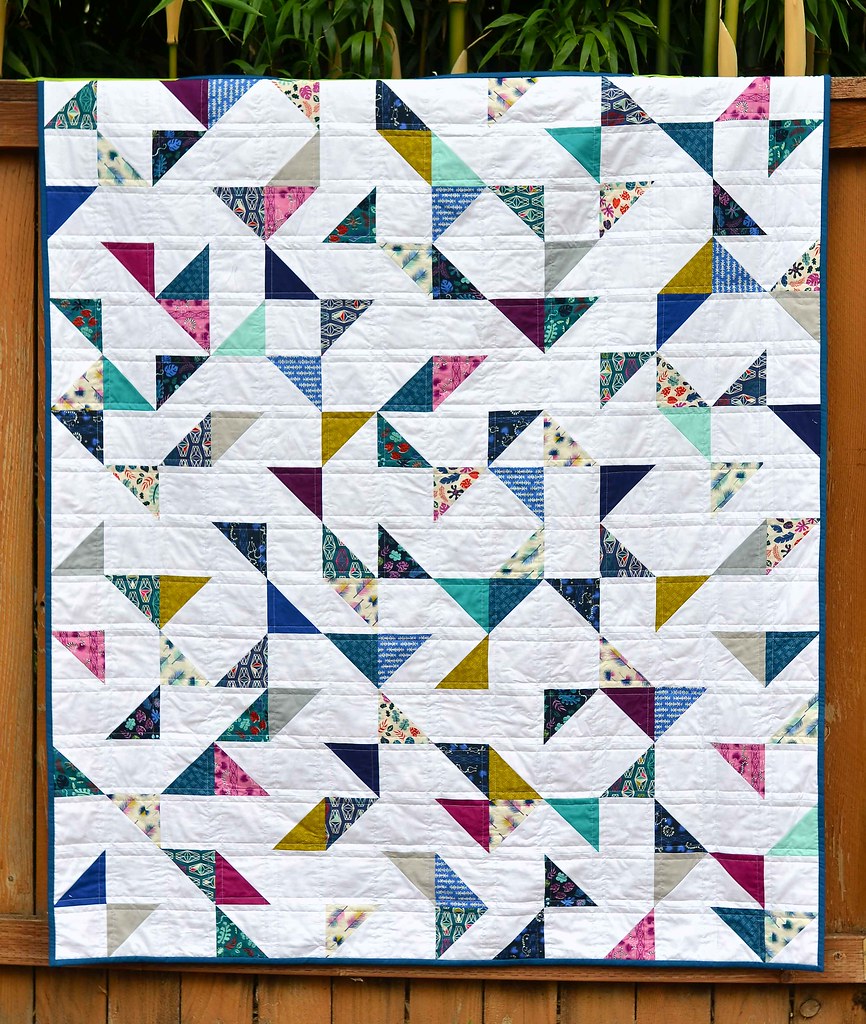
I had an idea in my head based on a quilt I’d seen on Pinterest
Another HST Idea
to use the print as my background, the solids as accents, with the solid triangles formed from three strips.
This afternoon I finally got back to sewing on this quilt (I’ve been avoiding it for over a month). It didn’t take long to sew the strips for the “solid” triangles, pair each strip with a strip of background print fabric, cut the HST.
56 HST with Solids
Each strip pair gave me four blocks – I just needed to lay them out interspersing them with background blocks.
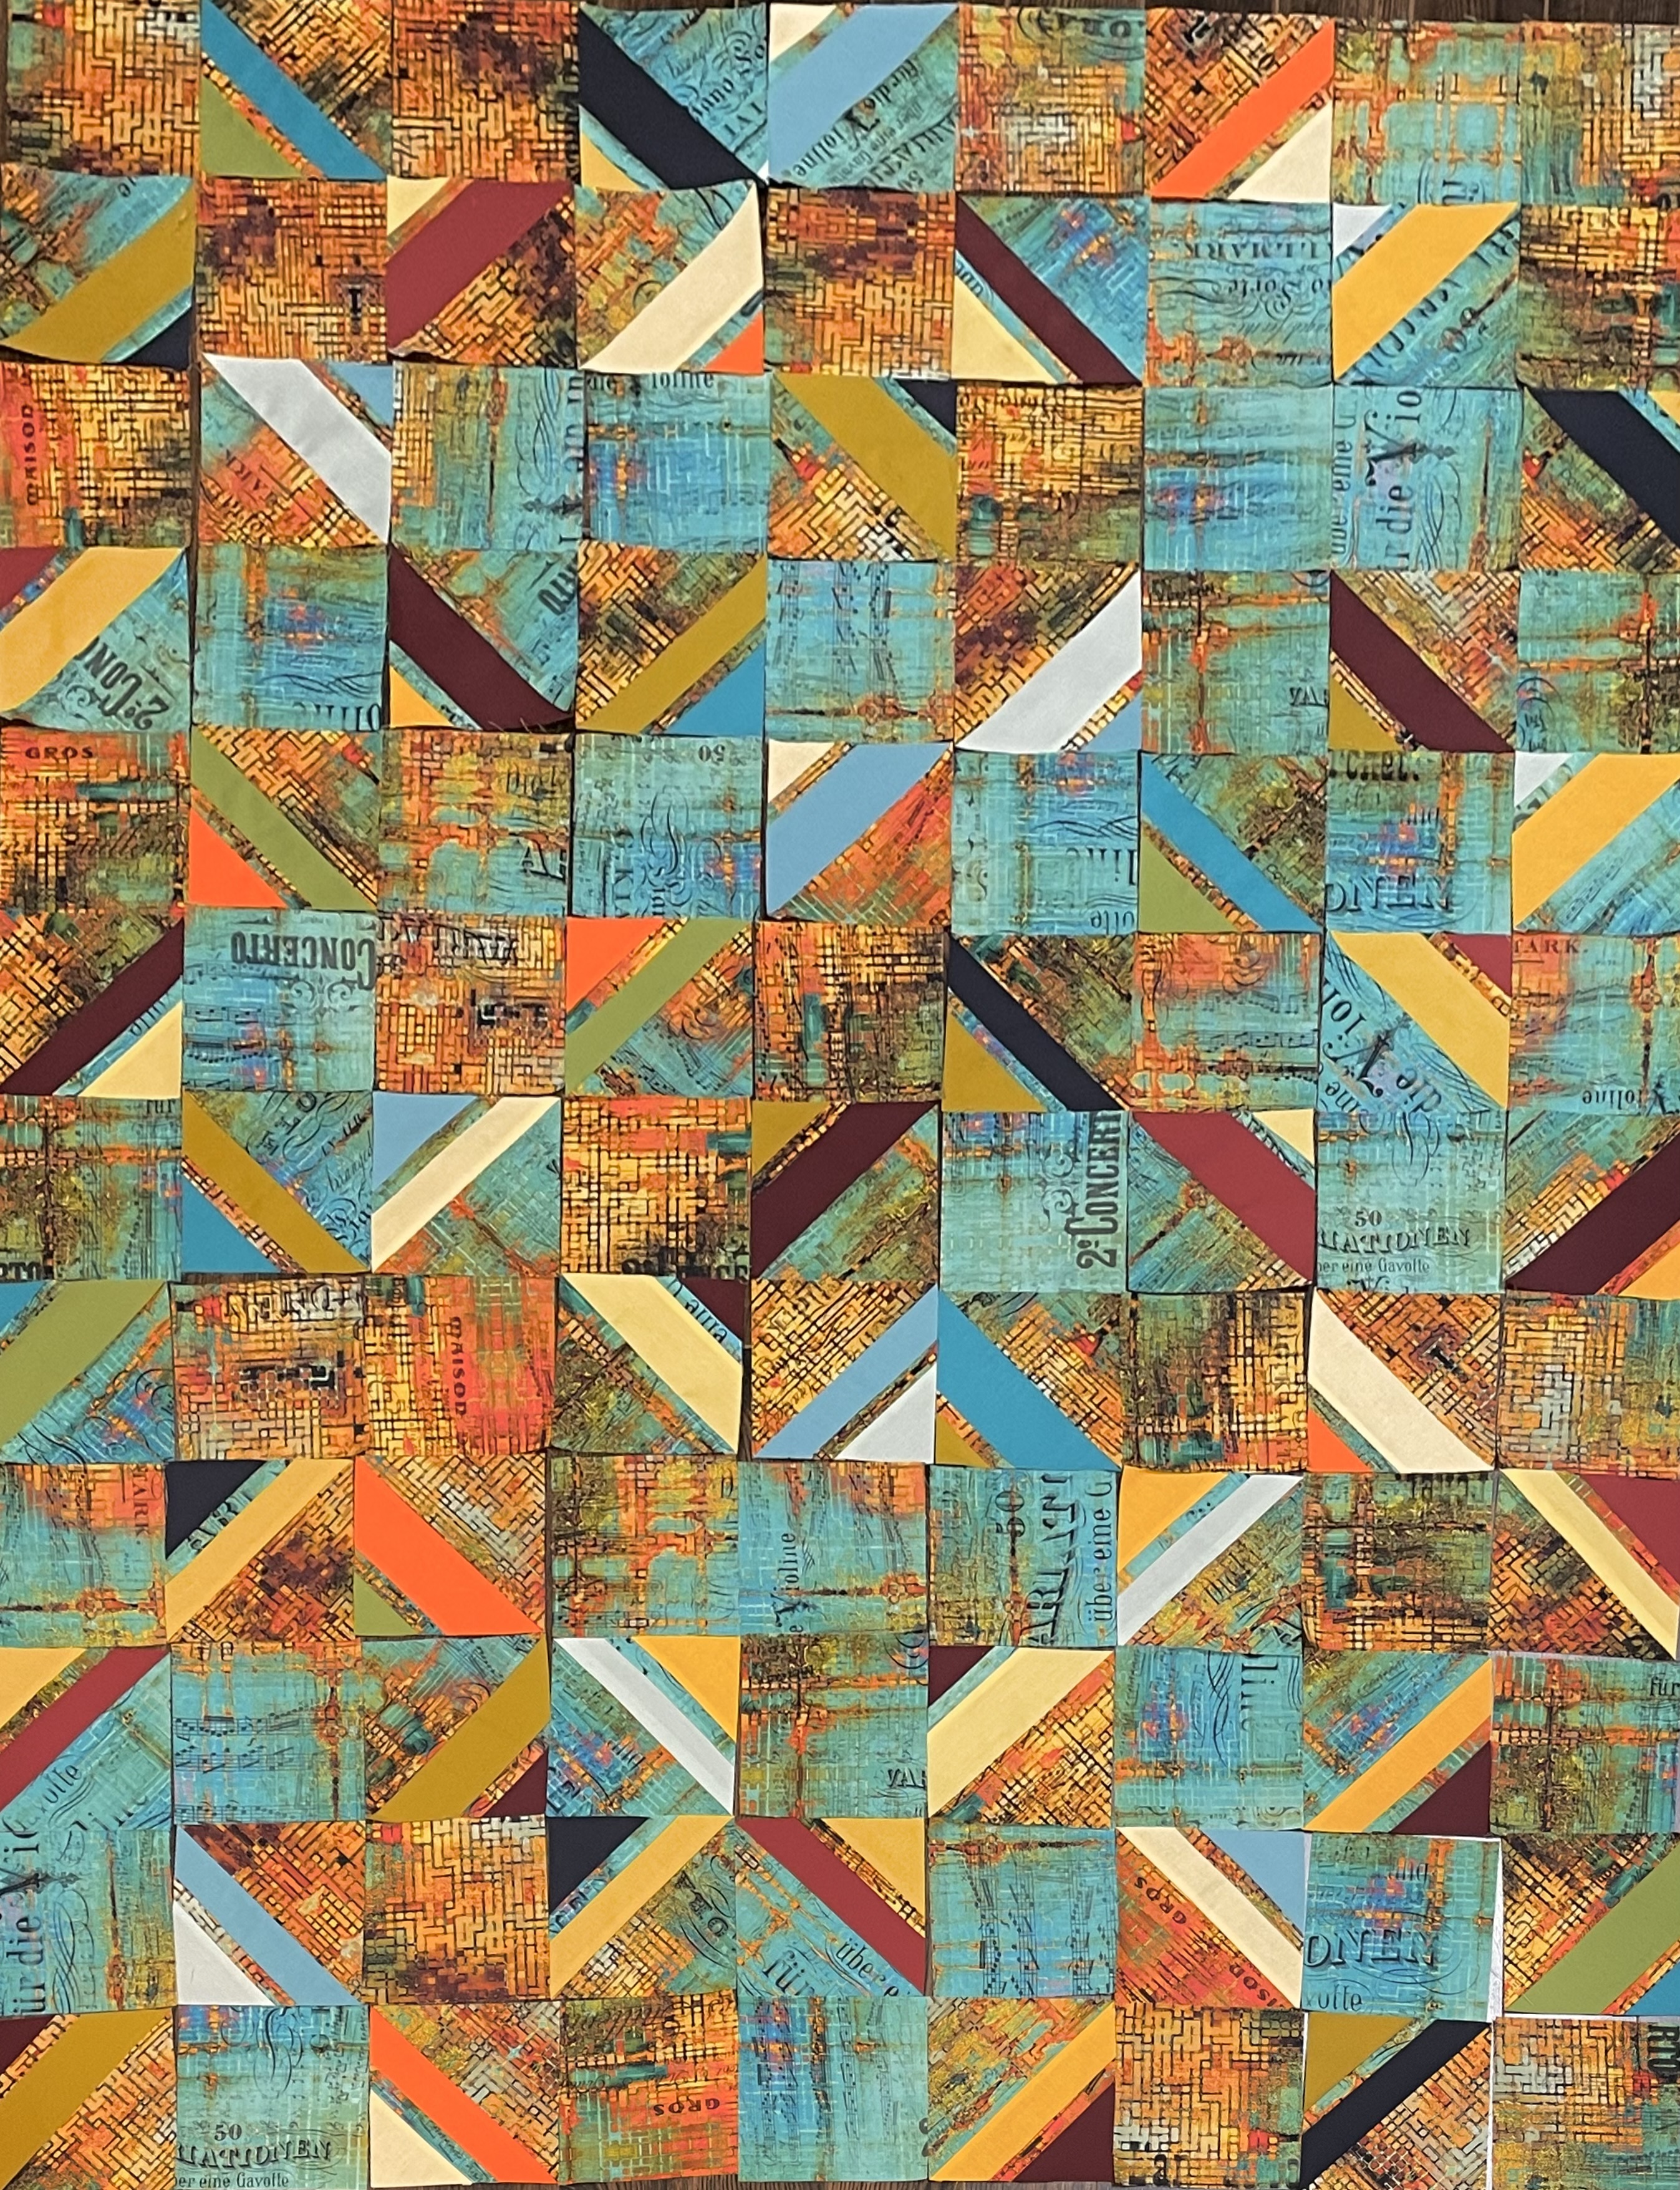
Tentative Layout 9×12 Layout
I find it very interesting that when I look at the pieces on my floor the yellows/oranges stand out, but the photo brings out the turquoises/blues! The pale yellow solid elements brighten the ensemble. The pale blues are lost among the music elements of the background. The orange solids, the burgundy stripes connect with the background print (on the floor – not so much in the photo), and the navy doesn’t do much of anything. I’m not sure I see much point in playing around with the layout – I don’t think it will make much difference to this rather drab quilt top.
My challenge now is to come up with some way to make this layout interesting. Would a solid sashing in one of the lighter yellows accomplish that? Use the background fabric for a border? What about circle appliqués (of different sizes) cut from the solids placed in some kind of cascade?
Whatever I do, it will have to involve the solids because that background fabric, which I thought would be striking is so busy when cut up, that it overpowers everything else!
Got any suggestions? I sure don’t know where to go from here.
Since I began working on the project, I’ve had a hunch I wasn’t going to be happy with the outcome. My fallback position was to assemble the array, make it into a quilt (with batting and a backing), then use it to make a jacket! Looking at the potential panel, however, I don’t think the jacket would be outstanding, either.
I hate it when the work goes sideways as it has here.