I finished up the panel I was working on yesterday and completed a second today. I’ve got a better handle on how to make the outline flower stand out by how I position the underlying circles and setting the leaves so they appear to be under the flower petals. I also downsized the signature a bit so it’s less prominent. I think this idea is now working.
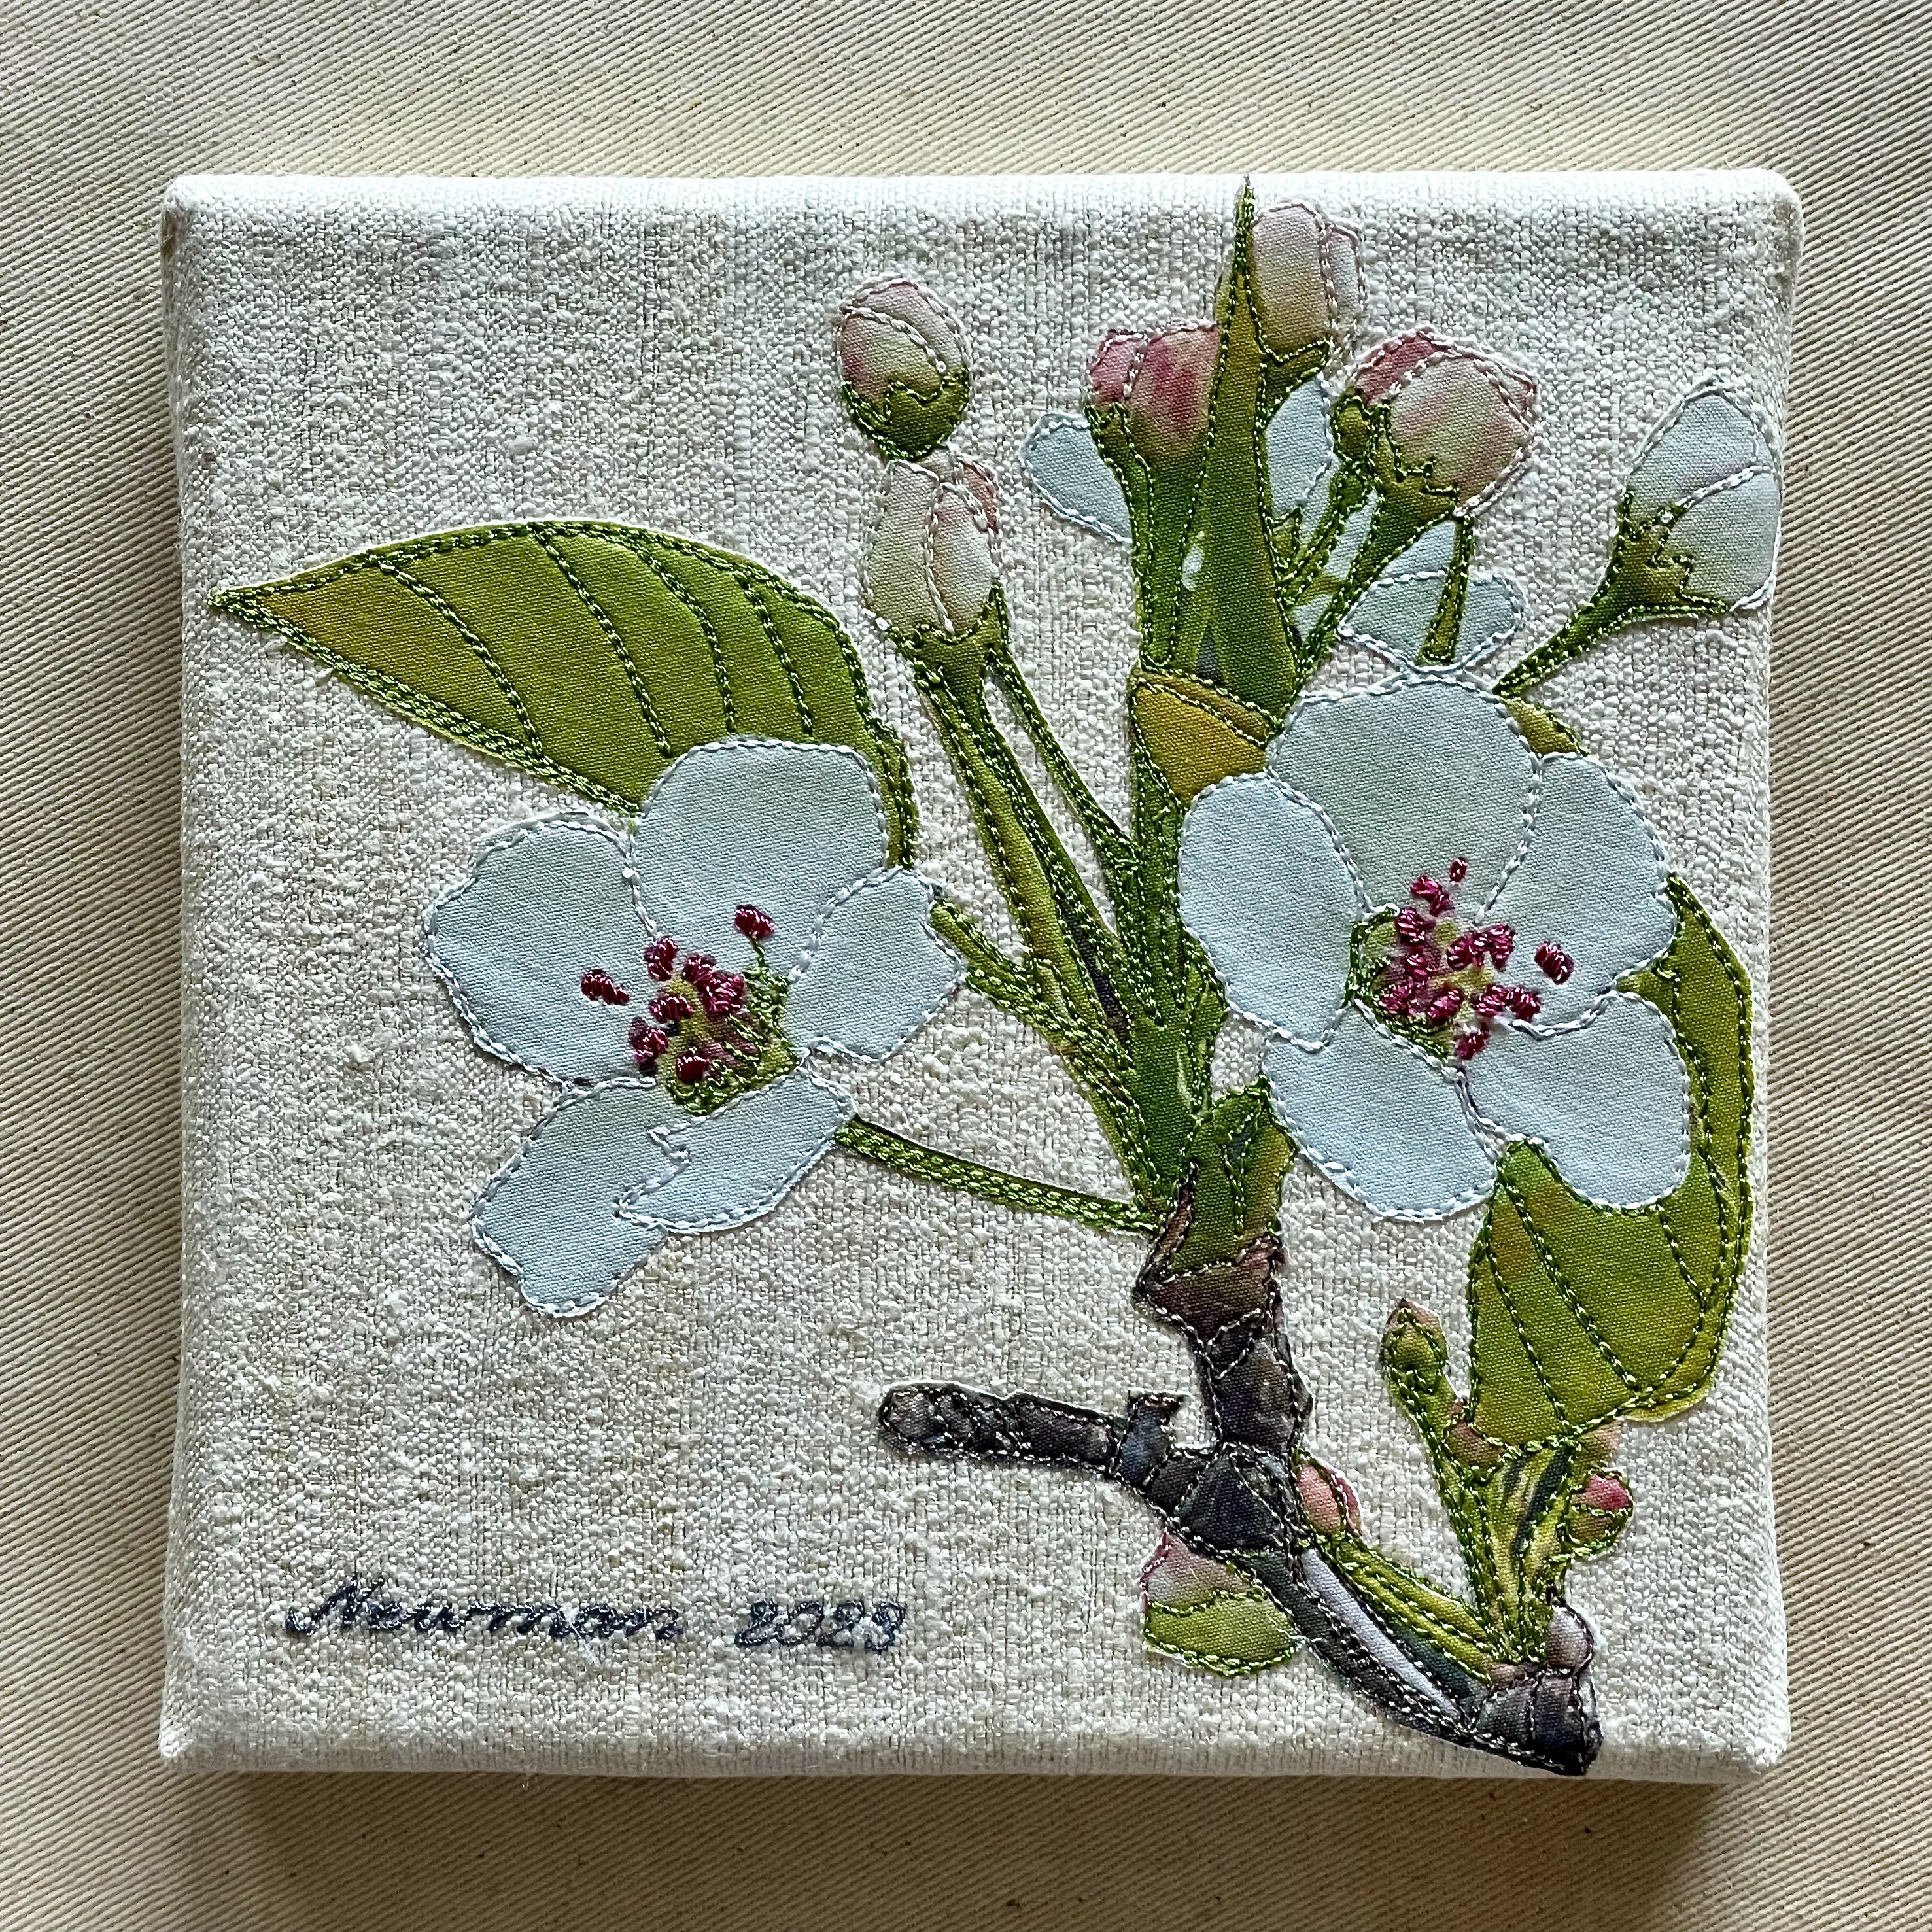
Along my street we’ve got Bradford Pear trees which are filled with lovely “apple/cherry” like blossoms early in the spring. They last maybe a week/ten days and that’s it. I’ve photographed the trees and the flowers each spring I’ve lived in my apartment (going on seven years). I’ll take pictures – of the same trees – again this year.
I did a bit of research to learn more about Bradford Pear trees and discovered they aren’t the best choice although they’re used widely to line streets. One writer identified several reasons why you should avoid them: they grow tall – 40-50 feet, the flowers have a strong, somewhat unpleasant fragrance, often have weak branches – sometimes falling apart after 20 years (!), and they cross pollinate with related trees causing problems if fruit pears are growing anywhere near. Nevertheless, I love how the flower clusters look which is why I decided to include one in this floral collection.
I decided to do very little stitching on the flowers, thinking the detail on the stems, leaves, buds and branch would more than offset the spare flower detail. A good decision, here.
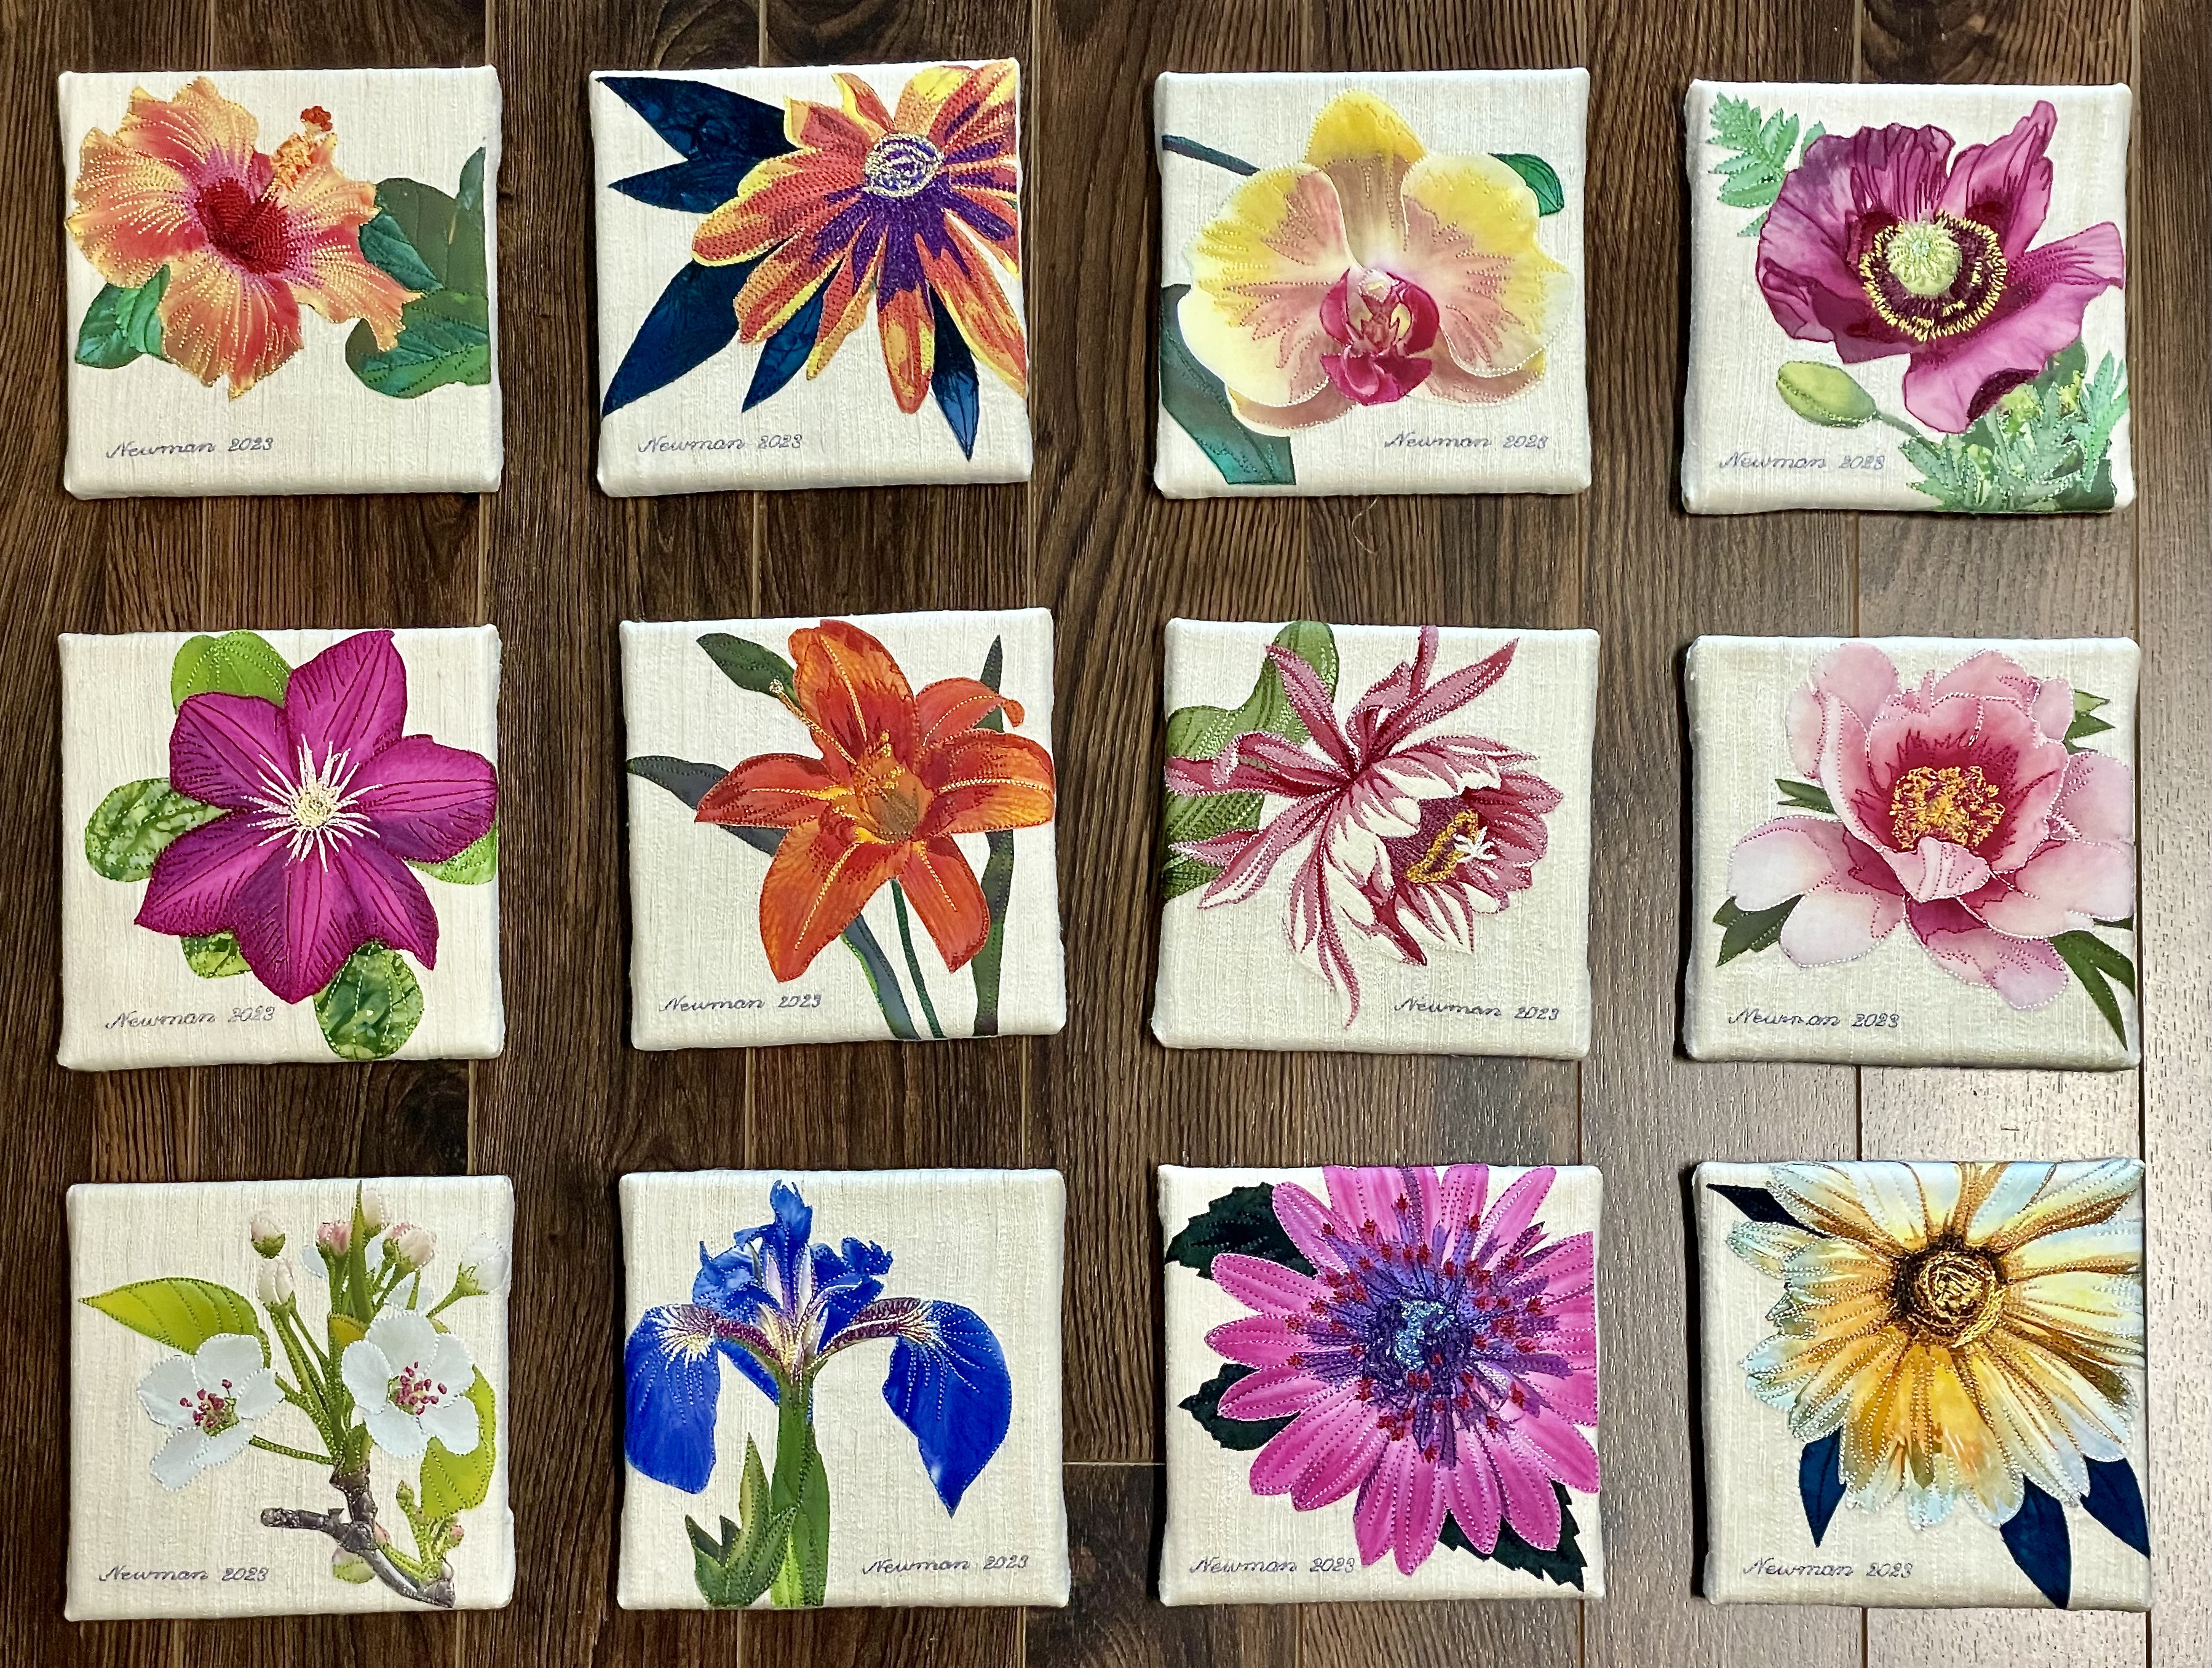
This is #12. The series is now complete.
My Floral Collection
I’ve laid them out on the floor to think about the display arrangement. I still have to add paper backing, a label, and a sawtooth hanger on the back of each before I can say they are finished. I’ll get that done over the weekend. I plan on showing the full set in Truro, I think. Brandt will only want ten for the December show in Tatamagouche this year – I will have a difficult time deciding which two to hold back! I’m happy with all of them.
Now I can move on to a new quilt, along with some clothing I want to make for the summer.
This flower isn’t from a photo. My friend Elayne gave me a bundle of four 1-yard pieces of Hawaiian barkcloth a number of years ago. It has lovely tropical flowers very sharply printed on a 100% medium weight cotton fabric. I’ve made a couple of wall art pieces from it by carefully cutting out flowers and leaves and mounting them on a raw silk background, then thread painting the resulting image.
I’ve shared the fabric with participants when I’ve done workshops on raw-edge appliqué with thread painting. I still have a lot left. I liked this printed Cereus bloom so I chose it to be one of the flowers in this 6″x6″ project.
This particular fabric had a lot of grey in the leaves and in the centre of the flower – I chose to obscure it with the thread painting. The challenge with this fabric is the weave is somewhat loose so the raw edges are “raw.” I do my best to tame them with edge stitching. I can see a few loose threads in the photo – I will use my very fine pointed tweezers to pull those threads out, and trim what I can’t remove with very sharp, fine embroidery scissors.
When I’ve finished the last flower – Bradford Pear (which grows just down the street) – I’ll decide which of the twelve pieces will go into the final collection of ten. This one may just stand out as different enough to be eliminated. I’ll see.
#10 – almost there, just two more flowers to go. Then I can move onto the final quilt I want to get done before summer (I want to do a quilt based on the Drunkard’s Path back insert I created for the Moons & Planets quilt).
Lots of thread changing involved in stitching this flower. You’re not aware of the changes because they mirror the shading of the petals and sepals.
Again, the difficult decision – how much to stitch and what to leave open. I’ve enhanced the brightness of the flower colours using the Inktense watercolour pencils – just enough to make different areas stand out a bit more. Overall I’m happy with the detail I’ve managed with this flower.
I took the eight completed pieces to the knitting group yesterday – the reaction was favourable – I guess I’m not wasting my time on this 6×6 project.
What was clear, however, is the women had no sense of the complexity of the work – that for ten of the pieces I’m doing a fabric/threadpainting rendering based on my own photos (the remaining two I adapted from fabric floral prints).
I explained to the gals that I started by going through my photos setting aside any I thought might be turned into a 6×6 piece. Next I edited them, adjusting the colour and cropping them to a 6.2″ x 6.2″ square so when I print them they are the right size for mounting and the colour strong enough to permit me to embellish them. Then I print each photo on a letter size piece of cotton lawn fabric (which is backed with plastic so it can move easily through the printer). After the print dries for a day or so, I removed the plastic and back the fabric with a fusible paperbacked glue sheet before I carefully “fussy cut” each flower.
At the start of the project I had prepared myself a dozen 9 1/2″ x 91/2″ squares of silk tussah which I’d backed with Sewer’s Dream stabilizer to keep the silk from fraying. I marked the position of the 6×6 square using a heat-erasable pen so I’d know where to place the flowers. After each flower was cut out I carefully positioned it onto the silk background, and fused it in place. On some flowers I added extra leaves before the final fusing.
Before doing any thread painting I use a heat-erasable pen to suggest the colour boundaries to be stitched. I might also intensify some colour with Inktense colour pencils or permanent markers. Then I begin sewing.
First I pull spools of thread from my thread stash (which at this point is quite large – a couple of hundred spools in every colour imaginable, a mixture of rayon and polyester – on this project the fibre content doesn’t matter, the colour does, so I mix and match). I constantly change thread (and bobbin) colour as I outline or infill aspects of each flower. For some flower renderings I’ve had to create machine stitches. After finishing each flower, I add my signature.
As I explained my process to the women they found themselves looking at the pieces differently, examining the detail more carefully. At first glance these pieces aren’t necessarily complex but the process of arriving at a finished 6×6 textile wall art piece takes me anywhere from 6-7 hours over a couple of days – likely longer than were I to simply paint the flowers on the 6×6 canvas!
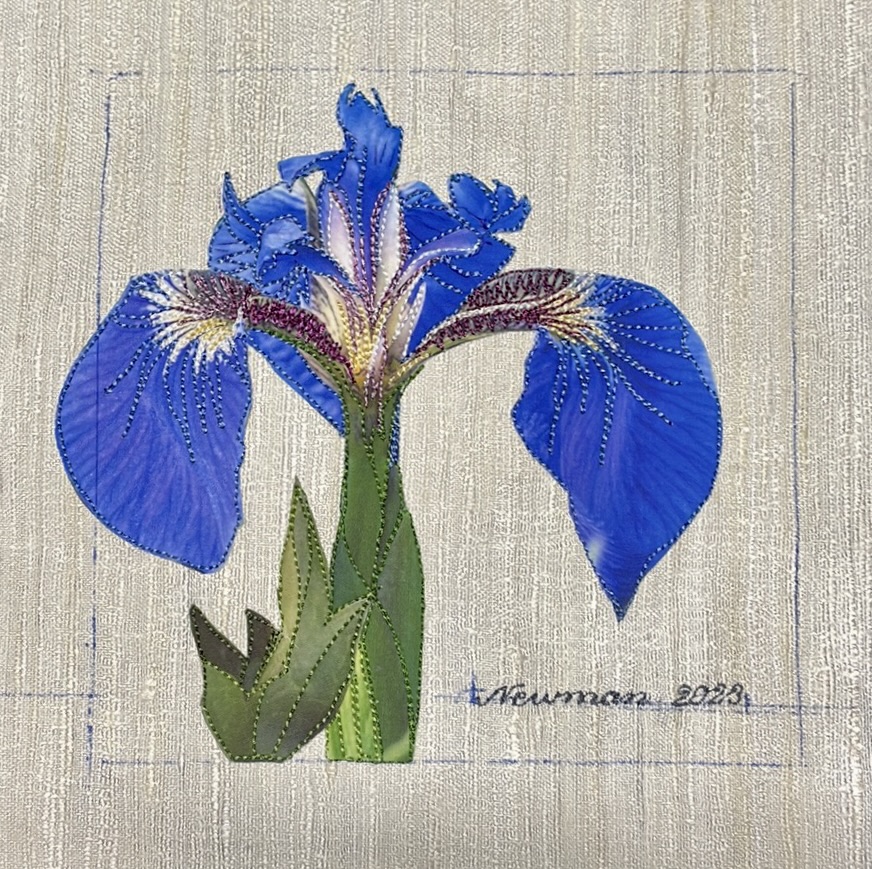
Yesterday when I stopped working on the Iris it didn’t feel done to me. There wasn’t enough detail on the leaves. I wasn’t sure whether I wanted to colour them a bit more or just add a bit of stitching – in the end I did both. I shaded both the cluster of leaves on the left as well as the leaves beside the stem. Then I thread-painted the shading. Because the leaves are darker they blend into the whole, not drawing attention to themselves. I’m much happier with this piece now.
I thought this piece would be easy and straightforward – not so. The first thing I had to do was tone down the reflection both in the flower and on the leaves – I used Derwent Intense watercolour pencils to shade away the white. That gave me better overall colour to work with.
I started thread painting by outlining the leaves and leaf veins. Then onto the flower. Using a strong yellow I stitched the highlights on the petals. Next came the dark red at the throat, then the brighter red of the centre. I wasn’t intending to fill the entire centre area but an edge stitching at the red/pink boundary was jarring and left the red centre very dull so I took it out and reworked the area – filling it in. After that, I added the pink, and stitched the pistil. I needed to create a stitch for the stigma (of the pistil), and another for the stamens, I filled in the style of the pistil in a darker red.
Up close there is more stitching than I’d prefer, but when the piece sits next to the other 7 completed pieces, the flower shading stands out and the piece fits in with the others.
I finished this piece a few days ago, just forgot to post the image. I decided to represent a simple peony rather than a many-petaled double flower. With this one I had relatively few petals to deal with and the centre of the flower is better exposed.
The question is always, how much stitching, how little? Whether to create a new stitch or can I adapt something already on the machine. In this case, I took one of the “flower” machine stitches, and edited it so that all I had were six small overstitched dots. I used and reused the stitch, filling in the stamens. I then created a second stitch for the multitude of stamen filaments, stitching that in dark rose thread. Finally I used a machine stitch for the stigma, which stands out from the stamens.
The finished, mounted piece has the illusion of depth I was after.
Then I went on to the Iris.
Iris
I haven’t mounted this piece yet – I think the flower has enough thread painting, but I’m not sure about the leaves on the left. I have to do one of two things there – either more stitching, or I have to create more texture with permanent markers or coloured pencils. I’m still thinking about it – I don’t want to do too much to those leaves – I don’t want to draw attention to them but they need something more. So Iris isn’t quite done.
Today I intend to work on Hibiscus.
Hibiscus
I’m going to soften the “white” highlights to make them less prominent, I will embellish the stamens along the side of the pistil, I will emphasize the pistil head – just not sure what I’m going to do with the leaves. The white highlights there also have to be toned down – I likely will do that with markers.
One more piece done – #5. This purple oriental poppy was growing in a friend’s garden several years ago. I’ve kept the photo in my library and from time to time I have thought about what I could do with it. I decided to include it in this 6″ x 6″ collection.
I’m reasonably happy with how the flower turned out – you get a sense of the depth of the bloom. The flower centre was challenging – the oriental poppy has a gazillion feathery stamens with long filaments. The pistil is elaborate, too. I had to do quite a bit of practice sewing to find a way of representing the fullness of these floral elements. When you stand back from the rendering (where you no longer can see the stitching), it looks remarkably like a vibrant oriental poppy!
Last summer I stayed at The Maple Inn in Parrsboro while I was doing the Cyanotype workshop. Their garden was lovely – lots of different flowers in bloom, among them this Clematis climbing the side of a small out building. I took a couple of shots of it. I was taken by the magenta of the flower (here we see mostly purple Clematis), and the rich detail of the flower centre. I decided to include it in this collection.
I thread painted the markings on the petals, the stamens and pistil, and outlined the leaves and the veins. The first attempt had three fewer leaves – the outcome looked unfinished, so I added three more leaves. I’m happy with this flower rendition; #4 so far for the 6″ x 6″ collection.