Last week my sister shared an idea with me – she’s been growing green onions on her window sill for several weeks. She suggested I try doing it myself. You buy a bunch of green onions, cut the greens off (chop them and use them) but put the white bulbs in a glass of water and, lo and behold, you’ve got green onions growing you can harvest for a salad as you need them. She tells me they grow for weeks.
Green Onions & Lettuce
Why not lettuce, too? On my last grocery shopping trip I bought a pair of hydroponically grown green lettuces, roots still intact. So instead of chopping them all up (and throwing away half) I plunked each in a planter with some water – I’ve got lettuces growing. I can harvest a few leaves from each as I need them for a small salad and the plants keep on growing, looks like.
What fun! I bet I can get some dill to grow that way, too. I must look for some dill seeds to germinate.
I don’t like tomatoes well enough to start an outdoor pot for tomatoes – I buy a single tomato every so often if I think I’m going to use one in a meal.
It’ll be interesting to see how long my lettuces will actually grow like this. When these two poop out, I’ll just pick a couple more.
Well, the quilt is almost finished – I still have to hand stitch the hidden binding on the back – at the moment the binding is just pinned in place.
I elected to do a hidden binding because I wanted the contrast strips to reach the edge of the quilt without the interruption of a conventional binding. Using a hidden binding adds a “modern” touch to the piece.
Crossroads – Quilt Top
The back was pieced from four leftover blocks with large segments from remnants of some of the grey fabrics. None of the three pieces I had were large enough to use without piecing. I added contrast elements to join the grey blocks in an asymmetric layout.
I was fortunate, when I trimmed the quilt, to have enough leftover fabric from each edge to use as binding. That has allowed me to match the binding to the back so the pattern layout is continuous. A nice surprise.
Crossroads – Quilt Back
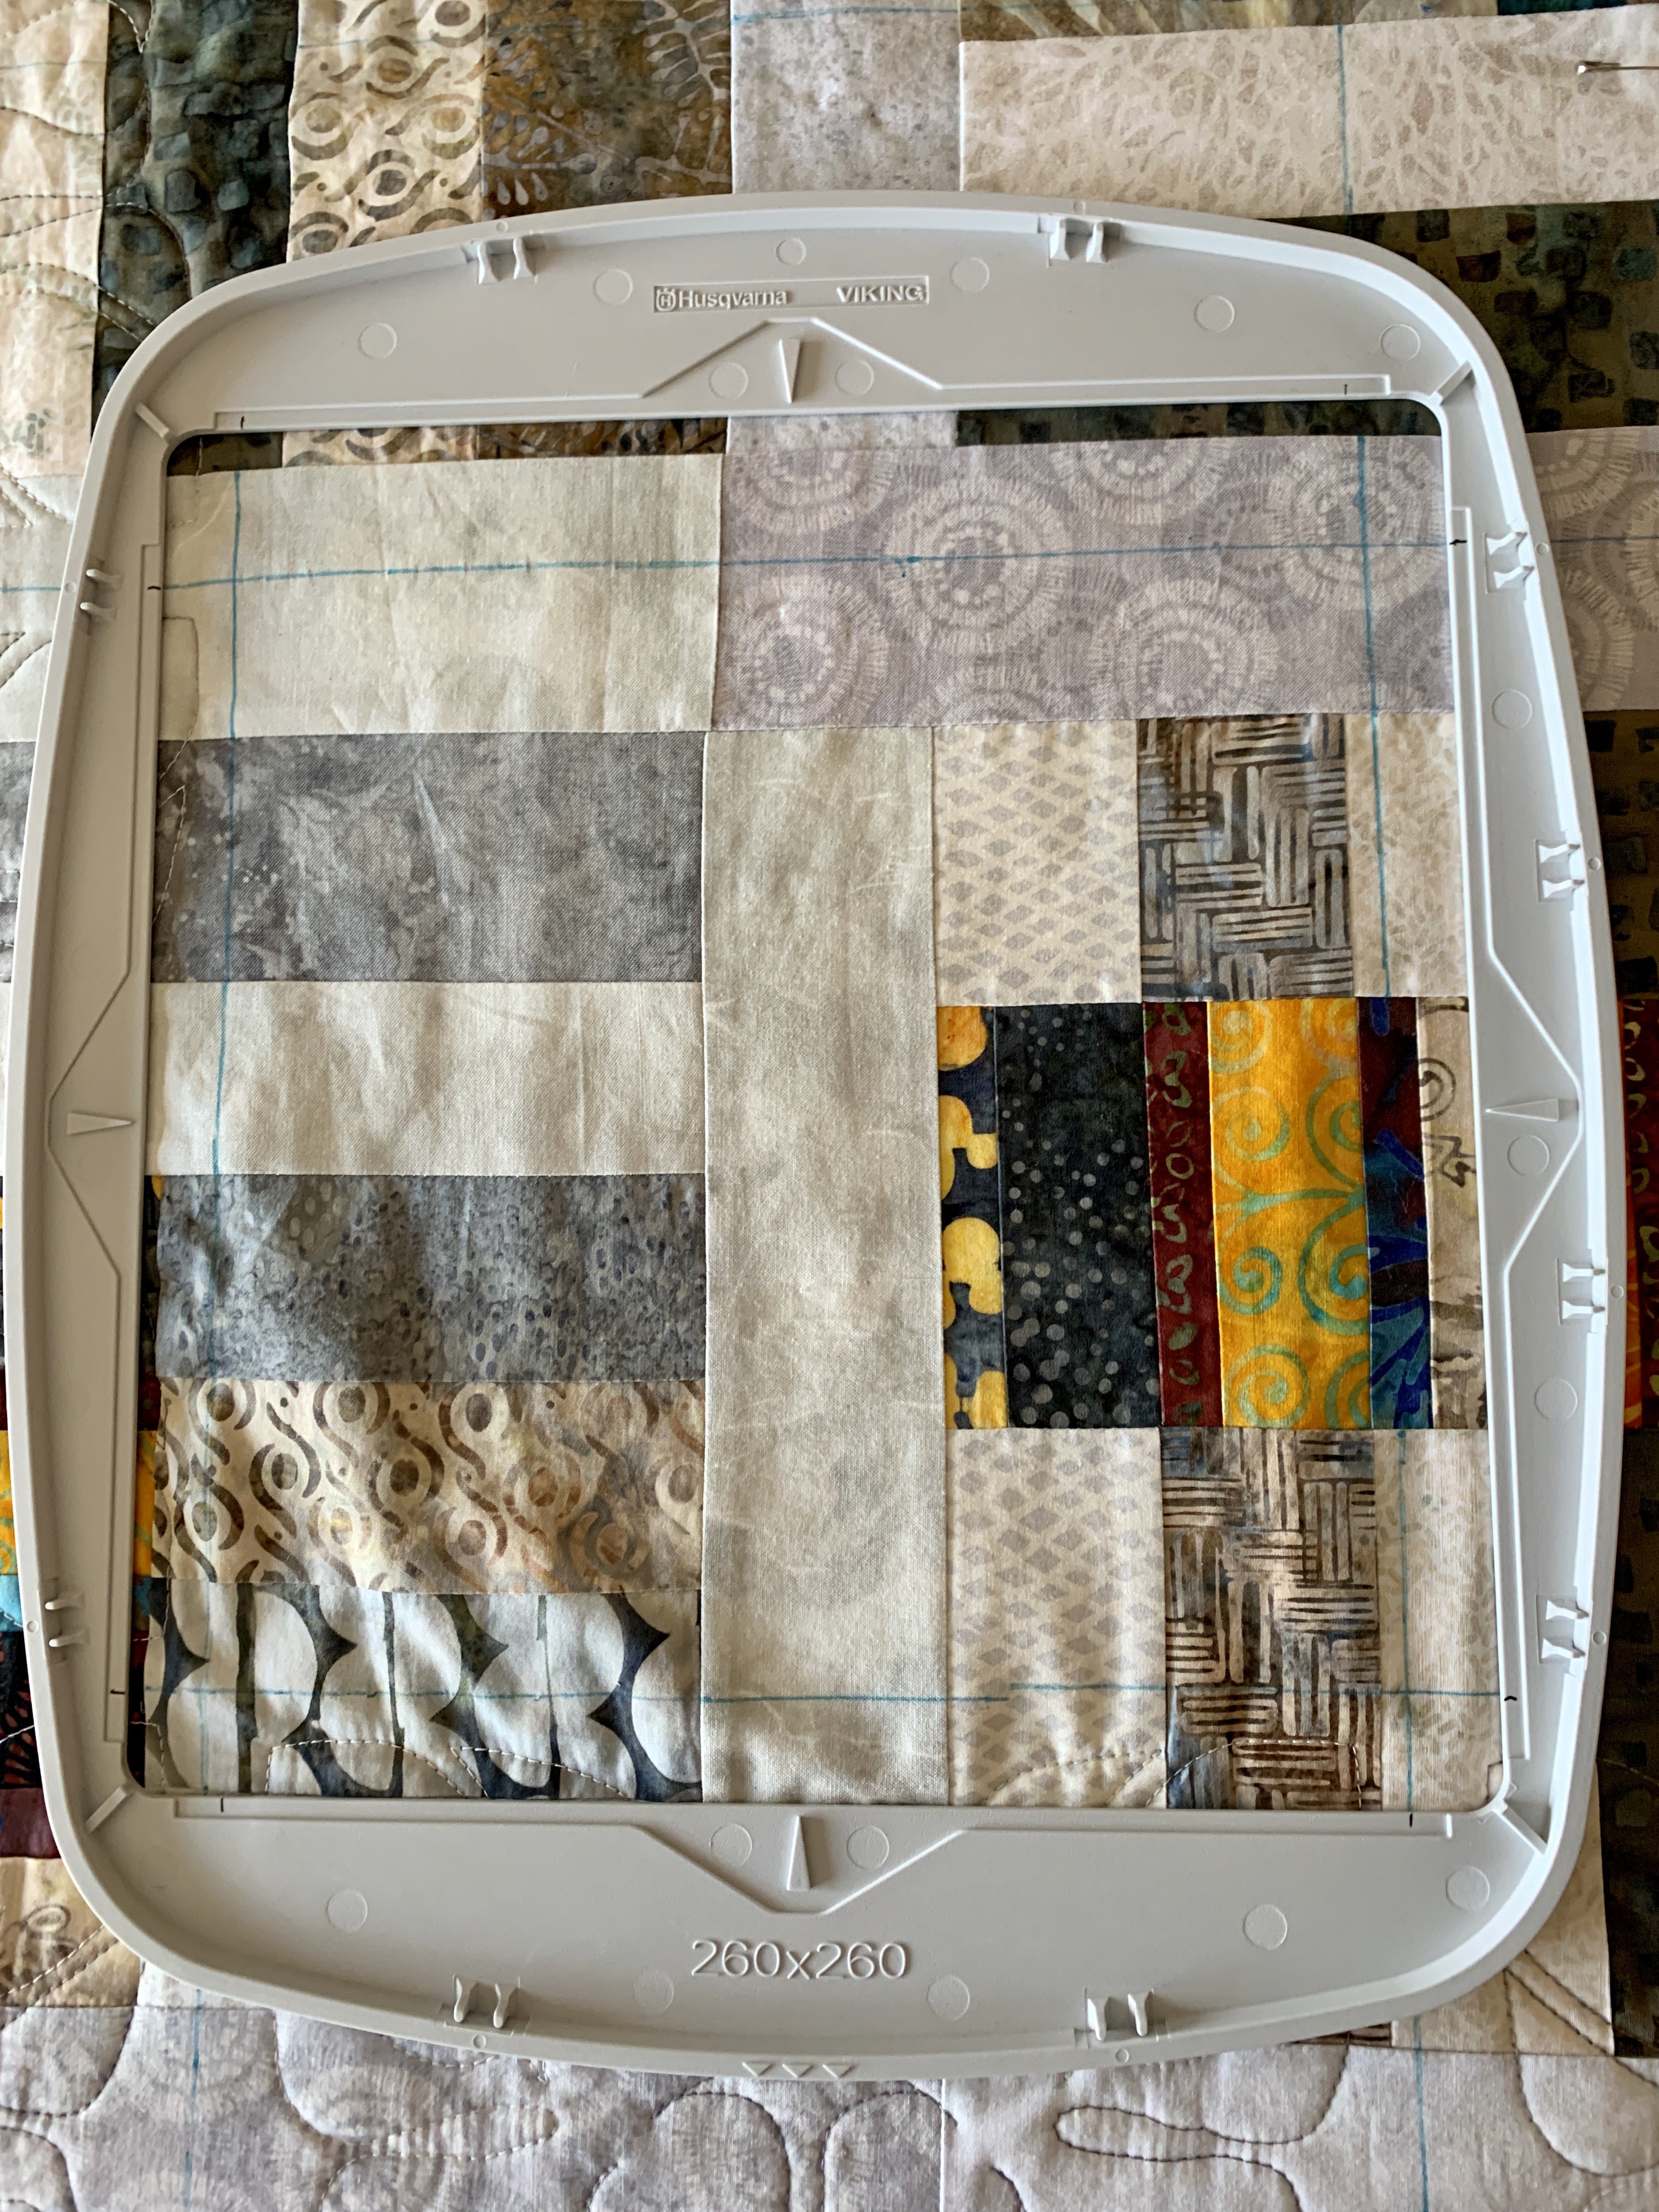
To quilt the quilt, I had to mark the quilt top into 250mm squares because the actual “blocks plus sashing” were larger than my largest hoops could accommodate. I figured the colour detail of the quilt top was strong enough that the fact the quilting block was smaller wouldn’t be obvious. So a 4 x 5 quilt layout was quilted using a 5 x 6 + 5 x 1/2 blocks. The top row of half blocks blends in – the quilting appears continuous.
Quilting In The Hoop
The quilting blocks can be seen on the reverse but the more open structure of the back panel accommodates that.
I’m actually very pleased with how this quilt turned out.
Now to hand stitch the binding and label – this evening in front of TV.
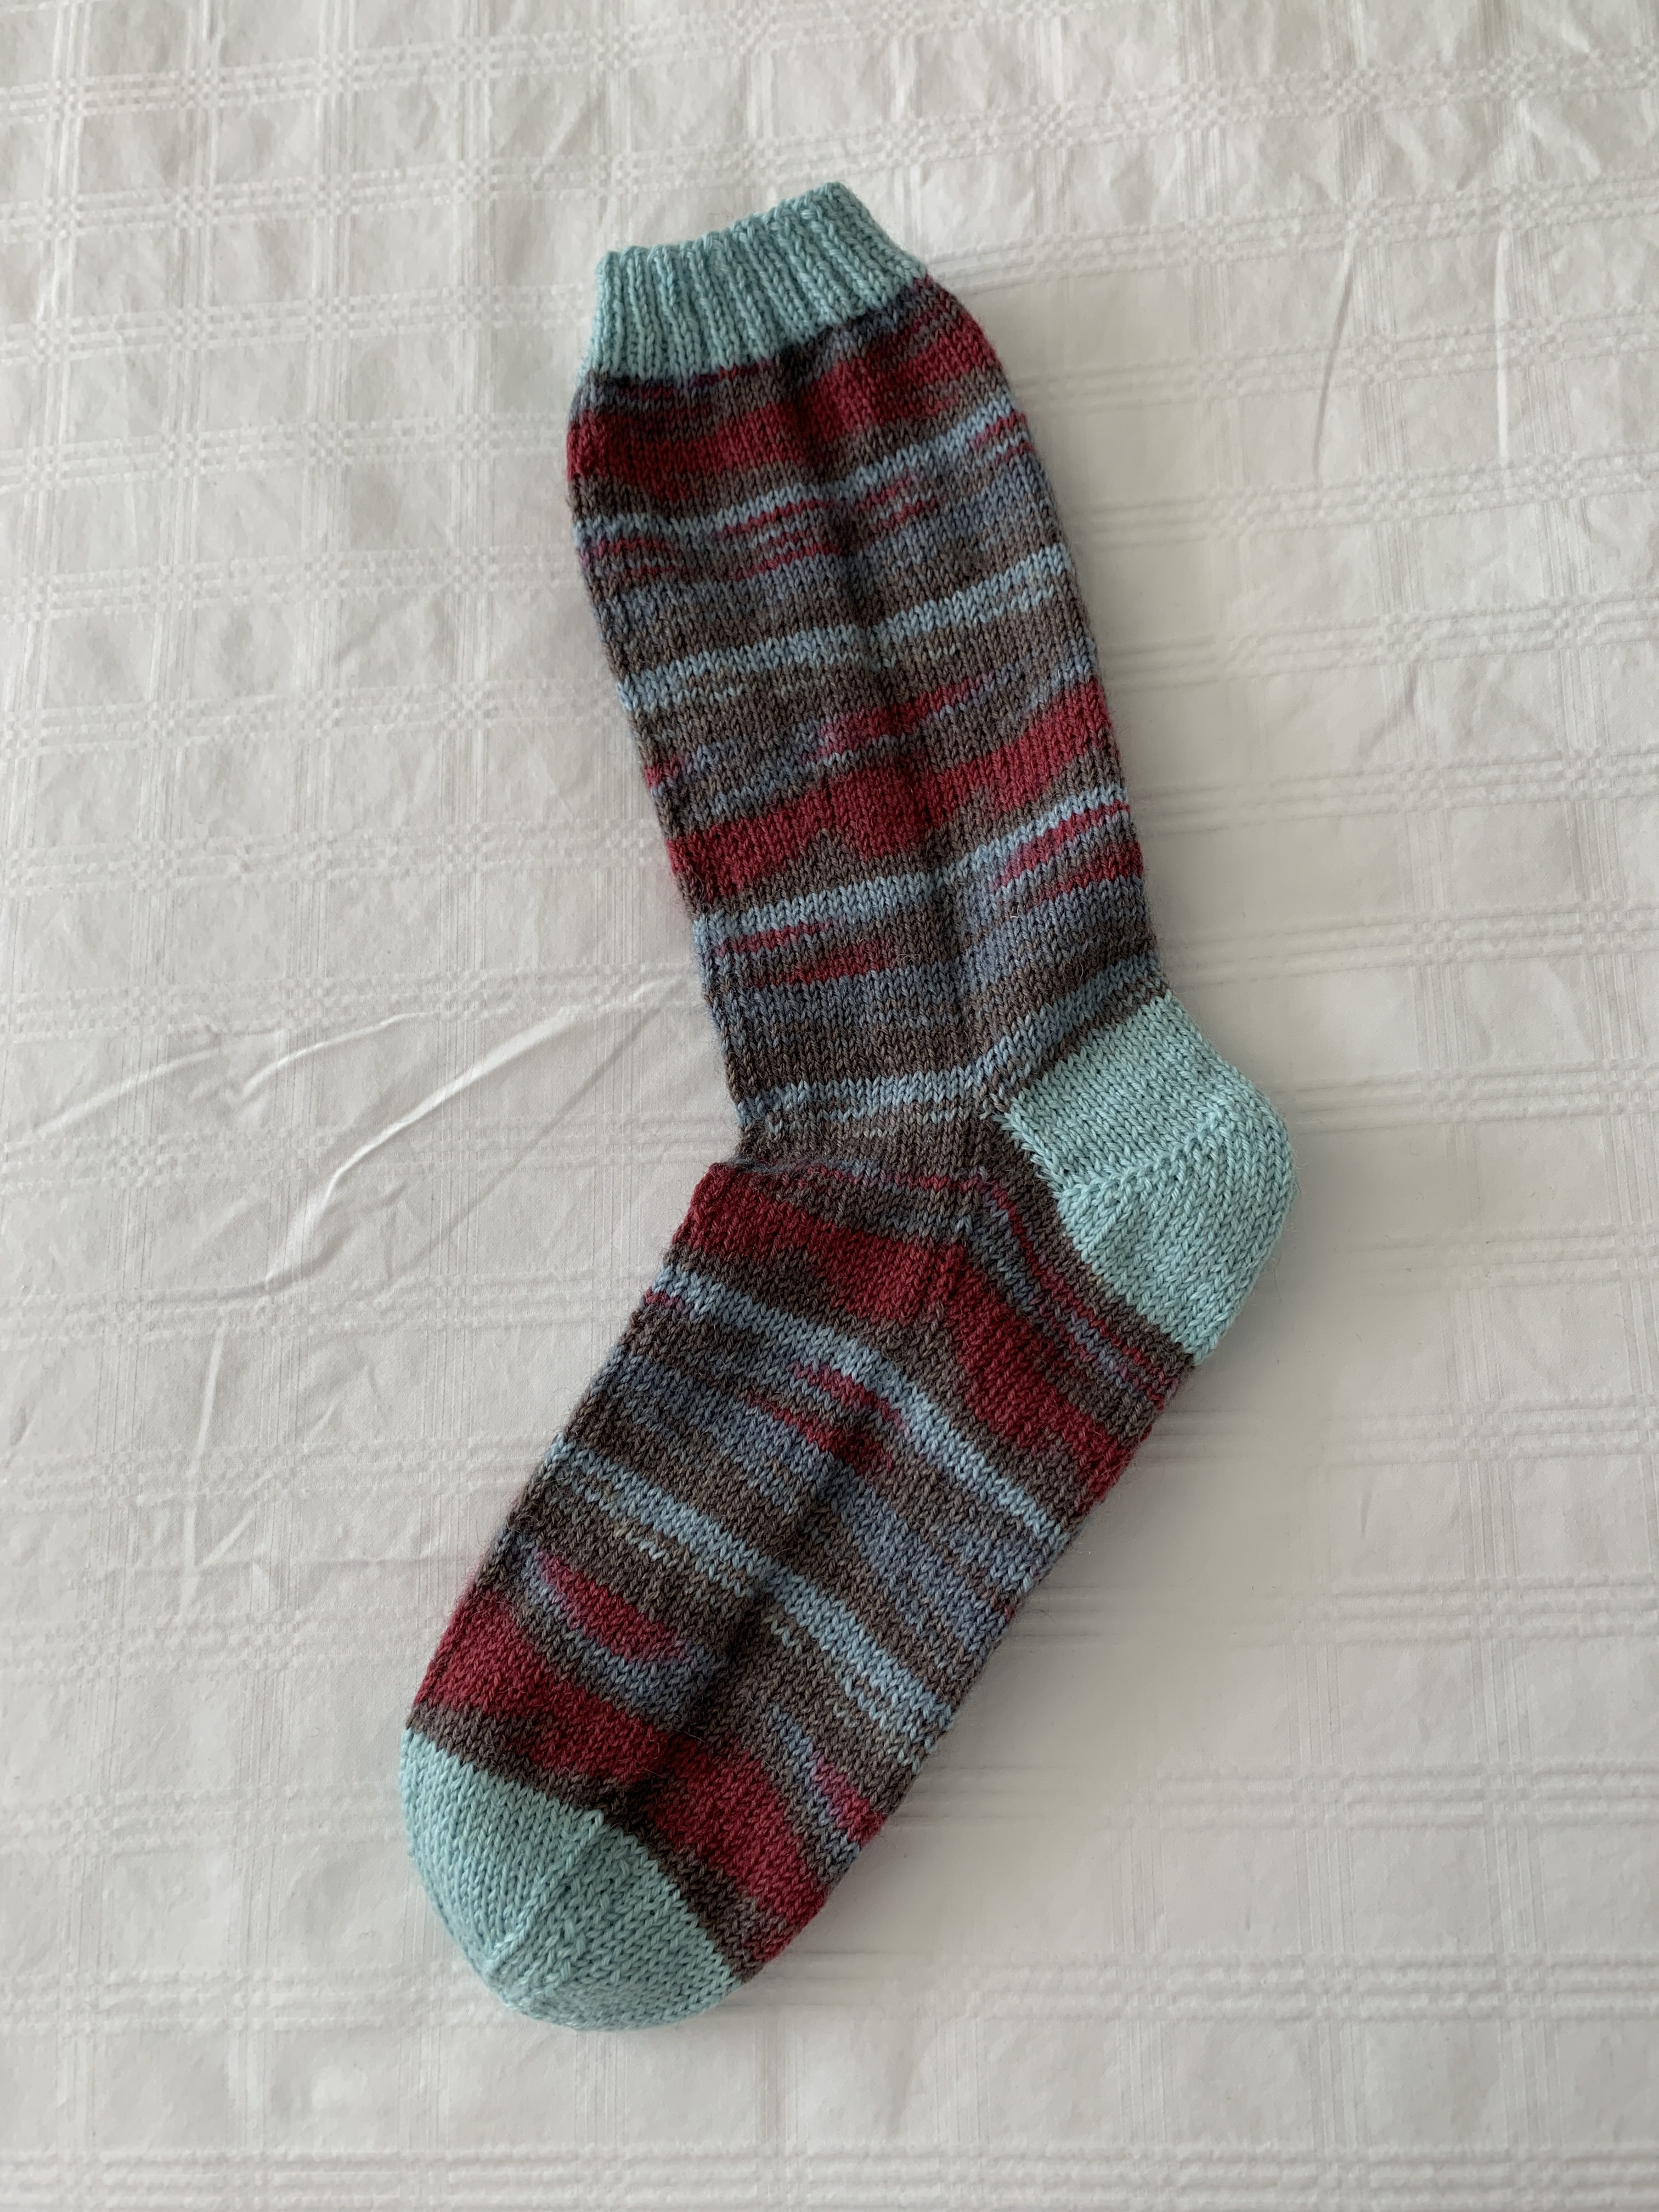
Another pair of socks finished. Not sure whether to put them in my sock drawer to in the “give-away” pile. I just enjoyed knitting this yarn (Opal “Butterfly”) – the colours were strong and cheery. Had I had either a ball of the golden or red colours to use for cuffs, heels, toes, they would have been even brighter. But I didn’t – I used what I had in my yarn stash. The charcoal makes a somewhat more “sedate” sock.
Opal “Butterfly”
Started the next pair last evening as soon as my needles were free.
I’ve actually gone back to the Knitters Pride wooden “Cubics” needles (6″ double pointed 2.5mm) after having used Knitters Pride “Zing” metal ones for several months. The Zing are lightweight, very smooth, and they hold the yarn but I found I had still had more slipping than with wood. By that I mean when you hold up and shake the sock in progress the Zing do sometimes slip out – the Cubics – never. It was like returning home when I switched back to the Cubics mid way through this pair of socks. They slip through the yarn smoothly; they just don’t fall out – ever. I enjoy the feel of them in my hand. Mine are actually getting smooth on the edges from use, the points have also worn a bit but I’m sure they’re still good for many more pairs of socks.
I’ve passed on bits of information about the COVID-19 pandemic before. I just read this article by Atul Gawande – a surgeon and medical writer – which I’ve summarized; however, I really recommend reading his whole article if, for nothing else, than to enjoy the clarity of his writing (click on the title to get to the article).
[I’m both quoting and summarizing Gawande’s discussion in what I’ve shared below]
“… Hospitals have learned how to avoid becoming sites of spread. When the time is right to lighten up on the lockdown and bring people back to work, there are wider lessons to be learned from places that never locked down in the first place.
These lessons point toward an approach that we might think of as a combination therapy—like a drug cocktail. Its elements are all familiar: hygiene measures, screening, distancing, and masks. Each has flaws. Skip one, and the treatment won’t work. But, when taken together, and taken seriously, they shut down the virus.”
Cleaning your hands is essential to stopping the transfer of infectious droplets from surfaces to your nose, mouth, and eyes. Frequency matters – The key, seems to be washing or sanitizing your hands every time you go into or out of a group environment, and every couple of hours while you’re in it; plus disinfecting high-touch surfaces at least daily (like your phone). BTW environmental transmission (i.e via touching things) may account for as little as 6% of COVID-19 infections, he says.
The virus spreads primarily through respiratory droplets emitted by infected people when they cough, sneeze, talk or simply exhale (singing in a group is very hazardous!). That’s why physical distancing is so important – the six foot rule. While not perfect (some people’s sneezes can travel up to 20 feet!), it helps a lot since most droplets seem to fall within a 6 foot radius.
COVID-19 is not actually crazy infectious – an infected person might infect 2-3 people while going about ordinary life but that means the disease spreads. Exposure time matters: less than 15 minutes with an exposed person makes spread unlikely. Again, the 6 foot rule goes a long way to shutting down this risk.
In the health setting daily screening of all employees, patients, and visitors for symptoms of COVID-19 is crucial for preventing the spread of the disease. People are asked to confirm that they have not developed:
a new fever,
cough,
sore throat,
shortness of breath,
loss of taste of smell,
or even just nasal congestion or a runny nose – [My take-away from this, is we need to monitor ourselves for these symptoms constantly and keep away from other people should we experience any of them and stay away for another 72 hours after we’re feeling better.]
The critical thing about COVID-19 is that the virus can make people infectious before they develop any symptoms of illness.
That’s the reason for MASKS! Combining social distancing with masks can block the spread of respiratory droplets from a person with active, but perhaps unrecognized, infection.
The cloth masks, while not as effective as surgical masks, can block droplet emissions, as well. (And the virus does not last long on cloth; viral counts drop 99% in three hours.)
“Culture, is the fifth, and arguably the most difficult, pillar of a new combination therapy to stop the coronavirus….It’s about wanting, among other things, never to be the one to make someone else sick.” [It’s all about social responsibility – accepting that my actions can have serious (even lethal) consequences for other people.]
The first of the official guidelines in the US for re-opening is at least 2 weeks of very low to zero new cases! This is most difficult – waiting for the number of new cases in the community to drop to zero (or almost zero) and stay there.
I was explaining to someone the other day it’s kind of like the difference between setting off on a car trip to Chester (NS) vs a car trip to Vancouver! You’ve got a very different mind set when you start out to go to Chester (from Halifax) – it takes an hour and the trip’s over before you know it. The mind set for a car trip to Vancouver is a committed undertaking – you know it’s going to be a long, uncomfortable, inconvenient, sometimes boring, haul.
Well, we’re all taking that long slow car trip to Vancouver right now – we need to accept the expectation that our commitment to – frequent hand washing, self-monitoring, social distancing, wearing masks, and remembering each of us does this not just to keep ourselves safe, but to keep others safe – will have to go on for a LONG time. The better we are at following the full regimen the safer we all will be and the faster we can experience the world beyond our homes safely again.
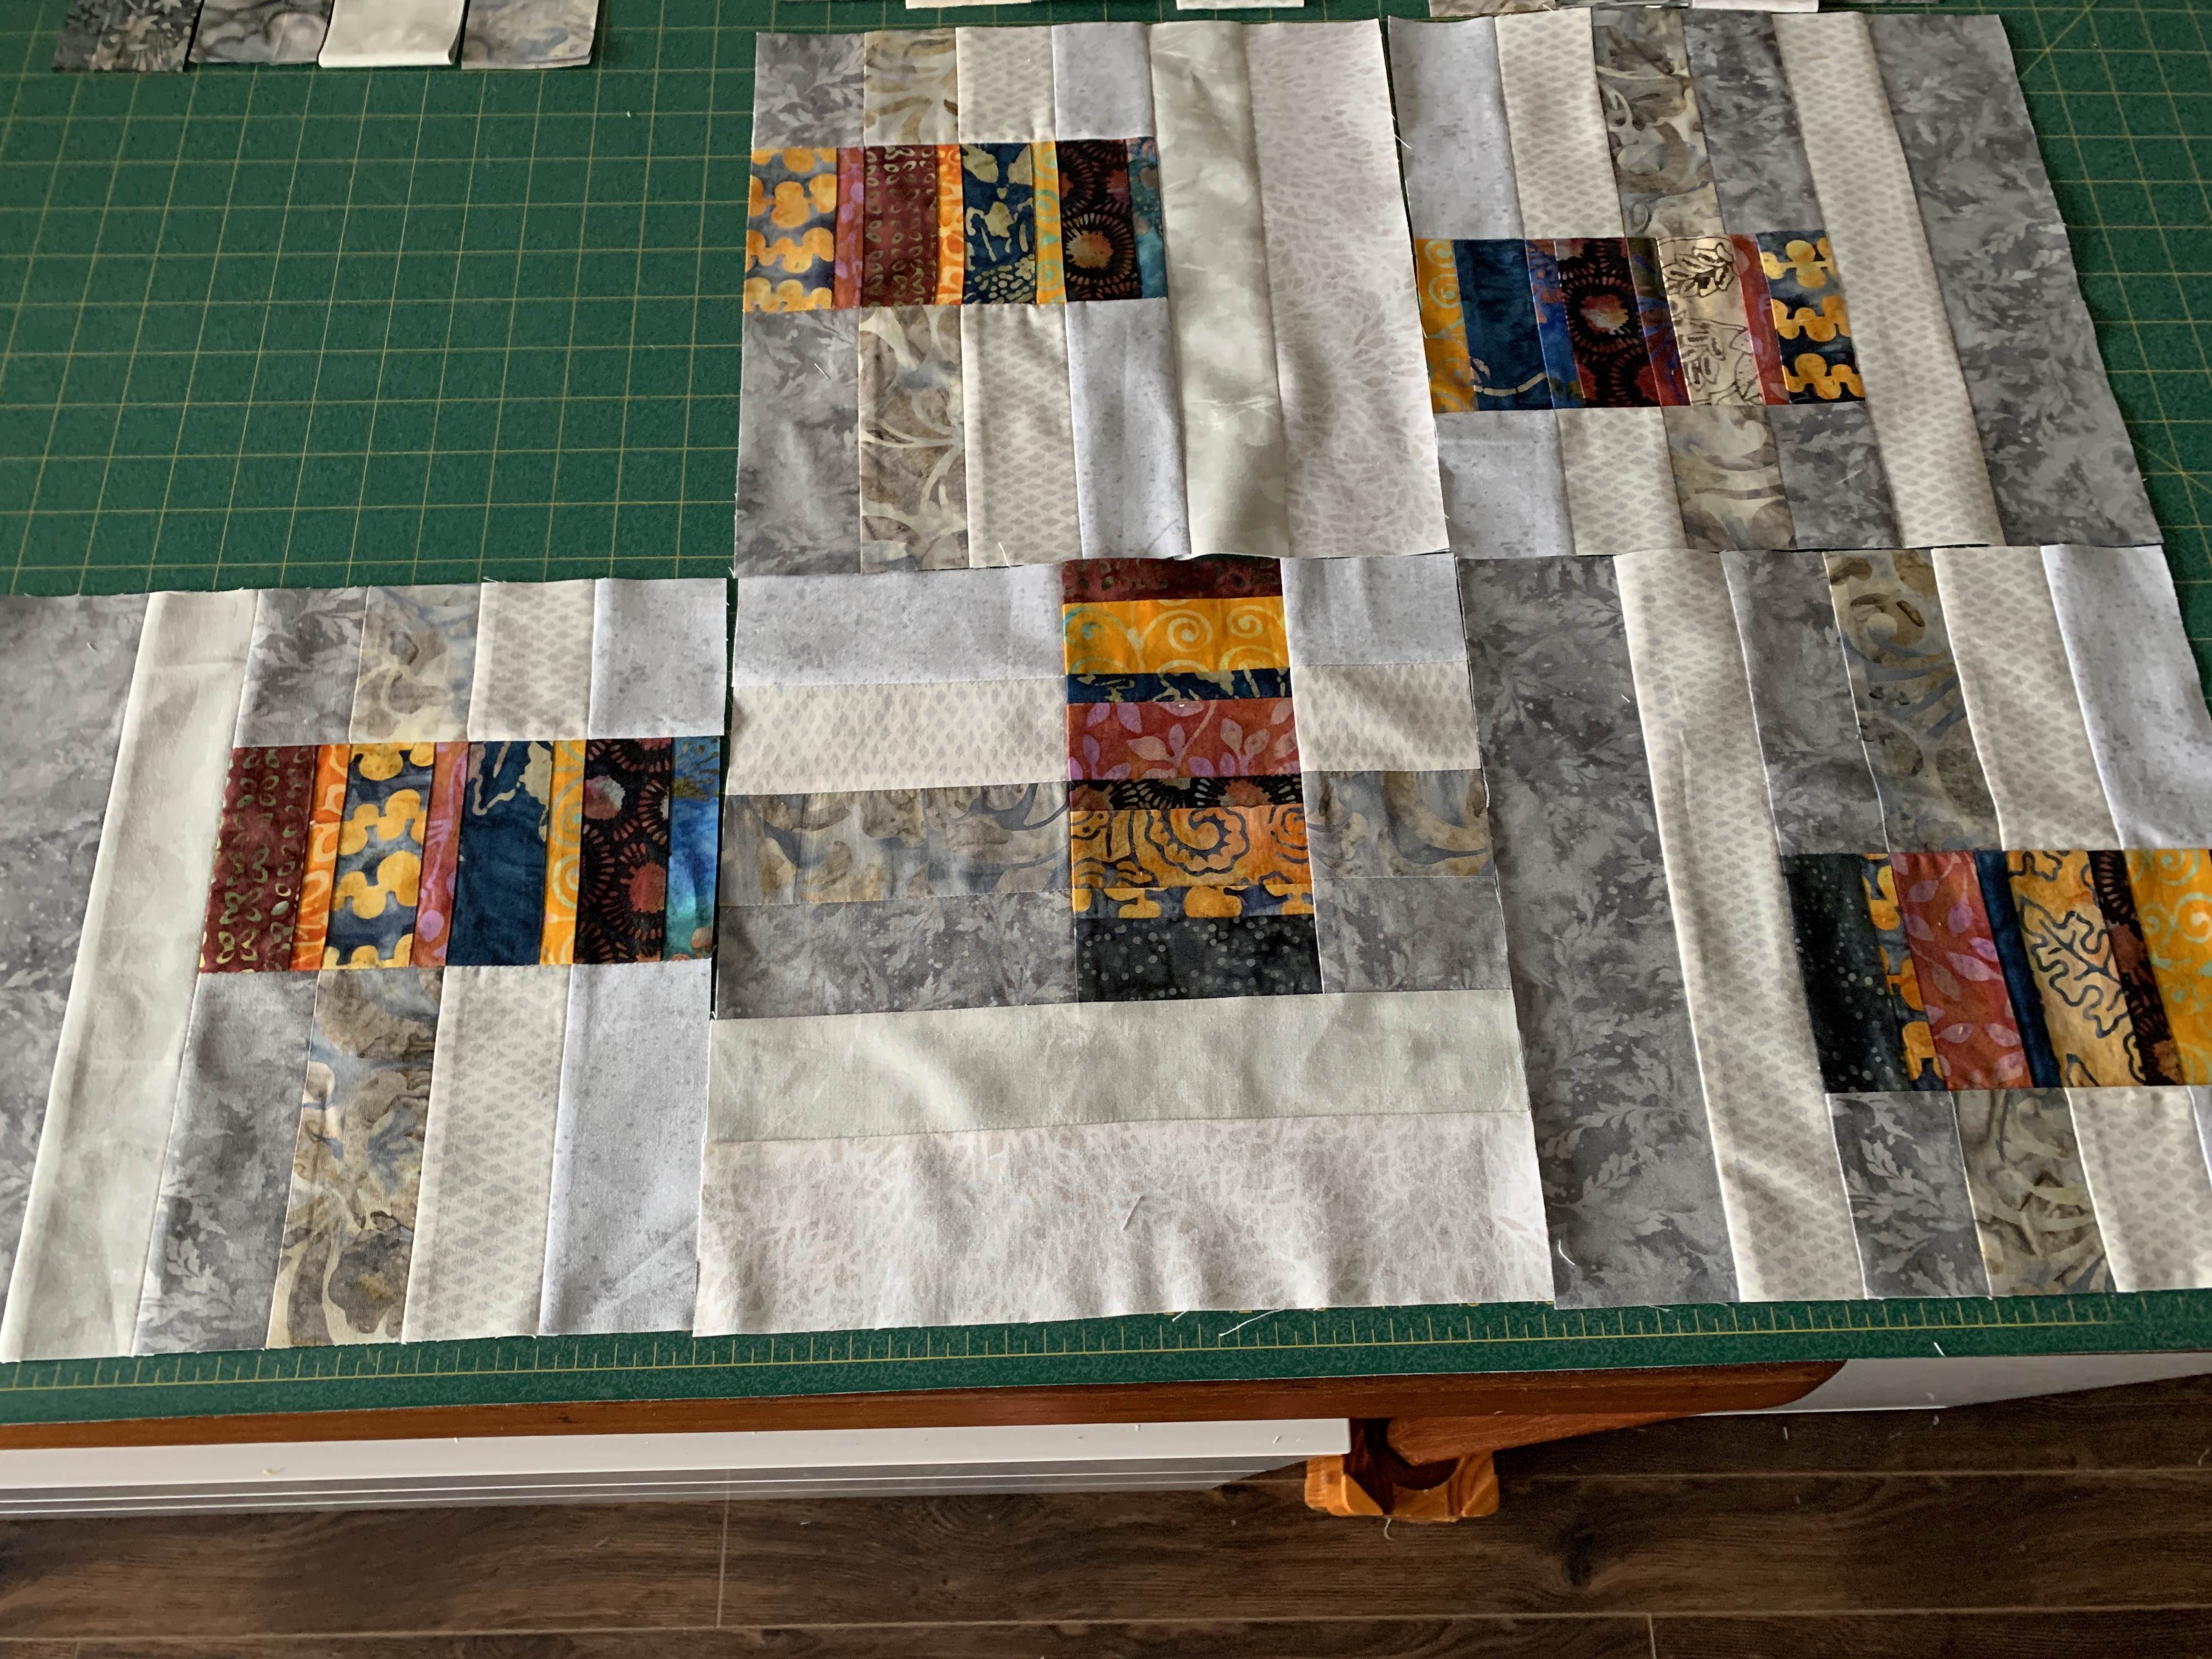
I took the blocks, rotated each in turn clockwise (both vertically and horizontally) to move the contrast strip around. I then sashed the blocks in each horizontal row, assembled the rows, and sashed between the rows using pieces of the lighter fabrics (a mixture of batik and printed grey fabrics) to lighten the overall appearance of the quilt top.
Blocks Assembled
My size, at this point, is 50″ x 64″ – probably large enough for a good sized throw/lap quilt without borders. And looking at the photo, I think I’m going to do a hidden binding so those contrast elements at the edge stay at the edge.
Now to think about the reverse side. Back to my stash to see what I have in the way of largish pieces of grey fabric I can put together with 3 (possibly 4) of the extra blocks I have left over. I know there isn’t a single large piece that I can split and insert a strip to make a backing wide enough. I’m sure I will have to do more piecing than that….
I don’t have a name for this quilt – nothing pops to mind
I’ve just finished 20 blocks (actually I have 23 and could probably eke out a 24th – to use on the quilt back). The question is now what?
20 Blocks
I could just stitch the blocks together (after I’ve looked at the placement for a while and moved some around); or, do I want to add pieced sashing between the blocks to extend both length and width a bit? I do intend adding an outer border – probably pieced using both light and dark fabrics.
I guess the next step is to go through the fabrics in my stash to see what I have that might work for sashing – I don’t need all the sashing to be the same fabric, in fact, it might be interesting to mix and match fabrics – the challenge with that is to be accurate enough that I actually align the seam matches with seams in the existing blocks…
A couple of weeks ago, Saturday afternoon, I was watching America’s Test Kitchen on PBS. Among the dishes they made was a Torta Caprese – “an Italian flourless chocolate cake with finely ground almonds (which breaks up the heavy fudge crumb of most flourless chocolate cakes)”. They’re right – it does.
I went to the website to find the recipe: America’s Test Kitchen – Torta Caprese. I saved it, and printed it out. (If you can’t get to the recipe let me know because I created a PDF from the “print” pages and can pass that on.)
Torta Caprese
I was anticipating a very chocolate-y, light cake and it is.
Here is my torta caprese – I must explain why it doesn’t look like the one above (from America’s Test Kitchen).
Torta Caprese
First, there’s an ambiguity in the recipe – it calls for 2 cups (7 ounces) of almond flour – well, which is it? 2 cups or 7 ounces (and BTW my cup = 8 ounces, not 7, but I ignored that discrepancy.) I added 1 cup of almond flour at the appropriate place in the recipe, mixed it into the batter, and I thought the batter looked reasonably thick at that point but to be on the safe side, I added another 1/4 cup scoop of almond flour, just in case the batter really needed more. I’d say, having sampled the cake, that it’s just a tad on the dry side and next time I’d only add a single cup of almond flour.
Second, my springform pan is 9 1/2″ – I could have used a smaller diameter which would make the cake taller, or I could have baked it in a 8 1/2″ parchment-lined cake pan which would also have produced a taller cake.
Third, the recipe recommends turning the cake around half way through the baking. I did that, but had an accident! I was baking the cake in my convection toaster oven which is large enough for my spring form pan. I pulled out the rack to be able to reach the cake pan when the rack tipped toward the back of the oven, the cake pan tipped spilling some batter into the oven. I managed to right the pan and the rack and get both back in position. I left the mess in the bottom of the oven hoping I’d be able to clean it reasonably easily if it didn’t bake on too badly. So the top of my Torta is kind of wonky having been disturbed half way through baking.
But I have to say the cake tastes “right some good” as folks say in this part of the country. Served warmed (I’d zap a slice in the microwave for, say, 12-15 seconds), with a spoonful of a good vanilla ice cream – a lovely dessert for guests.
I’m planning on cutting the cake into small portions, freezing each separately, and eating the whole thing myself – preferably over a period of weeks.
Since I finished Black Rock Beach (a week ago) I’ve been struggling to get a quilt going. I’d hauled out groupings of fabric several weeks ago for some ideas I wanted to try but in each case I was missing either contrast or background fabrics to make the idea work. I ordered some possible pieces online but I’ve had to wait for them to arrive – two have but I’m still waiting for two more to show up before I can start on either of those possible projects.
I’d also thought about working on a diamond/triangle lap/throw quilt based on ideas in Jan Krentz’s book “Quick Diamond Quilts And Beyond“. I pulled out some scraps, cut some triangles and diamonds and tried assembling them – my accuracy was nowhere close. Part of my problem was actually cutting – I used a template for the triangles, cutting from a strip the height of the triangle but as careful as I tried to be when stitching I could not manage to combine four triangles into a larger triangle with the edges matching! I need more practice – with cutting, stitching, and pressing. I will get back to that idea but not at the moment!
I moved on to something else. I’d picked out a scrap bag of grey batik fabrics (twelve 9″ cuts) and then some much brighter batiks to use as contrast.
The idea is to sew four grey 2 1/2” strips together, cut into blocks, split the block off-centre, insert a contrast strip, then add two more rows to one side to square off the block.
5 Completed Blocks
I’ve completed five blocks so far. The first block was an experiment to figure out how to construct the insert collection. Also, because my grey fabrics are 9″ WOF cuts I can’t get 2 1/2″ strips from them – just 2 1/4″ – so all my other measurements had to be calculated to accommodate that difference.
What I’m seeing now, is a 4 block by 5 block quilt, with some additional complementary piecing at the top and bottom to extend the length of the quilt relative to the width. I plan on adding an outer border, as well, to make the lap quilt/throw just a bit larger overall.
I pieced all the insert strips today. I’ve cut enough 2 1/4″ grey strips for 22 blocks, as well as pieces for the two longer outer strips. I’m ready to go with chain piecing the blocks tomorrow.
Life now feels more normal with a quilt on the go!
Just finished. Unfortunately, the photo doesn’t do the piece justice – I’ve tried lightening the blue of the frame and can’t get close to the real colour without distorting the body of the piece.
Black Rock Beach
I’m happy with the balance of the whole. The piping, which doesn’t show well in the photo at all, pulls out both the orange of the vest and the blues of the water.
Now to find a place to hang it in my apartment – there isn’t obvious wall space in any room. I’m going to have to walk around and decide what to take down so I can display this piece of art.
Finished this pair of socks last evening. A Regia sock yarn from their Arne & Carlos collection – Mountains & Fjords.
Regia – Mountains & Fjords
I found this spread out pattern calming to knit with. I have another ball in the series in shades of blue and I’ve just ordered three more in brighter shades.