One Pair Of Socks Completed; New Quilt Started

The knitting continues as usual. A couple of evenings ago I finished this pair of red/brown socks – they’re in the give-away stash. The next pair of socks got underway.

Red Socks Completed

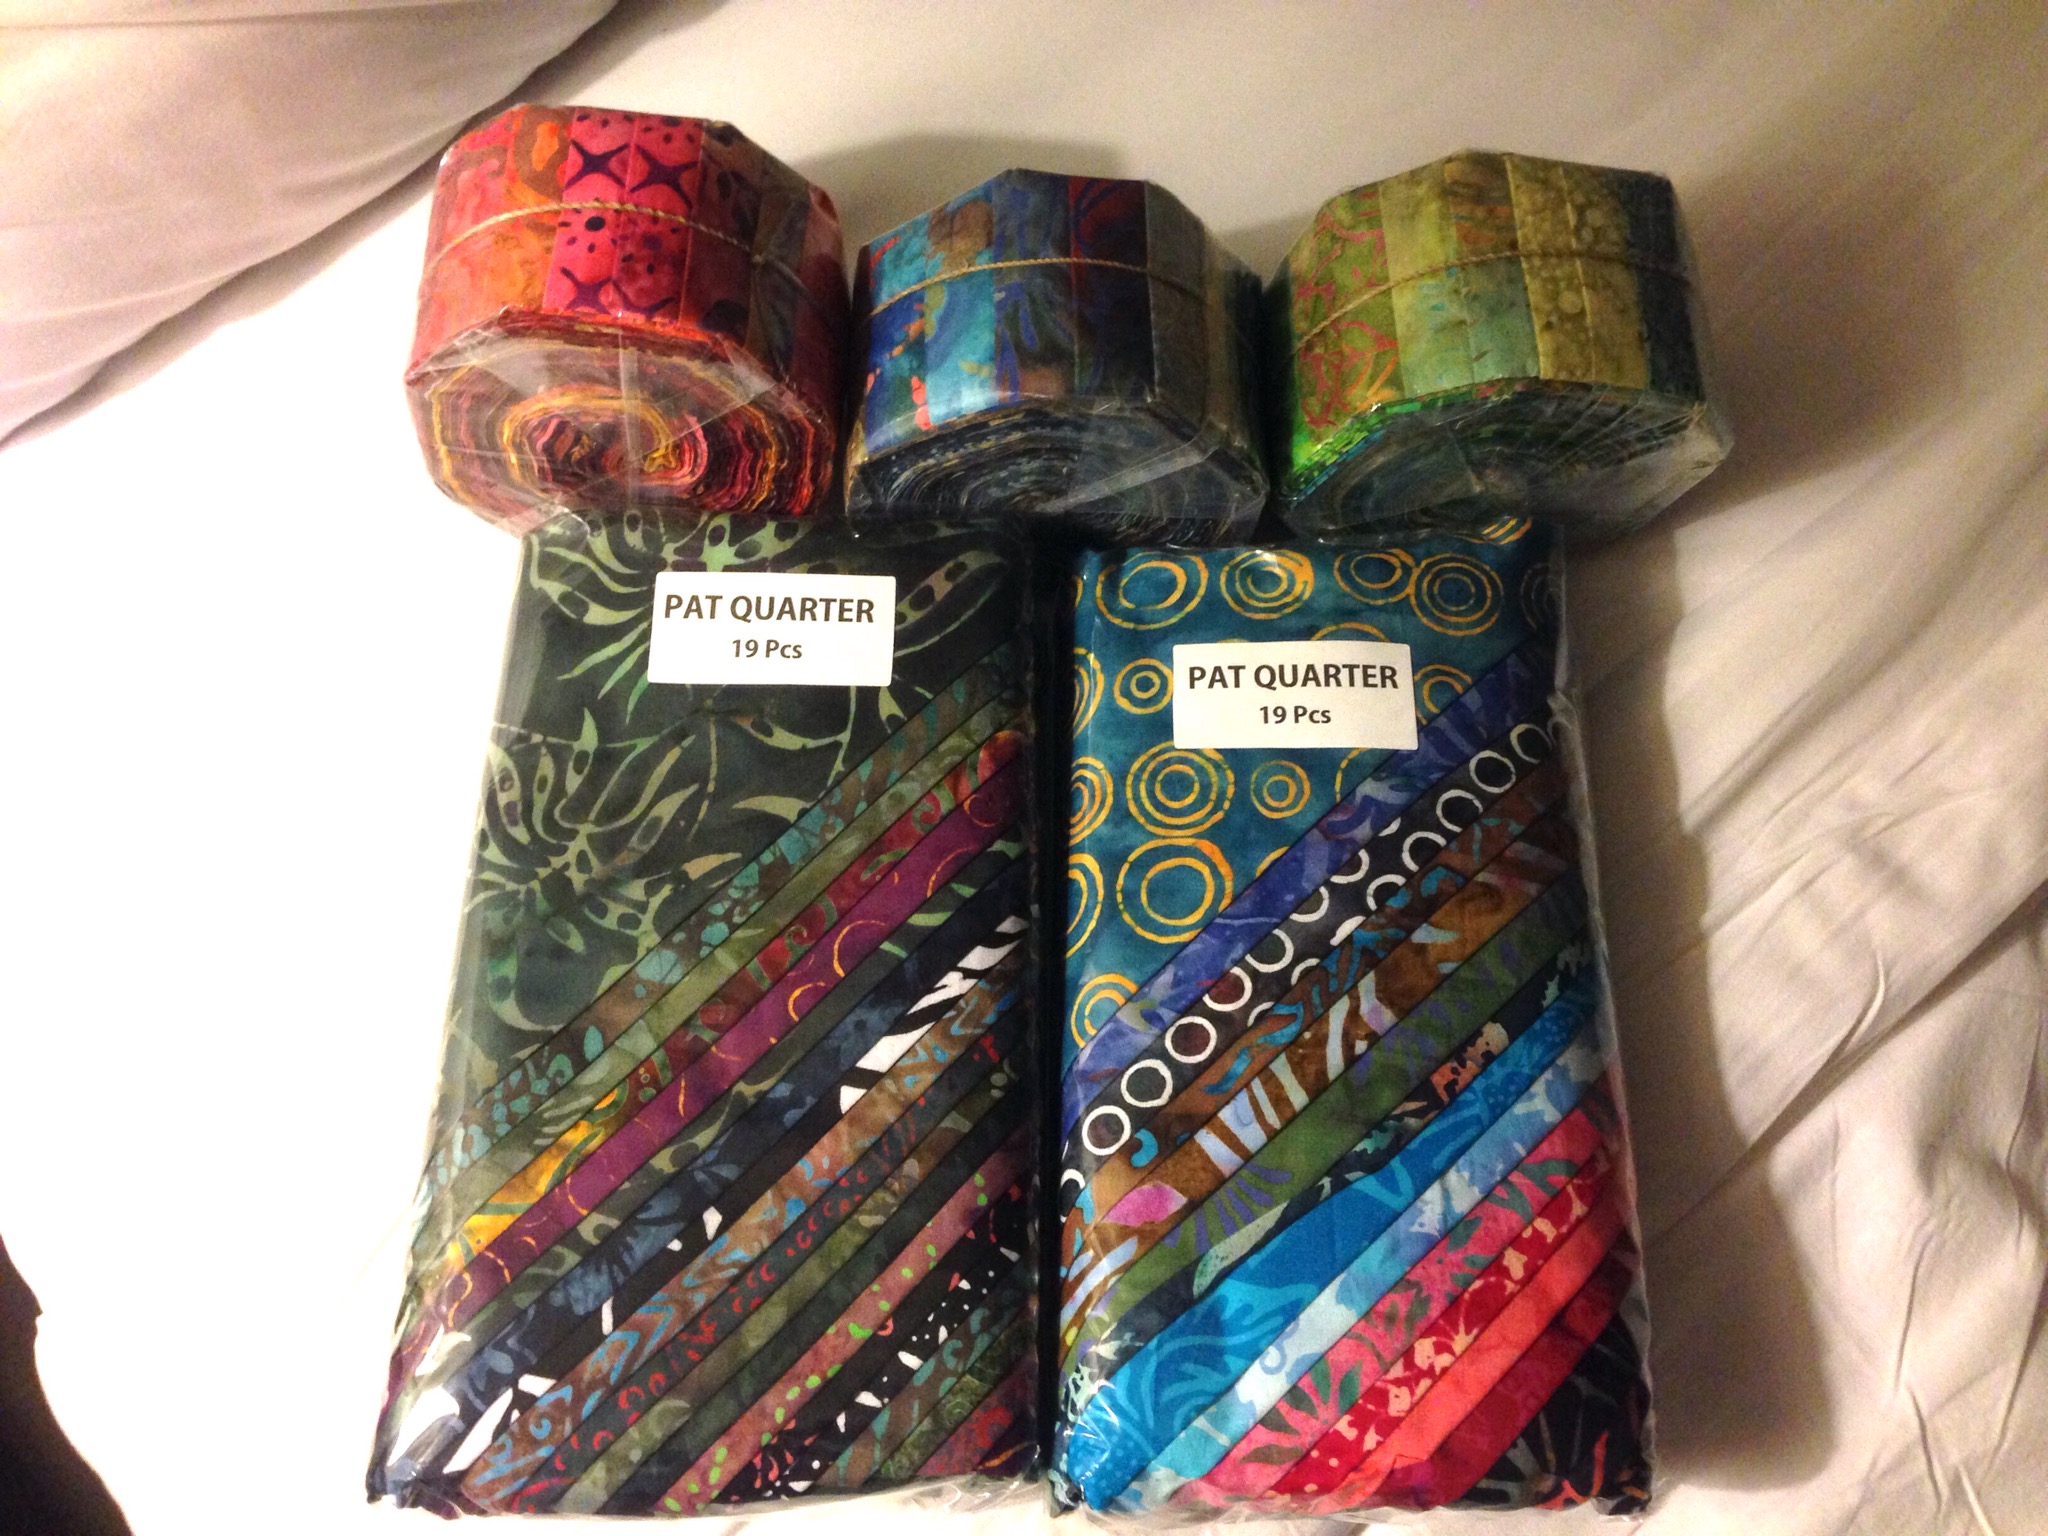
A few days ago, I also started a new quilt. I had a collection of leftover batik jelly roll strips – I sorted through them picking out contrasting lights and darks in a variety of shades (reds, blues, yellows, greens, browns…) and set up sets of four. If I had stitched them together as 2.5″ strips my resulting blocks would have been 8.5″ square which was bigger than I wanted for the quilt I was planning so I trimmed them to 2″ which has given me 6.5″ blocks to which I’ve been adding sashing strips which will finish at 1″ – completed block size = 7″.

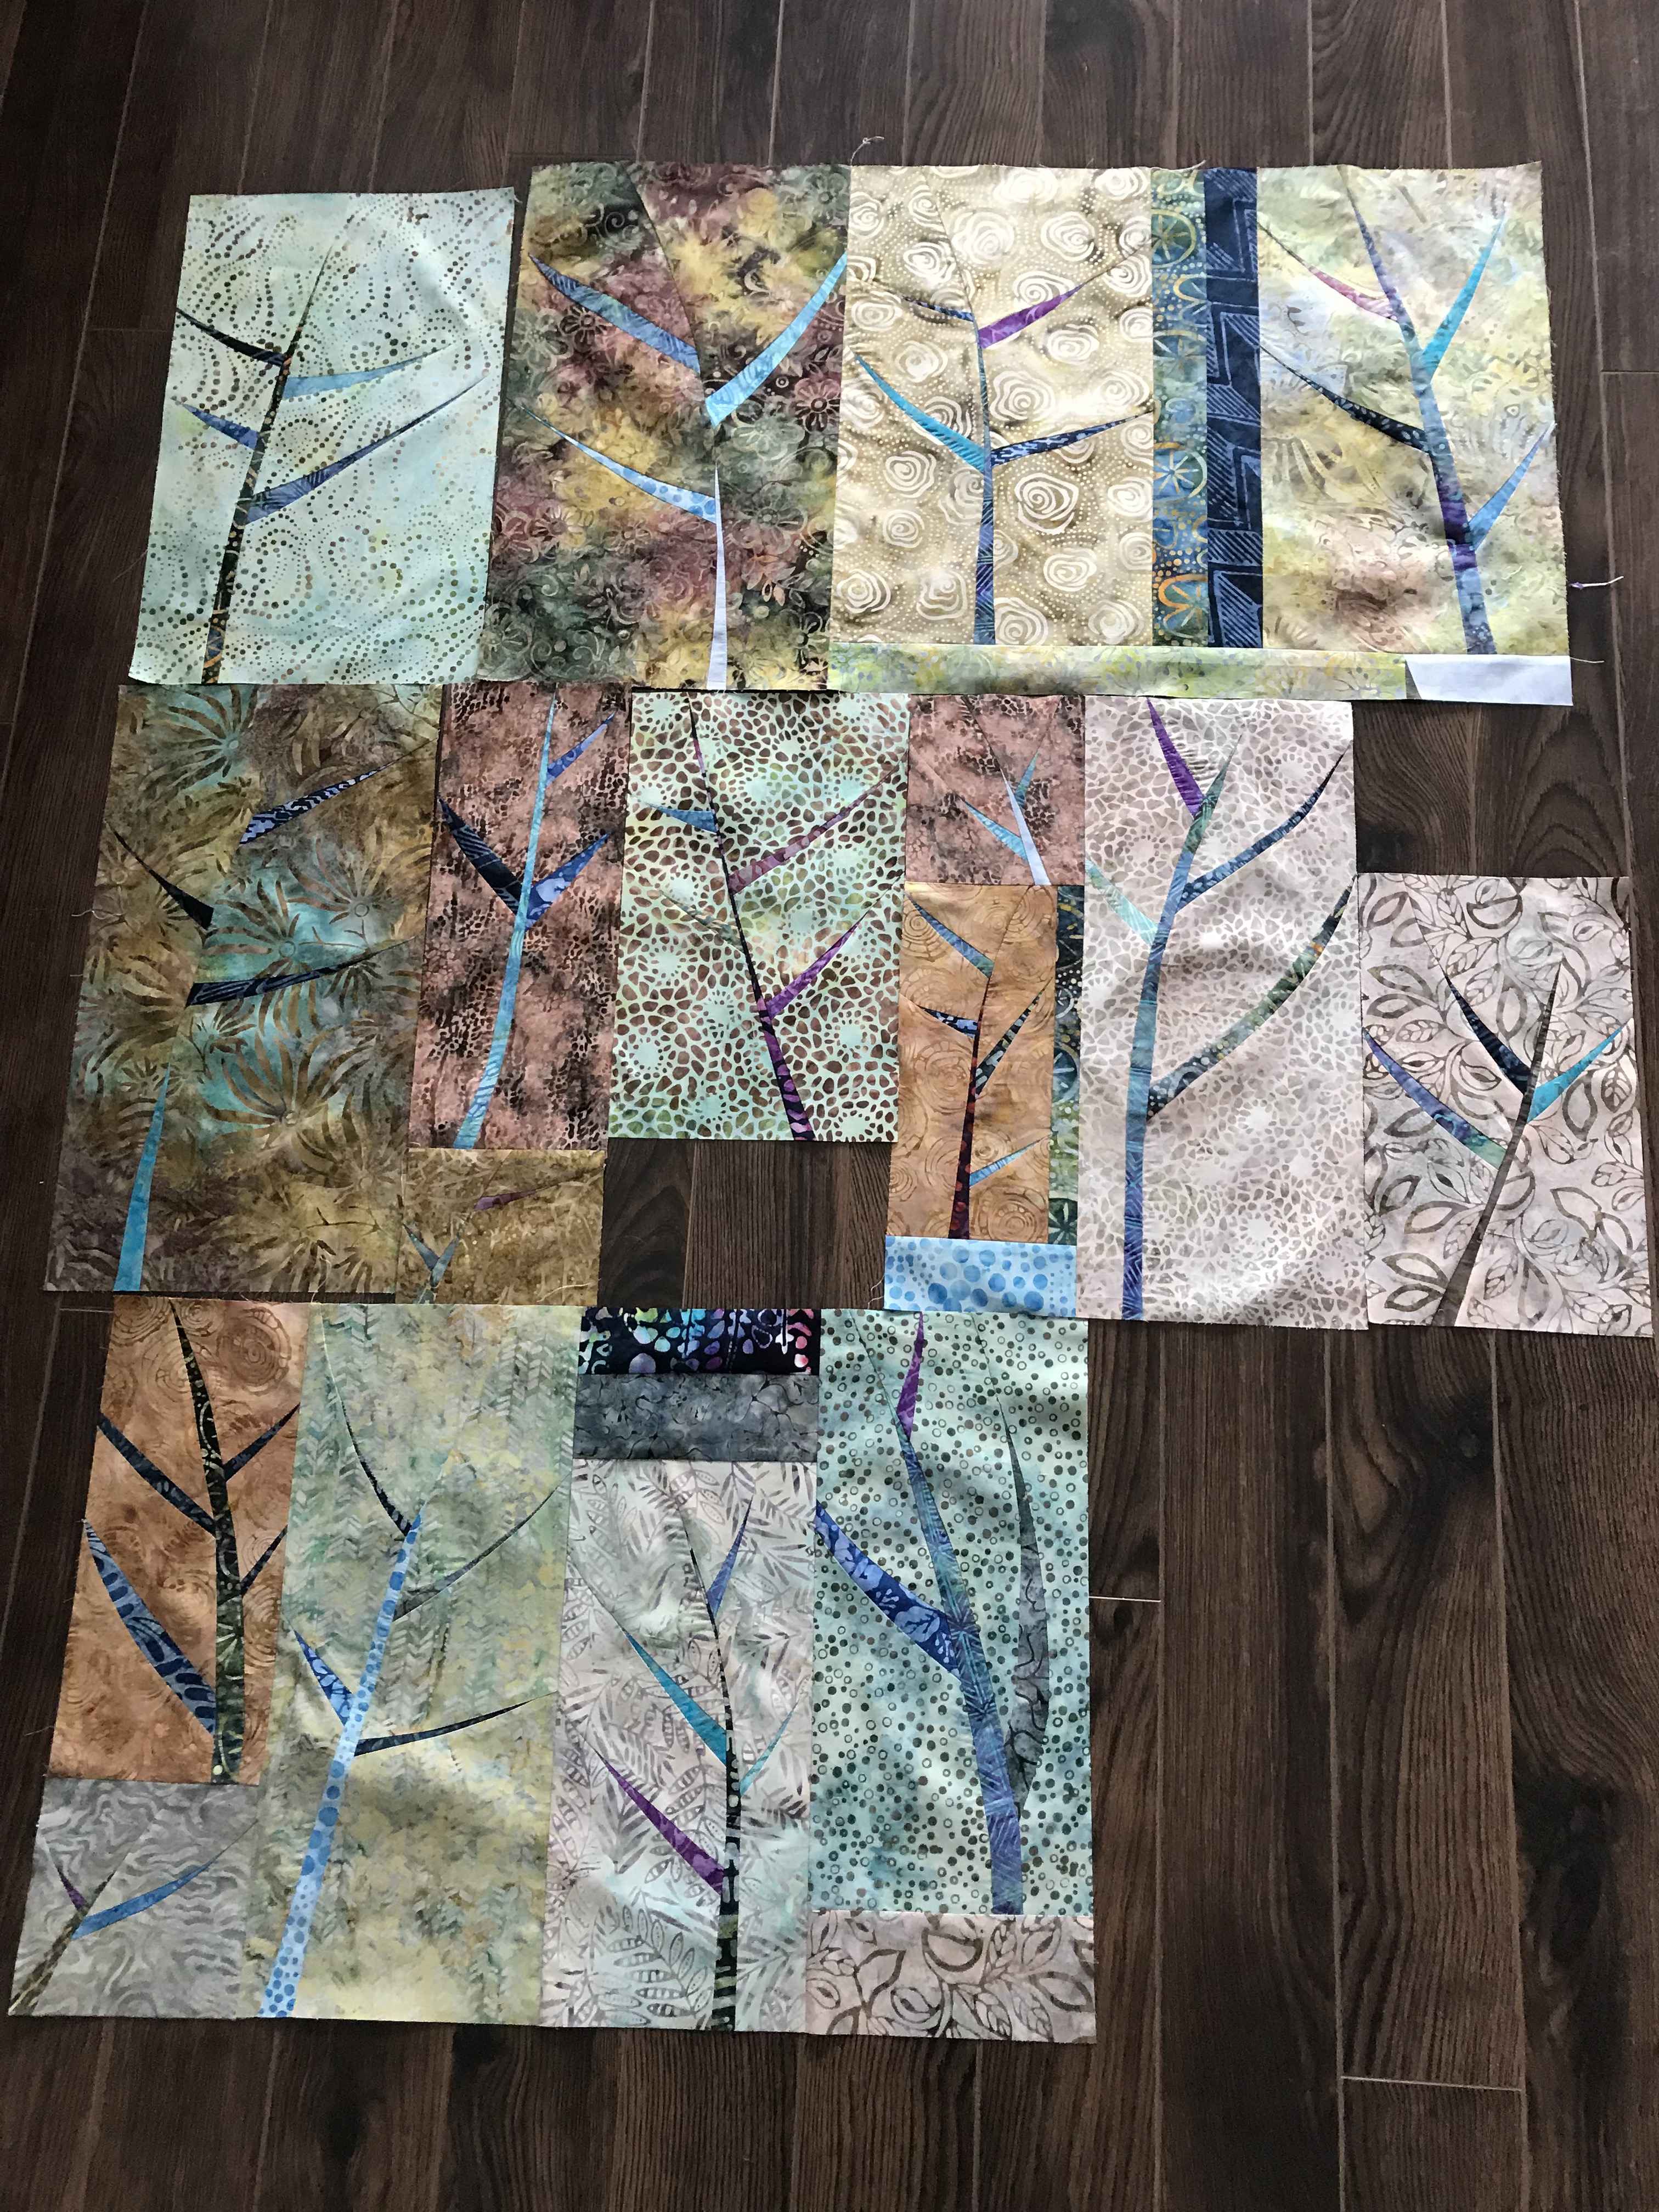
First Half of Latest Quilt

As you can see in the individual blocks, I’m alternating asymmetrically cut pieced strips with narrow sashing and alternating the sashing direction when I put them together. I’ve offset the third column against the second – it’s about making it easier to sew the columns together – the sashing joins don’t need to match up. (I’ll match up the blocks/sashing position in the 4th and 5th columns with the 2nd and 3rd.) It’s also making the content of this modern quilt less regular, therefore a bit more interesting.

Also, around the outside (on three sides) I’m using fewer pieced strips in each block (you can see that in column 1) to increase the amount of background toward the outside edges of the quilt. I’m planning a 6 x 8 quilt to which I will then add uneven borders – 3″ on the top and left, 6″ to the right and bottom to extend the background and position the pieced blocks toward one corner of the finished quilt.

I’m half way there – I completed three more blocks for column four late this afternoon, I hope to finish the fourth and fifth columns tomorrow which will leave just one column (with blocks composed mostly of background to complete Monday). I have fabric from the original sewn strips sections to use when I go to make the quilt back – don’t know what I’ll do with them, yet (haven’t chosen a backing fabric either – have to go through what’s in the stash and hope there’s something there that might be suitable).

The background fabric (a pale grey grunge by Moda Fabrics) I did purchase just for this quilt – I really didn’t have a long enough length of anything that would set up a strong contrast between background and inserted strips.

I find it interesting that in spite of the quantity of fabric in my stash I still have to buy fabric each time I go to make a new quilt. I seem to be missing some fill-in colours, or background or backing. The stash just seems to keep getting bigger!

Bamboo Quilt – Piecing of Panel Done

Finally, I have finished piecing the elements for this quilt top. The next steps will go relatively quickly.

Bamboo Quilt Panel – Finished

Now I have to add borders: a narrow light one, then a wider batik that seems to coordinate with all the other batiks in the pieced panel.

I’m thinking I will do something simple to extend the width of the back – a jellyroll race piecing, crazy quilt strip…. Whatever it turns out to be it will go a lot more quickly than this piecing did. I got tired of creating these elements which took quite a bit more time than I expected when I started which is why the project ground to a halt.

Now I can move again, get the quilt done and added to the collection for the showing in Parrsboro this summer. Whew!

Bamboo – Further Along

Making headway. The width is now about 42″, with the fill-ins being place-held with batik blocks; the panel length will approximate 62″ – with borders added the quilt top will end up a reasonable size for a lap quilt.

Tentative Layout

So it’s looking like I will want between 7-10 more “bamboo” blocks – that’s getting to be within range (it was beginning to feel as if the end of the project was nowhere in sight). I’m giving up on getting any overlap between the blocks – bits of sashing to make blocks fit is going to have to do.

Truth is I’m feeling pressure to get this quilt done. I want to get onto a bit of garment sewing – I need to make a pair of pants and maybe another casual jacket to take to Florence at the end of April – that’s just a month away.

Bamboo – Making Progress

I’m making headway slowly on the Bamboo quilt top. I’ve created some more blocks – they’re getting better even though I’m not getting faster! The tapering of the inserts is looking more like I want it to. I’ve also started joining blocks and fitting in inserts where needed to make row segments. I’ve got 15 blocks assembled – I figure I’ll need between 35 and 40 to make a lap-size quilt.

Bamboo – Beginning To Take Shape

In the picture I saw originally, there are some leaves overlapping from one block to another: 

The only way I think this can be done is if the whole quilt top was constructed using raw edge appliqué. I’m doing this with slashing and inserting contrasting fabric.  I’m stumped about how to accomplish the overlapping across blocks! Nevertheless I’ll keep working away at these blocks.

Charm Quilt I – Finished

Just done. Label and all. I’m pleased with how the quilt turned out. I like the contrast between the two muted background fabrics and the individual swatches – each is strong and colourful, yet they blend well.

I wasn’t sure about the bold batik I used for the back – whether it complemented the insertion or not, but now that the quilt is completed I’m happy with the result.

This quilt I think has found a home in my living room- it fits in better than the quilt I had there.

Bali: Shopping for Quilting Batik

IMG_3849.JPG

IMG_3850.JPG

Shopping in Bali is a bit like shopping the Yellow Pages – for lots of things you go to the location where whatever it is is sold and you will find many shops selling the same commodity. That’s how it was today shopping for cotton quilting batiks!

We returned to Denpasar to the quilt fabric street to look at cotton quilt batiks. Barb and Cheryl, after years of coming to Bali, have established a relationship with a number of wholesale quilt fabric vendors. Rayyis’s shop was our first stop. He had a terrific selection of cotton quilting batiks (there was also a lovely rayon batik selection as well, but having bought some already, I wasn’t interested in looking at those fabrics; my focus was on quilting cotton). Rather than buying large cuts of a few cotton fabrics, I was looking for fat quarter and jelly roll collections which would give me a large number of smaller coordinated fabric pieces.

Rayyis had lots of both making it hard to reach a decision, but in the end I chose two fat quarter collections (19 different fabrics 18″ x 22″ – half of a half yard), and three jelly rolls (40 different fabrics in strips 2 1/2″ x 44″) for a third of what they would cost at home (I am not counting in my travel costs here).

IMG_3860.JPG

The next stop, a few shops down the street, we found some traditional Javanese prints on a wonderfully silk-like cotton fabric. I couldn’t walk away from it – I bought a meter.

IMG_3861.JPG

We could have spent days here poking into shops – each with slightly different selections, some high quality fabrics, others of lesser quality – all interesting. But there were other sewing related stops to make so we headed back to the Bali Bakery for lunch. We had eaten there yesterday – as we were leaving, I noticed a shelf of shoes constructed of chocolate!

IMG_3858.JPG

Our afternoon was spent in two wholesale shops across the street from one another (both part of the same business) browsing through beads, lace, elastic, feathers, you name it. In the end I came away empty handed because either the item I looked at was only sold in large quantity, or because you need a specific notion for a particular project. These items are hard to stash.

By mid afternoon we were done in. We returned to the hotel and spent an hour in the pool cooling off.

Tomorrow it’s indigo dying.

Bali: Creating Batik Fabric

We traveled back to Denpasar today to visit a batik factory. The market for rayon batik fabrics has fallen sharply and this factory which was a bustling enterprise is now struggling to find a way to survive. They have started to batik a range of other fabrics: a linen/cotton mix for beautiful tote bags in a variety of sizes; knit fabrics for gorgeous t-shirts, silk for scarves and blouses… And they’ve turned to making these products for export as a way of keeping the batik business alive.

The purpose of our visit was to make some batik ourselves. Making batik involves hand stamping wax on fabric using a copper tjap, a labour intensive process. The wax protects a base colour on the fabric when it is dyed a second time using a darker colour.

IMG_3757.JPG

Five yards of a very high quality rayon fabric had been dyed and over-dyed in preparation for us. So we came into the process at the waxing stage. We were invited into the room housing a couple of hundred tjaps to choose one or more for our own batik:

IMG_3749.JPG

I chose two tjaps:

IMG_3767.JPG

IMG_3765.JPG

Next we headed to the waxing table – a cool, spongy, surface on which to stamp the fabric:

IMG_3777.JPG

The wax is heated in a large, shallow tray (heated from below using a gas burner). The tjaps are placed in the hot wax until the copper is hot, then the wax-bearing tjap is stamped onto the fabric creating a repeating design.

The fabric to be stamped is laid on the table, and the stamping process begins. We were helped out by Henry whose spatial sense was amazing – he could control the positioning of each stamping that can only come from years of working with the tjaps!

IMG_3793.JPG

My fabric quickly took shape:

IMG_3799.JPG

Once the fabric is completely stamped, it is dyed again, hung to dry, then dipped in fixative, rinsed again, next put in boiling water to remove the wax, then finally dried again. Henry will complete all of these steps over the next couple of days and we will get our five meters of batik by the end of the week. Can’t wait to see how mine will turn out.

Next stop lunch, then on to a sarong wholesaler where I bought a sarong with hand painted flowers – I want to make a summer skirt like one I saw in Goddess On The Go (they only had the one skirt like this and it was too small for me – so I will make one myself).

Last stop: a button store where I wanted to find two buttons for my latest quilted jacket :

IMG_3814.JPG

I had the foresight to bring a fabric sample:

IMG_3822.JPG

Tomorrow, exploring notions…

Bali here I come…

Bali1

This looks orderly – you should have seen it yesterday—that room was a MESS! It took me the whole day to organize stuff: following the rule – lay out all the stuff, then pack half the stuff and twice the money!

I’d already looked after the “twice the money” thing with a visit to the bank a couple of days ago. Yesterday was the day for sorting out “half the stuff.”

Notice the post it notes? I’ve been leaving messages to myself so I will remember a few last minute items I’m still using. I hope to finish up the pair of socks I’m working on tonight which will let me begin the pair I will work on while I travel (hence the small knitting bag with the fish mola).

I leave Wednesday afternoon. I’m travelling Toronto/Frankfurt/
Bangkok/Denpasar (takes three calendar days – about 35 hours travel time).

I’ve managed to get everything into the one suitcase (which is half filled with “gifts” – (which are heavy) that is the custom in Bali, apparently) – so there will be lots of room to bring back batik fabric. The bag weighs only 35 lbs – well below the 50 lb limit so I’m good to go (the bag will open another 2″ wider if I unzip that second zipper). On the way back the bag will likely be well over 50 lbs – I’ll simply pay the charges – or I guess I can jettison the clothing and other stuff I’m bringing to keep the weight within the limit – none of that is of concern at this point.

I have my small Japanese style backpack which I made a couple of months ago and a carry on bag which I made a couple of years ago to carry stuff to sewing classes – it’s not too big—just the right size for my pillow, a change of clothing, the liquids/meds/supplements that you don’t want to get lost on the trip. It’s not too heavy to carry across my body (I added some strap padding last evening for that very purpose).

Tomorrow and Tuesday I have things to catch up on—I will be able to attend to those tasks without feeling any panic about having to pack.

And Wednesday—the adventure begins. I’ve made contact with three women who are coming via Taipei, arriving in Denpasar about half an hour after I am (that’s if everybody’s connections actually happen as the itineraries say!). We’re planning to meet up in the Denpasar airport and travel together by cab to the first hotel we’re staying at. I’ll be looking for the chartreuse luggage tags we’ve all made.


Quilted Jacket

IMG_3244

Like I need another jacket! However, when Bonnie mentioned the quilted jacket class I thought I’d enjoy sewing with the gals again, so I signed up.

First, select two different fabrics (I chose two batiks) – buy 3 meters. Then I left the fabric at Sew With Visioin (the Pfaff/Husqvarna shop where the class was going to be held) to make into a quilt sandwich with bamboo batting, then to have the whole thing quilted on the long arm quilter.

Thursday I went to class having prepped the pattern – traced a size small knowing it would need a bit of adjusting. Cut the fabric, pin based it, adjusted the fitting and then began to sew.

The point of the class (as far as I was concerned) was to learn ways of joining double sided fabric using bindings. For the most part that wasn’t terribly difficult – line up one edge of the binding with the edge of the seam, sew, press binding away from the garment, fold over seam, press, pin (I actually found it easier without pinning), stitch binding to garment on the second side. The tricky seam was along the underarm of the sleeve – it gets narrow pretty quickly so it’s slow going carefully keeping the binding flat against the sleeve as you go along.

Because I wanted the jacket to be completely reversible and have pockets on both sides, I had to come up with a way to access the pocket on one side through a zippered welt opening on the second side.

IMG_3247

It looks as if there’s a pocket on the second side, but it’s actually just access through the front to the pocket on the other side.

The buttonholes took forever – I tried some samples on my embroidery machine but today the machine wouldn’t cooperate with me (it may have to go in for a check-up). In the end I decided to create bound buttonholes. This meant creating a facing for the second side to cover the unfinished buttonhole seams on that side. They turned out reasonably well.

Last thing – add buttons to both sides.

We’ve a second class coming Thursday but I’ve got appointments during the morning so I finished the jacket today. I’ll still go to class to show off my completed jacket and to socialize with the other gals.

Amazing World Map


My sister sent me a link to this image yesterday with the note “Imagine quilts like this!”

Rachel Evans

Rachel Evans makes colorful world maps out of Spirograph-produced patterns.

Can you just imagine a quilt map done with large pattern fabric?

I’ve pinned the image on my Pinterest board along with many other ideas. I’ll probably never do a quilt like this but it’s fun to think about trying one.