Another HST Quilt

Two weeks ago at class one of the gals gave me a batik charm pack in exchange for the materials I’d given her. The batiks – five related colours – all felt “burgundy”. I thought they’d work with a light background. I decided to create unequal half-square triangles.

I raided my stash of larger fabric pieces and found a remnant of a white with grey fabric from the Zen Chic Fragile Collection.  I measured it carefully – thought I had enough for 40 5″ squares, plus sashing pieces; I started cutting. Turns out I was close, but I had to hunt through boxes of scraps hoping to find a wee bit more – luckily I found exactly enough to scrounge 8 more 4 1/2″ sashing pieces. That was it – there are no scraps of any kind left! This fabric collection, this colour in particular, were popular and are nowhere to be found. Trust me, I looked for hours online.

Stitching Unequal HST

To construct the unequal HST I marked the diagonal, then another parallel line 1/2″ to one side. I chain stitched the diagonals, cut the blocks apart, chain stitched the second line, cut them apart. Then cut between the two lines of stitching. After pressing the blocks open, I added a 1″ sashing to two sides of the smaller triangles.

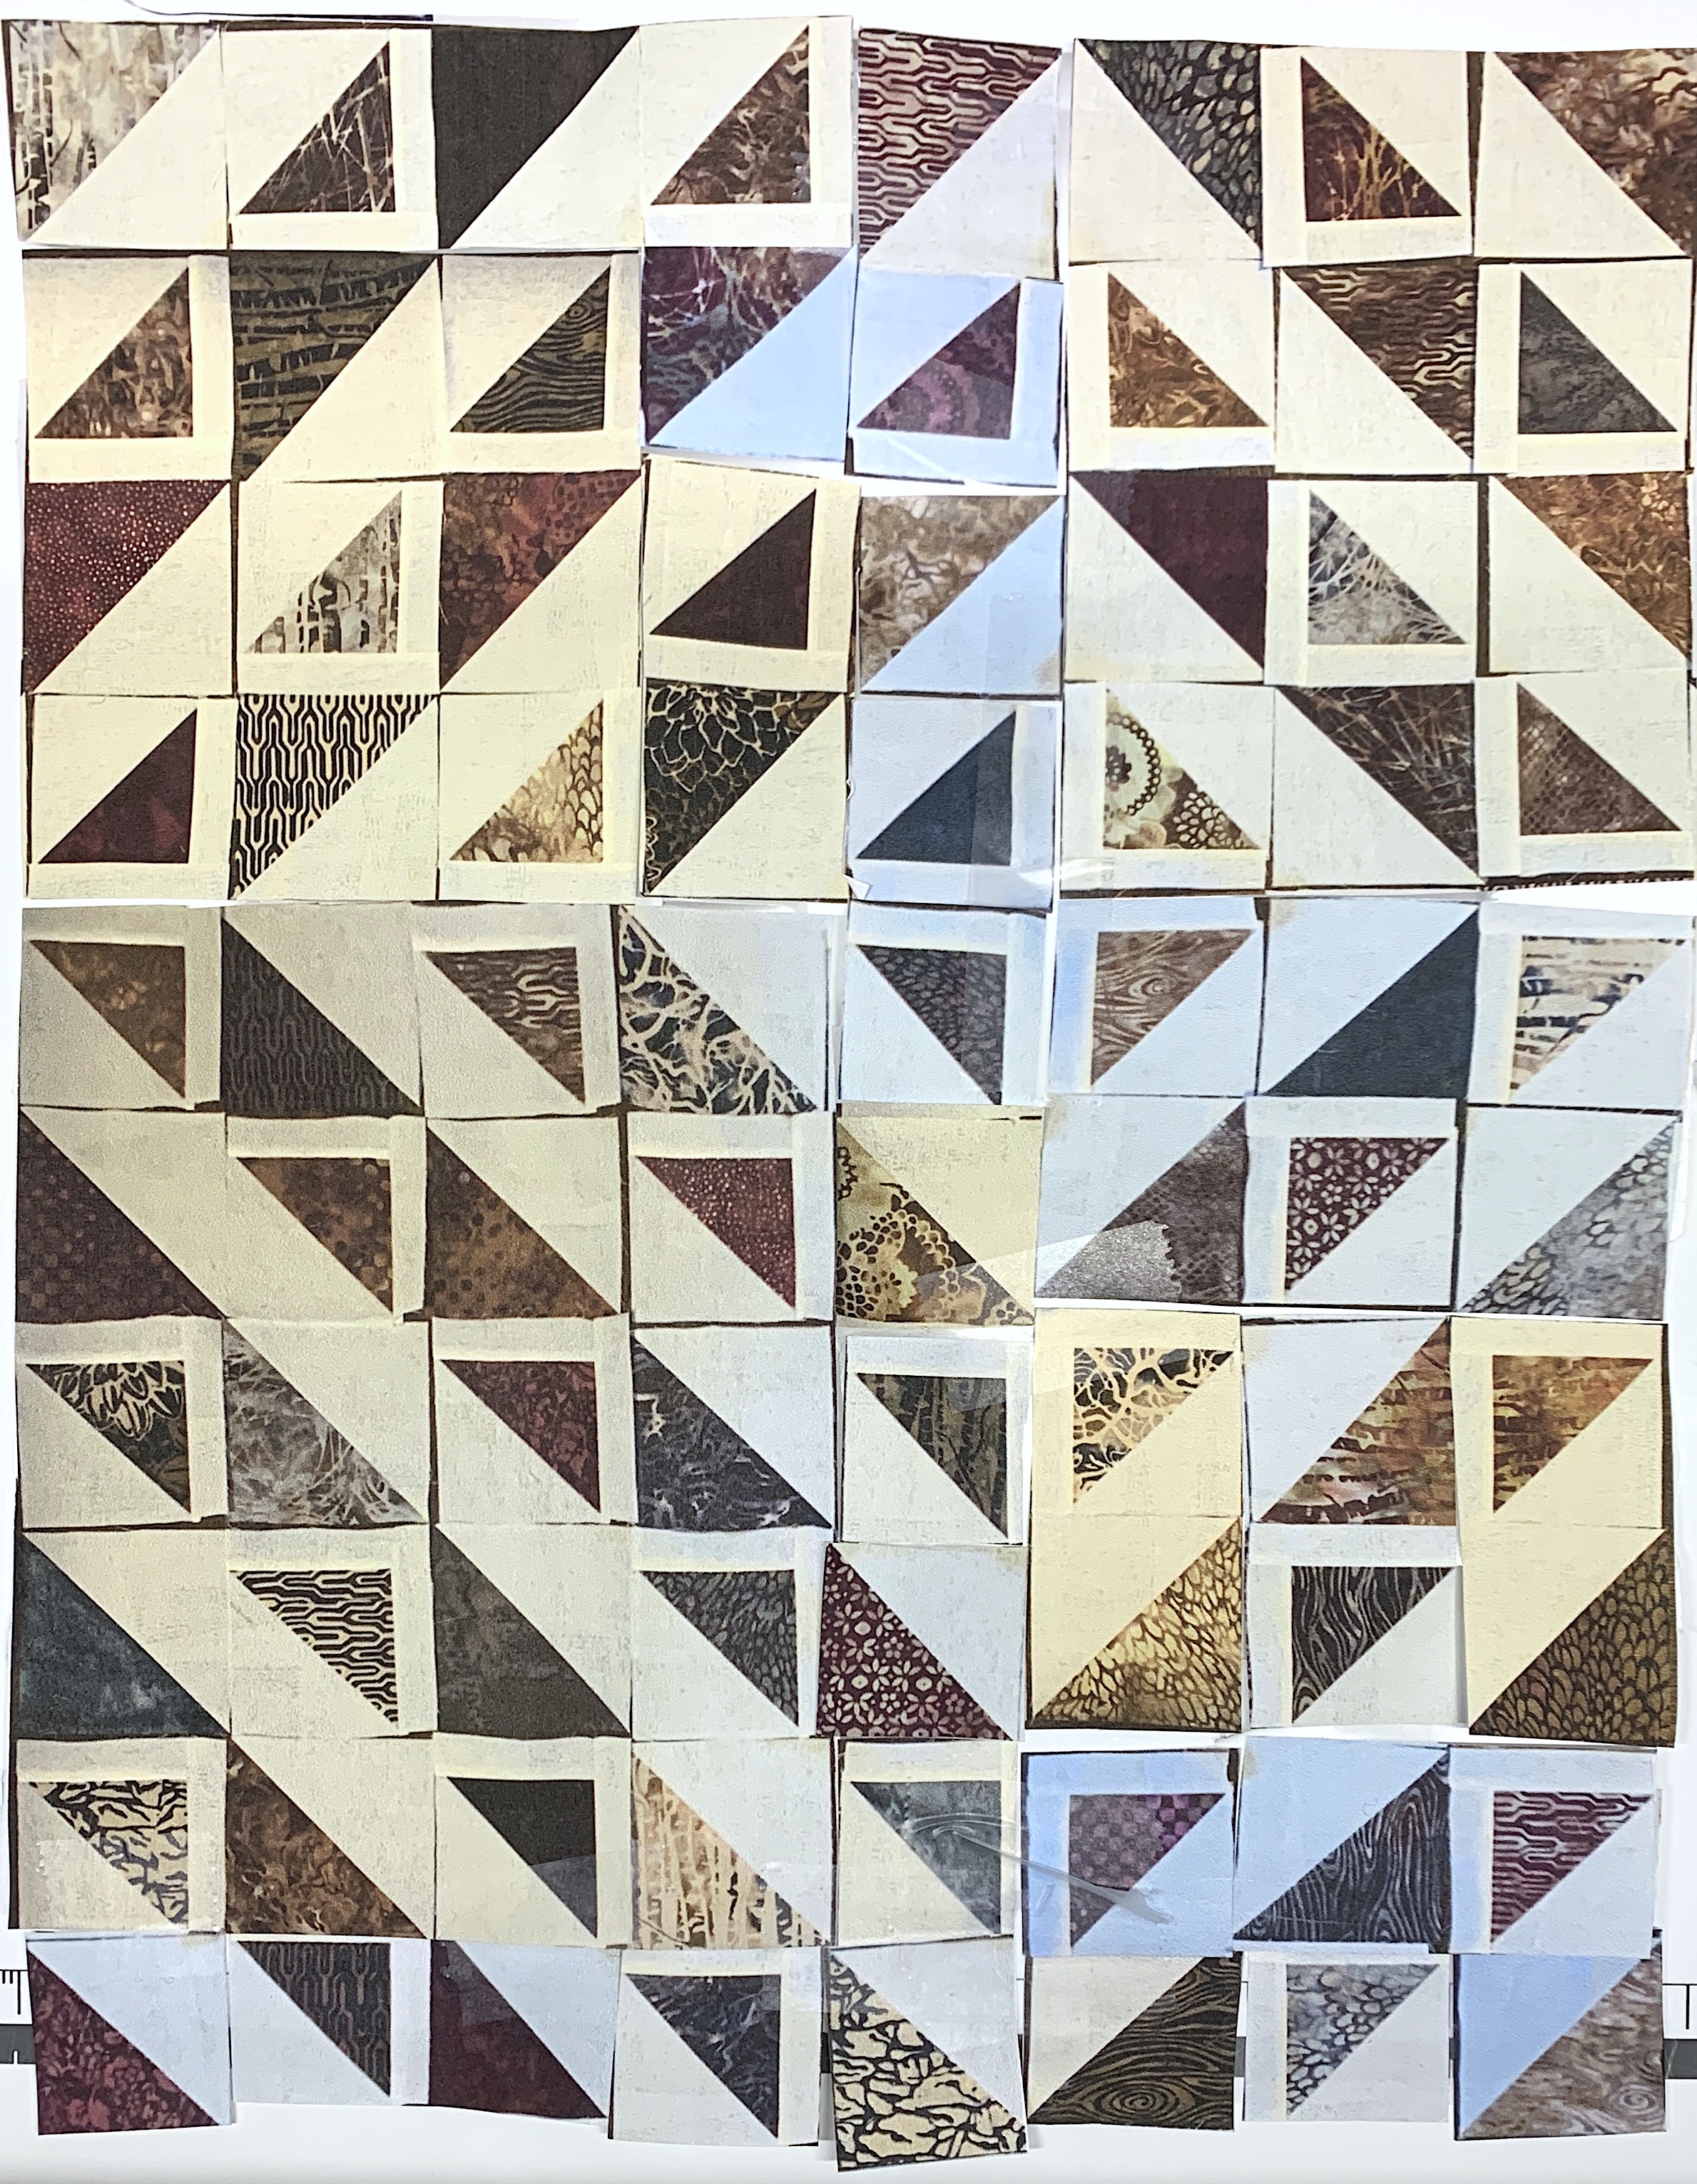
I’ve interleaved larger and smaller triangles and this is the 8 x 10 array I currently have on my floor. Kinda interesting….

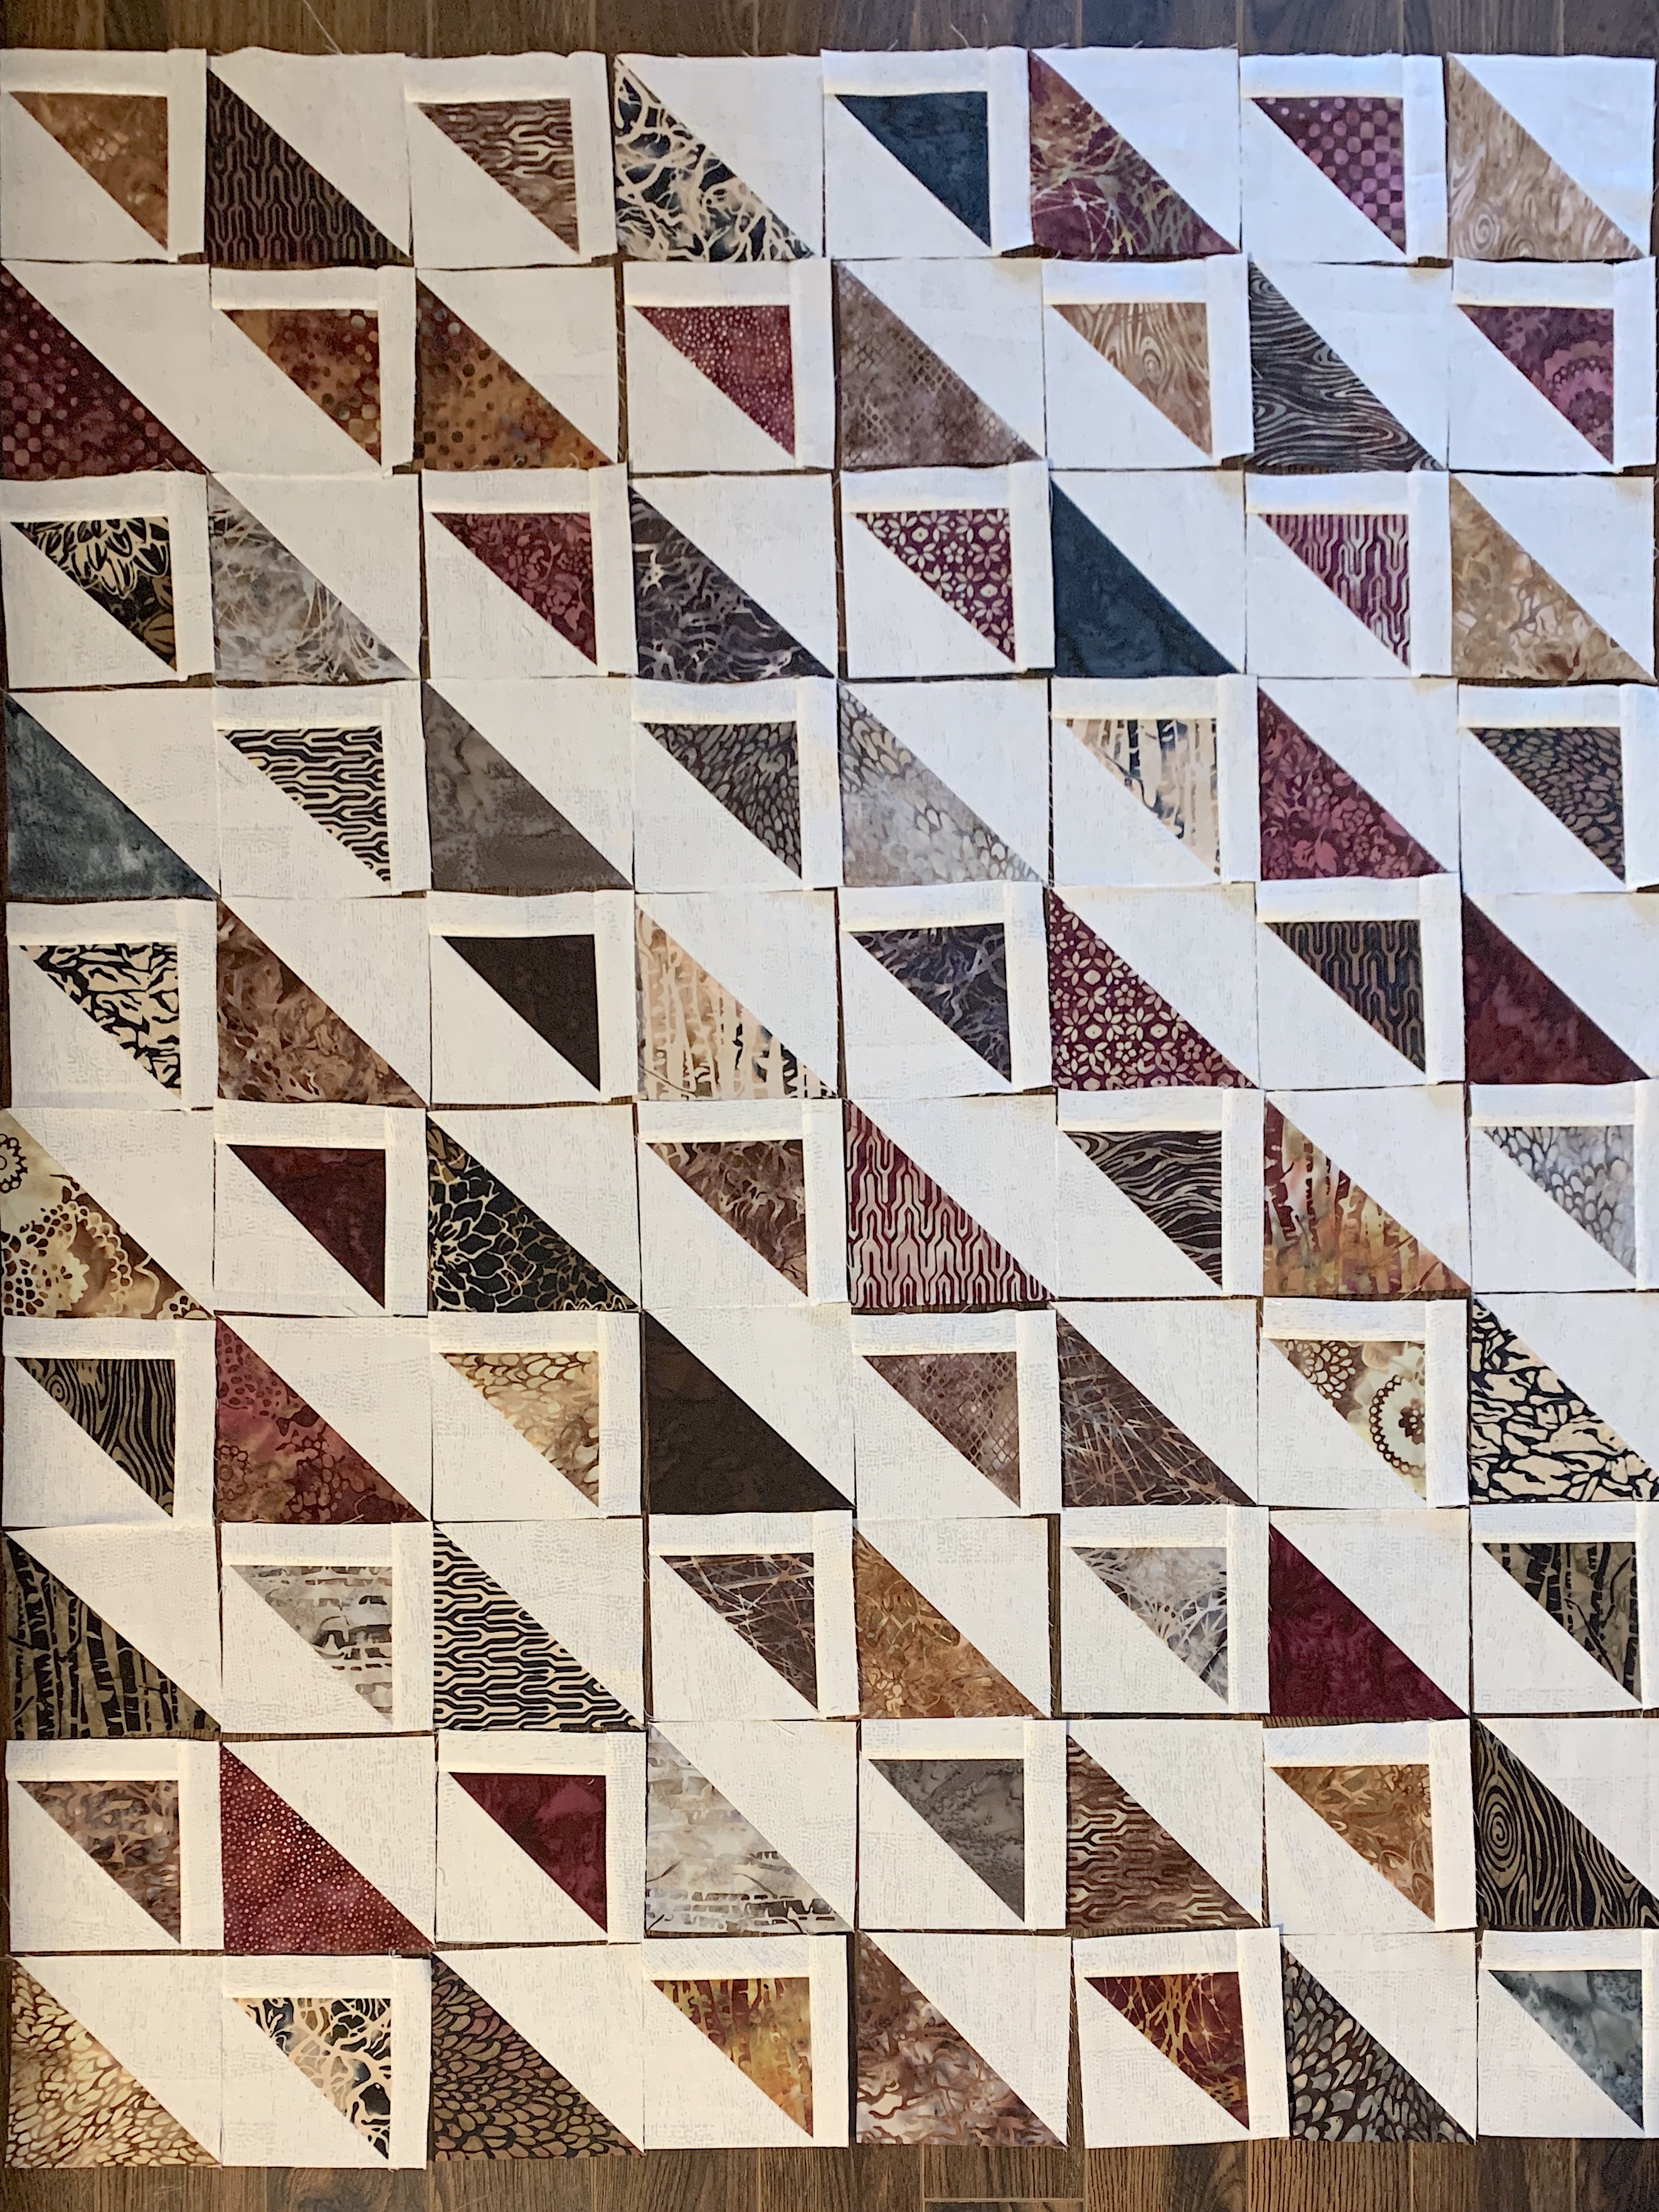
Current Layout On The Floor

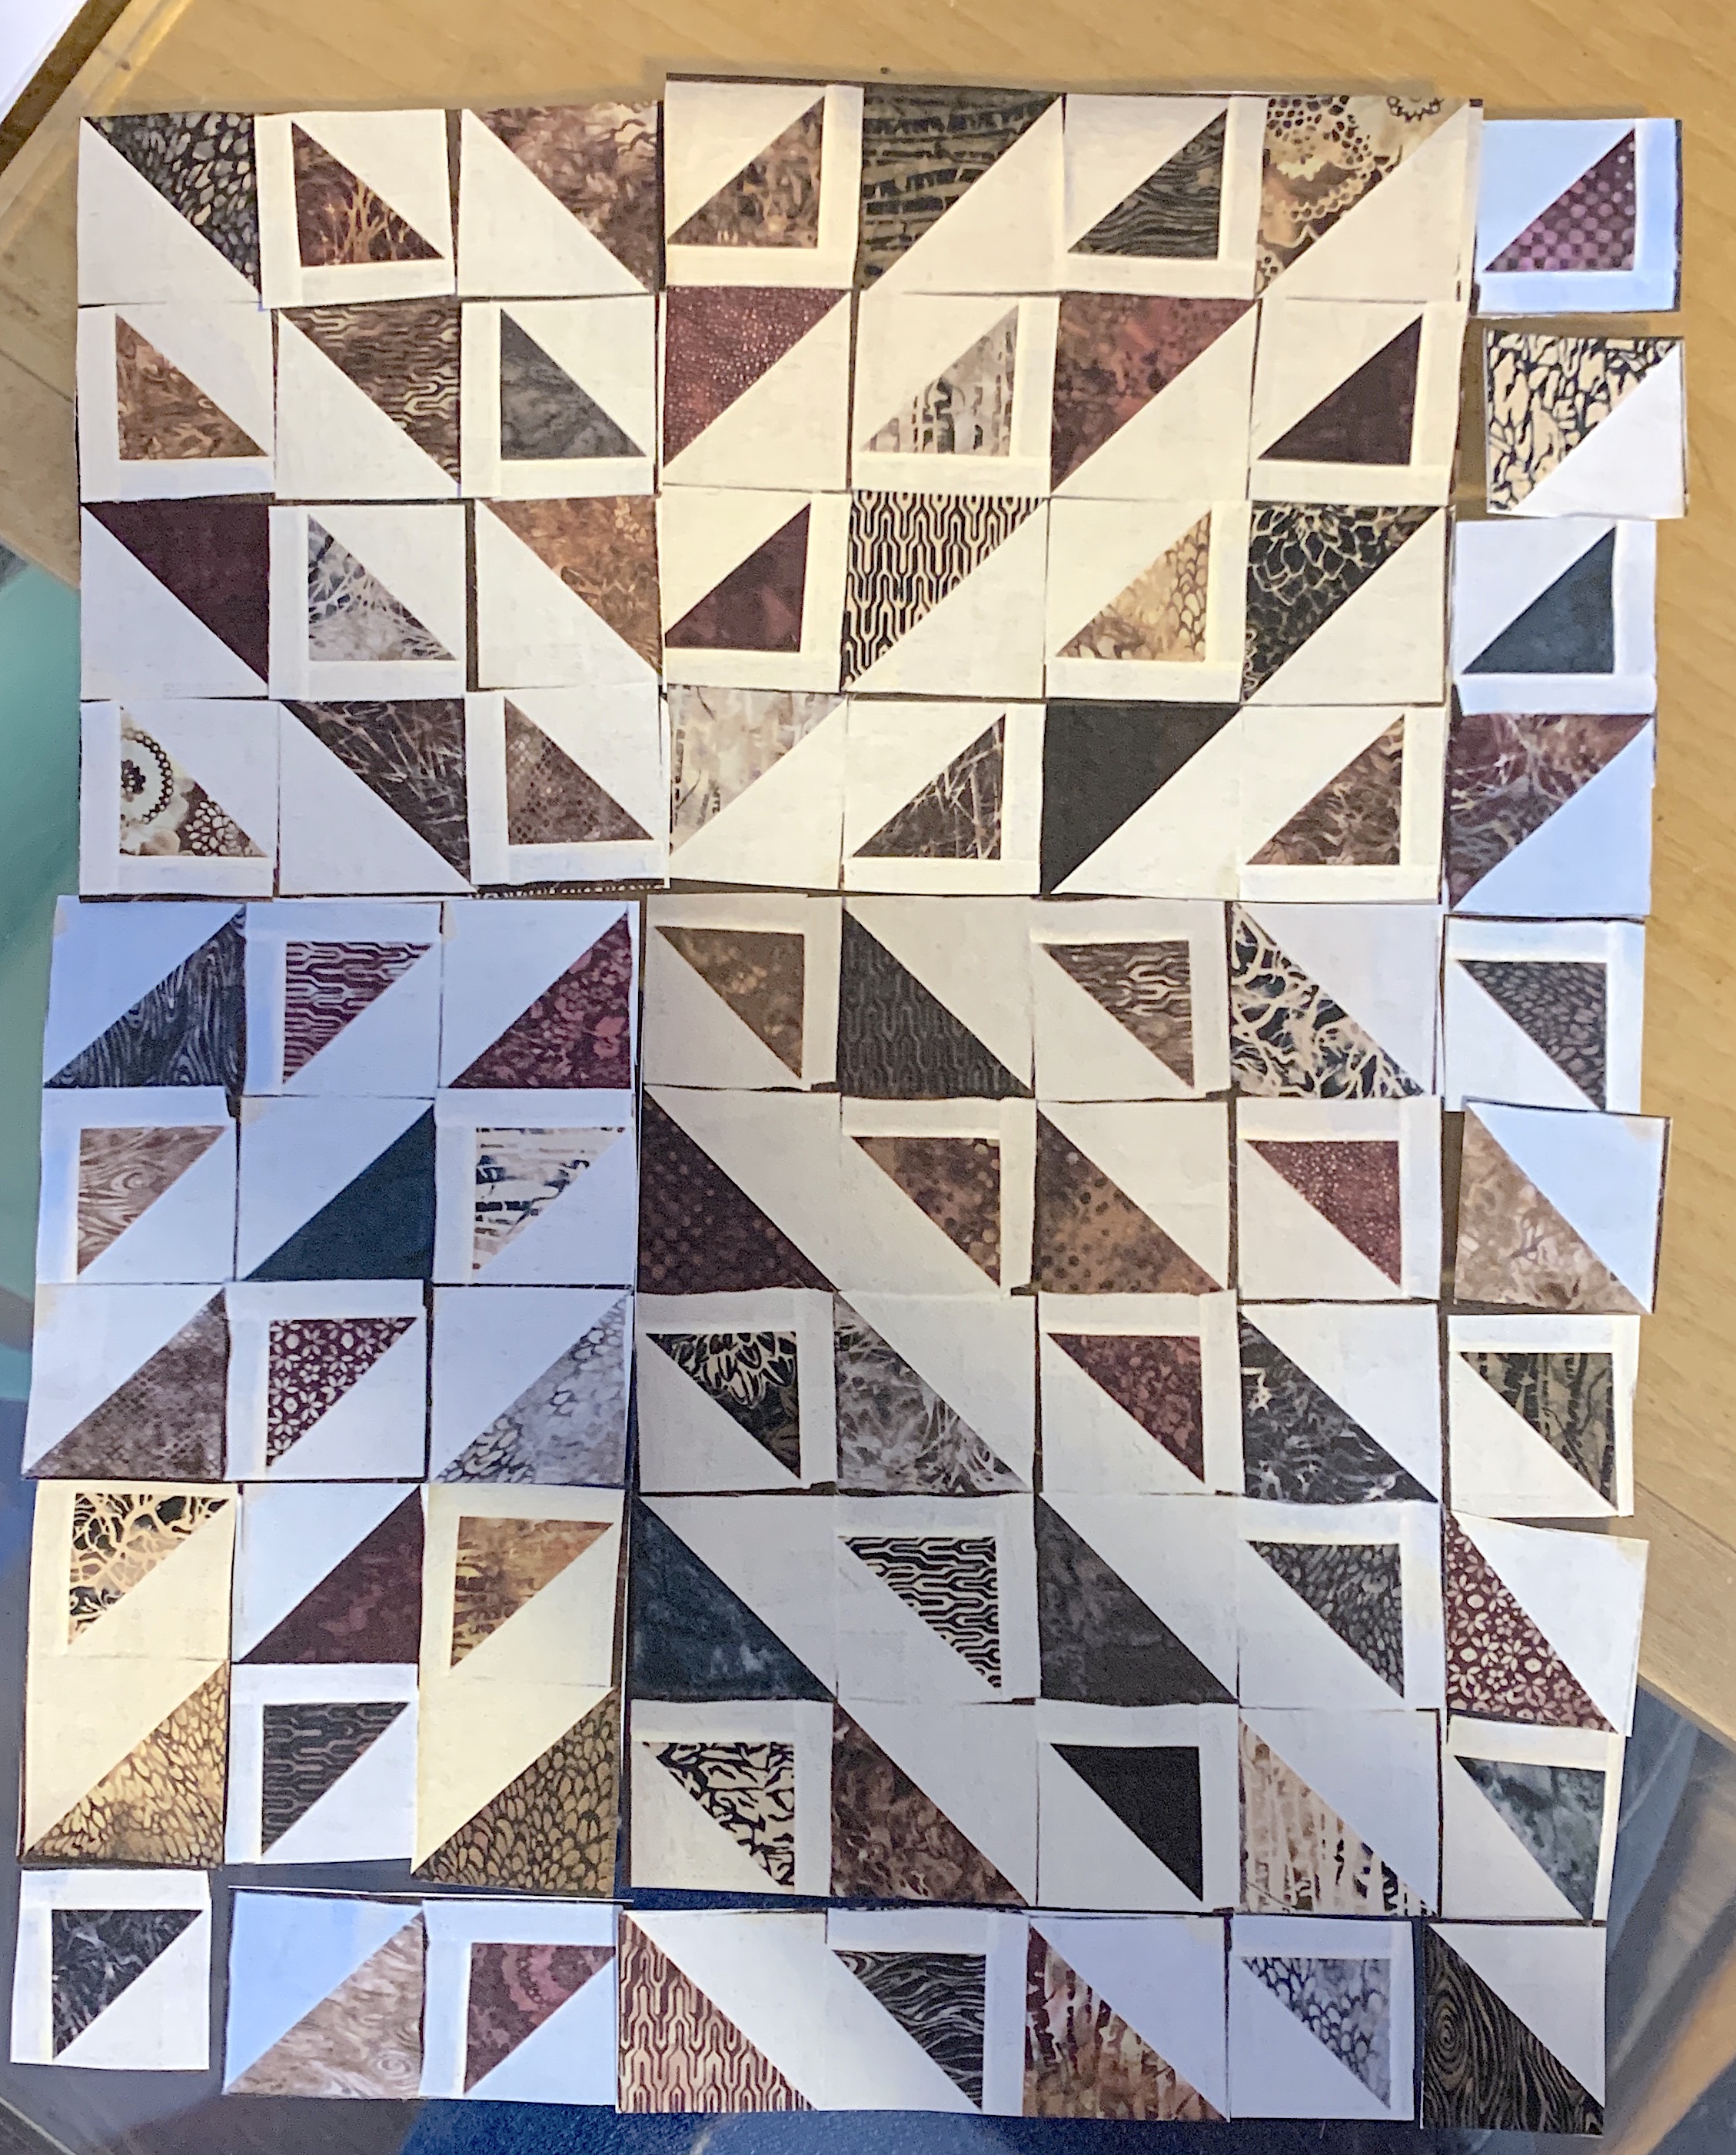
I decided to see what other arrays are possible. I took a photo, then cut the paper into sections so I could try other arrangements:

Pinwheel Array

The pinwheel is off centre (centre is at position 4/3). While the centre should provide focus, it doesn’t seem to in this case – what’s there is too busy.

Next layout:

Chevrons

The chevrons work better – the white lines draw your eye in toward the offset centre. However, this layout requires two smaller triangles which I don’t have. I have two of the larger triangles but not a single scrap of fabric to convert them into smaller triangles – no fabric to construct sashing!

I’ll probably stick with the array I currently have on the floor – I need to leave it there for a day or so to make sure I’m happy with the colour distribution.

I didn’t say the reason I’m doing this quilt is so I can demonstrate for a class in early February how to “quilt-in-the-hoop“. I need both a quilt top and back to do this. Stitched, this array is going to be on the small side (but with no more burgundy batik squares and no more backing fabric to extend the size by a row/column or two, I will enlarge the panel with an inner sashing and a wide outer border so the finished size lands somewhere between 40″-45″ x ~55″- 60”.

I have a piece of complementary burgundy fabric large enough for sashing; and the other day I bought a metre of soft grey which should work for the border. I’m thinking a hidden binding from the main backing fabric might be in order because I don’t think I want to define the outer edge of the quilt with another strong colour.

First to assemble the blocks into a panel. I’ll work on that tomorrow.


Another possible layout:

Diamond

This one works – and I’d complete the diamond on the right in the border (including a narrow sashing all around up to, but not including, that point…).

Hmmmm.

[BTW – I’ve been doing these different layouts by cutting a paper printout of the layout currently on my floor and holding it together with tape – no need to spend time on the floor arranging and rearranging blocks! The reason for placing my layout on the floor – my cutting table is too narrow to hold the width of the panel and I don’t have a space where I can hang a flannel design wall. I suppose I could set up a flannel panel and use weights to hold it in place on the floor – that could help keep the blocks from sliding around – but I’d still have to be on my knees to work with it.]

Finishing Wall Art

I’ve finally got around to creating instructions for adding borders and piping to a textile wall art panel as well as instructions for hidden bindings.

It took some time because I had forgotten to take photos as I added the borders etc. to the Iris panel last week.

This morning I took a small panel I’d made quite some time ago, removed the backing, and added borders & piping and a hidden binding – and I took pictures along the way to illustrate the process! Finally. I did it because the panel wasn’t really finished and I needed something already assembled (instead of taking the time to construct something new) so I could take photographs as I did the work.

If you’re interested here are links to the PDFs

Blue / Rust Socks

Finished these socks a couple of days ago. I have a couple of sweaters they’ll go with nicely so I decided they should live into my sock drawer.

Blue/Rust Socks

When I went to put them on they were just a bit on the long side in the foot so I threw them into the wash with the other socks I’d worn last week. (BTW, I put all my socks into a mesh bag so they don’t get beaten about in the washing machine; and I DON’T put them in the dryer. I hang them over a rack to dry.)

The important thing to remember is to change the water temperature of the load you include them in to COOL, otherwise you run the risk of matting and shrinking the yarn if the water is too warm.

I’ve put a label on my washing machine “Remember To Change Water Temperature” in large letters to remind me to set the water temp to cool when I do a load that includes socks.

If all you have is a couple of pair of wool socks then I’d recommend washing them by hand, wringing them in a towel, and hanging them to air dry somewhere. They’ll last a lot longer that way.

Iris

Yesterday, I enlarged and printed both the iris and its leaves on fabric then applied some Steam-a-Seam2 Lite (fusible web) to the back so the iris could be fused to the watercolour panel background. Last evening I fussy cut the iris, the bud, and the leaves.

Complete except for hidden binding

This morning I fused the appliqué elements to the panel, then thread painted them, taking care to edge stitch everything so the appliqué won’t lift  over time.

Iris – Thread Painting

Because the appliqué elements are rather small they didn’t want a great deal of stitching but I did want to work in a bit of shading on the leaves and on the flower – not so much that I obscured the shading within the appliqué.

I added a signature along the right side, then applied three border sections – first a narrow inner binding of natural raw silk, then small dotted green piping, last a 3″ purple grunge outer border.

All that’s left to do is add the hidden binding (I do have a small amount of purple grunge left but I’ll see if I can pick up 1/2m more because it’s a very useful colour to have on hand). Once the bindings are attached, I’ll insert a muslin backing and hand stitch the bindings in place on the back.

I will leave the piece as it is – while I can still lift the border to reveal the inner border construction. That will allow me to show the gals how I align the narrow border, and piping as I explain how I do it.

Yet Another Watercolour Piece

So I can demonstrate on Wednesday how I finish a hanging, I had to produce another panel for class. I had a clear idea of what I wanted to construct – a colour shading from dark purple in one bottom corner to very light in the opposite one. That was easier said than done – I had no suitable precut light colour squares; instead, I had to go back to my stash and pull out both large and small cuts of fabric in very pale colours that would blend with the purple range I was building. After considerable hunting and cutting, I was finally able to assemble a complete panel.

Once laid out, I stitched the rows (first sewing the 8″ panels together, then cutting apart each row, starting at one end, sewing and pressing each seam open).

Rows Sewn Together (Back)

Next I stitched the columns, again by cutting apart and sewing each column one at a time beginning on one side.

Columns Stitched, Seams Pressed Open

I pressed the seams open as I went along – first finger pressing, then pressing with the iron.

Completed Panel

I’m now ready to add a fused appliqué to the pale side of the panel – that’s for tomorrow. Once the appliqué is fused and thread painted, I will be ready to demonstrate how to add the three finishing layers on Wednesday.

Watercolour Quilt Workshop

I arrived at the class on Wednesday with my latest watercolour panel completed. I also took along the others I’d done as well as a folder of images I’d compiled from Pinterest to discuss with the gals – pointing out technical decisions evident in each photo.

Garden In Pink

We started by preparing the gridded fusible interfacing – cutting it into working size rectangles, then into 8″ rows – to be able to carry them to and fit them on an ironing board.

I’d come to class with over 2000 precut 2″ squares in a wide range of colours (all sorted into small zippered sandwich bags so the gals would have something to use – I was anticipating they might not have a broad colour selection and I wanted to be sure we had enough precut fabric to work with).

We spent almost all of the day working on developing colour flow. Each panel shaped up into something striking and different from the others – fascinating to watch.

Jean’s

I pitched in as the gals were trying to meld the different parts of their assembly – locating squares from my abundant stash to fill the central gap and draw the panel together.

Faye’s

Once laid out, the squares were fused to the fusible interfacing in sections in preparation for sewing the rows and columns together.

Nancy’s

That was as far as we got on Wednesday. Homework: to stitch the panel completely – first,  sew the rows together, then the columns, with the 1/4″ seams pressed open (to allow the panel to press flat).

Heather’s

Coming Wednesday, we’ll turn these panels into finished art works complete with a signature (which I’ve already prepared on my computer and will bring with me on a memory stick so we can use one of the high-end embroidery machines in Sew With Vision to stitch each out).

We’ll frame each panel with a narrow off-white inner frame, a contrasting piping, followed by a wide, contrasting, outer border. Lastly, we’ll add hidden bindings and a backing fabric. All of that takes as much time, I find, as creating the panel itself.

With the pieces taken that far, I’m gambling the gals will blind stitch the hidden binding at home to complete their hanging. I hate contributing to everybody’s UFO piles – I’m determined these pieces will get done.

Watercolour/Colourwash Pieces – Completed

The finished colourwash panel – complete with inner raw silk border, rust piping and black crackle frame.

Blue Garden With Butterfly

I’m pleased with the colour distribution on this piece and the small butterfly appliqué adds a place for the eye to land.

I undertook a second panel for the class – this time I cut my fusible interfacing grid into 8″ strips, taped them to the cutting table, laid out my squares, fused the squares to the interfacing (easy to do because the strips were narrow enough to carry and place on my ironing board), stitched the three panels together, then continued systematically stitching the small blocks – cutting the interfacing as I went so I could press the seams open (which precludes stitching in the ditch as a finishing quilting).

Garden in Pink

I wanted to add some kind of focus element in the centre of the panel but I didn’t want another butterfly and I didn’t have anything else to place there so I’ve left it as is, for now. Should I come across an idea or an image of something small enough and from the right colour palette I can always remove the backing panel and add it to the work.

Next, in preparation for the Wednesday workshop, I cut a gazillion (around 2000 actually) 2″ blocks in as many shades of dark, light, and medium print fabrics as I was able to find either in my stash or from my local shops. I bought 4″ strips from width of fabric which yielded two 2″ strips – one I set aside in my stash, the other I cut into 20 2″ squares.

I’ve colour sorted all the blocks into sandwich bags placing bags with similar colours in larger ziploc bags so there is some order to this collection. I also cut a 26″ x 24″ panel of fusible interfacing in preparation for the class, and using the grid on the non-glue side as a guide, marked 2″ squares on the glue side so it’s possible to visualize the layout (the grid lines are very difficult to see when I’m working on my dark green cutting surface).

So I think I’m now ready for the Wednesday day-long class. Week 1 we’ll assemble the watercolour/colourwash panel; Week 2 we’ll turn it into a finished textile hanging – inner sashing, piping, outer frame, even an embroidered signature.

Rhubarb Ginger Jam

Several months ago a friend gave me a jar of rhubarb ginger jam – oh wow! It has the sharpness of the rhubarb and the liveliness of the ginger. Delicious on toast, but amazing on ice cream! Good with roast pork… There are a ton of ways you can pair this jam to make something remarkable – it’s just a matter of imagination.

Rhubarb Ginger Jam

My jar of jam is just about empty. Time to make some for myself. I checked out several recipes online – the one I decided to try was the one I found at “all recipes.com“. My friend got her recipe from the UK Certo website. (You can also download their book of recipes).

I started with a bag of frozen rhubarb (early January is definitely not rhubarb season although fresh rhubarb was what the recipe called for), put it in a pot (still frozen), added three tablespoons of grated fresh ginger root (I keep my ginger root in the freezer and grate it as I need it, works fine), three cups of sugar (next time I’ll try 2 1/2 cups – it shouldn’t affect the sweetness all that much and will reduce the quantity of sugar used; I might even be able to get away with 2 cups), and three tablespoons of fresh squeezed lemon juice (no substitute for this).

Started the mixture on a low heat to defrost the rhubarb – once it was softened, I turned the heat up to medium high, brought the mixture to a boil, turned it down to medium and boiled for 15 minutes until the rhubarb was falling apart. (Here’s where I cheated a bit – I used my immersion blender to break up the remaining intact pieces of rhubarb after boiling for 15 minutes, but didn’t whiz it enough to purée the jam).

The recipe made 5 small bottles of jam which will go into my refrigerator as soon as it’s cooled to room temperature.

I couldn’t resist tasting as I went along – I admit to licking the spoon and the pot before cleaning them. The taste is heavenly. Do try it.

Another Watercolour Quilt Experiment

I’m signed up to teach a class in two weeks on colourwash/watercolour quilting. After finishing “Nine Shades Of Grey” two days ago, I opened my box with the gazillion 2″ squares of fabric all nicely colour sorted in ziploc bags and started laying them out.

The other day I bough a couple of metres of fusible grid interfacing to see if that simplified the process of setting up a colourwash panel. I began by cutting a 24″ x 20″ panel of interfacing, then glue side up (which is the back of the interfacing, so it’s kind of hard actually to see the grid), started laying out squares attempting to bring some kind of colour order to what I was doing.

Blue Garden With Butterfly

I wanted my light focal point to be off-centre which took some moving of squares as I laid them out. I felt hampered by an insufficiency of both light and predominantly dark squares (I need to go fabric shopping this weekend to see if I can add to my stash of suitable fabrics both light and dark so I have enough contrasting fabrics for me and the workshop participants to work with).

After placing squares, walking away, coming back, moving them around, I was ready to fuse the squares to the grid. That was when the process became hairy! I had a difficult time moving the grid panel from my cutting table where I worked, to the ironing board – without having squares flying all over the place. In the end I slid one of my smaller cutting mats underneath the grid interfacing so I could support it as I moved it from table to ironing board.

Now I really ran into trouble – I couldn’t press directly on the cutting mat (the heat from the iron would make it buckle). I tried sliding the grid interfacing (with loose squares laid out) onto the ironing board but my board wasn’t wide enough to support the whole piece. Fortunately I had taken photos of the layout so when the bottom half of my squares landed on the floor, I was able to reposition them (more or less) as I’d had them so I could systematically press them all in place. This is clearly a problem I have to solve before the class because I can’t have people struggling to retain the positioning of the squares as they press them onto the grid interfacing!

I used straight pins on my previous colourwash piece (because the grid cloth I used wasn’t backed with fusible glue) – I think pinning may be in order here as well. I plan on making another test piece before the class to see if that will work better.

I chain stitched the squares in my original watercolour piece which worked nicely – however, I had to stack my pieces carefully and mark the placement of each stack with post-it notes so I got the assembly the way I’d originally laid it out. Using the fusible grid cloth has definite advantages but you can’t fuse as you go along since, at least for me, I need to be able to reposition blocks until I’m happy with the colour flow.

I will continue working to solve this problem so it will be easy for the class participants to concentrate on colour flow and not get hung up on the technical aspects of securing the small fabric pieces.

Postscript: I’ve just had a thought! What if I cut my grid interfacing into 8″ strips, laid the strips together on my cutting board, placed my squares, then carefully carried the narrow strips to my ironing board to press the squares in place – these narrow strips would fit on the board. Ultimately, I have to sew 1/4″ seams along the edges of the squares – all I need to do is juxtapose the narrow fused strips where they are to be joined and sew a 1/4″ seam along that join. That would work quite nicely. Have to give it a try as soon as I have some more dark and light fabrics from which to cut more squares!

A Second Postscript: I appliquéd a small purple/orange butterfly in the lower left of the light area to provide some kind of focus to the piece. I wish I had more butterfly fabric to choose from – this one is a wee bit on the small side but it was the only size I could find in what I had.

Mauve Socks

These socks were completed last night. The mauve for the cuffs, heels and toes came from another 100g ball of variegated yarn with a very subtle tonal graduation – this mauve was the first colour in each of the two repeats (the second repeat signalled with a length of white yarn – remember how I missed that detail on an earlier pair of socks?)

Mauve Socks

This time I knew the repeat would be marked so I looked for it – unwinding and balling the yarn until I reached the white segment, then cutting the yarn and setting up a second ball. The remaining ombre yarn is very dull – I think I’ll probably use the remains from this pair of socks to liven up the pair I’ll make from it.

In the meantime I’m on to a new pair of socks – this time using a much brighter variegated yarn – while I find knitting relaxing, I much prefer working on lively colours rather than yarns without much contrast. The knitting seems to go faster when the pattern is strong and the colour changes are frequent.