Day Two: Second Wool Shirt

IMG_2515

Today was clean up from the storm day – got up, dressed for the cold weather, went out to dig out my car (and move it so the plow could clear the parking lot). Then came in and set to work on the second wool shirt.

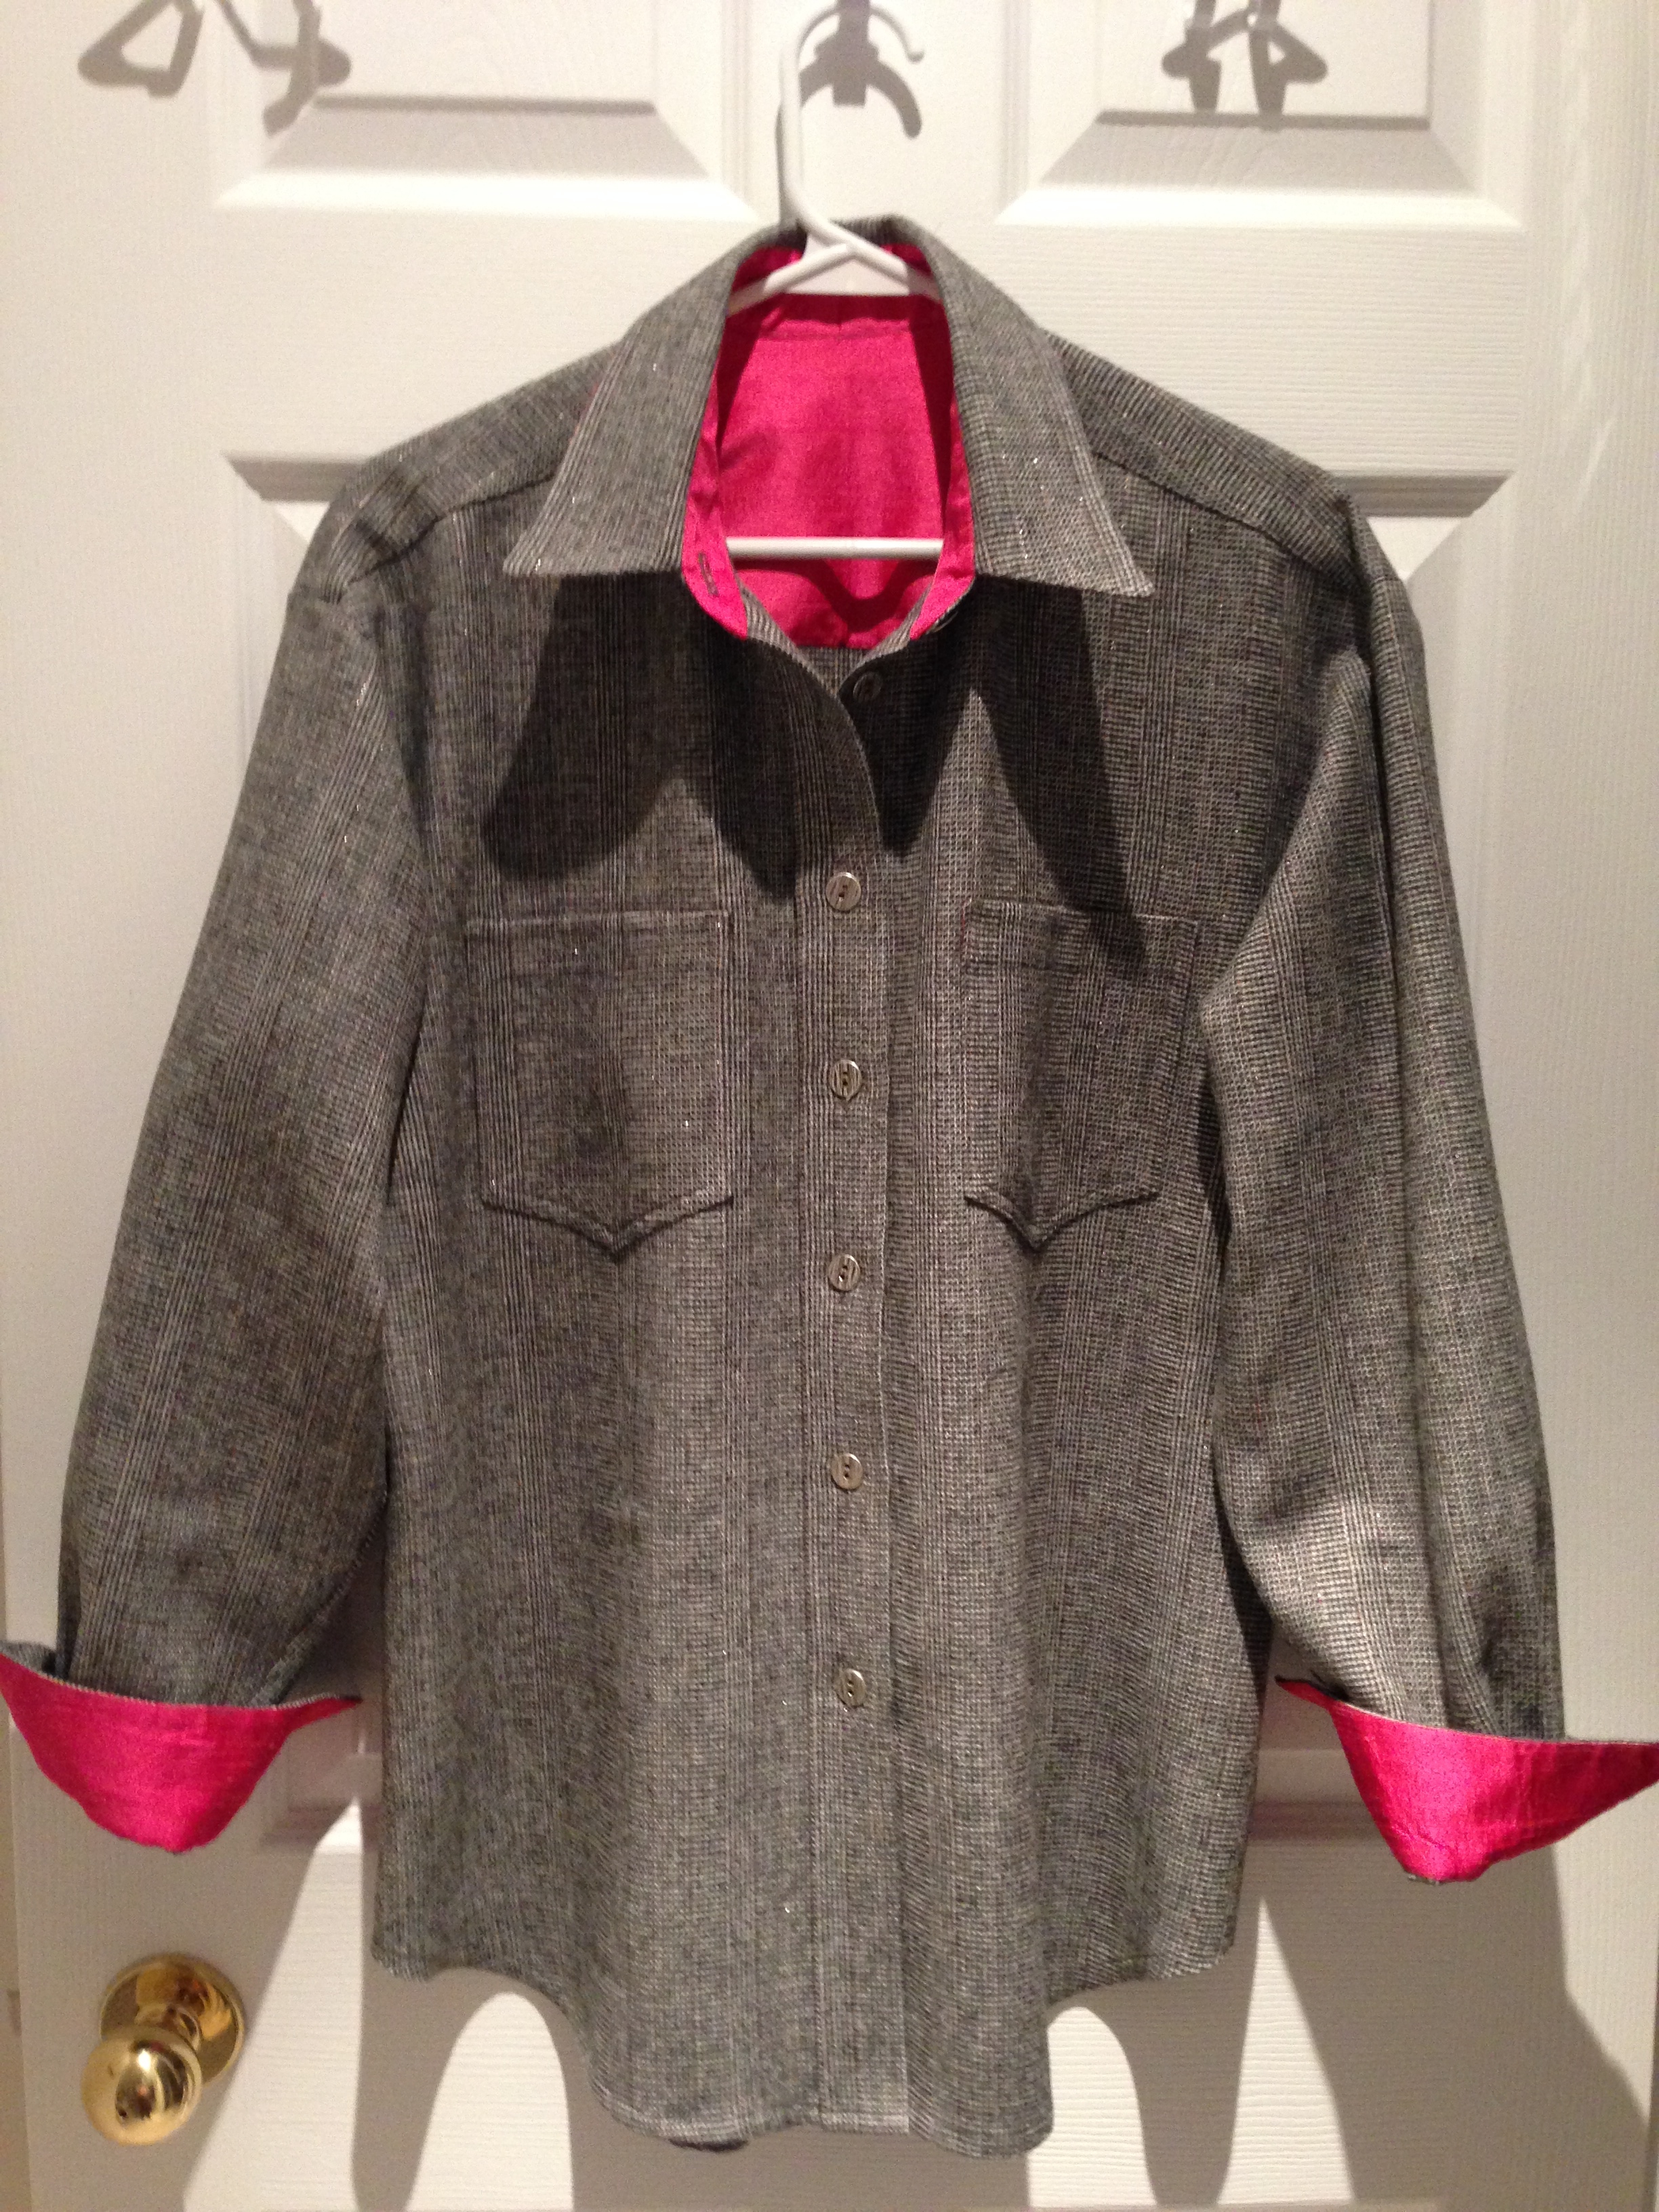
In the photo it looks quite brown, but the tonal value of the fabric is closer to an ink blue, hence the navy silk accents! Also in the photo you can discern the red stripe in the fabric – not so noticeable in daylight.

Because I’d done all the prep work yesterday the whole production went quite quickly. In the end, I did a “burrito” finish for the collar stand – it turned out reasonably well – I can see I definitely should do a practice set – at least half a dozen – in order to become proficient at the technique. I think I also want to modify the ends of the stand – in my pattern they taper quit a bit toward the centre edge rather than being rounded. A rounded collar stand would be easier to apply having just a bit more room to stuff seam allowances in (I already have modified the seam allowances for the collar and stand to 1/4″ so they don’t have to be trimmed but that’s still difficult handling the seam allowance fabric with the tapered stand).  The other thing I realized, I can’t stitch the turned up portion of the inner stand in this technique at 3/8″ before applying the stand, I need the full seam allowance available so I can do the turning at the ends and still be able to stitch along the seam allowance line!

When I picked out buttons for this shirt there was some discussion with the gals in the fabric shop about whether to go with these light coloured buttons or to choose something that blended better (there was a “bronze” shank button that did blend well, but I really didn’t want a shank button). In the end I went with “bold” and glad I did.

Snow Day! Another Wool Shirt

Here’s what I accomplished on my snow day, yesterday…
grey-front

grey-back

On Monday, I cut out shirts from two pieces of lovely wool fabric I’ve had in my stash for years – the original intention was to make pants, but I realized I was likely never going to do that – in part because wool pants need to be lined, and while I make all my pants from a pattern that pretty much works (most of the time) I wasn’t up for the effort involved in having to line the wool. A couple of weeks ago I dug out the fabric and put it in plain sight so I’d make time to create a couple of shirts.

The grey striped shirt worked well with the silk accents (under collar, inner collar stand, inner yoke, inner cuffs, inner pocket top). I knew I wanted to do that again for both shirts. The second piece of wool  is a subtle plaid with a value of navy. I had no navy silk dupioni in my stash and there’s no silk to be had locally, so I had to order a 1/2 yard of dark navy silk dupioni from Etsy which arrived last week. I still had enough pink silk in my stash for this grey shirt (I also have some black silk taffeta – I cut off a half yard to audition it against the grey fabric, but the subtle red/metallic thread in the grey called for the pink accent so I went with the pink).

I tried several new techniques on this shirt: 1) Collar points – Pam Erny has a great technique for making sharp collar points using a thread embedded next to the seam which gets sewn in when you stitch the side edge of the collar and then you pull the thread from the right side and the point actually pops out – WOW! It works. 2) Last week Pam posted her method for getting perfect sleeve plackets. She uses a two piece placket (which allows you to use different fabrics, for example for the under and over lap – which I did this time). Again, her technique is simple to follow and produced a very neat placket.

My challenge is still getting the edge of the collar stand to align with the shirt front edges. I managed not badly on this shirt, but that join still isn’t as tidy as I want it to be – so I spent time last evening tracking down different methods of applying the collar stand. I came up with two different methods – one which attaches the stand first then adds in the collar, the second which uses the “burrito” method. I think I’ll try the stand attachment method and if that doesn’t work, I’ll have a go at the “burrito” technique. I use that technique on the cuffs and it works well, but the collar stand has so little room to manoeuvre that I haven’t been able to get it to work. The video included in the blog entry on the “burrito” technique shows clearly what the gal is doing, so I think it should be manageable.

I find that once I’ve cut out all the pieces (including interfacing) and do the prep work (pressing the interfacing in place), the actual shirt making is very satisfying – the shirt assembles quickly and the pieces in the shirt pattern I use  (by Janet Pray) all line up precisely – no fudging necessary!

Another Pair of Socks

ed kinleyDuring the summer I made a visit to my GP – he had on a lovely pink shirt – it looked wonderful on him. Having just finished the Sweet ‘n Spicy socks I made for myself, I thought a pair in the same colour would be great for him. I picked up the yarn, but had to wait to make the socks since I didn’t know his shoe size. A couple of weeks ago I happened to visit again and asked him for his shoe size. You can imagine the look I got. I explained why I was asking. Finished them last evening. In the end, although I did have a lovely pink/peach solid Sisu yarn for cuff, heels and toe, I decided to use a deep royal blue – I figured the socks would be somewhat less “pink” and he might actually wear them. I’ll take them to him the next time I make a visit to the clinic – but they’re given with a caveat – if he doesn’t wear them, he has to give them back! I don’t put that kind of time into knitting to have the socks just sit in a drawer!

Kaffe Fassett IV – Finished

KFiv-frontThis is the finished quilt! Added the binding this morning.

KFiv-backOther side – I hesitate to call it “back” since what I have is a two sided quilt – either side could be “front”.

KFivClose up showing the quilting – I used a 50wt variegated thread so the stitching is subtle – the point was simply to quilt the piece – not make the stitching the focus. I used a dark variegated thread on the other side so it shows even less there.


Kaffe Fassett IV

DSCF2615

I completed the top this morning. In the end I decided to abut the blocks rather than use a black sashing – mostly because I didn’t want to add to the width of the quilt. It was a finicky task – required quite a bit of taking out and resewing to make the points and triangle bases align. Fortunately, the block edges were on the bias so I had a little play room to help me out.

Now to figure out what to do with the other side! I have one block left over from the original 36; I’ve just cut fabric to make four more, So with five blocks and wide sashing between the blocks I should have enough to make a strip the length of the quilt to insert into the backing panel. I’m hoping to have enough of the backing left over to bind the quilt.

Amaryllis

20140106-153011.jpg
My amyrillis is fully in bloom – standing straight and tall. Not a double bloom, but lovely nevertheless. The second stalk is tucked in, waiting for this set of four to finish, likely in a couple of days – then there will be four more blossoms.

Sweet ‘n Spicy Socks IV

IMG_2449I finished this pair of socks last evening – also made from the Opal, Sweet ‘n Spicy Yarn. These, I think, will go to my friend Linda – she’s happier with more subdued socks. These will fit into her wardrobe nicely.

I got a LOT of knitting done this past week – I found myself locked into watching the Criminal Minds Complete Marathon on Bravo (there were episodes from 2005 to 2013 running in order 24/7 for eight days!) – perfect to knit to. I finished the shawl and this pair of socks – both went faster than usual – the socks took the usual 25 hours, but the knitting time was concentrated, rather than spread out over two weeks!

Kaffe Fassett Quilt IV


IMG_2458

I’ve started a new quilt using some of the Kaffe Fassett large print fabrics in my stash. This is based on a photo I saw on Pinterest – log cabin constructed out of triangles instead of strips. It took 6 samples before I got the dimensions right so that the triangles come to a point at the corners of the square in the centre of the block. Half of the blocks are set up to rotate to the left, half to the right. Half of the blocks have the black and white triangles on the inside, half have them on the outside. This is one of those situations where you partially stitch the first triangle, apply the other three triangles, then finish off the first one so that none of the points overlap, but create the whirl. Took a few tries before I figured that out. Those are the challenges when you’re working from just a picture with no directions!

Below is a stack of cut pieces – part of the 315 elements I need for the completed top. (Not including the binding strips – I haven’t cut those out yet).
IMG_2461More to come as I create the blocks. Haven’t begun thinking what the other side of the quilt will be like – but I will have to do something because the top will be close to 50″ wide – the backing fabric is just 44″.

Winter Blizzard

IMG_2456

IMG_2453

IMG_2451This is the container garden on my back deck after yesterday’s blizzard. There’s going to be snow there well into spring if the temperatures remain cold.

IMG_2445These were a couple of pots before the snowfall – this was after the ice storm last week! Environment Canada is forecasting an unusually cold winter this year. I believe it.