Diamonds III – Completed

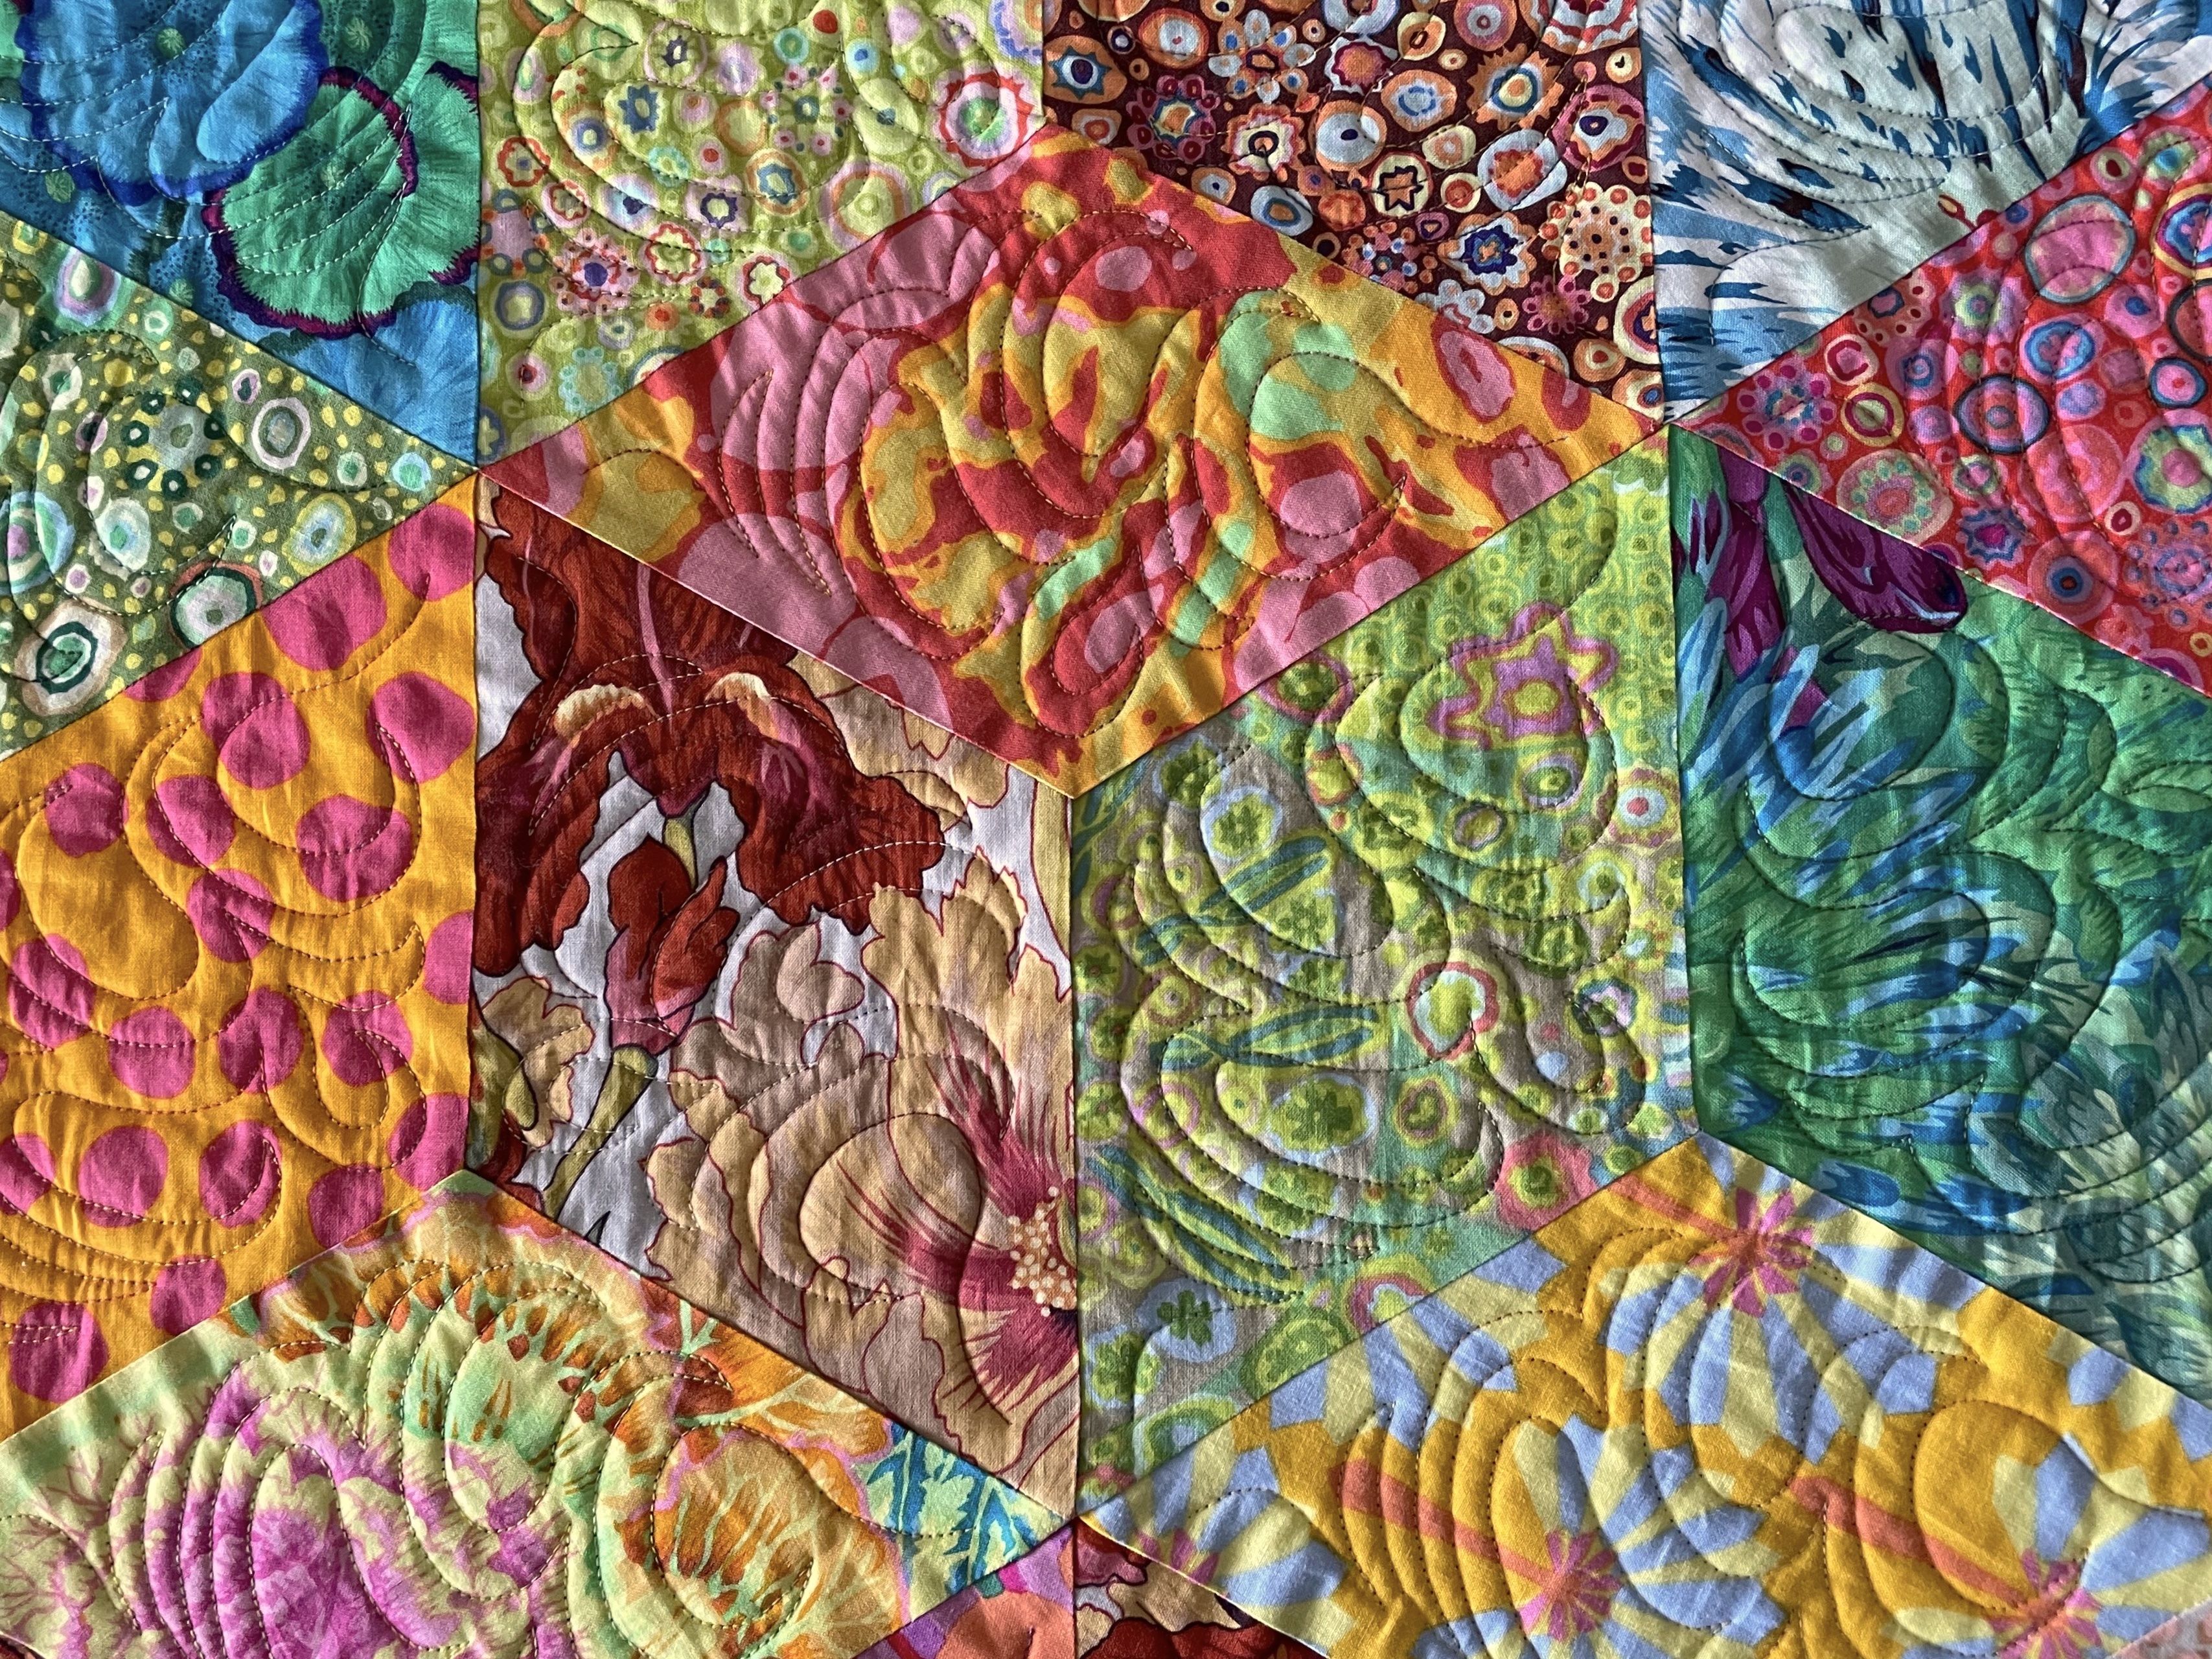
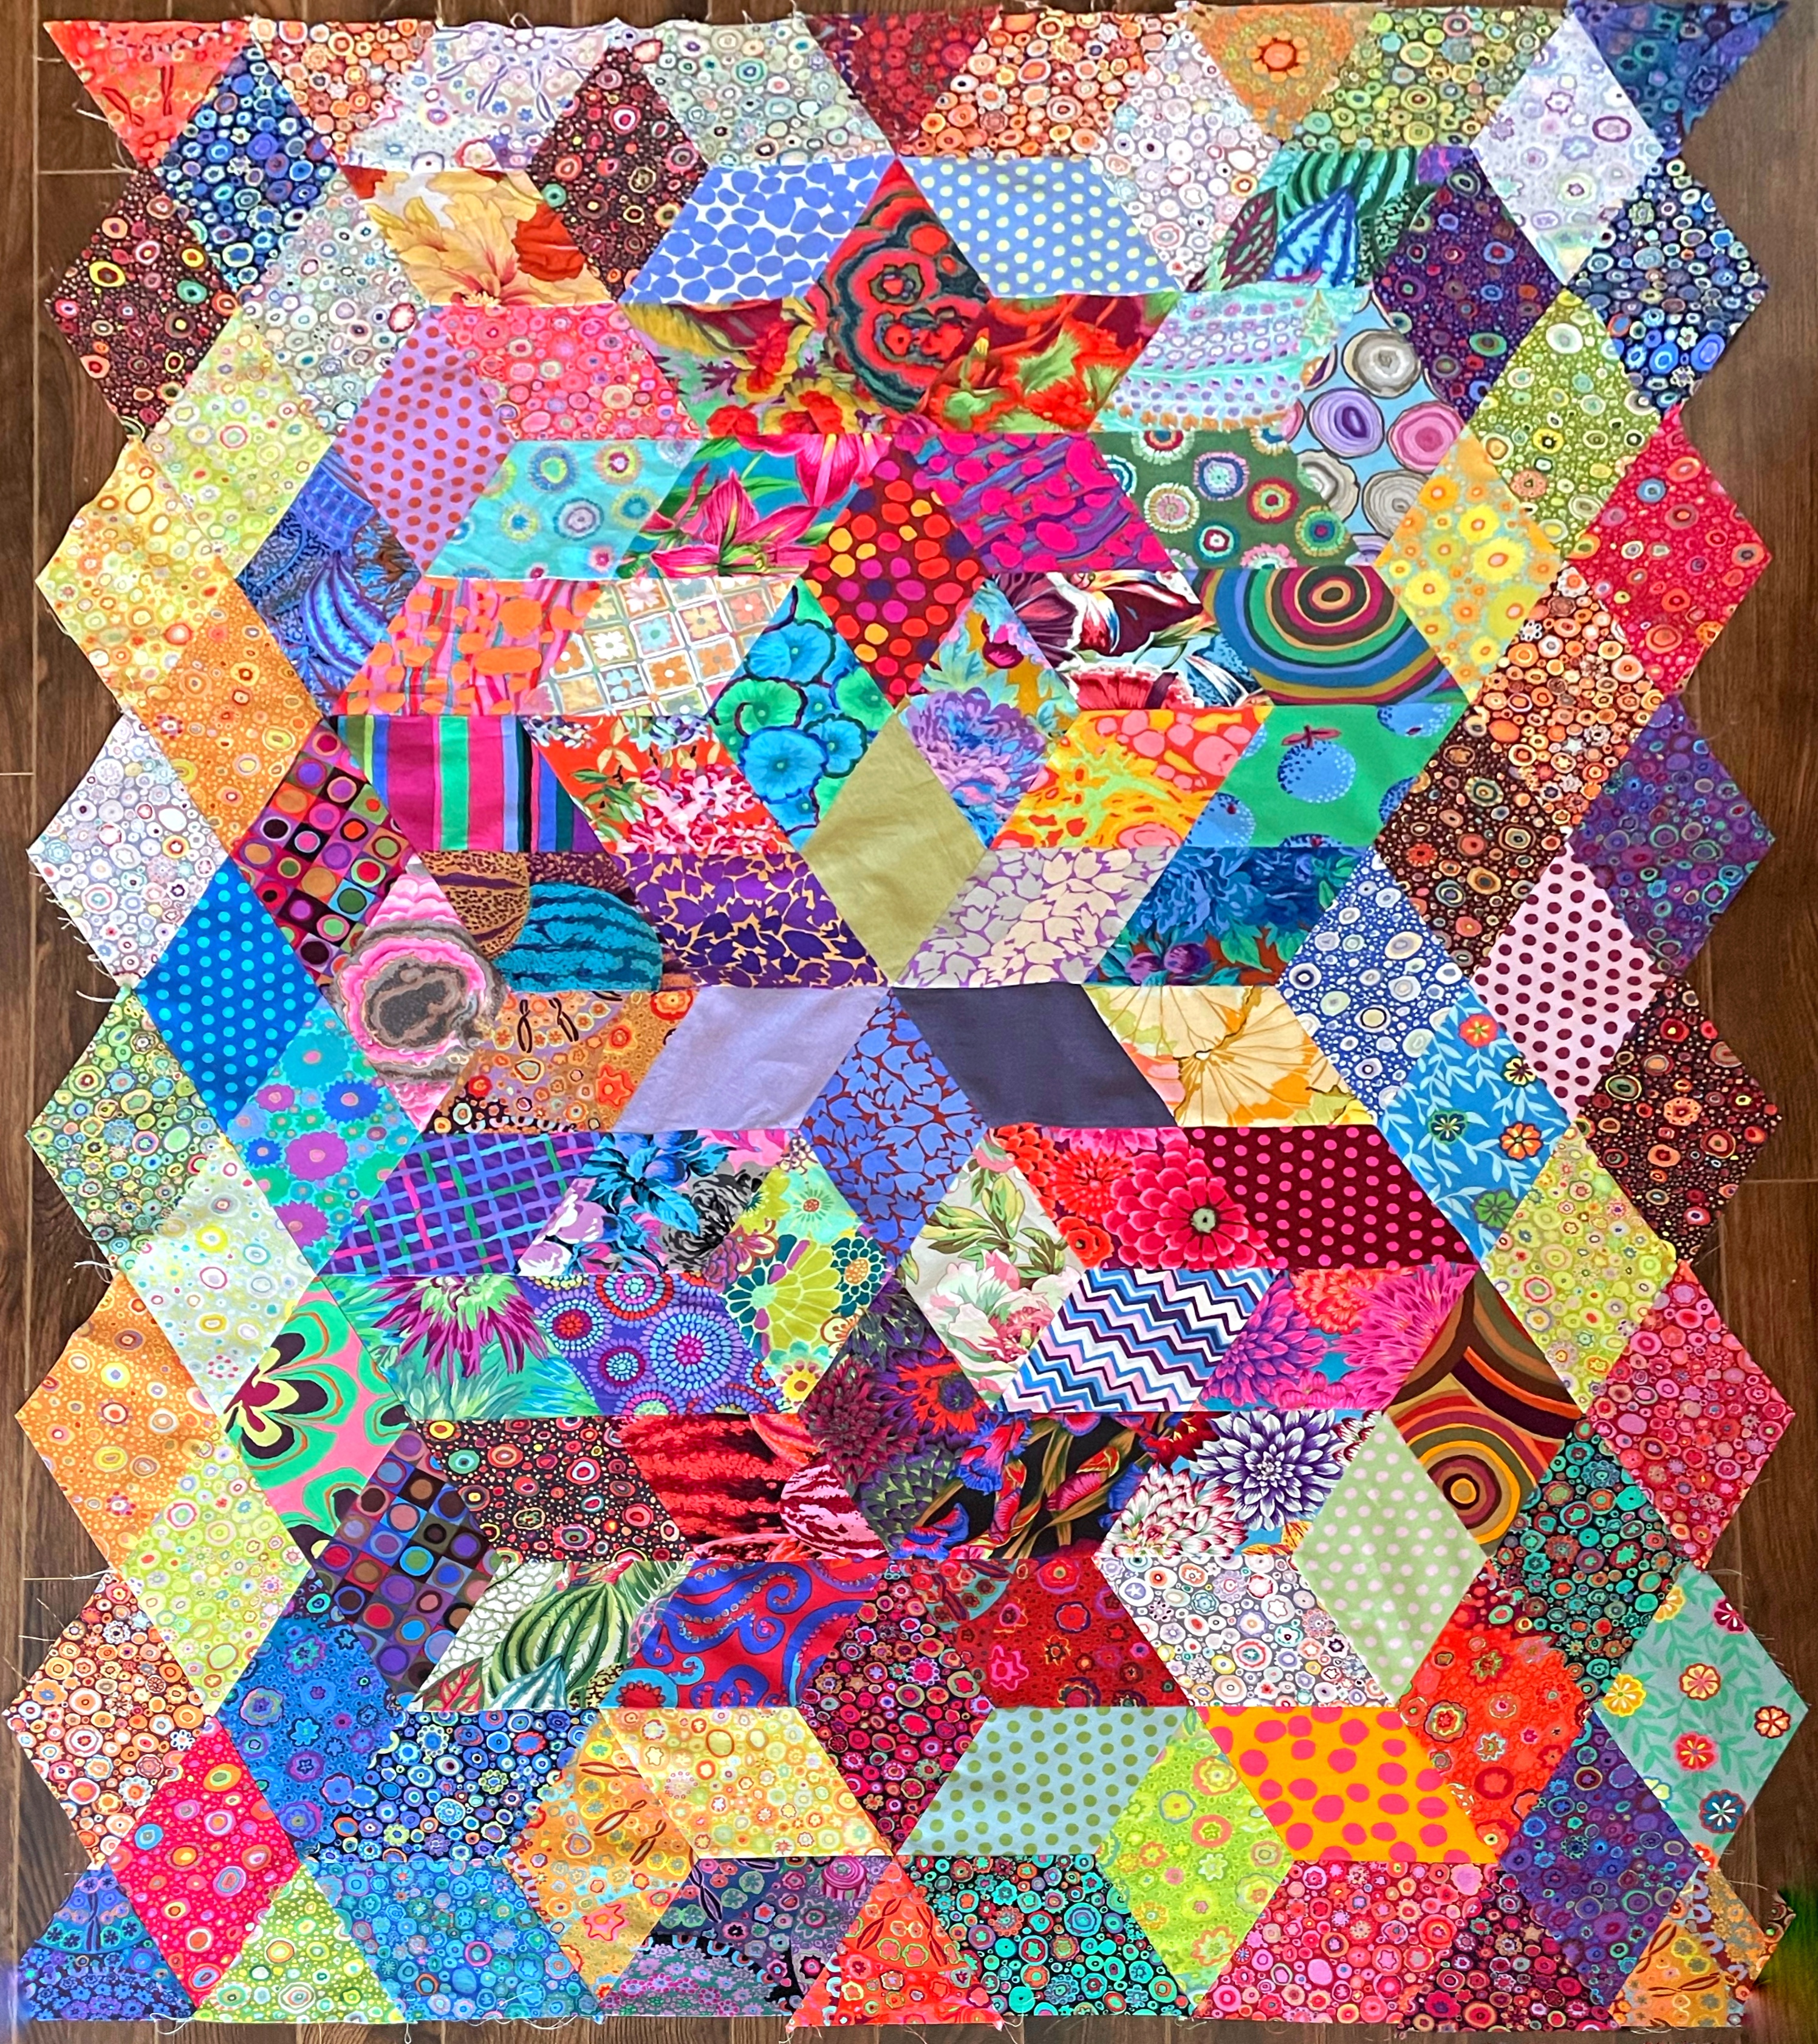
Finished the quilt yesterday – at least for the moment I’m considering the quilt done. I’m still contemplating quilting the seams in the ditch but pressing has flattened the 6-point joins reasonably well – I may leave well enough alone.

Diamonds III - Finished Top
Diamonds III – Finished Top

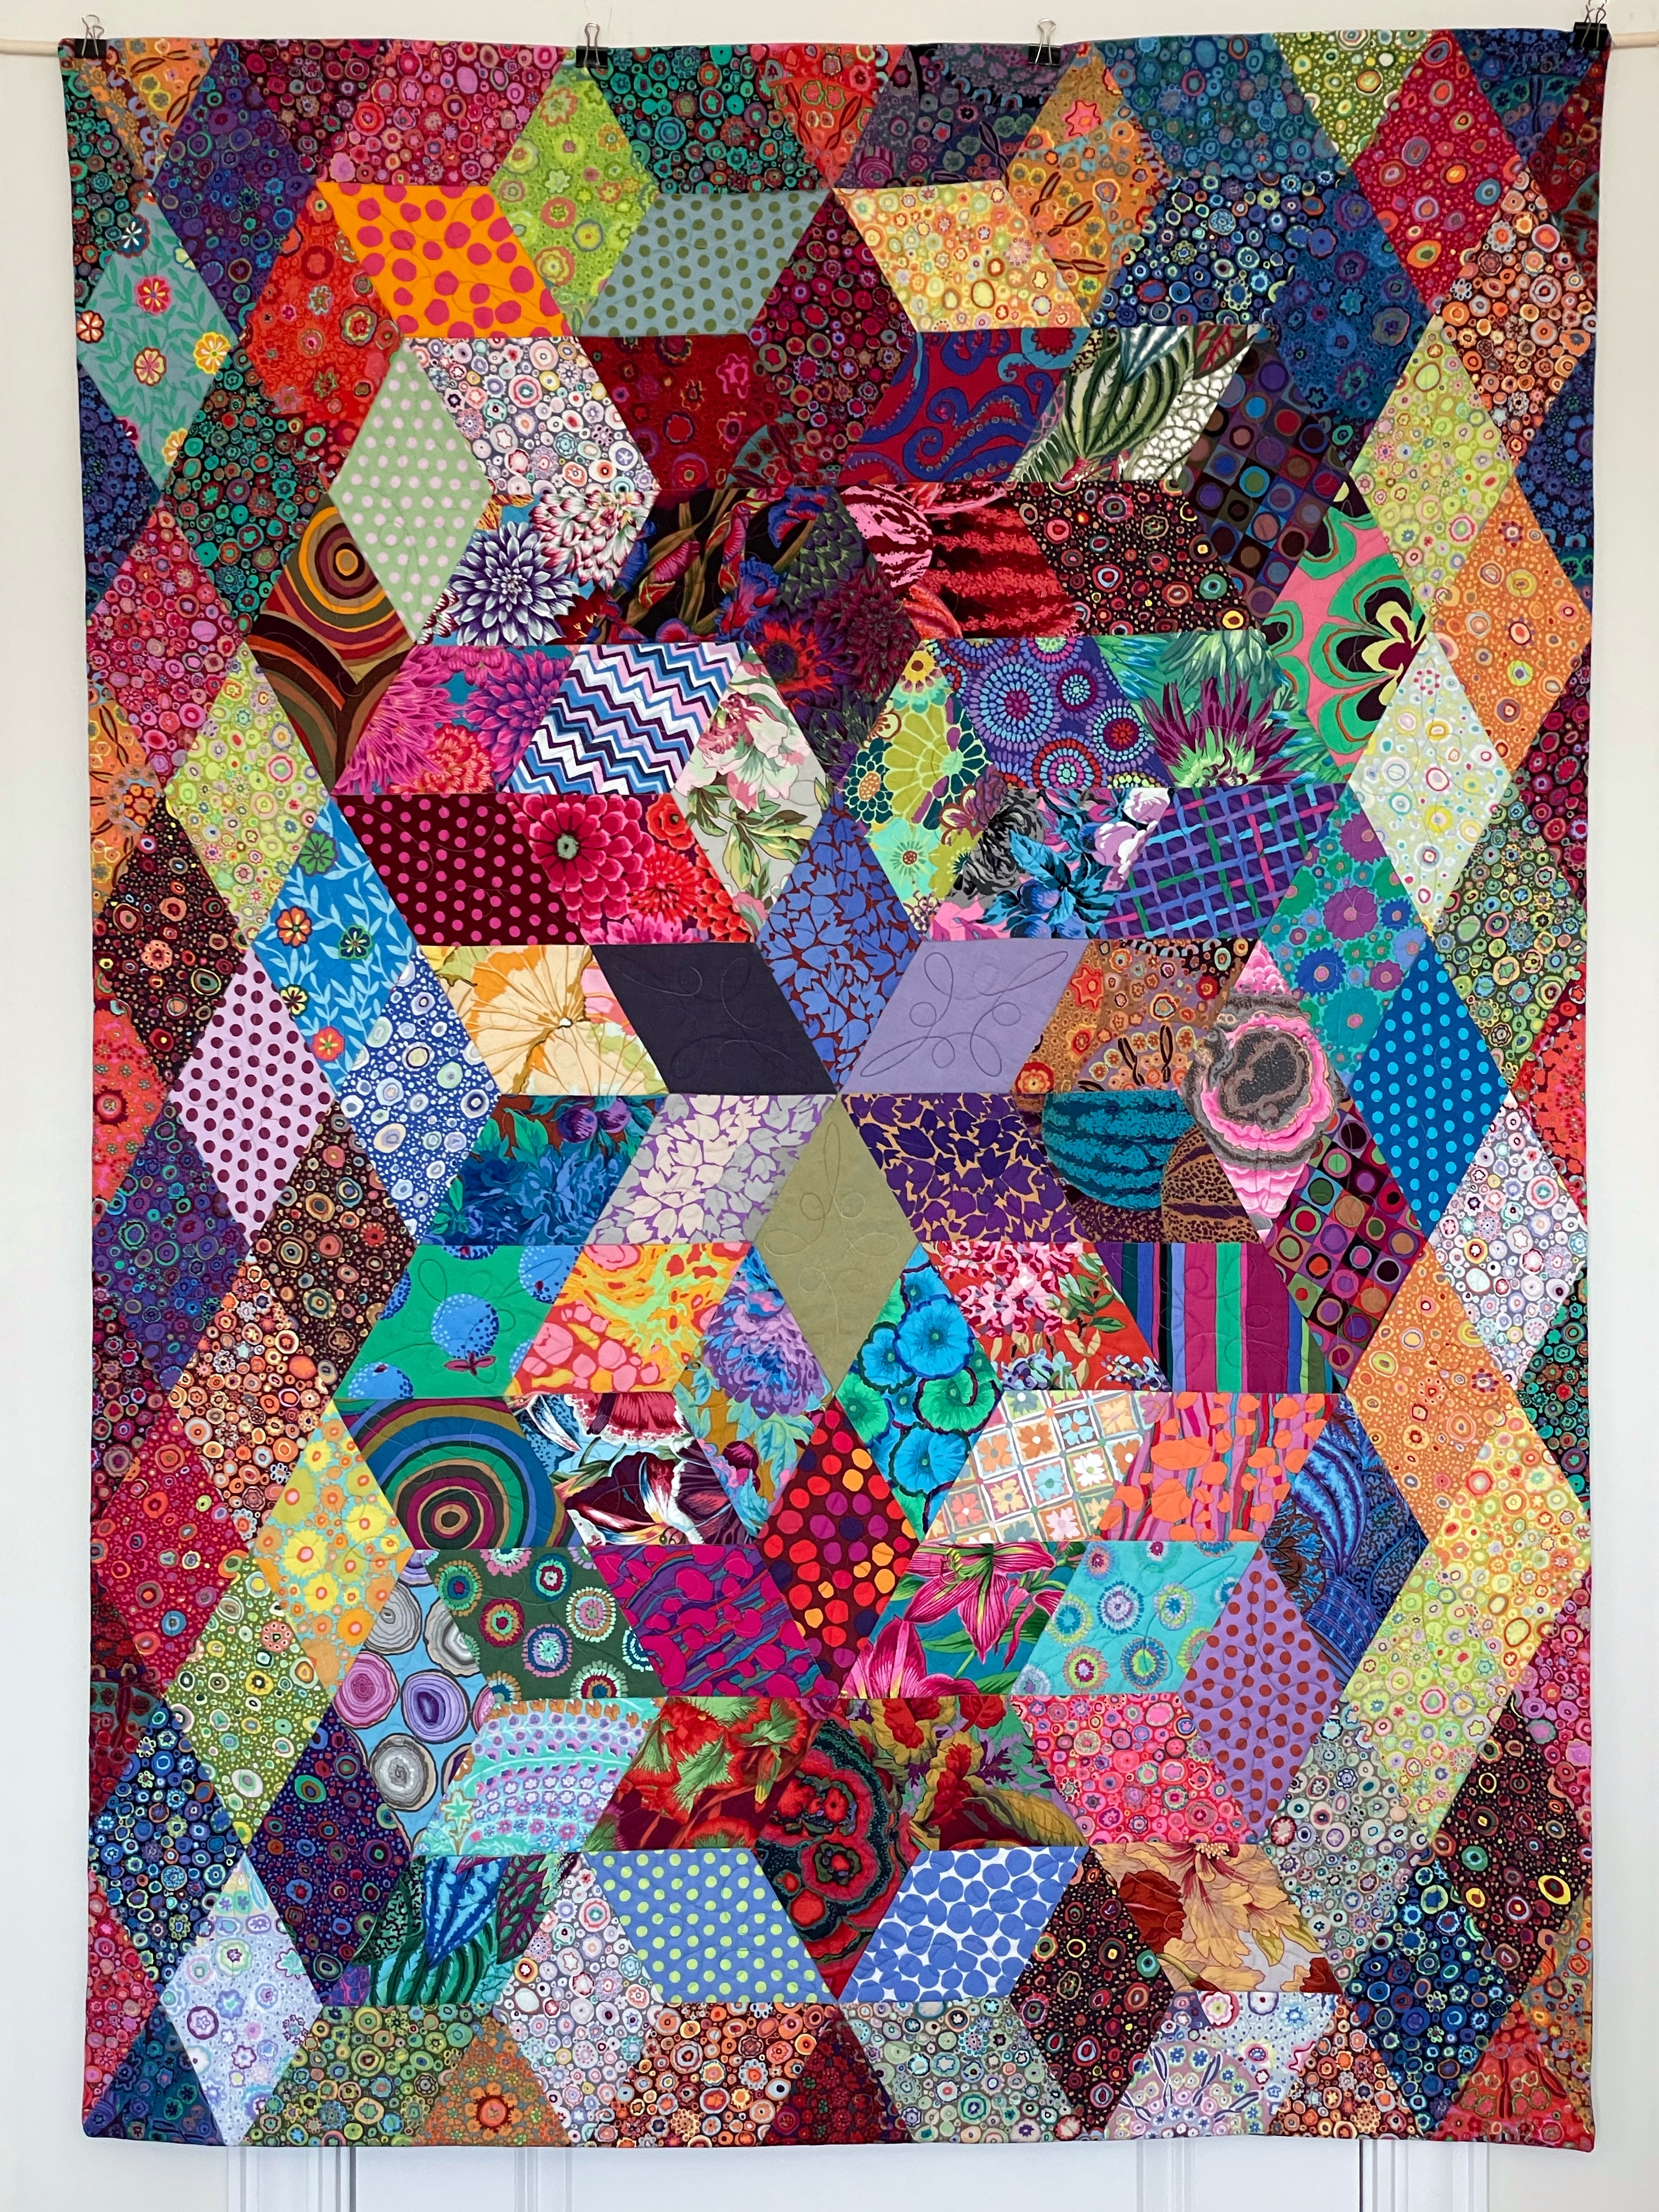
Finished size: 47″ x 66″.

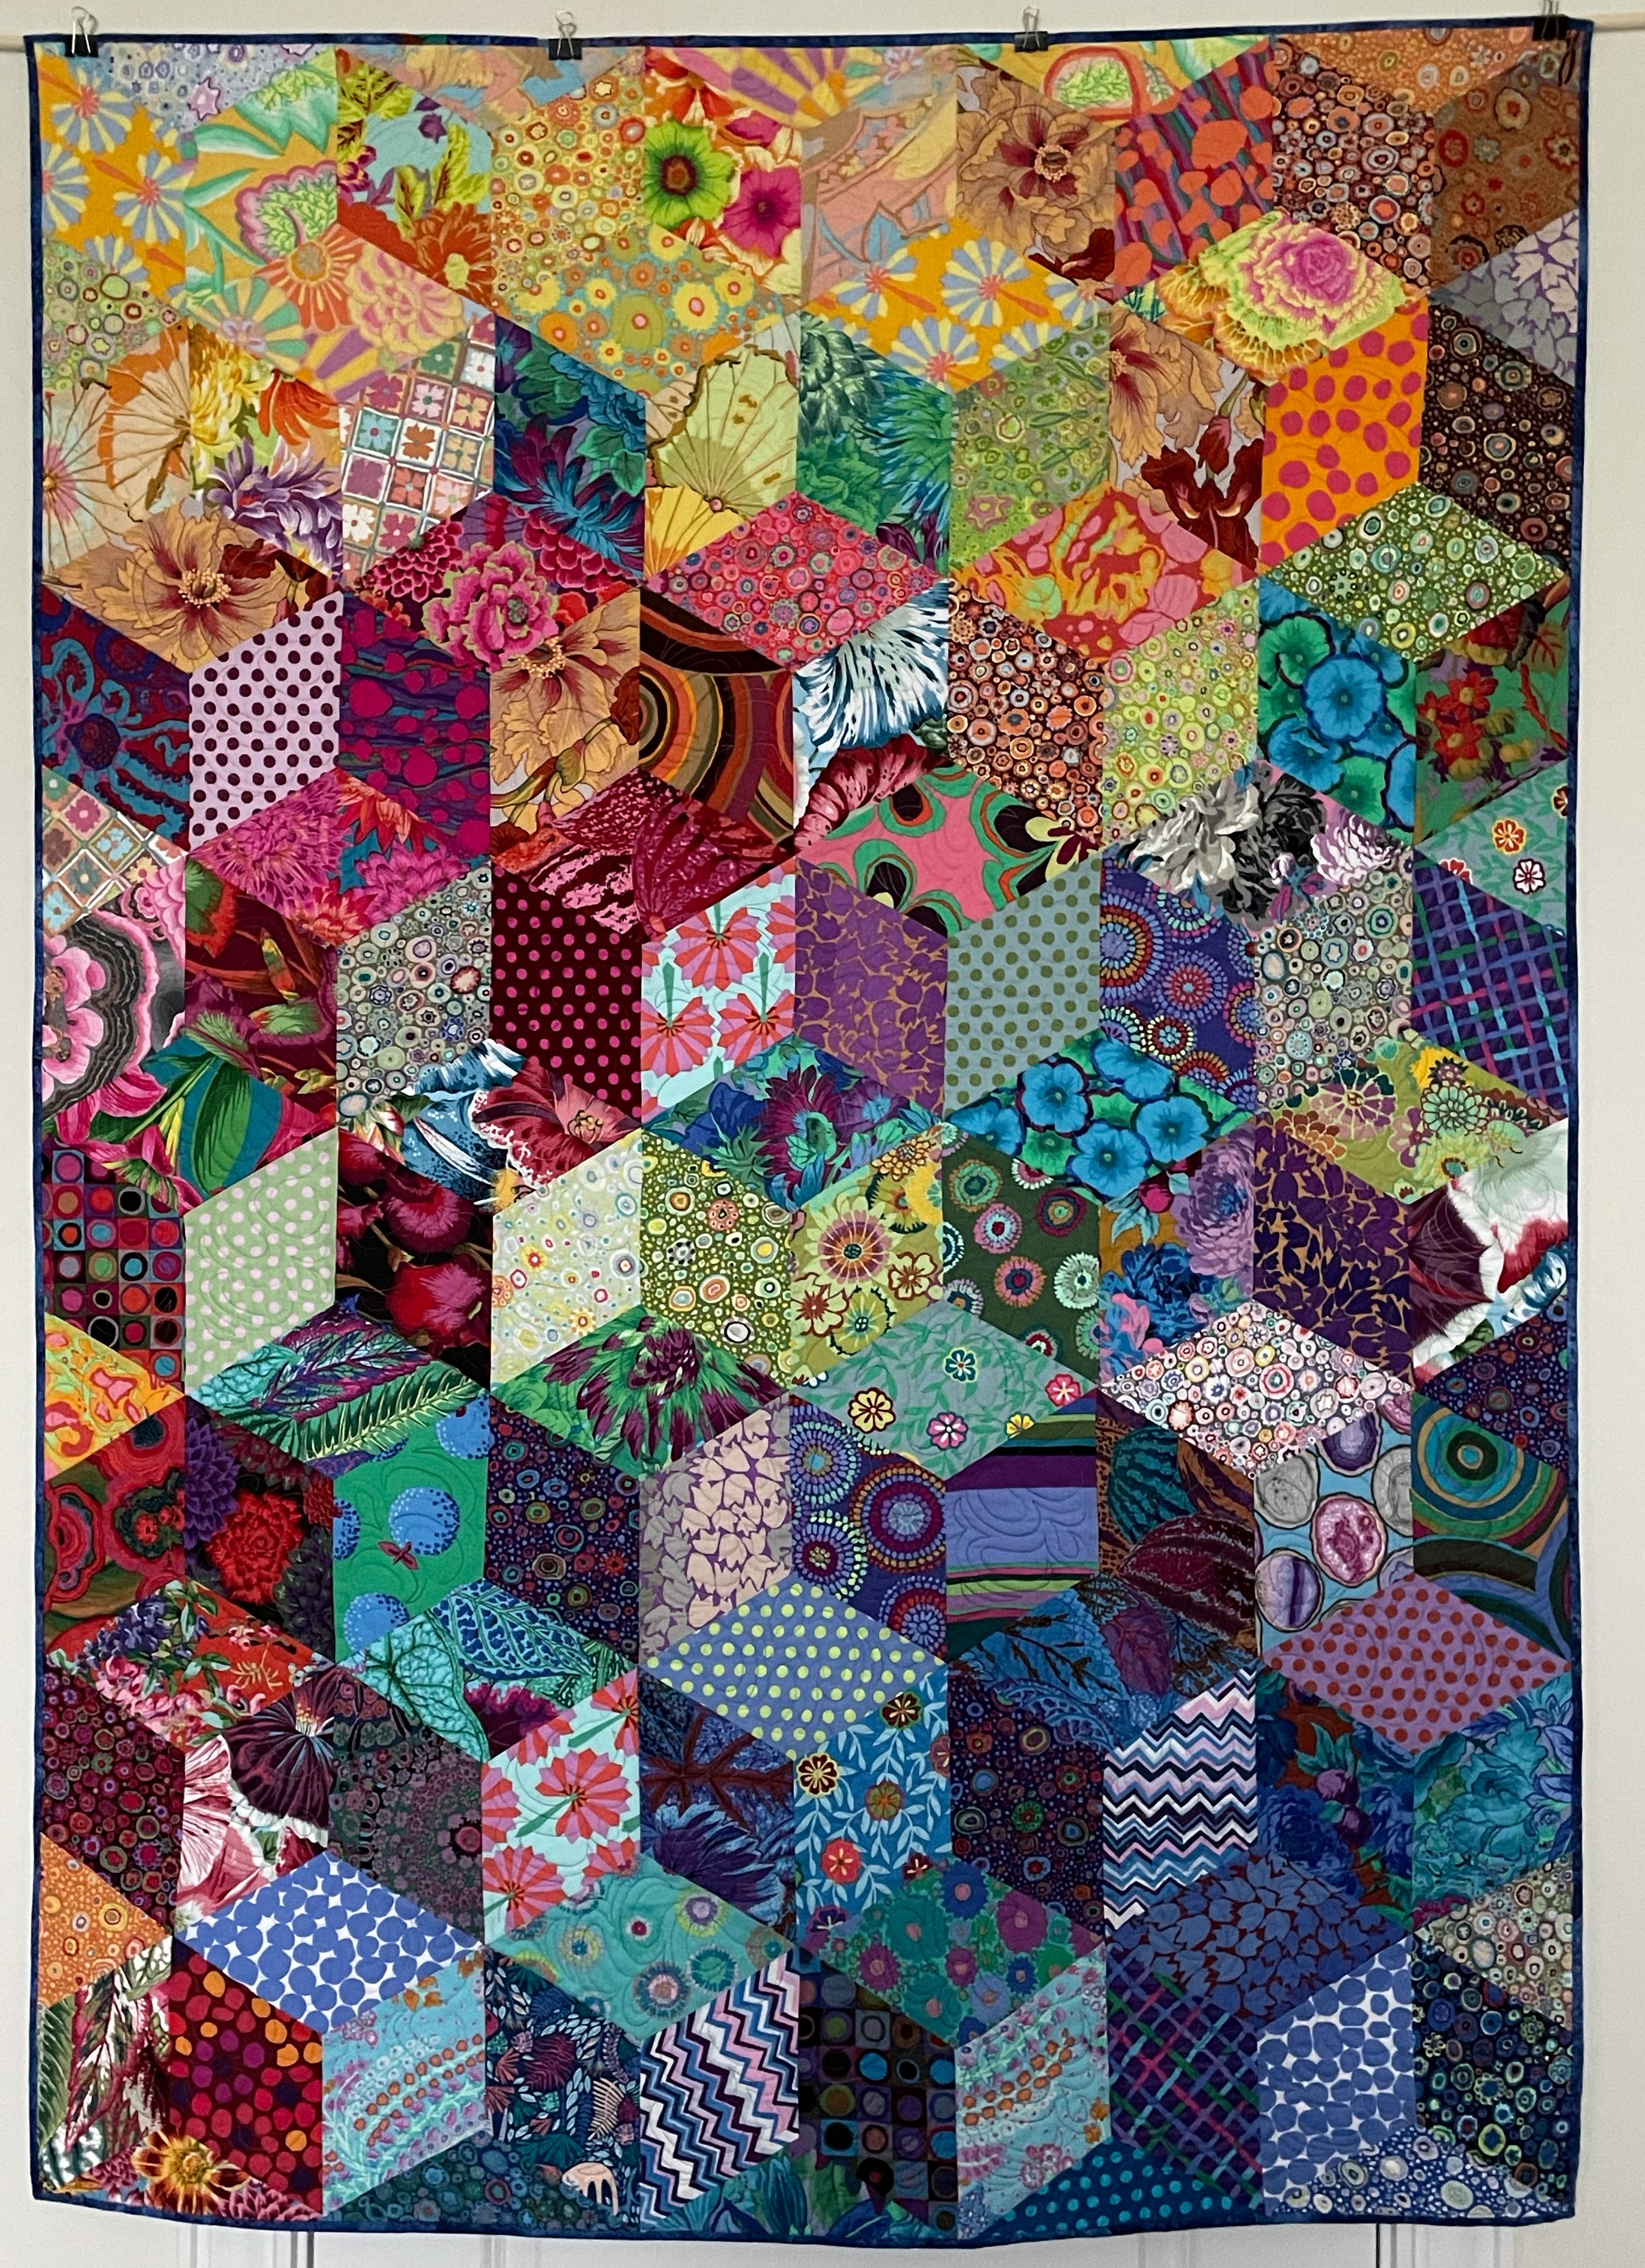
It’s hard to see in the photo but I finished with a 1/4″ binding using what scraps I could scrounge from the backing cut-offs (it was close – I have nothing left over!). In this case I stitched the binding to the front, hand stitched on the back (I usually stitch a binding to the back, fold over, and use a decorative stitch on the front). Stitching to the front with this quilt made sure I had an even 1/4″ dark edge to the quilt top.

Diamonds III - Finished Back
Diamonds III – Finished Back

This is the seventh quilt finished since last August – I have time to work on one more for the showing in Parrsboro, scheduled to happen through July this summer. I have more than enough of the Kaffe Fassett Collective fabric to work with – no point in saving it because I have more KFC fabric ordered to arrive sometime in June.

I signed up for the July/August “Kaffe Quilt Along – Gathering No Moss” online workshop being offered through Hyggeligt Fabrics in St. Mary’s ON. It was the colour of the blue collection that caught my eye. I don’t expect I will construct the suggest quilt – if I do work on that quilt block, I won’t make it using just those fabrics – the blues need some kind of an accent to liven the array. I registered because I’m interested in seeing what Fassett has to say about choosing colour and planning layout.

I knew of Kaffe Fassett’s work through his knitting books and even tried a couple of his sweaters – first time I tried intarsia knitting (not my favourite kind of knitting – too fiddly).

From Fassett’s 1985 book “Glorious Knitting”

Then I as a novice quilter I came across the You Tube videos of his Tampa weekend workshop Oct 17/18 2008.

I watched all three sessions and learned a lot about colour flow. (Here is another video where he discusses colour.)

Over the next year or two I did a series of quilts with batiks (as well as large scale print fabrics) using what I’d picked up from watching the workshop videos. So I’m curious to see what he will have to say this time as people work through four different colour arrangements of the designated quilt.

Diamonds III – Diamonds Quilted

I just finished quilting all ~135 diamonds (I haven’t actually counted them). It took me four days to stitch/embroider all the diamonds – somewhere in the vicinity of 16 hours.

Yesterday I learned two new things.

First – I use the Precise Positioning feature on my Pfaff Icon embroidery machine – however, in all these years I’ve been quilting my quilts I’ve used the left/right up/down feature but except when I was learning what Precise Positioning could do, I have never used the rotate feature! This set of diamonds and positioning a design within each block required I also rotate the design slightly to make sure the end of the design finished in the right position.

Second – When I’m quilting, I bring the bottom thread to the top before I start stitching. Sometimes when the machine starts the top thread gets pulled beneath the quilt sandwich, often leaving a bit of a bird’s nest below. Yesterday, I found out why that was happening! I discovered when I bring the bottom thread to the top, I have to make sure the needle position is rotated past the highest point. If I’m careful about that, my top thread stays where it is.

Diamonds III - Quilted
Diamonds III – Quilted

There are lots of things you can’t tell from the photo which looks a lot busier than the quilt does “in person”. You can’t see that I change thread for each block to minimize the impact of the quilting. You can’t see that I’ve embedded all thread ends from the start and stop of each embroidery. You do see the overall effect of the precise positioning of each quilting embroidery.

I still have the edge half-diamonds at the top and bottom to quilt, as well as the triangles along each side. I’ll get to that tomorrow; it won’t take long. Then, as I did on the Diamonds II quilt, I will stitch in the ditch over the entire quilt to give definition to each diamond/cube.

Still lots of work to do here.

Diamonds III – Top Finished

I’ve been working steadily on the quilt top. Yesterday I completed the 8th row of tumbling cubes – leaving just a row of diamonds to complete the top row.

Diamonds III - Tumbling Blocks
Diamonds III – Tumbling Blocks

I trimmed the diamonds on each end and then began working on the quilt back.

I had already set up seven hexagons from leftover triangles I’d cut previously when working on the Diamonds II quilt. I auditioned them against a backing fabric I found in one of my drawers (didn’t have to go buy more fabric!) – the questions was whether to place them on-point or lay them flat. I decided, on-point was more interesting.

I cut a strip of backing fabric wide enough to cut triangles to fill in the spaces, sewed the strip together then set the insert strip into the backing fabric.

Diamonds III - Quilt Back
Quilt Back

Because of the cubes on the top of the quilt, these hexagons imply cubes when you look at them.

The quilt sandwich is now pinned together and ready to be quilted. I’ll work away at that over the weekend and next week. I just have to create an embroidery design to fit each cube and then I’m ready to quilt.

Diamonds III – Assembly

I did a bit of searching before starting to sew my diamonds together – I wanted to see how people generally stitch their diamonds/cubes/hexagons together for the Tumbling Blocks design. The cube/hexagon, as I learned with the previous quilt, is created using Y-seams with three diamonds. I’m getting relatively good at that, so that wasn’t my question – I wanted to know how people put the cubes together. Turns out they do what you’d expect – create each cube then butt the blocks together, but most of them are working with three fabrics (a dark, medium, light) and it’s possible to start in the centre of the project and work your way out from there.

My challenge is each cube/hexagon is unique and I want a specific colour flow. The way to assemble the quilt top, I thought, was to carefully stack the diamonds in each cube keeping it in its exact row; stitch each cube, stitch each row, then join the rows to one another.

TOO FIDDLY!

I created rows 1 & 2 separately, and managed to join them, but getting the “star” joins, involving six points, took a great deal of time, and a lot of picking out of stitching, to get the points to match precisely. So that’s not the way to do this!

How else might I assemble sub units so I can join them with less effort?

I realized, as I was sewing row 2 to row 1, that if I set up half-star units, I might be able to get the 6-point join to work more easily.

Cube layout changed to 6-point star

In this layout I have two “simple” Y-joins at each end of the star with the 6-point join in the centre of a long flat seam, rather than struggling with two Y-seams to make that 6-point connection.

I’ve laid out the rest of row #3 that way, and I’ll sew it tomorrow.

Row 3 set up as “half-stars”

I still have to work with my carefully stacked rows of cubes – but before sewing cubes, I will lay out each row as half-stars, join those units, then connect them to the rest of the quilt top.

Let you know how well that works, tomorrow!

Diamonds III

I’ve just laid out the second pile of diamonds from the Kaffe Fassett Collective. I’d cut them from the strips I’d cut for Diamonds II and added a few more from fabrics I picked up at Woolworks just outside of Mahone Bay when I was in Lunenburg for my regular bone density scan.

Tumbling Blocks Layout

I began by colour sorting the diamonds then sorting again for intensity. I laid out the blocks so I could get a colour flow from the yellows in the top left to blues in the bottom right. I haven’t taken time yet to sit with this array – I did my best to keep the dark diamonds aligned on one side of each “cube”, lighter diamonds on the “light side” with a medium intensity for the “top” of each cube. I now need to spend some time checking that the flow allows each cube to stand out.

In actual fact I began the layout with the blue diamonds (in part because I had more blues than other colours) but once I had the layout I decided the colour flow works better from the yellow to the blue, rather than the other way around.

Reverse Layout

So now to begin assembling the quilt top.

Diamonds II – Finished

Just finished the second Diamonds Quilt.

Diamonds II – Finished Quilt

In this quilt I wanted the quilting to provide texture but not detract from the strength of the individual fabrics. I began at one edge stitching-in-the-ditch but I didn’t get far because I could anticipate running into trouble with the backing not distributing evenly. I switched to quilting the individual diamonds (I still haven’t counted them – there’s approximately 130-140 pieces in the quilt including the triangles and half diamonds at the edges).

Because I was quilting-in-the-hoop, I had to hoop each diamond separately as well as change the thread for each diamond. I was able to use the same variegated thread for several diamonds but to make sure the backing remained flat I started in the middle – that meant I couldn’t quilt every similar coloured block one after the other because they were distributed throughout the quilt top and I needed to work my way from centre to edge making sure the backing was taut with each hooping.

Once I had all the diamonds quilted I resumed stitching-in-the-ditch which now was straight forward.

I finished the quilt (final size: 48″ x 64 1/2″) with a hidden binding because I didn’t want to interrupt the flow of the diamonds at the edge of the piece.

Diamonds II – Quilt Back

Added a hidden binding and a label and the quilt is finished.

Diamonds II – Quilt Sandwich

I just figured out something I should have figured out a long time ago!

Batting On Backing

When assembling the quilt sandwich, I’ve always used three 6′ pieces of 1 x 3 pine. (I prefer the boards to pool noodles because their weight makes smoothing the fabric/batting easier). I roll up each layer on a board, then open out some backing, position and roll out some batting, then position the quilt top on top.

Today, I realized what I should be doing is uniting the batting and backing into a single layer which allows me to smooth the backing on the batting before rolling the one layer onto a board! Before adding the quilt top, I know my backing is smooth. Now, why didn’t I figure that out before?

Once I have the smoothed backing/batting layer on a board, I can start rolling it out, then position the quilt top and start pinning.

Creating The Sandwich

Creating the sandwich this way means I’m not struggling to keep the backing smooth when I’m pinning because it’s already been “attached” to the batting and all I have to worry about is the pieced top.

I now have my quilt sandwich pinned and ready to quilt. First, stitch in the ditch, then embroider each diamond. I can’t group the diamonds to be able to do fewer embroideries because each is 9 1/2″ vertical length and double that is much too large for any embroidery hoop available. So it’s one diamond at a time, I’m afraid, for all 200+ diamonds. The design I’ve created is a simple single run design – it’s purpose is just to hold the layers together. Each embroidery will go reasonably quickly.

I also want to share a video I came across today from the Missouri Quilt Company – Seam Ripping 101. In the video Natalie Earnheart “walks through what a seam ripper looks like, how it works, and how to use it.” Take a few minutes to watch; you’ll discover things you didn’t know about ripping out seams.

Now back to work.

Diamonds II – Assembled

Here it is – the Diamonds II quilt top fully assembled:

Diamonds II – Assembled

The sewing process did get much easier as I went along. Once I’d figured out the sub-assembly groupings and sewed each segment, the parts went together very easily. I did very little taking apart and restitching.

I find it interesting that my original star in the centre is almost invisible. I chose to set up a star with those fabrics because there were three each of the solids and the leaf ombre – I couldn’t see where else to use them. However, although the colour of those diamonds is strong, it’s overpowered by the other fabrics and what pops out when you’re not looking at cubes are the two red six-point stars; you almost don’t see the star in the middle.

In any case, this is how the top is going to stay. If I trimmed the side diamonds I’d be able to get away with a single length of backing fabric (provided I find a fabric that complements the wild colour range of the top). Of course, I can always add a single strip with end to end diamonds which I would need to do were I to make the panel wider.

I just measured the finished dimensions: Length = 66.5″ (that’s a reasonable length for a throw or wall hanging); width = 43.5″ if I trim the outlying diamonds. If I add half diamonds in those spaces I can grow the width to 49.5″.

I think I have to add the half-diamonds. Which fabrics? Gotta think about that a bit.

Lots of decisions remain.

Diamonds II – Bottom Half Done

The assembling is becoming easier. I’m doing the obvious diamond strip joins then nesting pieces and doing the Y seams. I’m finding I just have to mark the strategic corners with a tiny dot where I have to remember not to sew to the edge. My Y seams are pressing nice and flat.

Bottom Half Assembled

I incorporated the side elements; next I will assemble the top extended hexagon, fit that into the bottom segment and then all I have left to do are the four top segments.

The sewing isn’t taking as long as I thought it would but it will likely take another day to stitch all the remaining blocks.

I’m just carrying on (glad I printed out a photo – I’ve needed it to keep the colour placement consistent)….

Diamonds II – Assembly

I stumbled around yesterday trying to figure out how to assemble this quilt top panel – sewing some staggered diamond seams and some Y seams to get a small portion together (the point being to have as few Y seams as possible). I did three Y seams yesterday – today I can see how to put that grouping of diamonds together with just one!

Left Corner Assembly

I picked up today where I left off and began adding diamonds on the right side of the bottom, making mistakes with the orientation of the cube, and having to redo quite a few seams. The Y seam – turns out it isn’t terribly difficult – I’m managing to get a nice flat join; the challenge is seeing some kind of logical way to assemble these various elements.

I think I have finally figured it out:

Assembling Units

I now have the bottom assembled. When I stood back and looked at the array on the floor, I decided I could put the side diamonds together into more or less a triangle shape; so I did that.

I then grouped the block elements for the top part of the panel which leaves the middle in two symmetrical 6-sided shapes (which are still side-by-side on the floor).

Here’s how I plan to proceed – start by putting together the centre diamond in the bottom half of the centre block (khaki/blue, blue/red); next the four “diamonds” laying on their sides; finally put those five pieces together and attach them to the bottom piece – that gets me the full bottom half of the panel completed. All I have to do is repeat the process for the top. The final assembly involves adding the two side pieces (which can be accomplished with a single Y seam, each).

Looks like my panel is going to measure ~ 45″ wide – not quite wide enough. I can extend it a wee bit if I add in another set of diamonds down each side. I already have 75 diamonds cut out (which I’m planning to incorporate into a second version of this quilt top); or I could put a 2 1/2″ – 3″ border around the finished, trimmed panel – the question is what would I use as “framing” fabric – no idea at this point. Any decisions about how to extend the width/length of the panel will have to wait until I have the panel assembled and just before I trim the sides.

Depending on how long the panel turns out to be – I may have to remove the triangles at the top/bottom edges replacing them with diamonds which would let me to extend the length as well. Again, that decision will have to wait until the panel is fully assembled.