Finished this pair of socks on Friday and began a new pair that I think I might keep. The stash keeps growing – I will definitely have plenty of socks to share for Christmas. Last week I contacted the gal who wanted 4 pairs of socks from me two weeks before last Christmas – I told her this was the time to place her order. She said no socks this year. Do I really believe her? When she asked last year I just squeezed her order through – I had to take one pair, remove the toes, lengthen the foot by an inch, reknit the toes – she was lucky I had enough time to do that. I’ve already put aside a couple of pairs with someone’s name on them. I’ll just keep knitting as usual.
The Christmas Show Challenge
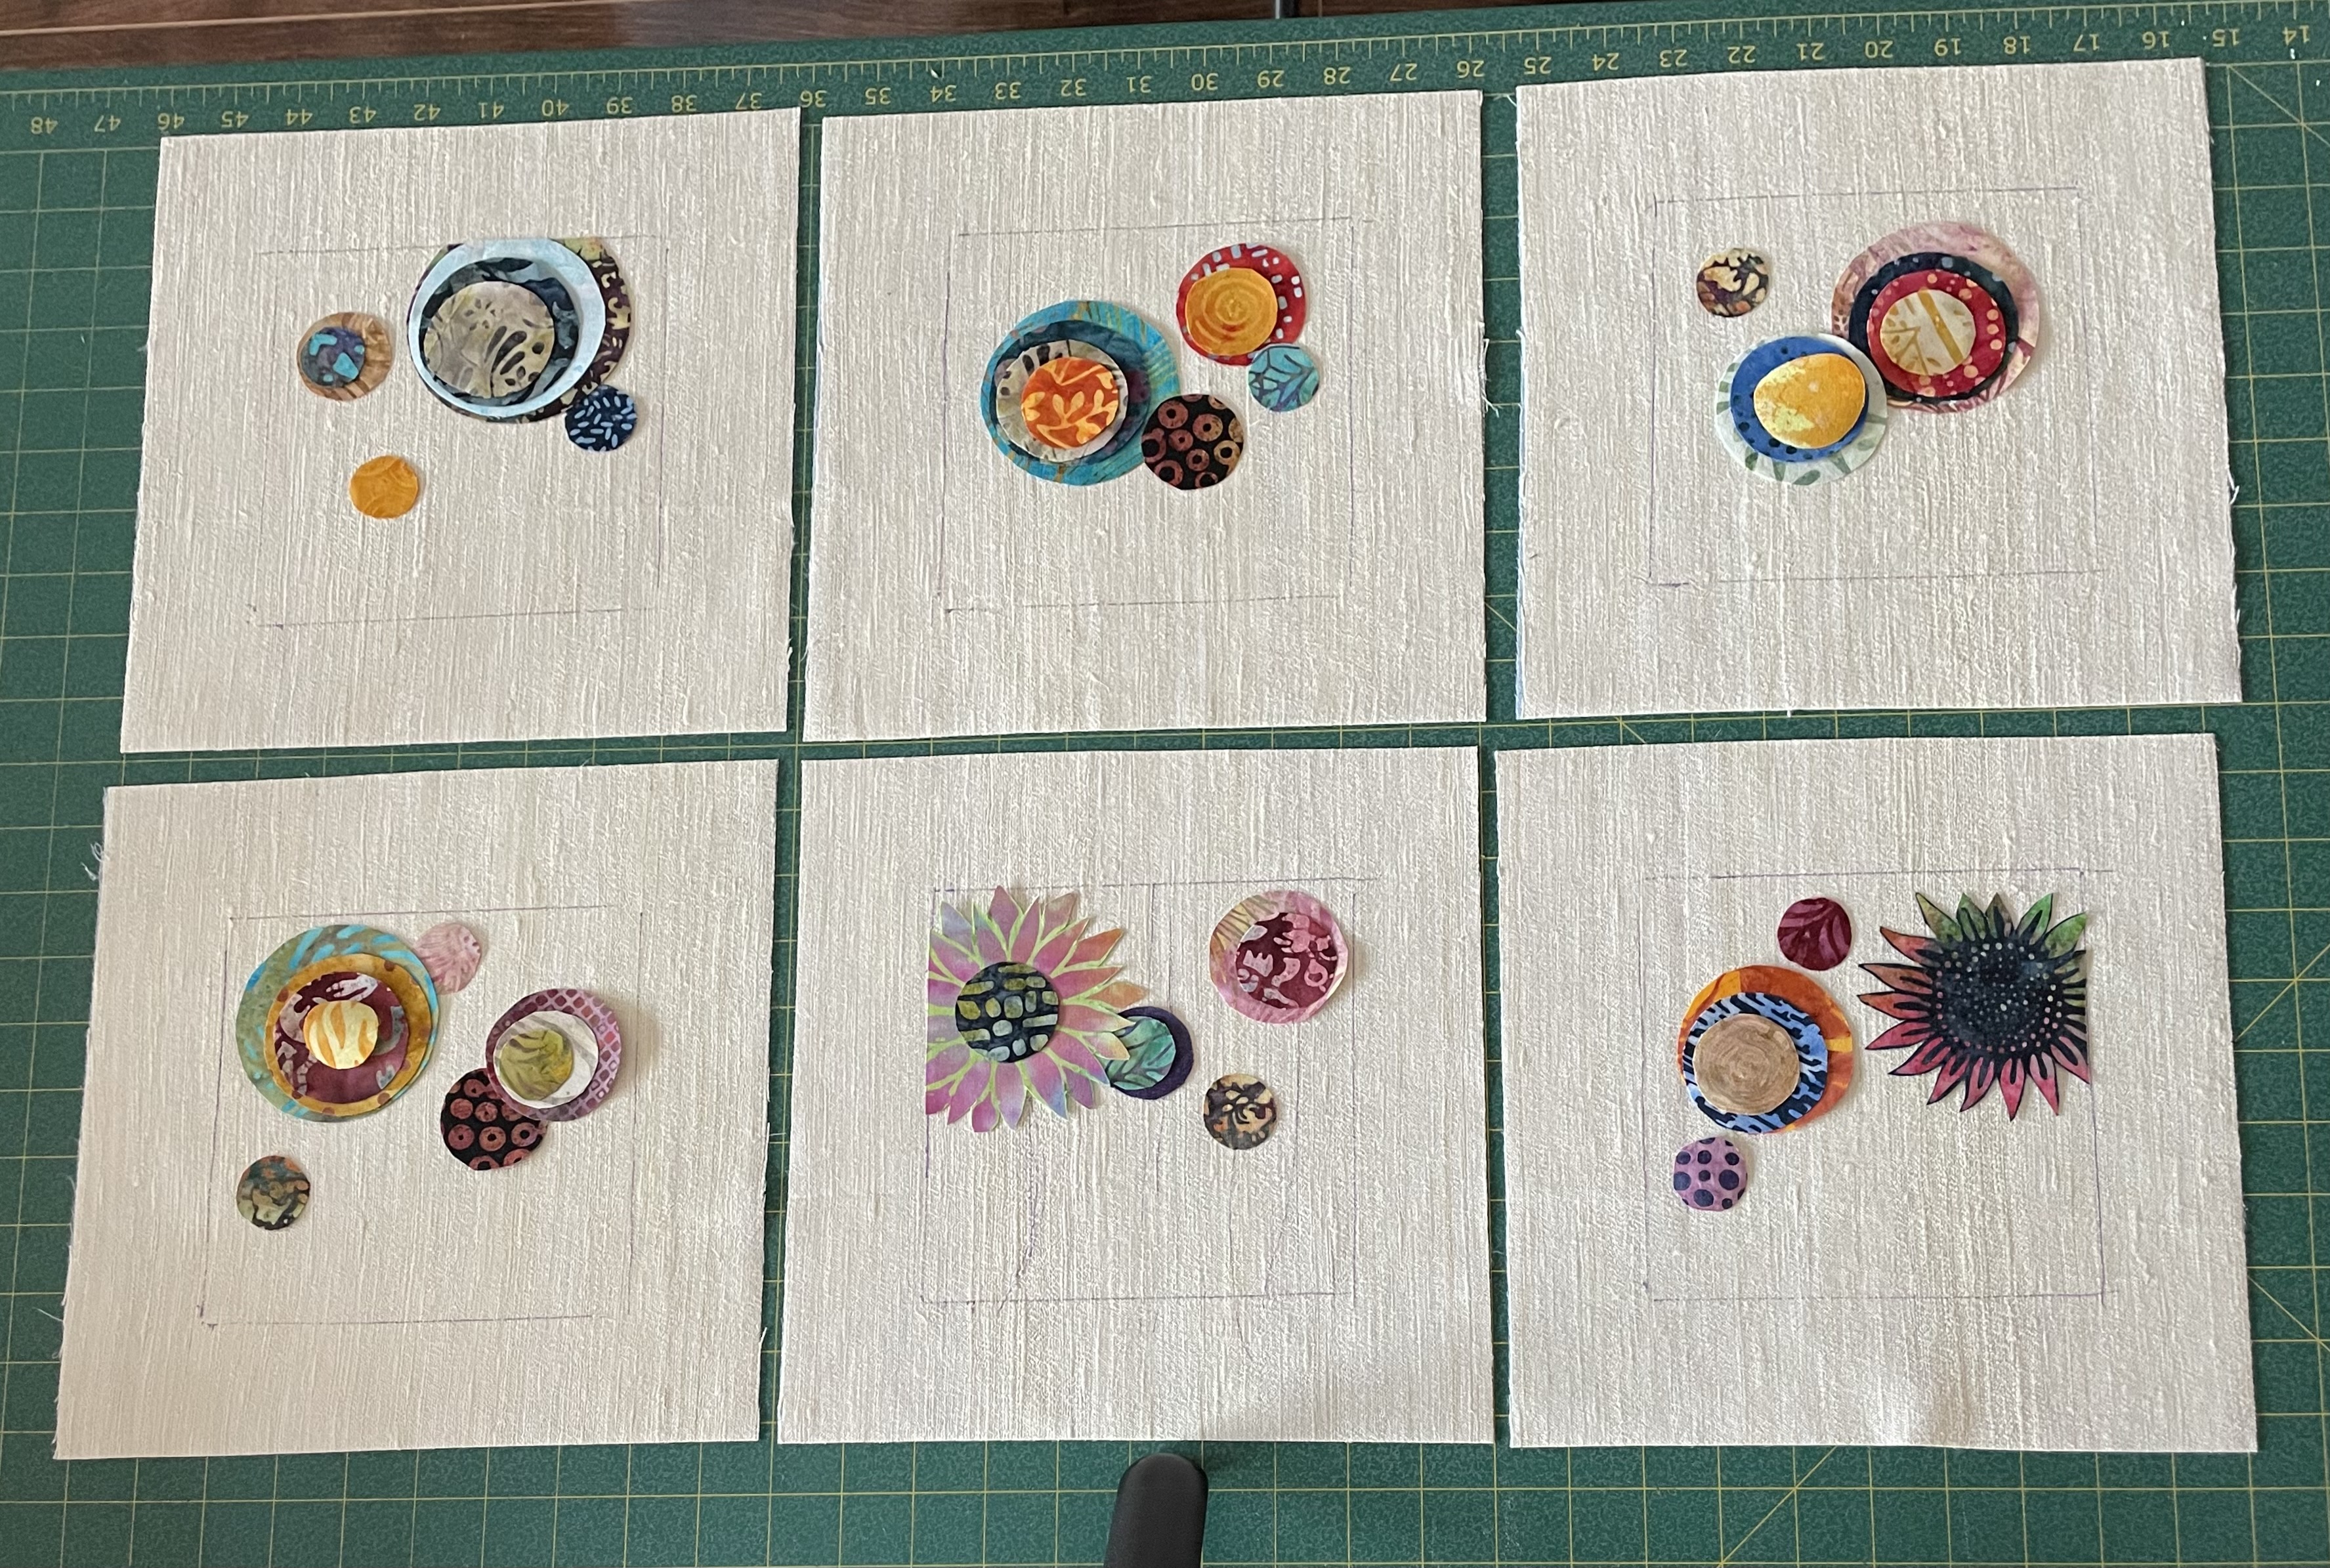
I finally made a decision regarding the 6″x6″ blocks – to use the textured raw silk for the background, to fuse batik circles of various sizes to the background to simulate “modern flowers”. I cut out ten 10″ blocks from the raw silk I have on hand, backed it with sewer’s dream to stabilize it, marked 6″ squares in the middle (using a heat erasable pen). Next, I added fusible web to a pile of batik scraps and cut out a lot of circles. I have started arranging and fusing circles to the raw silk.
Six Blocks Laid Out (but not yet fused)
Because all ten blocks will be shown next to one another, I’ve worked to vary placement, even cropping some of the flowers so the appearance of the blocks is different. I have to edge stitch the cropped edge so there are no raw edges at the edge of a piece.
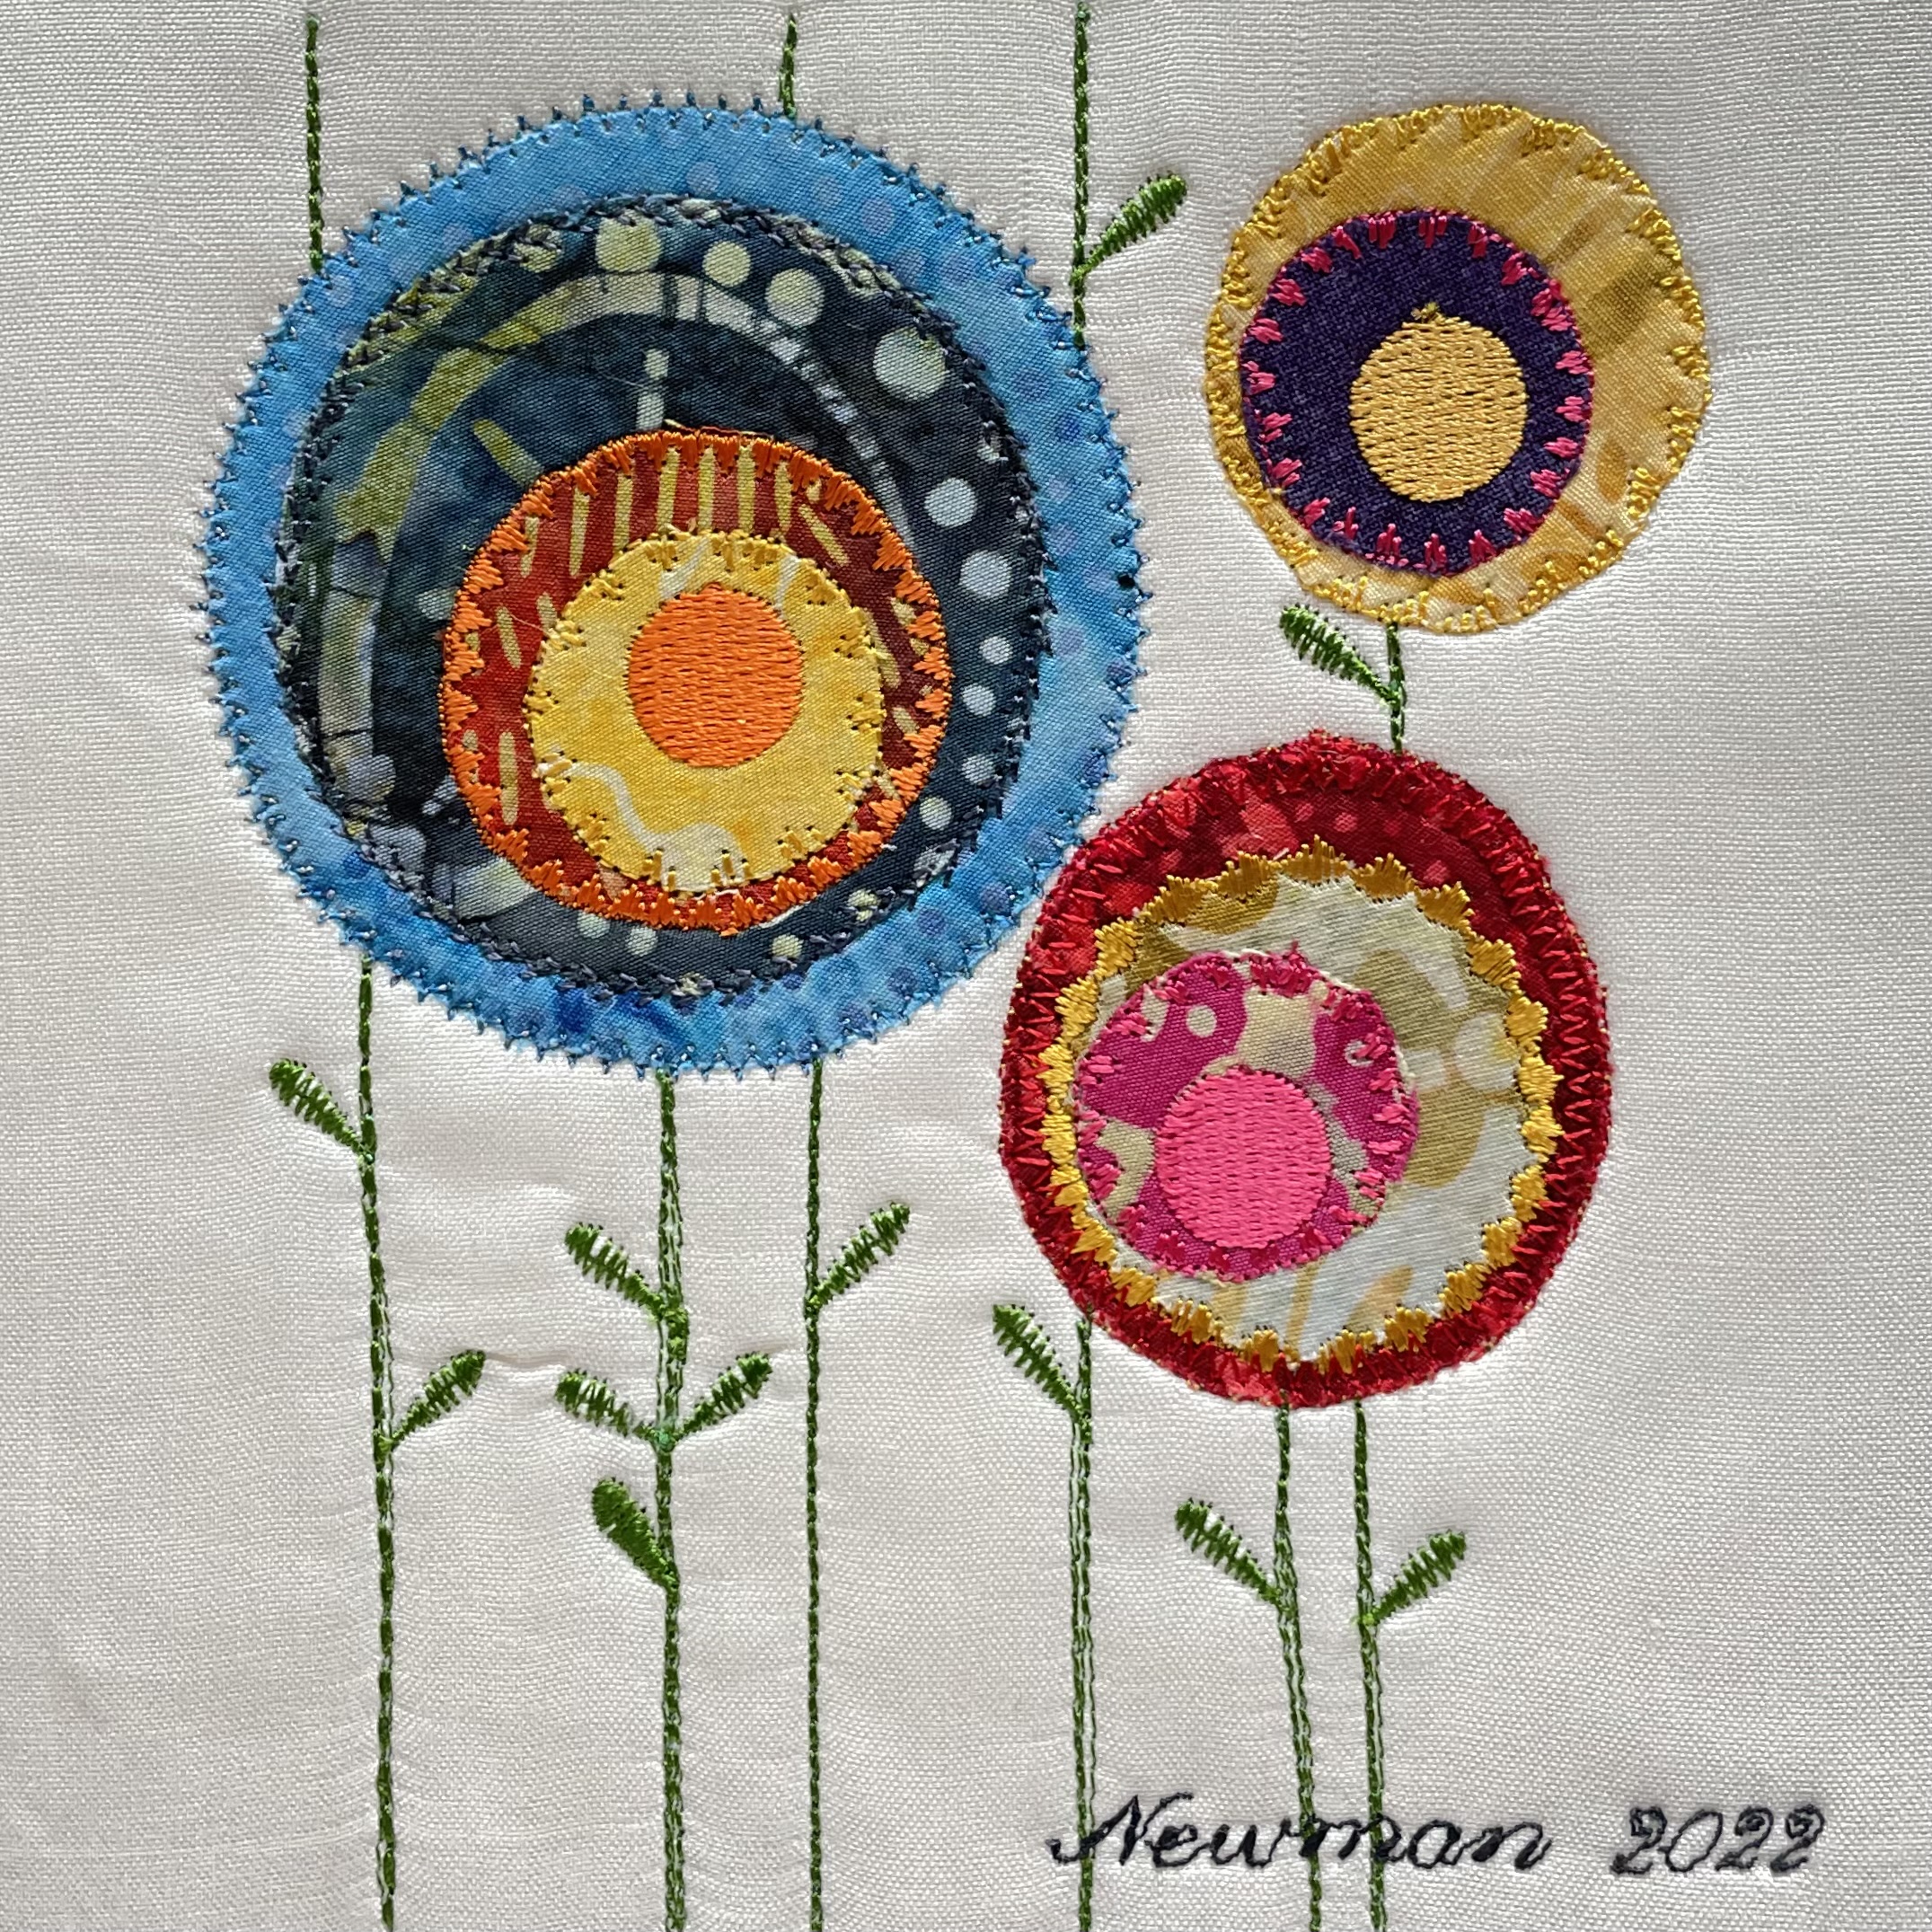
I’ve completed one of the blocks
First finished 6″ Block
The slight wobble at the bottom of the block will be eased out when I mount the fabric over the stretched canvas.
Looks like each block will take me between 2 and 3 hours to embellish. It doesn’t look like a humungous amount of stitching but it takes more time than you think to edge stitch each bit of batik, then to add stems and leaves, and signature. The stems are free motion. The leaves are decorative stitches each requiring careful placement. The flower centres are embroideries which want precise positioning and often involve thread changes. It all takes time.
I’ve got another block sitting on my machine waiting to worked on tomorrow.
In my stash, I have several metres of raw silk – I bought it in Toronto in 2008 to do wall art. I cut a strip, backed it with sewer’s dream – light weight woven fusible interfacing – to stabilize the weave of the silk and to eliminate some fraying at the edges, then cut the strip into 7 1/2″ blocks. I also had some fabric with these roses which I thought might work as appliqués – I backed a piece of the fabric with Pellon 805 fusible web, fussy cut these two flowers, fused them to the silk, thread painted them, added a signature, trimmed the block to 6 1/4″, bordered it, finally I mounted it.
Again, those corners are driving me crazy! Adding the black silk border adds quite a bit of bulk at that critical location and makes it nearly impossible to get a tight, square fold at the corner so while the fold look OK when you look at it from the side you can see the “pointy” bit sticking out when you look at the block face on.
I’m not sure how I feel about the raw silk – I think it has a bit too much texture compared to the woven silk I used on the other flower piece:
Also, I think I prefer the whimsy of the “Modern Flowers”.
I can’t source anything close to this woven silk here in Halifax; I’ve ordered several different types of silk from two different suppliers. Until it arrives (10 days/2 weeks?) I’ll keep playing with the raw silk squares, making more Modern Flowers arrangements. I think that’s where I’ve landed. Because I’ve cut the raw silk at just 7 1/2″ (8 1/4″ is what I need for wrapping around the stretched canvas) I’m going to have to trim and border the blocks but I want to explore different leaf types and lots of different appliqué placement.
My order of a dozen 6″ square stretched canvases arrived day before yesterday. I tried stretching some of the panels I’d made to see how it went. I first tried the crazy quilt block – I had already added a white cotton border to it so I darkened that with a black permanent marker (just to see what it looked like) then folded the fabric over the stretched canvas. Very difficult to get the corners tidy!
I next tried the beans – I didn’t bother trimming and making borders I was primarily interested in folding the corners. Again, they didn’t turn out as smoothly as I wanted. So I took both apart. I removed the canvas from the frame with the crazy quilt block – I wanted to use the canvas piece as a template to shape the bordered block. I trimmed both the crazy quilt and the beans blocks. Then I used double sided tape on the back of the frame so when I brought the border fabric around the sides and to the back it would stay where I put it without having to use a gazillion staples. I centred the crazy quilt block (trimming the corner from the batting underneath to eliminate some of the bulk in the corners) then folded the edges in the same way the canvas had been folded (which gave a flatter corner) and stapled the corners. I redid the beans piece the same way – the edges looked better.
I decided I should try adding a black border to the flowers – I have a large piece of woven silk shantung which my sister had brought me from Thailand at least 15 years ago. I’d made a pair of silk dress pants from half of it but I still have at least 2 metres so I decided I’d give it a try. The silk provides a nice matte edge but in order to sew it without a lot of fraying I will have to back it with sewer’s dream interfacing to give it some stability. The second challenge is to mark the 6″ square as accurately as possible, then add a line 1/4″ from that, so I can align the border silk and stitch an accurate 1/4″ seam. I did an adequate job on the flower piece but I have to become more precise because the light/dark join is obvious and has to be well done!
How long have I owned a serger? It’s gotta be close to 25 years. Most of the serger sewing I do works perfectly fine and I’m happy with it. However, when I need to sew in the round (like when attaching the neckband to a t-Shirt, or at the bottom edge of pants), when I stitch past the place where I started, I end up trimming the edge of the beginning stitches. It annoys me – I usually end up zig-zagging across that small part of the edge. The other day, I figured out how to solve that problem (although why it’s taken me 25 years to do that, I don’t know!).
Normal Knife Position
This is the normal cutting position with the knife blade (upper right corner) in the up position beside the presser foot (and the small white knob on the left with no writing).
Knife-down Position
I realized the other day that when I reached the place where I started stitching in the round all I had to do was lower the knife to the down/lock position (below the presser foot, in line with the needle plate, with the small knob on the left showing “lock”), and here’s what I get:
Round Serged Seam Join
No trimmed stitches! I can connect the join and not worry about that centimetre of trimmed stitches in front of where I stopped serging! (The trimming happens because the cutting knife is in front of the needles and trims the seam edge before it gets sewn – in the round it catches and trims the already serged edge.)
I have a second tip. The other day, I was helping a friend set up her new coverstitch machine (that’s a sewing machine that only does a three thread coverstitch – just look at the hem on your t-Shirt – that’s a three thread coverstitch). Threading the needles is straightforward. Threading the looper (on her machine, that’s to the left side) is not intuitive and involves some very awkward threading from back-to-front on the looper itself.
I pointed out to her that she only ever needed to thread the machine once, then she never have to thread that looper again – just cut the thread at the spool, tie on the new coloured thread, make sure she’s raised the presser foot to release the tension on the tension disks, then pull on the old looper thread bringing the new thread through the entire thread path.
It’s the same with a serger – cut the looper threads (on a serger there are two loopers) near the spool, tie on the new colour thread, raise the presser foot, pull the new thread through the machine. I actually do that with all four threads even though I’ve not figured out how to tied a tiny knot that will go through the needle eye – I just cut the needle threads when the new thread reaches the eye and re-thread the needles with the new colour. I use an overhand knot (which I pull snug) – I’ve tried reef knots but they’re no smaller.
Threading the needle paths on a serger or coverstitch machine from spool to needle is easy; it’s the loopers that can be complicated. Tying the new threads on and pulling them through is an easy fix.
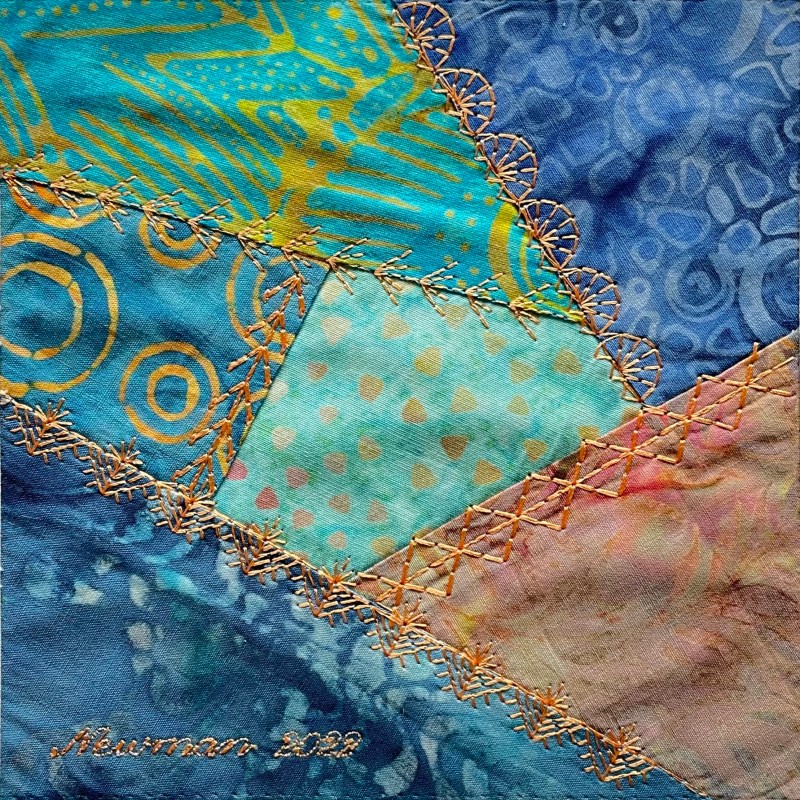
A quick try at “crazy quilt”. I learned several things with this experiment:
Leave out the batting, it isn’t necessary
Use light tear-away stabilizer instead
Be sure to save modified stitches as I go along so I don’t have to recreate them
The centre element should have a more irregular pentagonal shape
Cover area with fewer fabrics
Use brighter/lighter fabrics
Decorative stitch each strip as I go (much easier to make starts and stops exact)
In fact, I need to do another experiment – this time creating the entire block in the embroidery hoop! I’ve never done that but I have several block possibilities that create crazy quilt blocks as embroideries.
In any case, this is another possibility for the set of 6″x 6″ blocks!
With this block, I trimmed it to 6.5″ square, then added 2.5″ muslin strips to the sides to frame it. That will work. As soon as the 6″ mounted canvas arrives, I will try trimming and adding border strips in some colour or other so the sides of the pieces are uniform – that might be where the black comes in – the sides of the pieces could be finished in black fabric.
Afternoon
Crazy Quilt – Created In-The-Hoop
This block I created in the embroidery hoop using an embroidery design I had in my collection of embroideries. I like the shape of the central pentagon better – as I carry on – if I carry on – to create a series of these, I need to begin with an irregular central shape.
However, doing this in the hoop isn’t straightforward – the embroidery is set up to work with raw edges – the built in basting secures each piece but doesn’t take into account that the first basting seam needs to stop, the fabric turned, then the tacking to continue. In addition, I had to enlarge the embroidery in order to get a 6″ finished block – this resulted in the embroideries being larger than they want to be. Finally, the decorative stitching wasn’t done as the block developed but after all the fabric had been basted.
So, I don’t intend to carry on in the hoop – but this exercise was useful since I learned about
working in a clockwise order
trimming my fabric after each addition
leaving out the batting, using tear away interfacing instead, works well for the neatness of the stitches
and I still want to do decorative stitching as each fabric piece is added
This is an adaptation of my Modern Flowers idea, an outgrowth of the Blue Flowers banner piece. Difficult, however, to decide what to do in a 6″ x 6″ space!
I started with a 10.5″ square of woven silk habotai fabric. Next I opened a baggie filled with circles left over from the Blue Flowers banner and began laying some out. Always the same decisions – centre the circles, offset them, relative size of adjacent flowers….
Once I had an acceptable layout, I fused the circles to the silk, added a 6.5″ x 6.5″ layer of batting beneath. What I didn’t do, and should have done, was add a backing of light tear-away stabilizer – that would have eliminate the bubbling in the silk as I embroidered the edges, stems and leaves. I will definitely add stabilizer to the next experiment.
The tricky element is positioning the embroideries for the centres and the decorative stitches for the leaves. I needed to rebuild the leaf stitch to start and finish at the stem end in order to be able to position each leaf on the stem in a realistic way. And then always the question – how many leaves do I want?
I’m happy with this experiment. I’ll do another couple of these – using the raw silk fabric I have rather than the silk habotai I used here.
There’s still time this morning to move on to another experiment – a crazy quilt block using batik. The question here is whether to cut and fuse it to a background at 6″ x 6″ or to take the quilting to the edges of the base 10.5″ square – that would allow the block to be wrapped around a mounting frame.
In the end I think I’m planning 10 pieces based on a single experiment, rather than 10 unrelated pieces.
This is the second “beans” experiment finished. I used a different stitch to edge stitch each swatch which worked better than the blanket stitch (the small fraying threads are contained). This time, the revised signature is a bit larger and actually readable! There are still one or two edits I want to make on the signature but it’s working better now.
On to another idea – a “flower” collage on raw silk – just to see what that turns out like in a 6″ x 6″ piece. I also want to create couple of crazy-quilt blocks to see what they turn out like.
Two days ago you could sense the impending change – the air smelled different, the colour softer/less glaring. Here in Nova Scotia there is one day in middle of August where you know autumn is not far off. When we were kids, we attended a six week sleep-over camp and in that last week there’d be a day when you knew summer was coming to a close. You felt the early morning chill, put on a warmer jacket that evening.
It is August now, towards the end, and the weather can no longer be trusted. All summer it has been very hot. So hot that the gardens have died and the hay has not grown and the surface wells have dried to dampened mud. The brooks that flow to the sea have dried to trickles and the trout that inhabit them and the inland lakes are soft and sluggish and gasping for life. …
At the end of July we said to ourselves and to each other, “The August gale will come and shatter all of this.” The August gale is the traditional storm that comes each August, the forerunner of the hurricanes that will sweep up from the Caribbean and beat and lash this coast in the months of autumn. The August gale with its shrieking winds and crashing muddied waves has generally signalled the unofficial end of summer and it may come in August’s very early days. But this year, as yet, it has not come and there are only a few days left. Still we know that the weather cannot last much longer and in another week … the pace of life will change.
Alistair MacLeod
Today it’s overcast and cool. The kids have all come through their summer camping experiences safely – they’re home again; sad summer is over, looking ahead to the adventures of a new school year.
My younger sister was moaning the other day about the shortening days. I think about the cosmic realities that govern our seasonal life. The earth’s tilt as it rotates around the sun affects the angle at which the sun’s radiation impacts the planet – the northern hemisphere is now entering the annual period where we’re angled away from the sun. Those shorter days are predetermined – out of our hands – set in motion when our solar system formed five billion years ago. No point in complaining, no point in wishing it were otherwise. The changing seasons bear witness to our connection to the universe.
The chicory/goldenrod/Queen Anne’s lace, are abundant, but coming to an end – in another six weeks we’ll see trees responding to the seasonal change. There are warm days still to come – our Nova Scotia fall is the loveliest of our seasons. I look forward to it every year.
I’m organizing our December show at The Ice House. Usually I do a winter theme but this year I’m changing it to a miniature show. There’s no theme so everyone is free to do whatever they like! The only requirement is that all the work is 6” x 6” in size.
My immediate reaction was to reply “Thanks for thinking of me, but I don’t work with anything that small…” however as I considered Brandt’s invitation I thought “that’s an interesting challenge” so I began playing with an idea.
6″ x 6″ – #2
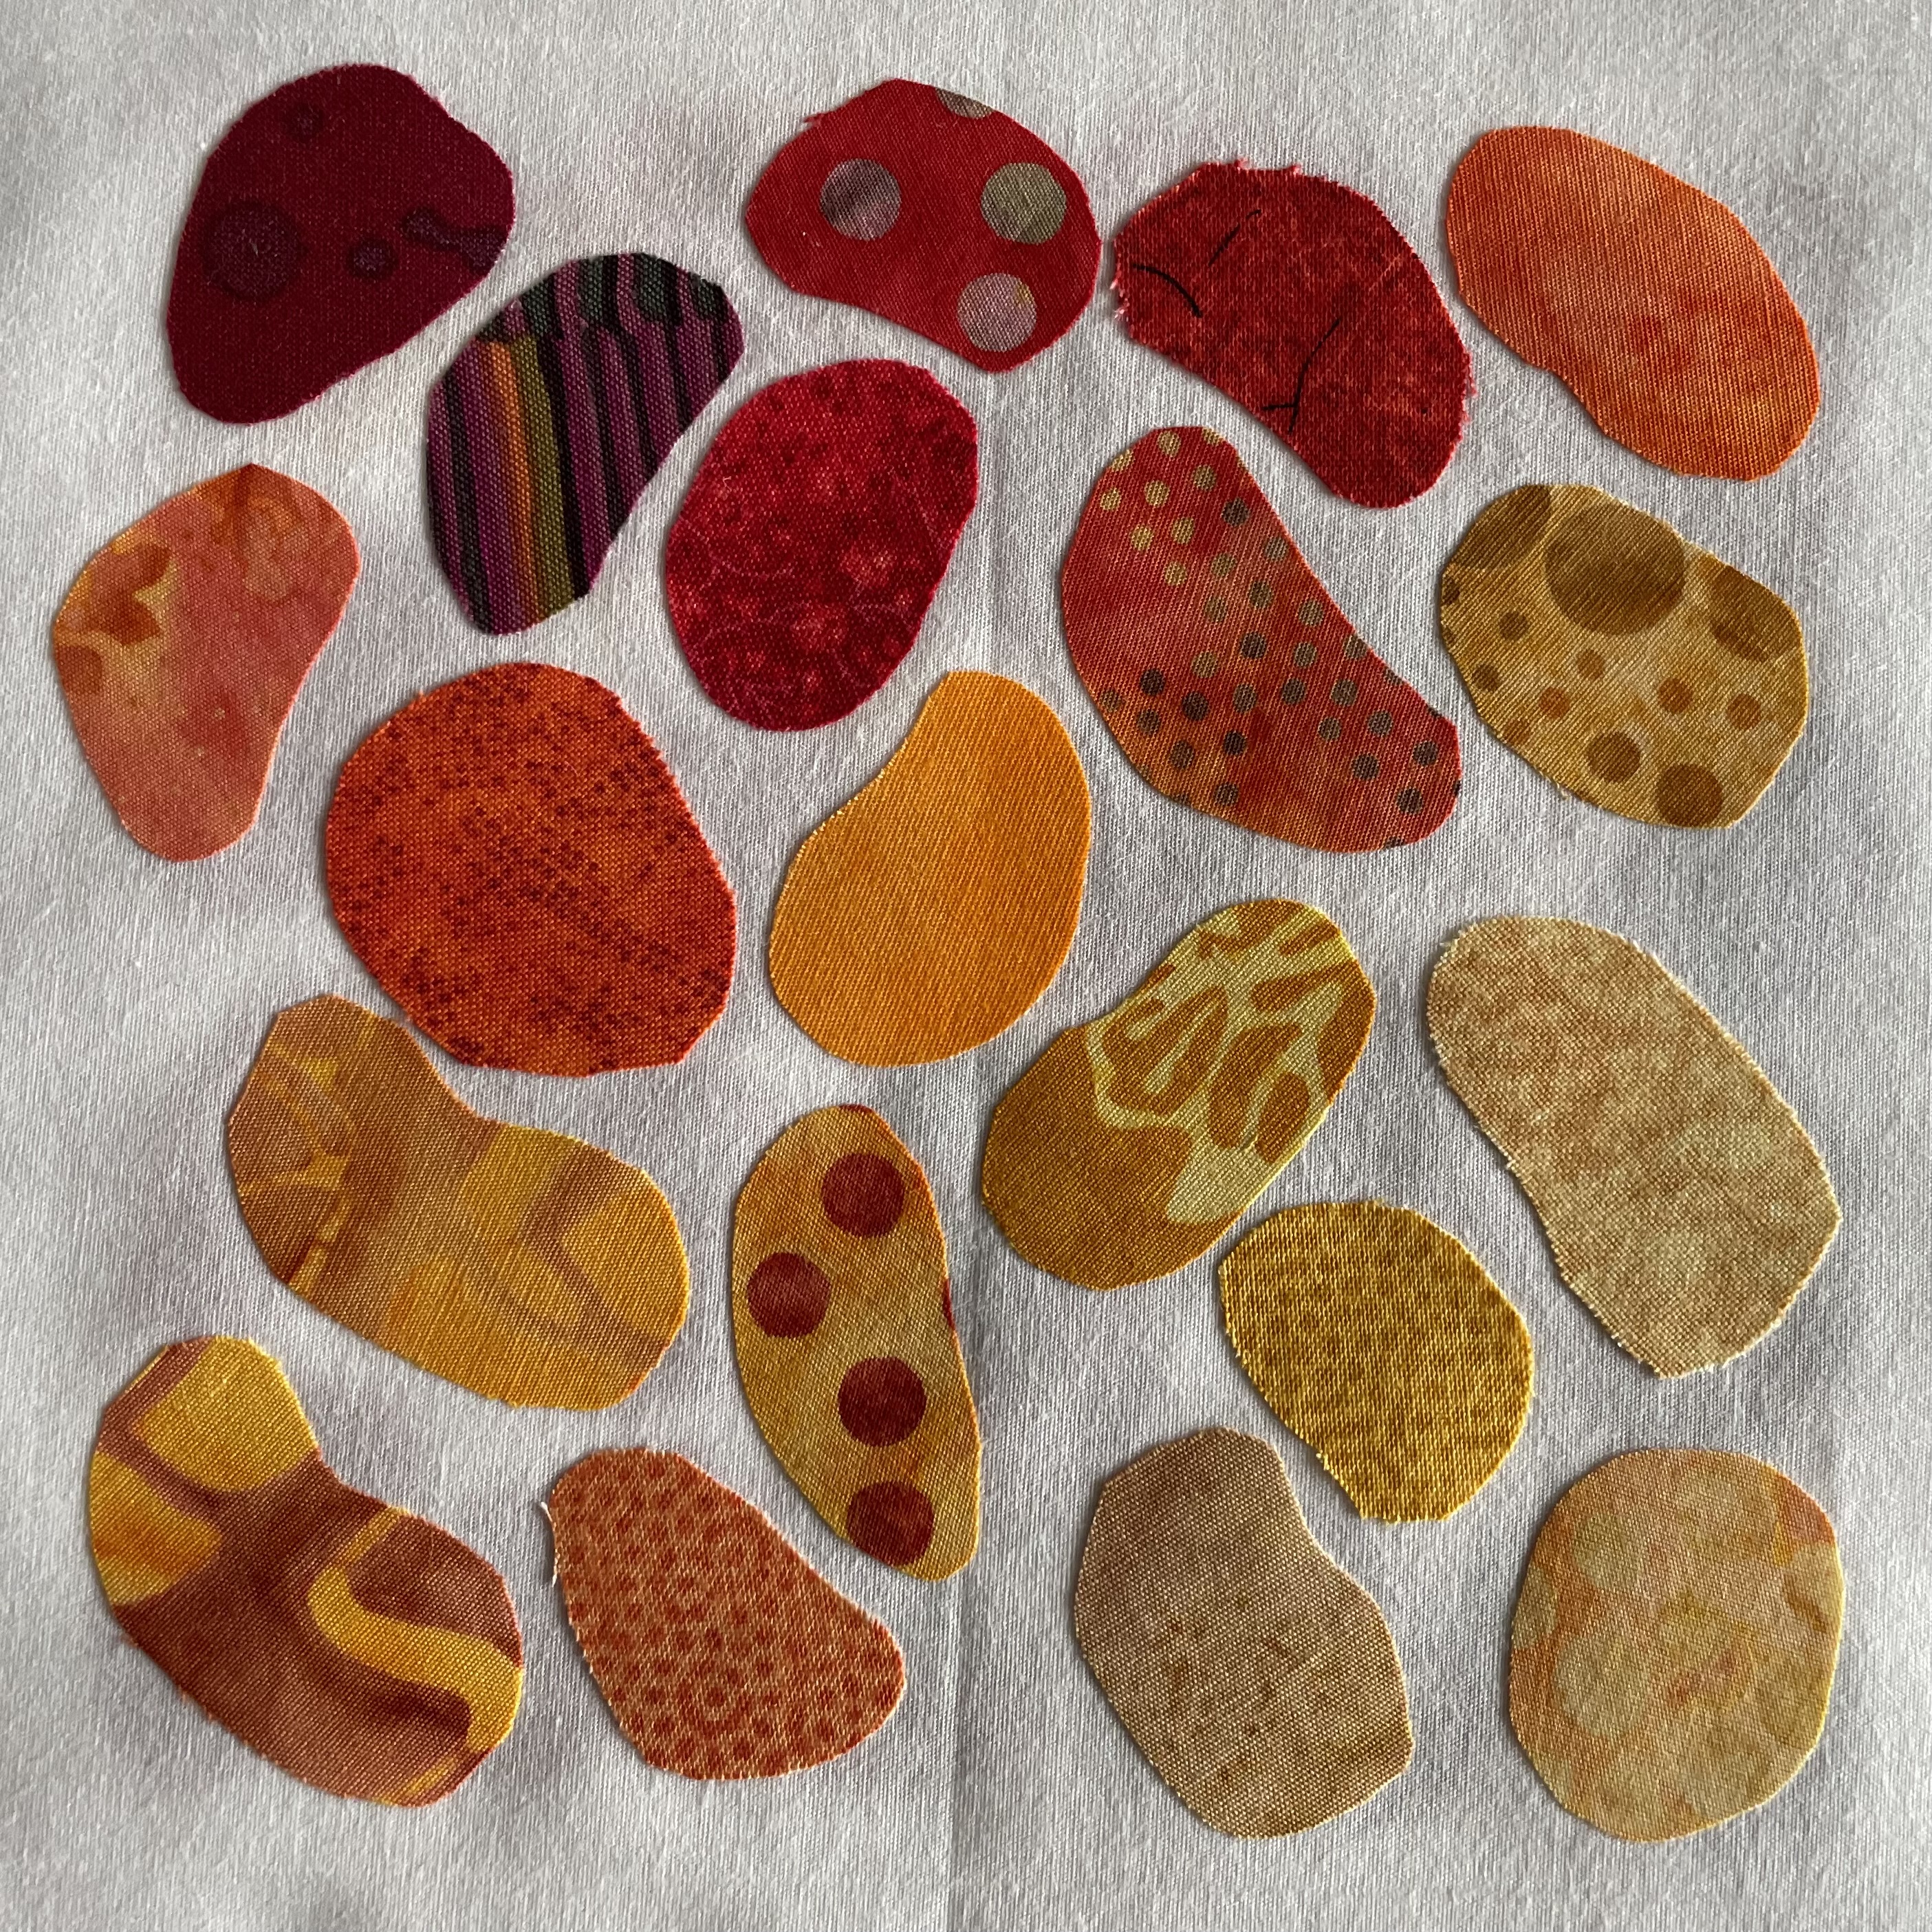
I cut out a 10.5″ x 10.5″ square of white fabric, then went to the box of scraps with fusible web already applied, pulled out the bag with red/orange/golden bits and cut out “bean” like shapes. I drew a centre 6″ x 6″ block, then filled the space.
6″ x 6″ – #1
This is actually the first block I tried – after fusing the beans in place I edge stitched each, changing thread colour as I went along. The stitching took time, but it went reasonably quickly – fast enough that it was worth trying more (hence the second incomplete panel above).
Each piece needs to be signed. I sign my work with a machine embroidered signature. On a piece as small as this, the signature needs to be small! I spent several hours trying various fonts in my embroidery software but none is set up to create a stitched signature small enough. I wrote out my signature, tried using it as background to create an embroidery – those didn’t stitch out well either. I went back the lettering function on my machine – I got closer but size is still a problem.
After stitching a dozen or so variations of a signature (Newman 2022) I settled on one which I tested a couple of times.
Embroidery for Signature
Although I had tested the embroidery, when I finally added it to the completed panel it didn’t work out as well as I’d hoped. You can barely discern what’s there. So it’s back to the drawing board to see if I can work out something better.
The second challenge is how to finish each 6″ x 6″ piece – Brandt suggested I try mounting them over a 6″ x 6″ canvas – so I’ve ordered a dozen in that size to see whether that can work.
In the meantime, I have a bunch of ideas – appliqué flowers in this small format based on those I’ve done before, crazy-quilt blocks, tiny quilt blocks using a variety of piecings,… there are lots of possibilities. In the end Brandt wants up to 10 pieces of art – I’ll likely end up making quite a few more than that as I experiment with the size.
I spent the weekend in Parrsboro doing a workshop learning to work with Cyanotype:
The cyanotype process uses a mixture of iron compounds, which when exposed to UV light and washed in water oxidise to create Prussian Blue images. The technique was invented in 1841 by Sir JohnHerschel and was popularised by photographer and botanist Anna Atkins. Her book ‘Photographs of British Algae: Cyanotype Impressions’, published in October 1843, is considered the first photographically illustrated book.
The process starts by coating a good quality acid-free watercolour paper (or other paper like tissue paper) with a UV reacting iron salts solution (which is nearly clear), hanging it to dry in a relatively dark (non UV) spot, when dry arranging objects on it, then exposing the layout to sunlight until the wash become a brownish grey at which point you rinse the image in a water bath (with a couple of capfuls of vinegar) until the “yellow” unexposed parts become reasonably “white”, then rinsing it in a second bath with a bit of hydrogen peroxide to fix the blue – the cyanotype.
Sounds easy, not so much. The quality of the paper matters, the accuracy with which you combine the solutions used in the coating, how you apply it, the amount of light where the paper dries, whether you’ve managed to keep it in a dark place after it’s dried – those are some of the technical variables that affect image outcome.
Then comes composition. My first inclination was to use quite a few different objects of varying transparency layered on one another –
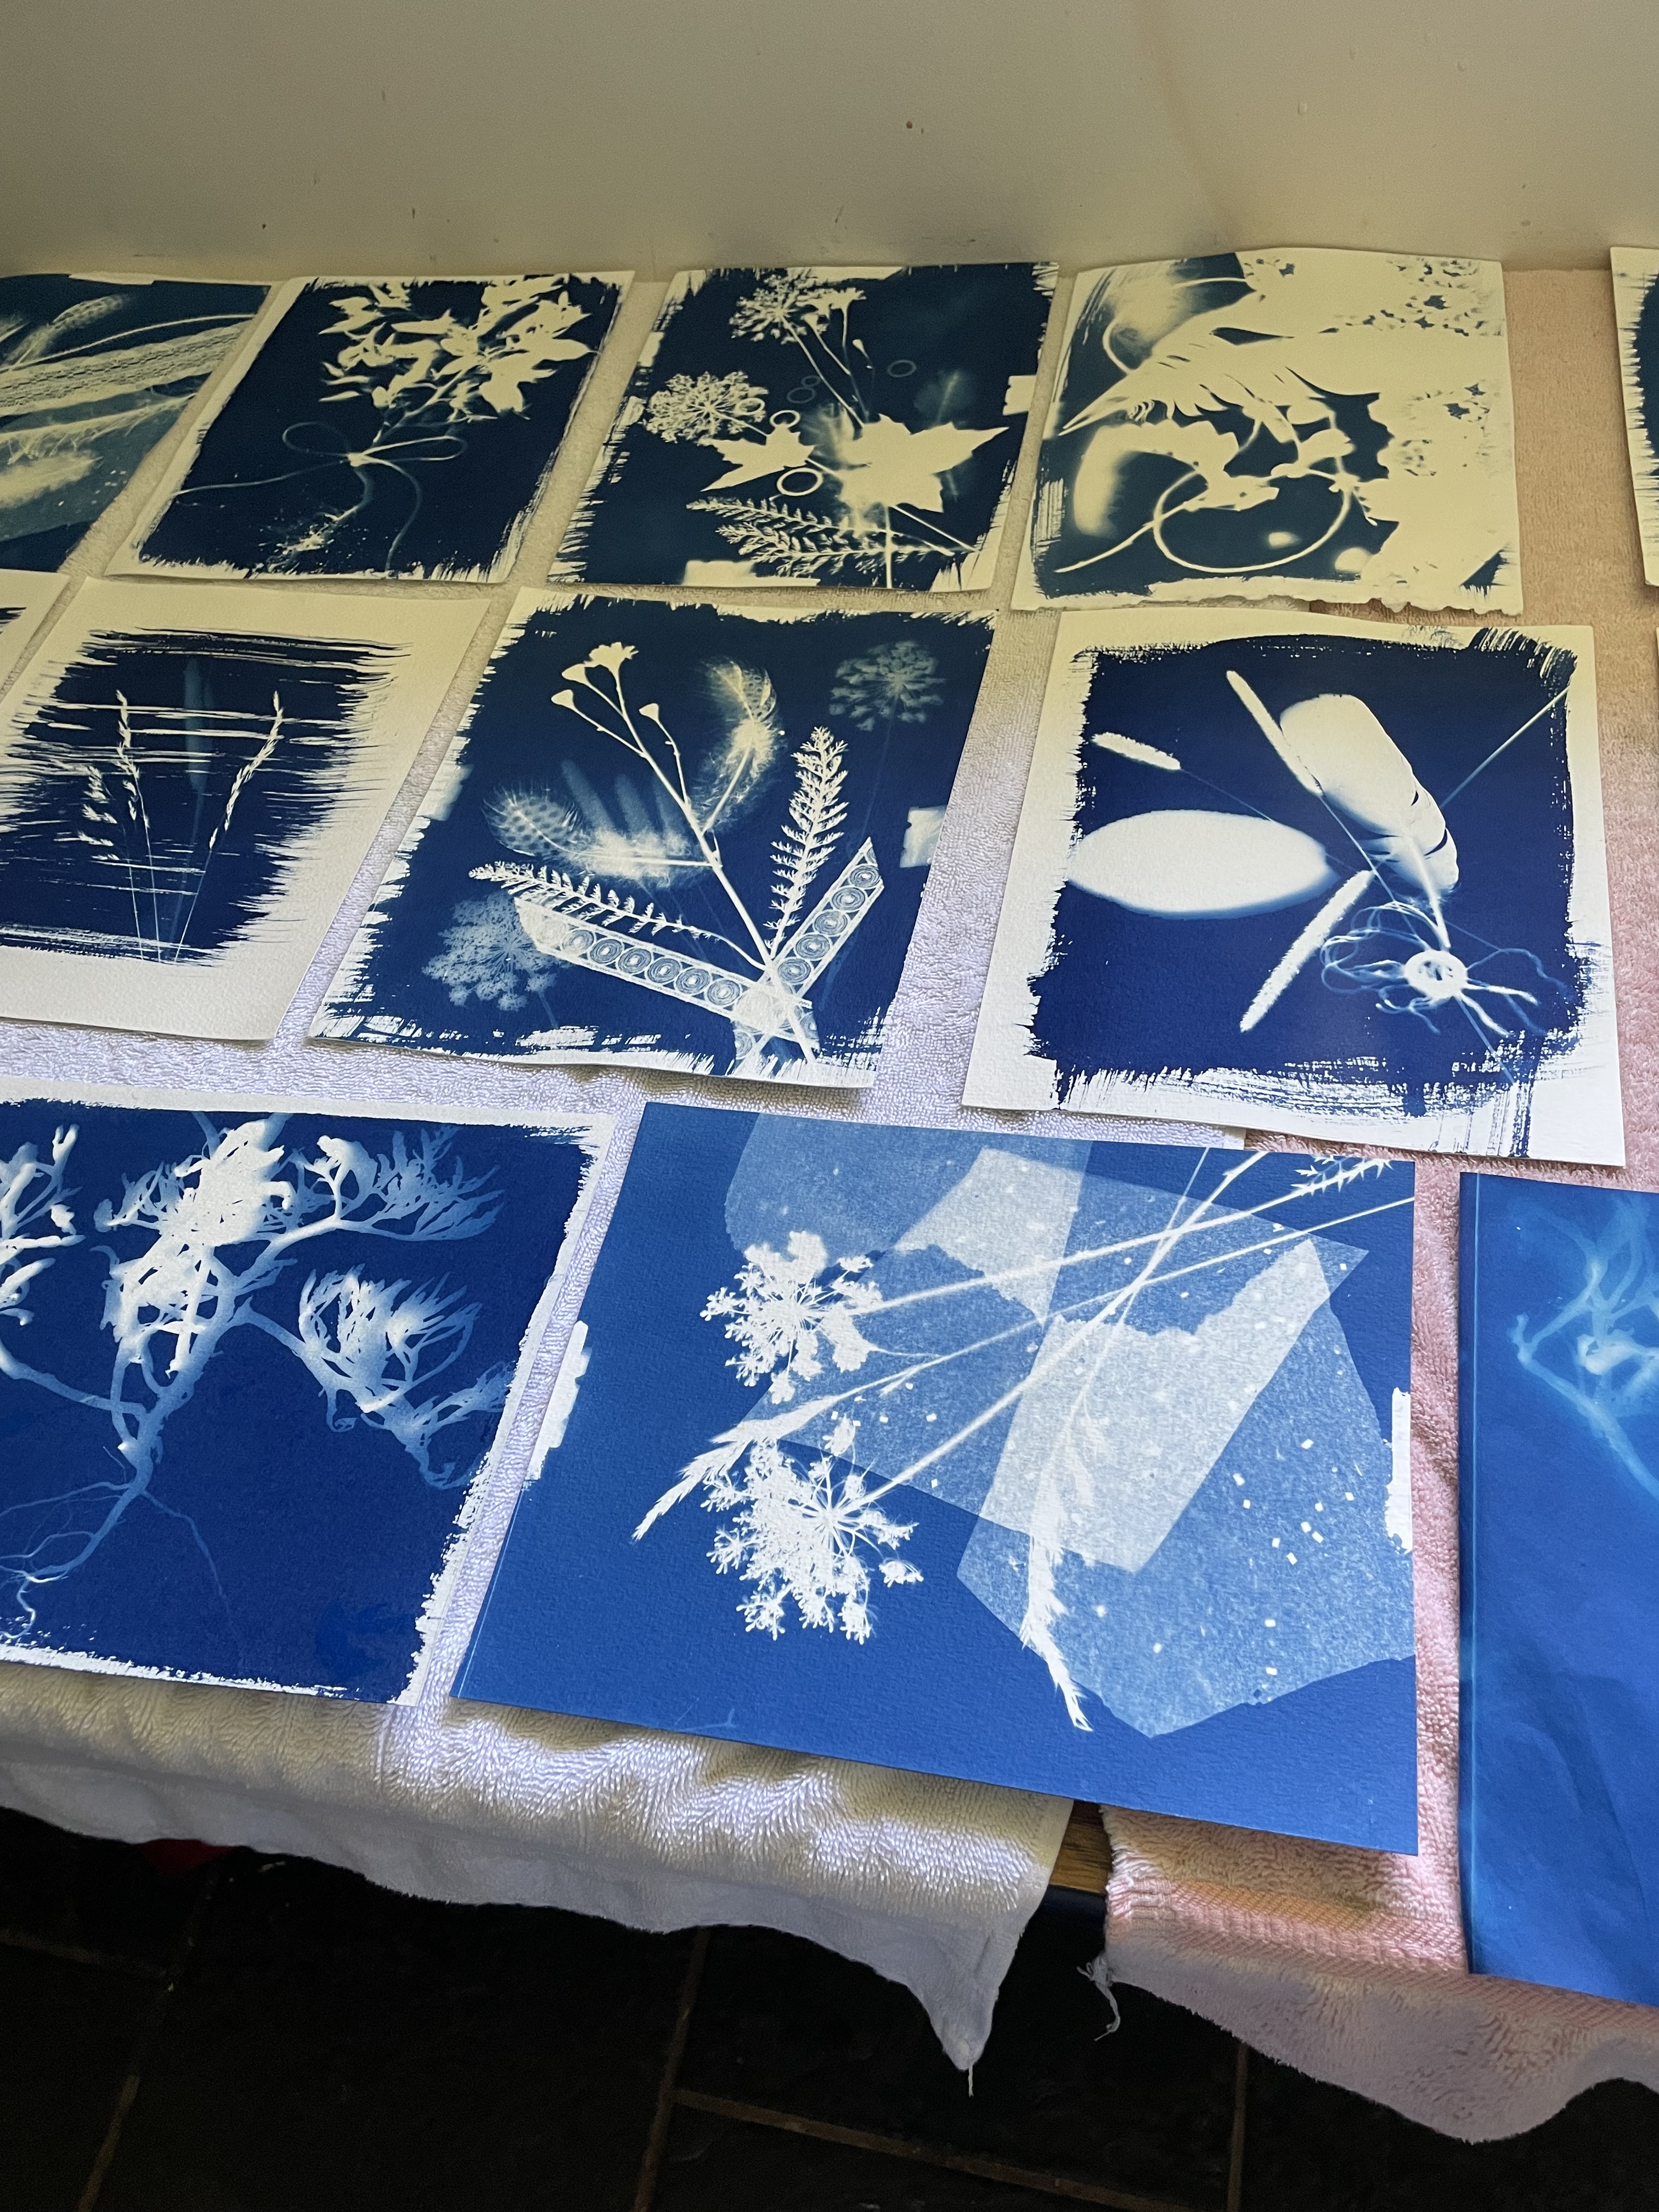
Mine are the ones in the centre of each row – Day 1
I’d raided my sewing supplies and brought all kinds of lace, sequins, tissue paper (with glitter), feathers, beads, knitting stitch markers…. all of which would blocked sunlight. I tried arranging wildflowers and grasses with these inanimate items only to discover the rings/tissue paper/lace all blocked the sun more effectively leaving much stronger white areas on the image detracting from the “subject” – the wildflowers!
I also placed all of my objects beneath a layer of glass (primarily to keep the lighter items from being moved by the wind – because you need a relatively long exposure time – 3-5 minutes (maybe longer – it’s subjective). The first thing I realized was that maple leaves/lace, placed under glass blocked too much UV light. I was going to have to experiment with placing those objects on top of the glass and removing them part way through the exposure. By the end of the afternoon I also understood I really wanted fewer items so I could highlight a definite subject. Hence the trials on the second day.
On the first day we used a high quality paper supplied to us. Second day, I used watercolour paper I had brought (not so good) – it reacted with the coating solution differently than the better paper and the resulting image had less contrast.
Queen Anne’s Lace with Angelina Fibres and Glitter
Next I experimented with objects under glass vs items on top –
Cyanotypes
The print on the left is an impression of a Moth Mullein – delicate petals allowing light through, you can see where they overlapped. Further down the stem are finished flowers which are much denser, hence they blocked more light. At the bottom of the image you can just detect a “card” with holes – that was placed on top of the glass at the start of the exposure, but removed about half way through.
The print on the right – another Queen Anne’s Lace and a sprinkling of glitter below the glass, some leaves (don’t remember what they were from) placed on top, then removed – which gives a better balance to the image.
I was also interested in allowing the brushstrokes to show rather than completely coating the paper giving the image an unfinished organic feel.
I learned a lot. I had hoped to try fabric for some cyanotypes but it has to be prepared differently (washed in a non-calcium containing detergent, dried – then soaked in the iron salts solution (somewhat different proportions), dried again, before the pieces can be exposed. I had thought I’d do some fabric blocks to embellish with appliqué and thread painting but I would have difficulty doing this at home I realized – I get very little direct sunlight on my balcony (I get an early morning sun at a low sky angle until just before 10:00am at midsummer); to work on my friend Deb’s patio of an afternoon to get a higher sun means I’d have to set up the developing wash basins in her kitchen (trying to darken the room, not to expose the paper/cloth further) before rinsing and fixing. All a lot more complicated than I think I want to bother with.