The Truth About Spring in Nova Scotia

I’ve heard nothing but griping about winter for the past week. I’m not among the gripers. That’s because I’ve been keeping records for 30+ years on the first appearance of Forsythia and Coltsfoot in Halifax.

We’re still in the grips of winter – two snow storms in the past ten days. Strong winds, freezing rain. I understand that the time has changed and the calendar has passed March 21 but guess what — we can expect at least another month of “winter” here!

First Coltsfoot – April 27 2016

When I started keeping track more than 30 years ago, the first Forsythia – those bright yellow shrub flowers, the first we see in spring in Halifax didn’t show up until close to the 20 of May – the earliest I recorded Forsythia up to 1992 was May 16. From 1997 to last year that date slowly shifted – from May 12 to around May 2. In 2015 I recorded some Coltsfoot and Forsythia on May 2. Last year I actually saw some Coltsfoot and Forsythia on April 27. That’s still a month to go.

First Dandelions – May 31 2016

We can’t expect to see Dandelions in bloom until around May 24 in Nova Scotia.

So there’s no point in griping – enjoy what sunshine we’re getting. Be sure to put on a warm jacket. The calendar may say “spring” but Spring won’t arrive in Nova Scotia until the very END of April – even with the changing climate.

Socks Again

Comfort Yarn

Finished last evening. I had intended knitting the heel with the golden yarn I used for cuff and toe but given the spot where the second gold stripe on the leg showed up, I thought a contrasting heel would be more interesting so I dug through my yarn stash and came up with this dark green (almost dark grey). 

Worked out well.

12 X 12 Quilt

I mused about the teal/indigo fabrics I had for a couple of days and decided in the end to limit the quilt to just the set of twelve fat quarters (I put the rest away). To use my set of twelve indigo fat quarters, I decided to make a 12 x 12 quilt based on Elizabeth Hartman’s “Low Volume Tiles” quilt from her Craftsy Class: “Inspired Modern Quilts“).

I based my quilt on Hartman’s design but had to adjust the sizes of my small blocks because once I cut the first 13″ square I knew I had to fiddle to cut a second set of 12 blocks – there wasn’t enough fabric for a second 13″ square. So the dimensions of my small blocks are a bit different than hers in order to be able to use the fabric I had – there was just enough with a 5″ x   8″ leftover piece of each fabric which I used in my side borders.

The idea behind this quilt is to take 12 fabrics, cut 13” (or whatever large size) blocks you want by stacking and cutting them into the same 12 sections. Next you sort them shifting fabric #1 to the back of the stack for the second small block, fabrics #1,2 to the back of the stack for the third small block, fabrics #1,2,3 to the back of the stack for the fourth small bloc…. You get the idea:

12 Blocks – Stack ‘n Whack – Sorted

When you’ve done the setup, each stack has 12 fabrics, arranged so that a different one of the 12 fabrics is at the top of a stack before you begin laying out the large blocks and the fabrics in each stack are in the same sequence, just shifted by one so when you sew the blocks, each block has all 12 fabrics with no repetitions!

I intended to end up with 10 1/2″ blocks (having started with a 13″ square) – I trimmed my stitched sections to 11″) and assembled them into a 3 x 4 array:

12 X 12 Stitched Together

That’s a small quilt, however. I had cut a second set of 12 small blocks from the residual fabric from my indigo fat quarters – so I stitched together the second set of twelve blocks. It turns out that I was lucky to have chosen 13″ as my starting size because I wouldn’t have had enough fabric to create the second set of 12 blocks had I started with 14″!

One other thing – I removed one of the light fabrics from the collection before I began cutting, substituting a bright green for block #12. I wanted one colour to pull the other fabrics together.

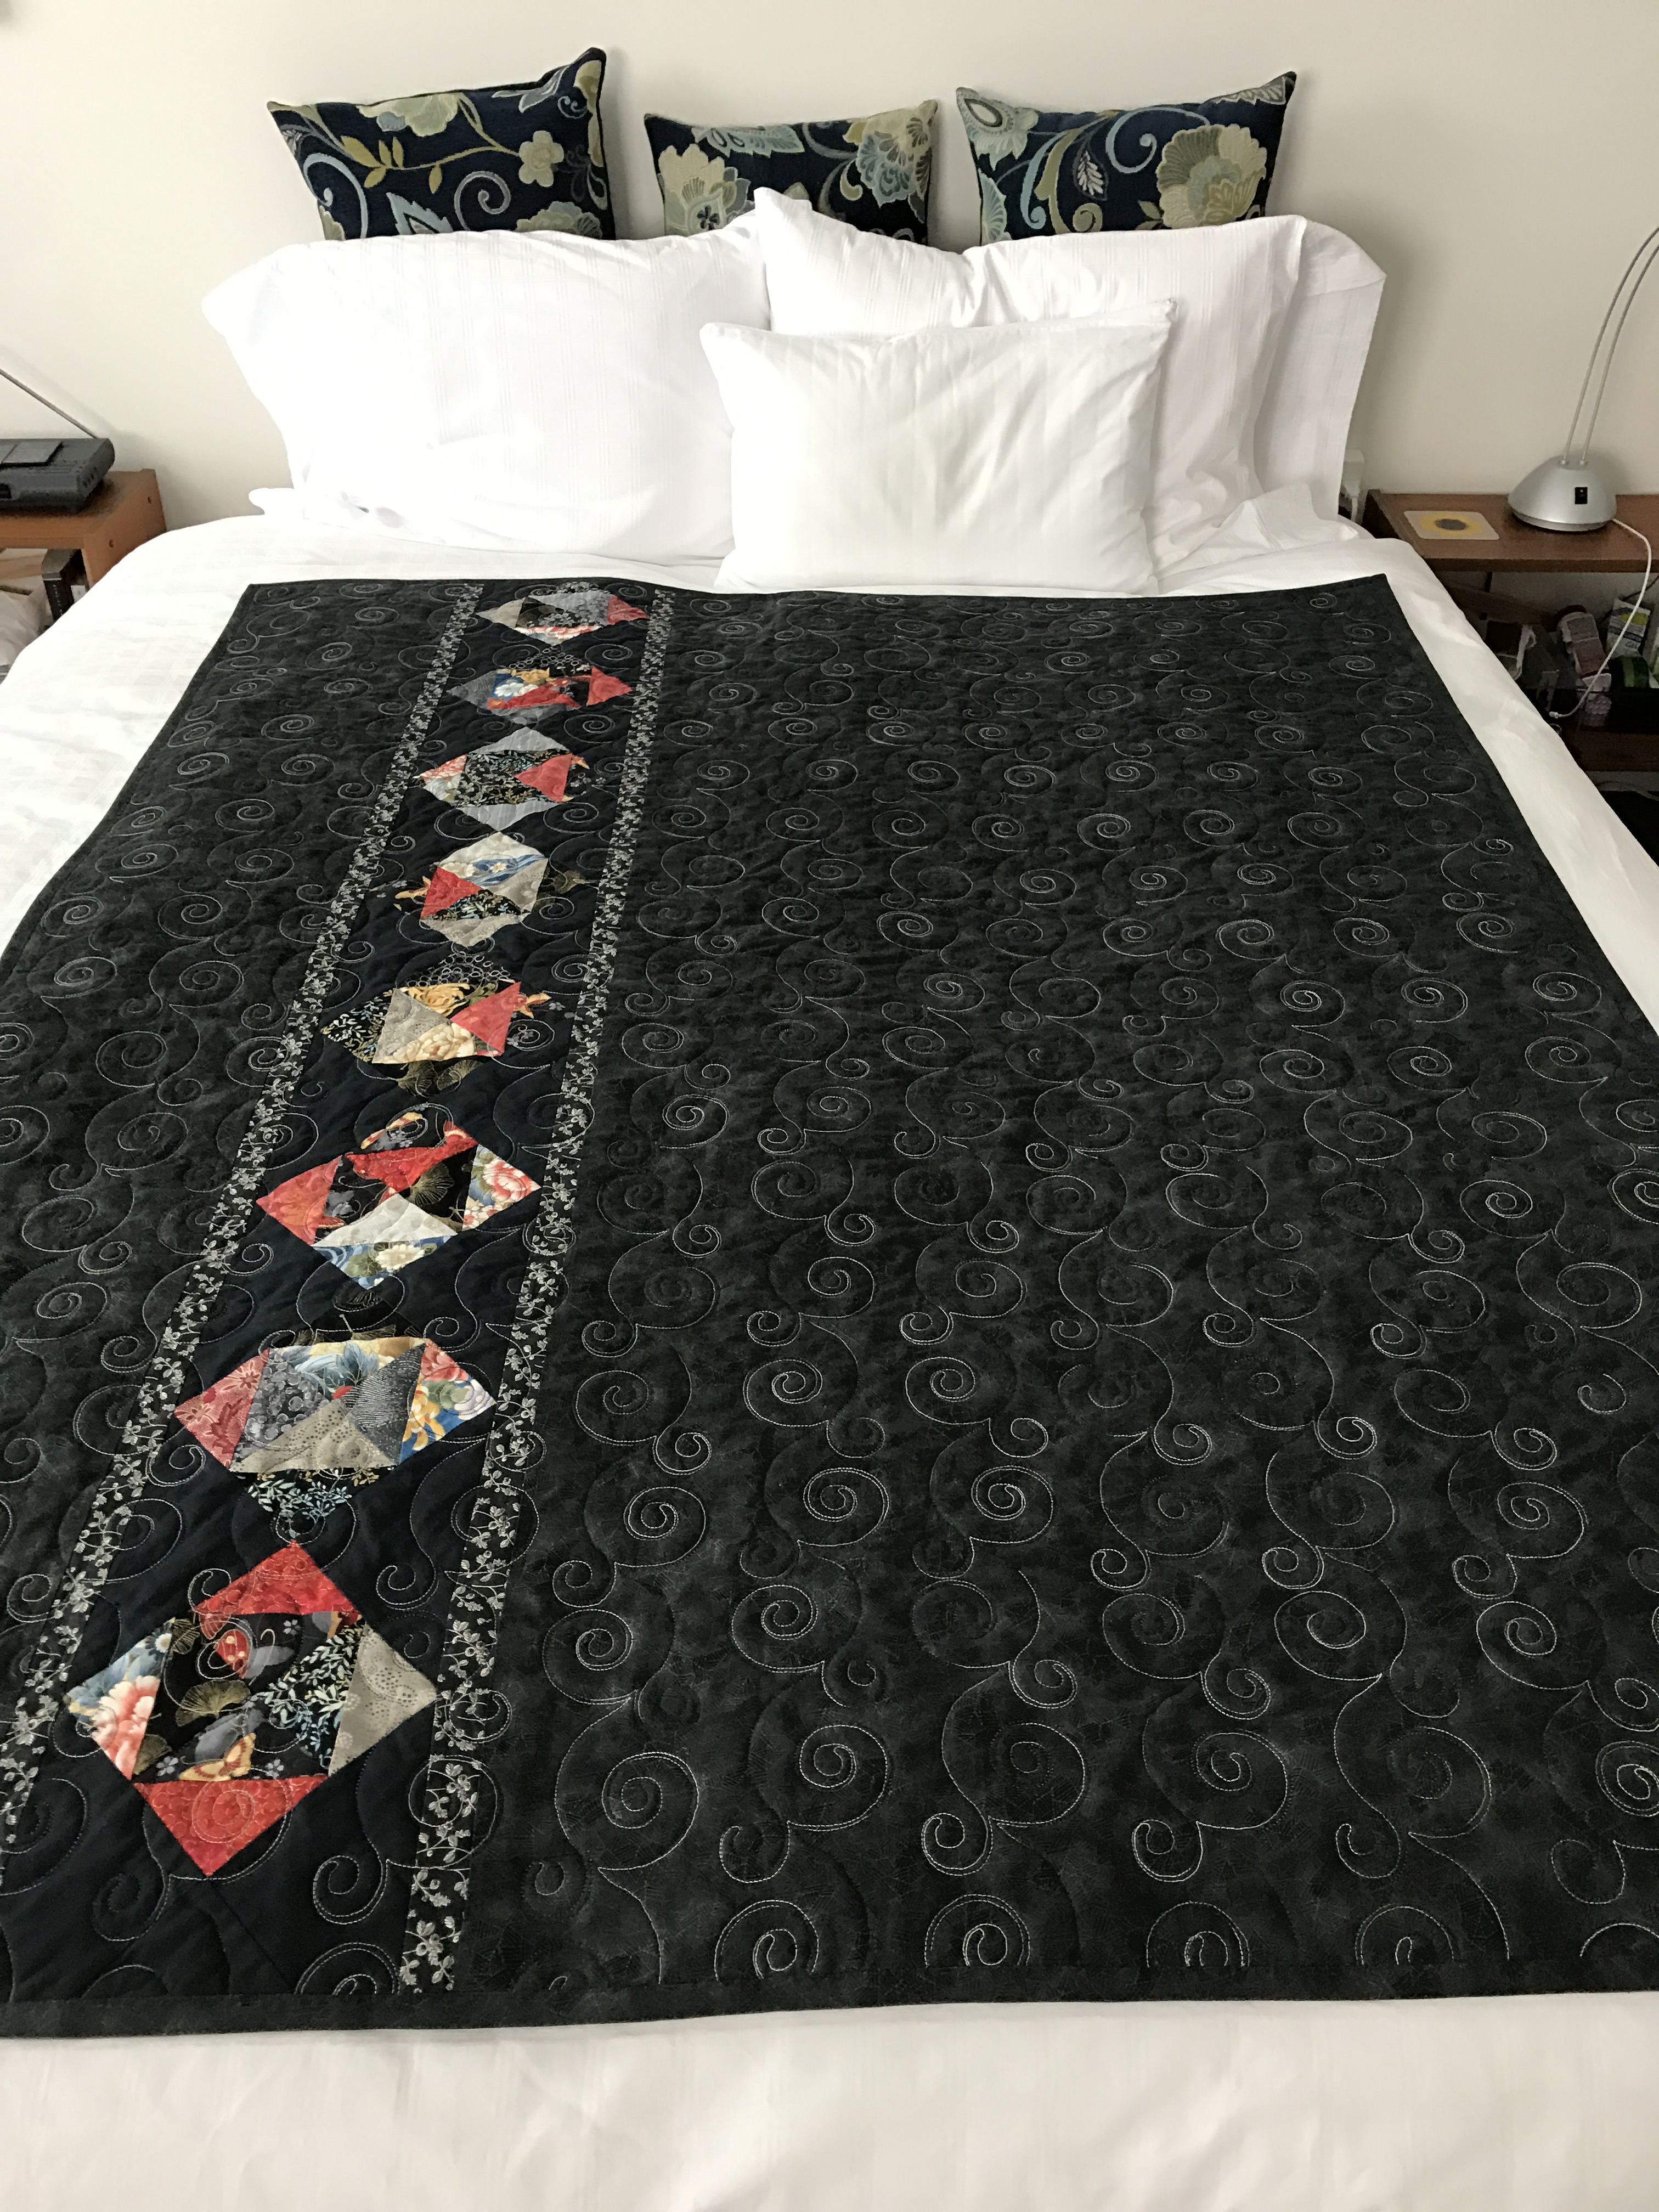
My Finished Double 12 x 12 Quilt With 4″ Borders Added to the Sides

My finished quilt top is a 4 x 6 array with added 4″ side borders to give me a final width more in proportion to the length. Finished quilt: width 50″; length 64″. I lost a tiny amount from both width and length with the trimming I did in order to able to fit the blocks together. But in a design like this you can’t tell where the trimming occurred. You really aren’t able to see the “blocks” or where the main joins are.

Now to come up with an idea for the back. Yesterday I bought some backing fabric and 1/4 m of four teal/indigo batiks to add to some others I have but didn’t use in the quilt top. I had to do that because I didn’t have a single scrap left from the original fat quarters I started out with.

From My Fabric Stash

Fabric Stacks

Nearly two years ago I returned from a road trip to Toronto via Center Harbour Vermont so I could visit the Keepsake Quilting shop. I’ve been buying fabric from the online shop for years. This was a chance to actually see the entire selection.

I was looking for green batiks to make a quilt for Noah. However, once I’d made my choices, I couldn’t help looking around and ended picking up two different fat quarter collections of indigo/teal – eighteen pieces of fabric in all.

Having just finished the Japanese Strip Quilt, I was looking through my stash and decided it’s time to use these indigo fabrics so I opened the packages, spray starched and pressed each piece. I realized I didn’t have enough light coloured fabrics so I made the rounds of my nearby fabric shops and bought several 1/4 m selections.

Now the prepared fabrics are sitting on my cutting table – along with a 1/2 m length of a bright green to use as an accent.

I just have to decide what to do with them! I want something “modern” but probably constructed using traditional elements. Can’t make up my mind, is the problem.

For example I could set up half-square triangles and recut them:

Disappearing HST

I could cut squares, stack them three/four at a time, wonky cut them, and sew, mixing and matching to create blocks.

Wonky Log Cabin

I could just make 4 HST at a time and cluster them:

HST Clusters

I could cut rectangles and arrange them somewhat randomly:

Japanese Blocks

Or I could just cut and sew, improvising as I go along!

Don’t know where to start yet.

A Note on Binding My Quilts

I bind my quilts using 2 1/4″ strips cut from the width of fabric to provide a bit of give as I attach the binding (given the large lap quilt size of my quilts I need six strips). I join the strips using a mitre – the reason is the angled seams don’t attract the eye and often they are nearly invisible.

Sometimes I press the long strip in half lengthwise, but lots of times I don’t bother. I attach the binding first to the back of the quilt starting 10 inches or so from one end (to allow me to create a mitre join when I get all the way around) – no pinning, just stitching in short sections, aligning the binding against the quilt edge (with a hint of stretch), and stitching a smidgeon more than 1/2″ from the edge. When I get near to the join I stop sewing, lay the quilt flat on the cutting table, cut one end of the binding then overlap the second end, measure 2 1/4″ from the end of the first binding edge, and cut. Now I create a mitre to join the two overlapping ends of the binding – I make sure the binding is the tiniest bit short (1/8″ – 3/16″) so I can stretch the joined binding to fit the quilt (that way I don’t get a bubble in the binding). (I haven’t said anything about creating mitred corners – click here to get more or less an idea for how  I do it.)

Now I turn to the front of the quilt, fold over the binding, turn it under and pin so the turned under edge just meets my stitching from the back. I have used a number of decorative machine stitches to attach the binding on the front. Here’s the one I use most often:

Binding From The Front

It’s a modification of one of my machine stitches – I am careful to keep the straight stitches along the edge, the stitching to the right and back overlaps the binding and holds it securely.

Binding On The Back

And because I’ve been careful to make my fold align with the stitching, the stitching is pretty much aligned on the back of the quilt (although my stitch tension isn’t always perfect – I don’t worry about that, it is the back of the quilt, after all.)

I’ve done this so many times that it doesn’t take long to bind a quilt.

Japanese Strip Quilt – Finished

Here it is – the finished, bound quilt (just a label needed – I’ll do that later this afternoon when I get back from some errands).

Quilt Top

I did the quilting from top to bottom in line with the strips, instead of across the quilt. I wanted to emphasize the flow of the piecing. I was lucky my quilting design was the perfect size for the side borders and fills that space nicely (It was pure luck that I was able to balance the border quilting on each side!). It took a lot of precise positioning to make the embroidery joins work but it would take a hawk eye to detect the slight misalignments I decided to live with. I used a variegated white/grey/black thread, top and bottom and I like how it turned out on the back. On the front, the stitching blended well with the coloured strips. However, I darkened the light stitching in the dark strip ends because otherwise the alternating strip ends were obscured and that was a detail I worked hard to achieve.

Quilt Back

The back has worked out well. The pieced insert brings colour and interest to the back. The side borders of the strip blend well with the backing fabric yet effectively set off the insertion. I used strips of the backing fabric (which I had found in a second shop after I’d pinned the sandwich together) for binding. I’ve finally learned 2 1/4″ binding strips are better than 2 1/2″ – I have less fabric to fold under on the front of the quilt – easier to manage when I’m pinning the binding in place on the quilt front after first stitching it to the back.

I would have liked the quilt to be a wee bit longer but I was limited by my original 66″ length of backing fabric – all that was left on the bolt. The quilt is still a respectable 62″ long.

Failed Attempt

Failed Attempt

I needed to piece an eleven inch strip to insert into the single width of backing fabric I had (that’s the primary reason I piece the back of my quilts – to get the width I need for the quilts). I had lots of small amounts of the Asian print fabrics I’d used for the top so I cut single 2 1/2″ strips, sewed them together in pairs on both edges, cut triangles which resulted in 2 1/2″ squares. I assembled the squares into a central row then filled in the sides with another row of the small squares and edged with a set of light coloured triangles to set off my pieced strip against the dark backing fabric.

I decided to construct the insert panel along the diagonal so incorporating the triangles would be straight forward. Nice idea. However, in spite of the fact that I trimmed the triangles, the further I got into the panel, the more it bent away from the straight! I took tucks in strategic seams only to find my next diagonal row was even further off. With the panel half assembled, I gave up.

Unused Small Half-Square Triangles

I gathered up the unused small squares and triangles, looked at them for a while, paired the small squares, then joined two pairs to create five inch squares – I ended up with nine which I aligned on point down the middle of my cutting table (in the end I needed only eight). I had lots of the Kona solid “pepper” fabric I’d used on the quilt top – I cut 6 1/2″ squares (which I cut along the diagonal) and inserted the triangles in the spaces between the pieced squares. Finally I added two narrow strips of one of the black/white fabrics to offset the panel against the backing fabric.

Pieced Back Using Small Half-Square Triangles

So my efforts weren’t entirely in vain. I have tucked away my failed attempt. I inserted my new panel into the backing fabric (offset twelve inches from one side along the length). I pin basted the quilt sandwich and you can see I’ve begun quilting the quilt. My finished quilt will end up 49″ x 62″. My quilt design (in a 360 X 200 hoop) has worked out to 7″ x 13.7″. I’m quilting along the length of the strips rather than from side to side (to complement the strips rather than stitching across them) – I will end up quilting seven rows, each row requires 4 complete and 1 half repeat to cover the quilt from edge to edge.

So far, I’ve stitched two rows and started the third. It’ll take me another two days to finish the quilting. I plan on binding the quilt with some of the backing fabric I was able to find yesterday in the sister shop across the harbour from where I bought the original backing fabric.

I’m already planning my next project – a spring raincoat using PUL fabric (Polyurethane Laminate used to make diaper covers among other things) in black with bright umbrellas which I came across a month or so ago. Now to find a pattern….

New Zealand Yarn

Socks From New Zealand Yarn

A friend recently brought me a couple of 50g balls of New Zealand sock yarn from Australia – I decided to make it up into socks straight away.

This variegated pattern, as is all of them, dependent on the number of stitches you’re knitting. I started with 72 stitches and got one pattern for 20 rows; I decreased to 68 stitches and got a second pattern; then I decreased to 64 stitches for the lower leg and the foot which resulted in a third pattern. With a yarn like this, dyed in very short segments, the difference in patterns is very noticeable. In most of the other variegated yarns, the dyed portions are of much longer length so the pattern isn’t disrupted by a change in the number of stitches. What emerges in this yarn at 64 stitches is the lime green spiral with blue patches and short red stripes.

The yarn I began with last evening changes colour every 4 rows so the number of stitches doesn’t make a big difference in how the design knits out.

Japanese Strip Quilt

Pieced Strip Top Completed

I finally finished piecing this strip quilt – much more difficult than I expected it to be. Assembling long strips, particularly strips that have themselves been pieced, and consisting of different fabrics, tends to produce a “bow” – so you have to alternate the direction in which each new strip is attached. This means you sew one strip placed on the top, the next the strip is beneath because you want to start at opposite ends of the growing top for alternate strips.

Assembling The Strips

The piecing of the strips themselves was also a challenge. I joined lengths of complementary fabric pieces being careful to alternate the direction of the joins from one strip to the next. Then to assemble the top each strip had to be carefully laid out, the background fabric attached at one end, that end trimmed and aligned, then the opposite background end had to be attached and trimmed.

No chain piecing here – each and every strip is unique with the joins needing to be staggered and in alternating directions. So, of course, the creating and assembling of this quilt top took much longer than piecing say a collection of half-square triangles were it’s possible to mass produce the blocks.

Now I have to come up with an idea for the back. I have 66″ of a single width of backing fabric – I will need to insert close to 10″ in order for the back to be wide enough for the top. Still thinking about what kind of piecing will complement the strips on the top.

Small Zippered Bags – Again

Three Different Fabrics

I made 40 small zippered bags before Christmas. During the holiday season I gave most of them away. Two days ago I went to my bag stash to pick out one to give a friend and realized I was down to just four bags. Time to make more!

Yesterday, I bought three half-meter pieces of bright fabric, raided my quilting fabric for a length I didn’t like any more to use as lining, cut batting from a large piece left over from a recent quilt, cut lengths of zipper tape, and 2 1/2″ pieces of grosgrain ribbon for a small tab on the side. An hour later I was set to go into business.

This morning I went into production – three hours later I had eighteen 6″ x 8″ bright zippered bags. 

I’m getting organized at this mass production thing – I resisted the temptation to do all the steps on individual bags; I completed each production step on all eighteen bags before moving on to the next. The whole job went quickly.

However most of my sewing/quilting is focused on unique constructions so what I’ve learned from bag production line isn’t much help for the other sewing I do.