It’s taken me three days to sew all 70 Drunkard’s Path blocks. It’s a rather slow process – I mark the centre of each piece with a small cut, place the “L” piece on top of the quarter circle, match and pin the centres, then align the right end of the curve and pin it, finally I align the left end, carefully place it under the presser foot, and slowly stitch my way around the curve. Many people prefer having the quarter circle piece on top, but I find I can ease the curve together more easily when the “L” is on top.
This is not a typical Drunkard’s Path layout. I’ve picked up the blocks and tried arranging them in a different way, but I seem unable to do anything other than lay out the blocks in alternating circles! So alternating circles I guess it’s going to be!
I’ve moved blocks around playing with colour placement; this may be where I stop. Next step will be to create rows and finish assembling the quilt top.
I know I want an outer sashing, although I have no idea yet what colour to choose. That raises the question of whether I want narrow internal sashing around the blocks as well. I think not. The sashing will need to be in some strong colour with a grey border outside. I think a grey sashing would fight with the existing grey backgrounds; a colour will fence in everything.
Last week and the week before, we had a series of VERY dark days. I turned on the two floor lamps and the LED lights at each sewing station, even so it was still dark over my cutting table, and although I wanted to cut the elements for the Drunkard’s Path blocks it was uncomfortably dark to cut with any accuracy.
Deb mentioned Costco had a sale on LED workshop light fixtures so I went to take a look. On my first visit I came home empty handed; the fixture wasn’t plugged in and I couldn’t tell how much light it would cast, so I left. Visited Home Depot the next day, couldn’t find what I needed – an LED fixture with a remote on/off control (small chains hanging from the light wasn’t going to work!). Back to Costco I went and picked up two. I wasn’t sure I needed more than one but until I unpacked it and plugged it in I wouldn’t be able to tell. One seems to be all I need.
Lucky to have a friend whose husband is a licensed electrician, I was able to have the fixture rewired – I wanted a white cord (not the black it came with) and I needed the cord to be 25 feet long! (The cord had to cross the ceiling, come down the wall above the patio doors, along the woodwork and the baseboard heater to the electrical outlet.) I bought the cord and a plug and with the fixture in hand I trundled over to Brayne’s to have the light rewired. It took him about an hour (he’s meticulous rather than speedy).
Next I engaged the architect husband of another friend to hang the light. Heather and Ben came over yesterday afternoon and Ben (much younger than the handymen in my building) climbed the 6-foot ladder I’d borrowed and he attached the light to my ceiling.
Now there is light over my cutting table. The lamps add a bit more brightness and now they aren’t casting shadows on the table which they were before.
After six years in the apartment, I’m in business.
I collect sweaters. I’ve been collecting for more than 50 years. I wear them, even when they’re no longer quite in style. I reluctantly discard them when they become too worn.
This Land’s End sweater I bought at least 40 years ago. A Fair Isle double knit that’s been done very cleverly with no more than two colours per row although the colour layout seems a lot more complex. This sweater was machine knit – the carrying of the yarn on the back is very even (except where my fingers or watch have got caught in the carry threads and pulled them). I’ve lovingly worn this sweater for a long time. I’ve reinforced the sleeve edges when they began to wear, otherwise it’s intact and warm.
Imagine my dismay the other day when I took off the sweater and discovered a LARGE hole in the left elbow! Why I hadn’t noticed the sleeve becoming threadbare I’ll never know but I missed it until a couple of stitches let go and what I had was a big hole.
I remembered I’d seen a video a couple of weeks back, which I saved to Pinterest, on how to repair a hole in a knit which I thought was ingenious.
Although my hole was a lot larger, I decided to try the technique on my sweater. I’m not a knitter for nothing – I have a large yarn stash of many colours of sock yarn. I chose a medium blue fingering to close the holes then top-stitched the stitches with yarns as close to the original colours as I could get – that gave me a final patch close in weight to a double knitting yarn.
The Repair!
I didn’t think to take a picture of the hole before I started. I didn’t take a picture of the initial repair using the medium blue yarn. I don’t have pictures of the repair in progress. I just have this image of the completed repair!
The hole was six rows by nine stitches in size. It started just at the top of the sheep’s back up to the navy stripe, from the sheep’s head on the left to the head of the one on the right – a BIG hole.
When I was finished with the repair itself, I reinforced the white sheep’s body since the yarn there was considerably weakened. Then I wove in all the loose ends on the back. My yarn colour choices aren’t perfect but they close enough that nobody will ever notice!
I cut these quarter circles Sunday. Today I cut the grey/white “L” shaped pieces (as well as clearing up piles of fabrics sitting on surfaces around my sewing room).
I decided to group the quarter circles more or less by colour into sets of 4 then lay them out on the floor. Not half bad. by staggering the rows I get 7 blocks across each row leaving the half circles on opposite sides on alternate rows which sort of hides them. To make this work as a full array I need 10 rows which gives me full circles at the top and bottom edges. In all, I end up using 70 quarter circles which means I will have to cut a bunch more for the back when I’ve finished the top.
Next I have to try laying out the background pieces.
Possible Bottom Row
Except for the bottom left corner (which is too brown in tone) the other background elements look like they might go together. Now I need to pick up these pieces, and complete adding background to the other circles.
Here’s where I wish I had a large design wall! I don’t have a big flannel sheet hanging in my apartment because I don’t have wall space for one. I have to resort to the floor in my studio. I’m OK getting down but getting back up is not as easy as it used to be. So I won’t be able to do a full layout at one time. I’m going to have to work row by row, picking up the pieces as I go along piling them carefully so I can sew each drunkard’s path block. When I have them done, I’ll play with layout again.
Background Added (Tentatively)
Now I need to spend time looking at the array to make sure I’ve distributed the background reasonably well.
I had two piles of fabric on my cutting table – a stack of bright ones, a pile of light greys/off whites/darker greys. I’ve walked around them for nearly a week. I started cutting today.
I cut quarter circles from seventy-eight different bright fabrics (many from scraps large enough for the quarter circle, as well as fat quarters and other fabrics I had on hand; I cut 6 1/2″ strips from the background greys, then eighty 6 1/2″ squares from the strips. It took me nearly five hours to get that much done. My next move will be cutting the background “L” pieces from the squares so I can construct the blocks (that’s going to give me eighty smaller grey quarter circles as “waste” that I have to use for something!).
Last week I’d cut a couple of 6″ test background blocks – too small. Sewn to the bright quarter circle element my background would have phased out to nearly nothing at the sides. Fortunately I’d only cut four 6″ squares so I didn’t lose a lot of fabric. But that mismatch stopped me going any further for the better part of a week!
Test Layout of Four Drunkard’s Path Squares – Not Sewn
Today, I cut four background squares into “L’s” to see whether 6 1/2″ would work. I laid them out with quarter circle elements. I think this will be fine.
Once I have all the elements cut out, I’ll start laying them on the floor to see what kind of colour flow I get – BEFORE I even start assembling the blocks.
I’m planning on a 7 x 9 block quilt – my finished blocks will be 6″ – that will give me a top panel that’s 42″ x 63″. I’ll add borders to that to make the quilt a bit larger. No idea yet what I’ll use, that will depend on how the colour flow of the top shapes up.
One of the women in the building – a regular at our Friday afternoon knitting/craft sessions – has MS. At this point she’s in a wheel chair and has some (if impaired) use of her hands. A couple of years ago I thought she might be able to use a knitting loom, so I bought her one she could use to make a scarf. It took a while but she knit a 6′ scarf using the loom.
Then she wanted to try socks!
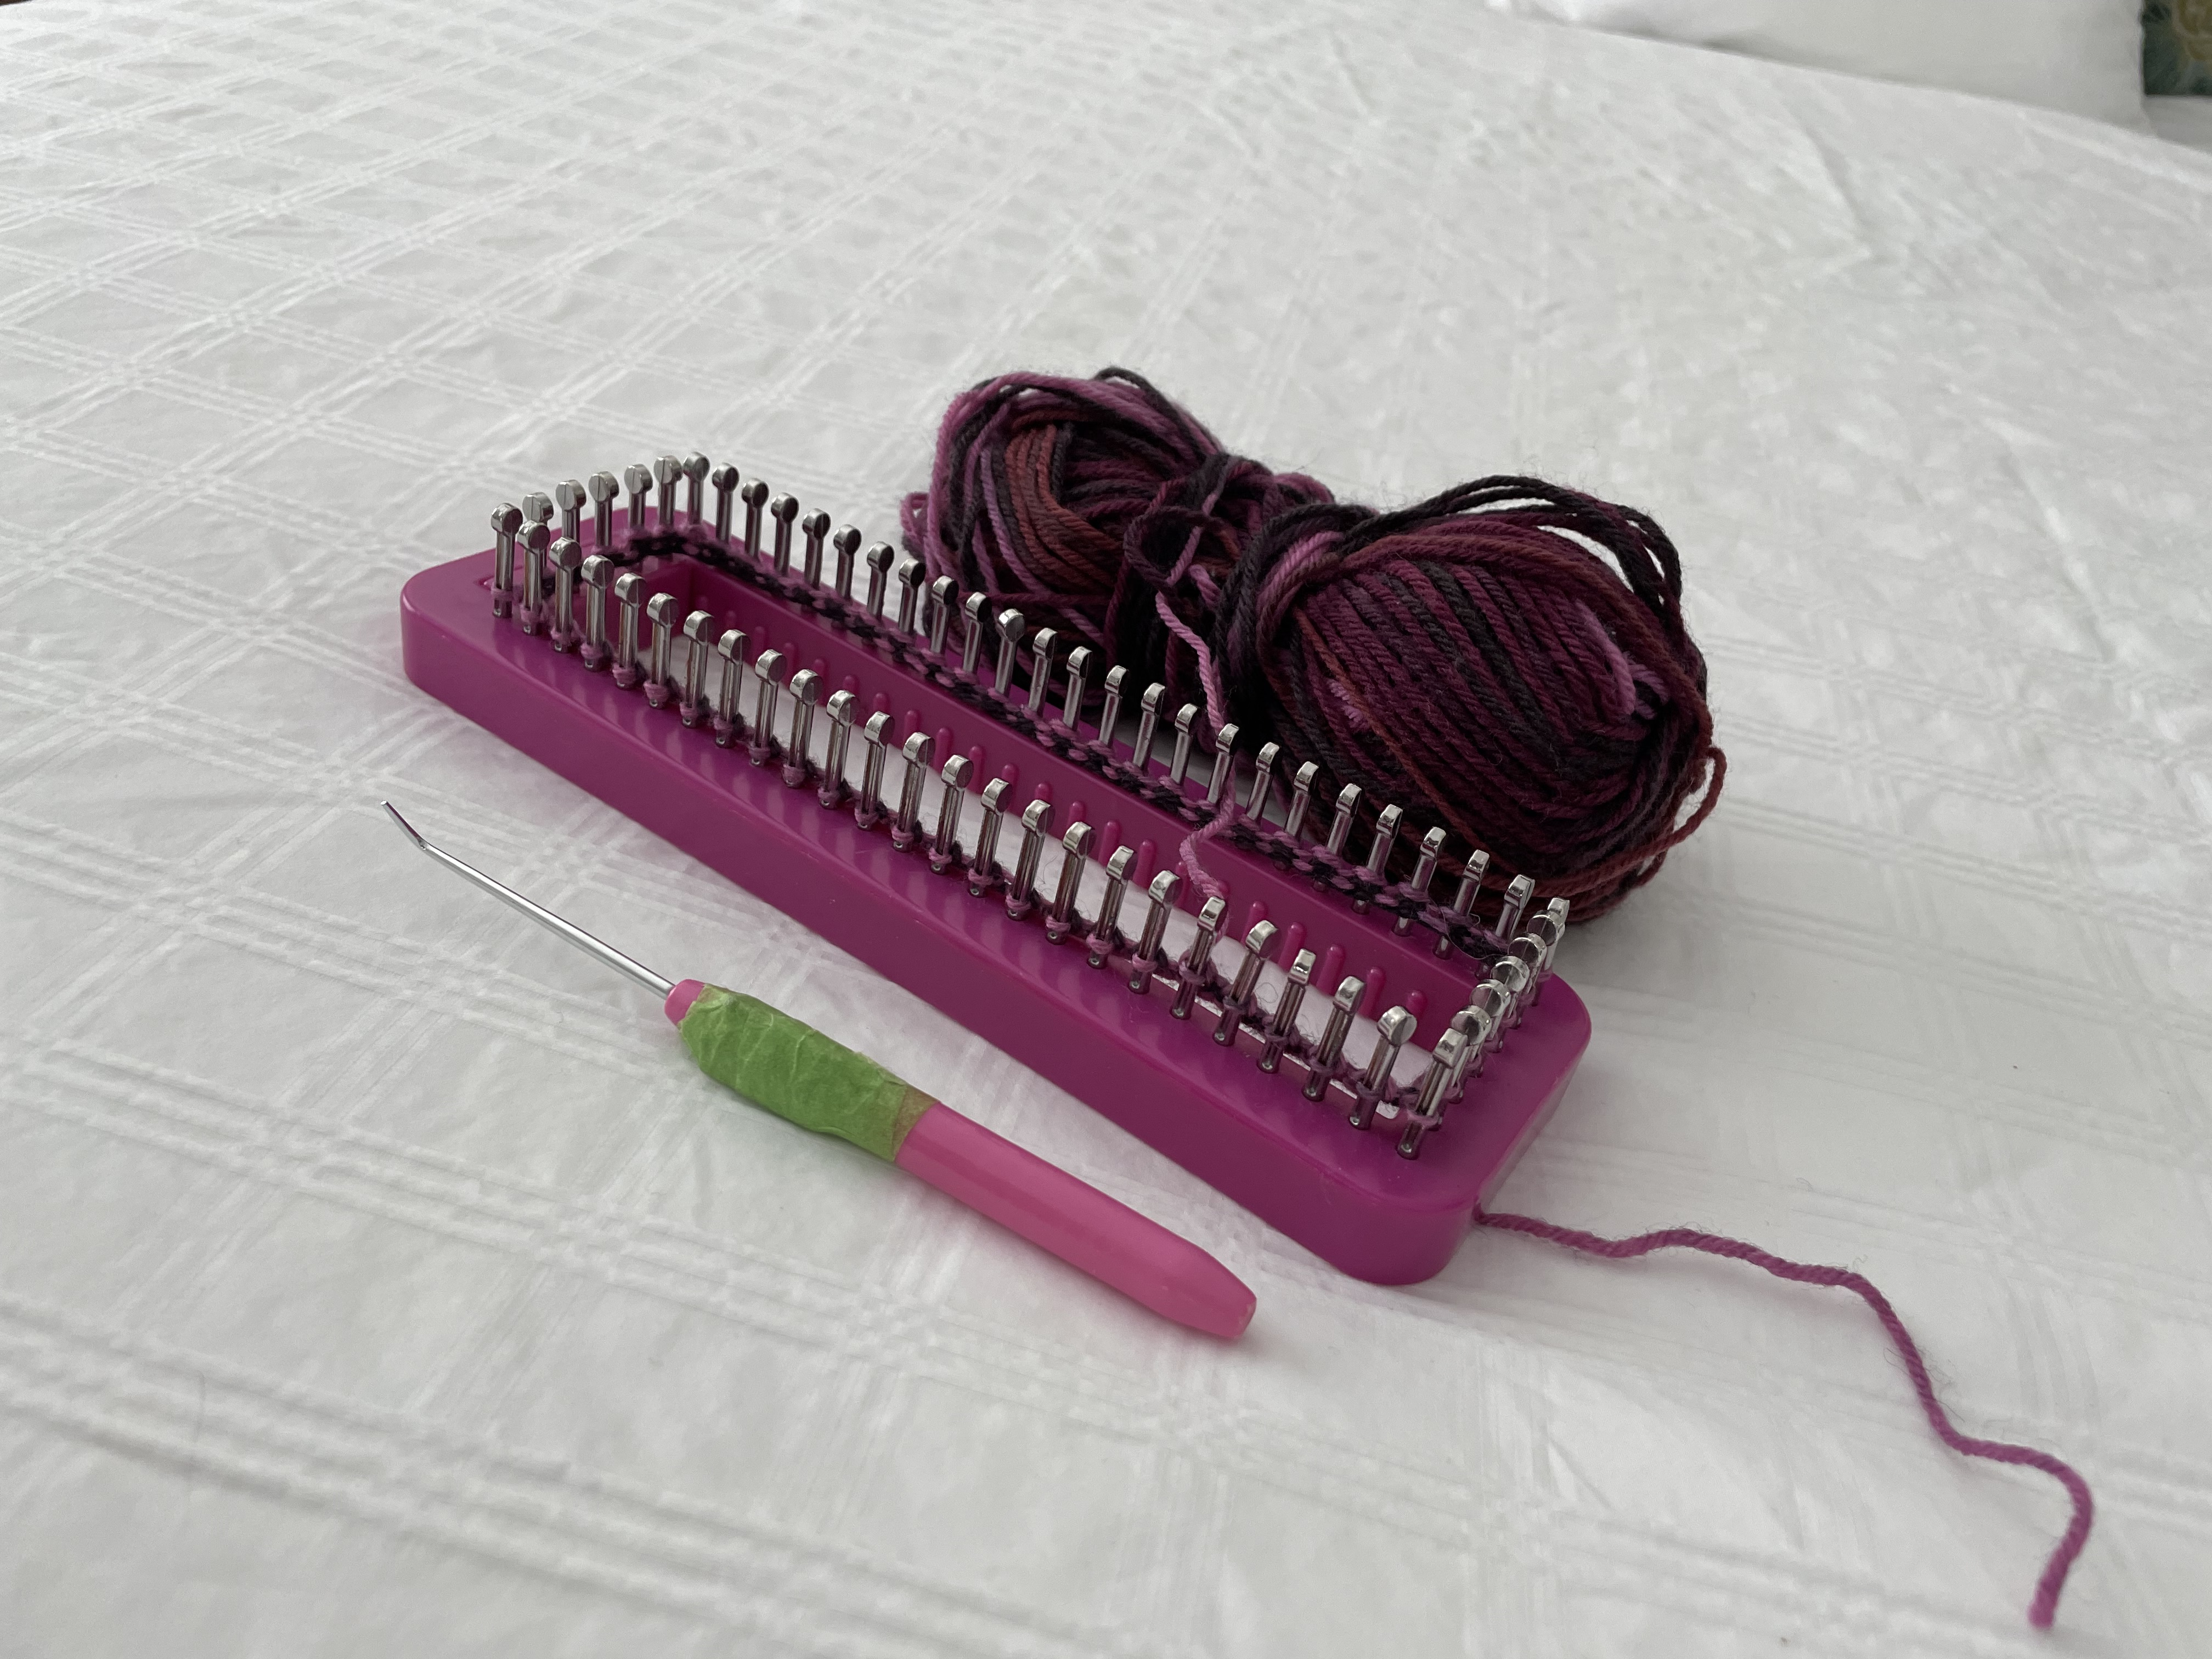
I found another knitting loom I thought might allow her to do that.
Loom with stitches on and two rows completed
The loom accommodates 60 stitches – with a heavyish sock yarn, I set up the loom for her and for the past two years JoAnn has been knitting every Friday afternoon. She’s just one of the knitters.
There are drawbacks to the system – I haven’t figured out a simple way of knitting a ribbing. We did without a ribbed top to the sock. Turning the heel required me to removed the stitches from the loom, put them on 3.5mm double pointed sock needles, knit the flap, turn the heel, and pick up the gusset, before returning the stitches to the loom (which required a bit of a stretch). JoAnn continued knitting the foot.
Yesterday, JoAnn thought she might have knit enough to finish off the sock. I took it home and last night I once again removed the stitches from the loom and knit the toe, finishing with the Kitchener Stitch, as I would any sock.
I washed the sock using Eucalan to soften the wool. Then I blocked it and hung it to dry. This morning I added a double thread elastic to the top edge to give it a bit more shape.
First sock finished
Looks like a sock. Should wear like a sock. I just hope it fits her foot. A wee bit too long I’m not going to worry about. Short? I’ll take off the toe, knit a few more rows, and redo the toe. But I think this foot length might just work.
I picked up the loom and yarn and started the second sock for her. I cast on the stitches and knit two rows. Having a finished sock might just encourage her to knit a bit more often than just for an hour or two on Friday afternoons. We might see a second sock sooner than 2025!
I recently read an interesting piece: I Need a New Group of Friends where Janet Torge, the author, laments growing away from friendships that have filled her past life. I’ve been thinking about her realization that she needs actively to search out new friends.
Because I’ve moved about over the years, grew up in Halifax, lived in Toronto, in Winnipeg, spent a year in Italy, visited Australia, travelled, I’ve had various collection of friends over the years. I’ve learned friends are the people you have meals with, do things that interest you both, with whom you share laughter. Friends are people who help out if you’re in a pinch. Friends are those you stop to talk to regularly in the grocery store – the gal who runs the deli department, that special cashier who kibitzes with you when you’re checking out, the bank teller who takes time to chat. And after these past few years, I’ve come to realize my days are built around the solitary time I spend sewing, knitting, reading and writing and those conversations I pursue each day – the brief text messages, or emails about inconsequential things that may interest someone else. They all contribute to making me feel connected and each day satisfying.
I’ve never had a huge coterie of friends. I got burned in my early teens by a friendship group that turned on me when I defended one of the other girls for some minor “transgression.” It wasn’t until I was much older that I was able to build a broad coalition of friends. In Winnipeg, I learned to reach out to women interested in aspects of the world that interested me and others who expanded my horizons. I had a wonderful collection of friends there.
When I returned to Halifax four years later, I discovered many friends had moved on and I was in need of new people in my life. I reached out to the gals in the swimming class. As I was singing along to the exercise music one of the women recommended I come along to a chorus rehearsal. That led to many years of singing baritone in a series of women’s barbershop choruses. Great fun that. I was also sewing a lot and reached out to other women who sewed. I started travelling with groups interested in textiles – Bali, Peru, Italy, San Francisco – I made friends all along the way. These days I have swimming friends, and sewing and knitting friends, those who have been friends for a long time, friends I’ve met as I’ve travelled, some more recent friends.
In 2016 I moved into an apartment building – there were community activities – cribbage on Monday night, coffee Tuesday morning, other card games Thursday nights, knitters congregated on Friday afternoons. There was a core of people who participated in all these activities, others attended one or two. I decided to reach out to these folks, too.
Even through COVID lockdowns we have managed to get together, both indoors and out. Months ago, when restrictions were lifted, we went back to meeting regularly (some of us wearing masks, others comfortable without) but all of us enjoying the laughter which is an essential element of whatever’s going on.
As our lives change, our friends also change. Some fall by the wayside, new people come along. It’s important throughout our lives to keep reaching out to people, sustaining old friendships and building new ones.
Last week I had my 80th birthday. My niece and her sons, my nephew and his wife all arrived from Toronto just for the celebration. Seeing them in the doorway of the party room left me speechless. I wasn’t expecting them. It was a wonderful surprise having them there to celebrate with me. It was also terrific watching all of them work the room – walking up to strangers and asking “How do you know my Aunt Judith?” My grandnephews (now 20 and 21) have learned the art of a good opener! They had no difficulty engaging this gathering of mostly elderly women in interesting conversation – interesting for the gals as well as the boys.
Grandnephews
So many people seem to forget how to start a conversation. Conversation is just storytelling; everybody has a gazillion stories to relate. “How do you know my Aunt Judith?” and another story is shared, building ties between people who moments before were strangers. In the elevator I’m joined by a couple carrying loaded grocery bags. “I see you were shopping!” – an easy conversation starter. The people in my apartment building all talk to one another in the elevator, in the lobby, in the garage. Everybody greets everyone else. It creates a sense of community everyone enjoys.
Regardless of age, everybody needs friends. You just have to reach out. Noticing something about a stranger can let you ask a question that starts a conversation – and maybe begins a new friendship!
I haven’t given up on Drunkard’s Path yet. Instead of the dull colours I started with, I’ve pulled 44 bright fabrics from my stash, mostly batik (and in the in end I may use only batik – I have lots more fat quarters to choose from), as well as a pile of blacks/whites/greys.
The idea this time – I intend cutting the quarter circle elements from the bright colours using the blacks/whites/greys as background. This idea comes from a quilt I came across on Pinterest
Here’s my plan – a 7 x 9 quilt – using 6″ blocks that gives me 42″ x 54″ which I can extend with borders to a largish throw.
My next step is to cut sixty-three quarter circle elements from the bright fabrics (there will be duplicates), and 63 squares from the blacks/whites/greys (selecting more from the lighter end of that collection), then sew them together.
I won’t know what this is going to look like until I get the pieces cut and laid out on the floor and then play around with layout. The quilt above uses the blocks in a straight layout – I may break that up somewhat to create a layered effect with some circles on top of others as I did with the Skyline Quilt #3.
This amaryllis was a Christmas present. When I opened the box the flower stalk had already grown substantially and at an odd angle to the bulb. There was also a “bulblet” at the base of the bulb. When I planted the bulb I placed it on its side to accommodate the flower stalk, I also left the offset intact hoping it might continue growing – so far no sign of it at the surface of the soil. When the flowers are finished blooming I’ll lift the bulb to see what’s happened with the bulblet – never know – might be able to salvage both the original bulb and a new one.
I set the pot on the ledge in front of my patio doors and left it alone (aside from watering it). Within a week the stalk had elongated to close to its final height, but it took another couple of weeks for the flower bud to show signs of opening. This week, the flowers appeared. I now have all four. It doesn’t look as if this bulb will produce a second stalk. The leaves which were present when I opened the box have become green but not grown any further, but they will as soon as this flower head is finished.
I’ve never had a white amaryllis before. I like the pale green centre. Not as dramatic as the various red and pink varieties but quite attractive none the less.
I’ll enjoy the flowers for another week or so, then I’ll cut the stalk back and let the leaves grow.
When you’re short, no matter how you try positioning your car seatbelt, the belt cuts into your neck when you’re wearing a t-shirt, or low cut top of some sort. In winter it’s not a problem but when I’m wearing light clothing I definitely have a problem.
A gazillion years ago a friend brought me a pair of seatbelt covers from Hawaii, of all places. I guess because they wear light clothing year round it was a solution to a pervasive problem, there. In any case, when that set of covers wore out, I made myself a new pair. Other people wanted some, so I did a small production. Each time I replace my old seatbelt covers, I make a batch for gifts.
8 Sets of Seatbelt Covers
The set I made for myself used a large floral print in red (I have a bright red car). Print fabric doesn’t wear as well as batik but I liked the colour. However, I’d bought these three batik fabrics on sale several weeks ago precisely with seatbelt covers in mind.
They’re easy to make.
Cut a 7″ strip of fabric from the width of fabric (WOF), then cut that strip in half giving you two pieces – 7″ x 22″ each. Cut a piece of batting 6″ x 21 1/2″; lay it down the middle of the fabric aligning it with the cut fabric end, leaving the selvage edge with the fabric extended beyond the batting a wee bit. Fold the cut end about 1/3 of the way over the batting, bring the selvedge edge over that end and stitch at the selvege edge to secure both the fabric and batting. (Those are the two seams you see in the middle of the cover.) In other words, the overlapping seam which joins the ends of the fabric ends up in the middle of what will be the “under” side of the cover. The finished length of the cover should be close to 11″.
Cut Velcro hooks and loops paired strips 10 1/2″ in length. Sew the loops (loop side up) to one long edge on the “top” side of the cover, turn the cover over, fold in the loop tape, tuck the top edge of fabric beneath the loop strip, then sew the other edge of the loop tape in place, turning under the bit of fabric extending beyond the Velcro when you get to the end. (That’s the seam you see along the length of the cover.)
Attach the hooks strip to the second long side of the cover, again sewing first on the “top” side, then folding the tape to the under side and stitching it down.
Fold the cover in half, and press the loops and hooks together. That’s it. You’re done!
Here is a link to instructions with photos that I provided the last time I made seatbelt covers.
BTW, this is all procrastination – I’ve got to get going on a new quilt and I have no idea what to make. I’ve been looking at photos on Pinterest looking for something interesting to tackle.
There are lots of interesting possibilities for improvisation:
I don’t have patterns, just ideas. Laid out like this, the Blocks and Stripes, and colourful Drunkard’s Path seem to be calling. Next step – go through fabric scraps and see what I can find there before going through the larger fabrics in my stash. I just gotta get started on something….