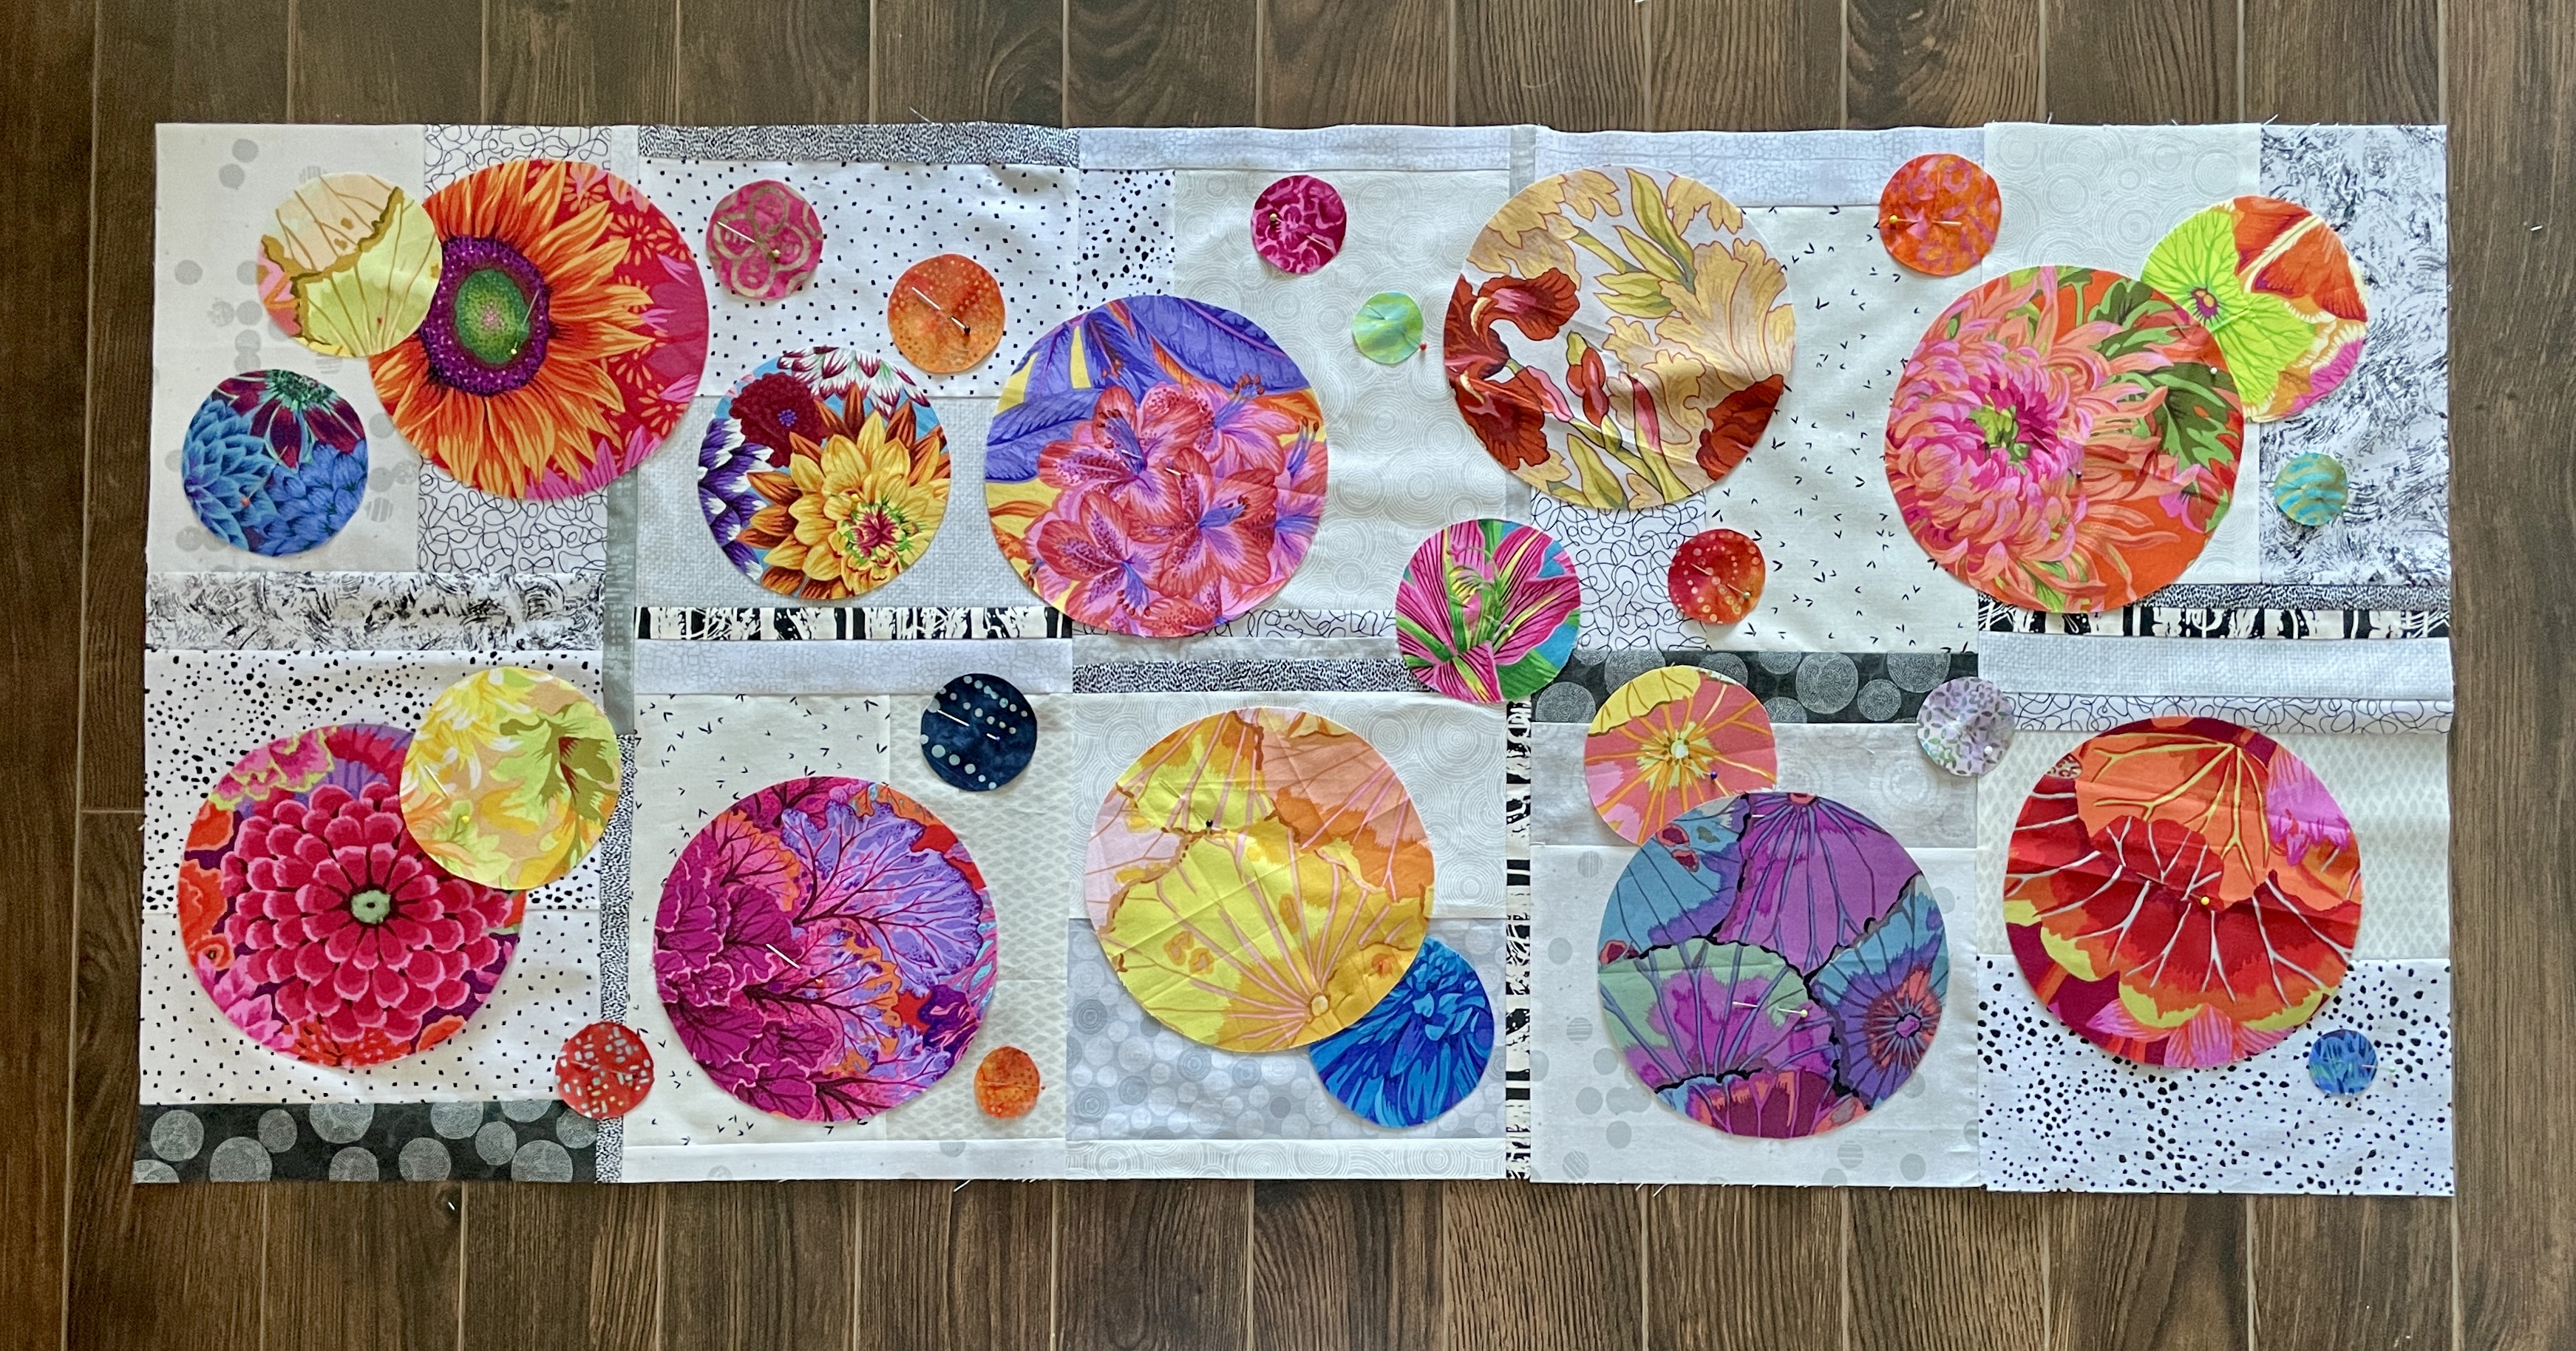
Moving quickly. I have the background assembled and I can immediately see a problem I want to fix – that dark strip in the bottom left corner has to go! Needs to be lighter. I’m not sure about the second one- I think it may be OK.
The circles are pinned in place for the moment – looking at the photo I can see I want to move them about some more. I’ve also decided the whole thing will be an appliqué work – I’m not going to fight to insert the large circles into the background! So I’m moving along.
Tomorrow I’ll take all the circles off, and reposition them, overlap different ones, underlap others. But first, I need to take that dark strip out!
I also need a piece of buckram to stiffen the runner so it will hold its shape when I hang it horizontally. I’ll pick that up tomorrow, as well.
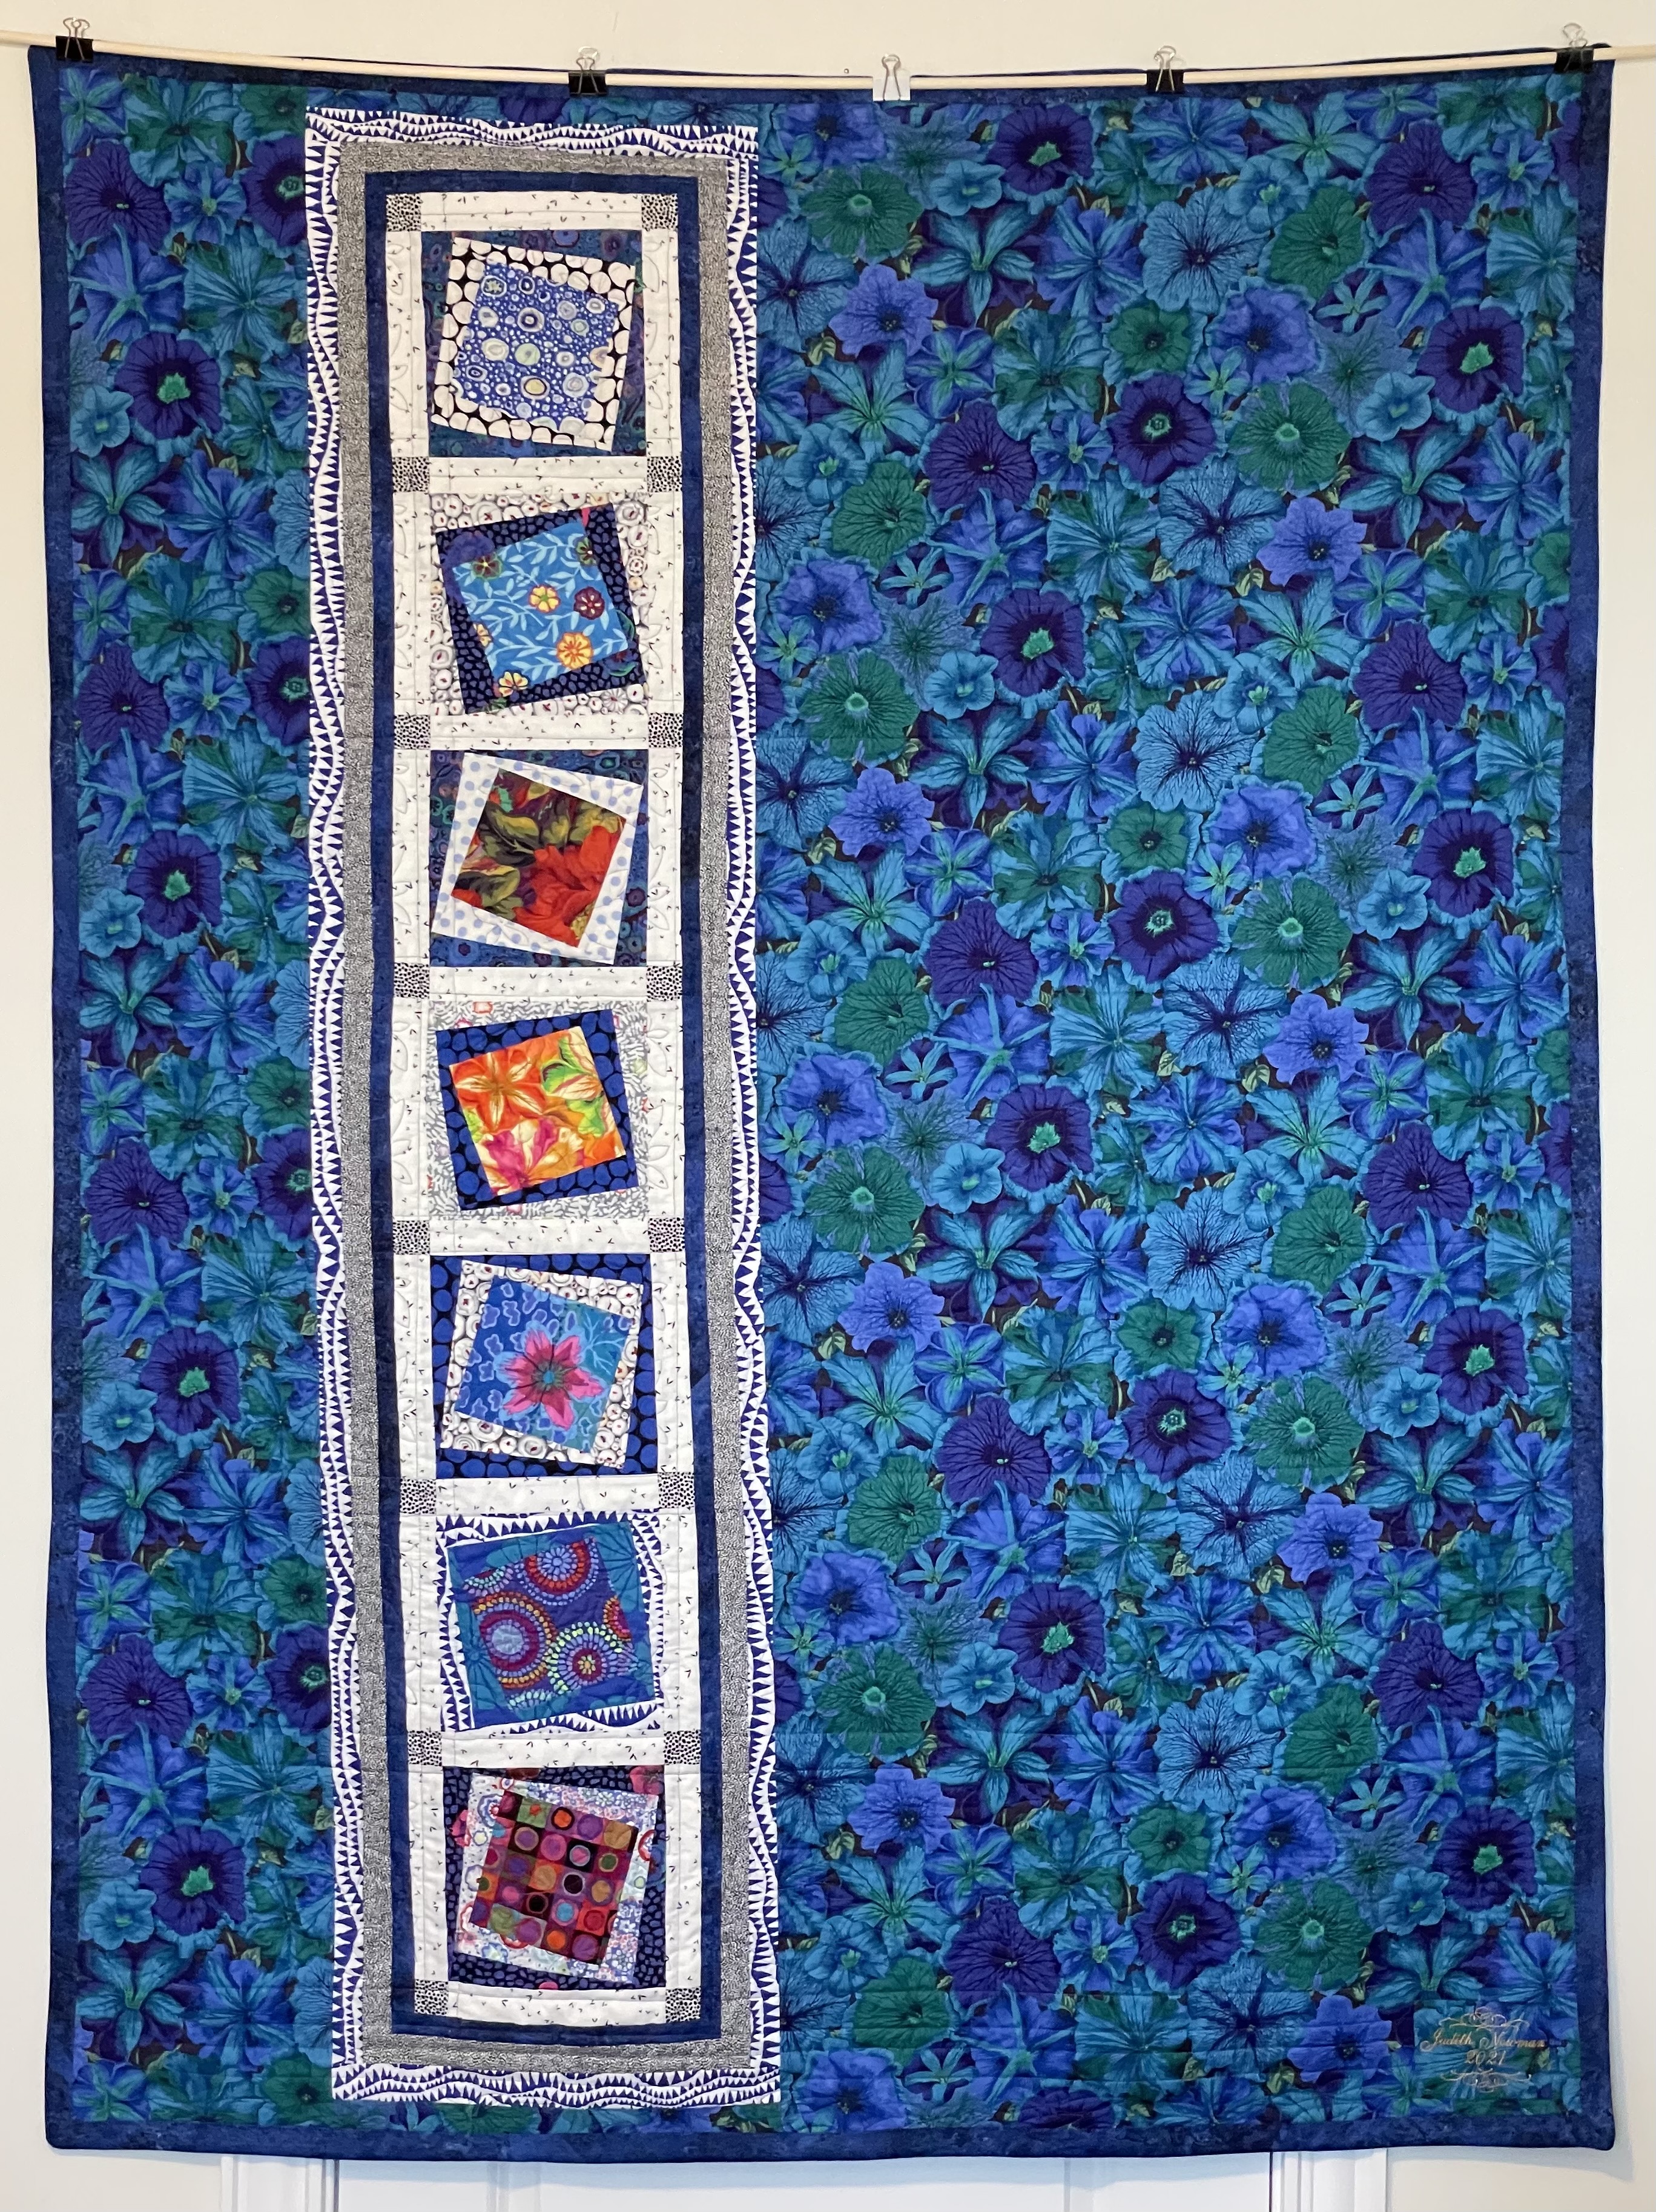
The photos don’t do it justice – the colours are more vibrant, the relationships among the elements on the quilt top are much clearer.
I finished with a hidden binding – I didn’t think the quilt front wanted another edge element. Besides, I didn’t have any more “petunia” fabric and used the darker blue stonehenge to finish the edge on the back.
The quilting turned out well. I chose to quilt the blocks excluding the sashing – in part because I’d have been left with an unattached row of sashing either at the top or the bottom. It was simpler to just quilt the blocks themselves. I stitched-in-the-ditch along all sashing edges, then quilted the outer border with a modification of the block design to fit the border width.
That’s it for quilts at the moment. I’m now picking up the Kantha bedspread and making another jacket – this time, the back without any flare. I need buttons – will go looking for some this afternoon.
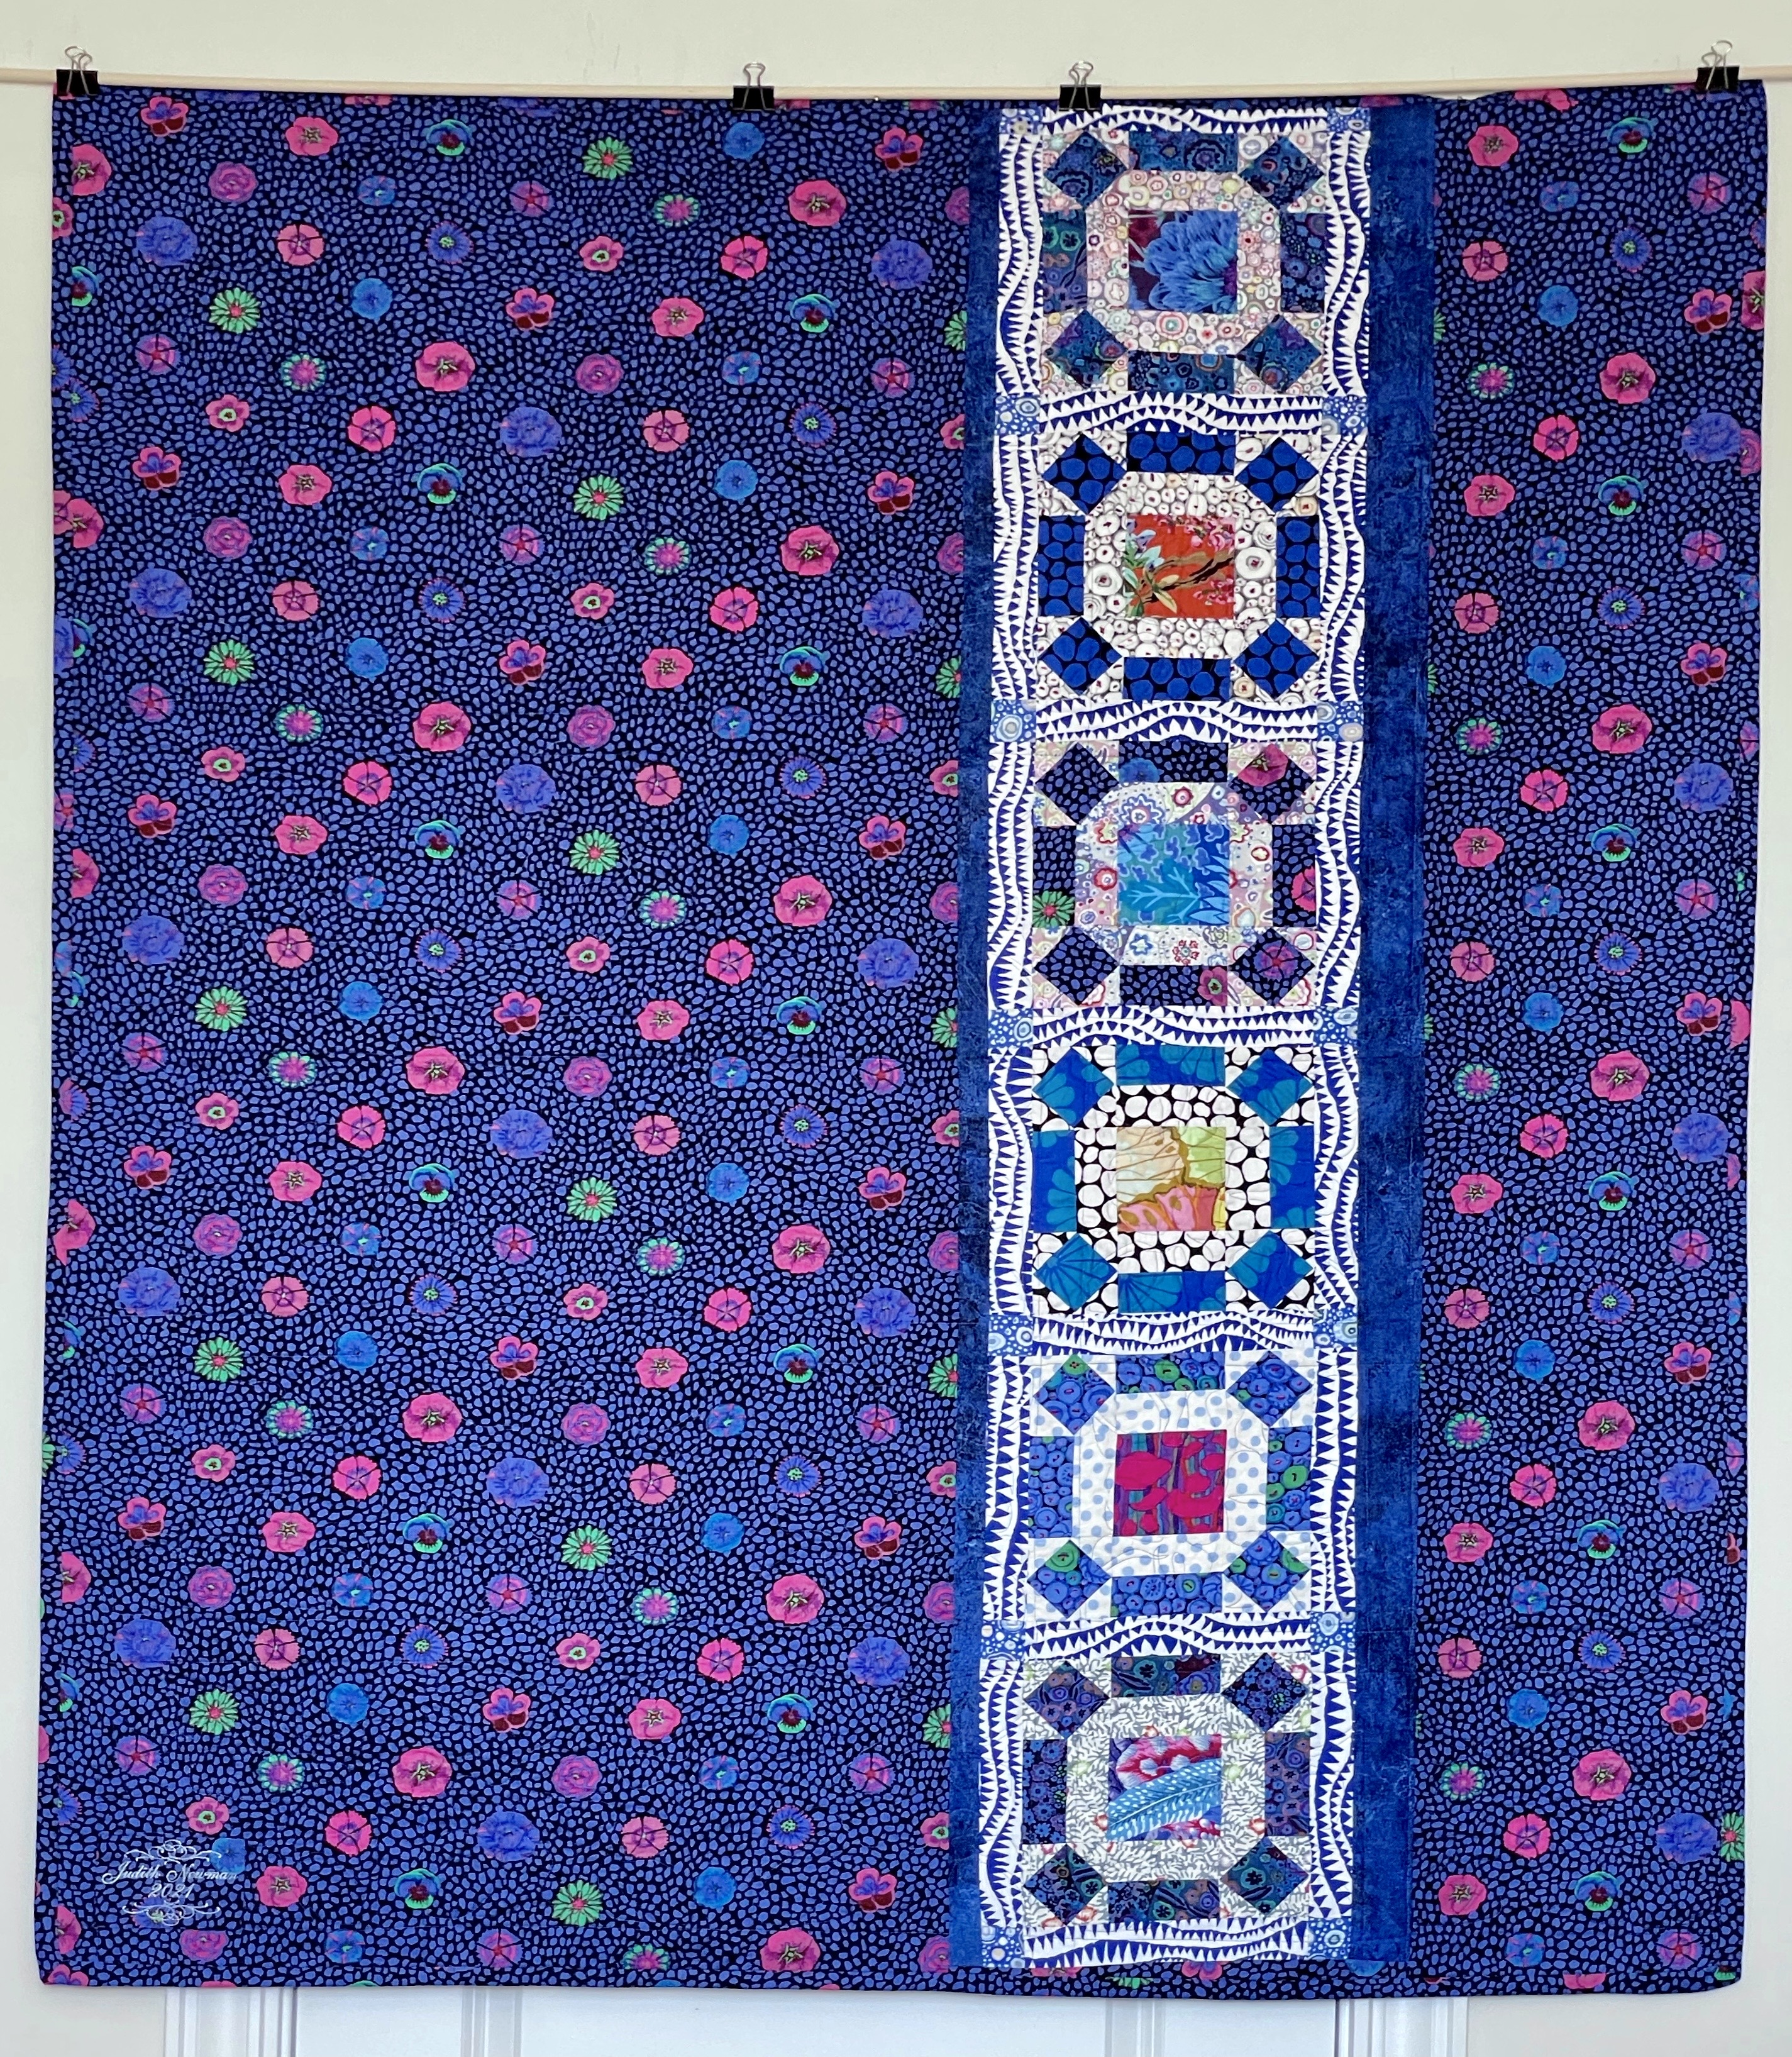
Once again, it’s a “blue” quilt. The borders change the colour focus from “white” to blue. Adding the borders has resulted in a somewhat large throw quilt (55″ x 73″)!
Now I have to piece the backing – the insert strip needs borders which I will do now; I just have to make sure the panel with borders is wider than 13″.
That’s it. Nothing more to say about this project right now. I’ll do a hidden binding (maybe in the black dots fabric – don’t know yet).
I just finished adding the sashing/corners to the blocks and now have a completed panel. I find it interesting how much the sashing overpowers the blocks. Were I to leave the top as is, it would be a predominantly “white” quilt. To offset that, I plan on adding three borders: a narrow inner border using the dark blue/black stonehenge fabric (at the bottom of the photo), another even narrower border using the black dots/pepper fabric I used for the sashing corners (that’s on the way from Newfoundland – hope it arrives late this week/early next), and finally a wider outer border using the blue/green petunias at the bottom of the photo. Those borders will turn it back into a blue quilt, and downgrade the intensity of the white sashing.
The back will use the petunias with the strip I created on the weekend, also bordered with a narrow piece of stonehenge and maybe also the dots/pepper fabric as well.
Pieced Strip for Quilt Backing
In order to carry on, I have to go back to Mahone Bay to pick up another metre of the petunias! I ordered 2 yards which would have been enough for the backing but isn’t enough to do the borders on the front as well. I’m not going to cut the 2 yard piece I have, I will cut the front border pieces from the new piece I have to buy! Besides, I’m having to wait for the black/white fabric to arrive from Newfoundland!
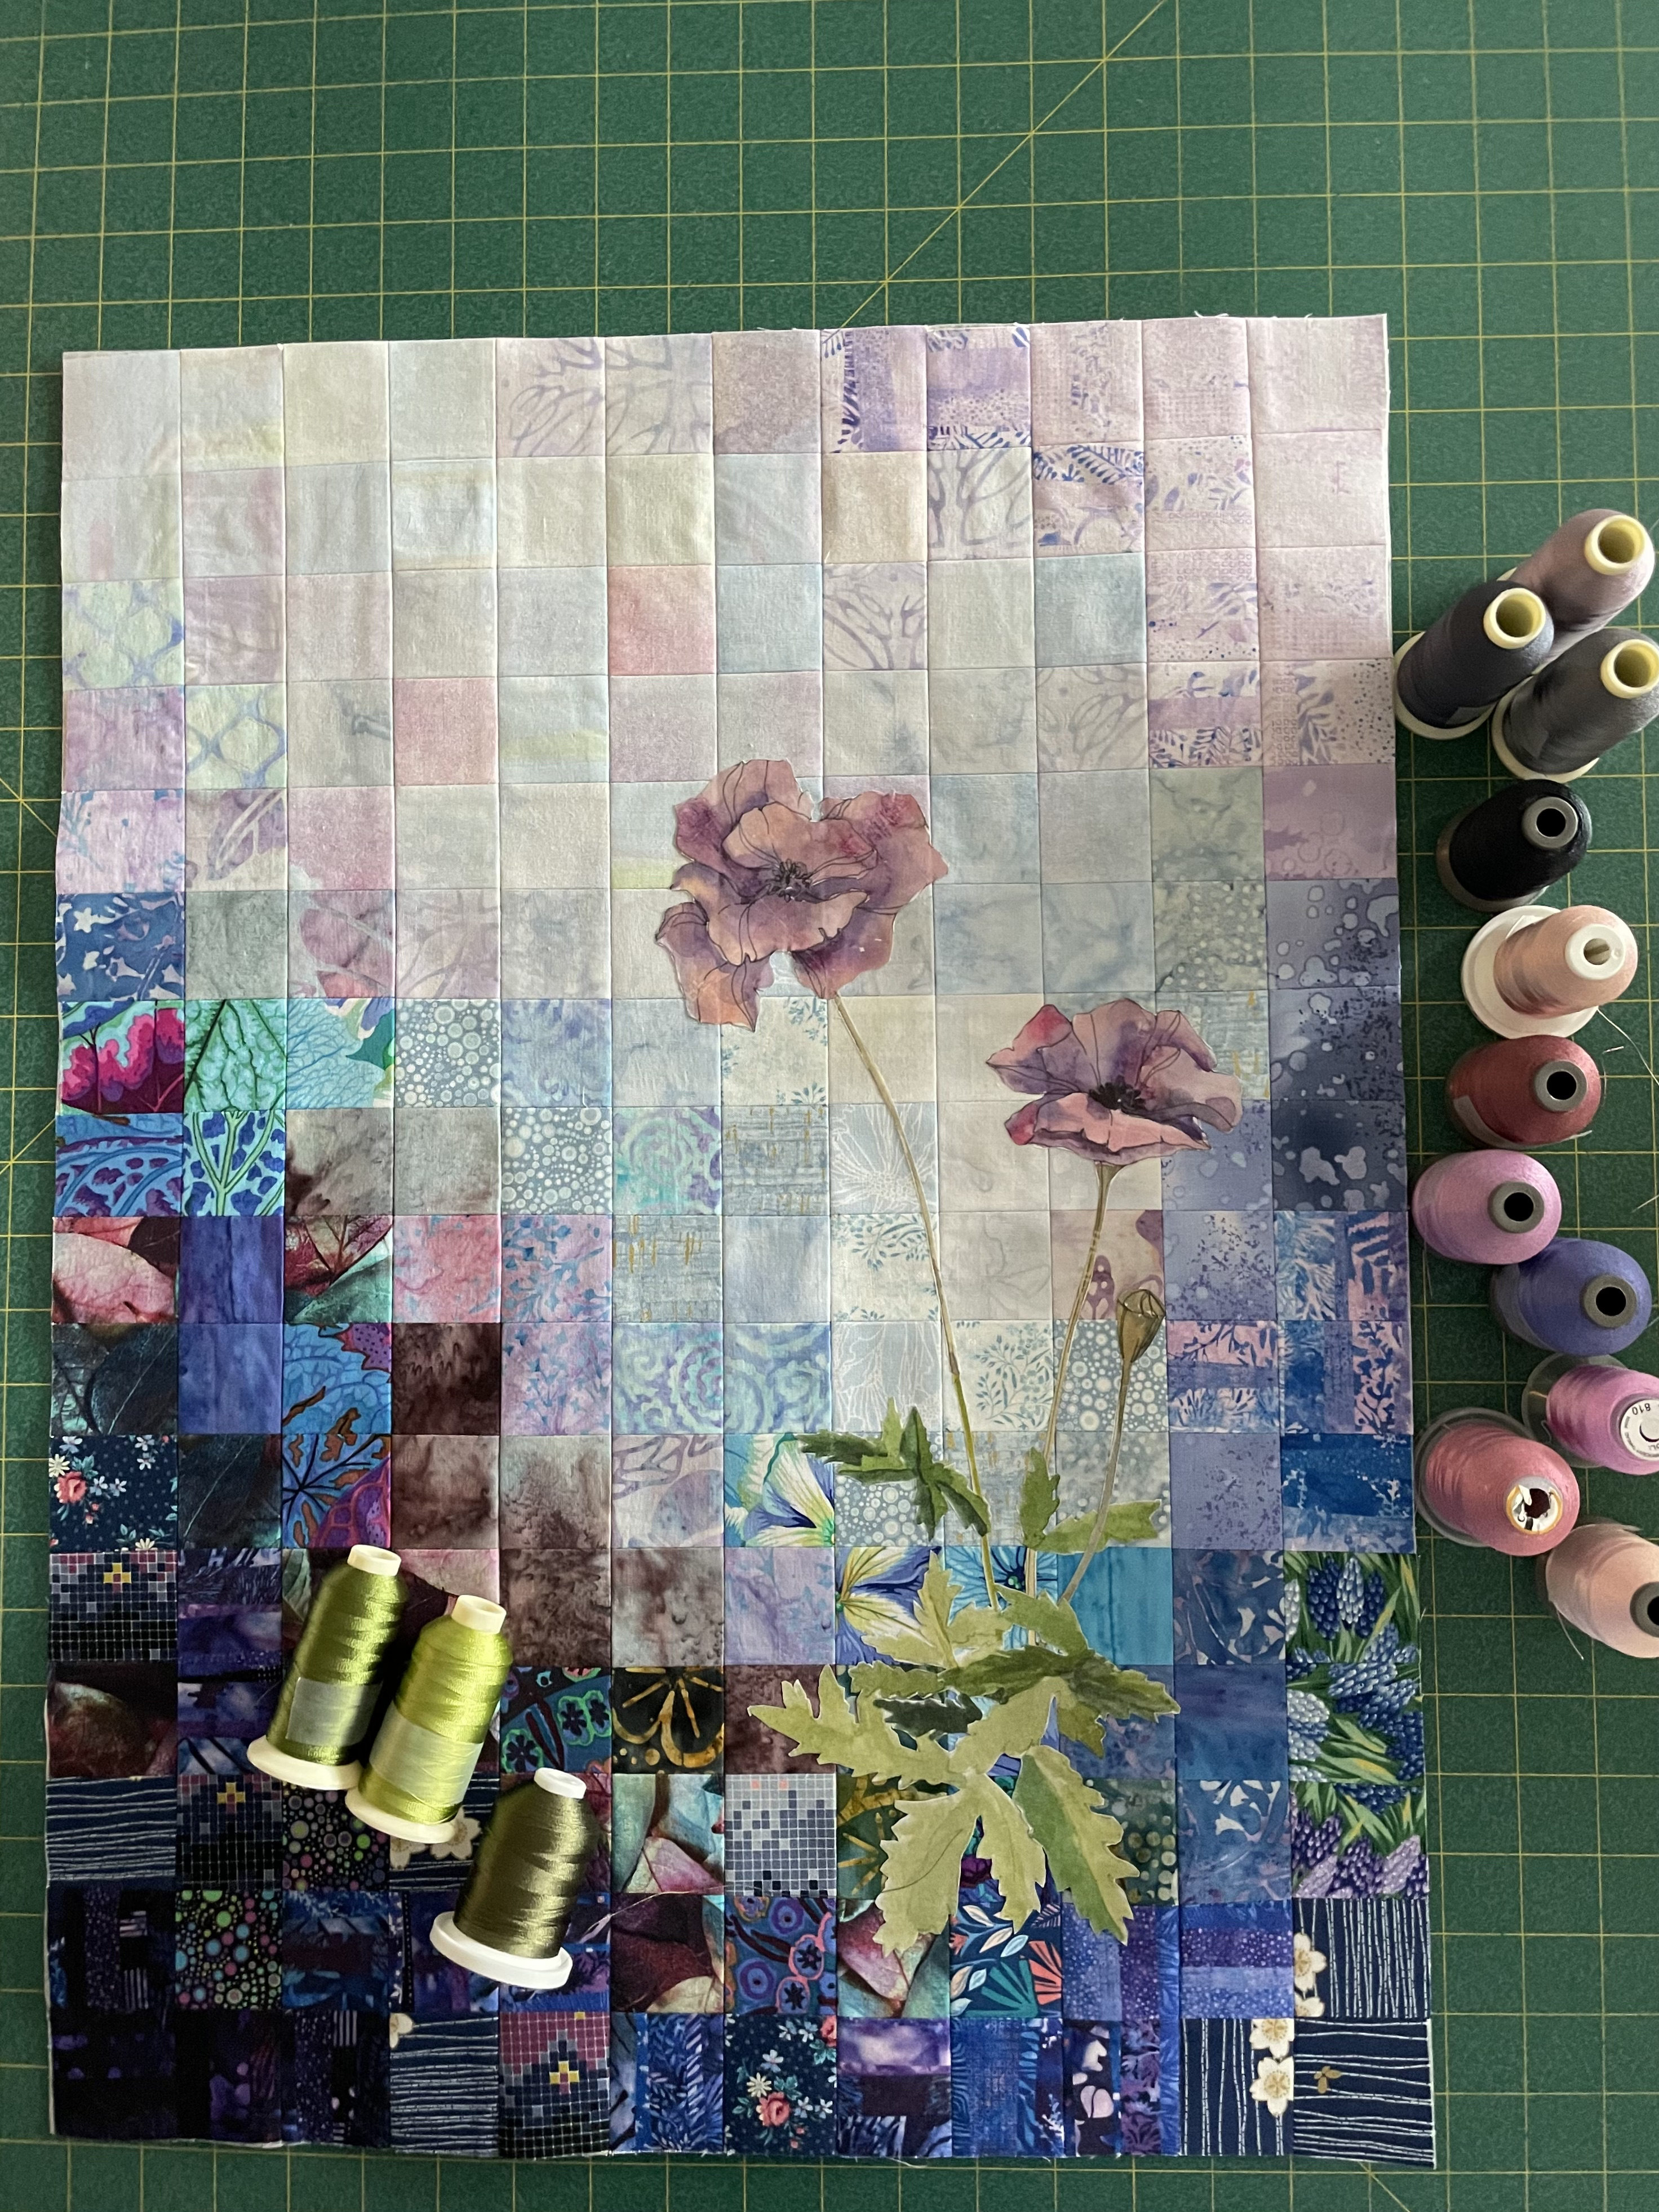
In the meantime, I’ll go back to the purple poppies wall piece I was working on several weeks ago. This will give me time to work on thread painting the poppies.
Now I have to spend some time looking at the blocks and their position in the array! There are three variables in play – the fabrics of the inner square, the fabrics of the first triangle, the fabrics of the second triangle. I’m trying to keep them all different so there are no two centre fabrics in a row or column; then I’m trying to have not two same fabrics touching. I’ve almost got it – I see three spots where the inner and outer triangles are the same fabric and I may not be able to move anything more to alleviate that. There are also some adjacent diagonals (which I’ve decided to ignore). More important is whether I have the colour distributed broadly around the array – it’s not bad – I will have to look at the blocks tomorrow to see if I still feel that way.
The issue is at this point I have almost no degrees of freedom – the only way I can gain more is the make the seven blocks for the quilt back and see if that combination accommodates some swaps. It’s probably a good idea to do that before I attach the sashing because once the sashing is attached I’m not going to be able to do any moving around!
The quilt is going to be colourful, for sure.
PS: I’ve been asked about measurements for the block. If you’re interested in constructing a quilt top like this, click here for information/measurements for creating/setting up the blocks. If you decide to try it, be sure to make a couple of test blocks using scrap fabric.
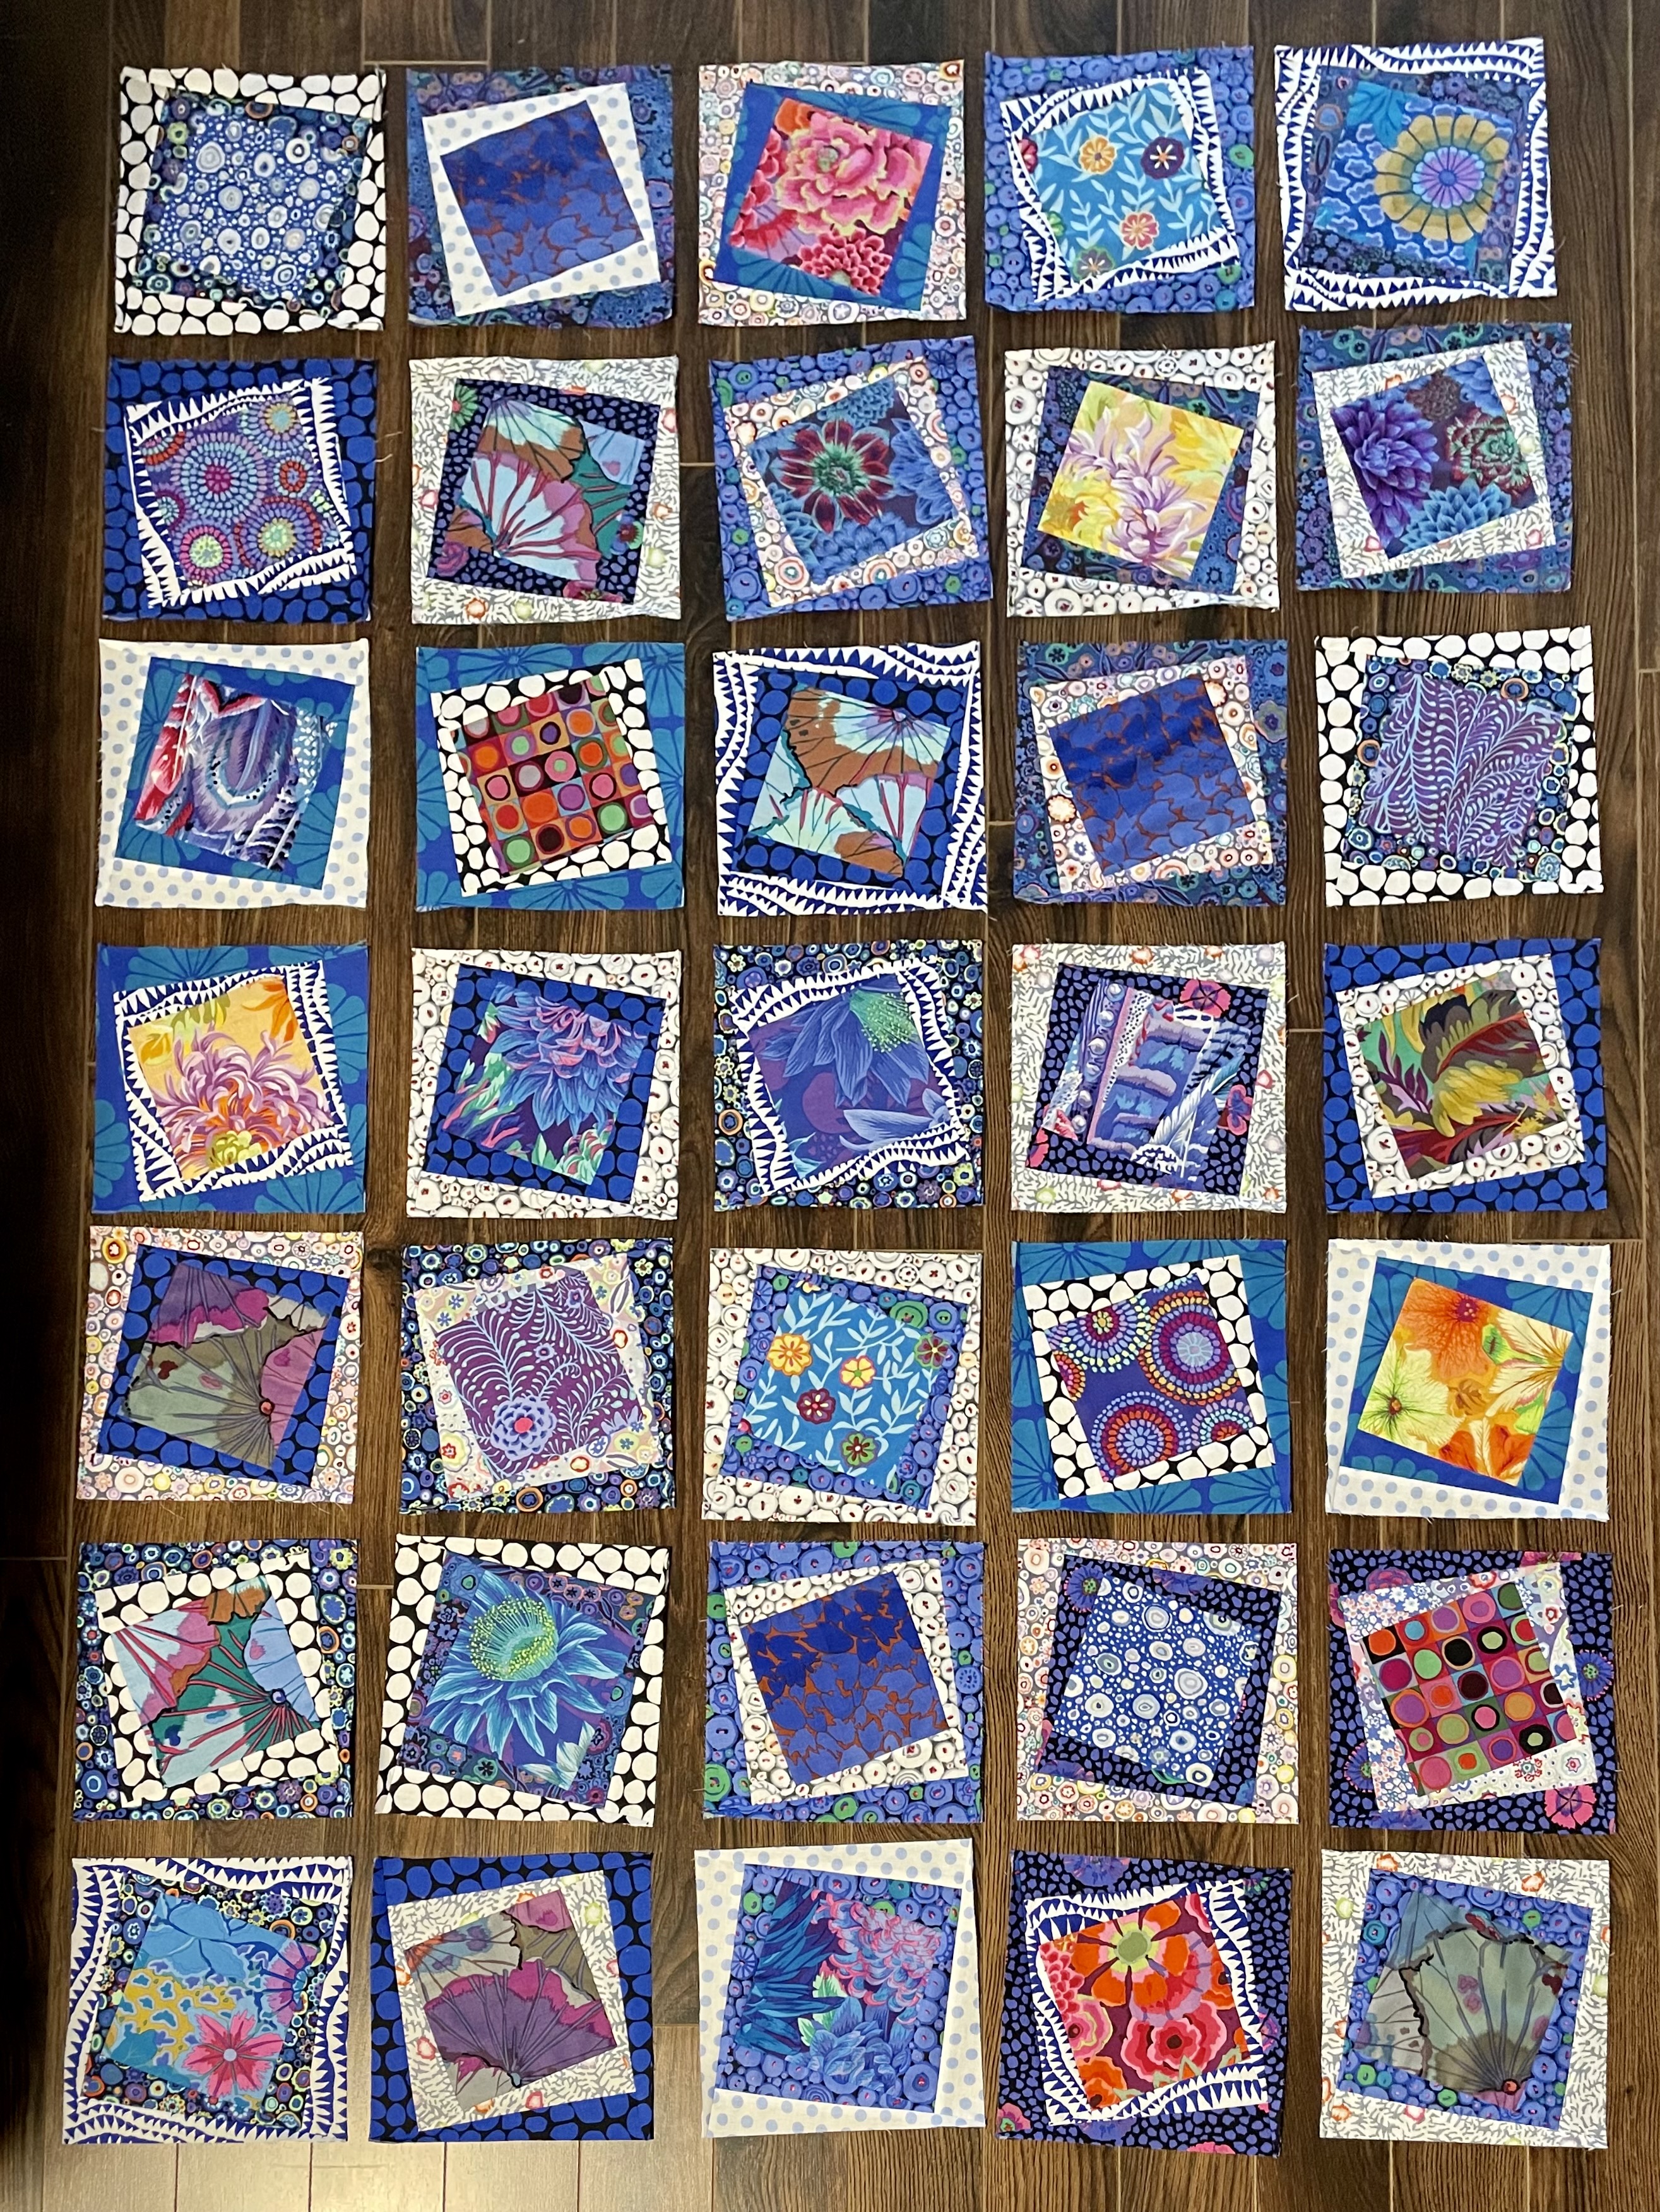
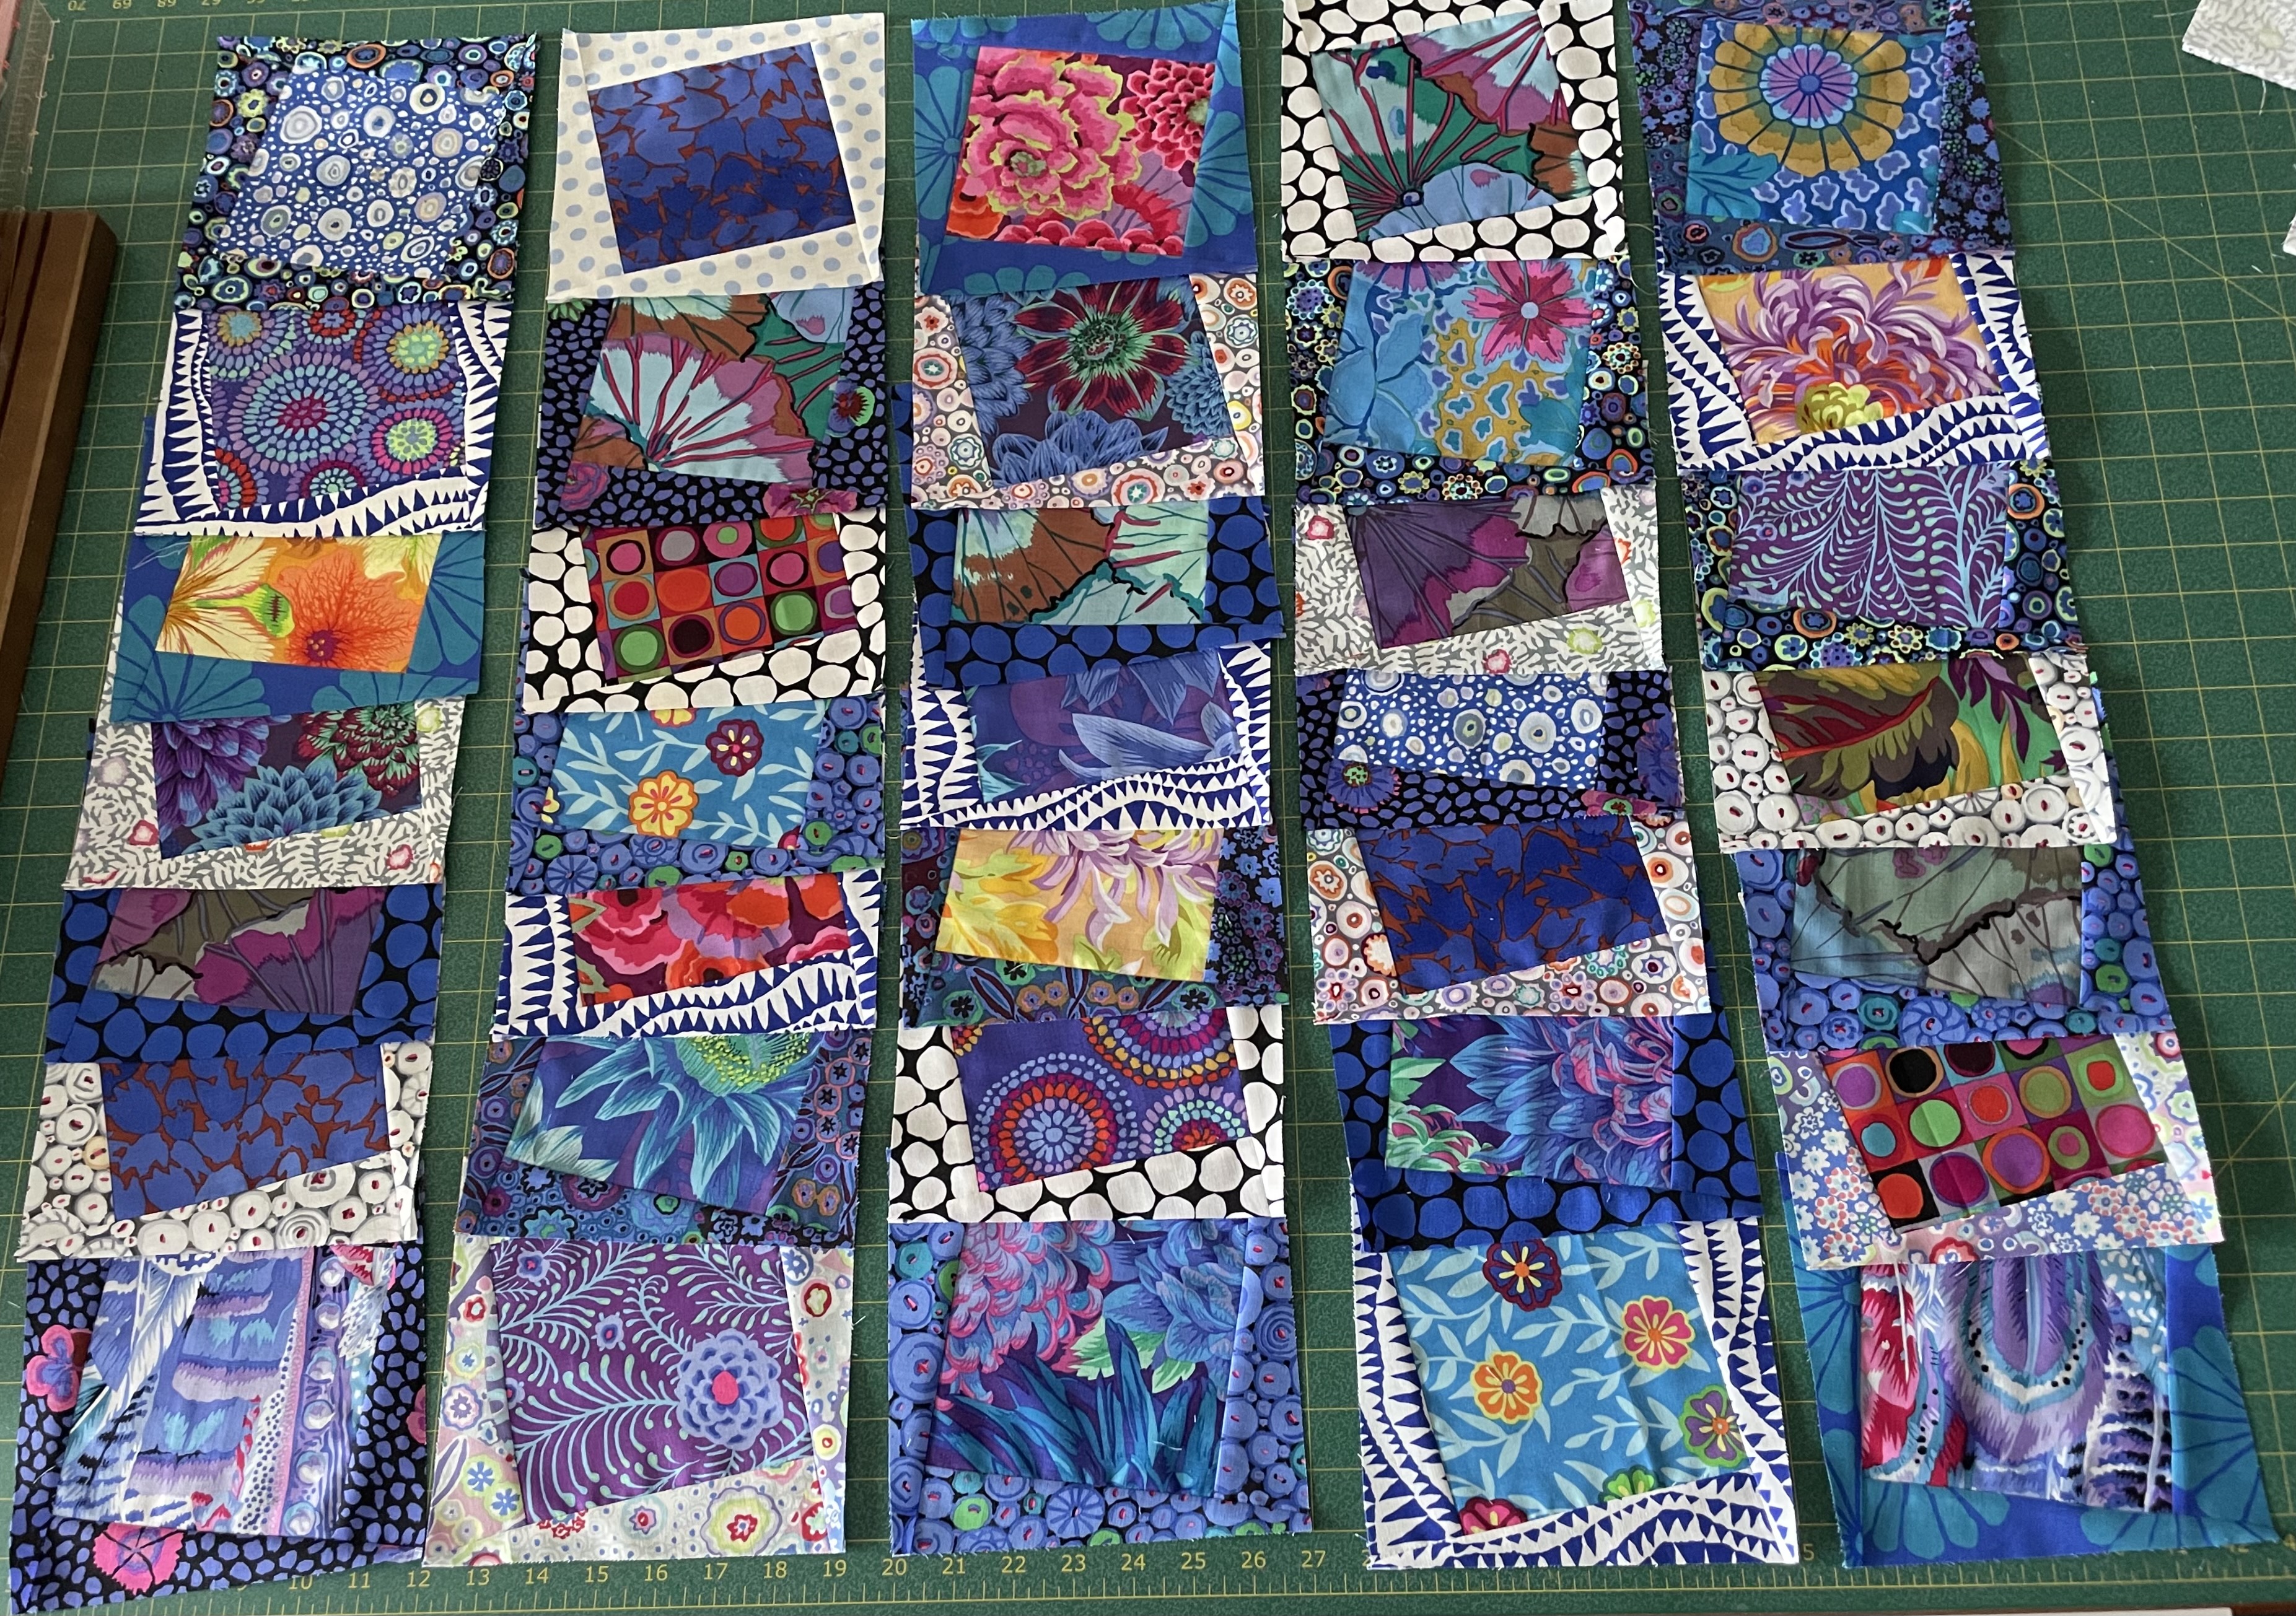
This is where I got to yesterday – all 35 blocks partially assembled with a triangle border on each. Today I began adding the second triangles to each block – I have 14 blocks done.
Then I was up early this morning going through my stash looking for something to use as sashing. I found a white fabric with black dots I thought would work but I didn’t have enough to do all the sashing, so after aquafit I went shopping for sashing fabric. I found one very close to the one I’d dug out of the stash. I also had a very small amount of a complementary white with larger black dots and had my fingers crossed there’d be enough in that piece to cut the 48 small squares I needed (I was lucky and there was!).
So here is what the setup is starting to look like:
Block Layout
I’m planning to alternate blocks with dark triangles with blocks with light triangles. That gives me alternating rotation as well since I cut all the light blocks in the same direction, all the dark on the second diagonal.
The sashing will be a wee bit narrower than the placement in the photo and will look fine once I have all the blocks completed and laid out.
So enough for today – back at it tomorrow. I expect the quilt top will be finished sometime on the weekend.
And then I have to start planning for a course I’m teaching in a couple of weeks – Industrial Techniques for the Home Sewer. My plan is to help people work their way through a relatively simple garment of their choosing while showing them some of the technique I’ve acquired over the years from various people I’ve taken classes with as well as other short-cuts I’ve figured out for myself.
I’m going to make myself a jacket from some kantha fabric I bought from Marcie Tilton a couple of years ago.
Kantha Fabric with Binding Fabric
I drafted a pattern from a jacket I bought at Gumps in San Francisco (looks like they’ve dropped the interesting clothing they had in the store) and made it from a kantha bedspread I bought online. I’m not sure whether I will line the jacket or not – quite likely not, but in that case I do need to bind all seams (I did pick up some faux suede to do just that). It’ll be a good example to illustrate details not in a pattern that make a garment more interesting and professional looking.
In the responses I got yesterday there was some confusion about how I cut the triangles for the second Delft quilt. For the inner triangles the rectangles are 8 1/4″ x 2 1/4″ – half cut on the diagonal in one direction, half cut on the opposite.
Inner Triangles – Half in one direction / half in the other
When you lay the two sets of triangles from the same fabric on top of one another they have the 90° angle in the same place. However, as you can see, were you to lay the dark set on the light set the 90° angle is on the opposite corner.
Here is the first set of triangles cut and placed upon the centre square (5 1/2″ x 5 1/2″) – they’re ready to be sewn. I’ve tentatively laid out the squares as they will appear in the quilt top – once the first triangles are attached I won’t have a lot of freedom to move these blocks around because I want adjacent blocks to be offset 90° from each other – the triangles determine that arrangement. In this array, I’ve cut all the light triangles to go in one direction, all the dark in the other.
Squares with Inner Triangles
When I have these assembled and trimmed to 7″ I will add the second triangle to each block – using a dark triangle against a light one, and a light triangle against a dark one.
Here are the rectangles cut for the second set of triangles – 9 1/2″ x 2 1/4″ – I haven’t cut them yet because I figured I’d mix up the inner and outer triangles which are very similar in size; they won’t be cut until the inner triangles are all attached. I’ve laid the rectangles out with the light fabrics face down – both sets of fabrics will be cut the same on the cutting board but because the light rectangles are face down, the diagonal cut will be 90° offset from the diagonal on the darks.
I have to think about this carefully before making these cuts because the light/dark cuts have to be opposite to the light/dark cuts for the first triangles! I think this presentation is correct for making that cut.
Rectangles For Outer Triangles
Now it’s time to begin sewing. If I’m organized about it, I should be able to chain piece the rows by adding one triangle to each square, then the second, etc.
I finished hand stitching the binding to the back of the quilt last evening. Usually, I would stitch the binding to the back, fold it to the front, pin, then use a decorative stitch to attach it to the front. But this time I wanted a 5/8″ binding but to use just 1/4″ of the sashing so it would balance on the outside with the rest of the quilt which meant when I trimmed the batting/backing, I left 3/8″ beyond the quilt top. To make sure I captured 1/4″ of the top under the binding, I had to align the sashing on the front, stitch 1/4″ from the top edge, then fold the binding to the back over the extended batting/backing. Even though I was careful pinning it in place, I knew top stitching on the back wasn’t going to give me a perfect stitching on the front, so I hand stitched the binding in place (not my favourite job).
Finished Quilt BackTes
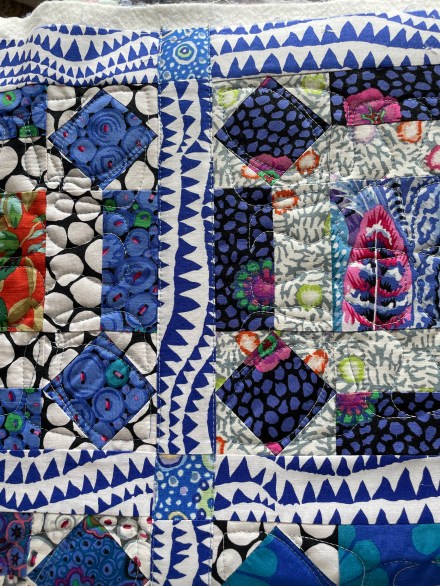
With this quilt now finished, I started playing with the leftover fabric:
I used scraps to construct two offset squares by attaching a double set of triangles to each side – the triangles in two sets – cut from rectangles on opposite diagonals. When attached this rotates the square to the left or to the right.
In these test blocks I was trying to sort out a couple of things – I wanted to see what placing the shark’s teeth as both the inside and the outside triangle would look like (I don’t like either and may not use that fabric in the block construction, maybe instead as a narrow sashing); I was also playing with the dimensions of the triangles which I haven’t quite worked out yet (I need the triangle to be cropped leaving 1/4″ in the finished square so the next seam brings it to a point. Mine aren’t yet quite long enough – I have to redraft the triangles and try another pair of test blocks.
I have laid out my fabric leftovers in three piles – light/medium/dark. I intend making a 5 x 7 block array which means I will need 35 centre squares. Gathering No Moss used the medium fabrics for the centres and I may do the same here which will free up the lights/darks for the inner and outer triangles (17 blocks rotating to the right, 18 blocks rotating to the left). I still have to decide whether all left rotating blocks will be dark inner/light outer triangles, all right rotating light inner/dark outer, or if I will distribute lights and darks more or less randomly!
I finished quilting the 30 blocks; next the sashing. I figured I had two options: edge stitching or stitching-in-the-ditch. I did a bit of both knowing I was going to have to take out whichever one I didn’t like.
Quilting The Sashing
On the left is the edge stitching (on the vertical sashing), on the right stitching-in-the ditch. The difference is subtle but I prefer the stitching-in-the-ditch. So I started taking out the edge stitching. Thank goodness I only did one horizontal row and a bit of the end sashing. That’s a job for working in front of the TV tonight.
I’m quitting for now but I will carry on quilting the sashing tomorrow.
I started quilting yesterday – did 6 blocks; another 19 blocks today – 25 blocks done – 5 remain.
A Quilted Block
I’d set up a single-run embroidery (single-run = the design is stitched once) to fit the block within the sashing, coming close to the edges but leaving a small amount of space so when I do something with the sashing (either stitching-in-the-ditch or edge stitching beside the seams) I don’t run into the embroidery.
Tomorrow’s decision will be what to do with the sashing. I’ve thought of other options besides the two I’ve mentioned above like under stitching all the rows of shark’s teeth but I think that would push me past my boredom threshold! And I can’t see a decorative stitch down the middle of the sashing strips – would just clash with the fabric detail. So it’s either stitching-in-the-ditch or edge stitching. I might just try a bit of edge stitching to see what it looks like, being prepared to take it out if I don’t like it! That’s for tomorrow.