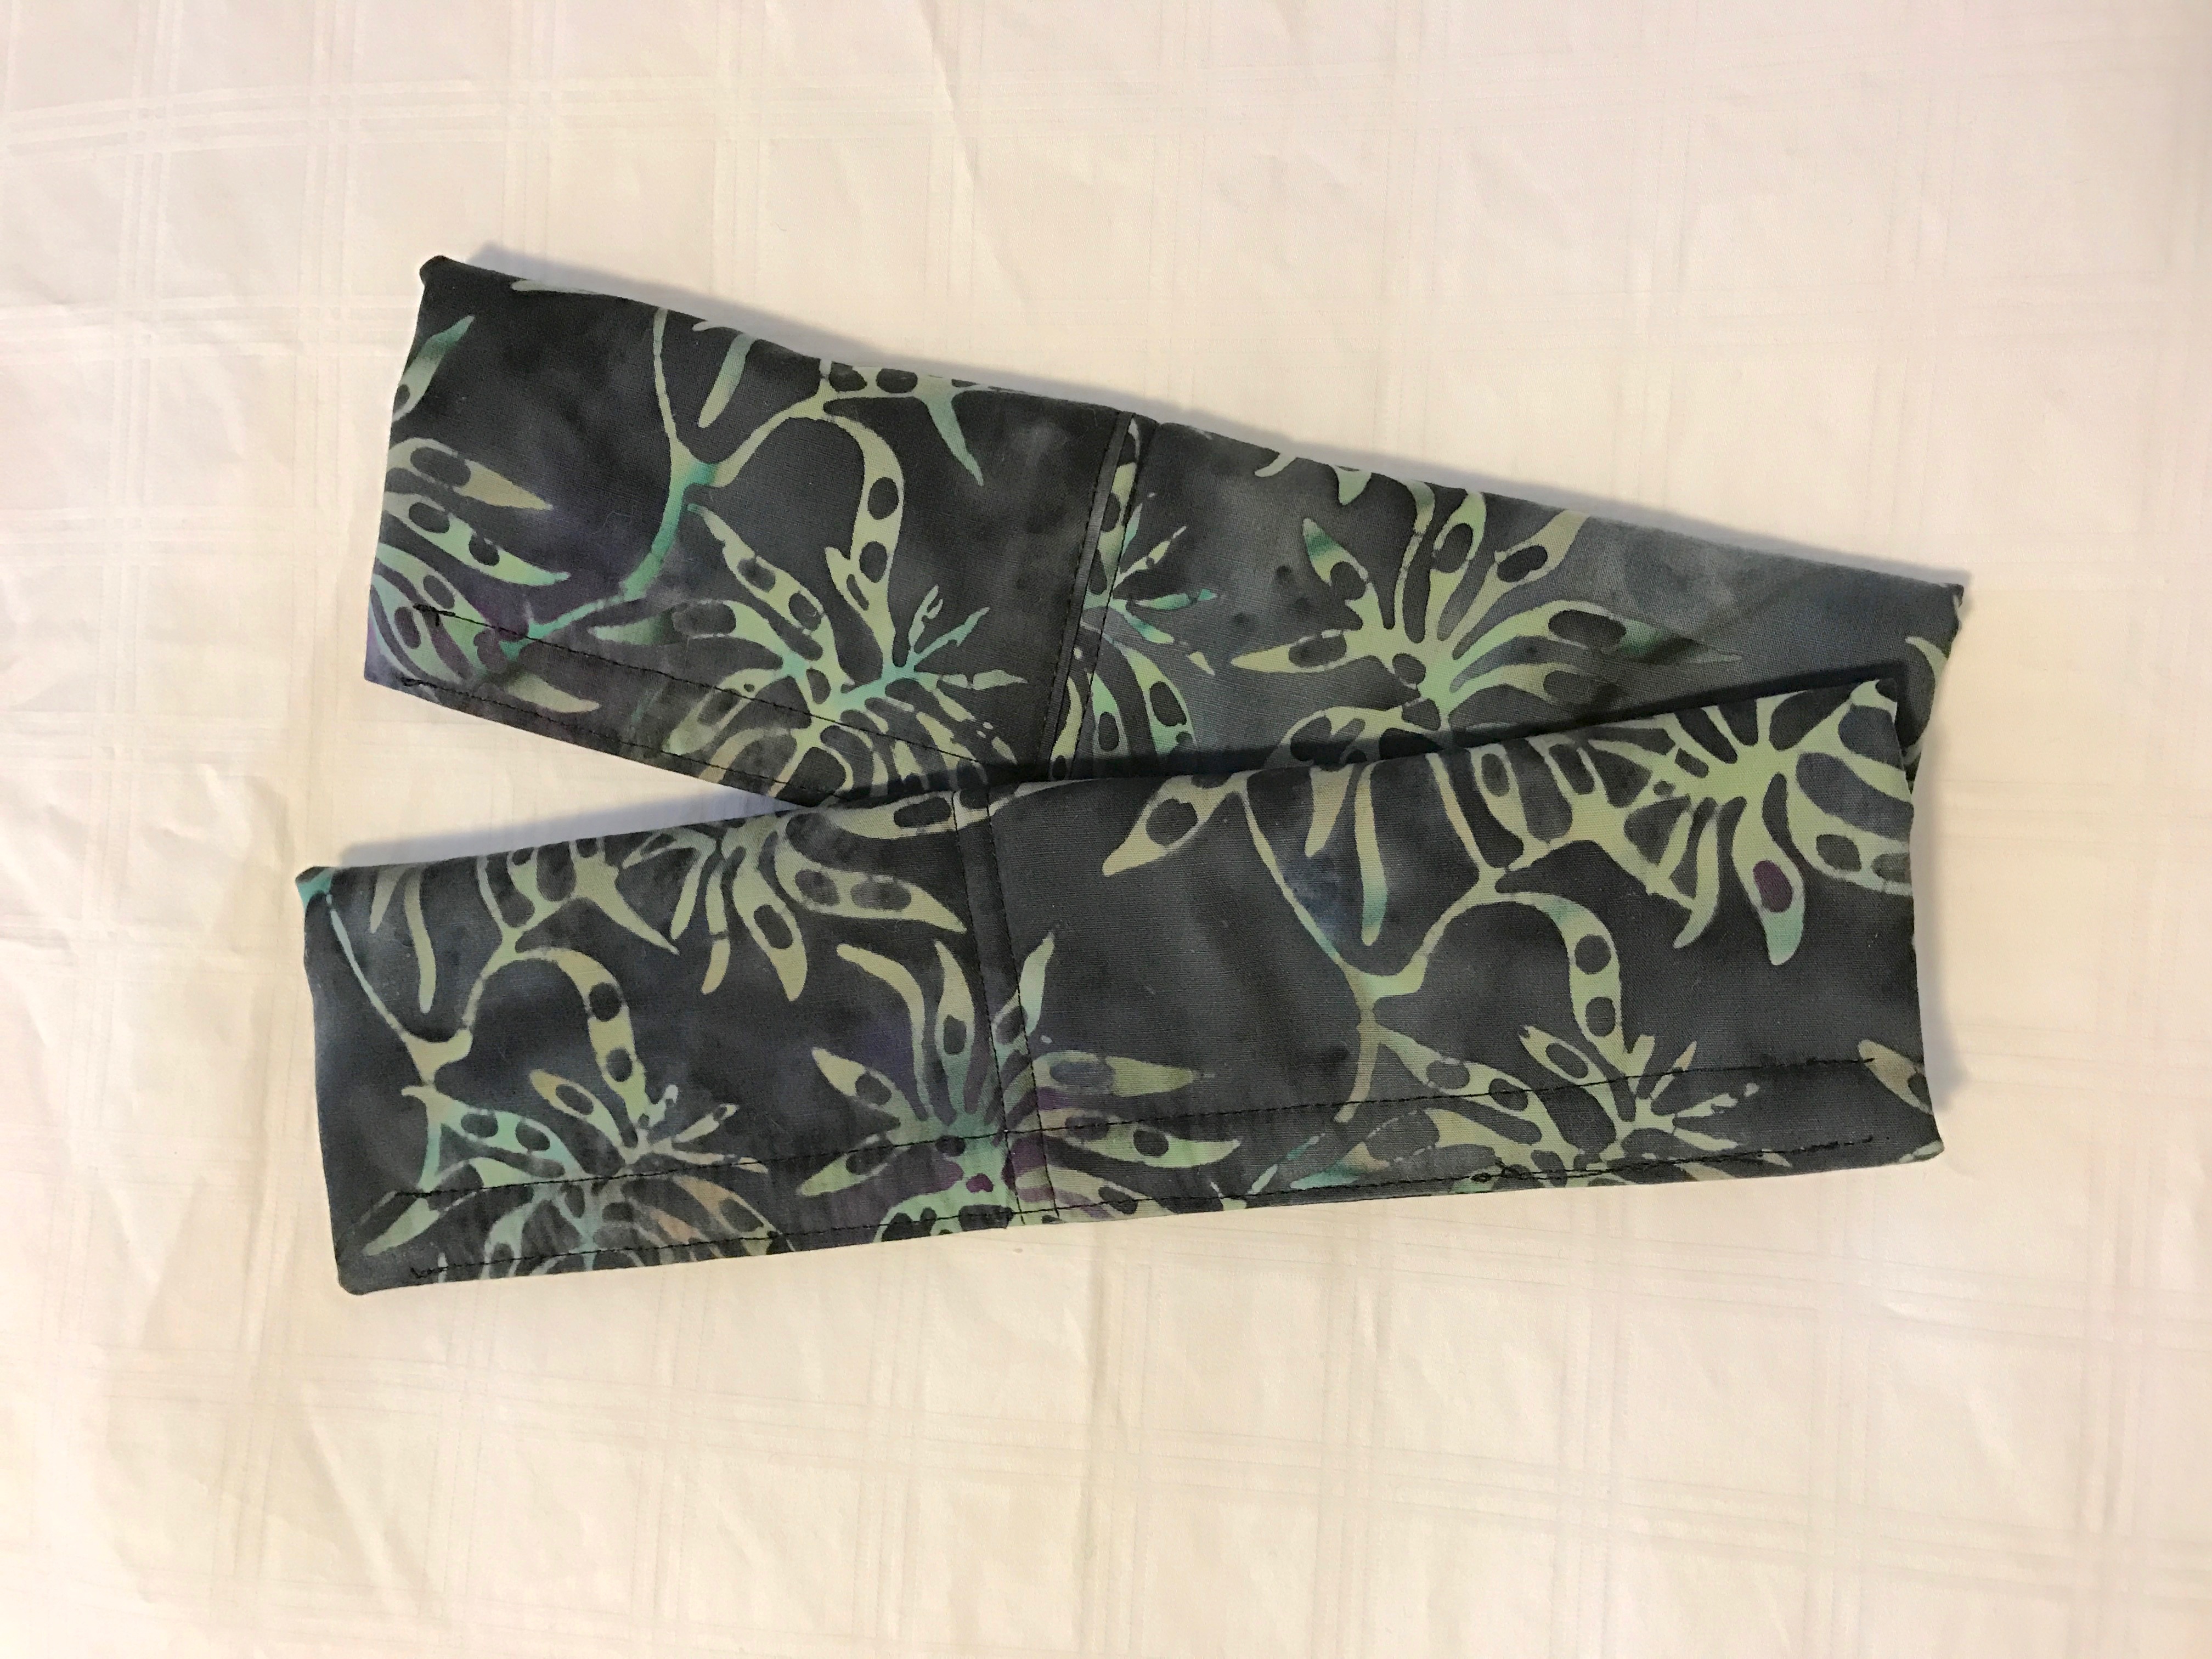
Seat Belt Covers

img_8224

Seat Belt Covers

Just finished two sets of seat belt covers. I’ve been meaning to make myself a new set. The impetus was a request from a friend who has a pacemaker and finds the seat belts in his car uncomfortable. I made him a set shortly after he’d had the pacemaker implanted. They’ve worn out. So I’d put a note on my calendar to make him a new set today. I made a set for myself as well.

Materials for one seat belt cover: a piece of fabric 24″ x 7.5″, a double cut of batting 11″ x 6″, 1 piece of hooks velcro 3/8″ x 10.5″, one piece of loops velcro 3/8″ x 10.5″.

Construction: I lay the batting in the middle of the fabric, fold down one long end over the batting, fold up the second long end to overlap the first (I try to use the selvage on one end – that means I don’t have to worry about folding under or fraying – if you don’t have a selvage, fold under the raw edge of the top fabric before stitching). Stitch close to the edge, then a second row of stitching 3/16″ away from the first. Next press the seat belt cover, turn in the side edges (folding in the end corners), press. Finally, careful lay one of the velcro pieces along the folded edge (over the folded-in fabric), stitch as close to the velcro edge as you can, then along the inner edge of the velcro. Add the second strip of velcro to the other side making sure both pieces of velcro are on the same side of the cover. Fold seat belt cover in half using velcro to close it. The cover will just slip over the seat belt – I use them with the folded edge to my neck, open/velcro edge away from me.

img_8225

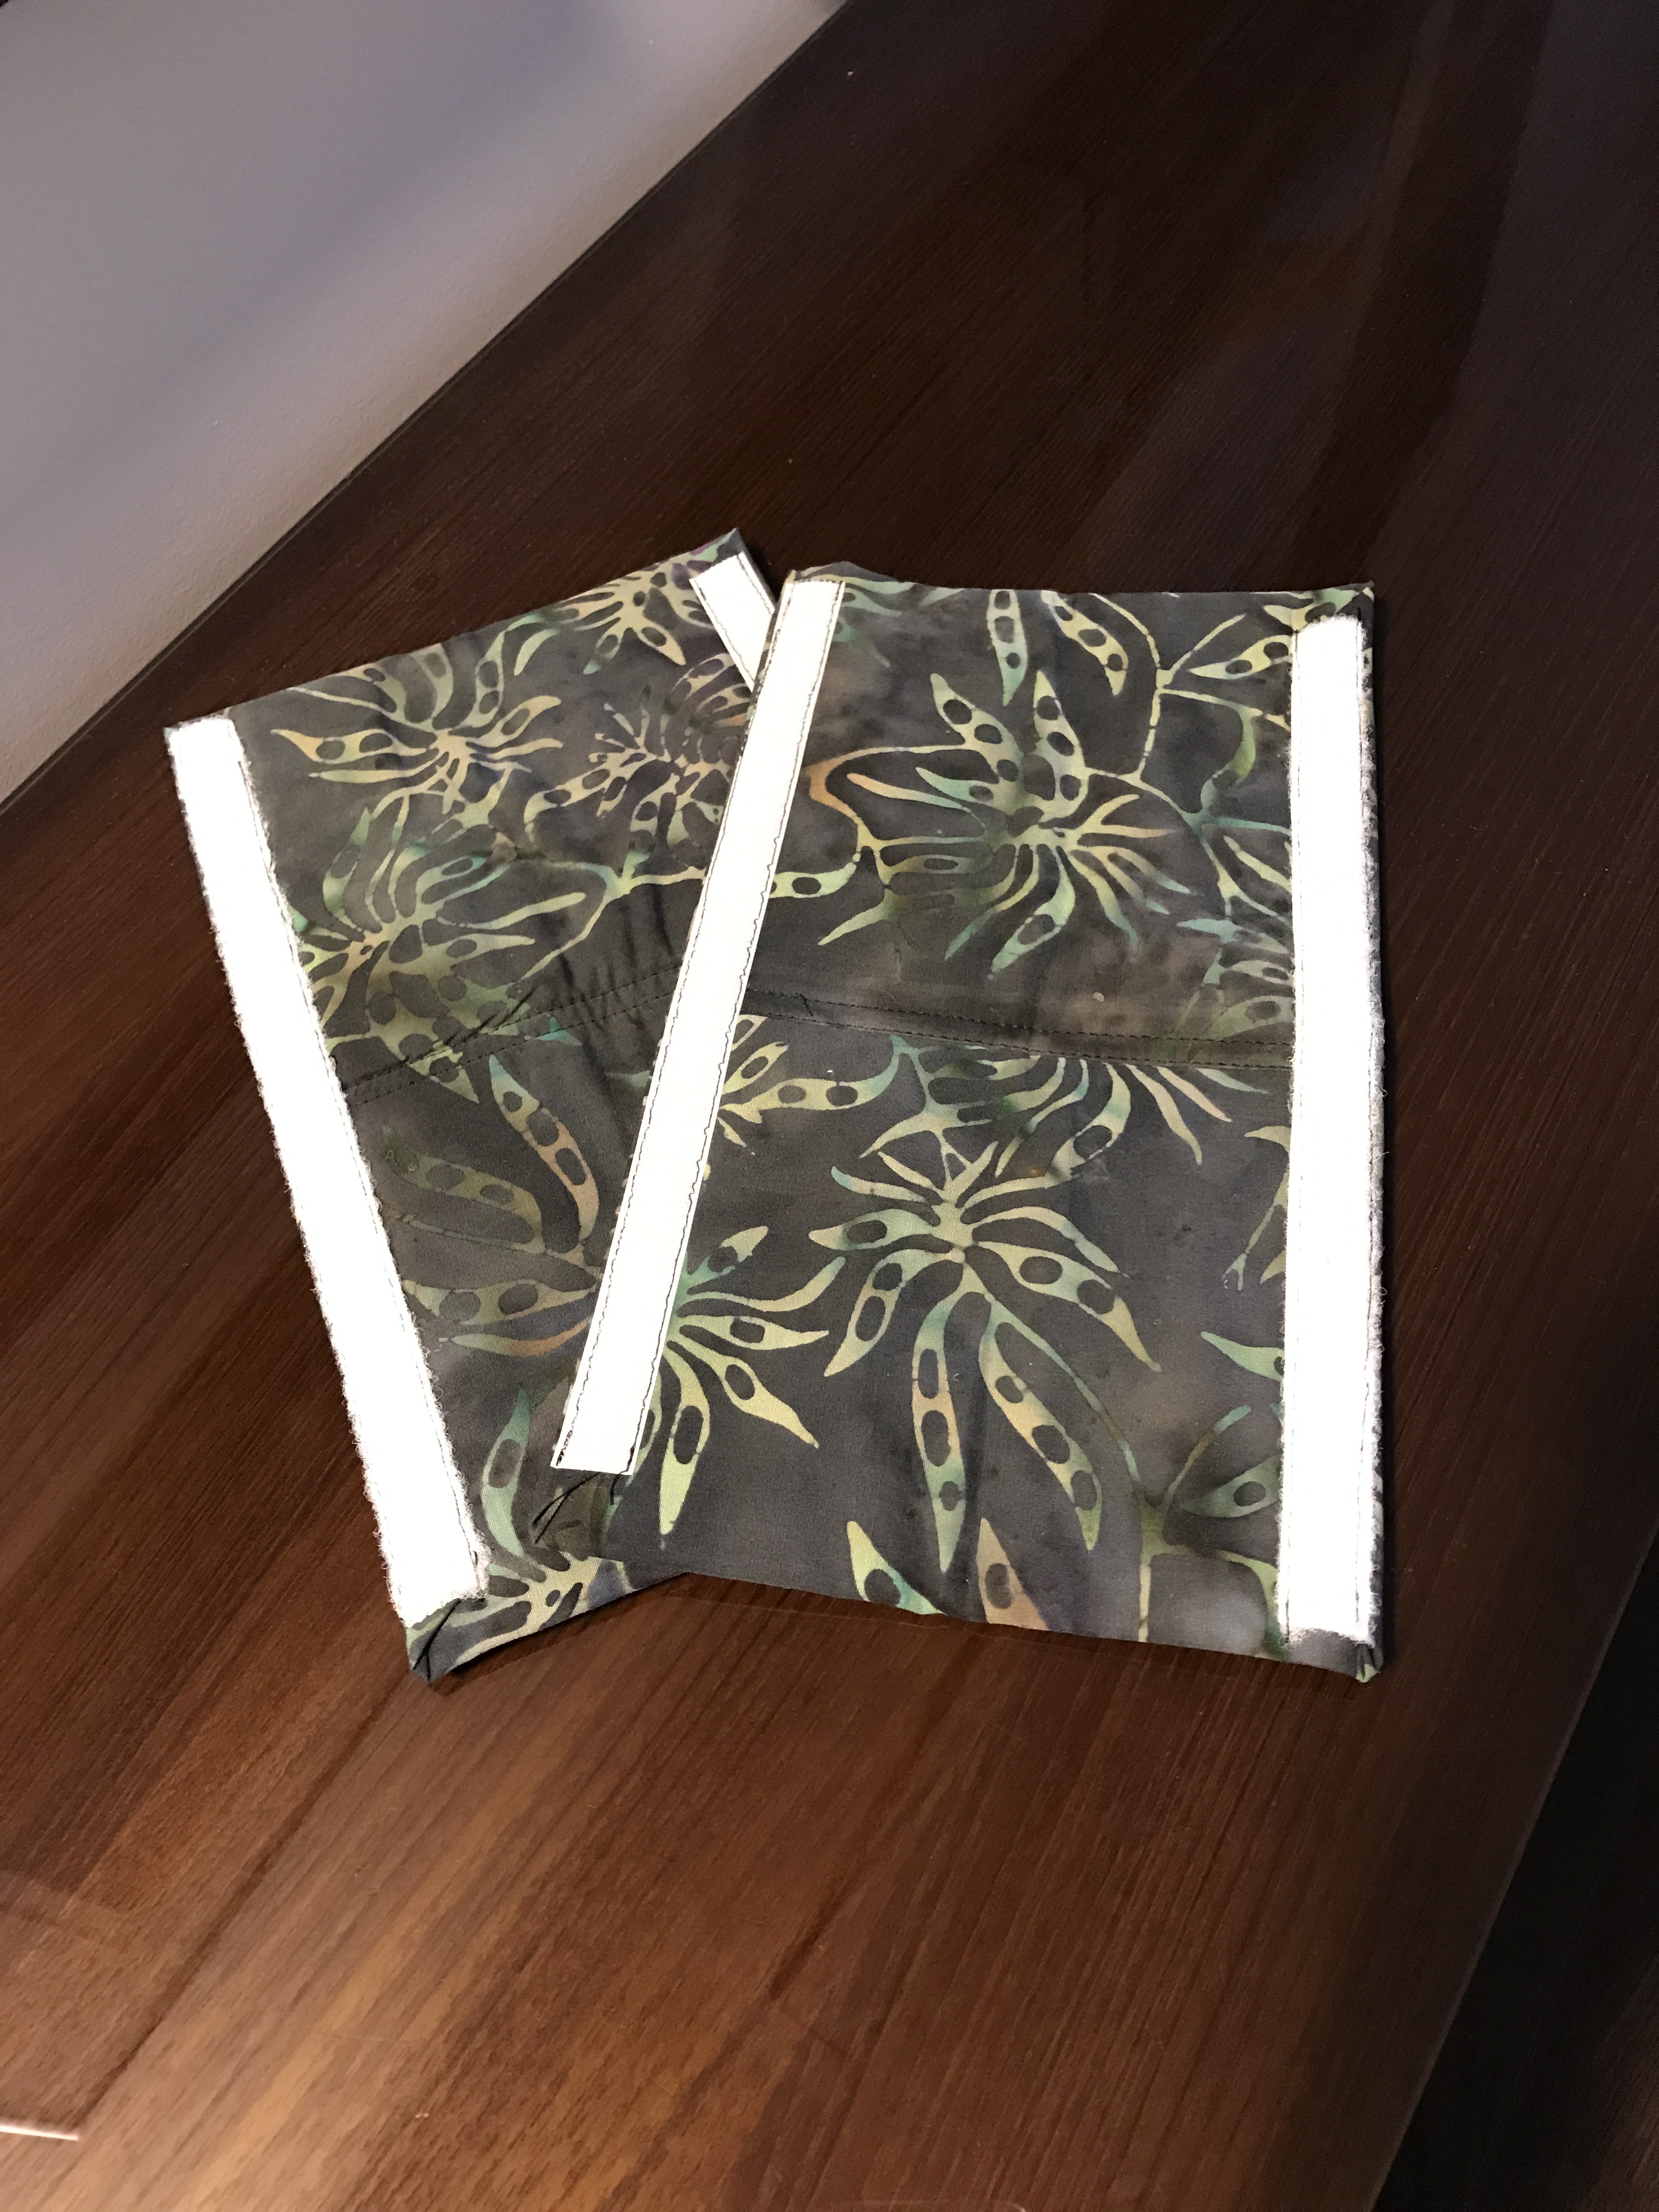
Inside of Seat Belt Covers

They’re great for short people who find seat belts uncomfortable, particularly in the summer when I’m not wearing a heavy coat. I still use them during the winter as well. Just convenient to have them in the car. I also have one on the passenger side. They’re particularly useful for children using booster seats who also find seat belts cut their necks.

My original pair came as a gift from Hawaii at least 30 years ago. I’ve continued making them as gifts and for myself ever since. The fabric doesn’t have to colourful, a closely woven batik works well – batik has quite a bit of body which makes the seat belt cover a bit stiffer and the fabric doesn’t wear as quickly as a softer cotton.

Bendy Bag…

Bendy Bag

Bendy Bag

I know, I said I was finished making bags but there was just one more I wanted to try – Lazy Girl’s Bendy Bag. I found images of it while looking for something to make for Hillary and played around with paper folding and almost got it figured out on my own – what I missed were the cut corners which you fold and seam straight across at the zipper tab end to get the blunt end at the front of the bag. I gave up, rather than mess around further and bought the instructions. I was right about how to get the diagonal seam and the zipper application. I had to try one this morning so I could put this bag making to rest!

There I’m done (really). The last bag for a while. Now, I can see each triangular piece I cut from my rectangle on each side to get the diagonal seams on this bag are large enough to make a pod… I’ll save them for another time.

Season’s Greetings 2016

Christmas Eve and all’s quiet here. No cooking or baking left to be done, no last minute present wrapping, none of the rush that most folks deal with on the night before Christmas. I thought this would be a good time to take a moment to send my best wishes for a relaxed and pleasant holiday season and all the best for a happy and healthy new year.

img_6993

Driftwood Sculpture Draped with Christmas Lights

Sweet Kugel – 2016

Sweet Kugel

Sweet Kugel

That time of year again.Two days before Christmas – making the sweet kugel for Christmas dinner at Marlene’s. Can’t make just one, my sister Donna loves this kugel so one for her (for her freezer); and one for a friend also in time for Christmas dinner.

I described in detail last year how I make it – Sweet Kugel – so I won’t go into the details again. If you want to learn how it’s done click on the link.

They’ve been in the oven about 20 minutes and already the apartment is smelling wonderful!

More Variations On A Theme

img_8214

I was curious to see if I could apply the half-zipper technique to my standard zippered bag construction – that meant figuring out a way to have the seams concealed between outer layer and lining. Turns out to be quite easy.

Instead of cutting two sides 6″ x 8″ I cut one piece 6″ x 16″ – I sewed the zipper to one long edge, added lining. Here’s the crucial difference – I didn’t top stitch the zipper, instead I steam pressed the zipper making sure both lining and outside were well pressed away from zipper edge. That allowed me to add the slide, fold the bag in half, separate the lining from the outside, sew the remaining side seam (from lining to outside with little tab inserted near the zipper) making sure zipper protruded on the lining side as I sewed. Next I made sure to open the zipper. Finally, I stitched the outside bottom, turned bag right side out pulling lining beyond the zipper, folded lining bottom seam allowance under and top stitched the lining bottom, pushed lining back inside bag, pressed.

I had a zippered bag with a “loop” zipper, and concealed seams.

I made six from four fat quarters which I had just bought so now I know exactly what my materials cost:

The fabric to make six 6″ x 8″ bags cost me $12; batting – I used large pieces leftover from a quilt (batting costs $26/m so say I used 1/16 m ) – $1.65, thread (can’t calculate), zipper (I buy zipper tape and slides from The Zipper Lady @ $36 for six yards (that includes exchange as well as shipping and handling), $10 for 40 slides (25¢/slide) – I get two bags from 1/2 yard so zipper costs me  $10.50/six bags (a bit less than if I’d bought zippers individually at the fabric store). Total for the materials: $25.65 for six bags = $4.27/bag. Labour: It took me 2 hr to make six bags – time per bag, ~20 min (that’s pressing the fabric, cutting fabric and zippers, sewing it all together, pressing again). At $20/h labour works out to $6.65/bag. Total costs: $4.27 + $6.65 = $10.92. Profit – 20% of costs = $2.19. Total cost of one 6″ x 8″ bag: $13.12!

People tell me I should sell them at the craft market – I’d be selling the bags at a loss if I charged $10/bag!

So even a small zippered bag is a gift of love.

That’s it for bag-making for now!

Variations On A Theme

img_8212

Experiments

It’s not a big stretch from a “sweetpea pod” to a “pyramid pod” – the pyramid is based on a similar idea – instead of sewing the two side seams in the same direction as I would for a flat bag, you sew one side seam (closed zipper end) with the zipper in the middle and the second (the open end) with the zipper at one end. I made this pyramid pod (on the left) with a double zipper tape but I still have to experiment to figure out how to construct it with a single zipper tape (the way I did the sweetpea pods).

The two bags on the right were sewn with a single zipper tape. To use this technique (with the zipper top stitched) I had to finished the seams within the bag, rather than concealed by the lining. However, if I don’t top stitch the zipper, it should be possible to make the bag with concealed seams – have to try that next.

Pods

Very early this morning (couldn’t get back to sleep), I was looking online for ideas for a Christmas gift for a fourteen year old girl. Last year I knit her a scarf, year before I made a small shoulder bag. I needed something for Christmas day to take to dinner at her grandmother’s house. I came across this picture of Lazy Girl Designs “Sweetpea Pods.” I tracked it down to a Craftsy pattern:

pod

What caught my attention was the way the zipper was attached – a longish zipper is separated and one half is applied to the zipper edge and the slide is then attached to either end to create a zipper that closes from half of a zipper tape. Clever idea!

Given I didn’t have time to puzzle out how the pods were constructed, I did something I rarely do – I actually bought the pattern at 7:00 am this morning, downloaded it, then proceeded to try making one.

My first attempt was a disaster – in large part because I didn’t fuse the outer fabric to the batting – each time I tried sewing the side seams I kept missing the outer fabric on one side. My pod ended up lop sided and quite a bit smaller than intended.

I persevered. My second pod at least looked somewhat like the pods in the pattern picture, but I still needed to refine my sewing.

Pods 3 & 4, however, turned out just fine!

img_8210

Tomorrow I have to buy some velvet ribbon and hair elastics to put in the pods so I can wrap them as a gift.

This zipper idea is one I need to try on one of my usual zippered bags – it could be a neat way of zipping them up!

Boring Socks II

Adding interest

I bought four balls of reasonably boring variegated yarn during the summer. The challenge has been to come up with ideas to liven up the color contrasts. In this case, what works is the single row of turquoise near the top of the sock and again in the instep. The rows of burgundy and rust add very little contrast. 

So the next pair in shades of blues and greys will want something that pops out – need to think about a bright green or a red.

Sleeping On It…

img_8207

Partially quilted light areas

Never ceases to amaze me how my brain keeps working while I sleep and when I wake I have a solution to the problem I walked away from (temporarily). I trust my sleeping brain implicitly – it always comes through; there’s always a solution the next day. That was how I worked when I was writing – stop when I got to a place where I wasn’t sure how to proceed – next day, ideas were just there! Always! Same with the quilting – walk away from a decision point, come back next day and there’s a way to work things out.

Last night the problem I needed to solve was how to quilt the light diagonal spaces in the quilt because the fabric expanse was too big (4″ x 20″) to lay flat – I needed to fill the space with something. I thought about just straight line quilting but that seemed too boring. I woke this morning thinking about stippling and knew how to set that up. I traced the light diagonal shape onto paper, sketched in some stippling, scanned the drawing, opened the image in Photoshop and scaled it to the right size, saved the image, imported it as background into my TruEmbroidery Create software and created a design based on my sketch (had to do some adjusting to balance the fill). I did a test run to see  how the stippling worked out – it was perfect! Just the right size for the space.

So far, I’ve quilted in eight of the spaces – I have four large ones, four light triangles and eight smaller diagonal pieces to go – that’s three different embroideries, in all, to fill all the different shaped light areas. I’ll probably work at this some more this afternoon, and it will still take at least another day, if not two, to complete the fill work.

Cost of table topper?

Overhead: $0 – I won’t cost the electricity to run the machines, the iron, the lighting in the studio, rent for the studio space.

Supplies: $100 – the backing fabric alone cost me $40 (cotton fabric these days is ~ $20/m) – then there’s the four half metres of red/green printed fabrics, plus the metre of dotted cream fabric – so $100 is an estimate, my materials may have cost a bit more and I’m not counting in thread or machine needles.

Batting: $30 – batting is $26/m plus tax – the cotton needle punched batting I buy is 90″ wide so I needed a metre.

Labour: $20/hr – I’m a skilled artisan, my time is worth more than minimum wage! My education consulting hourly rate used to be anywhere from $100 – $200/hr, my web design hourly rate is $50/hr. I should be charging the same kind of rate for the sewing/quilting but let’s go with $20.

I will have put in at least 15 hours (probably more over 7-8 days) to make this Christmas table topper so labour = $300.

Total cost for the topper were I selling it: $430.

However, the topper is a gift for a long-time friend; it’s a labour of love.

Christmas Table Topper

img_8206

Table Topper

I’ve worked on this project all day – started quite early piecing all the small blocks together. Then I discovered I hadn’t bought enough backing fabric so I had to go out (just as the storm was starting) to pick up 2.1 m of backing fabric to be able to cover the length (81″) in one piece.

I’ve done about half of the stitching in the ditch. I got bored, so I set up an embroidery design to quilt the eight small squares and the “diamonds” in the centre. That’s now done. I’ve stitched around the outer edge 2″ from the edge to establish a border. I chose not to bind the project, instead, again I did a pillow case finish with the back.

Because the edges of all the blocks are cut on the bias, I’m having trouble getting every section of the topper to lay flat – it’s most obvious in the light diagonal sections – the way to solve that, of course, is to embroider/quilt each section and I may actually do that tomorrow. It isn’t quite as simple as it sounds because each of the long light diagonals is 17″ – I don’t have a hoop large enough to do that. so each of those sections would have to be done as two embroideries. Hooping each of those areas, however, would stretch the fabric flat and the stitching would hold the fullness in place so the topper would look flatter. I’m going to sleep on it!

Finished dimensions: 35″ x 81″ (to fit a 34″ x 80″ table with both extensions open).