Blue-Grey Socks

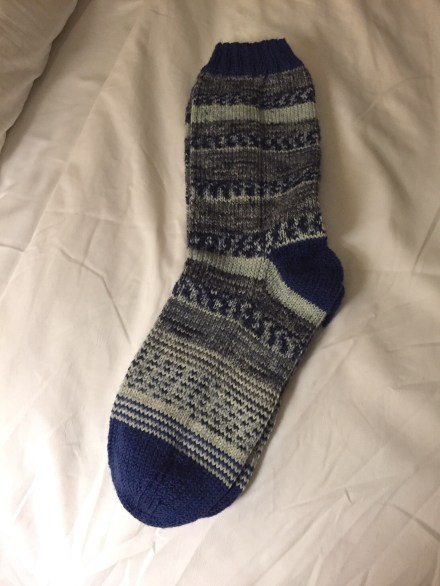
I knew before I began the patterned yarn wouldn’t be enough to do two socks without some accommodation. So I only knit 75 rows for the leg, rather than my usual 85 which would let me extend the pattern further into the foot than otherwise. Then I introduced a light grey to intersperse as alternate rows just past the instep to get me as far into the foot as I could possibly go. When the patterned yarn ended I knit a couple rows of grey then brought in the dark blue for the toe, knit five rows and toed off.

A pretty good looking pair of socks.

Mr. Piggy

IMG_5136

For the last couple of months I’ve been working with an eleven year-old on spelling. He reads well, but doesn’t connect what he knows visually about words to how they’re written. To add to his problem, while he has no difficulty speaking and understanding spoken language, he can’t for the life of him break spoken words into component sounds or connect spoken word elements with their letter representations. So we’ve been meeting weekly to work on writing, and spelling, and problem solving in an effort to help him develop strategies for learning and remembering how words are spelled.

Today was our last session before summer. His mom had invited me to lunch before our lesson. When I arrived at noon I found Mr. Piggy at the door entryway waiting for someone to let him in. Mr. Piggy, a soft rubber toy that goes “oink”, belongs to Max – a large black Lab, very friendly and very fond of Mr. Piggy, his favourite toy! Mr. Piggy was placed so carefully in front of the door I was sure one of the kids had put him there – neither admitted to it, however – “Oh, Max probably just left Mr. Piggy there.”

I had lunch, we’d had our session and I was getting ready to depart – I got up from the table and there on the kitchen floor beside my chair, looking right at me, was Mr. Piggy:

IMG_5135

I didn’t see Max deposit Mr. Piggy there – I know neither of the children did it. I wondered whether Max was trying to tell me something…

Stacks / Galaxy Quilt

IMG_5121

The idea for this quilt came from a pinterest photo a friend sent me a while back. I liked the idea of just creating blocks from strips of variable length with a background fabric. I had a jellyroll of blue batiks and lots of scraps in blues/greens. I’m guessing the pinterest original likely used 2 1/2″ strips but that would yield blocks too large for me to embroider in the hoop, so I reduced the strip width to 2″ (which meant cutting 1/2″ from the jellyroll strips) and created 9 1/2″ blocks of six strips each.

It took a while to assemble the blocks then I laid them out. I knew from the outset I’d place the strips horizontally in blocks assembled as columns (7 blocks x 5 columns = 35 blocks). I auditioned the blocks on my office carpeted floor and decided to reverse direction of two blocks which meant a narrow (1/2″) background strip to set them off from those in the adjacent column. And narrow borders so the binding would be separated from the batiks.

IMG_5122

Once the top was done, I used leftover strips to set up an 8 1/2″ wide strip the length of the quilt, inserted it into the backing fabric (so I’d have enough width for the quilt). I pinned the quilt together, stitched in the ditch (blocks that were 4 strips wide so I’d be able to quilt them in the hoop).

To quilt the whole thing, I adapted a long-arm quilting design and embroidered it in each section. Once done I added the binding (a 1/2 yd of Michael Miller fabric I bought at Britex in San Francisco for this purpose).

The embroidery design in this instance had tie-ons and tie-offs which I left (usually I remove them and draw the threads into the quilt when each block is finished). That left me on the reverse of the quilt with obvious small white clumps of thread at each tie-on/tie-off! So I did what I’ve done before – took a permanent marker in a colour that blended with the backing fabric and coloured the knots. Worked like a charm – the knots became invisible – until I turned the quilt over and discovered small grey-blue dots all over the front of the quilt!

PERMANENT marker, remember! I tried a bunch of different solvents on scraps of white fabric – bleach, soap, bleach & soap, nail polish remover, rubbing alcohol. The only solvent I didn’t try was hair spray only because I had none in the house. It was obvious that ink was there to stay.

So how was I going to salvage the quilt? I woke up this morning with an idea – smallish circles in yellow/orange hues appliquéd over each ink mark. I had some Heat ‘n Bond Easy Print Transfer Sheets so I opened Photoshop, set up a page of circles (in 3 sizes), printed two sheets, rough cut the circles, fused the transfer to the back of scraps of fabric, fussy cut the circles, then positioned them over the ink marks. I added quite a few more circles in random locations to balance the arrangement of the necessary yellow & orange dots.

IMG_5127I’ve renamed the quilt “Galaxy” – because it kind of looks like a constellation of suns. I’ve already fused the circles to the quilt front. All that remains is to stitch around the edge of each circle with some kind of decorative stitch. I’ll probably use rayon embroidery thread on the top and the same variegated Sulky I used for quilting the back in the bobbin.

So one quilt salvaged!

Jun 22/15 Update

I had to create a second set of circles using Heat ‘n Bond Lite because the first set didn’t fuse well to the quilt top – another couple of hours precision work. I carefully removed the first set of circles, fused the second set. It took the better part of two days to stitch around all 42 circles!

I used a variegated yellow Aurifil 50 on top and an olive green bobbin embroidery thread on the bottom (which disappears in the batik on the back). I had to stitch VERY slowly to outline each circle precisely.

From a distance the appliqué stitching disappears!
A Happy Face

A large group of us “older” women were out to dinner this evening. Some of the meals left something to be desired. The gal who organized our semi-annual get together mentioned the complaints to our server who came back to our table with this “happy” face!

A nice gesture!

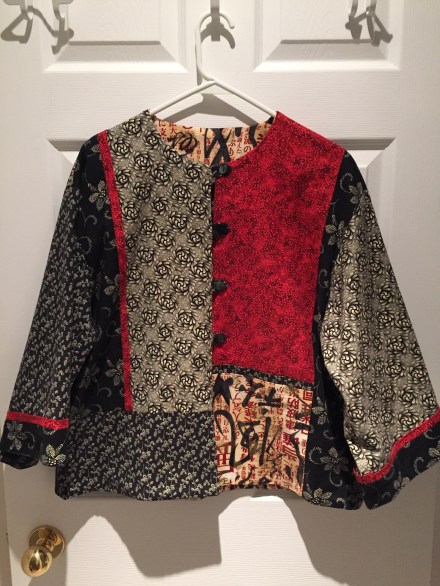
Kimono Jacket

Made this jacket a couple of years ago and while I like it, I don’t wear it often and yesterday I figured out why. I was wearing the jacket and didn’t want to have to carry a handbag but the jacket had no pockets. When I made it I thought about pockets on the front but couldn’t figure out how to apply them to the asymmetric front panels.

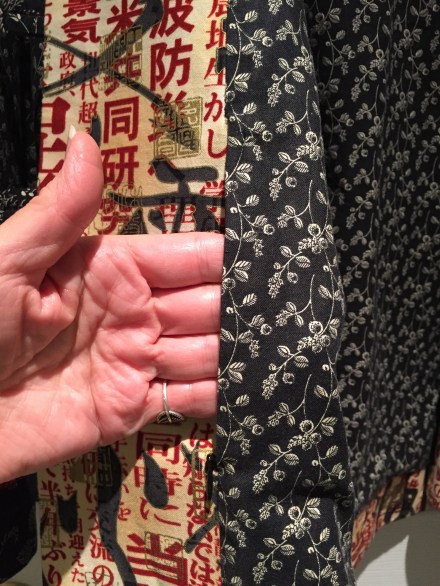
Having put hidden zippered pockets on the inside of the jean jackets I realized I could add zippered pockets to the reversible side of this jacket!

The reverse side had a wide binding – a perfect place to insert pockets:

So today I picked up a couple of invisible zippers, used a piece of black silk leftover from the silk pants I made to take to San Francisco, opened the seam at the bottom in the back so I could get at the binding/lining seams on the front panels, and in short order I had quite large hidden zippered pockets on each side!

Definitely makes this a much more useful garment.

Crab Apple Trees


The flowering crab apple trees in our cul de sac are in full bloom. Haven’t seen them this full of flowers for the last several years – thought the trees were dying (they’re more than 40 years old). I wonder whether the harsh winter could be responsible for this lush display. It’ll last another few days and then the flowers will drop. Haven’t seen much in the way of pollinating Insects – I wonder whether there will be any fruit at all this year.

Latest Socks


For some reason, this pair seemed to go slowly – other pursuits seemed to take precidence. However, they are done. They turned out nicely. 

In the stash, awaiting a good home.

This morning I had a visit with my massage therapist – he was wearing the socks I gave him last fall (a definite indication they’re appreciated). Could be time to knit him another pair!

Chocolate Zucchini Bread

I have company coming to “tea” tomorrow afternoon and I was looking for something to serve them that I could eat (gluten, cane sugar, dairy free). Came across this recipe on Pinterest:

http://elanaspantry.com/paleo-chocolate-zucchini-bread/

paleo-chocolate-zucchini-bread-recipeI just gave it a try (should have taken a photo but didn’t before I cut the loaf and put it in the fridge! This photo is from Elena’s Pantry recipe).

Recipe calls for grated zucchini, I tried buying some at the grocery store near my home but there were none – I substituted apple sauce instead which worked well. I also used maple syrup (instead of honey) and real vanilla instead of stevia.

I should have baked the loaf another 5-8 minutes, while cooked on the bottom it was still a bit too moist and broke apart when I removed the loaf from the pan.

I was surprised at how light and moist the cake was. Although it’s in chunks I think I’ll serve it with whipped coconut cream on top. It’s surprisingly tasty! Definitely worth a second try.