On Sunday I took down the Craig Gallery Exhibit (can’t believe the three weeks went by that fast). I was collecting the tags on each item when I discovered a red dot on one of the quilts – SOLD! That was a surprise. From the start I wasn’t sure about pricing the quilts (and other pieces). Looks like I wasn’t out of the ball park after all.
Not only did I sell a quilt, I sold one of the wall art pieces, as well as two 6×6 floral pieces (one has been sold twice – a friend of my sister Donna wanted the same piece that another person had already bought; I wasn’t able to say “No” to her so I’m creating another; that’s actually three of the 6×6 pieces sold).
All in all, a good outcome for a show of this size, in a location like this. A lot of visitors dropped in, they all spent more time looking at the quilts and other fibre art pieces than usual, and all left with smiles. When I was in the gallery visiting with friends who’d come to see the exhibit, all sorts of people either eavesdropped on what I was explaining, or came over more overtly to join the conversation. Everybody I spoke to was very engaged and interested in how my art was constructed.
I was in Parrsboro hanging the first show today. It turned out the third woman who was supposed to be in the show with Colleen and me couldn’t make it, so Colleen and I shared the space between us.
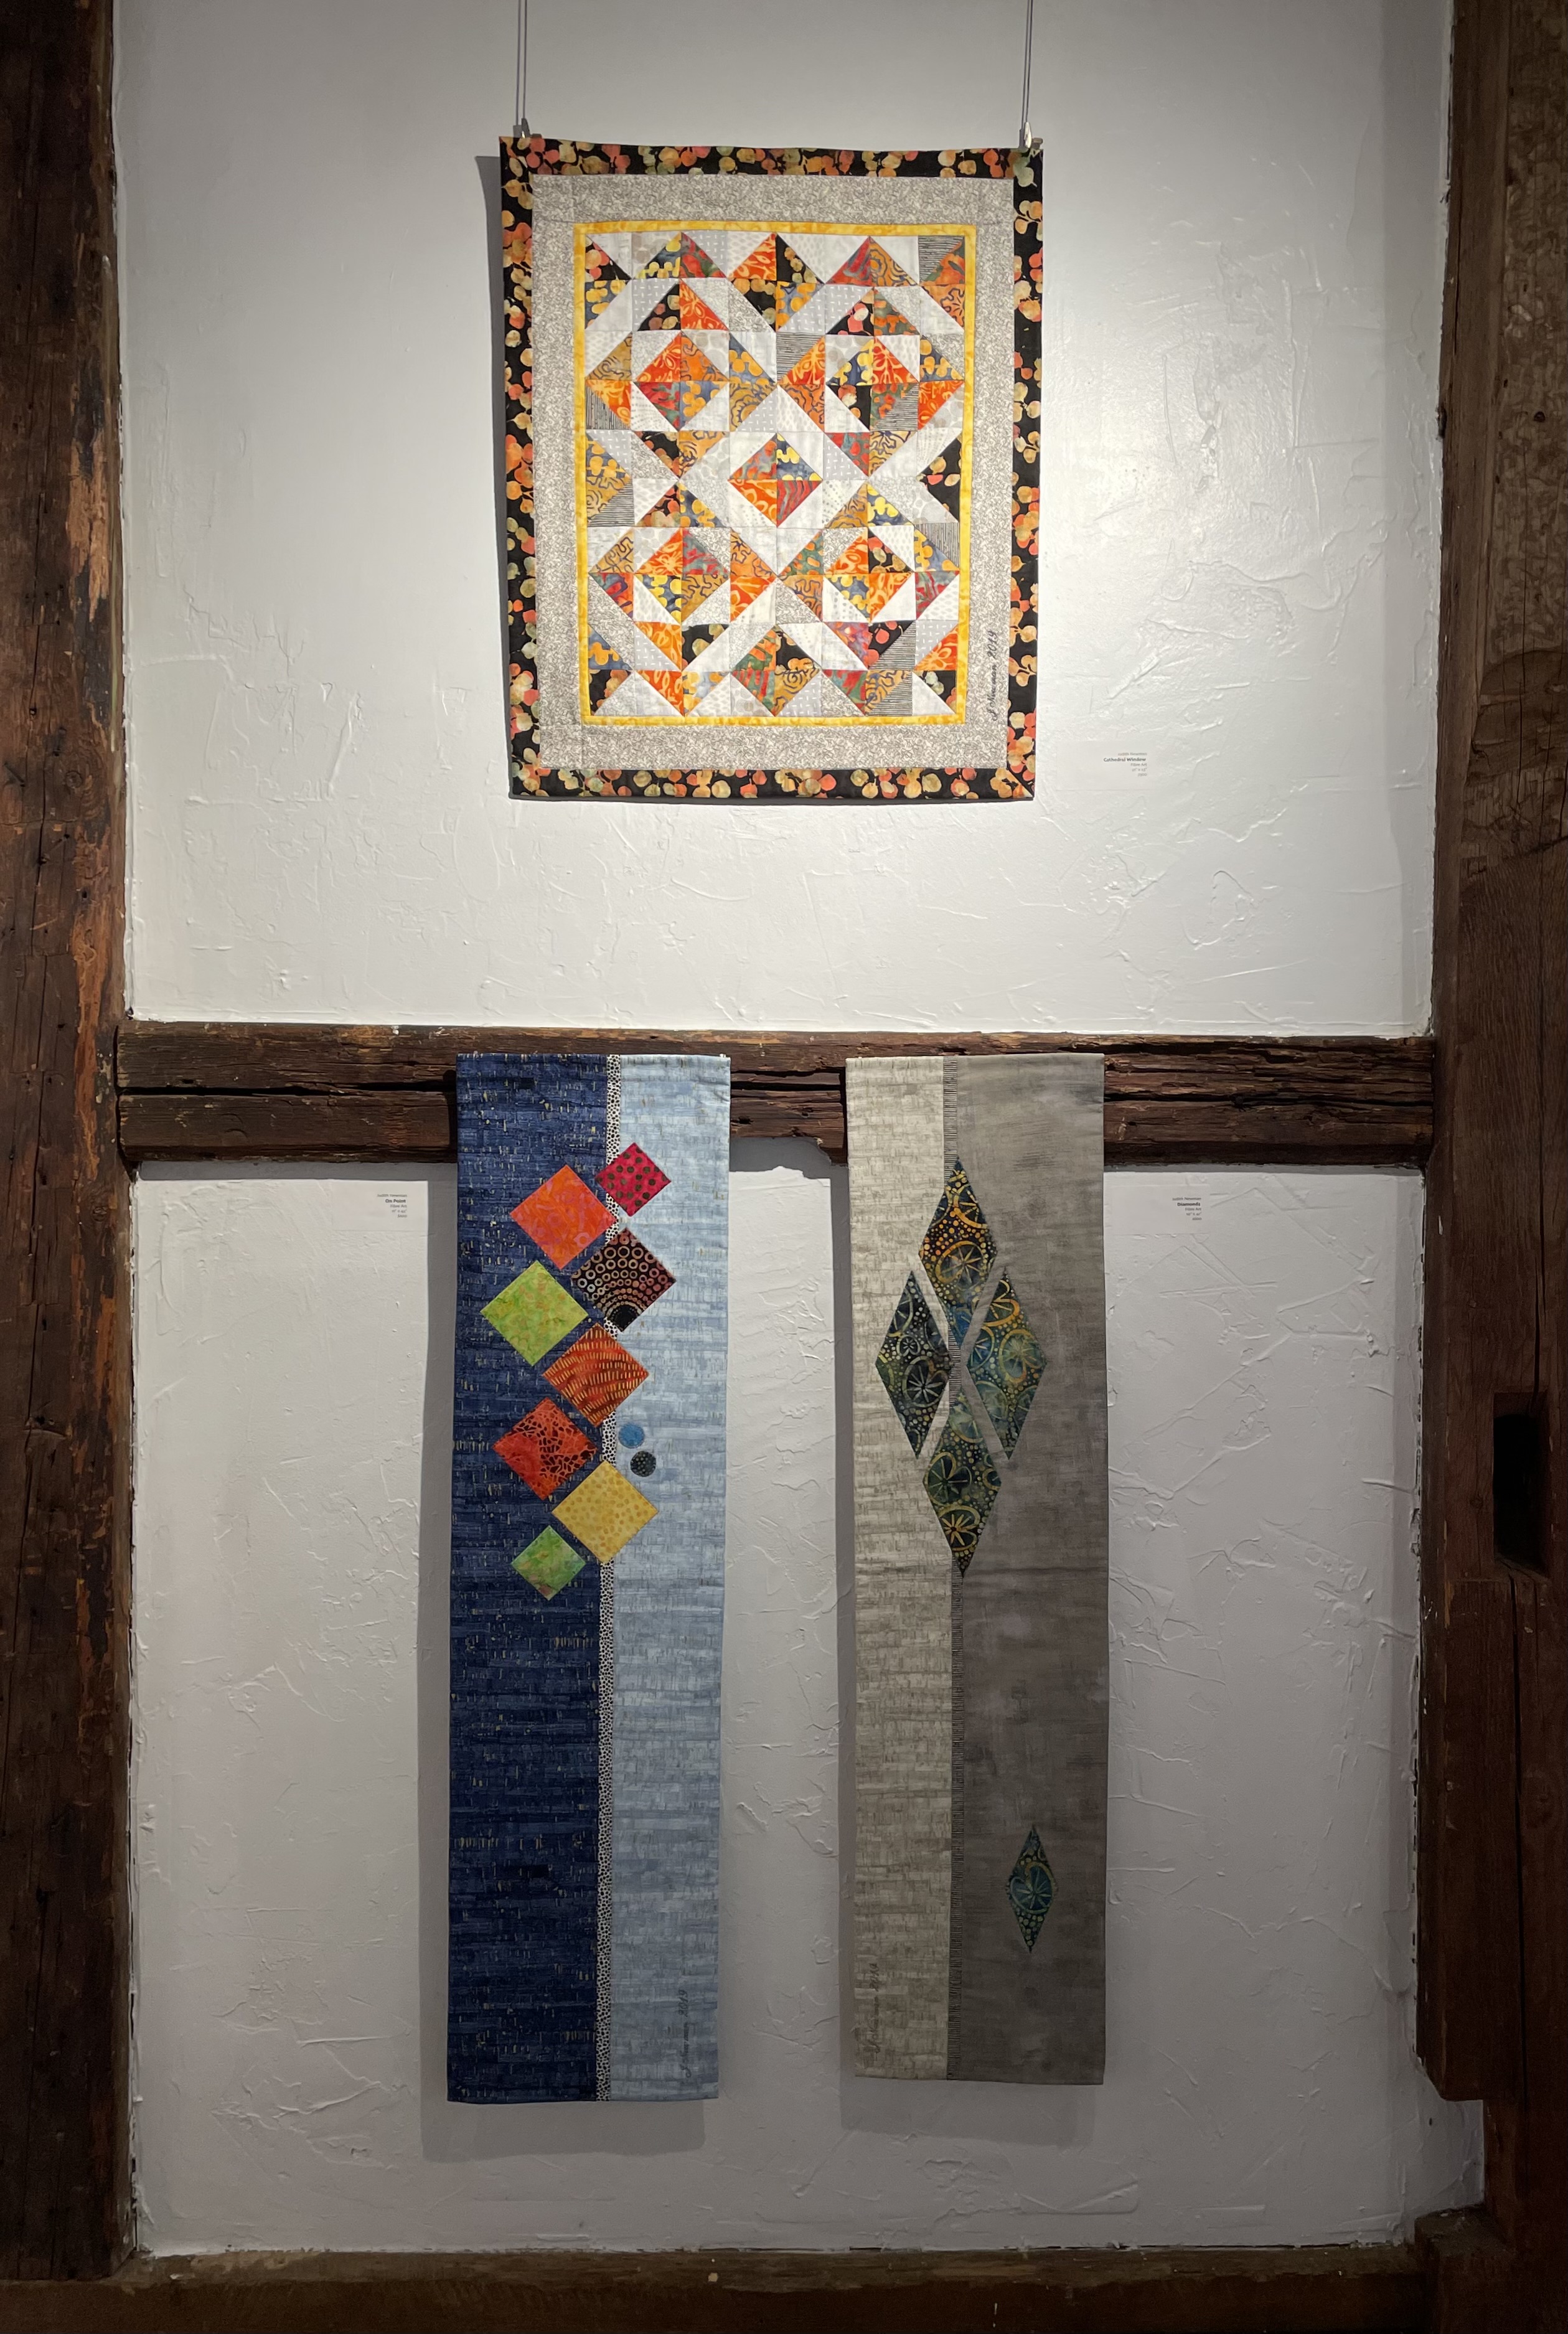
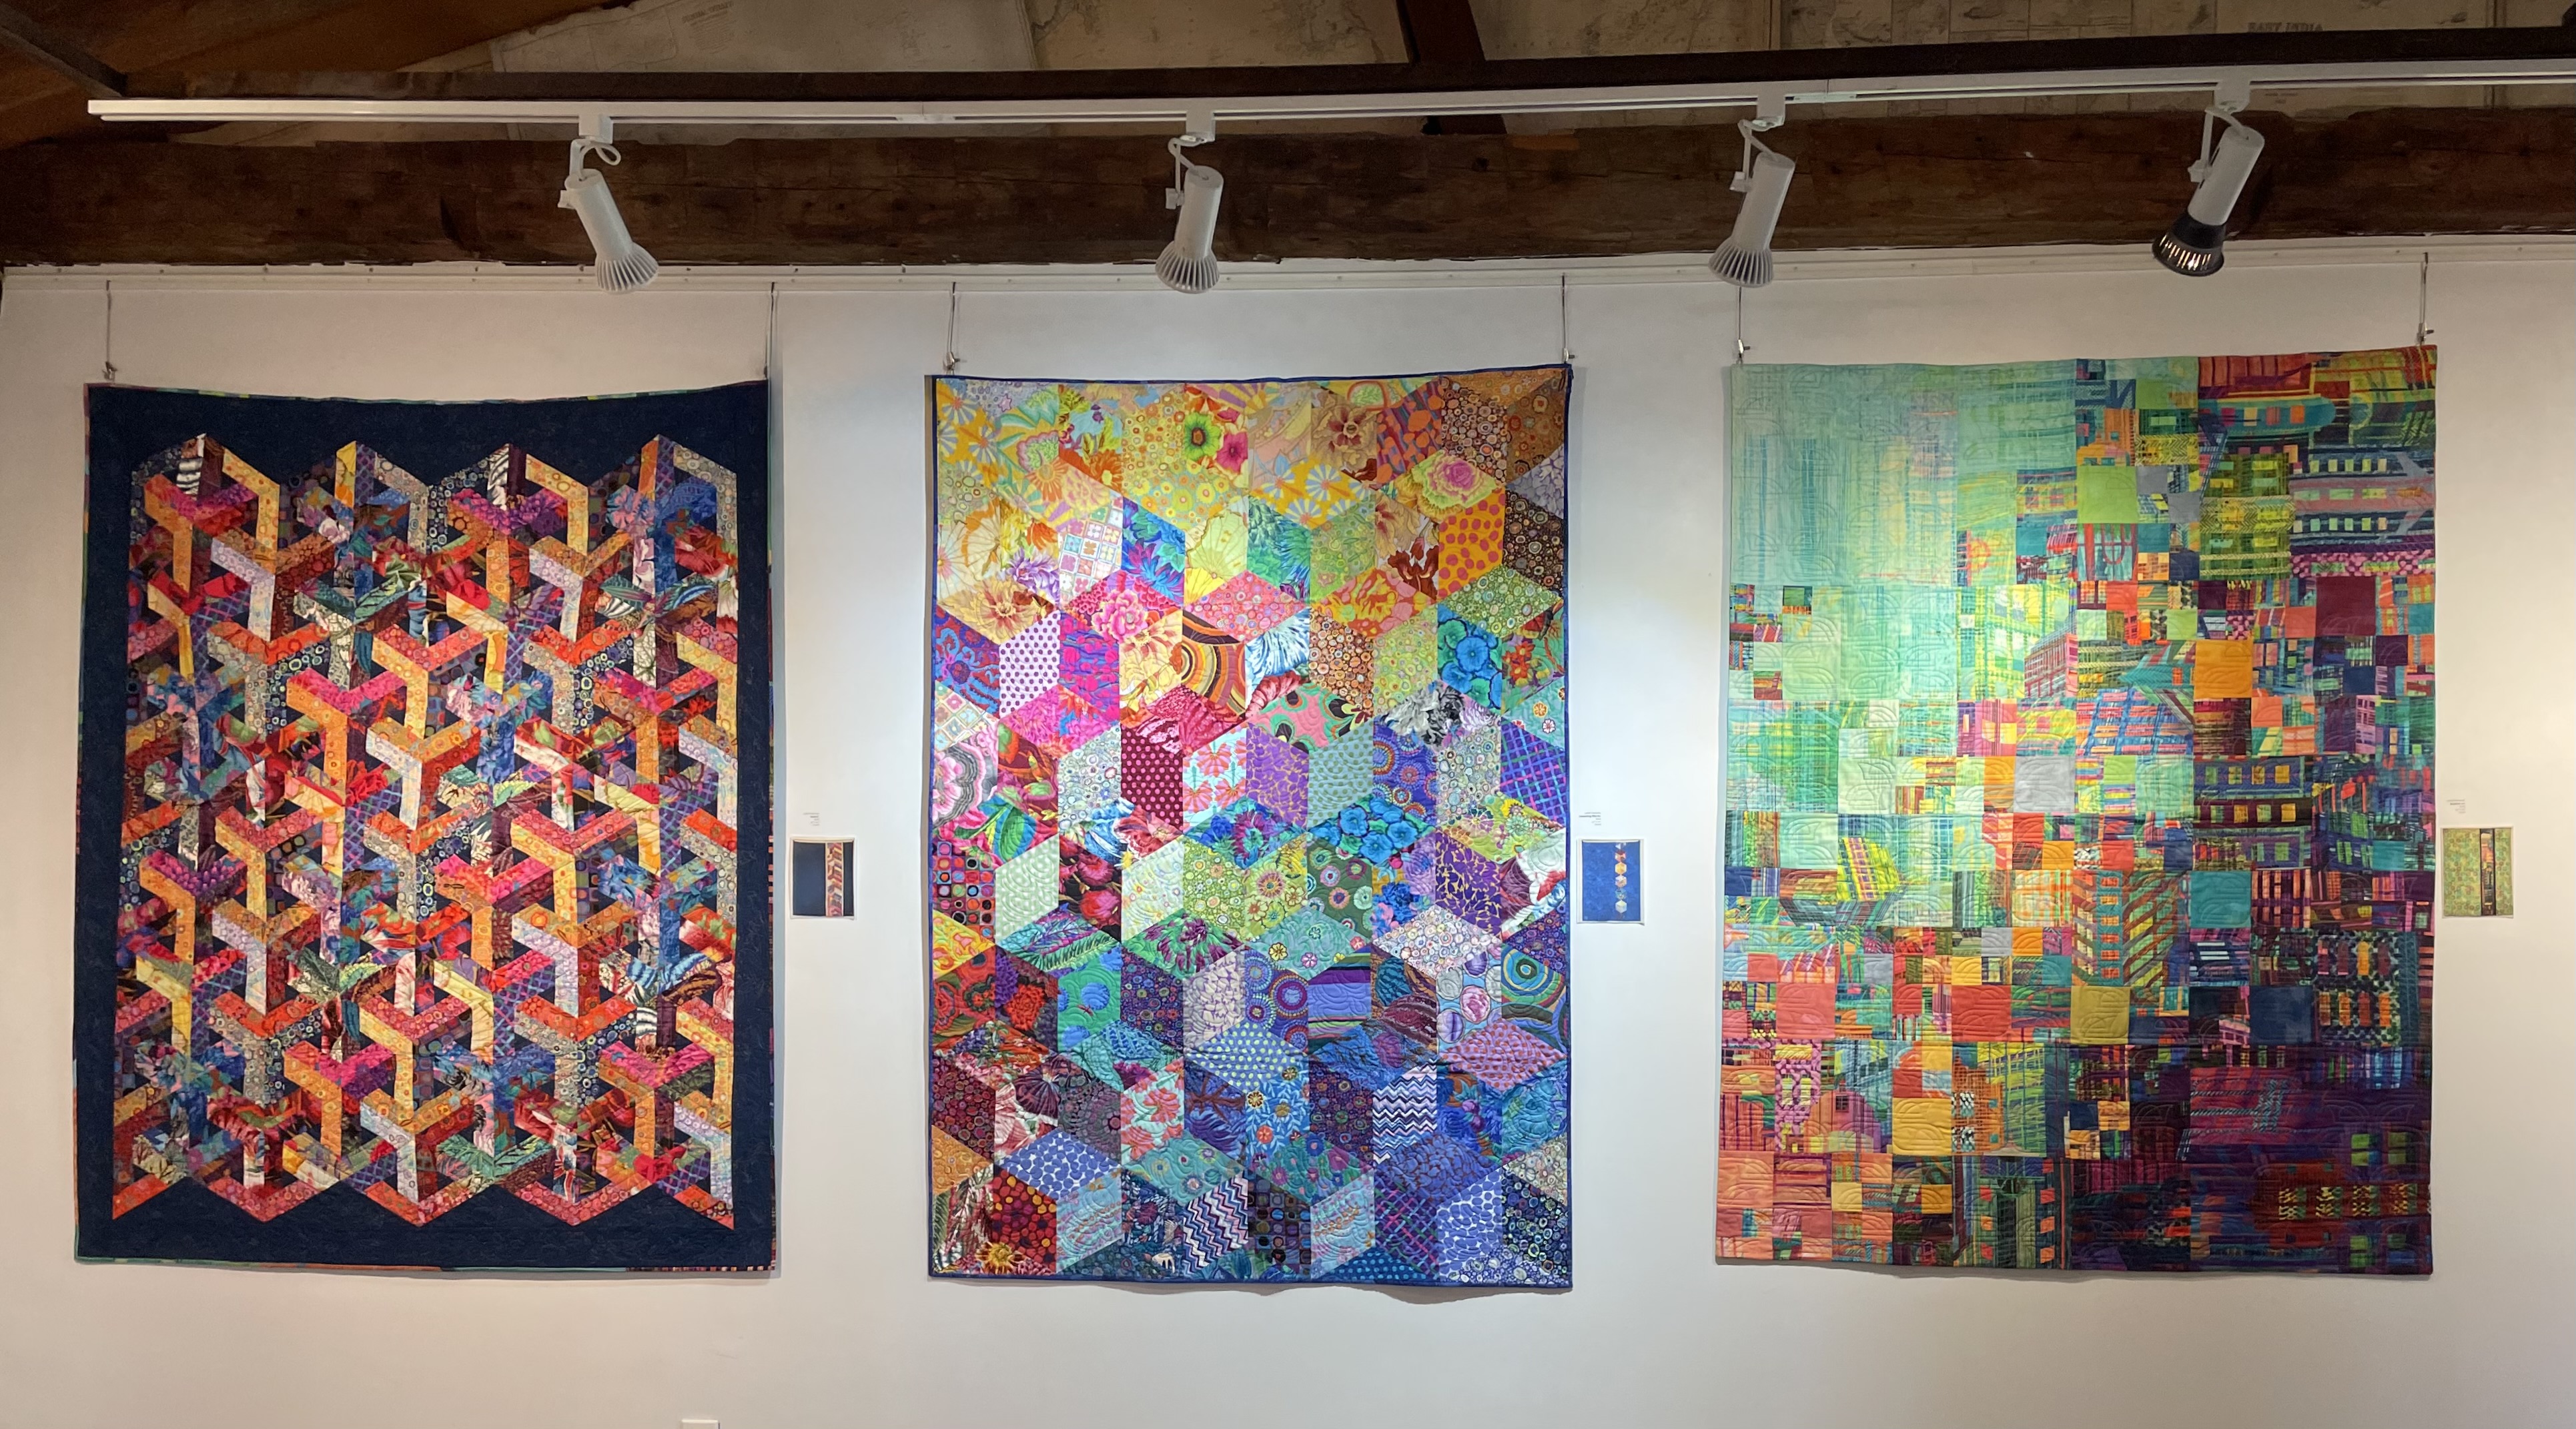
Here’s what I hung (plus one more Bargello piece):
Bargello #2Cathedral Windows On Point DiamondsMad TeslaEscherTumbling BlocksSkyline #1 Material Matters! Quilts and Fibre Art
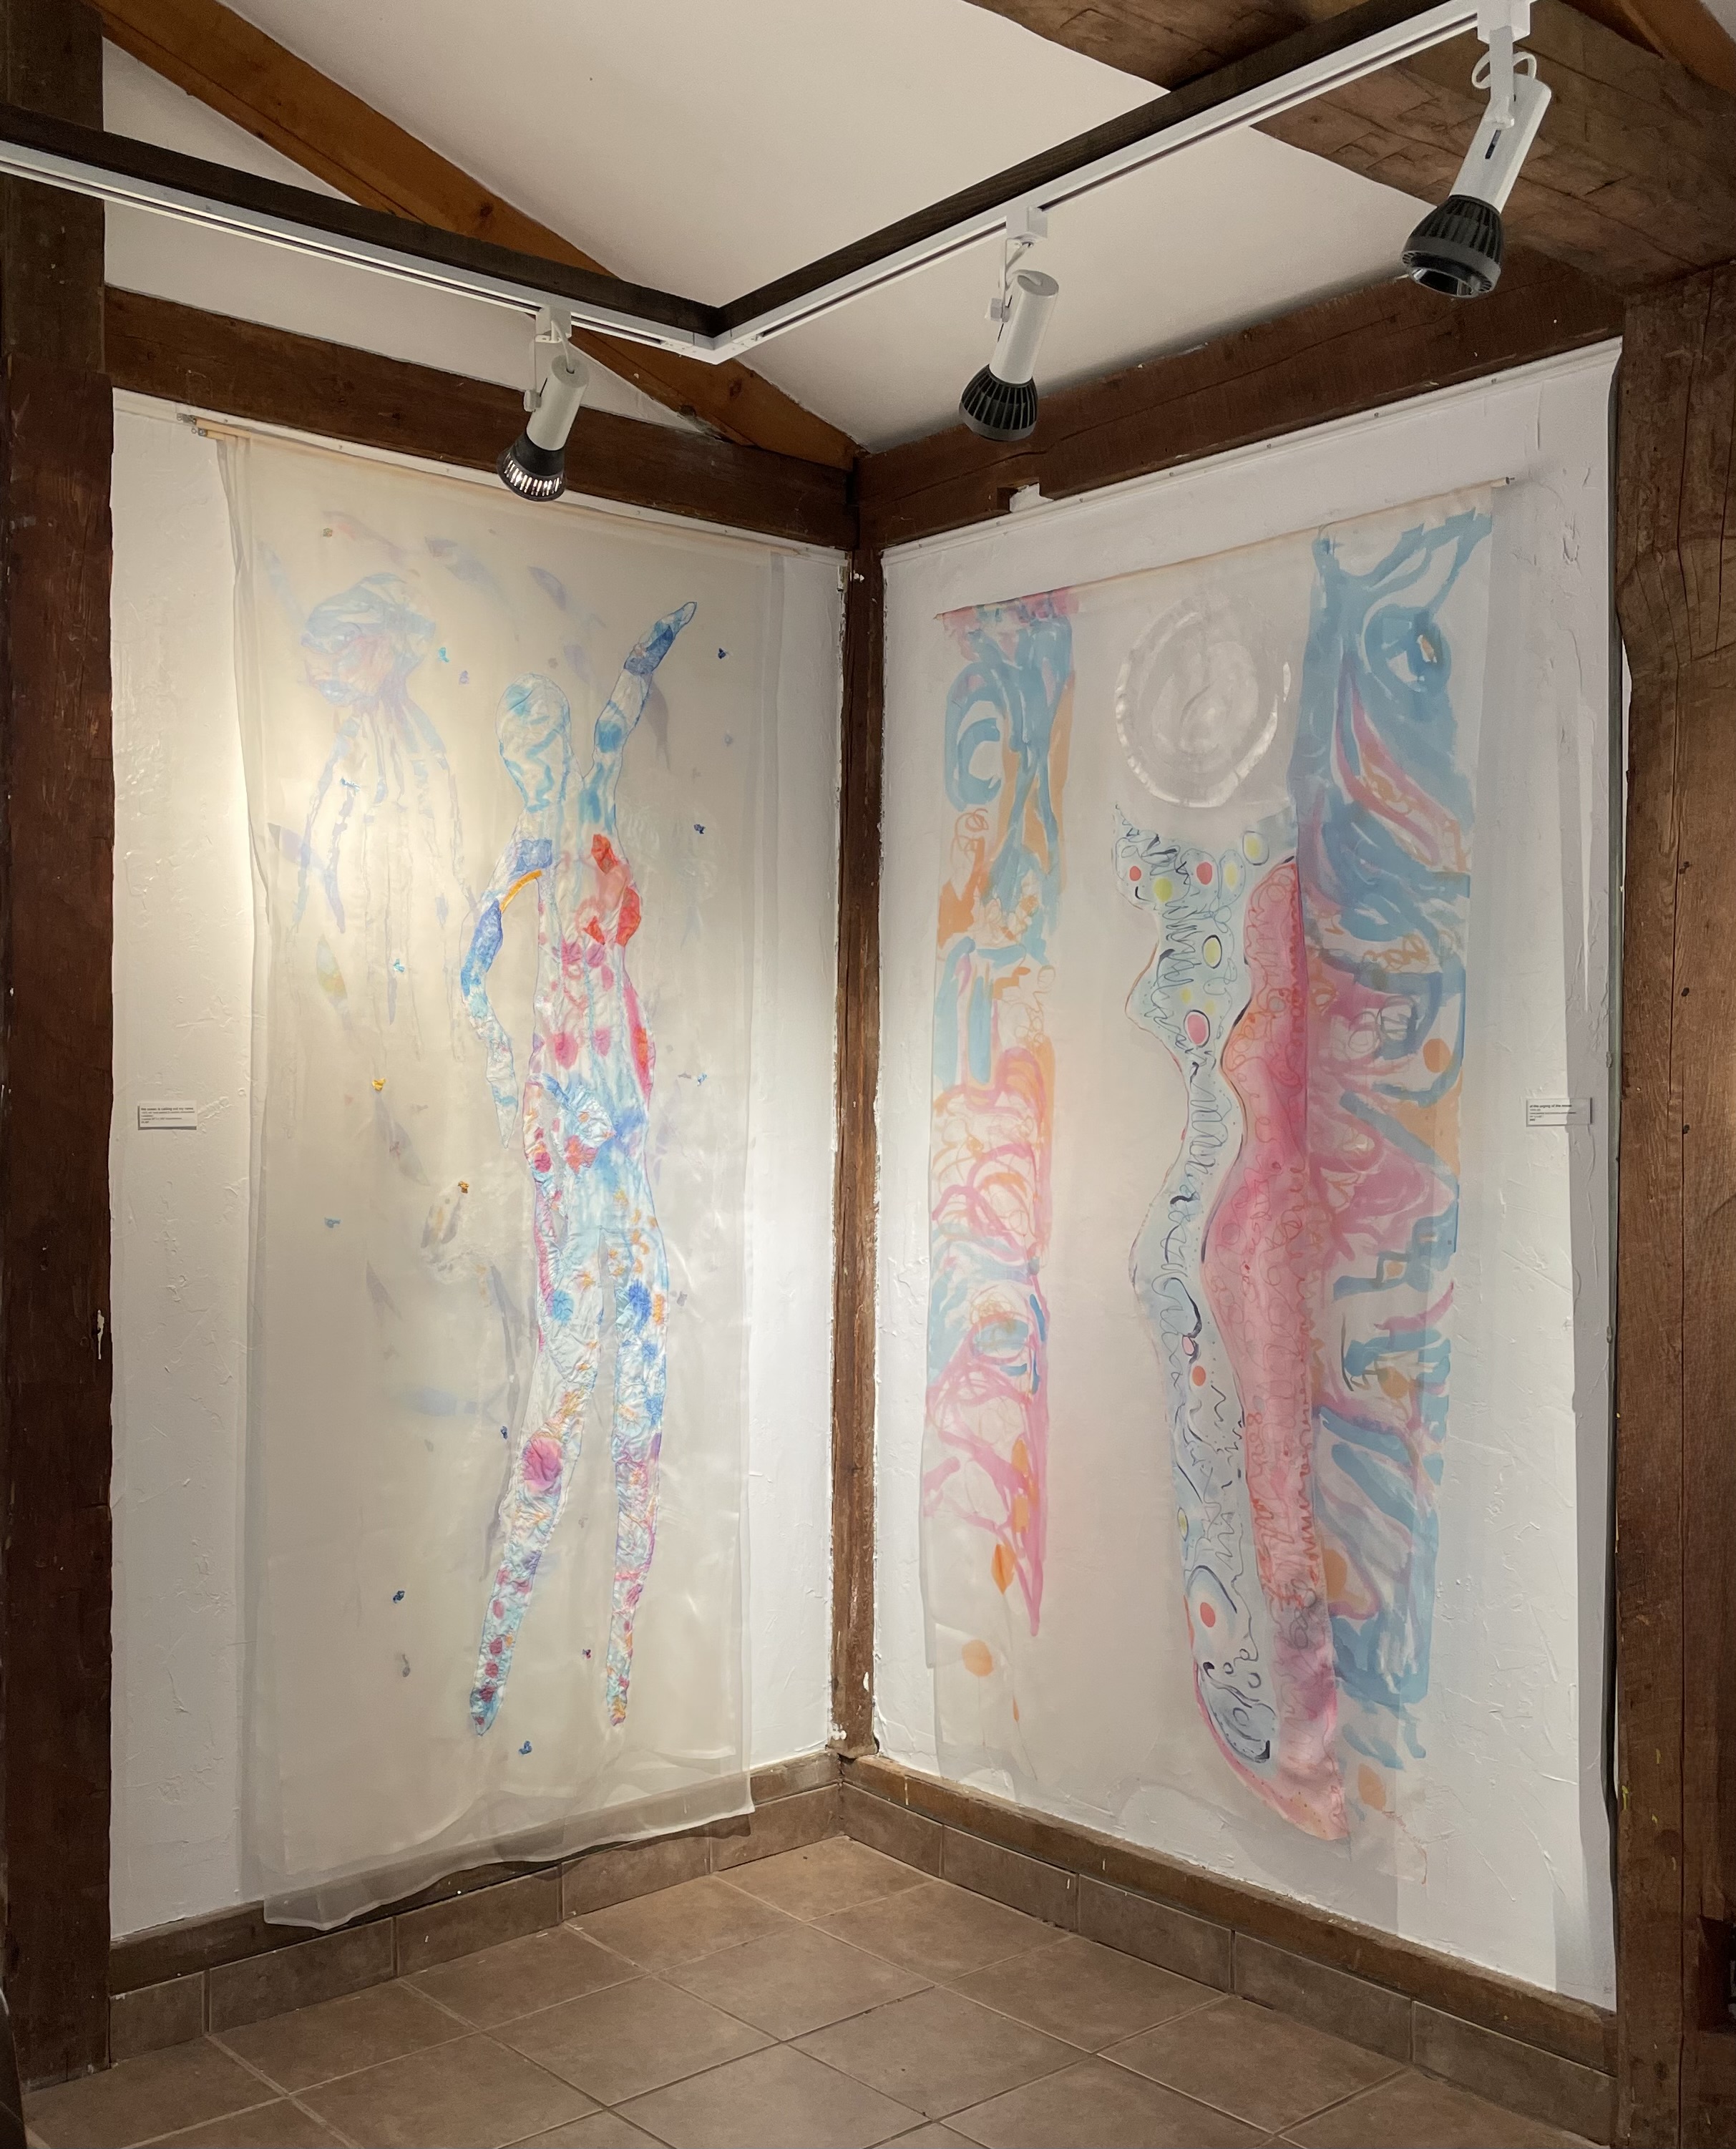
These pieces are by Colleen Davidson – she calls them “Moving Through Water”
Colleen Davidson Moving Through Water
You couldn’t have imagined two such different kinds of fibre work! Yet they hang together very well.
I work with traditional quilting materials using traditional quilting techniques. I play with colour and pattern/texture.
Colleen’s works here are on silk organza which she paints and cuts out and appliqués and stitches. The effects are very interesting and ephemeral! Her pieces all have the translucence and movement of water as the silk ripples with the slight air currents in the room.
I’ve never thought about creating anything like that – but as I work on new things this coming year, I must think about how to move toward more abstract creations!
The show is at Art Lab Studios and Gallery – 121 Main Street, Parrsboro. The show hangs until late Friday afternoon, Nov. 22. Do drop in if you’re in the vicinity!
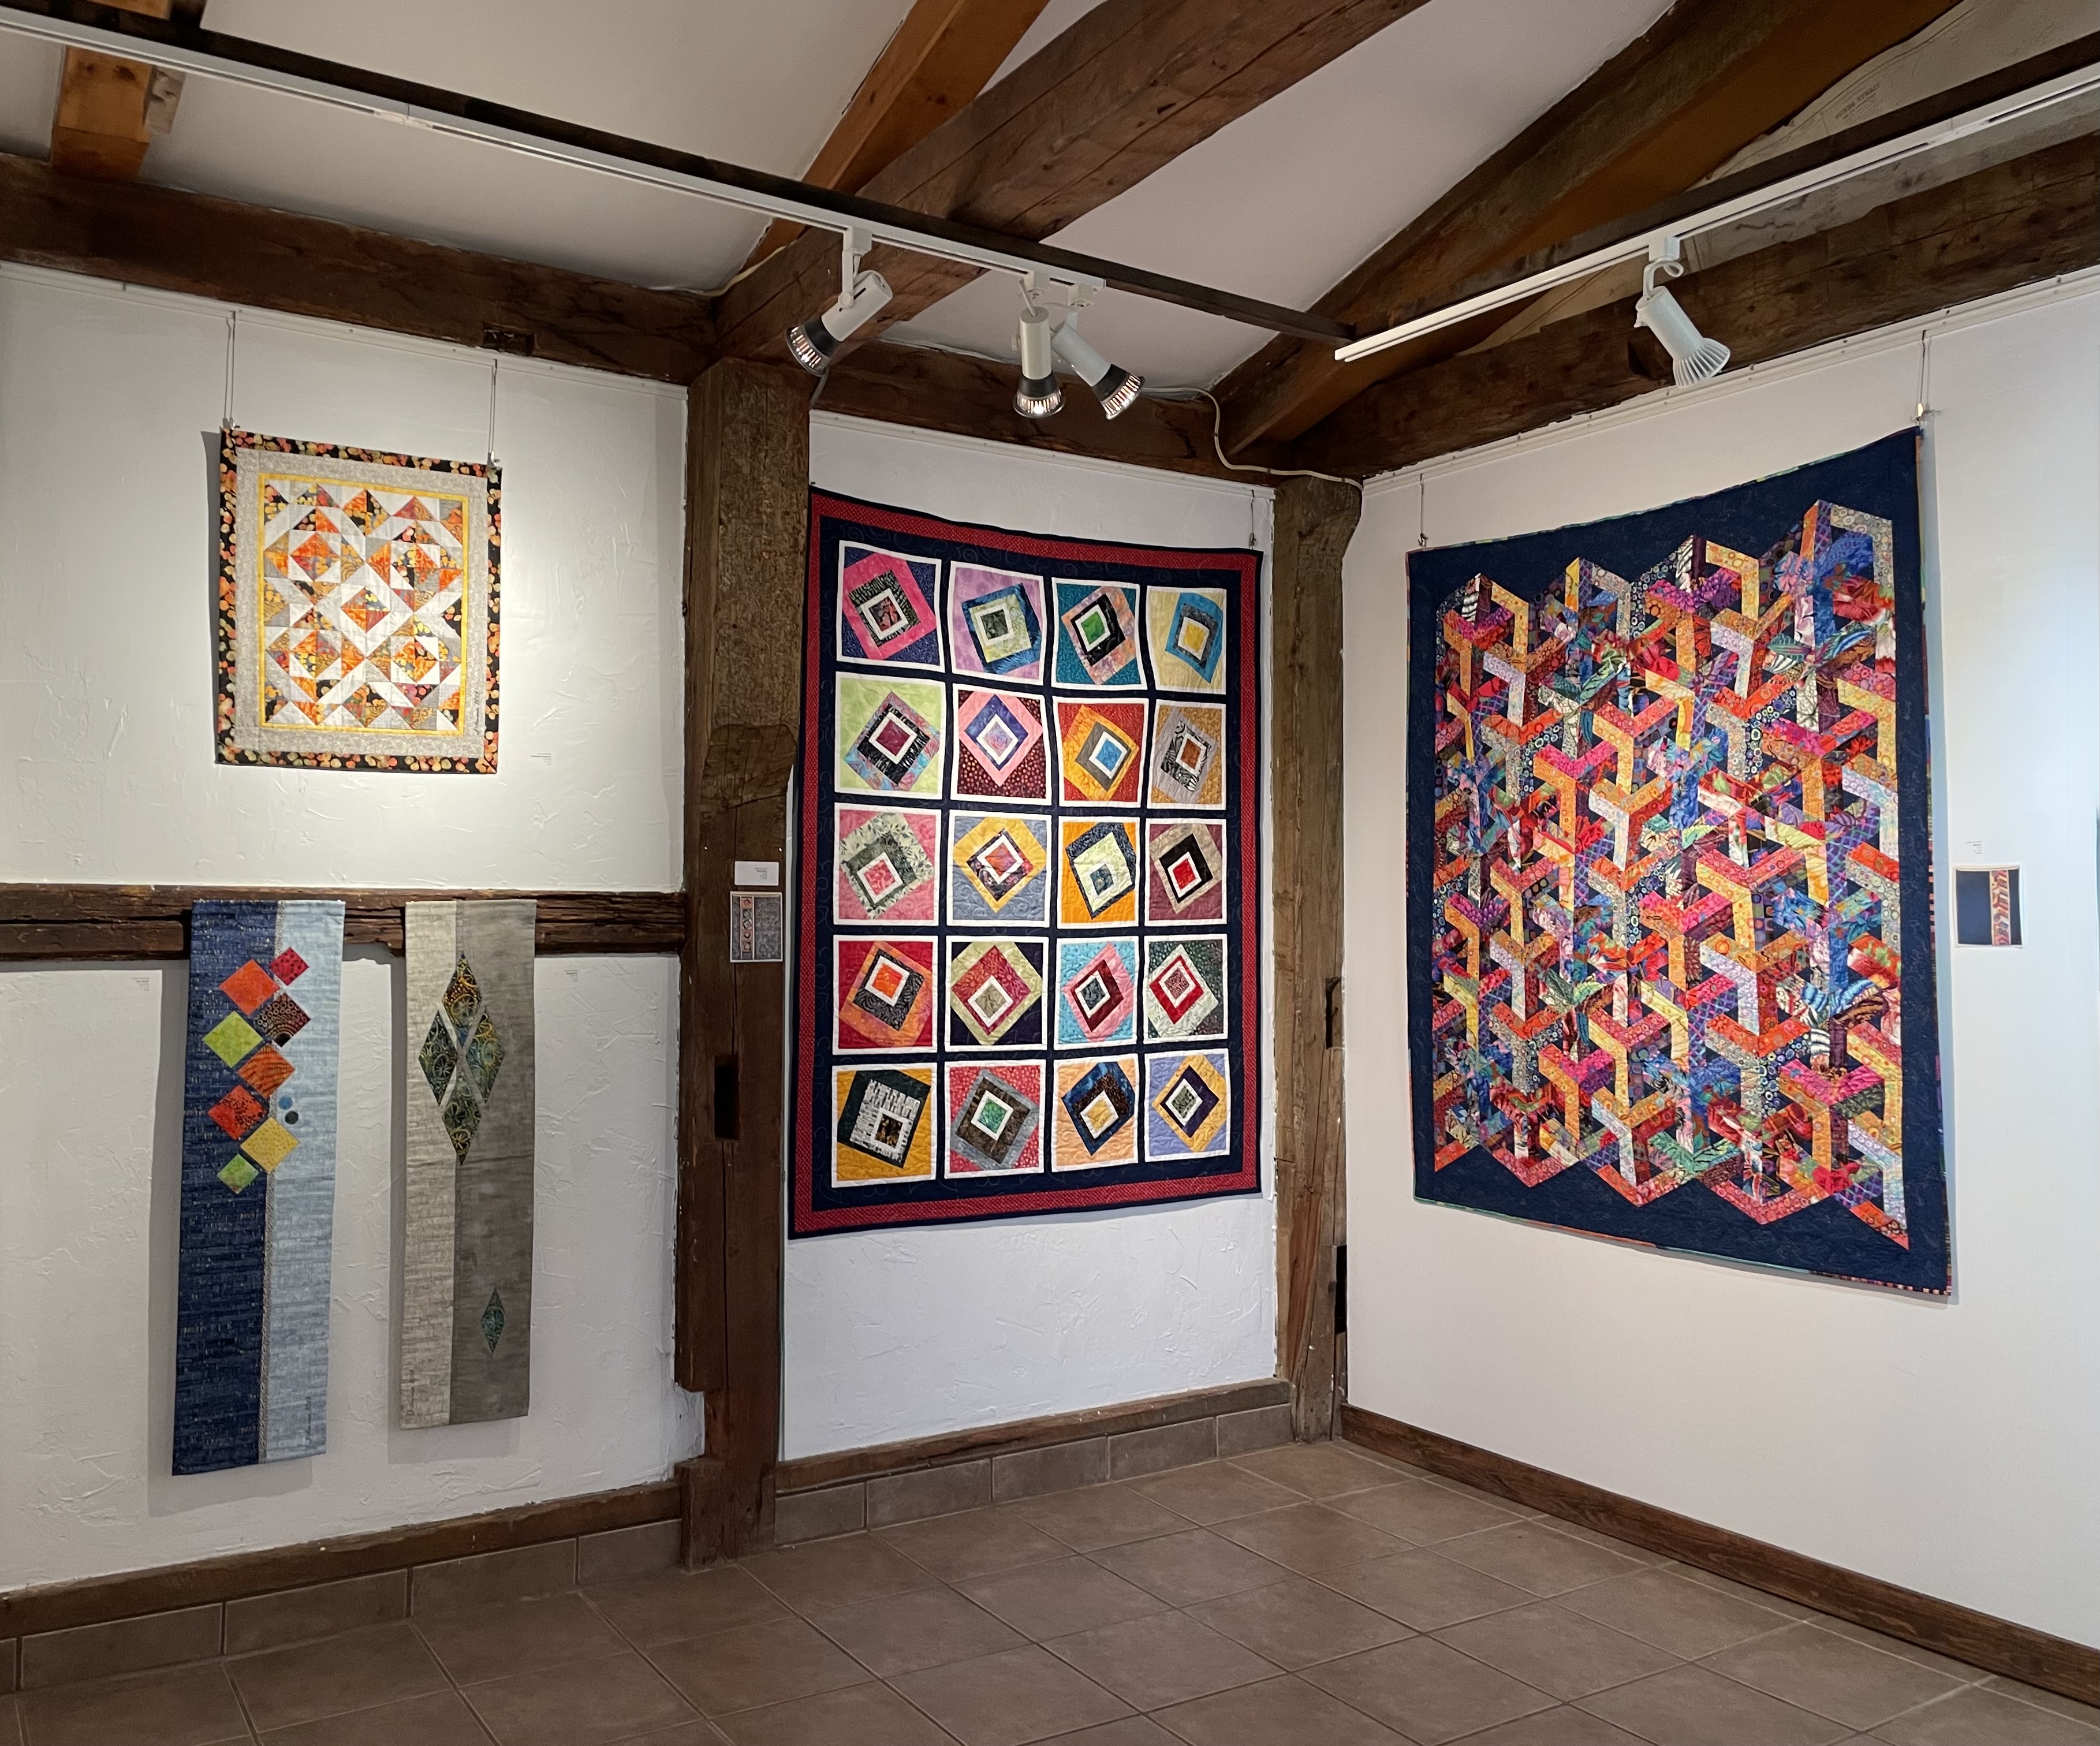
The show was hung on Friday morning after our two hour drive from Halifax to Parrsboro. I’ve shown in the gallery enough times that knowing what I wanted to hang, where, required little deliberation. I knew I’d brought exactly the right number of pieces to display.
The show consists of eight lap size quilts, accompanied by two panels each with an array of 6×6 pieces – a total of thirty pieces of textile art. A respectable amount of work.
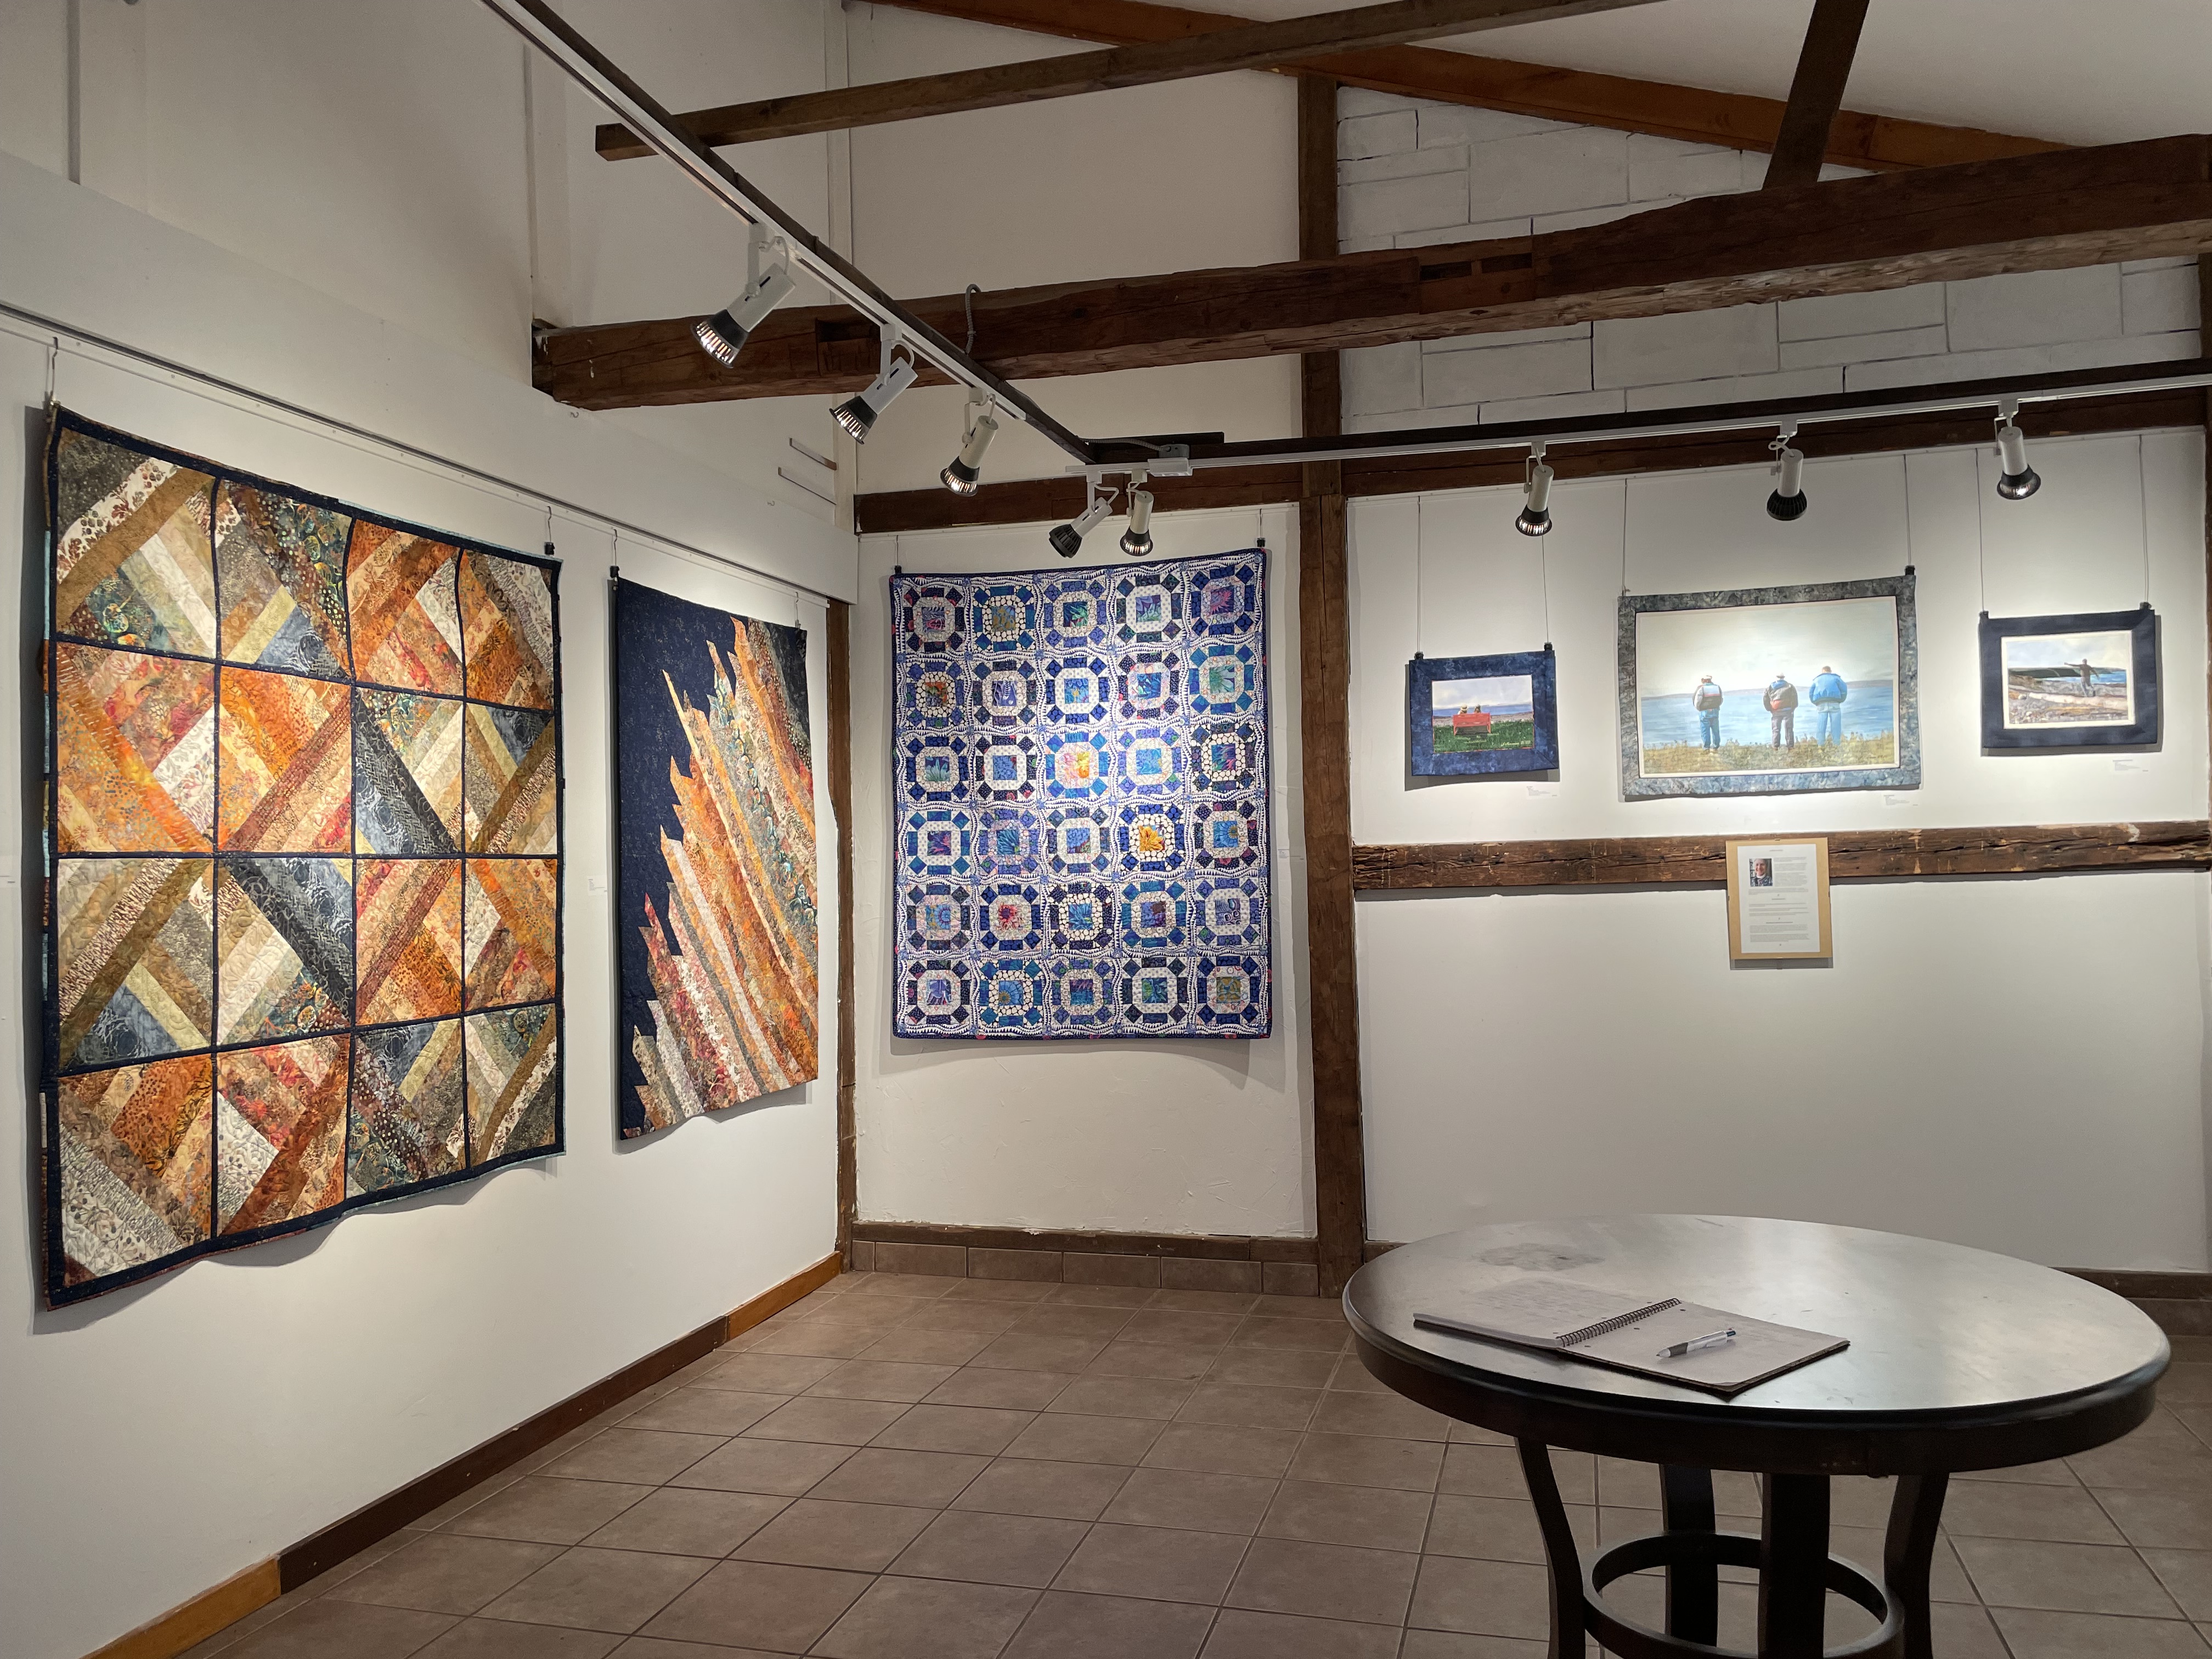
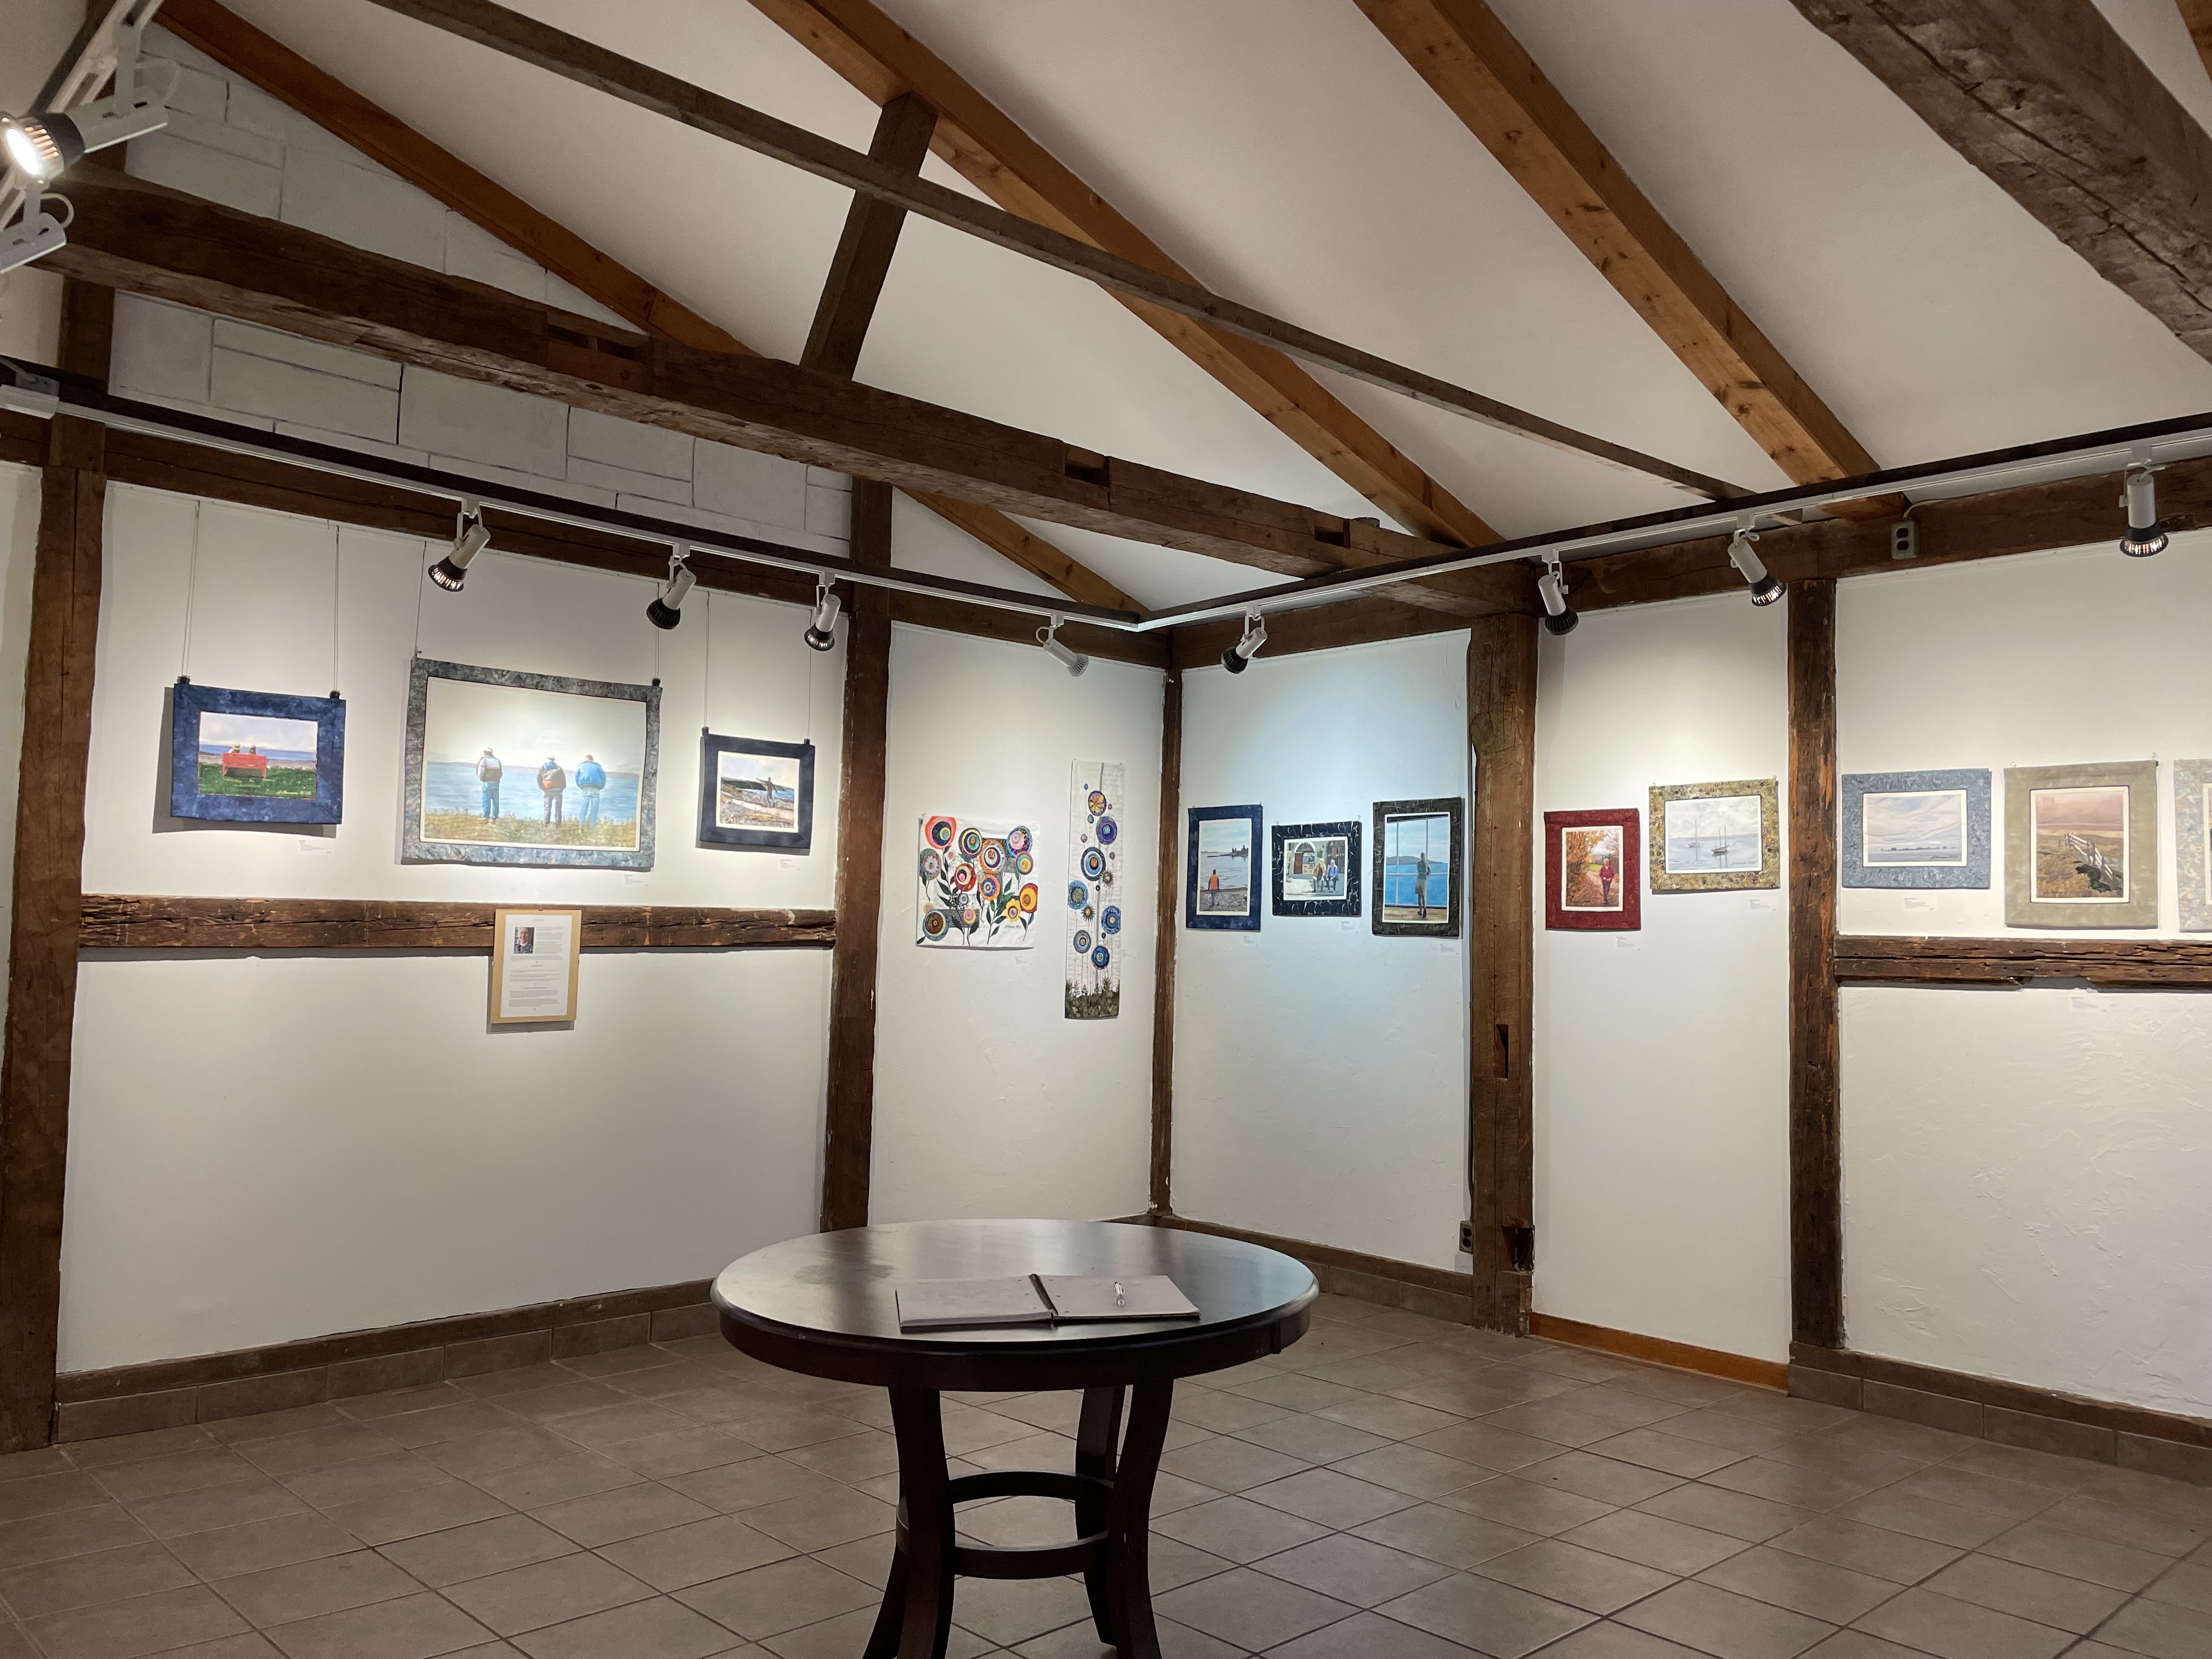
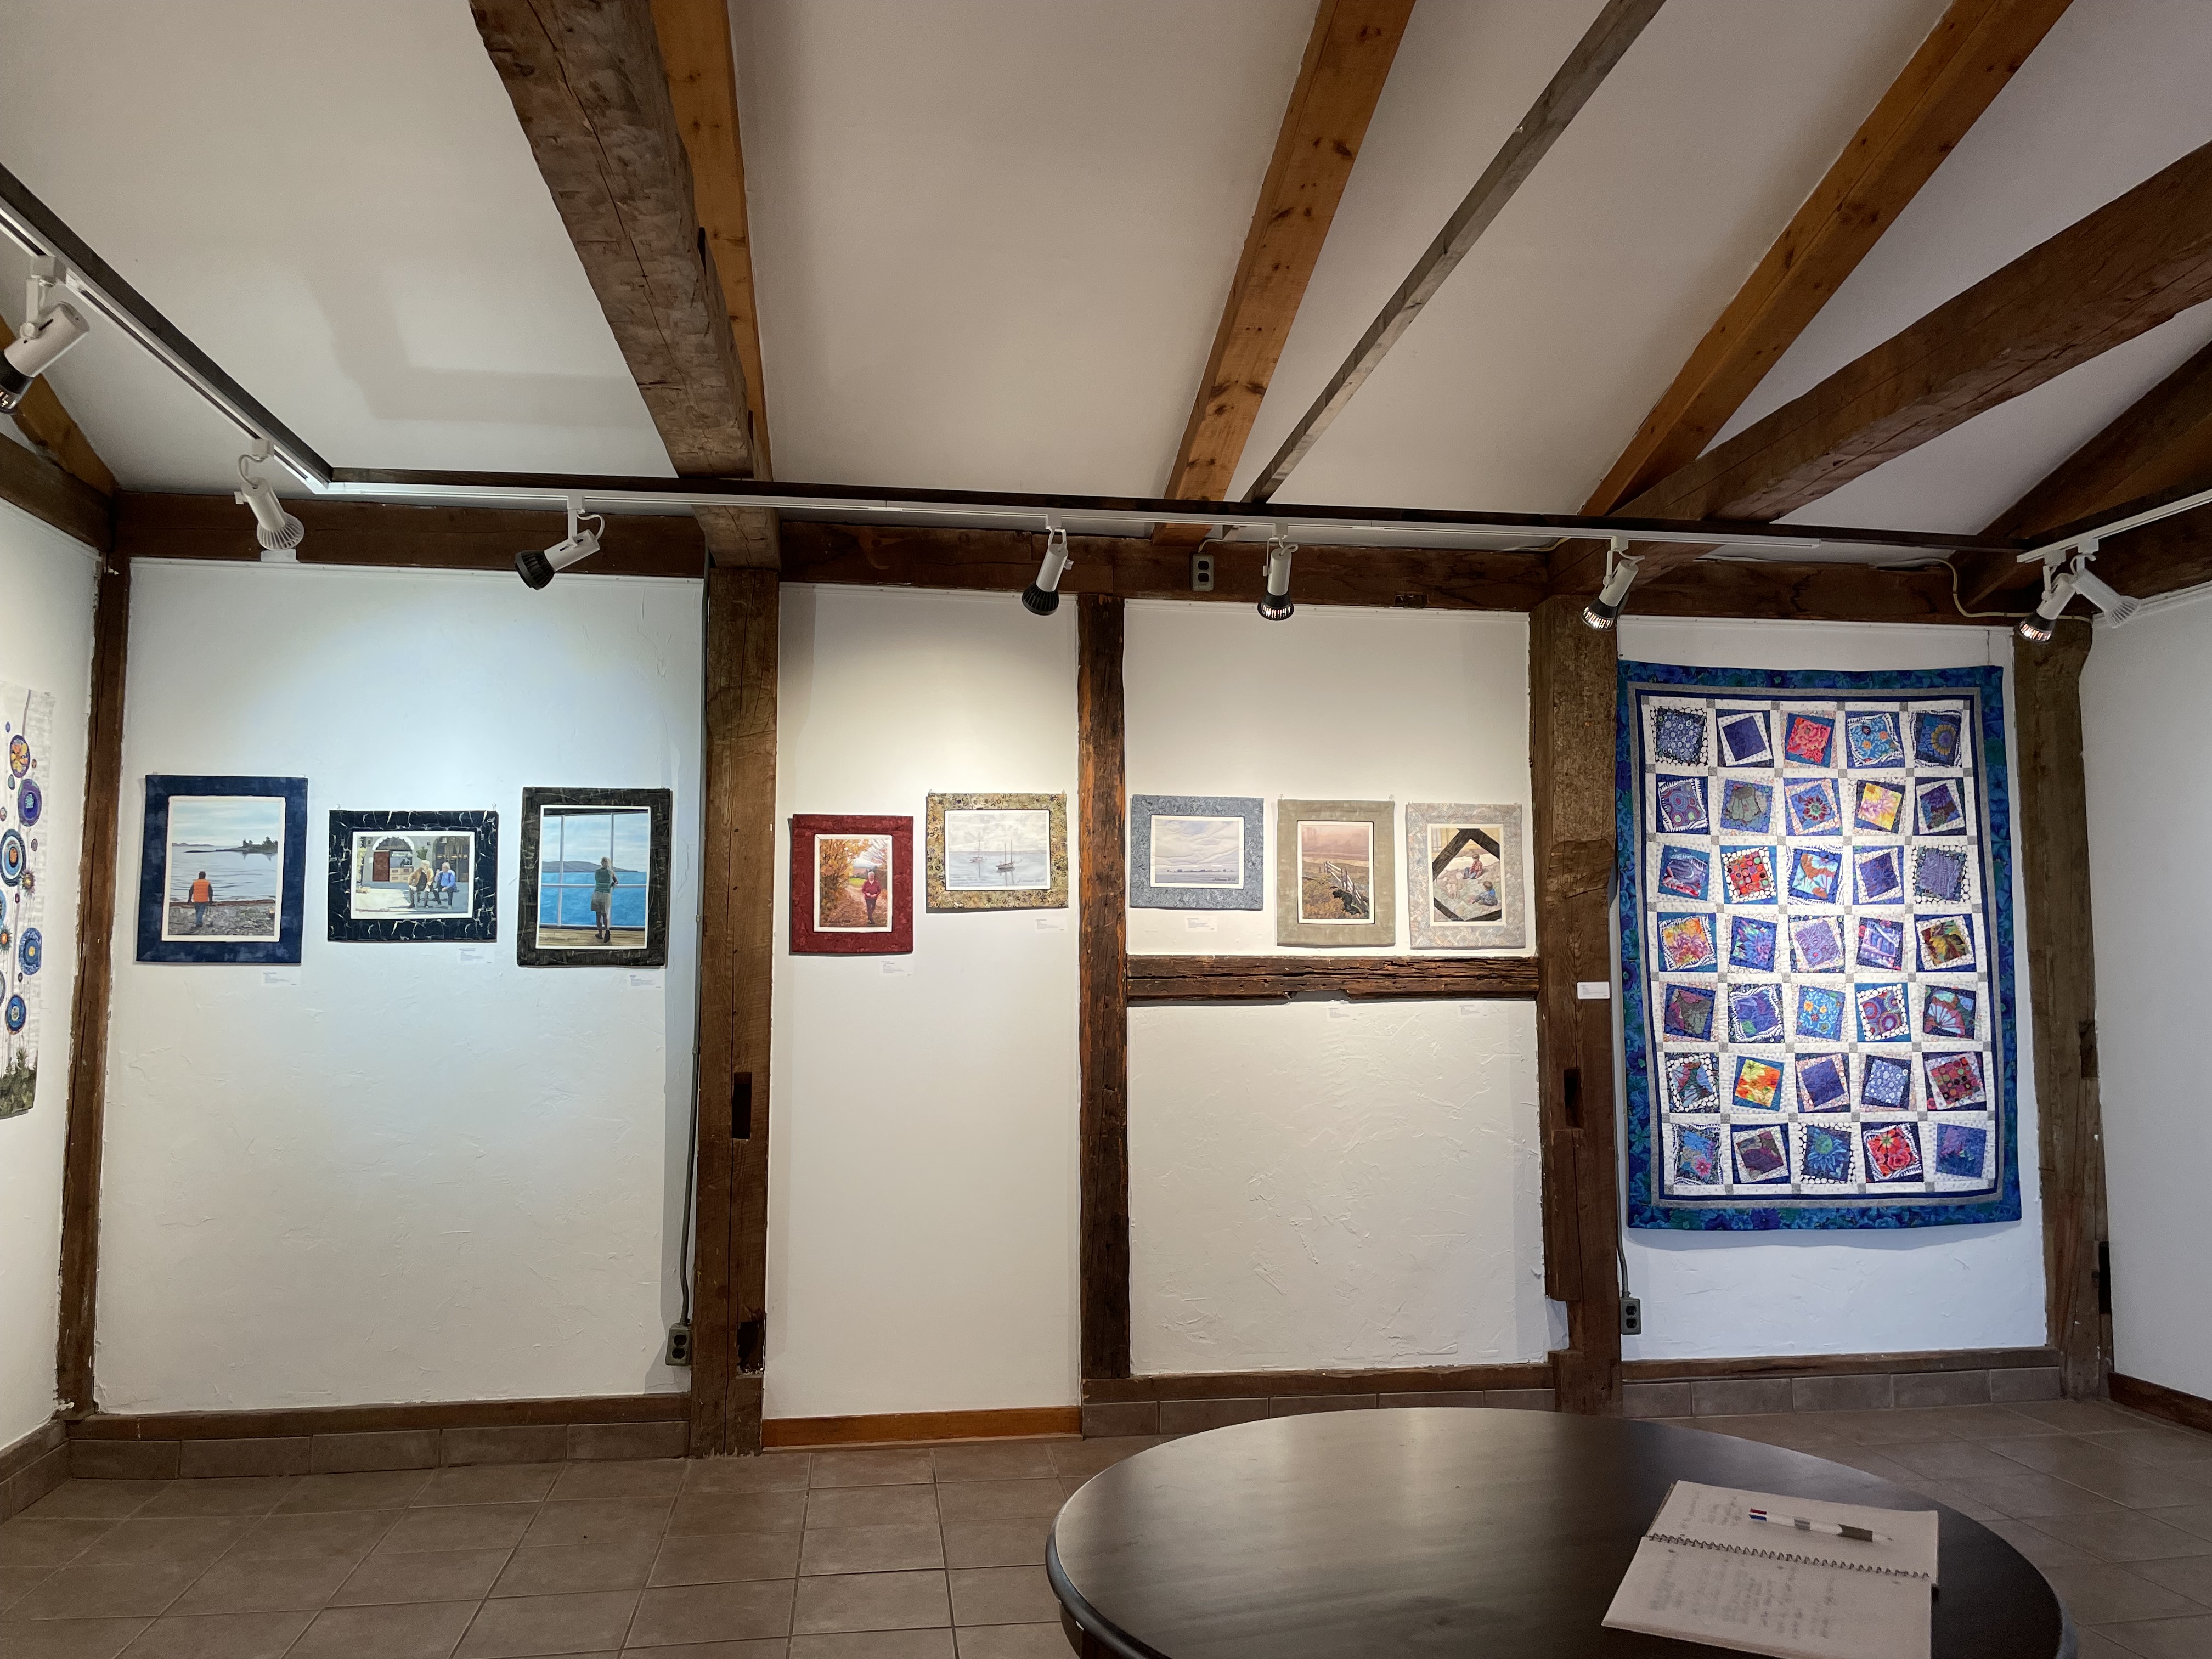
As you enter the gallery space
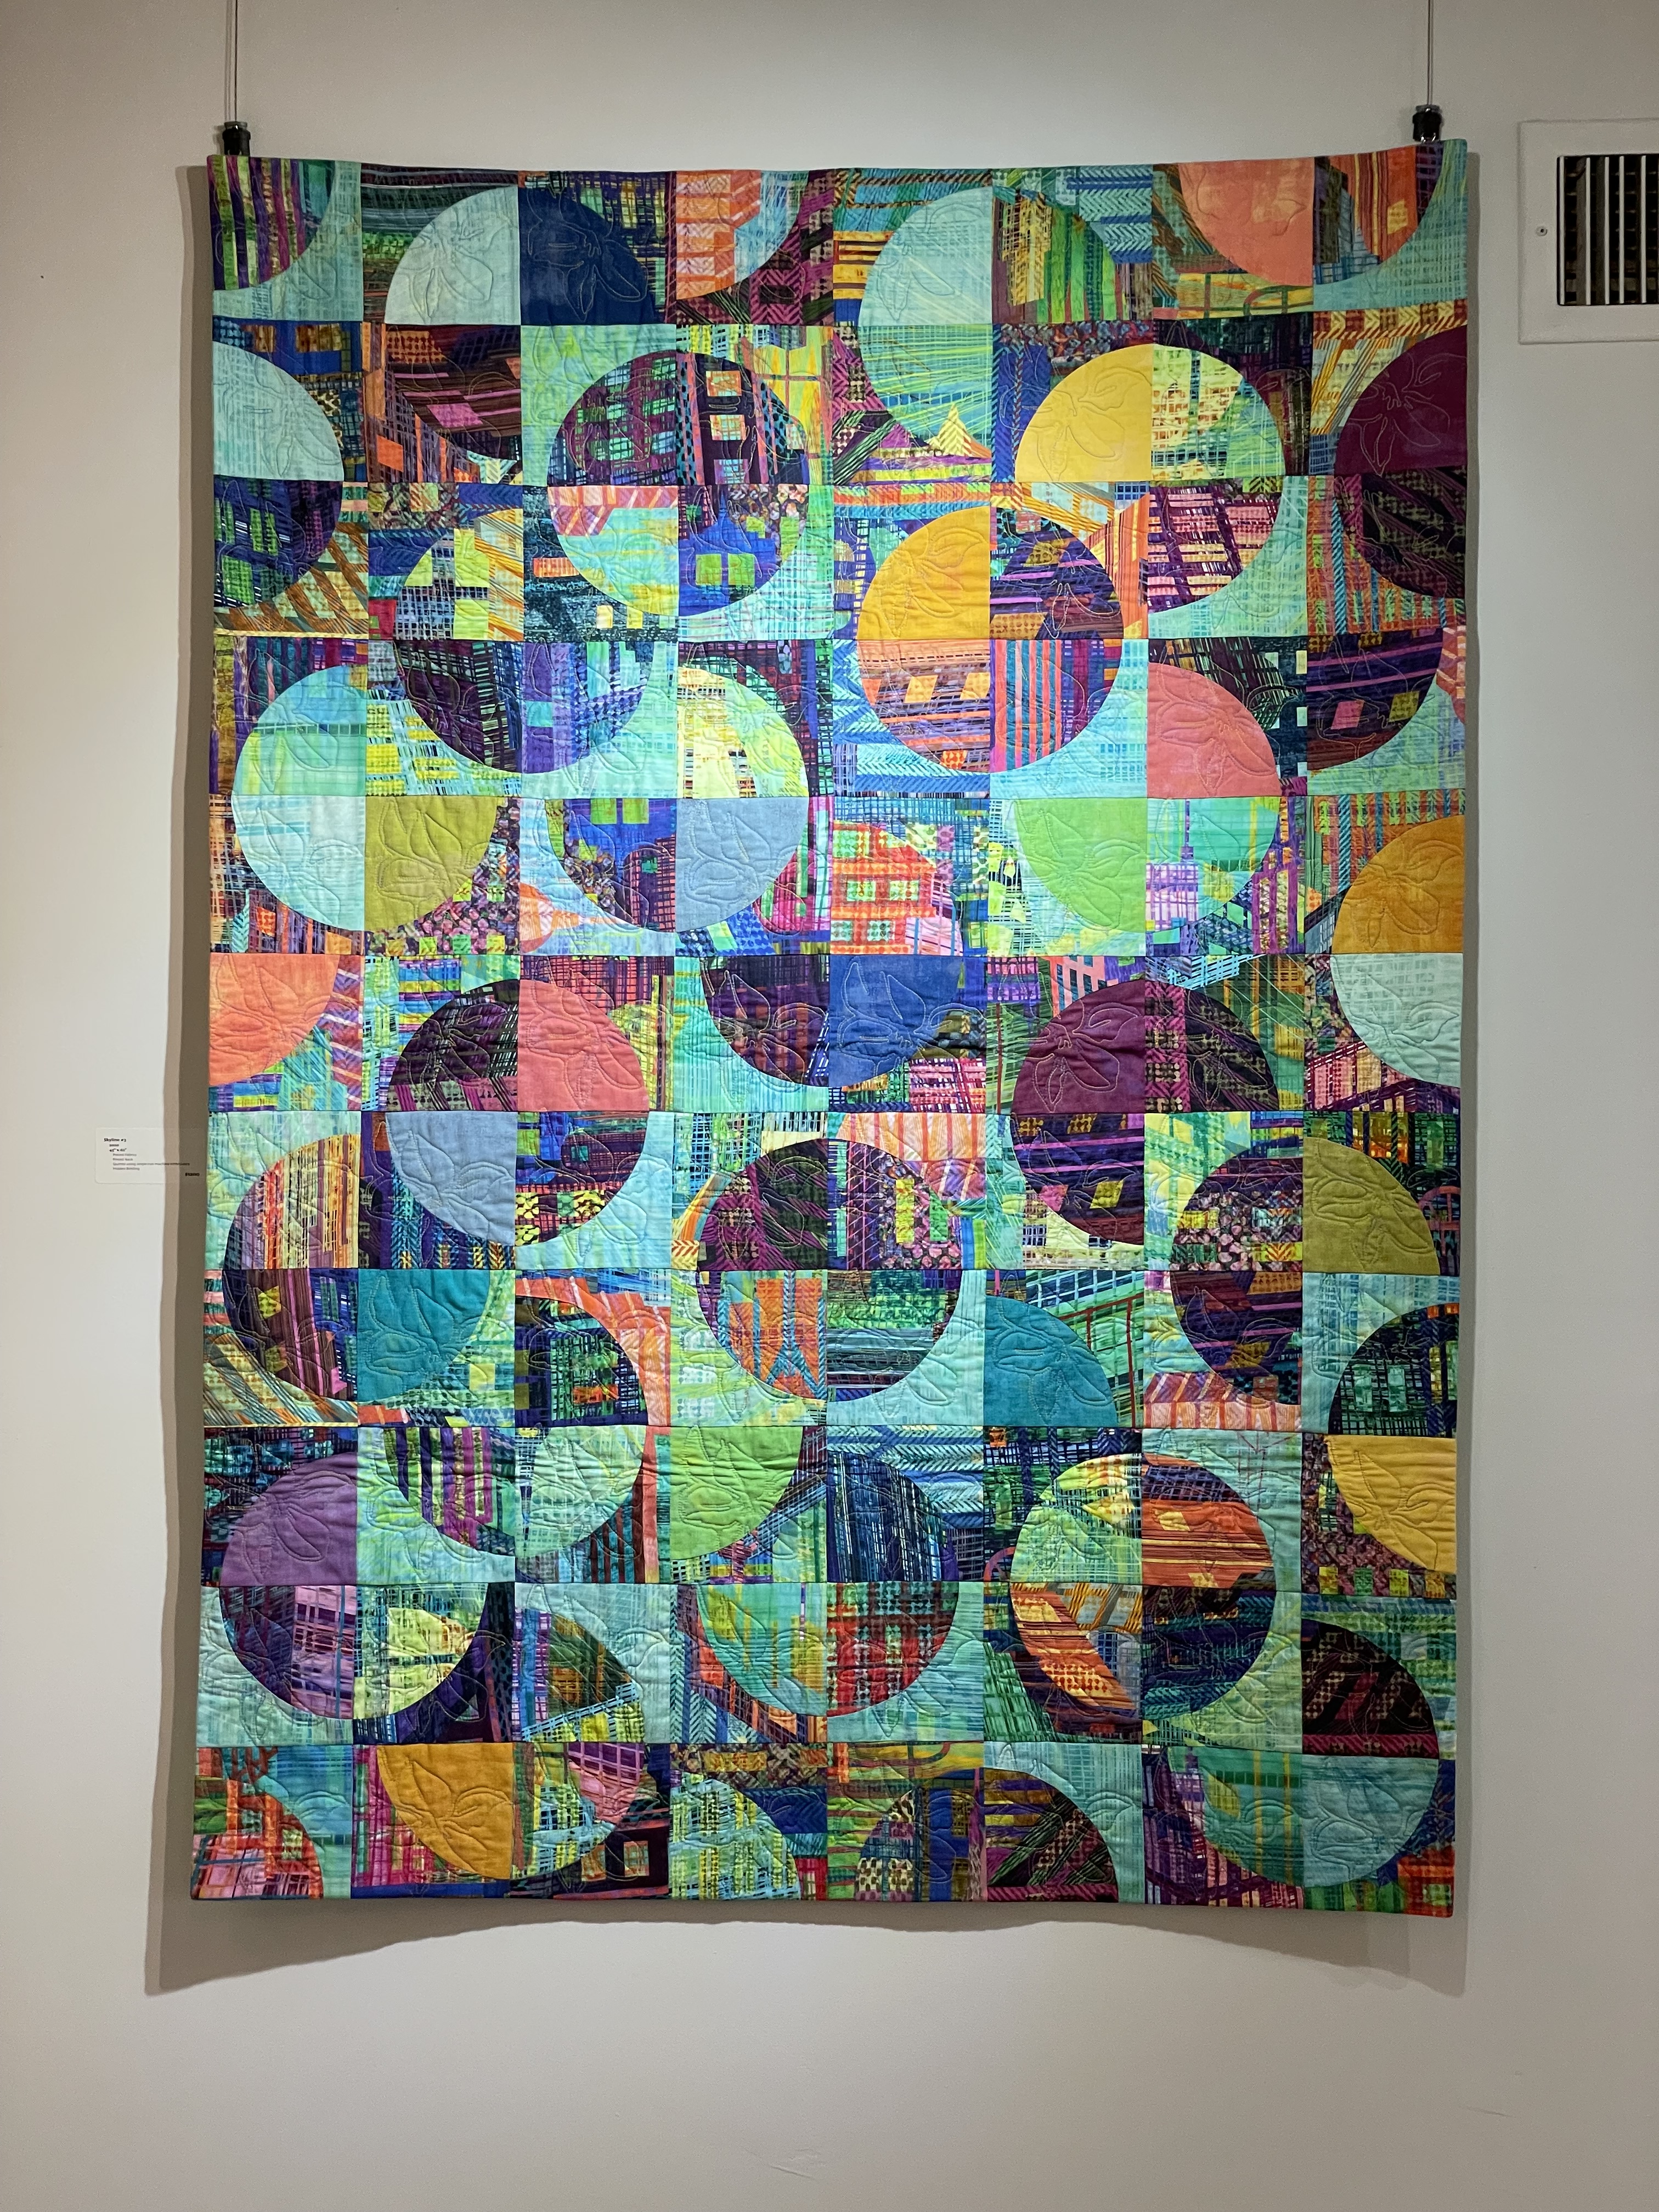
On your right as you enter the Community Gallery you find the four Drunkard’s Path Blocks quilts: Let the Trumpet’s Sound, Drunkard’s Path #5, Skyline #3, and Planet’s With Moons (from right to left). It doesn’t immediately strike you that all four quilts are built using the same block construction, but if you look closely you see the basic quilt block is the same in each.
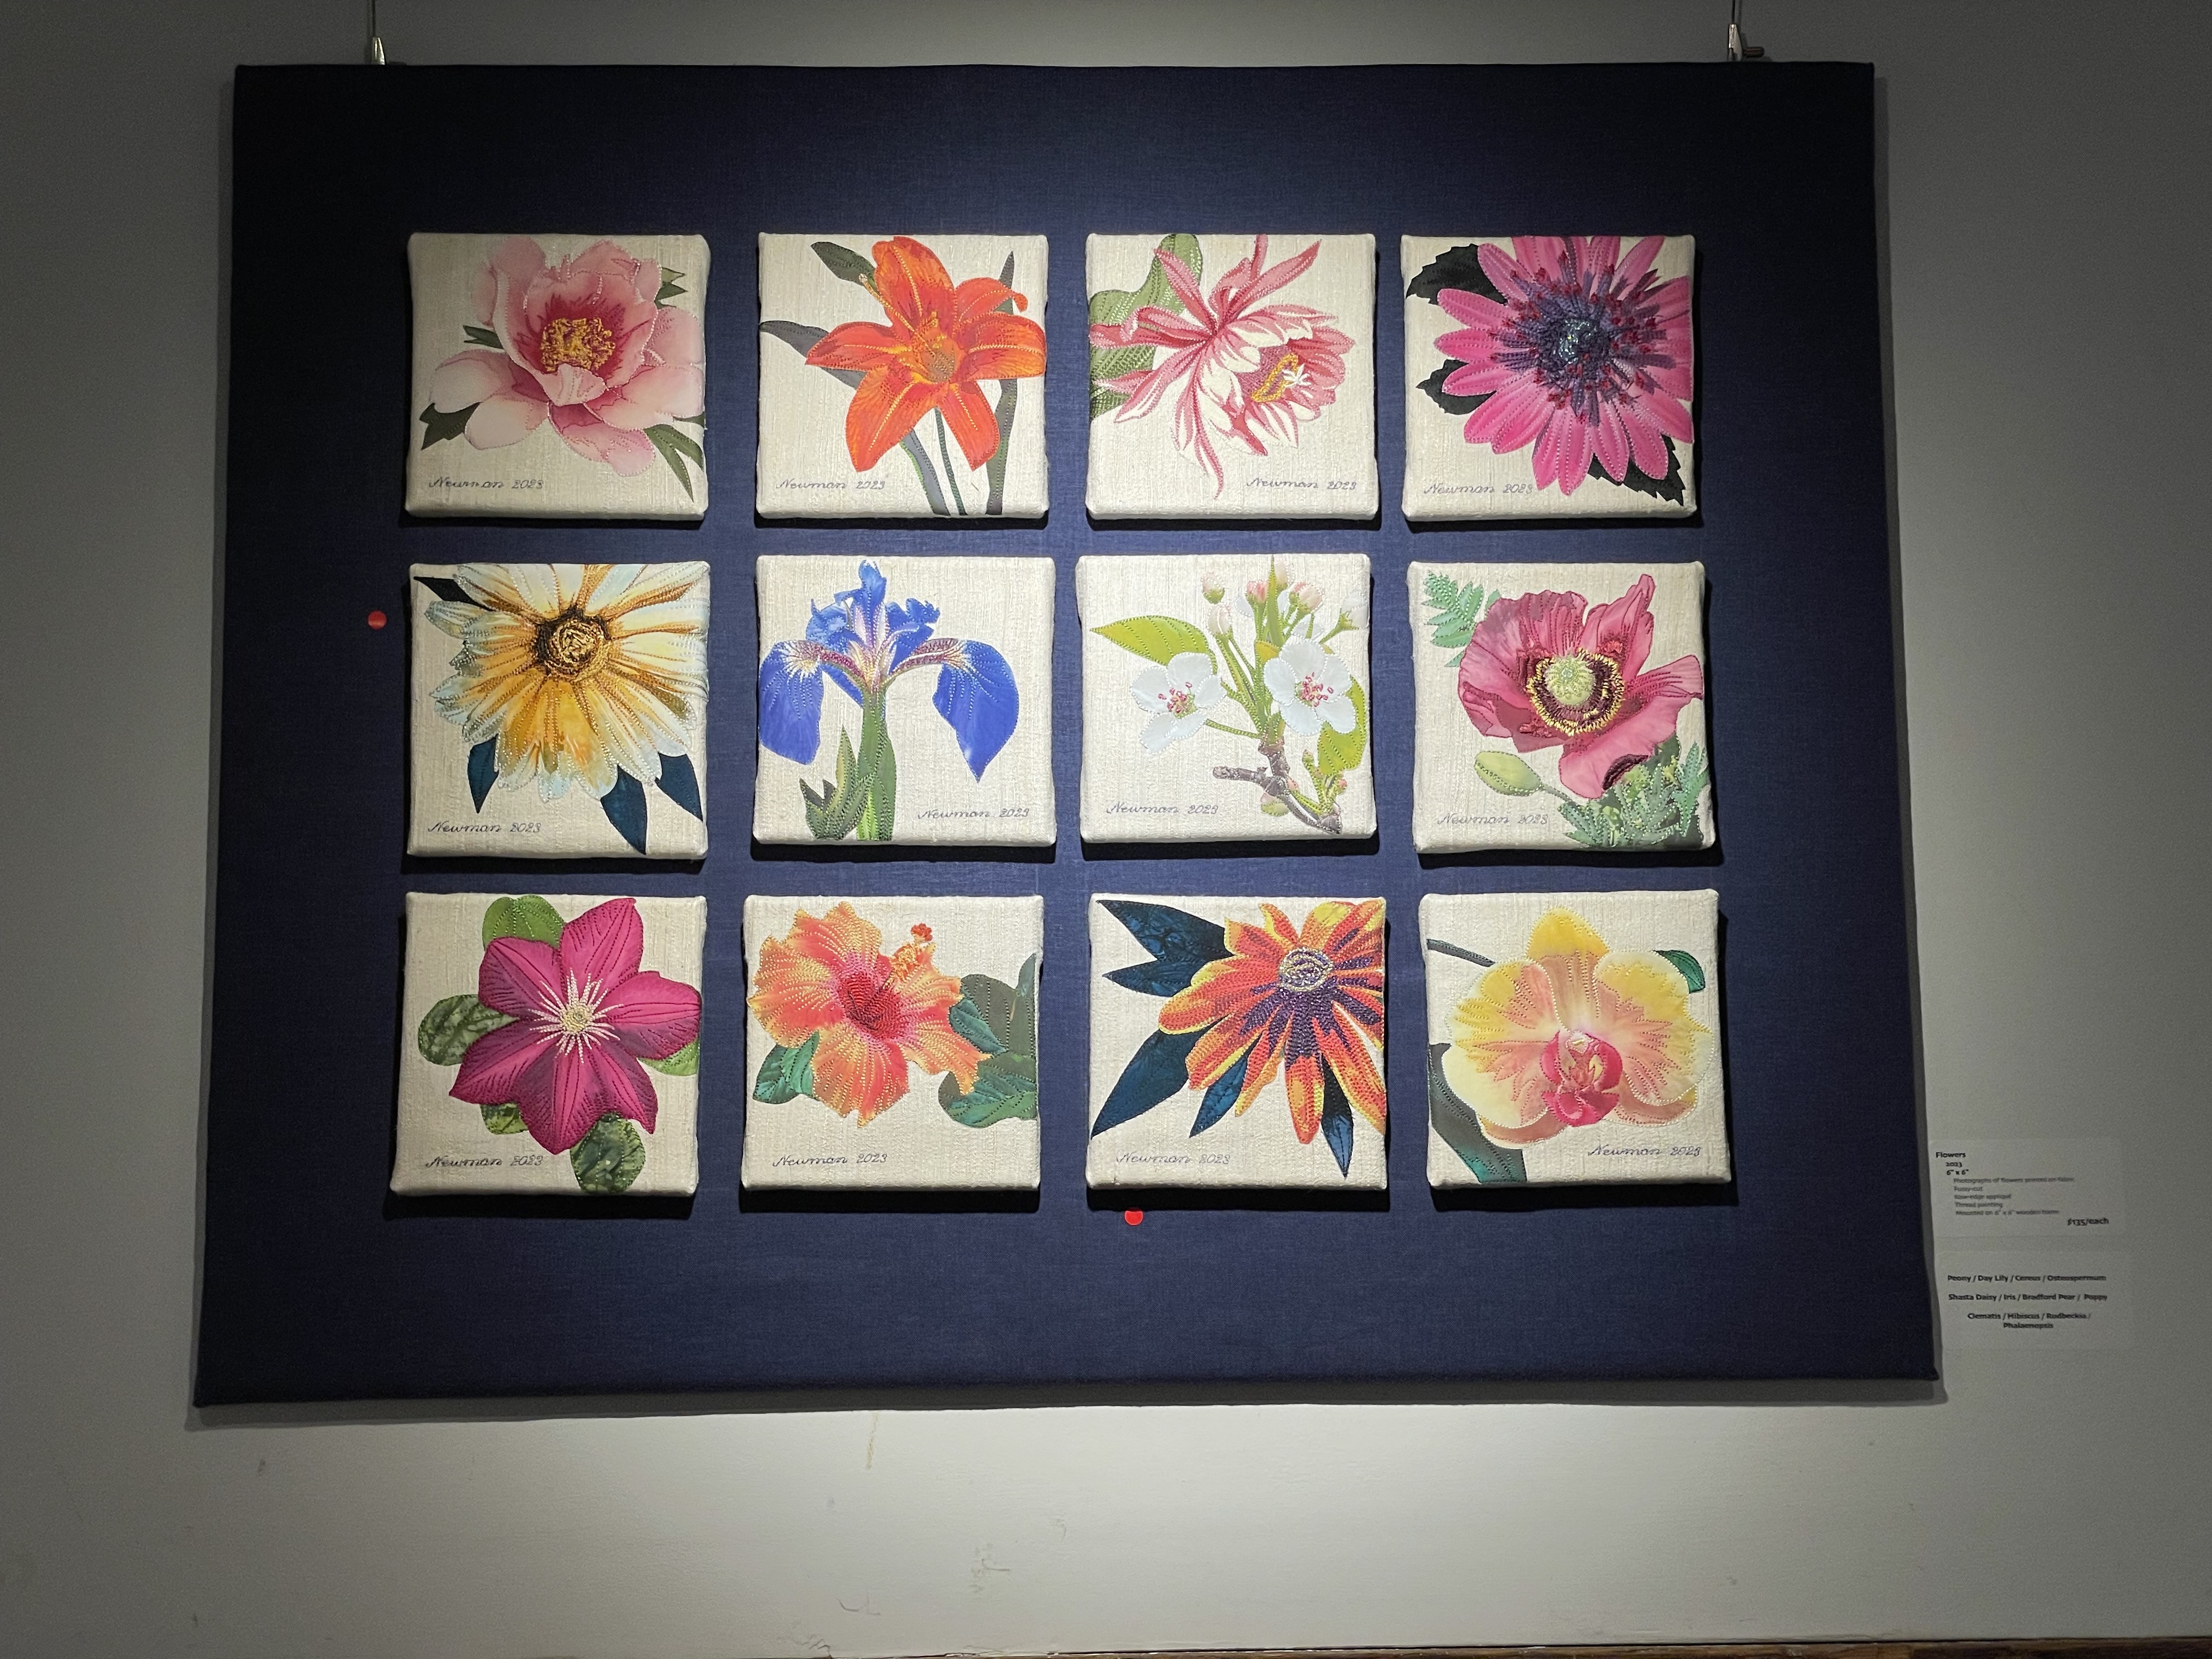
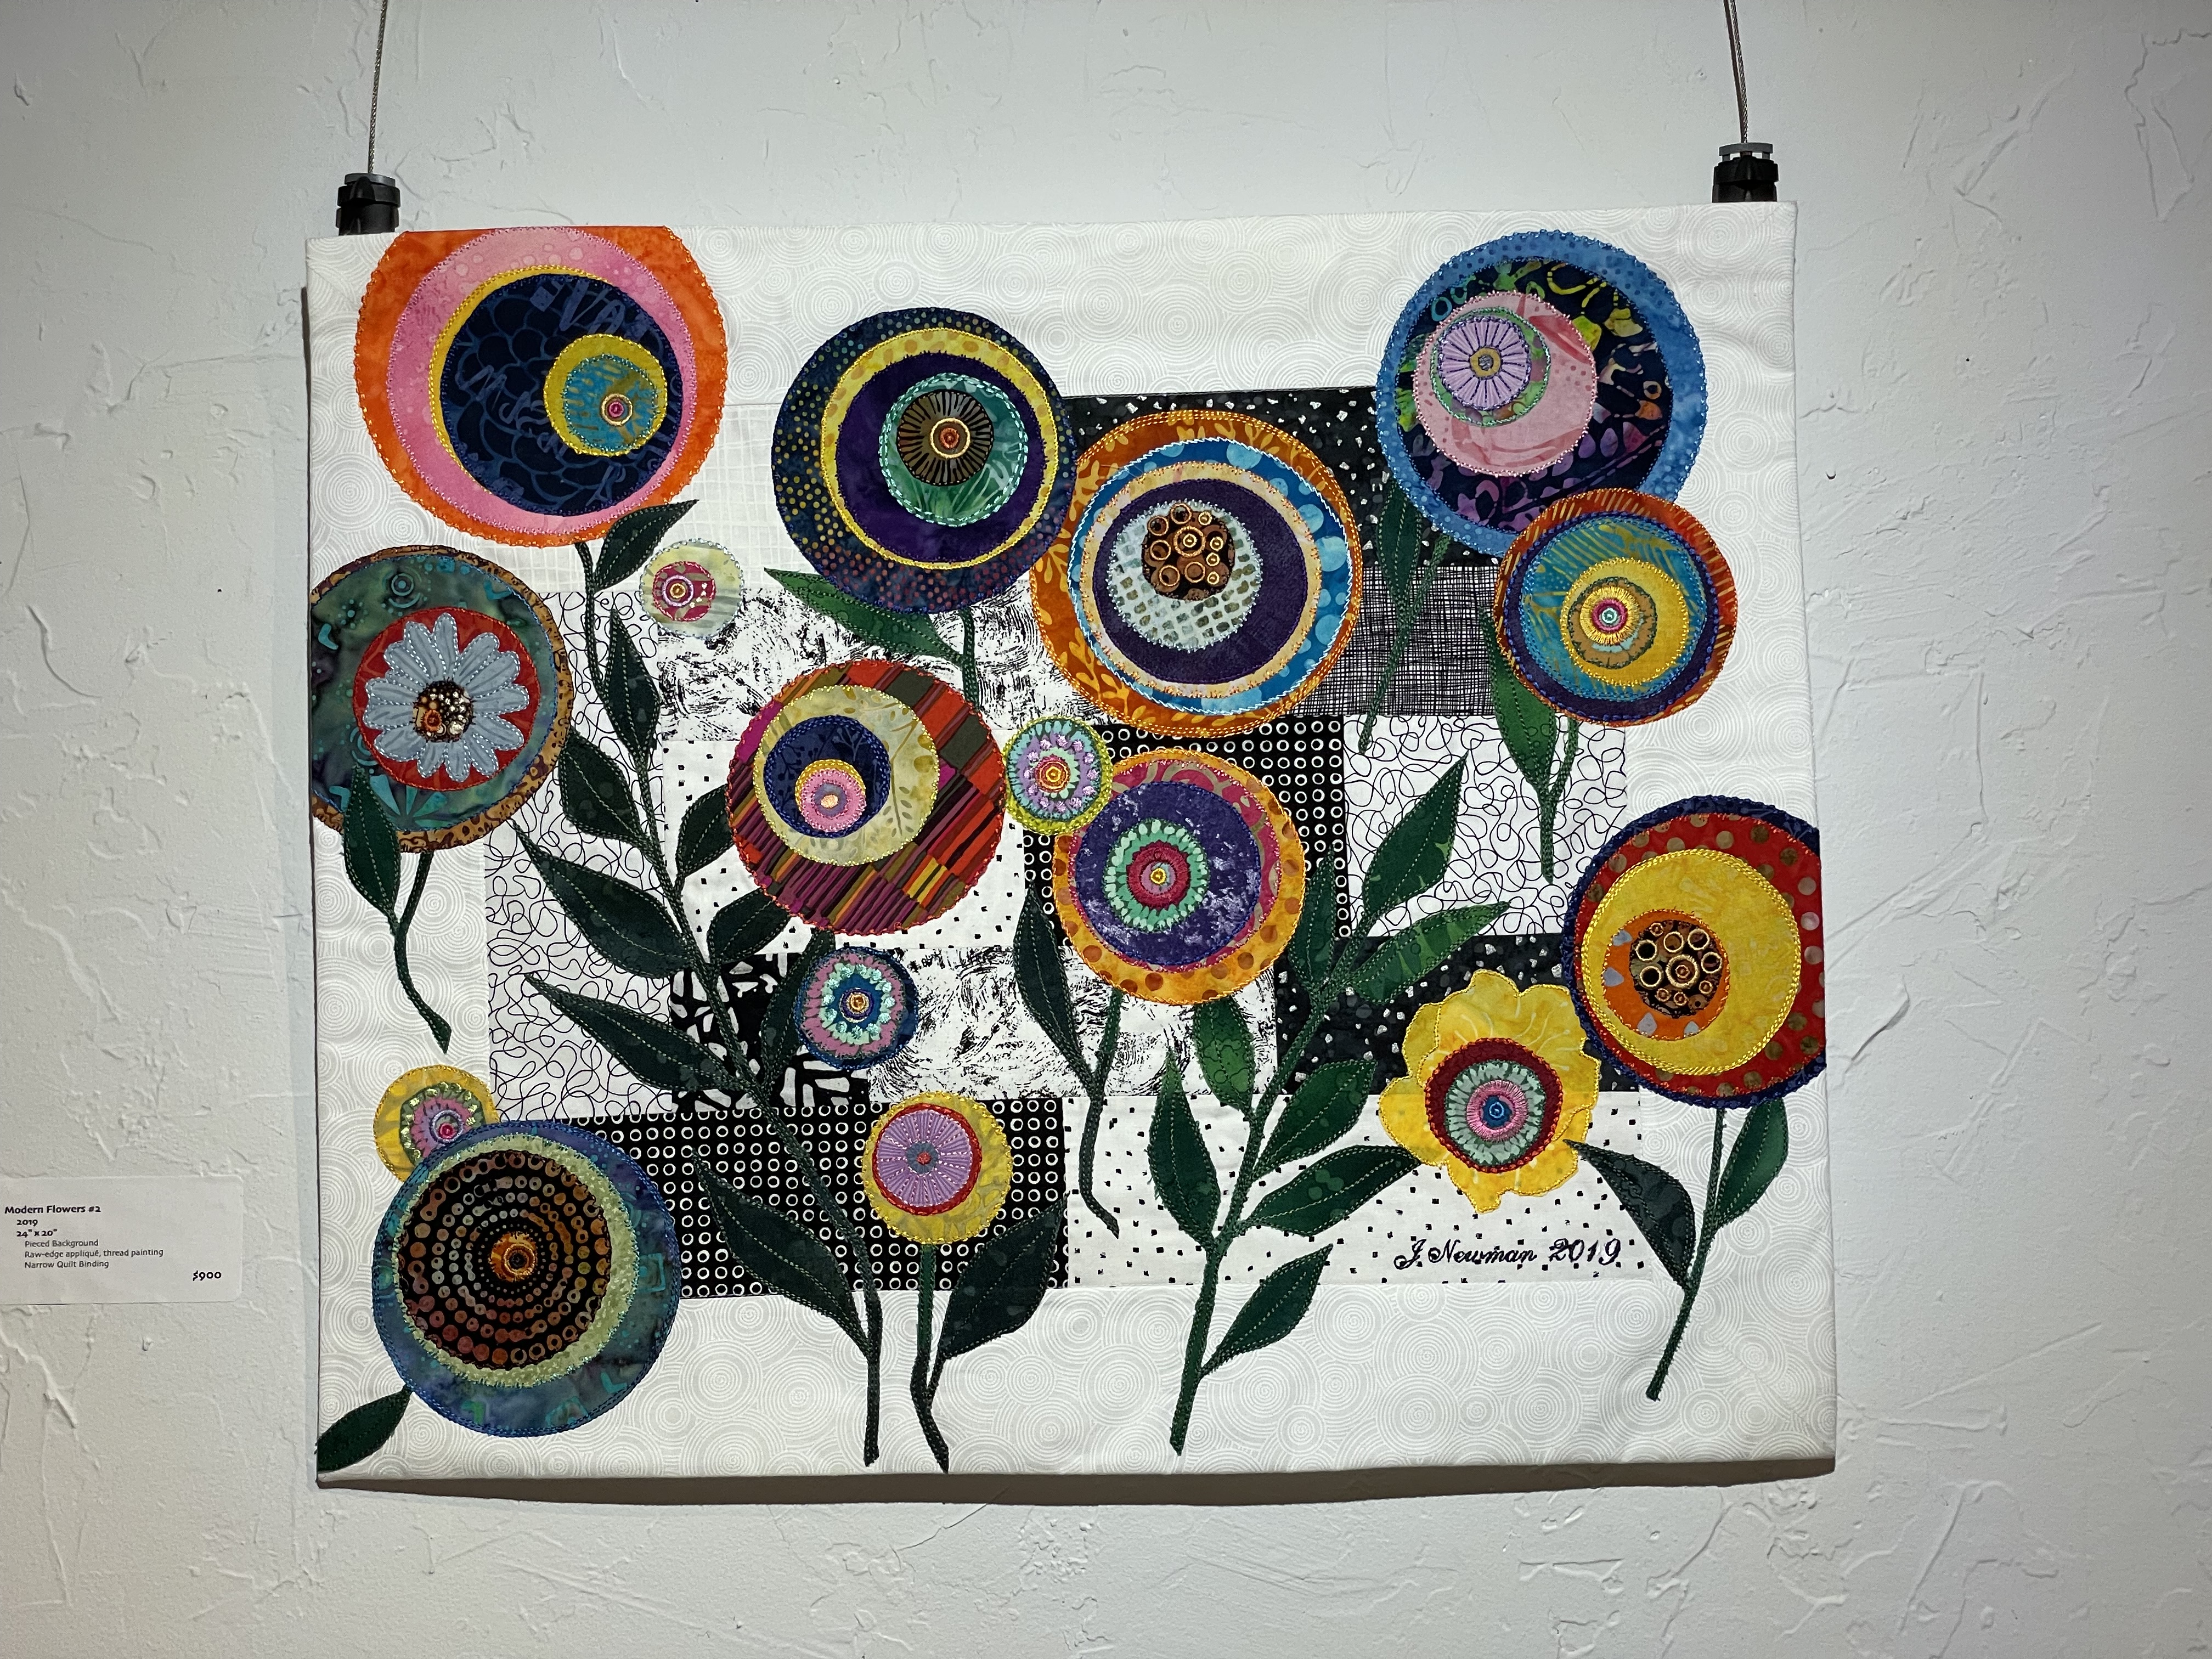
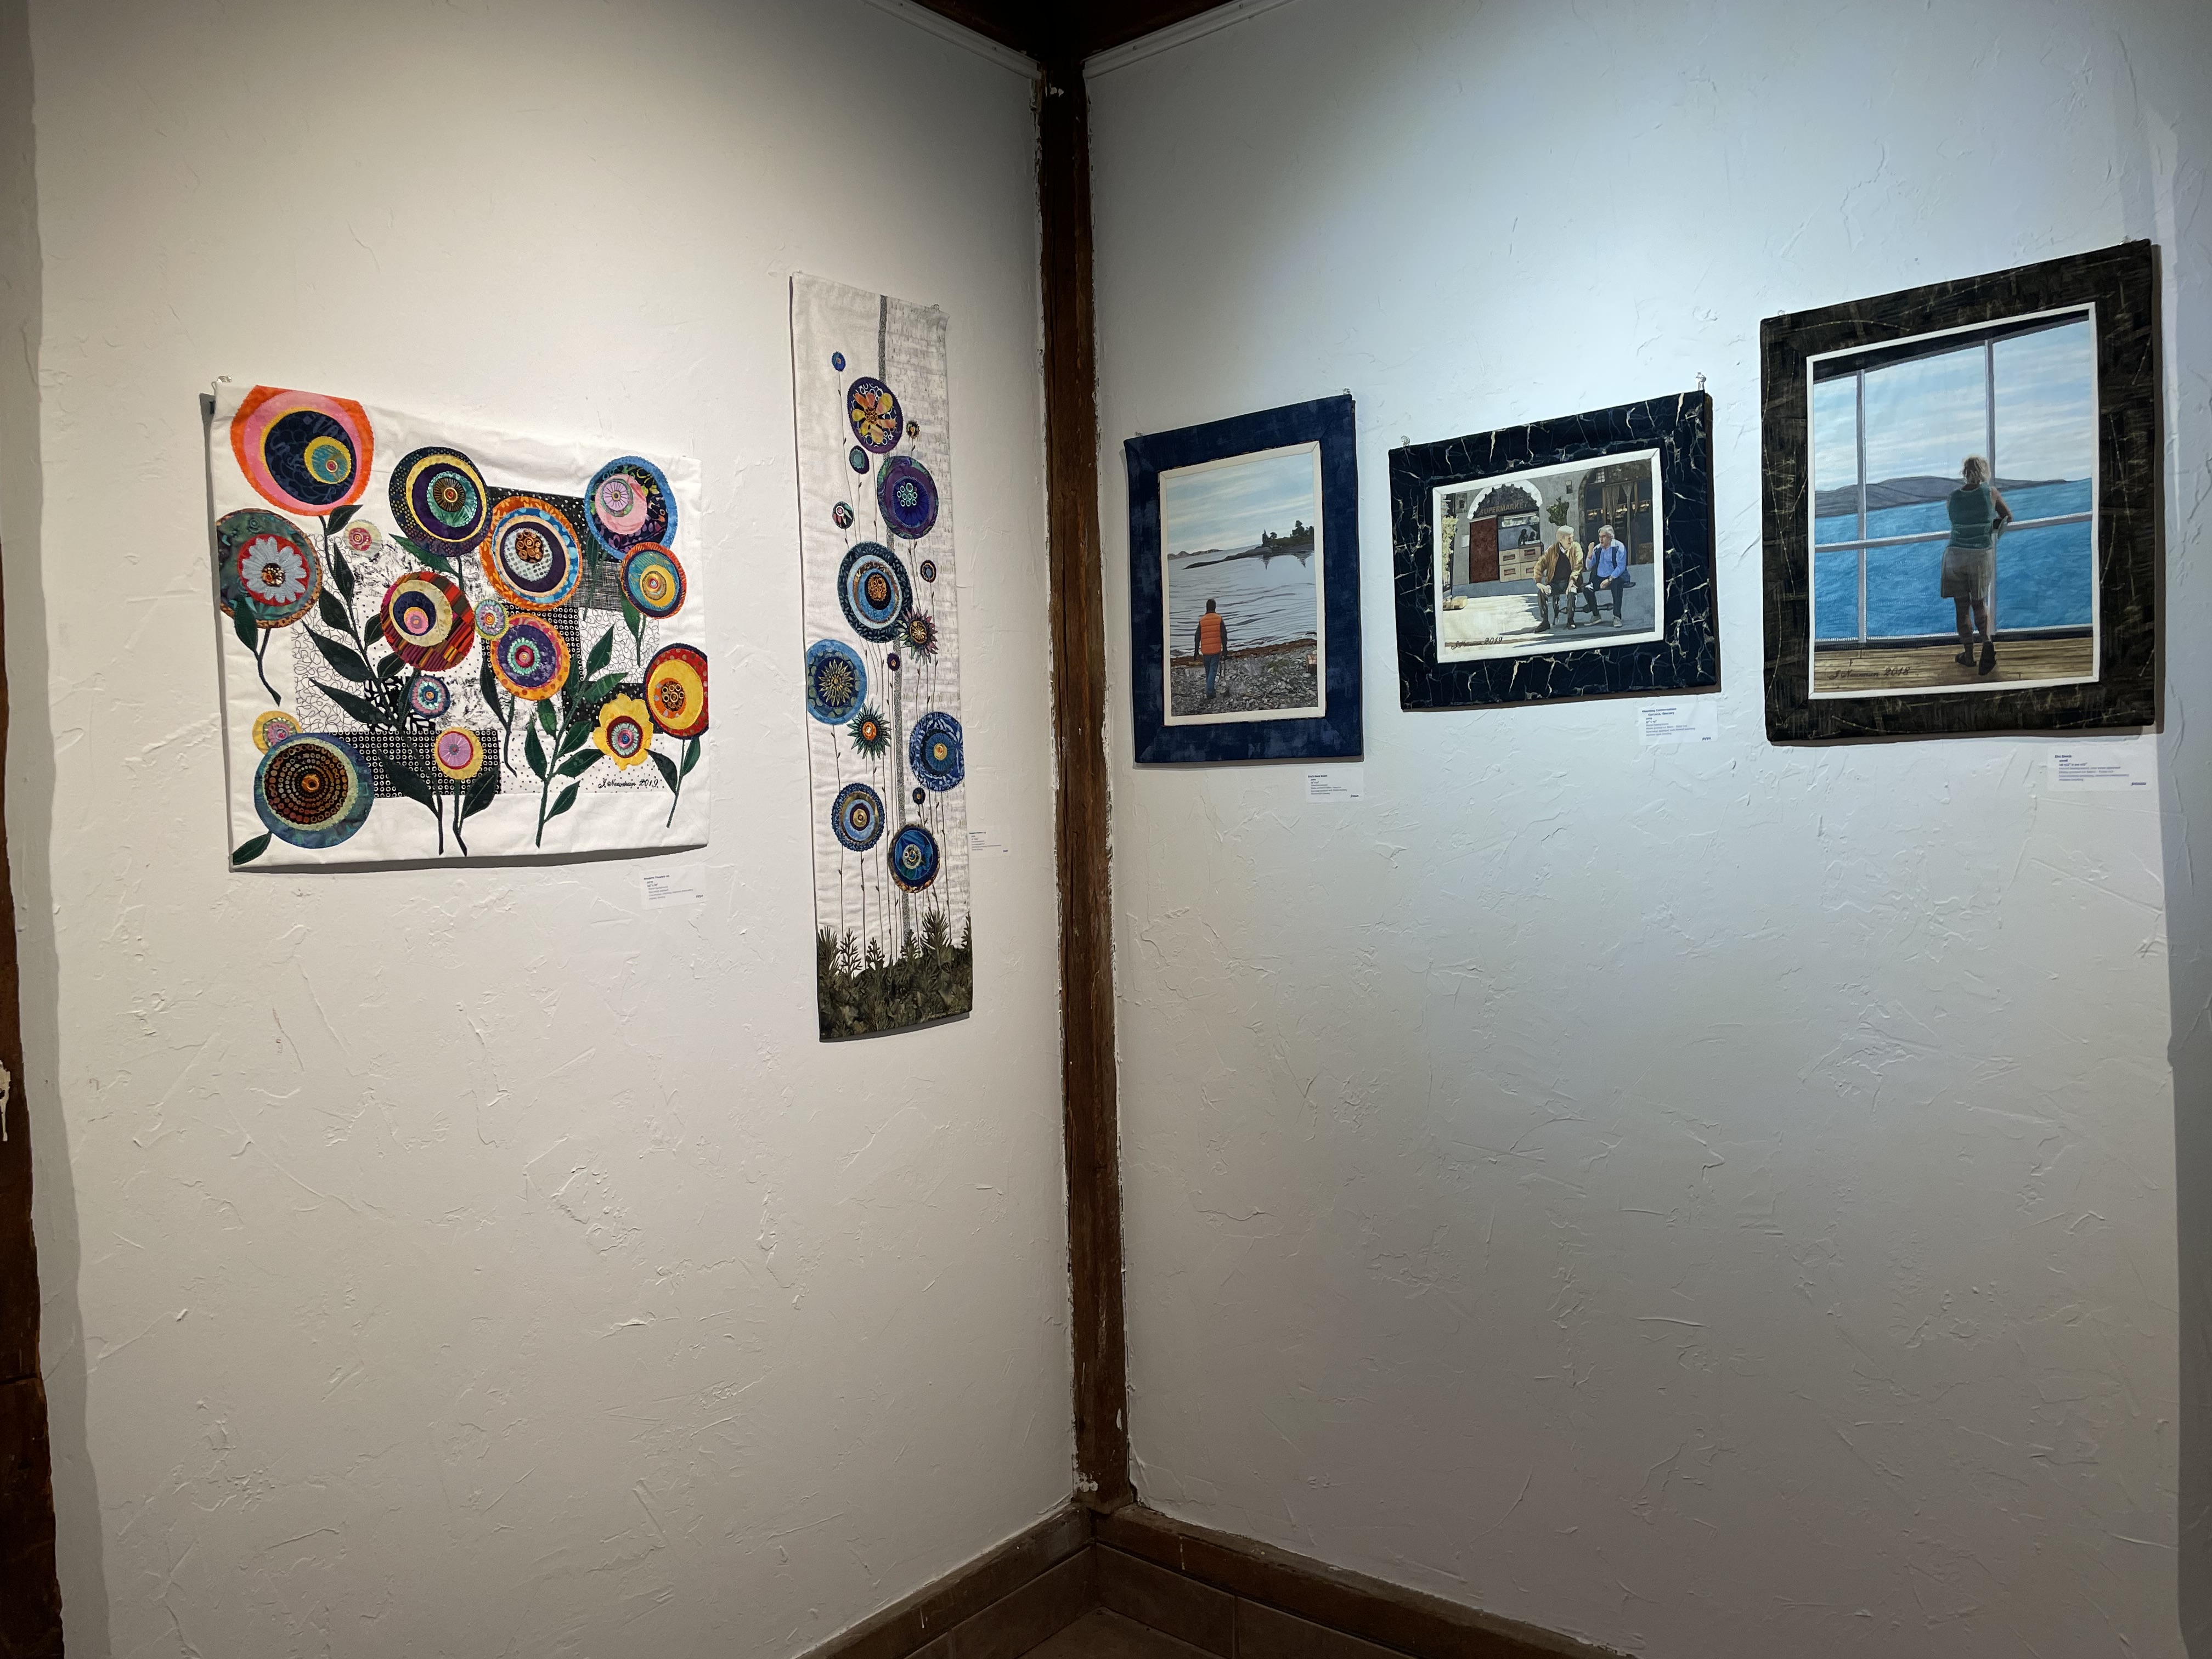
The “Modern Flower” Pieces
Turn to your left and you see the “Modern Flower” pieces – a couple of larger raw-edge appliqué works with the 6×6 pieces on a panel in between. On the end wall (on the left) I chose to hang the Asian Strips piece, showcasing the use of the asian print leftovers I used to assemble that quilt.
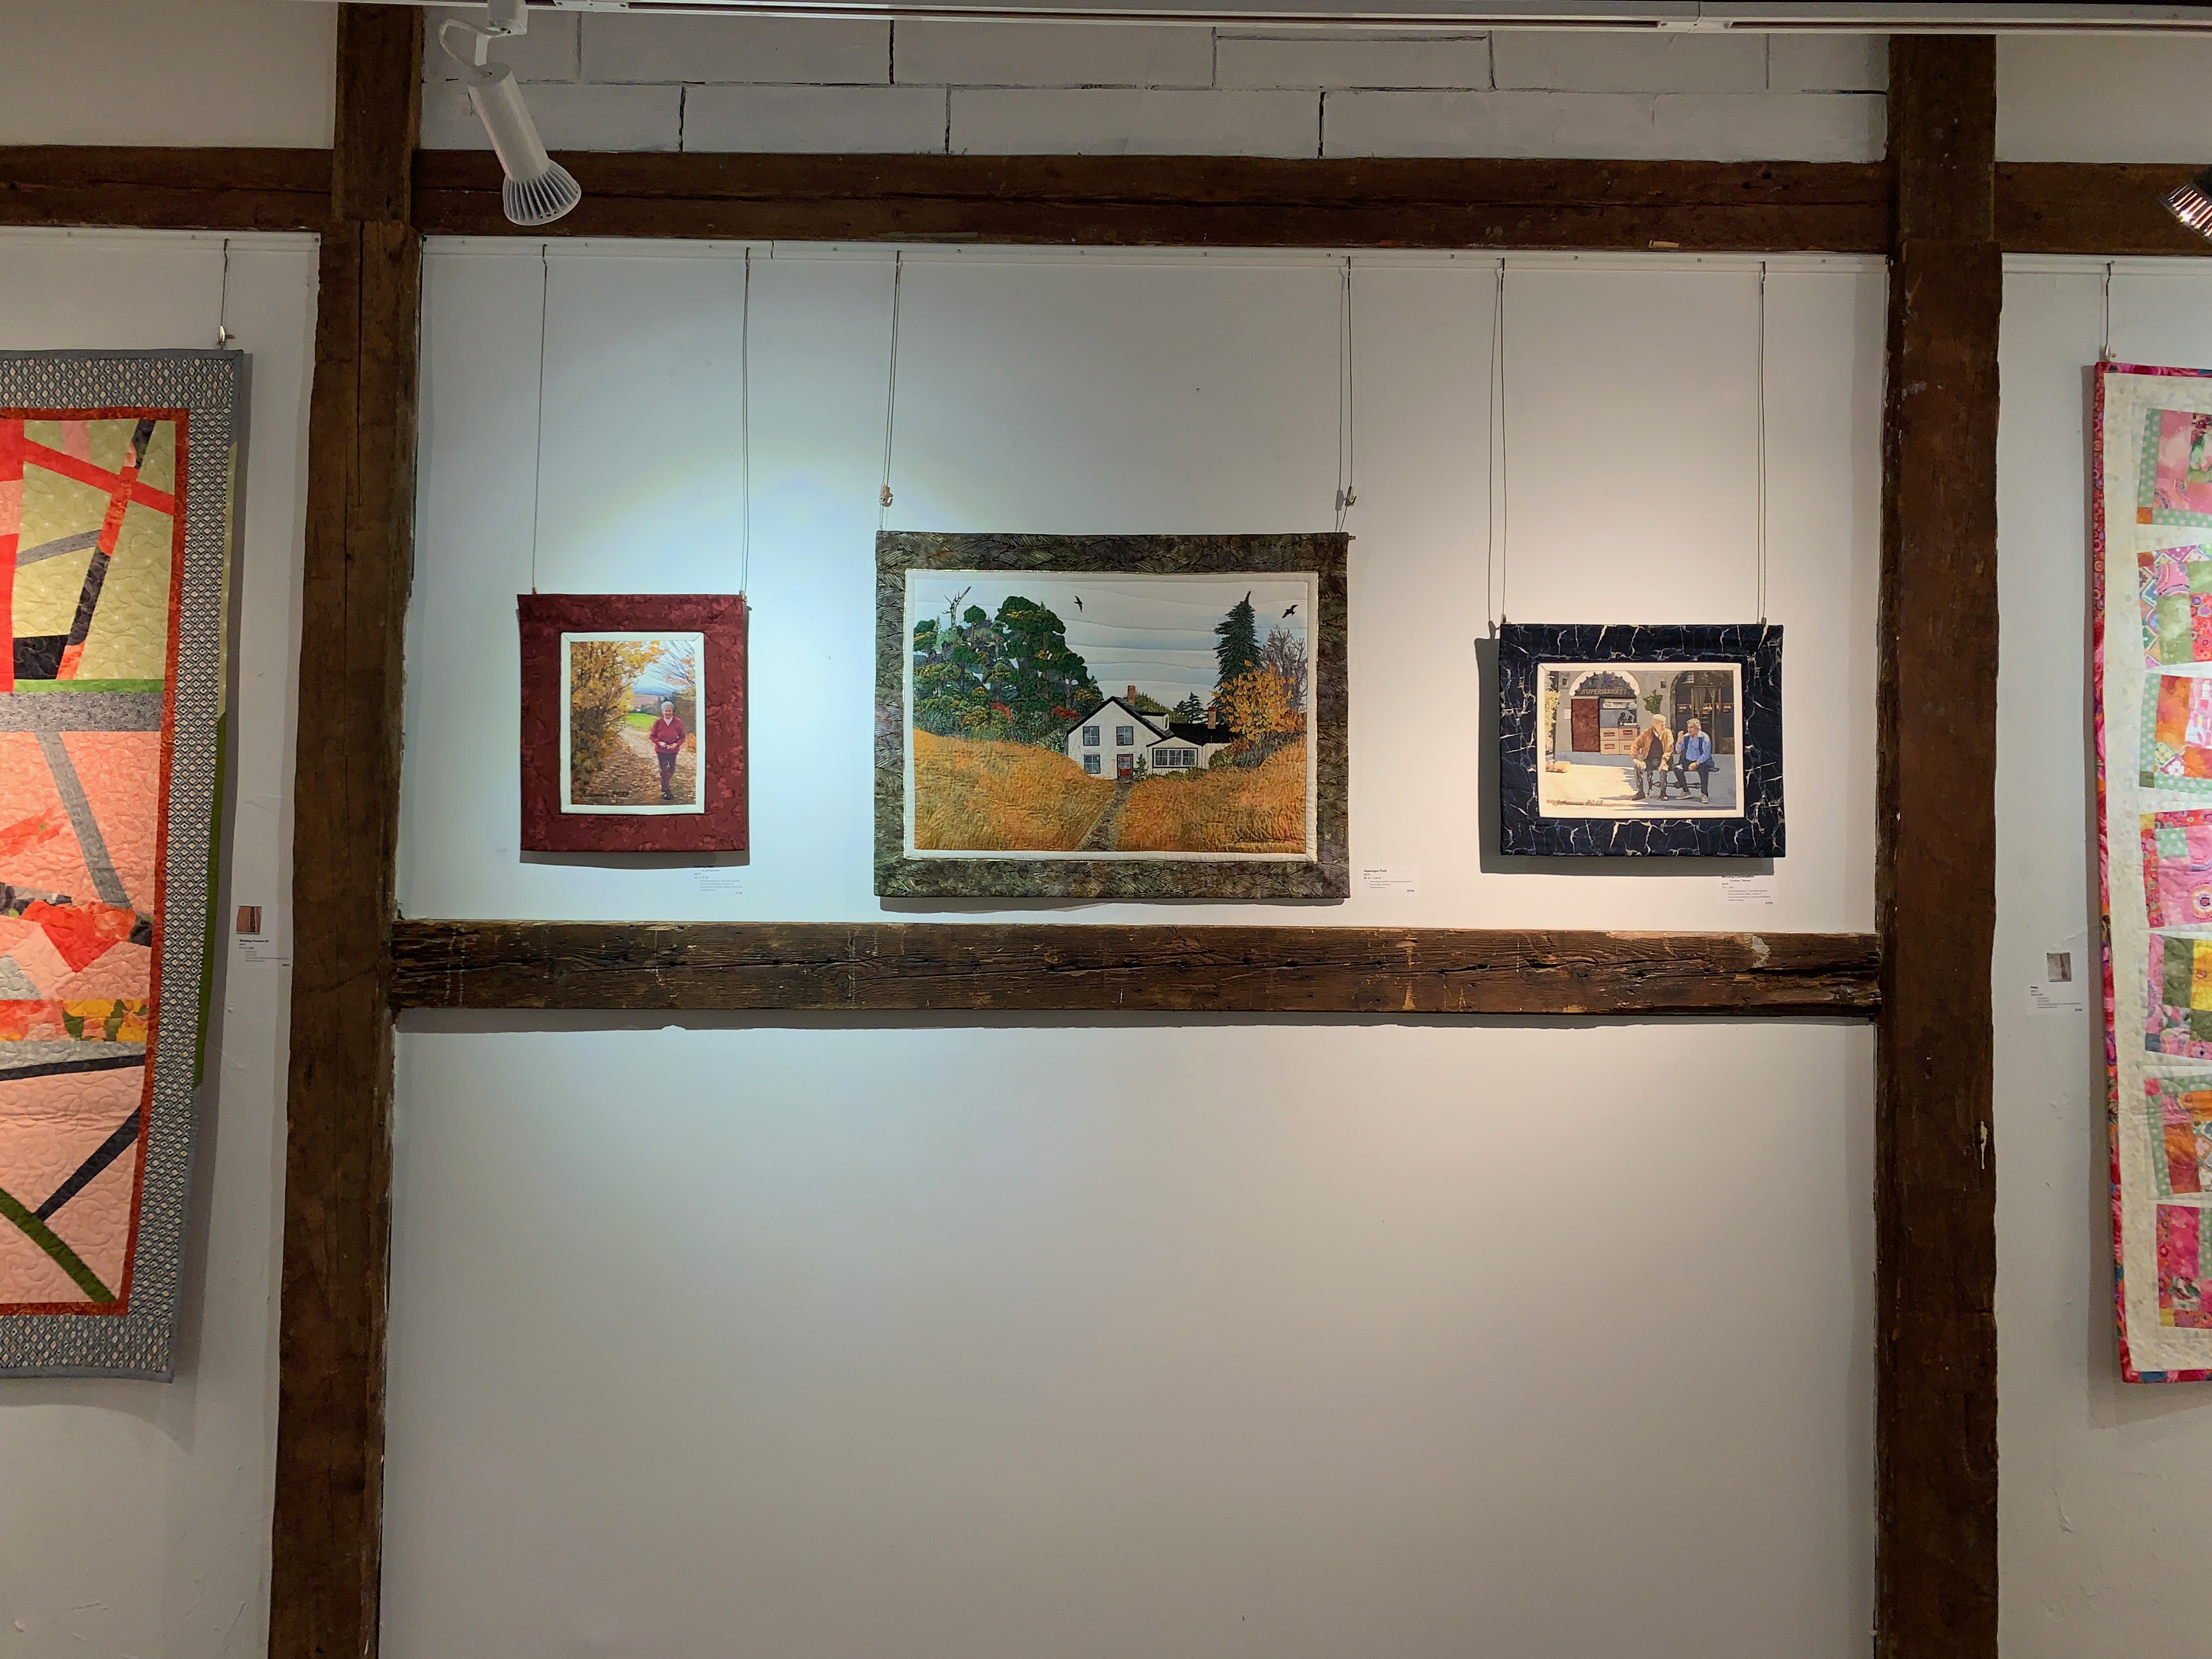
The “Convergence” Quilts
Again, turning to the left you see the “Flower” 6×6 panel above the horizontal post (three have sold so far!), followed by the Convergence quilts – Convergence Quilt #4, #3, and #2.
It always amazes me to see the quilts and small pieces hung in the gallery – the collection has such a different impact than seeing the art one quilt at a time. The technical work slips into the background as the visual impact takes over.
I spoke to a number of people at the opening during the afternoon, all of whom were interested in the decision-making that goes into each work, whether a lap quilt or a small 6×6 piece. People always want to know how long does it take – it’s an unanswerable question – there’s no way to account for the “thinking about it” time that goes into each textile work. The execution, the cutting out, the piecing, the quilting, the embellishing, the binding are all straightforward aspects of making this art. I can predict reasonably accurately how long each phase will take; but the thinking about it is out of my control – it takes as long as it takes.
The show is hanging in the Art Labs Community Gallery (121 Main Street) in Parrsboro NS until late afternoon on Thursday, June 15. If you happen to live near Halifax, or near Parrsboro, do drop by. In addition to the Community Gallery the four resident artists display their work as well. It’s worth a visit.
If you make it a day trip from Halifax, I’d recommend leaving around 9:00 am, driving straight to Parrsboro, visiting the gallery, then having lunch at the Harbourview Restaurant. After lunch mosey your way back, stop at the Five Islands Lighthouse Park to take in the ocean view. Further down the road visit Lowland Gardens – they always have some unusual plants there. You can’t drive back to Halifax without stopping at Masstown Market – fresh produce, great ice cream, good chili if you’re hungry. Depending on how long you take at each stop you should make it back to town between 6:00 – 7:30. You’ll have enjoyed the day.
PS – all of these pieces are for sale. If you’re interested in knowing more about any of them, email me: newman.judith@gmail.com.
21 Quilts & Wall Pieces [Click on photos to view enlargements]
@ Art Lab Studios and Gallery 2022
Today I hung my quilts and wall pieces at the Art Lab Studios & Gallery in Parrsboro. I didn’t hang everything I took with me, opting for the “less is more” principle. Nevertheless, I’m delighted with how the show looks.
I spent the afternoon as “artist in residence” to chat with folks who dropped by for the “opening” – there were probably a dozen visitors who stopped to look, half of whom actually wanted to learn more about the works themselves. Lovely conversations with each of them.
This year, I wanted to show the new quilts produced since last summer as well as a “retrospective” of what I refer to as “the portrait” pieces – the wall art based on my photos where I print elements of a photo on fabric and embed them in a pieced background. The initial reaction is always that you’re looking at a photo and then only when you step closer do you see you’re viewing a textile/thread piece.
The show hangs until late in the afternoon of August 18 in Parrsboro NS.
121 Main Street, Parrsboro NS
If you’re considering a day trip to Parrsboro make sure to stop for lunch at The Pier / Harbourview Restaurant in Parrsboro. Ruby and I went there just to have their lobster roll – it won’t disappoint you!
Lobster Roll (after taking a big bite!)
A nicely toasted (buttered) hotdog bun FILLED with chunks of fresh lobster seated on some lettuce (OK, so there wasn’t any chopped celery, but we didn’t complain because there was so much lobster). We added a single kids’ portion of fries which we shared (just enough for two without having to feel guilty about eating them).
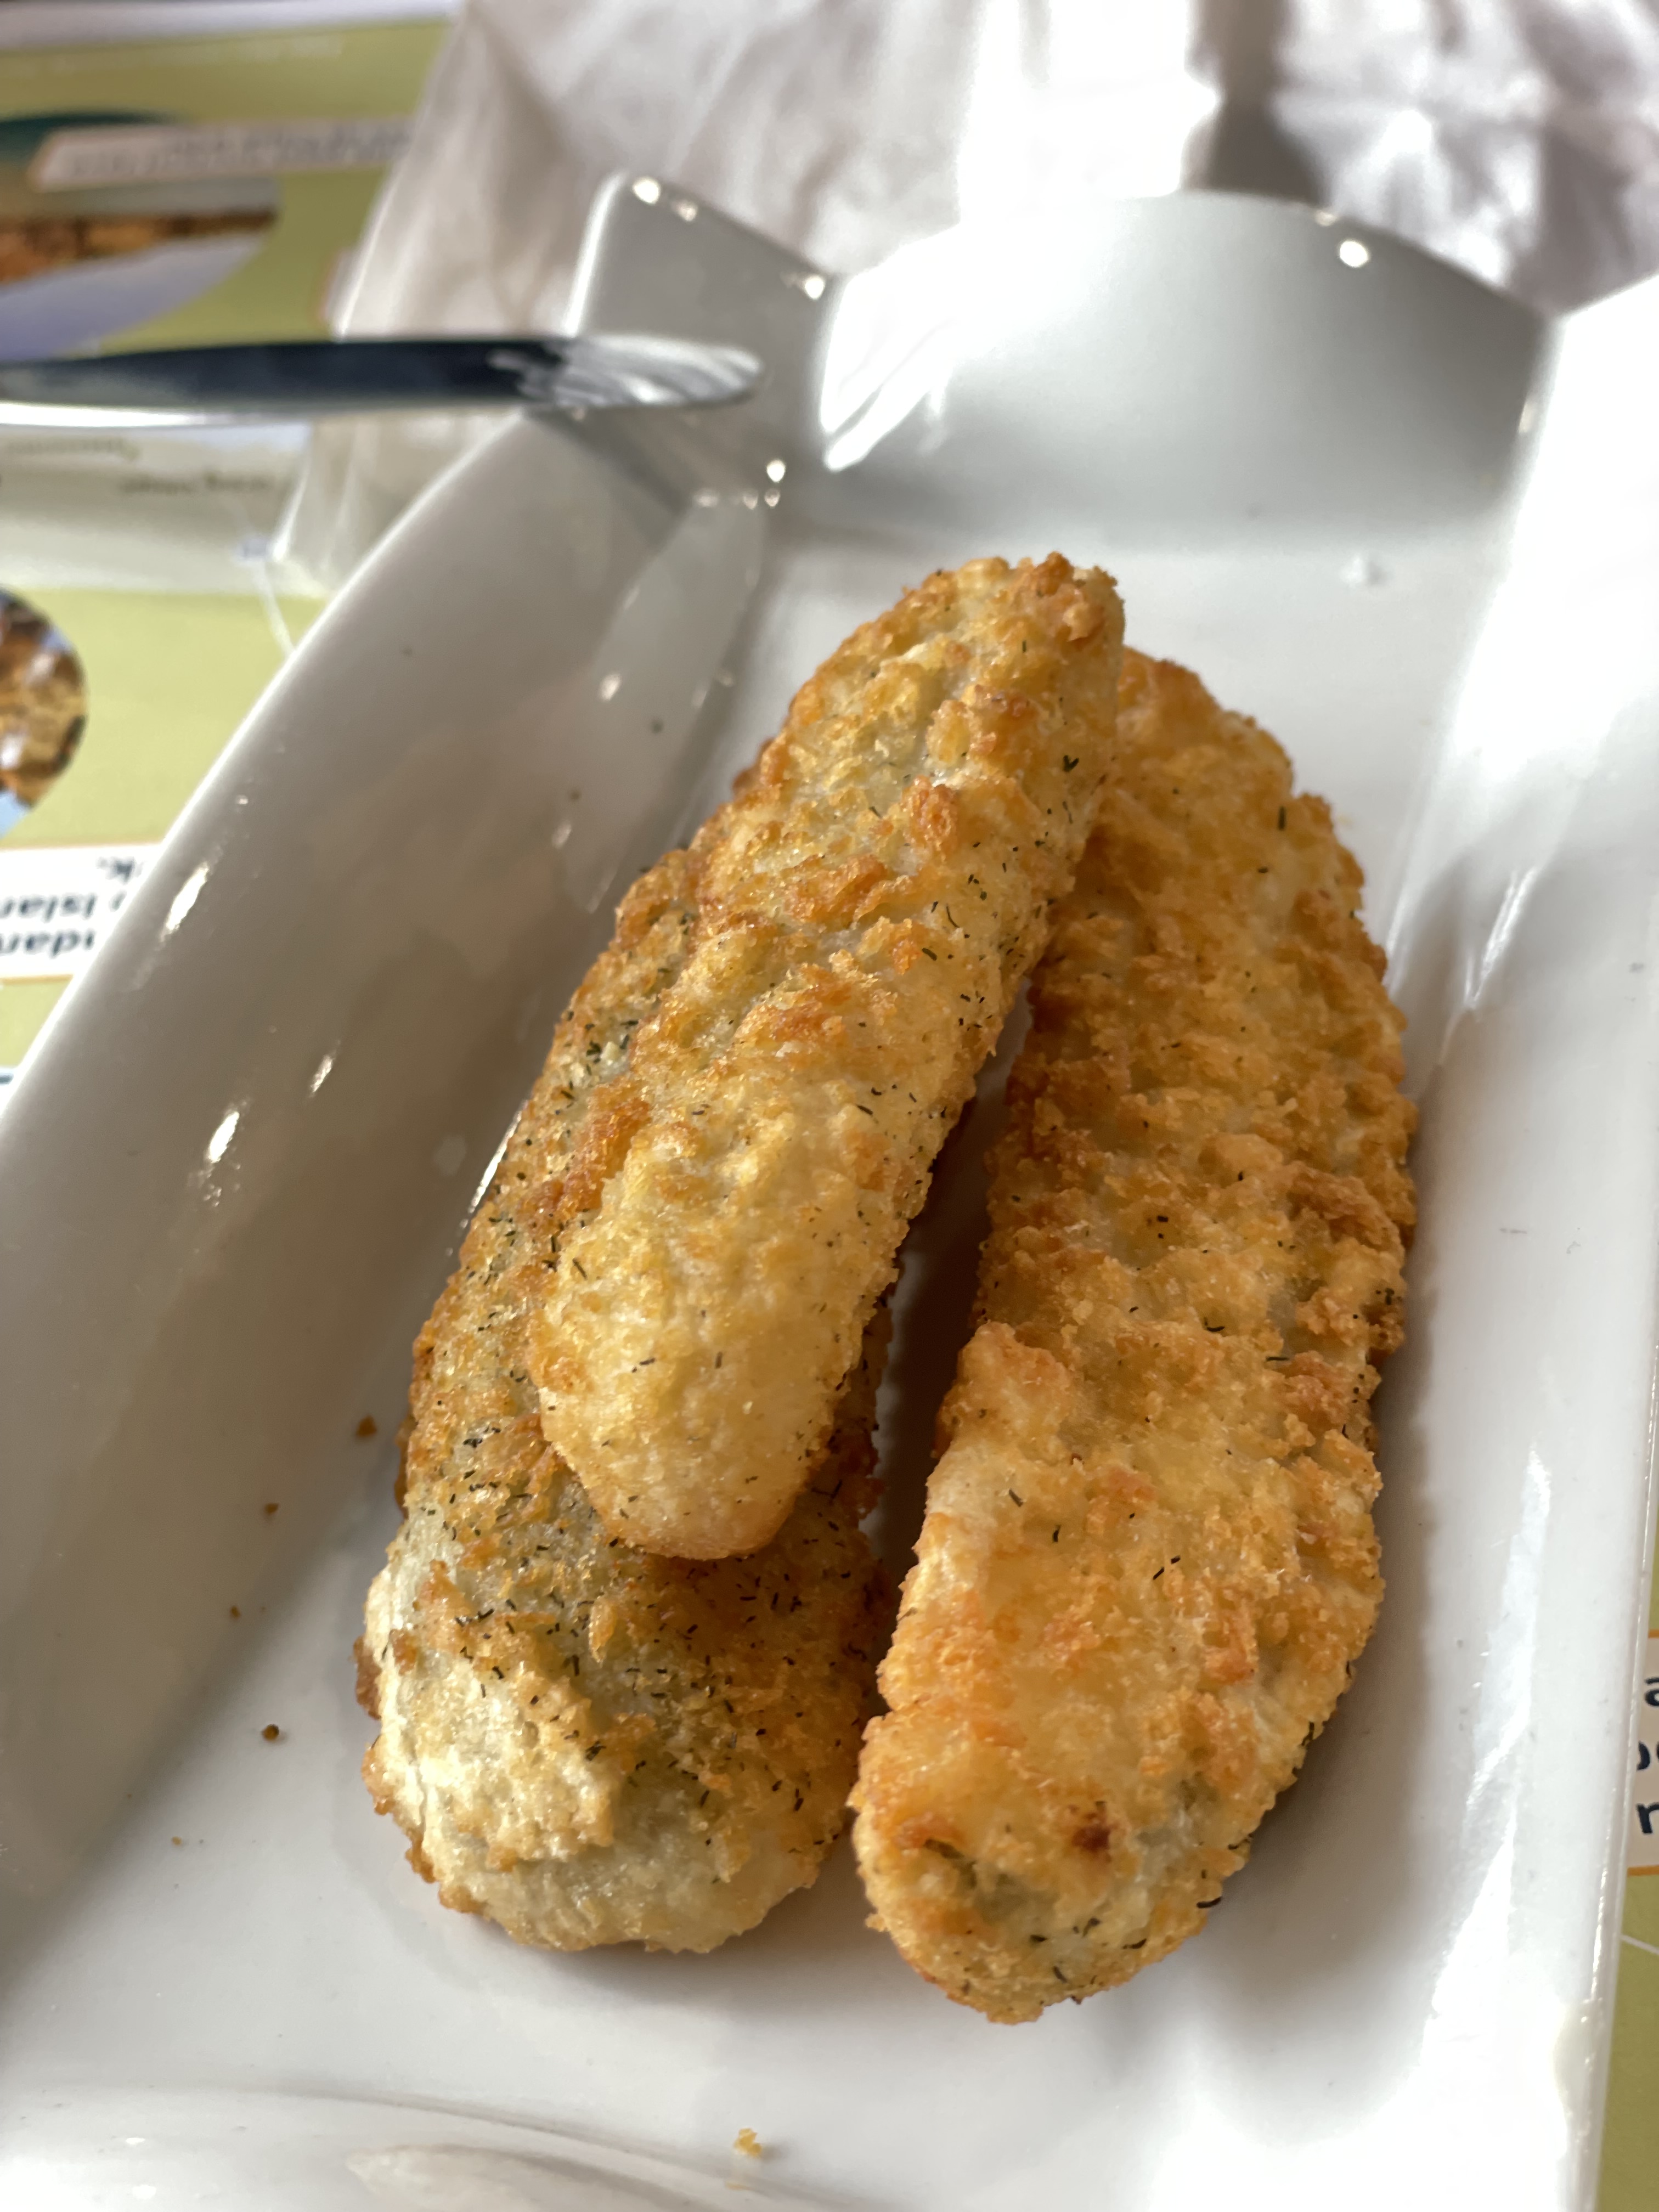
We started with the deep fried battered dill pickle – yes you got that right – a Pier Restaurant invention, I think. Crazy but surprisingly tasty. Ruby had never had anything like it so I ordered some. Comes with tartar sauce for dipping.
Deep Fried Battered Dill Pickle
On our way back to the city we stopped at “The Egg Lady” – to pick up 5 dozen fresh eggs for a friend of mine. Laid today, they’ll last her for several weeks.
Drove yesterday to Parrsboro, NS to set up a show of 22 quilts and wall art pieces which will hang in the Art Lab Studio and Gallery until August 30.
I’m always amazed at what my work looks like when hanging together like this – I can see just how much I accomplished in a year. The reaction of the visitors yesterday at the opening was encouraging – people were interested in how I constructed the wall art, particularly those pieces with photo elements printed on cotton.
It seems the favourite pieces, they got a lot of attention, are the modern “flower” appliqué hangings. I thought the “banner” pieces might generate interest but the flowers seem to be winning out.
Until I saw the show hanging, I hadn’t realized how much turquoise featured in my work this year. It shows up in quite a few of the quilts and hangings as a highlight colour.
I gave away another quilt this morning. It’s going to a new home and I’m happy for it. I know it will be used well and appreciated.
Quilt Top – Convergence Quilt
I need to draw up a list of friends who would appreciate receiving a quilt and give more away. I have three which I’ve put out to use myself and some of the rest in that closet need to move on.
I’ve given away about half of the quilts I’ve produced since I began quilting 15 years ago. If I have them hanging around too long I grow attached to them and it becomes harder to send them on their way. I like keeping particular ones on hand as examples for classes but I have photos of every quilt I have made (front and back) and, you know what, that will have to be enough.
My sister and niece were here from Toronto last weekend to visit the boys attending summer camp not far from the city. I was able to spend time with each of them at the apartment and to my delight two quilts have found a new home.
My niece fell in love with this “Double Vision” quilt which I completed in 2017. She has new light furniture in her family room and this quilt will be a bright addition to the room.
Finished Quilt Top
My sister came over a few days later – I showed her the quilt I wanted her to take back to Toronto for my niece. She loved the red. I mentioned there were more red quilts in my closet. In the end she chose the Shadow Quilt I made in 2016 to complement her new grey furniture. I love how the red blocks seem to float above the background – that, of course, is the effect of having a drop shadow on an image, it creates the illusion of depth.
That gives me room to make two new quilts. I have to go through what I have in the collection and see if I can find homes for a few more of them.
Just finished the central panel of the Layer Cake Quilt. I had two challenges with this quilt – the number of small pieces (408) and making the fabric I had on hand go as far as made sense in the context of this quilt design. Total number of fabric pieces in this 4 x 6 quilt – 600! Given the fiddlely work with the 1 1/2″ white squares I’m surprised that my points work as well as they do! Not 100% perfect, but close enough that when the final quilt is quilted the slight imperfections are not going to be noticeable.
Center Panel
Now I need borders. I want to introduce a contrasting colour. I have some 4 1/2″ batik strips that bring out the rusty/beige colours in the central panel, but I think a wide border in that fabric will be too strong – I’m thinking a 1/2″ – 3/4″ border will be enough (the question is whether to piece the strip in or to create a narrow flange). The outside wide border will be the white Zen Chic fabric used in the panel itself. My problem is that I have, at the moment, just four 4 1/2″ strips of that fabric! My local shop has none left! I’ve ordered some from the Fat Quarter Shop online (they had what I needed, my other usual sources didn’t) but the fabric hasn’t yet arrived. So I’m on hold for the moment.
I guess I can fill in the waiting time by going through my fabric stash and pulling out something for my next quilt….
Here’s where I left off yesterday – with the darker, busier yellows in the center – too heavy, not enough gradation from center outward.
Where I left off Saturday
So I began playing some more. The first thing I did was add two more rows to the bottom. It just so happened I cut twice as many blocks (the size of charms – 5″ squares) of both the greys and the yellows than I needed so I had lots of squares to work with.
Next, I dug out an even lighter grey from the stash to use in the centre. I matched it up with some of the stronger yellows. Then worked my way through the other blocks swapping out those with the most detail in the pattern for more clearly yellow fabrics.
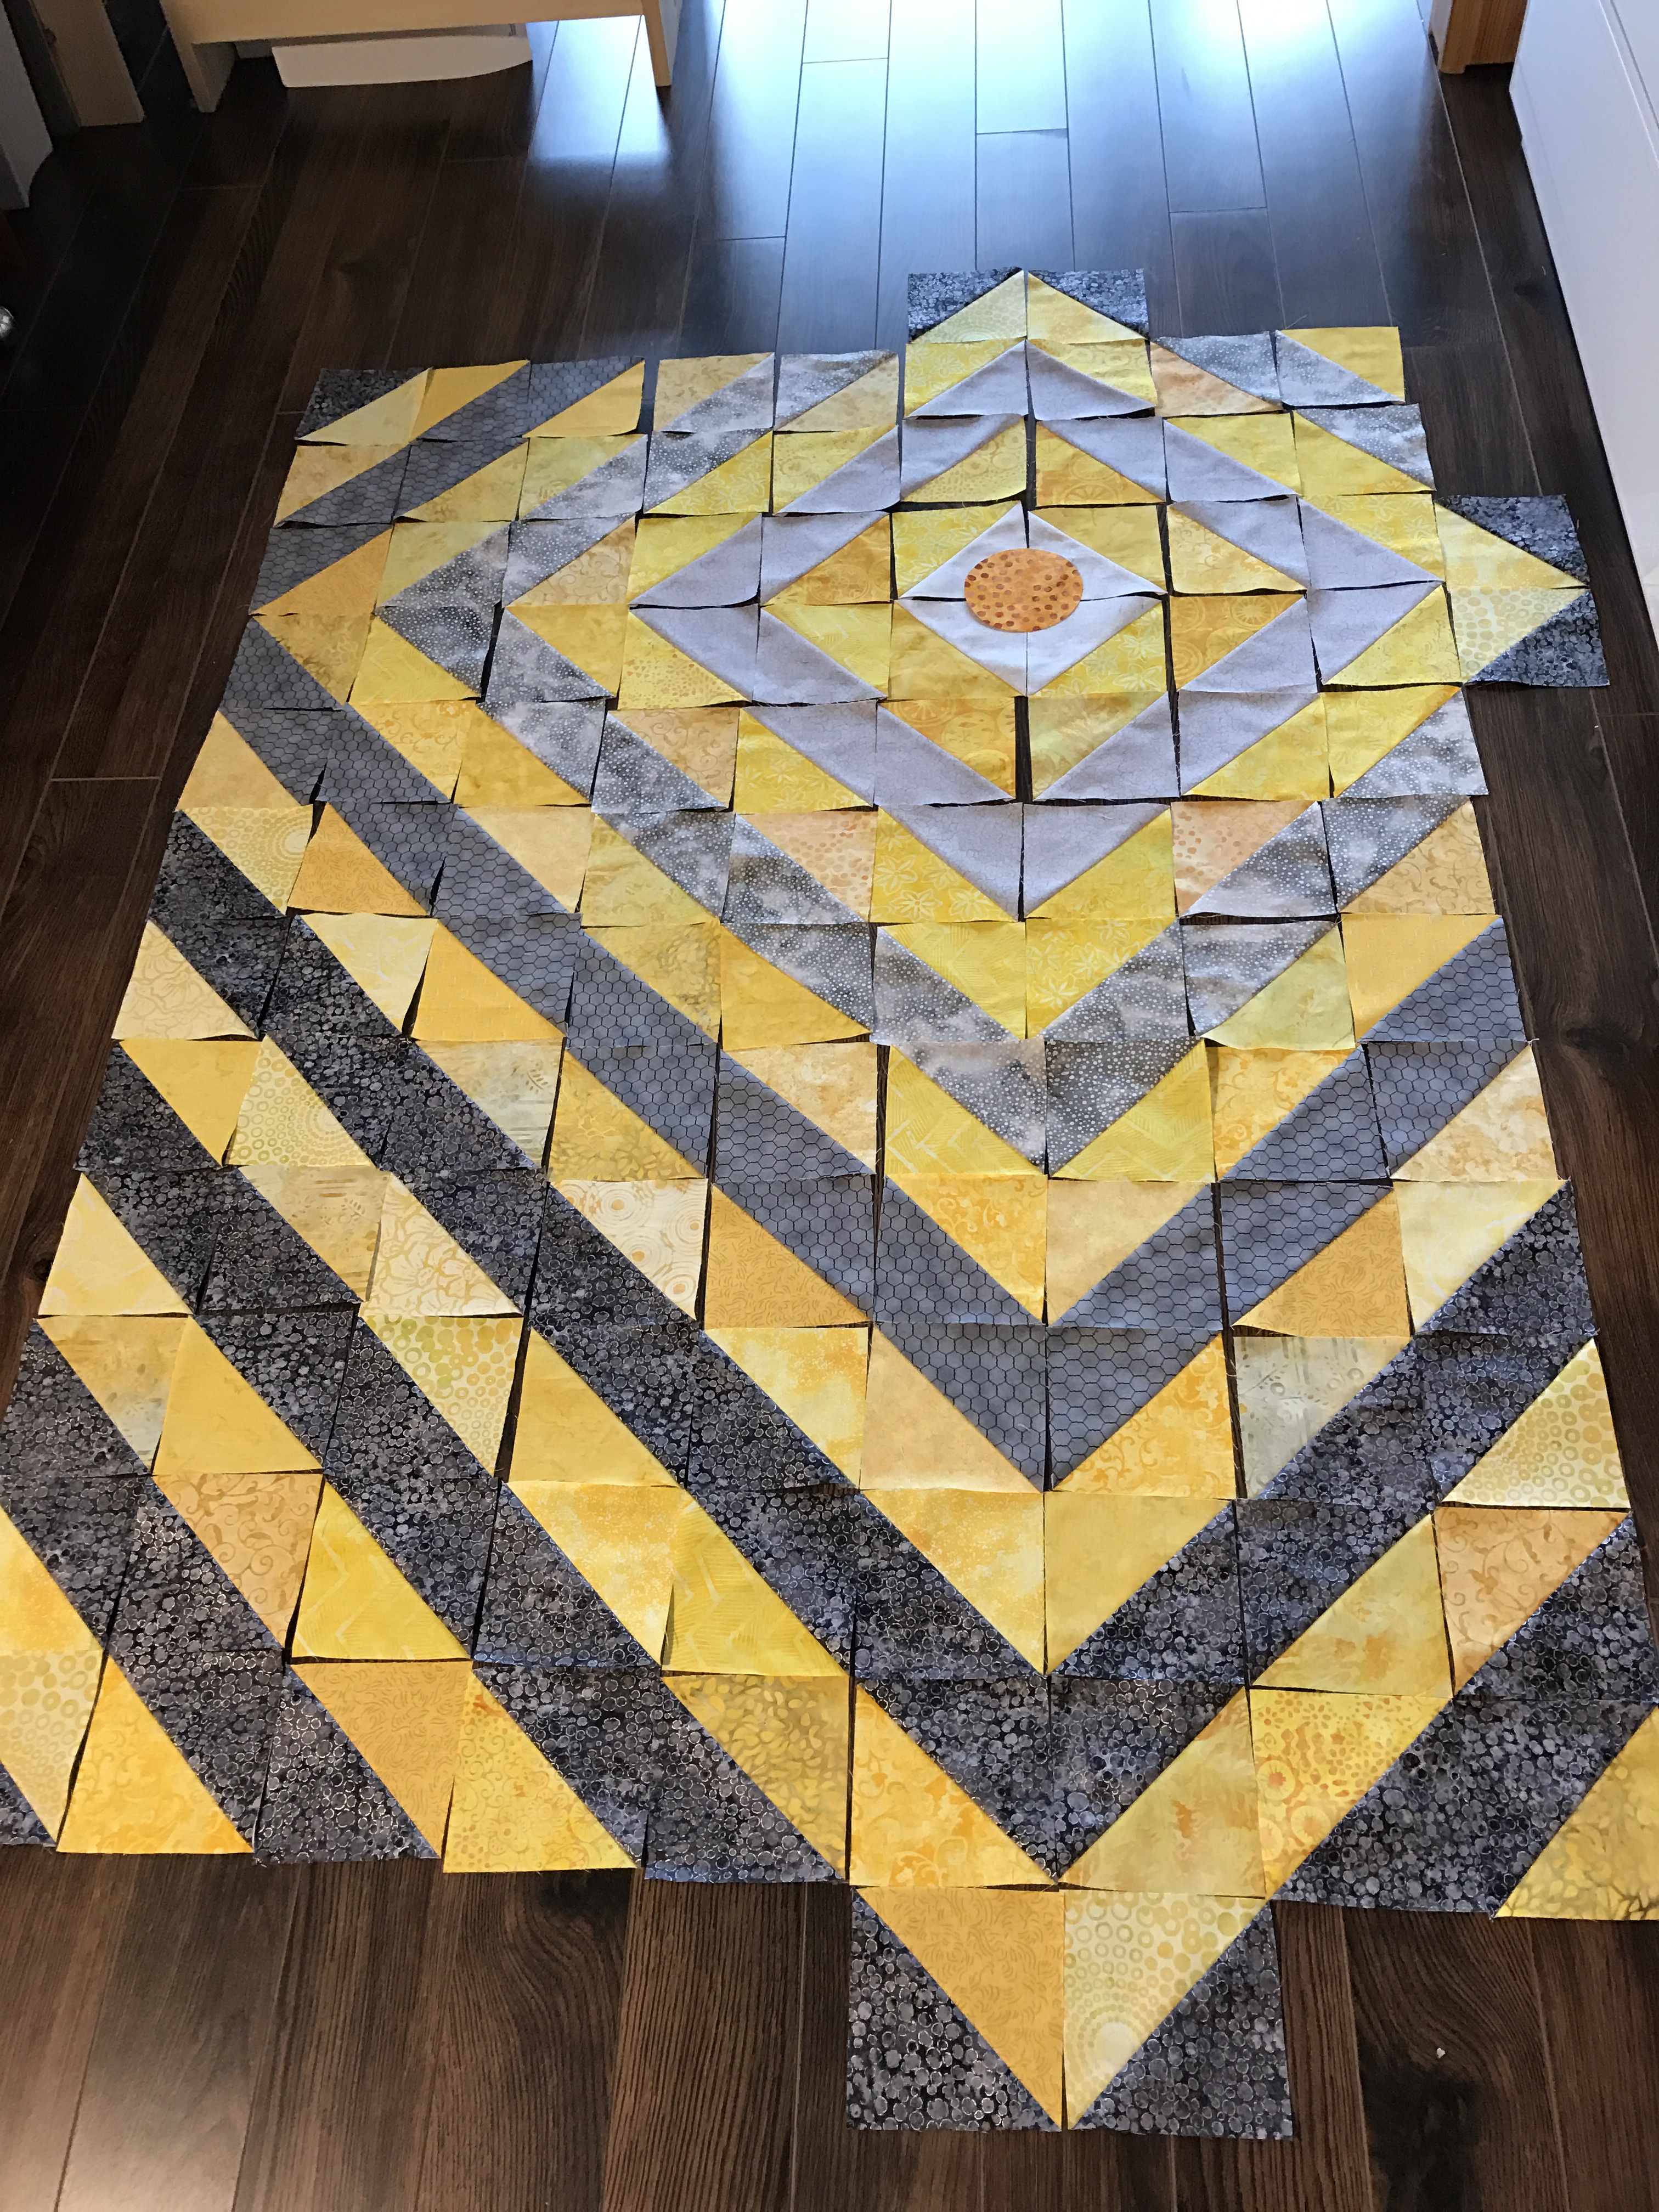
So here’s where I am today:
Grey & Yellow – v. IV
The yellow is more uniform – I suppose I could have done this with just 7 shades of yellow fabric from a strong yellow to pale – just didn’t think of it! (The yellow gradient likely would have worked better – oh well, this will also be interesting once it’s completely sewn and quilted.)
I also think the inner very light grey “square/diamond” could use something as an accent – I tried a circle using the darkest grey fabric (neah…), next I found a flower on a dark grey background, fussy cut it and auditioned it (neah…), for the moment I’m placeholding with the golden circle with dots – but looking at the photo I think “circle” is probably the wrong shape – I still have one square left of that fabric – I think I’ll give that a try as soon as I have the top completely sewn together.
So far today I’ve managed to assemble the bottom border and five rows – hope to do the rest tomorrow.
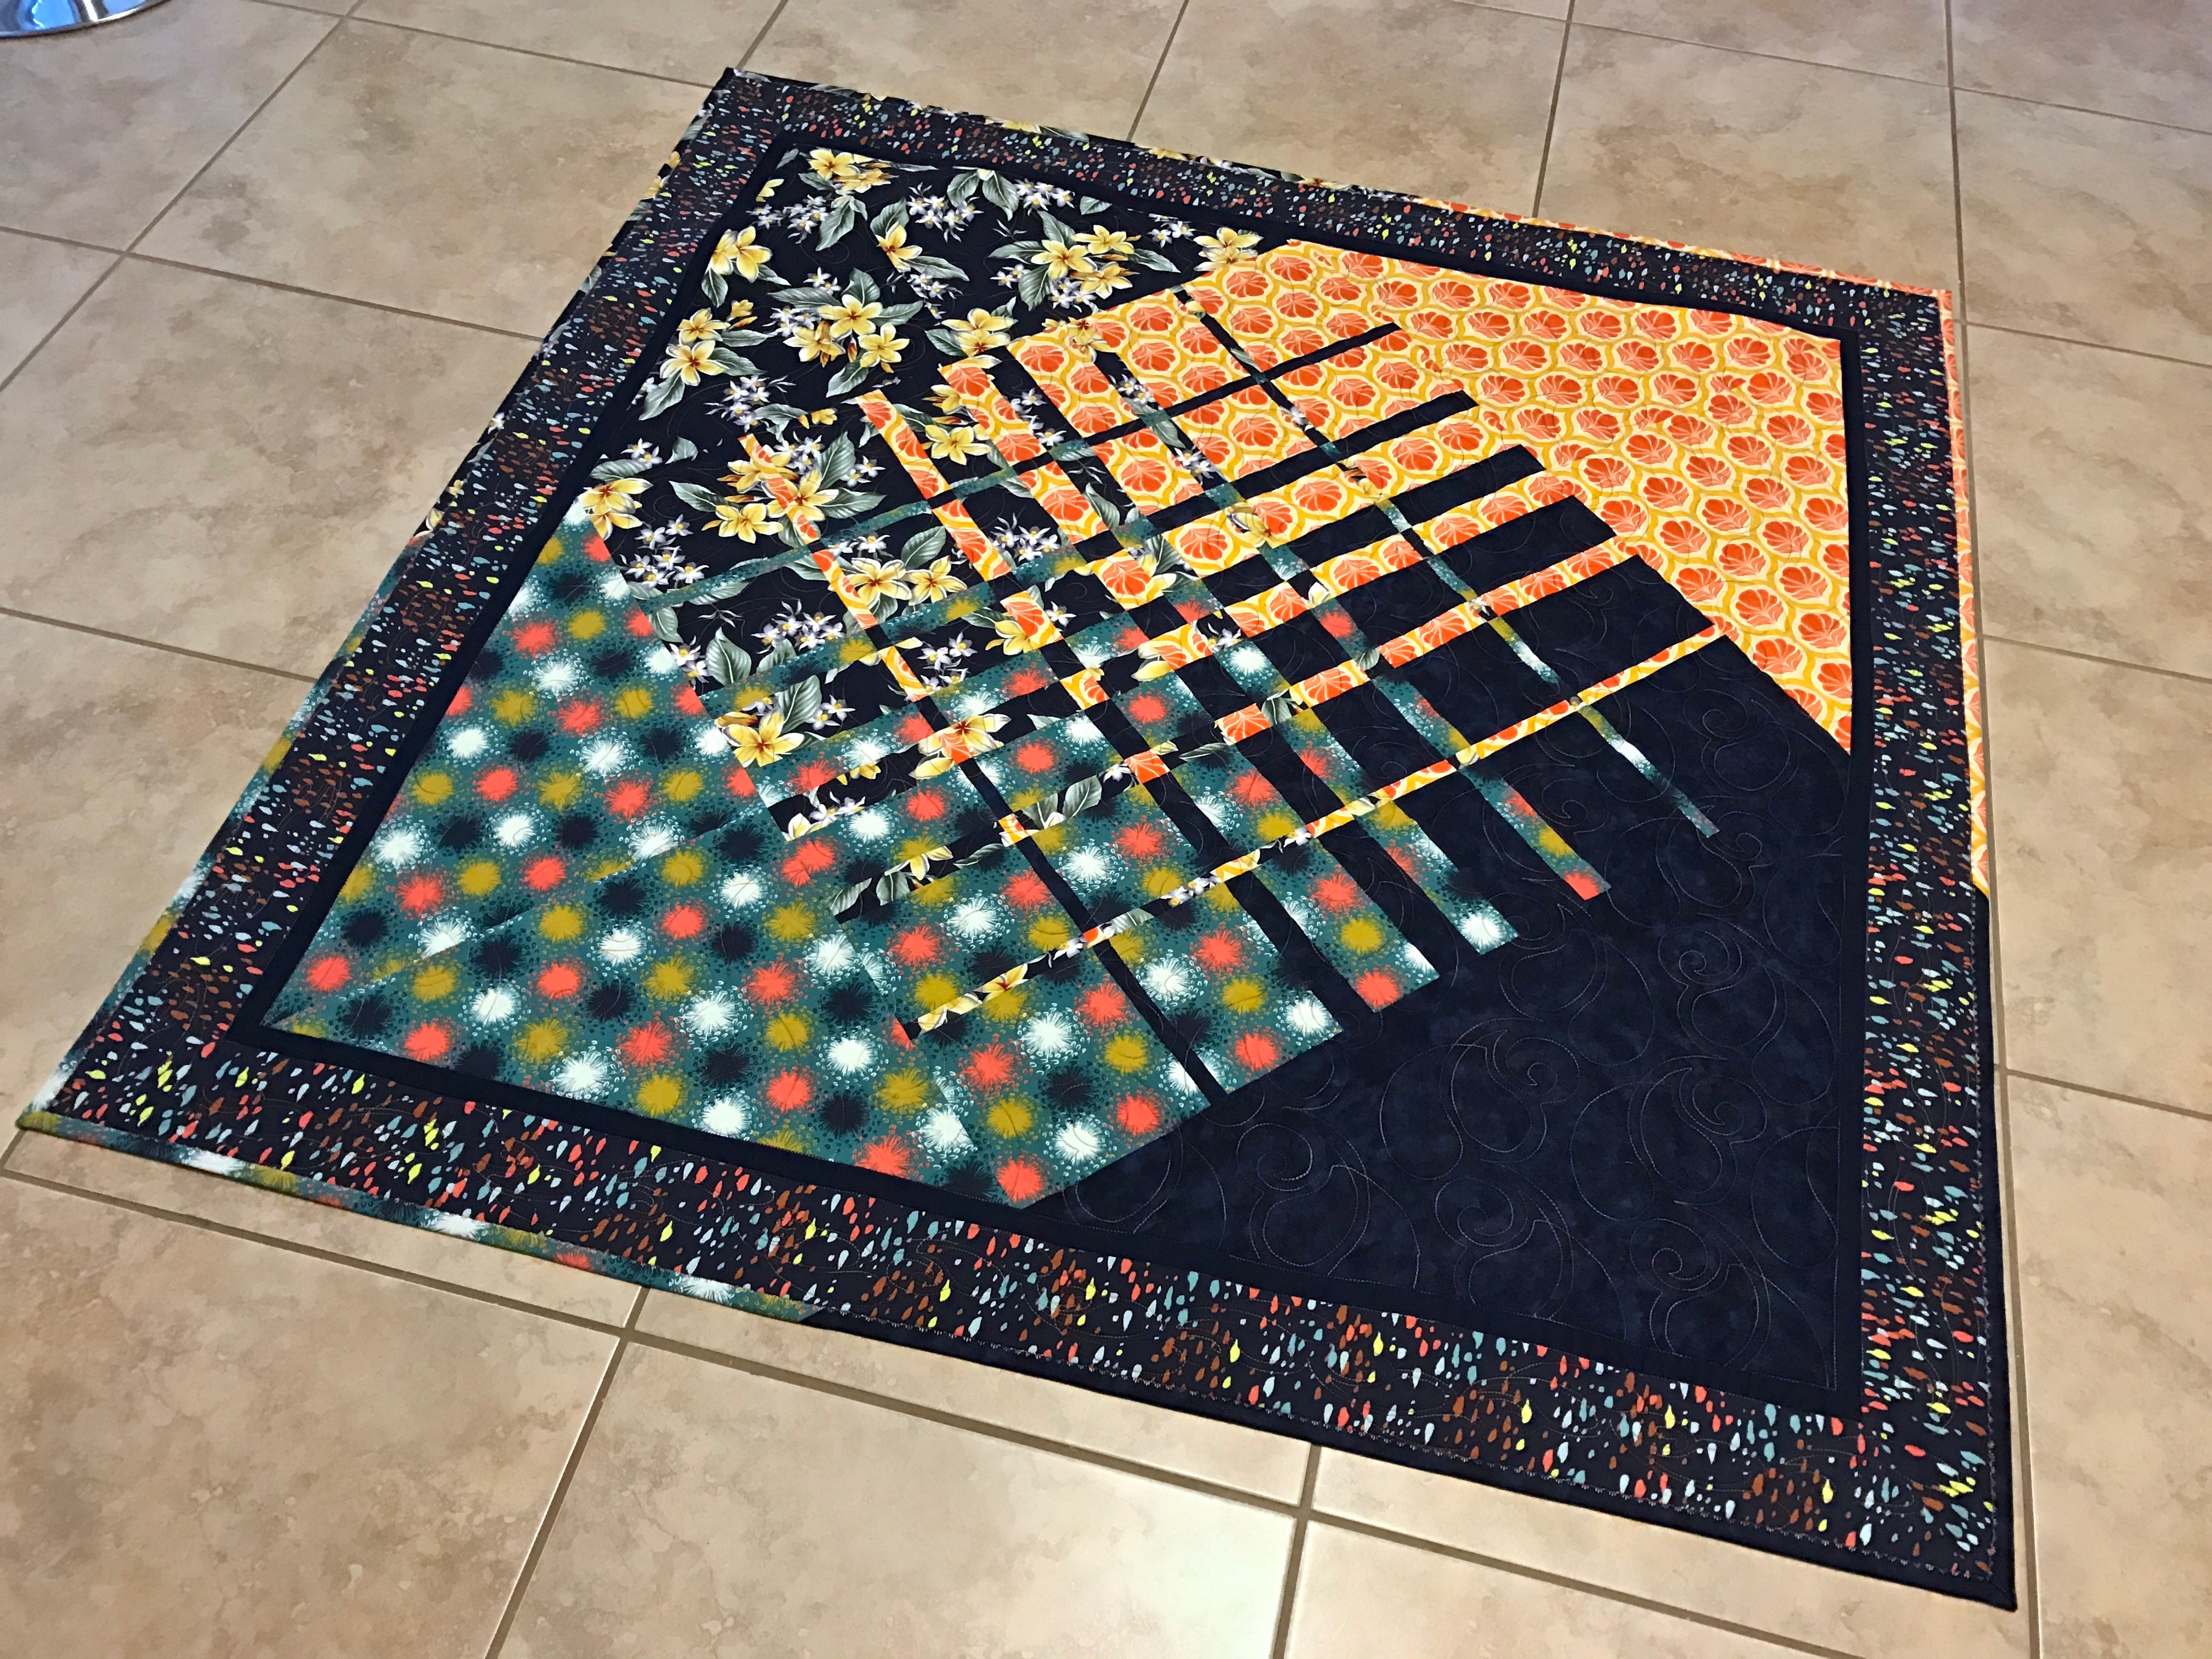
So here is the top completed. The original convergence block is the center of the quilt, with triangles matching one of the predominant colours on each side. Those triangles were difficult – in the end, I laid the sewn convergence block on the floor, laid paper under one side, then drew a triangle – the base of the triangle was the length of the block side, 45° angles to form what is an isosceles triangle! Where the two sides met created the apex of the triangle (which I made sure was a 90° angle). (I remembered to add seam allowances to each side of the triangle.)
I didn’t have enough fabric left to create the triangles in a single piece although overall there was enough fabric – if I made two smaller right angled triangles, stitched them together on what would become the diagonal of the overall block. Then I had enough width to accommodate the edge of the convergence block.
Once the triangles were attached, I added a 3/4″ sashing piece for stability – the sides of the triangles on the outer edge were all on the bias and needed to have something attached that would retain the overall shape. I cut the sashing on the length of fabric (since I had just enough length of the Kona solid I used). Then added a 4 1/4″ border from a fifth fabric that I’d bought as part of the set with the other four fabrics.
Now I have a 54″ square top. I need to think about what to do with the second side (back). I bought another 1/2 m. of each fabric, as well as 2 1/2 m of the dots fabric for the back. Flying geese? Half square triangles? Strips? Crazy quilt? Lots of possibilities. I’ll wake up with something in mind, I’m sure. That’s how these things seem to work themselves out for me.


