New Quilt

A while ago I came across a photo of a quilt constructed from a block I thought was interesting – two equal diagonal cuts creating three pieces – two triangles and one six-sided, double pointed polygon. In the photo, the triangles and polygons were mixed and matched in the piecing of blocks.

The blocks appeared to be perhaps 15+” square (the quilt was a 3×3 array incorporating solid blocks, sashing and borders). A block that size is problematic for me because the widest embroidery hoop I can use for quilting is 250mm (a shade under 10″, my preferred hoop is 200mm square (~8″). So my plan was to downscale the blocks to a size I could manage. I created four 9.5″ squares from 10 different coordinating fabrics.

To cut these blocks into sections I realized I needed a template of some kind so I constructed one out of quilter’s template plastic.

9.5″ Block With Template

To keep the template securely positioned, I used double sided tape on the back which stuck it to the top layer of fabric (I was using a “stack ‘n whack” technique so the triangles were interchangeable).

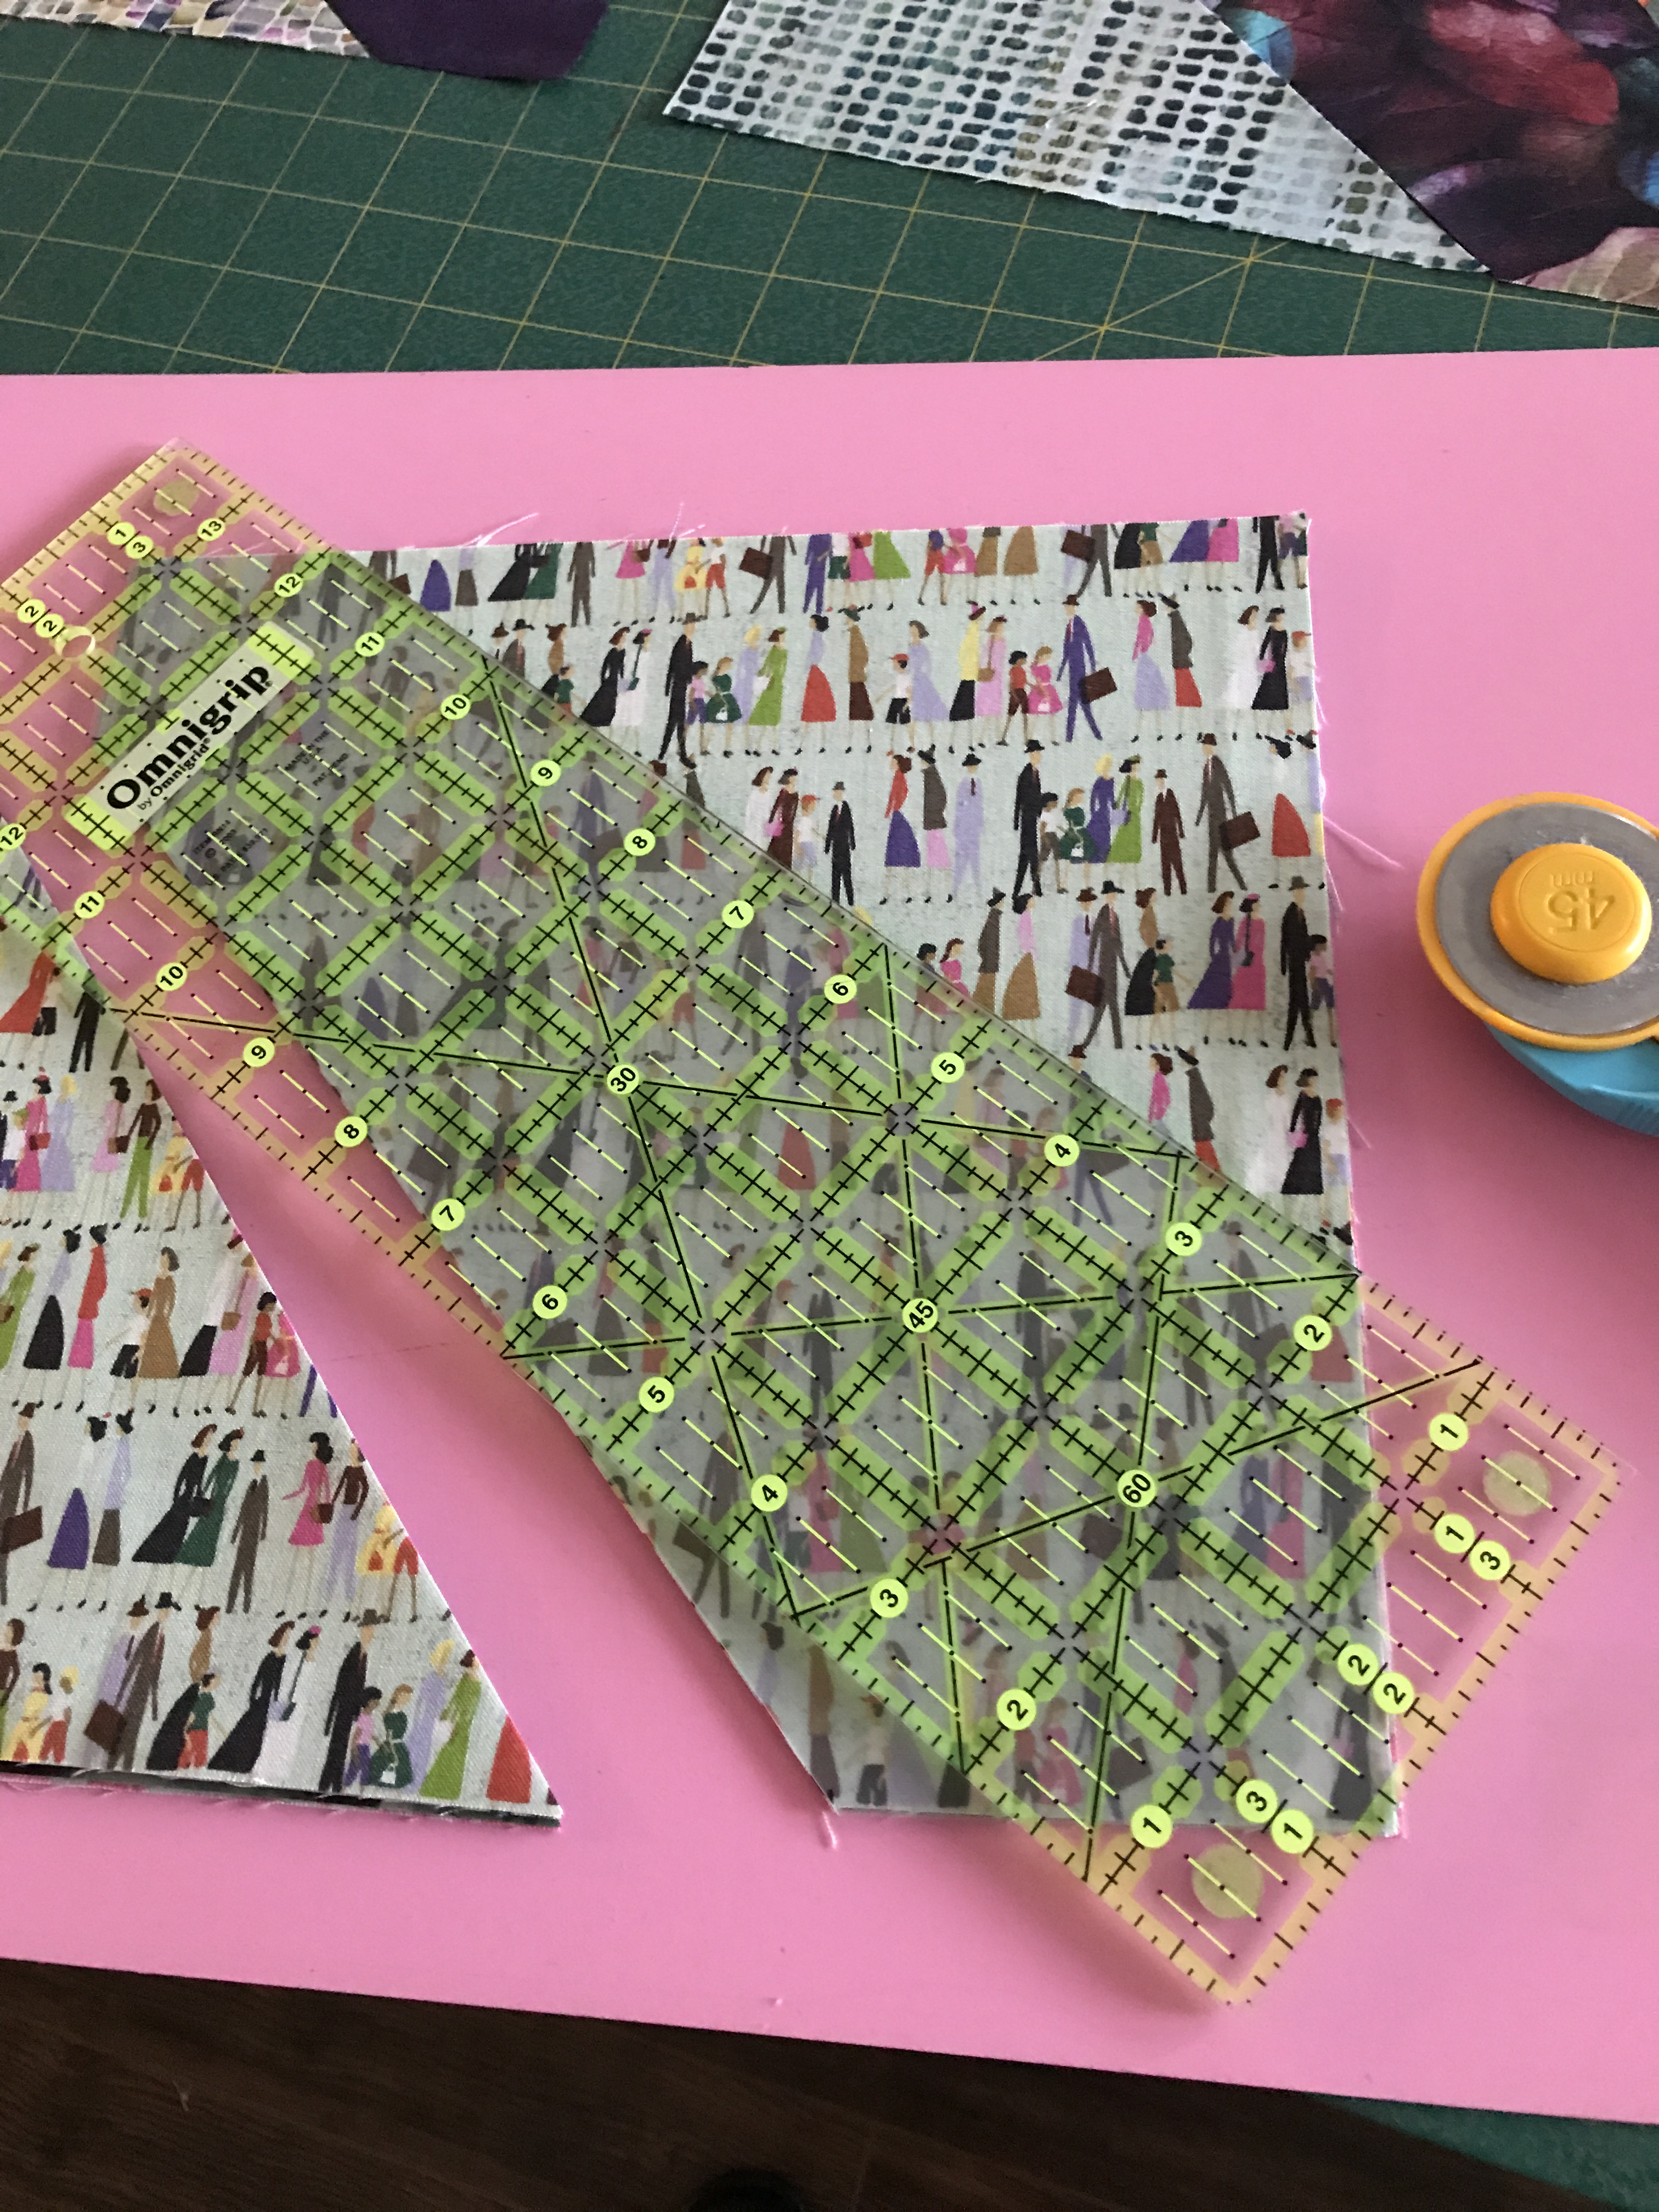
Cutting The 9.5″ Block

The template plastic is not thick enough to use with a rotary cutter, however, the edge of the template provided me a reliable guide for positioning my ruler.

9.5″ Block Cut

With the 9.5″ blocks cut, I laid out the elements for stitching:
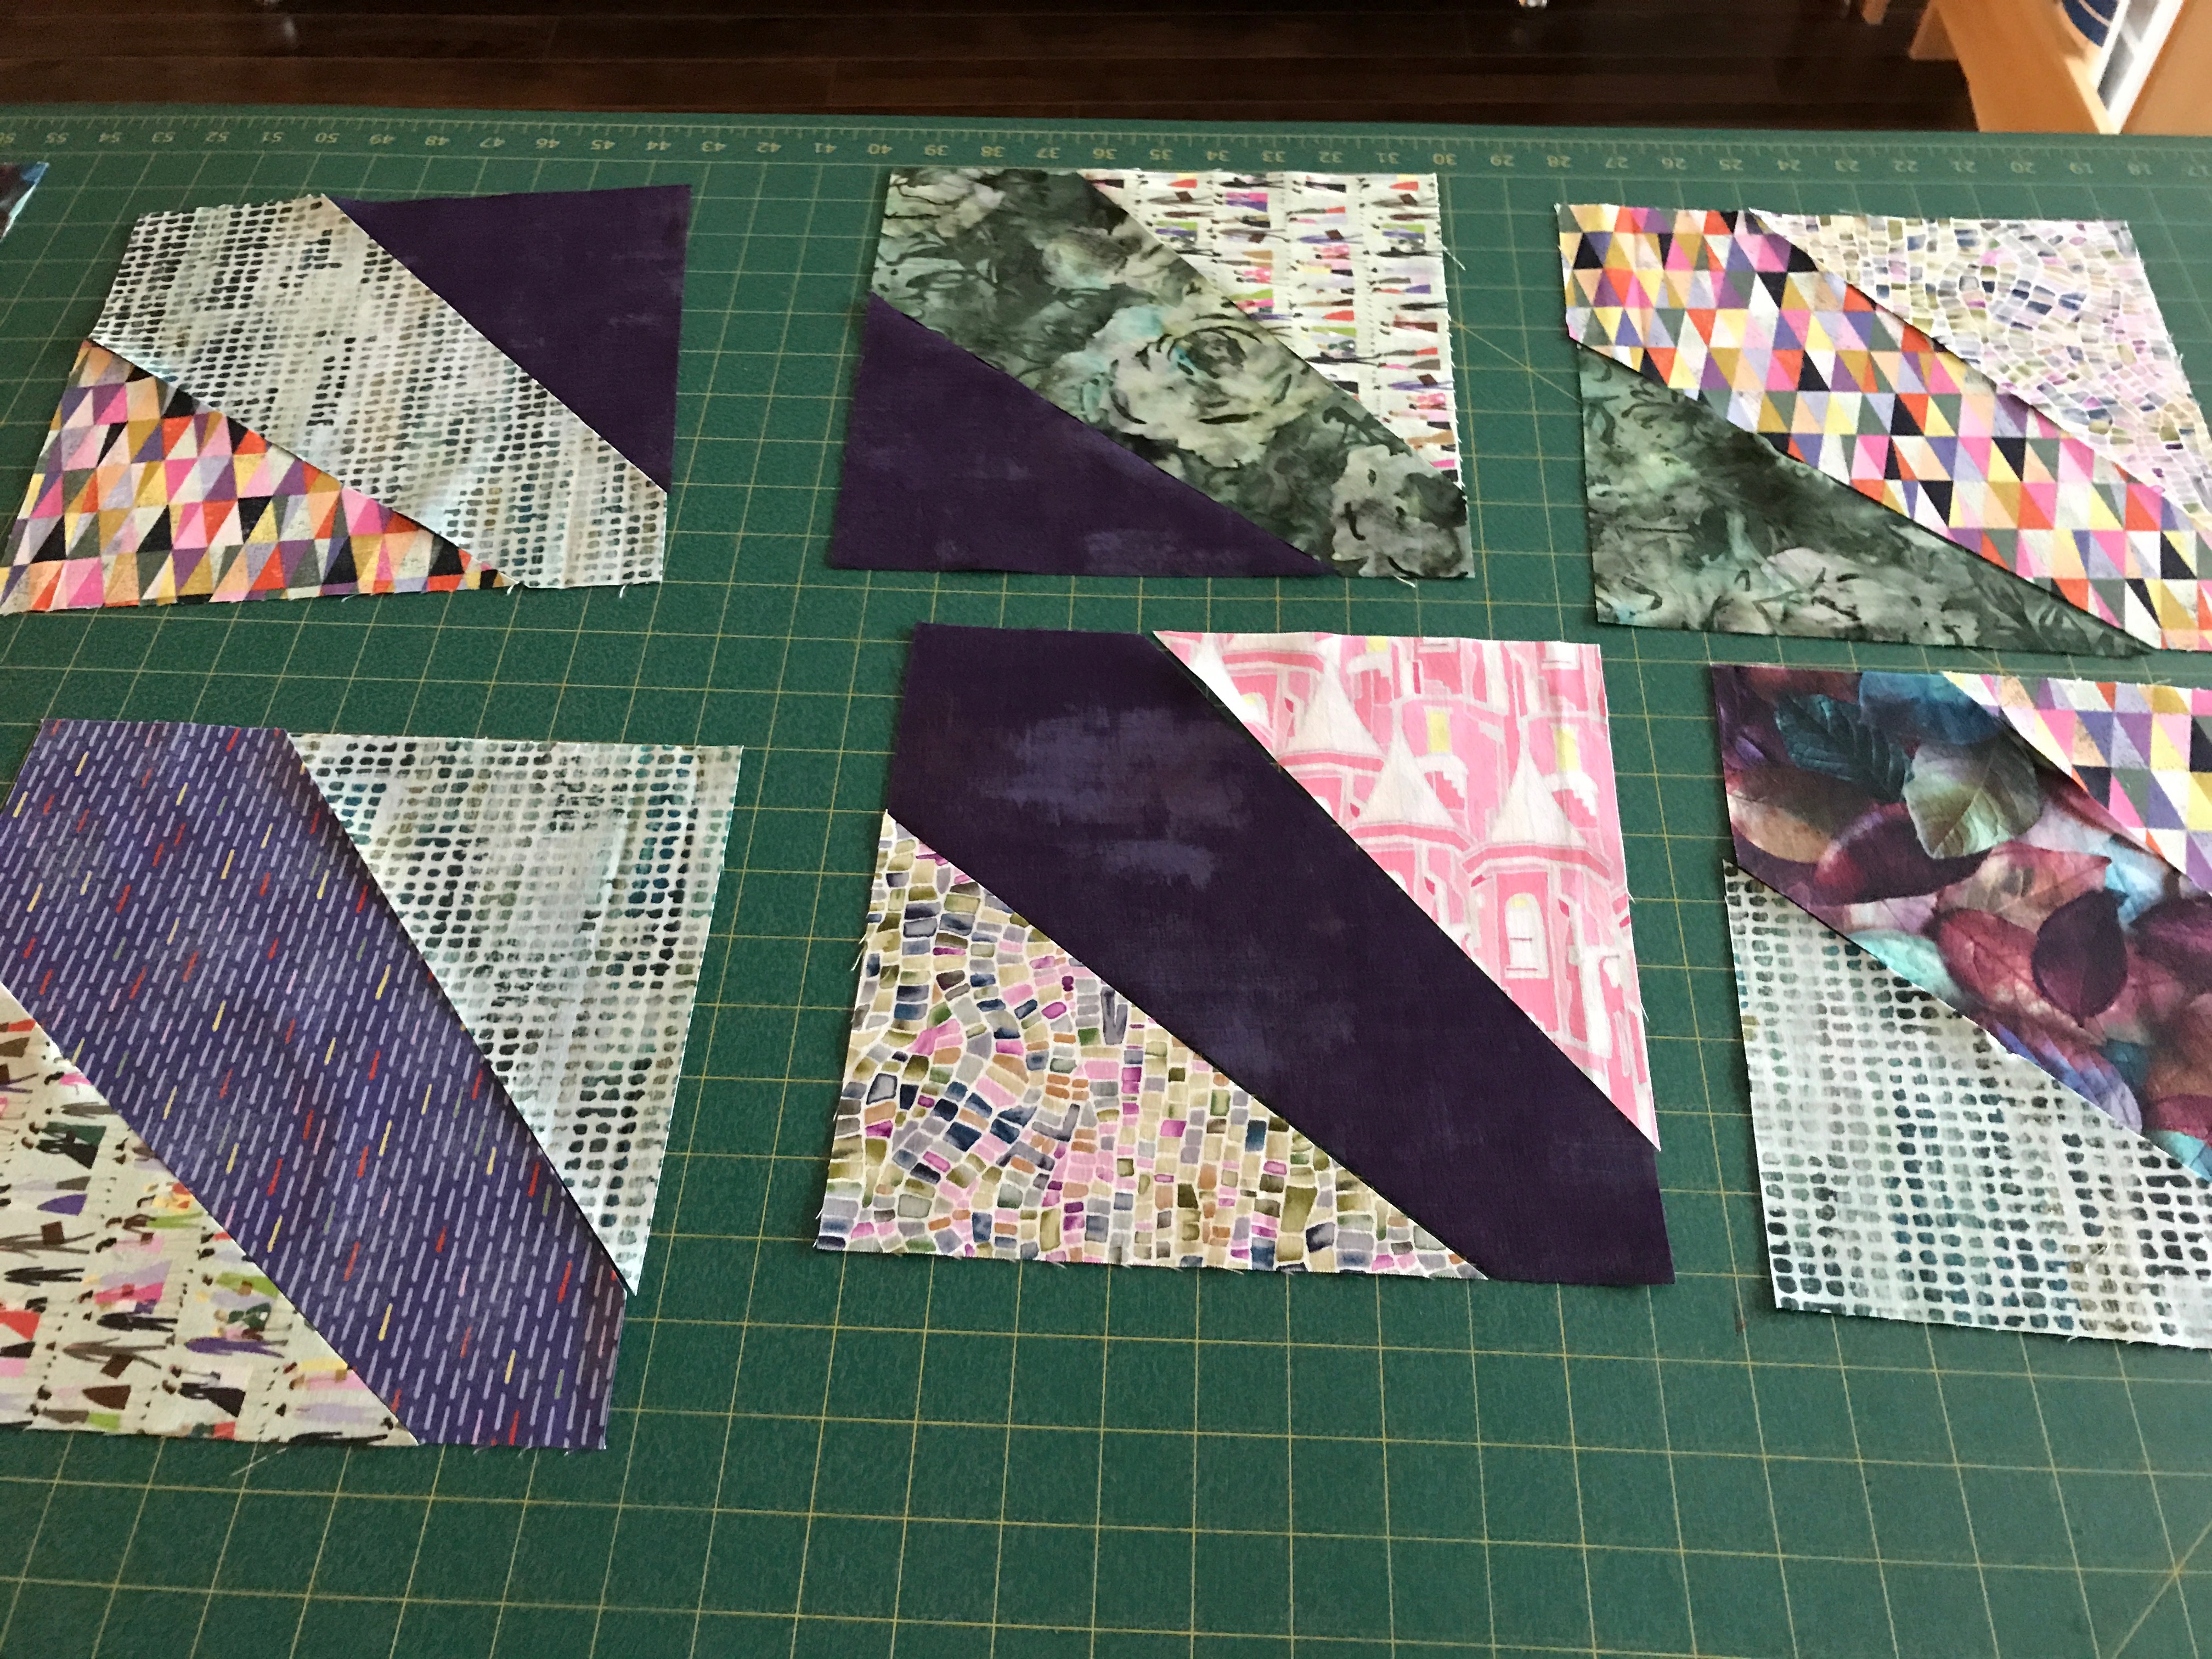
Cut Blocks

I chain pieced the blocks – sewing one triangle to one side of the polygon, pressing, then sewing the second triangle to the other side, pressing, then trimming the resulting blocks to 8.5″.

Pieced Blocks Trimmed to 8.5″ – Laid Out

I now have a 5×7 array on my floor. I have two interesting pieces of turquoise fabric that coordinate well with the fabrics in the blocks which I plan to use for sashing. I also have lots of dark purple grunge fabric (Moda) for a wide border.

What I haven’t decided is whether the polygons should all point in the same direction or whether they would be more interesting pointing in all four directions – at the moment they’re pointing the same way. I can also see from the photo that I have to revisit the block distribution because the pink bits are clustered. I have six extra blocks which I might substitute for a few of the pinks.

Lots of headway on this quilt today. I’ll pick it up again tomorrow.

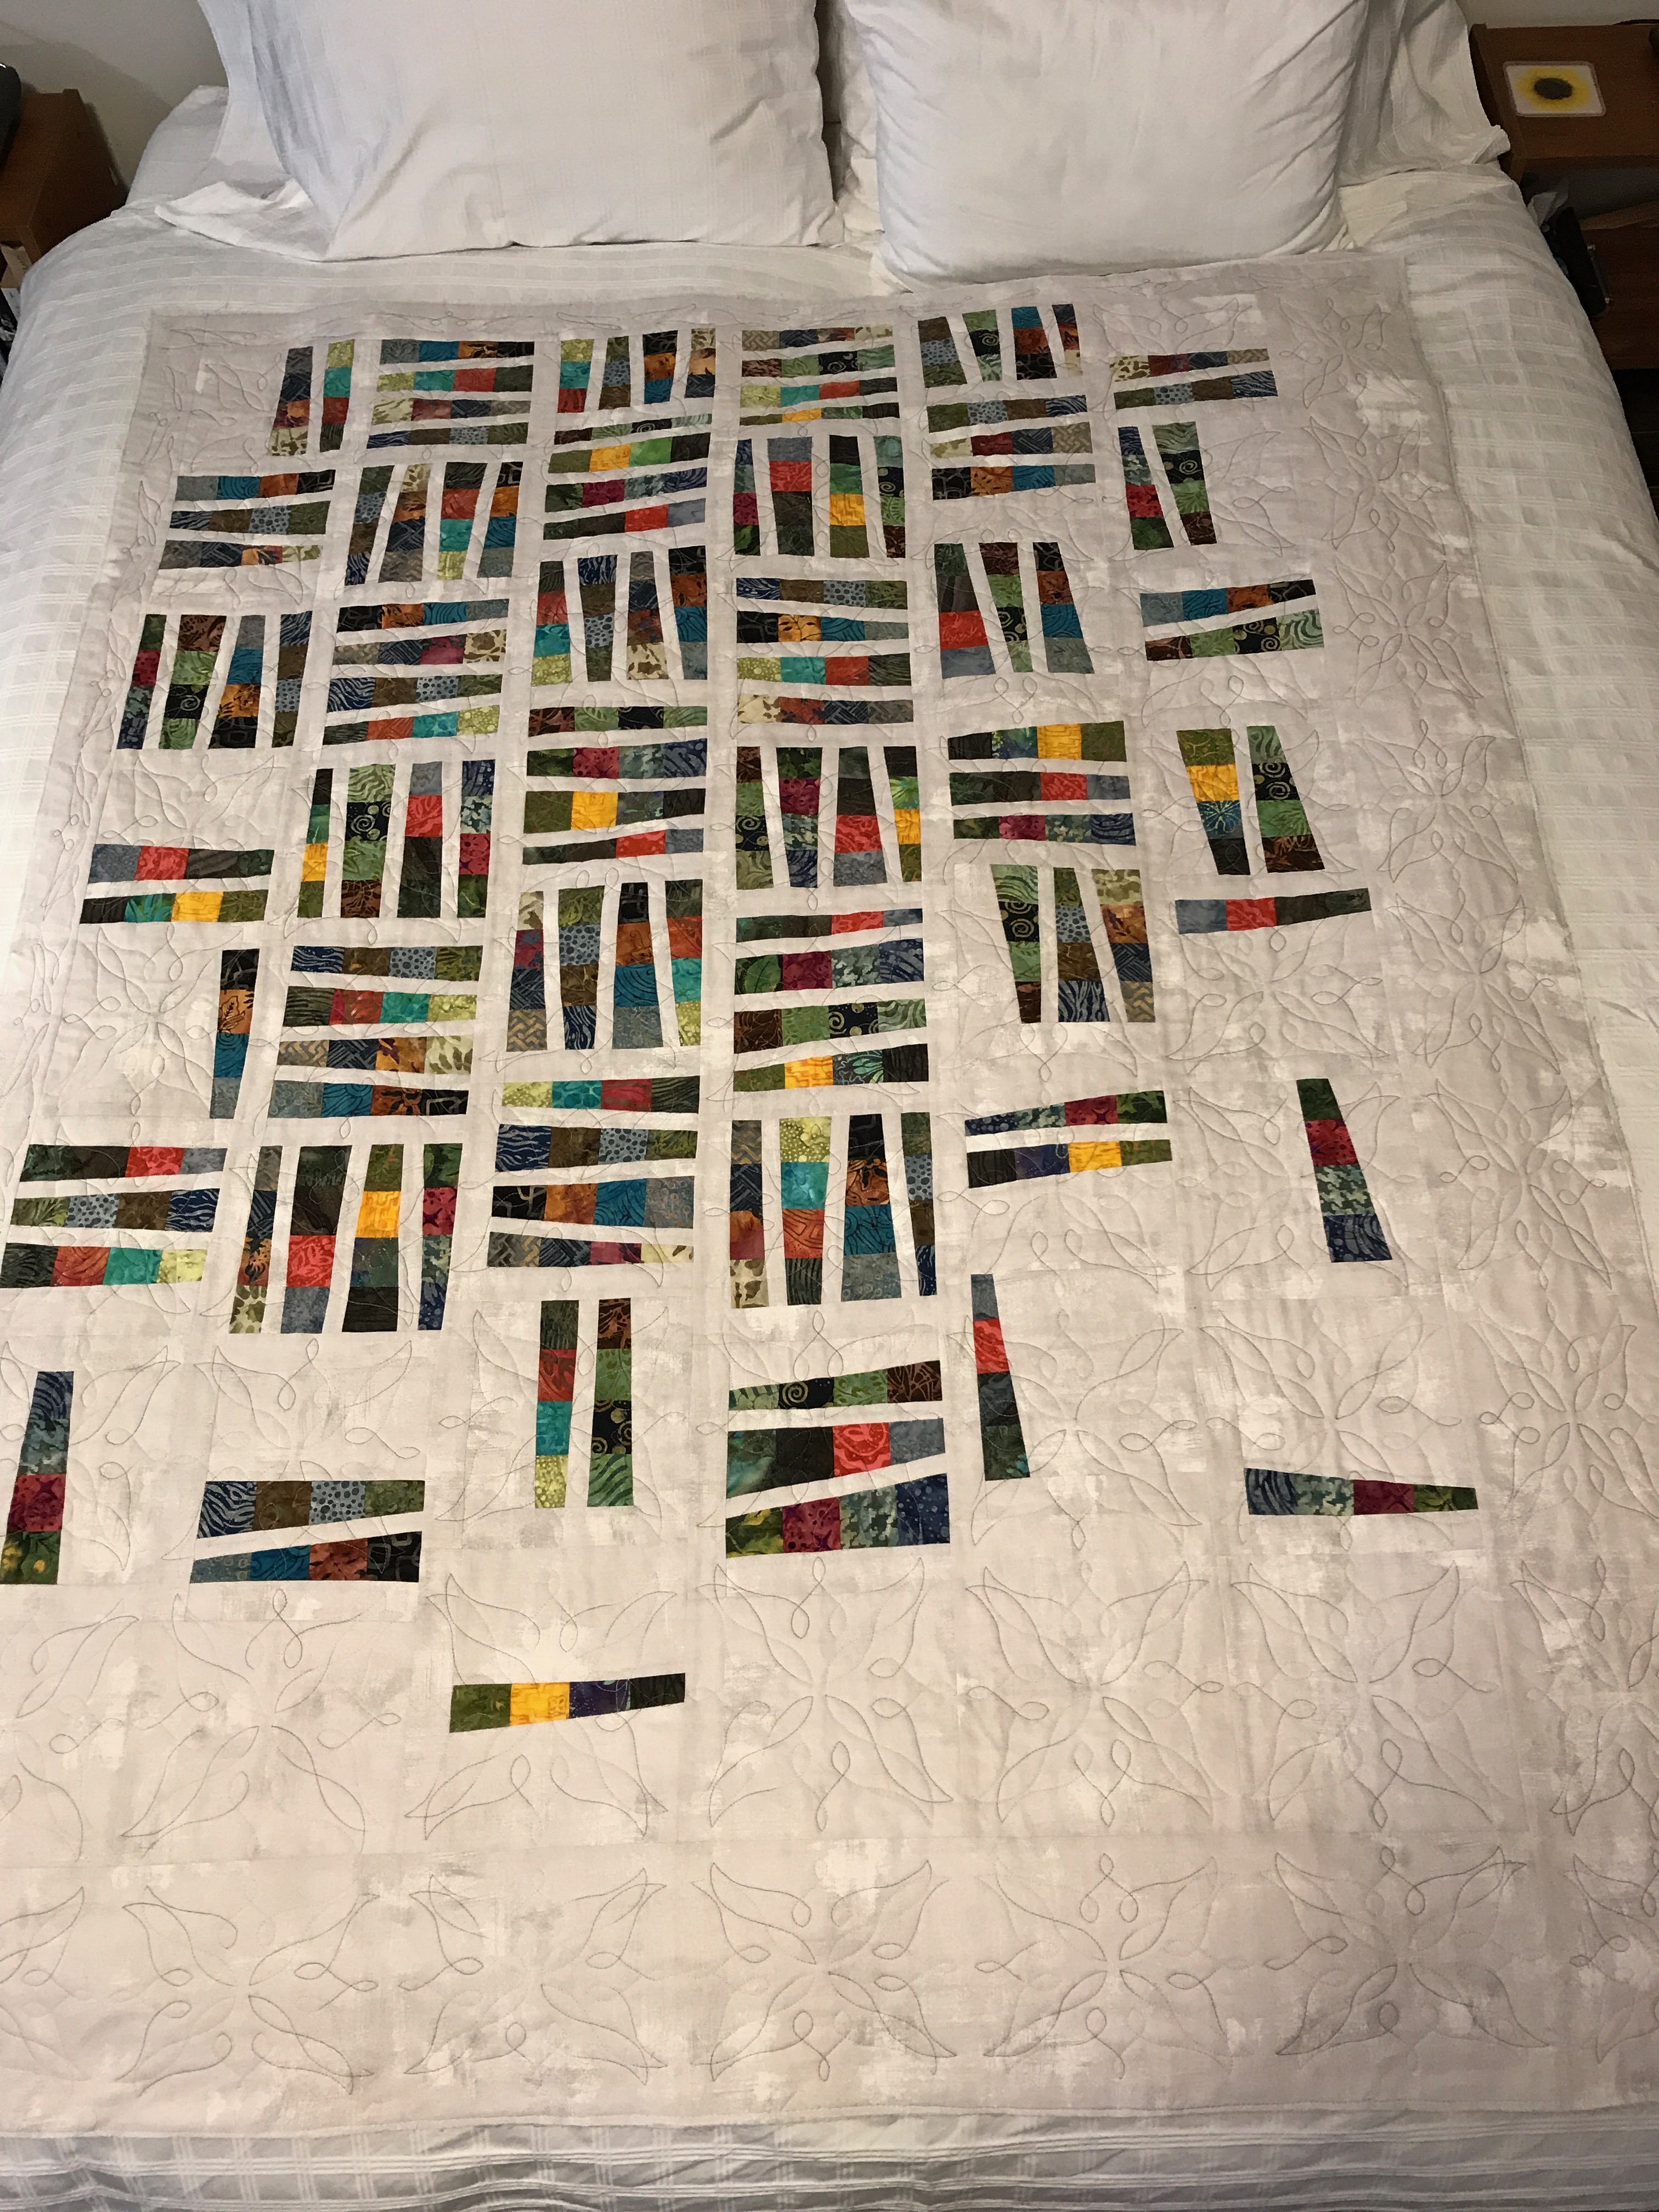
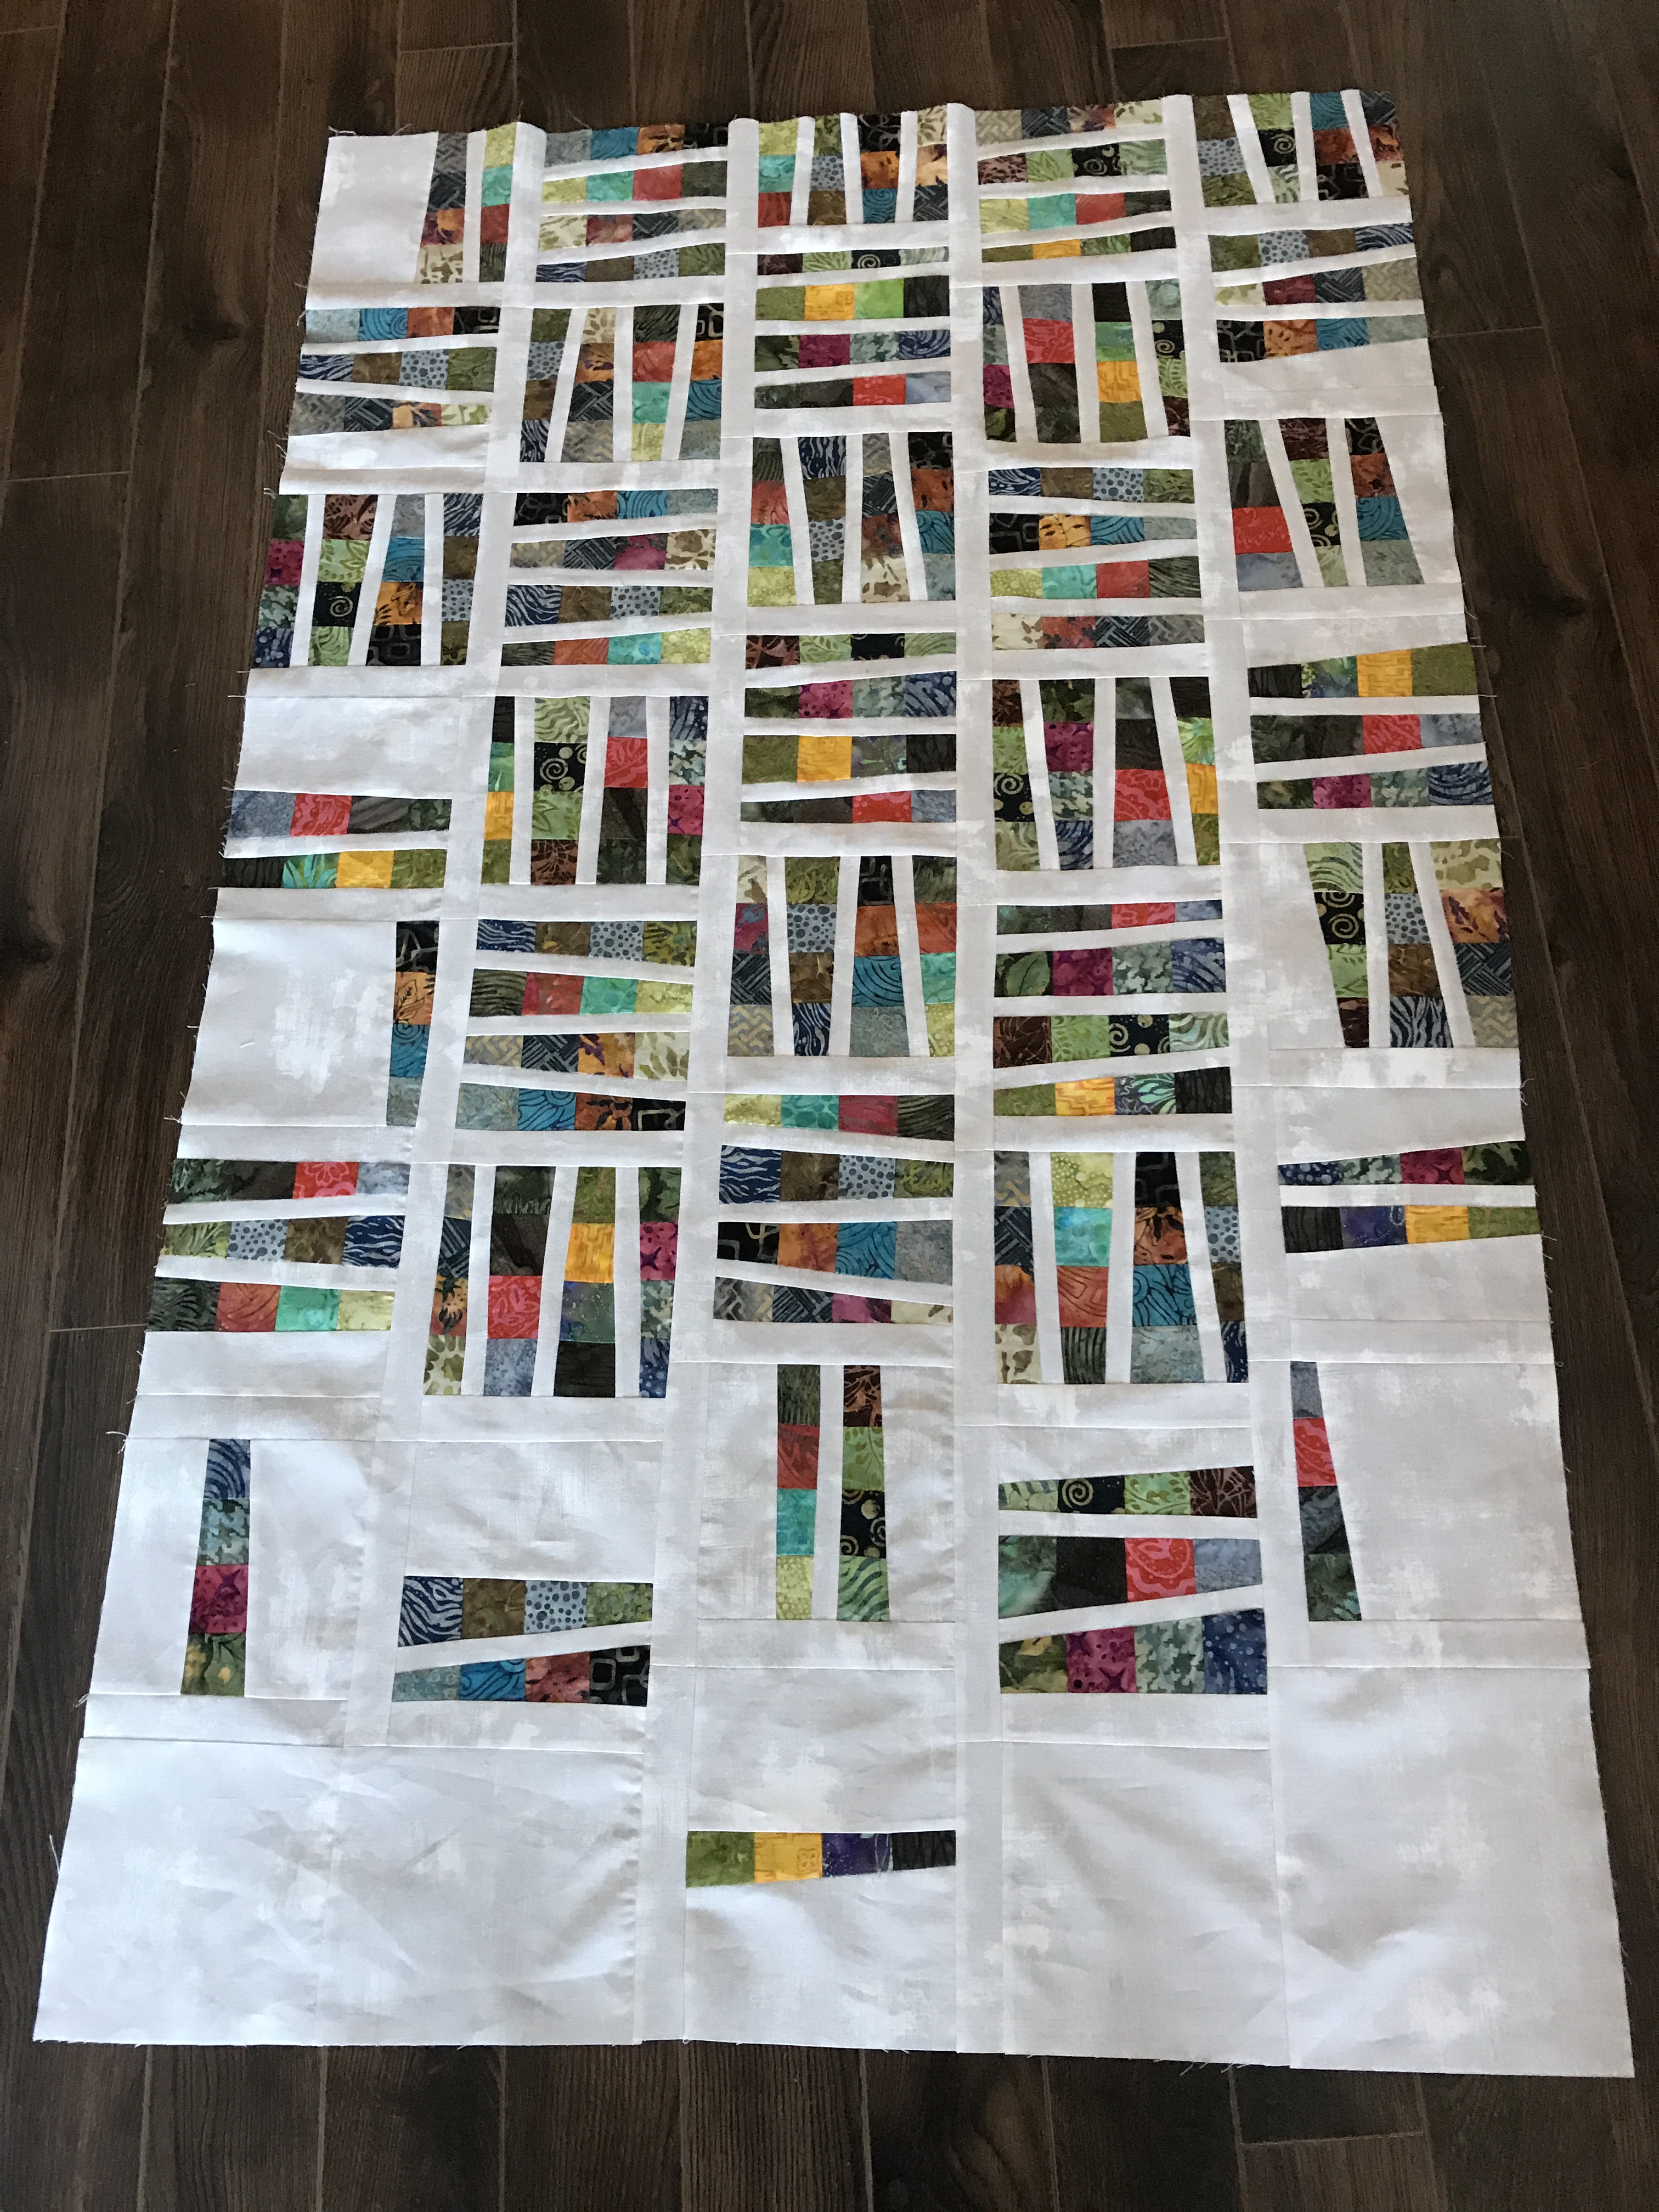
Oh, and I finished the binding on the strip quilt yesterday, as well.

Strip Quilt – Almost Completed

The quilting is done – just the binding left to do. I’ve decided to bind the quilt with the same background fabric which will accent the colourful blocks and strengthen the off-centeredness of the design. A coloured binding would pull your eye away from the design elements – a binding in the same backing fabric will blend with the borders.

Finished Quilt Top

The quilting itself was a challenge because I’d chosen to quilt it as if it had been regular blocks but I was short a vertical sashing on one side and across the bottom which left me having to resize the quilting design at least once in each column – you can’t really see the different size blocks but it meant measuring each “block” as I was quilting to make sure I was using the right size design to fill it.

Also, I had difficulty with the quilt backing – I’d been careful to smooth it out when I wound it onto the 1×4 board, but there was a small uneven distribution of backing fabric toward the strip insert resulting in backing overlaps within a couple of blocks which I didn’t discover until after they’d been quilted, which meant I had to unstitch those blocks, spray them with Best Press to shrink the fabric as much as possible, before rehooping the block and restitching it.

Finished Quilt Back

In the end the quilting worked out, the backing is laying flat, and the borders turned out balanced – in particular, I was able to start and stop the embroideries in the narrow border so they abut perfectly!

Tomorrow I’ll add the binding and the quilt will be finished.

Then on to the next one.

Quilt Back

Quilt back is also completed. I used the leftover bits to create four blocks like the ones on the top, and inserted uncut blocks of the original strips. With sashing I was able to get a 12″ strip to insert in the back. Now I’m ready to assemble the quilt – I’ll get that done later today. My next task is to create an embroidery design for quilting the quilt.

Quilt Back

The back looks wrinkled even though I’ve pressed it, but it will be taut once I’ve pinned the layers together and hooping each block to quilt it will tighten all the layers so the quilt will lay flat.

Quilt Top Done

Just finished applying the borders to the quilt panel to finish the quilt top. It does look the way I wanted it to – dense toward the upper left and more open on the right and bottom. The last column of blocks went quickly since there was much less piecing involved in constructing them.

Completed Quilt Top

However, I did have to go buy another 1/2m of background fabric in order to set up the 6.5″ wide border strips. Fortunately, I’ve found backing fabric in my stash so I don’t need more fabric for the back of the quilt. I do have enough leftover strips to piece a strip for the back but I don’t know what I’ll use to bind the quilt – I may use the pale grey Grunge (Moda) fabric rather than bring in another colour for the front. I’ll see what looks reasonable once I’ve done the quilting.

Final size approximately 48″ x 64″ – a good size for a lap quilt.

Quilt In Progress

I did get done today what I wanted – adding columns 4 & 5 to the developing quilt top. The two columns went quickly because I now understand what I’m doing – I didn’t when I began and the first few blocks took a bit of time.

Columns 4 & 5 added

The process is now streamlined – four 6.5″ squares of pieced strips are stacked and cut into four irregular strips, laid out in order for the block, then stacked again so I can chain piece the narrow sashing to three, join the pieces and add the fourth; press, add the bottom sashing, press, add the side sashing then join the blocks in the column – it’s going quite quickly.

I have the cut strips for the sixth column prepared and laid out – tomorrow I will sew them, create the column, and add it to the other five. That will just leave the two narrow borders and the two wide borders to add. The top might be done tomorrow!

Then I have to decide what to do with the quilt back…

One Pair Of Socks Completed; New Quilt Started

The knitting continues as usual. A couple of evenings ago I finished this pair of red/brown socks – they’re in the give-away stash. The next pair of socks got underway.

Red Socks Completed

A few days ago, I also started a new quilt. I had a collection of leftover batik jelly roll strips – I sorted through them picking out contrasting lights and darks in a variety of shades (reds, blues, yellows, greens, browns…) and set up sets of four. If I had stitched them together as 2.5″ strips my resulting blocks would have been 8.5″ square which was bigger than I wanted for the quilt I was planning so I trimmed them to 2″ which has given me 6.5″ blocks to which I’ve been adding sashing strips which will finish at 1″ – completed block size = 7″.

First Half of Latest Quilt

As you can see in the individual blocks, I’m alternating asymmetrically cut pieced strips with narrow sashing and alternating the sashing direction when I put them together. I’ve offset the third column against the second – it’s about making it easier to sew the columns together – the sashing joins don’t need to match up. (I’ll match up the blocks/sashing position in the 4th and 5th columns with the 2nd and 3rd.) It’s also making the content of this modern quilt less regular, therefore a bit more interesting.

Also, around the outside (on three sides) I’m using fewer pieced strips in each block (you can see that in column 1) to increase the amount of background toward the outside edges of the quilt. I’m planning a 6 x 8 quilt to which I will then add uneven borders – 3″ on the top and left, 6″ to the right and bottom to extend the background and position the pieced blocks toward one corner of the finished quilt.

I’m half way there – I completed three more blocks for column four late this afternoon, I hope to finish the fourth and fifth columns tomorrow which will leave just one column (with blocks composed mostly of background to complete Monday). I have fabric from the original sewn strips sections to use when I go to make the quilt back – don’t know what I’ll do with them, yet (haven’t chosen a backing fabric either – have to go through what’s in the stash and hope there’s something there that might be suitable).

The background fabric (a pale grey grunge by Moda Fabrics) I did purchase just for this quilt – I really didn’t have a long enough length of anything that would set up a strong contrast between background and inserted strips.

I find it interesting that in spite of the quantity of fabric in my stash I still have to buy fabric each time I go to make a new quilt. I seem to be missing some fill-in colours, or background or backing. The stash just seems to keep getting bigger!

Last Two Tunics Finished

Finally got the remaining two tunics done. My friend Janet suggested I add a cowl neck and it would have worked nicely but for the fact that I’d already cut these tunics out and didn’t have enough fabric to make a cowl neck scarf to wear with either. So crew necks I’ve got.

“Feathers” Flared Tunic #3

This is the same printed pattern as the second one I did, just in shades of black/grey/white. It’ll look good with a black turtleneck and pants.

“Grey” Flared Tunic #4

That’s it for garment sewing right now. I still have corduroy for a couple pairs of pants and I need to make another bedspread jacket for a friend but it’s back to quilting right now.

Flared Tunic II

Fabricville was having a sale a couple of days ago for “elite club” members (I’ve been one for years since I often drop into the shop for fabric, notions,…). The poly/viscose fabric was half-price so I looked at the other bolts they had. I chose three more lengths to make tops – here is the second one completed. I liked the bright colours.

Second Flared Tunic

I have the other two lengths cut and ready to stitch up. I am aiming to do one today and probably the second tomorrow.

Two Flared Tunics Cut Out And Ready To Sew

These will replace the tunic tops I made last fall – the fabric pills badly (I have to shave it after every wearing) and they are just a tad snug in the bum. So they will go to Hand in Hand – the St. Vincent De Paul thrift shop in the area. These days my rule is: something new in the wardrobe means something out! My wardrobe is still embarrassingly large I’m just trying to keep it under control.

Flared Tunic

Came across a pretty poly/viscose knit the other day at Fabricville. Thought it would make up into an attractive flared tunic top.

Flared Knit Tunic

Very simple garment to make – a front, a back, sleeves and a band to finish the neck edge. It’s based on a Marsha McClintock pattern – “T-Shirt Trifecta”

Safe-T-Pockets Pattern

Marsha’s patterns are all about hidden pockets everywhere for travelling. I made up View 2 originally but subsequently attached the diagonal top piece to the bottom and made a single front piece which I later flared a bit more than the pattern since the couple of tunics I made up were just a bit snug through the bum. I sewed the flared single piece front tunic in a black sweater knit last year. It fit well over a pair of jeans.

I’m happy with this latest tunic top which is comfortable and colourful. No pockets, though. To put them in the side seams will drag down the sides once anything is put in them. Same with pockets on the front because the fabric is soft and stretchy. So I have to wear this garment with pants that have pockets so I can carry all the stuff I carry in my pockets!

PS – I bought three more lengths of this poly/viscose fabric (different prints) today ( a half-price sale). Just finished cutting them out. Intending to replace the solid tunic tops I made last year with a fabric that pills like crazy – it needs to be shaved after every wearing. This fabric didn’t pill when I wore the tunic yesterday.

New Clothes

You might think I’ve not been doing much sewing/knitting but I’ve been busy with additions to my wardrobe.

First, a boiled wool jacket using Marcie Tilton’s V8430 jacket:

Marcie Tilton V8430

The boiled wool came from Blackbird Fabrics in Vancouver. I bought the aubergine which I thought would make a warm addition to my wardrobe.

A simple pattern with just two fronts, a back and sleeves which went together easily and because it’s boiled wool I didn’t need to finish edges! In fact there’s a dart at the bottom of the sleeve which is stitched by abutting the two edges and zigzagging it closed – doesn’t show but gives shape to the lower sleeve. I’m still debating whether to do something similar in the middle of the back at the neckline – I’ve a slight rounding of my back at the neck and I think the jacket would fall better in the back were I to make that tweak.

I chose the pattern because I thought the soft folds for the lapels wasn’t something I usually wear and would look “new”.

New Jacket/Sweater and Corduroy Pants – Front

With a new jacket/sweater I thought dark purple cords a good choice – I whipped those up two days ago.

New Jacket/Sweater and Corduroy Pants – Back

Taking pictures myself is extremely difficult – to position the camera involves twisting which causes the pants to show a bit of pull. I had to take the side seams in after I’d finished them – I didn’t take them in as much as I possibly could because I was afraid I wouldn’t be able to sit. I’ll see how they are after I’ve washed them – the fabric was washed before I used it but it will shrink a bit more, I’m sure, with further washing.

I have three more lengths of corduroy to make pants – I’m intending to get to at least one of those this weekend.