Possibilities #2

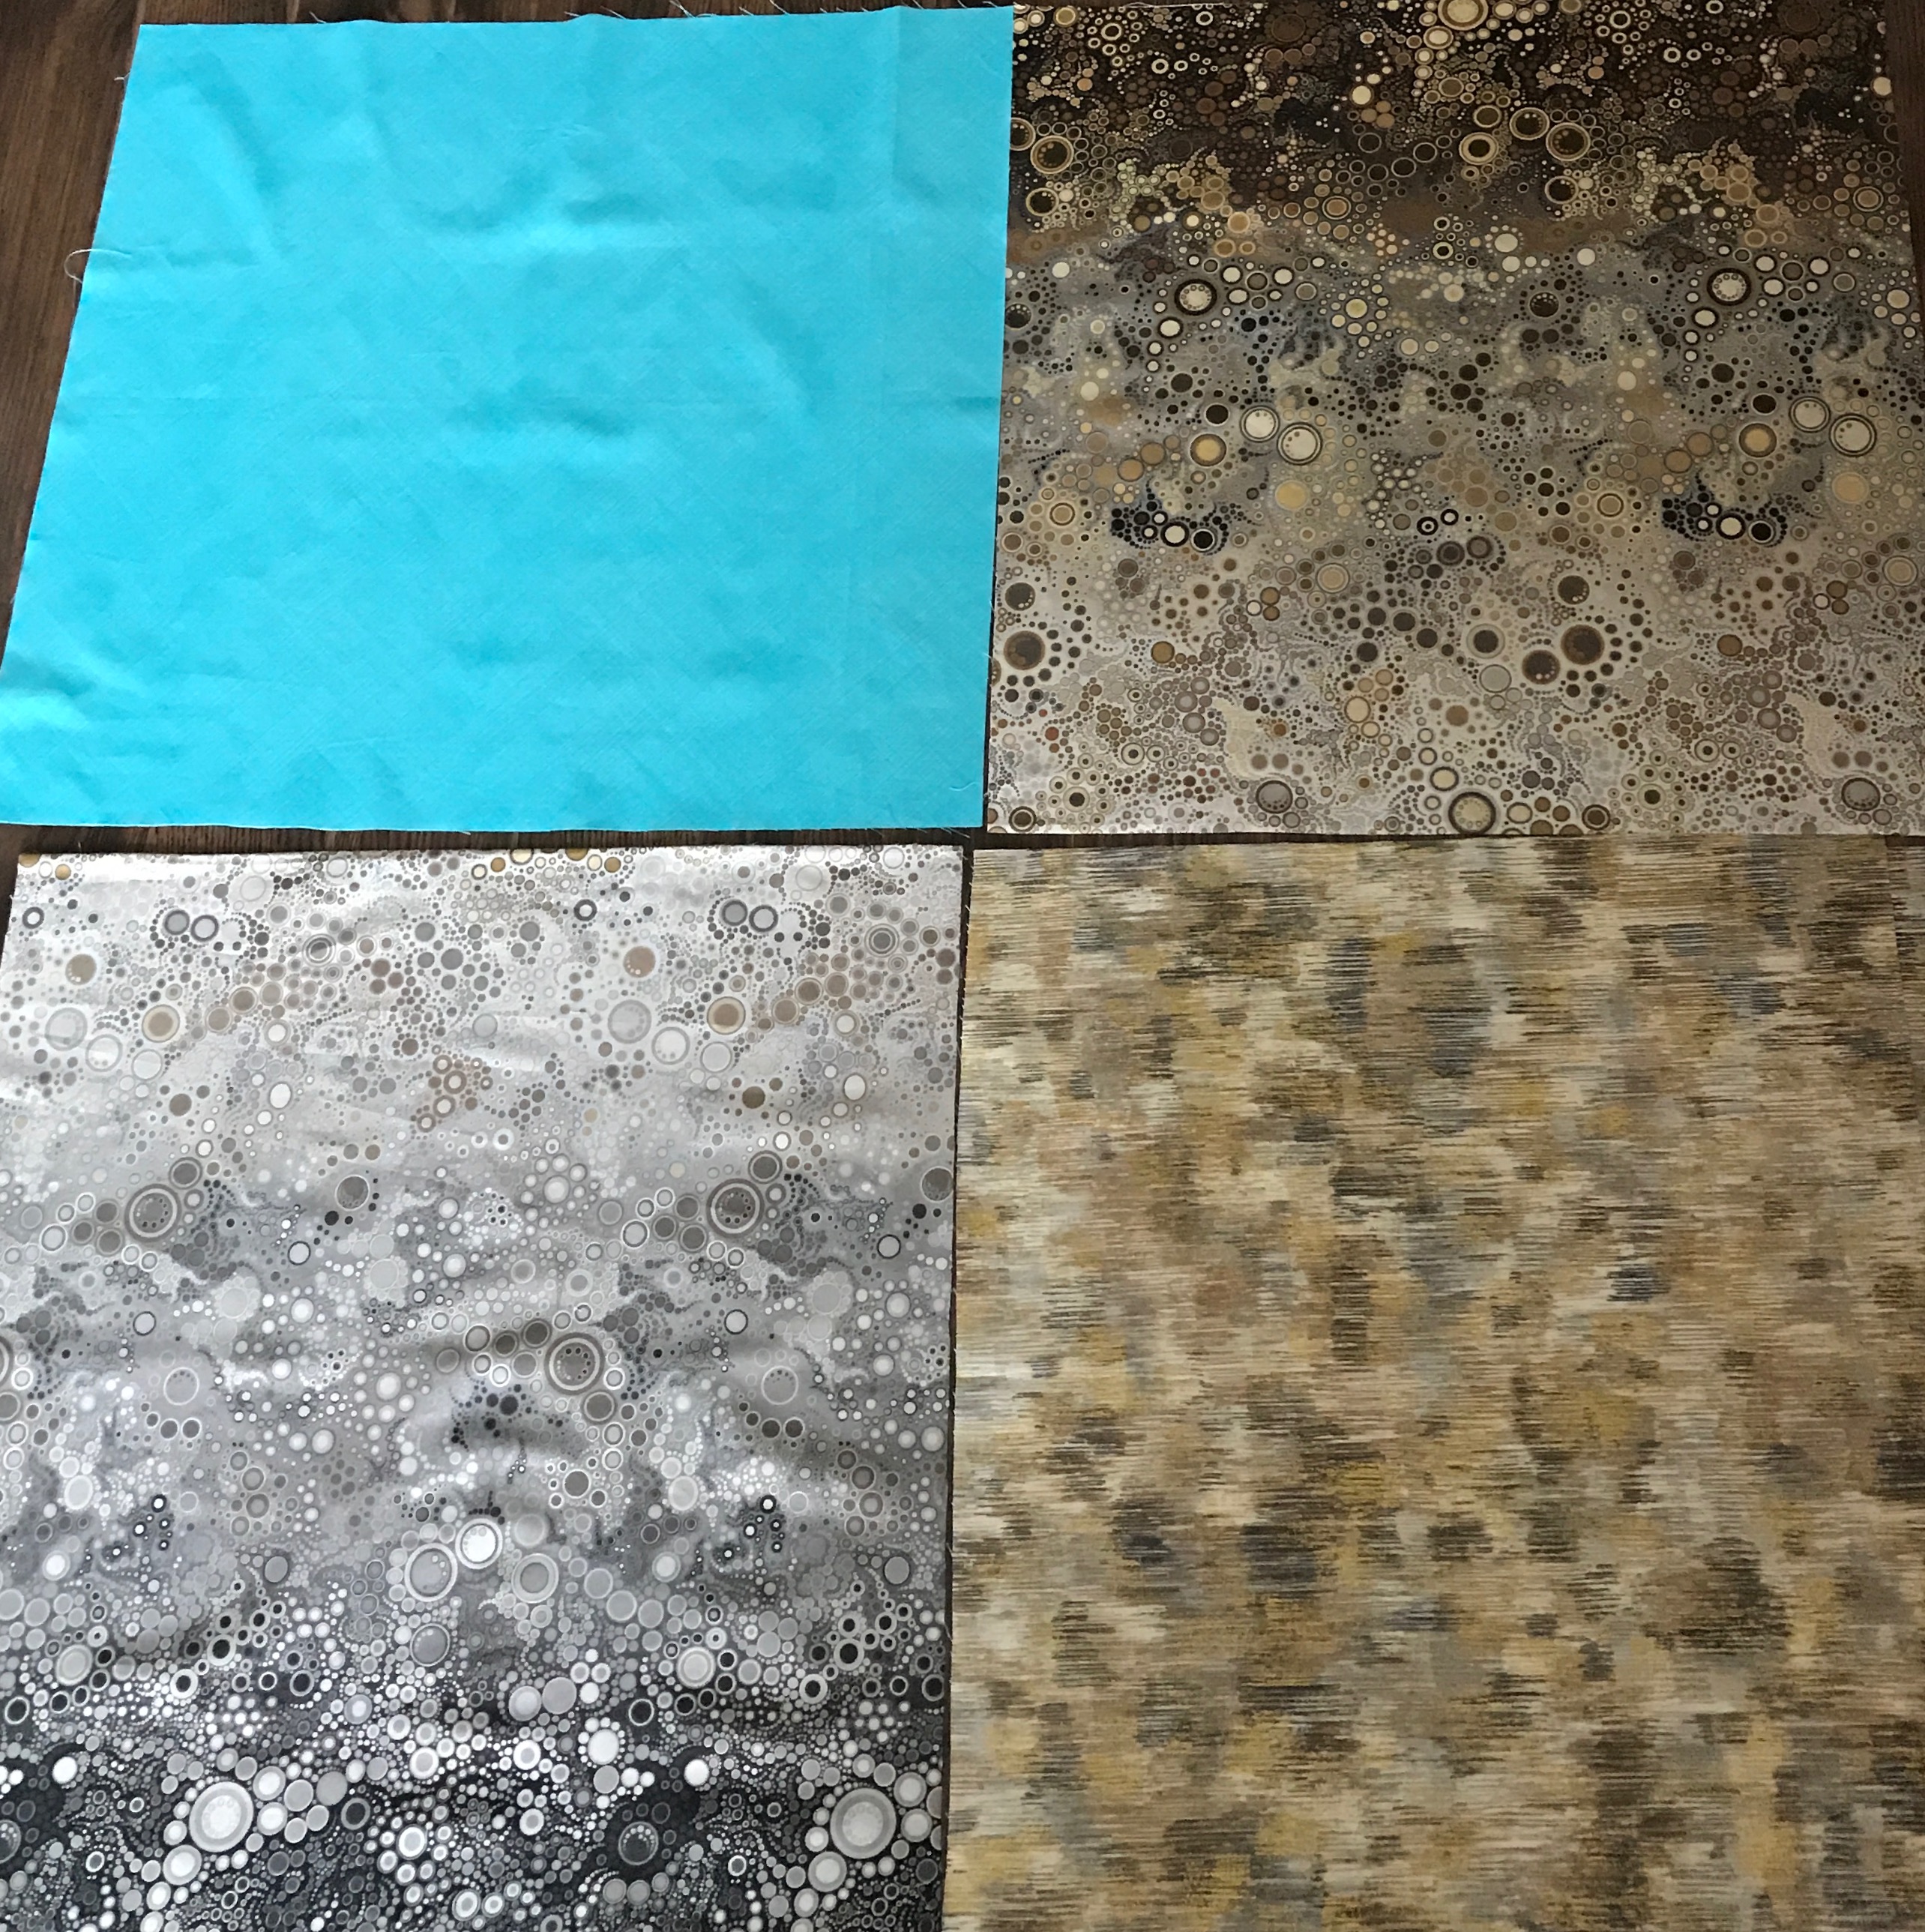
Christmas day is just another day. I read the news (stupid way to start the day these days – nothing but seriously ominous views of the world). Then I picked up the strips I constructed yesterday, dug out some grey backing fabric from my backing collection and laid the strips on it – I inverted adjacent strips to mix up the colour and added one narrow contrasting turquoise. Now the strips aren’t fighting the complementary fabric. This is a possible arrangement for a quilt top.

Possibilities 1

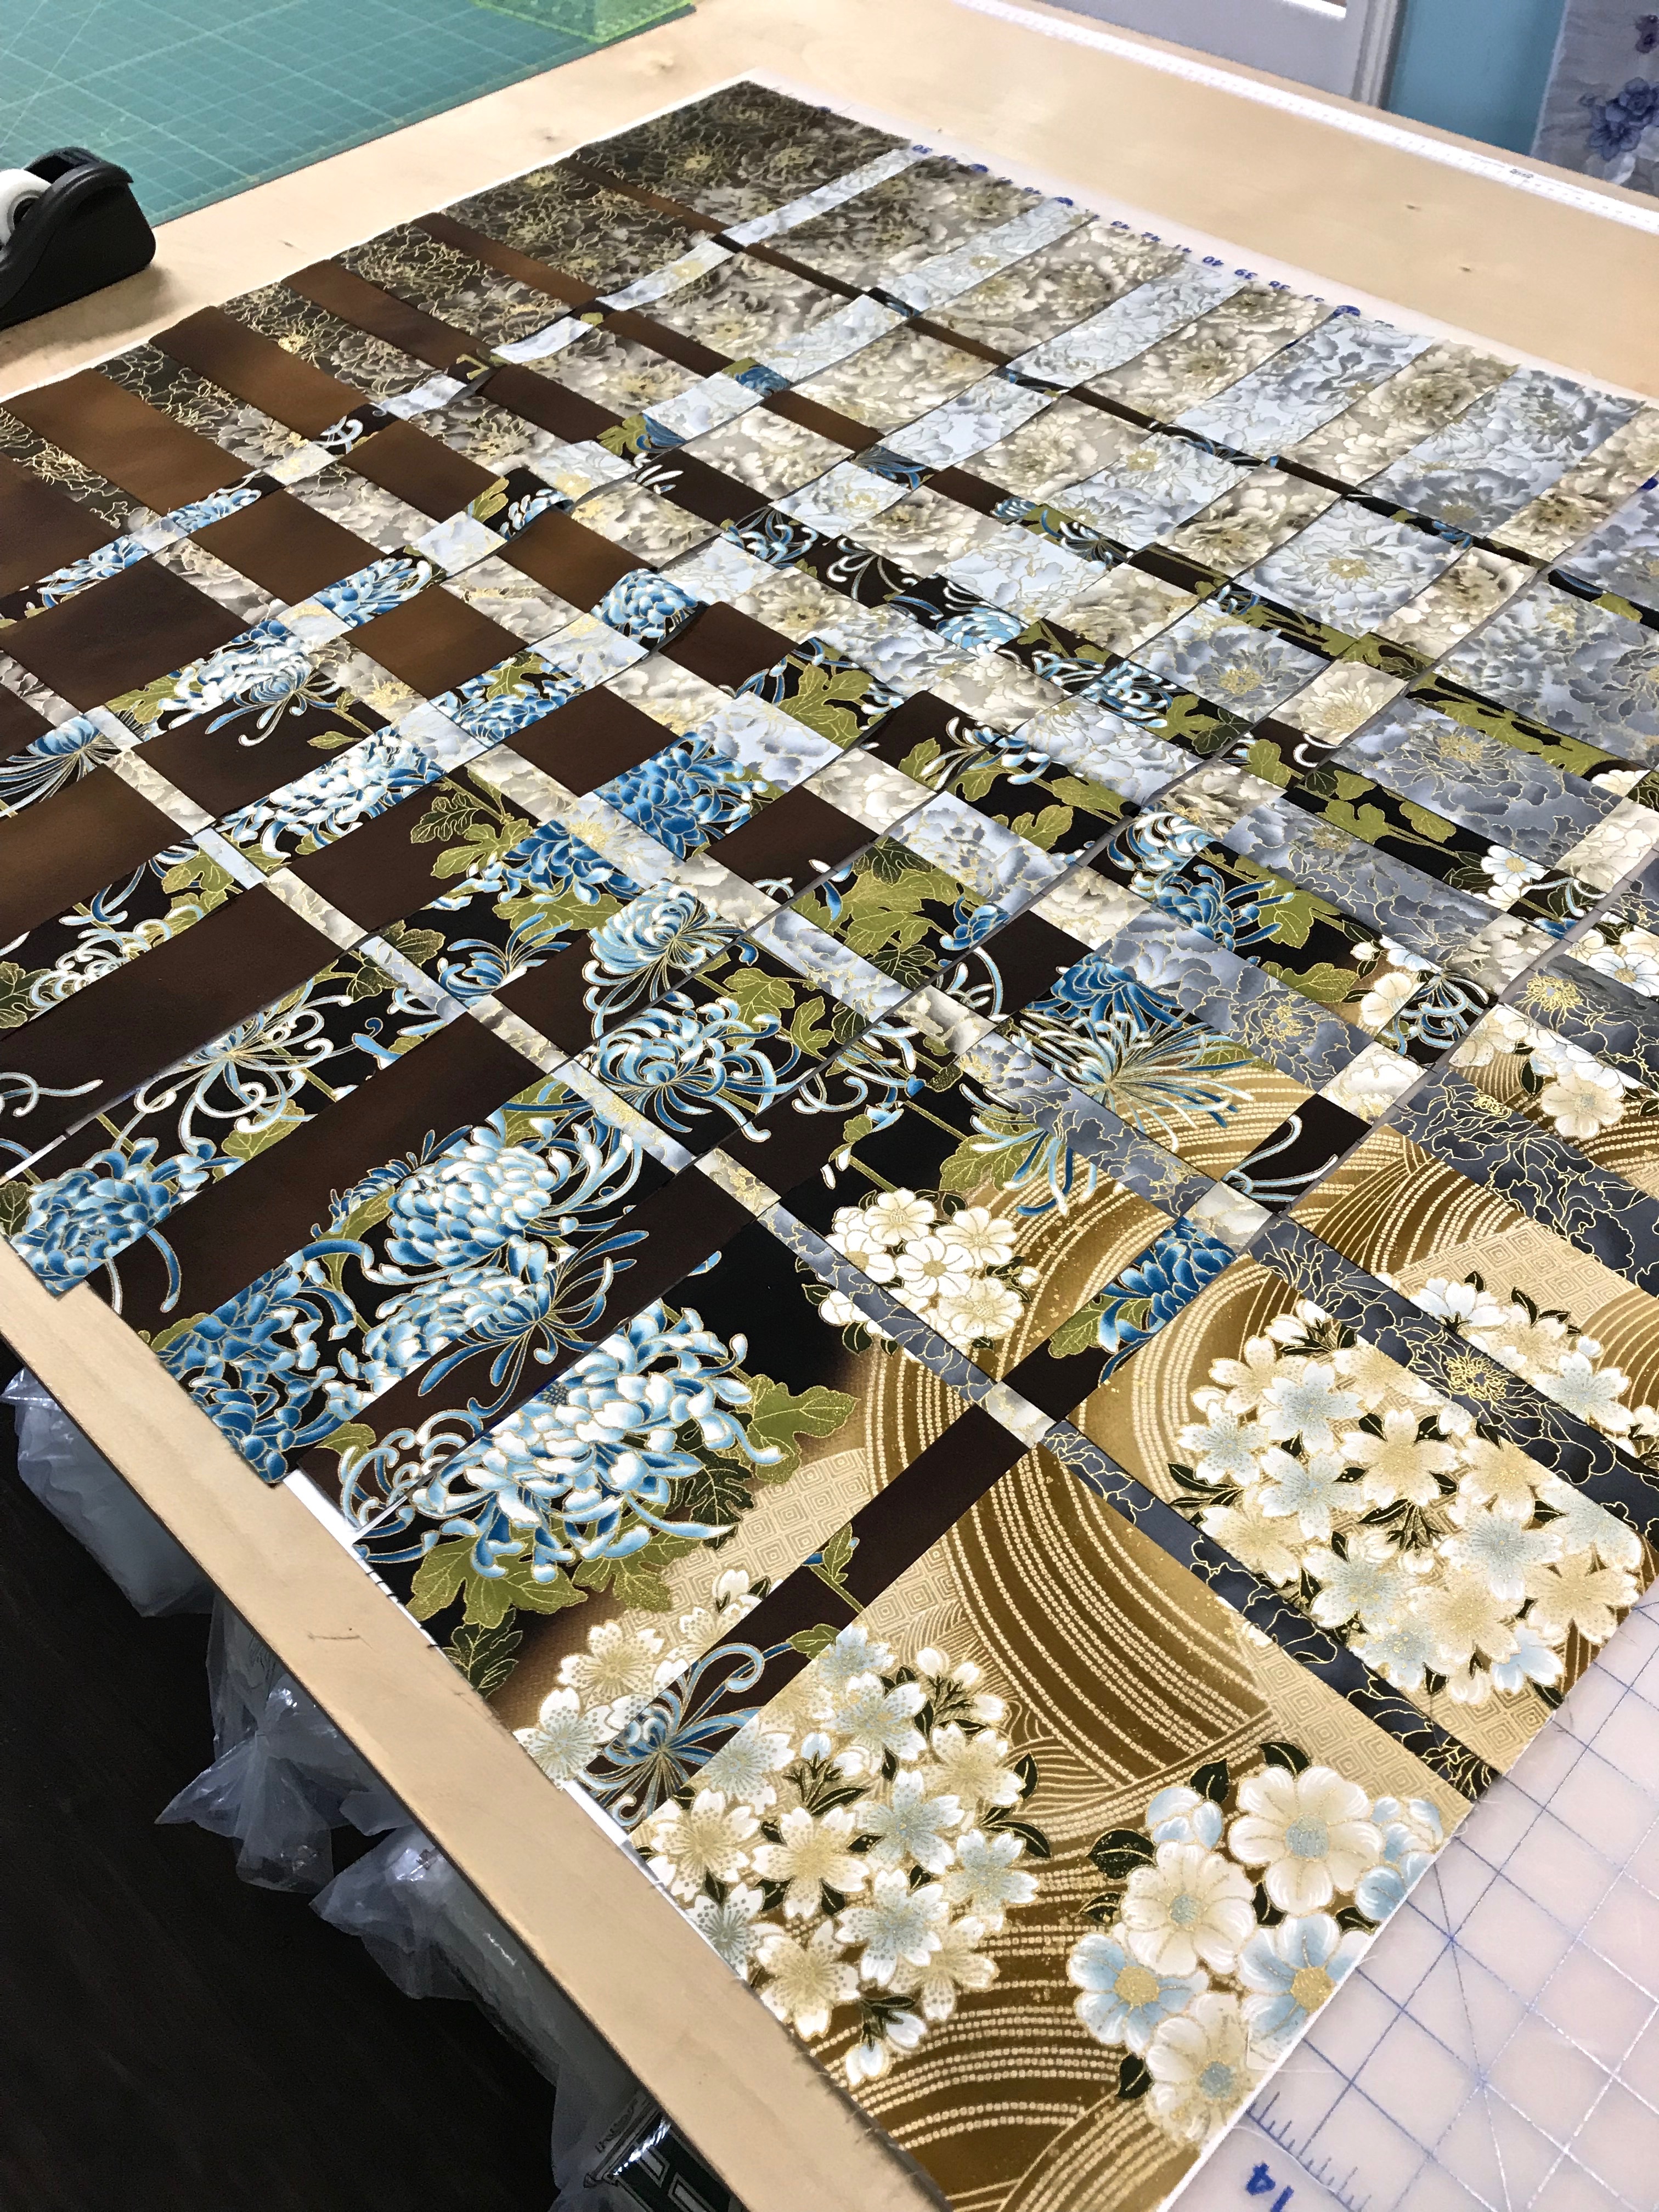
But I wondered what it would look like if I kept the strips all in the same direction and skewed them a bit and I think I prefer this layout. I’ll cut off the overhanging bits and resew them at the opposite end so the strips will be the length of the width of fabric. I will mirror strip widths in the interstitial fabric so the assembled top will have a balanced feel.

Possibilities 2

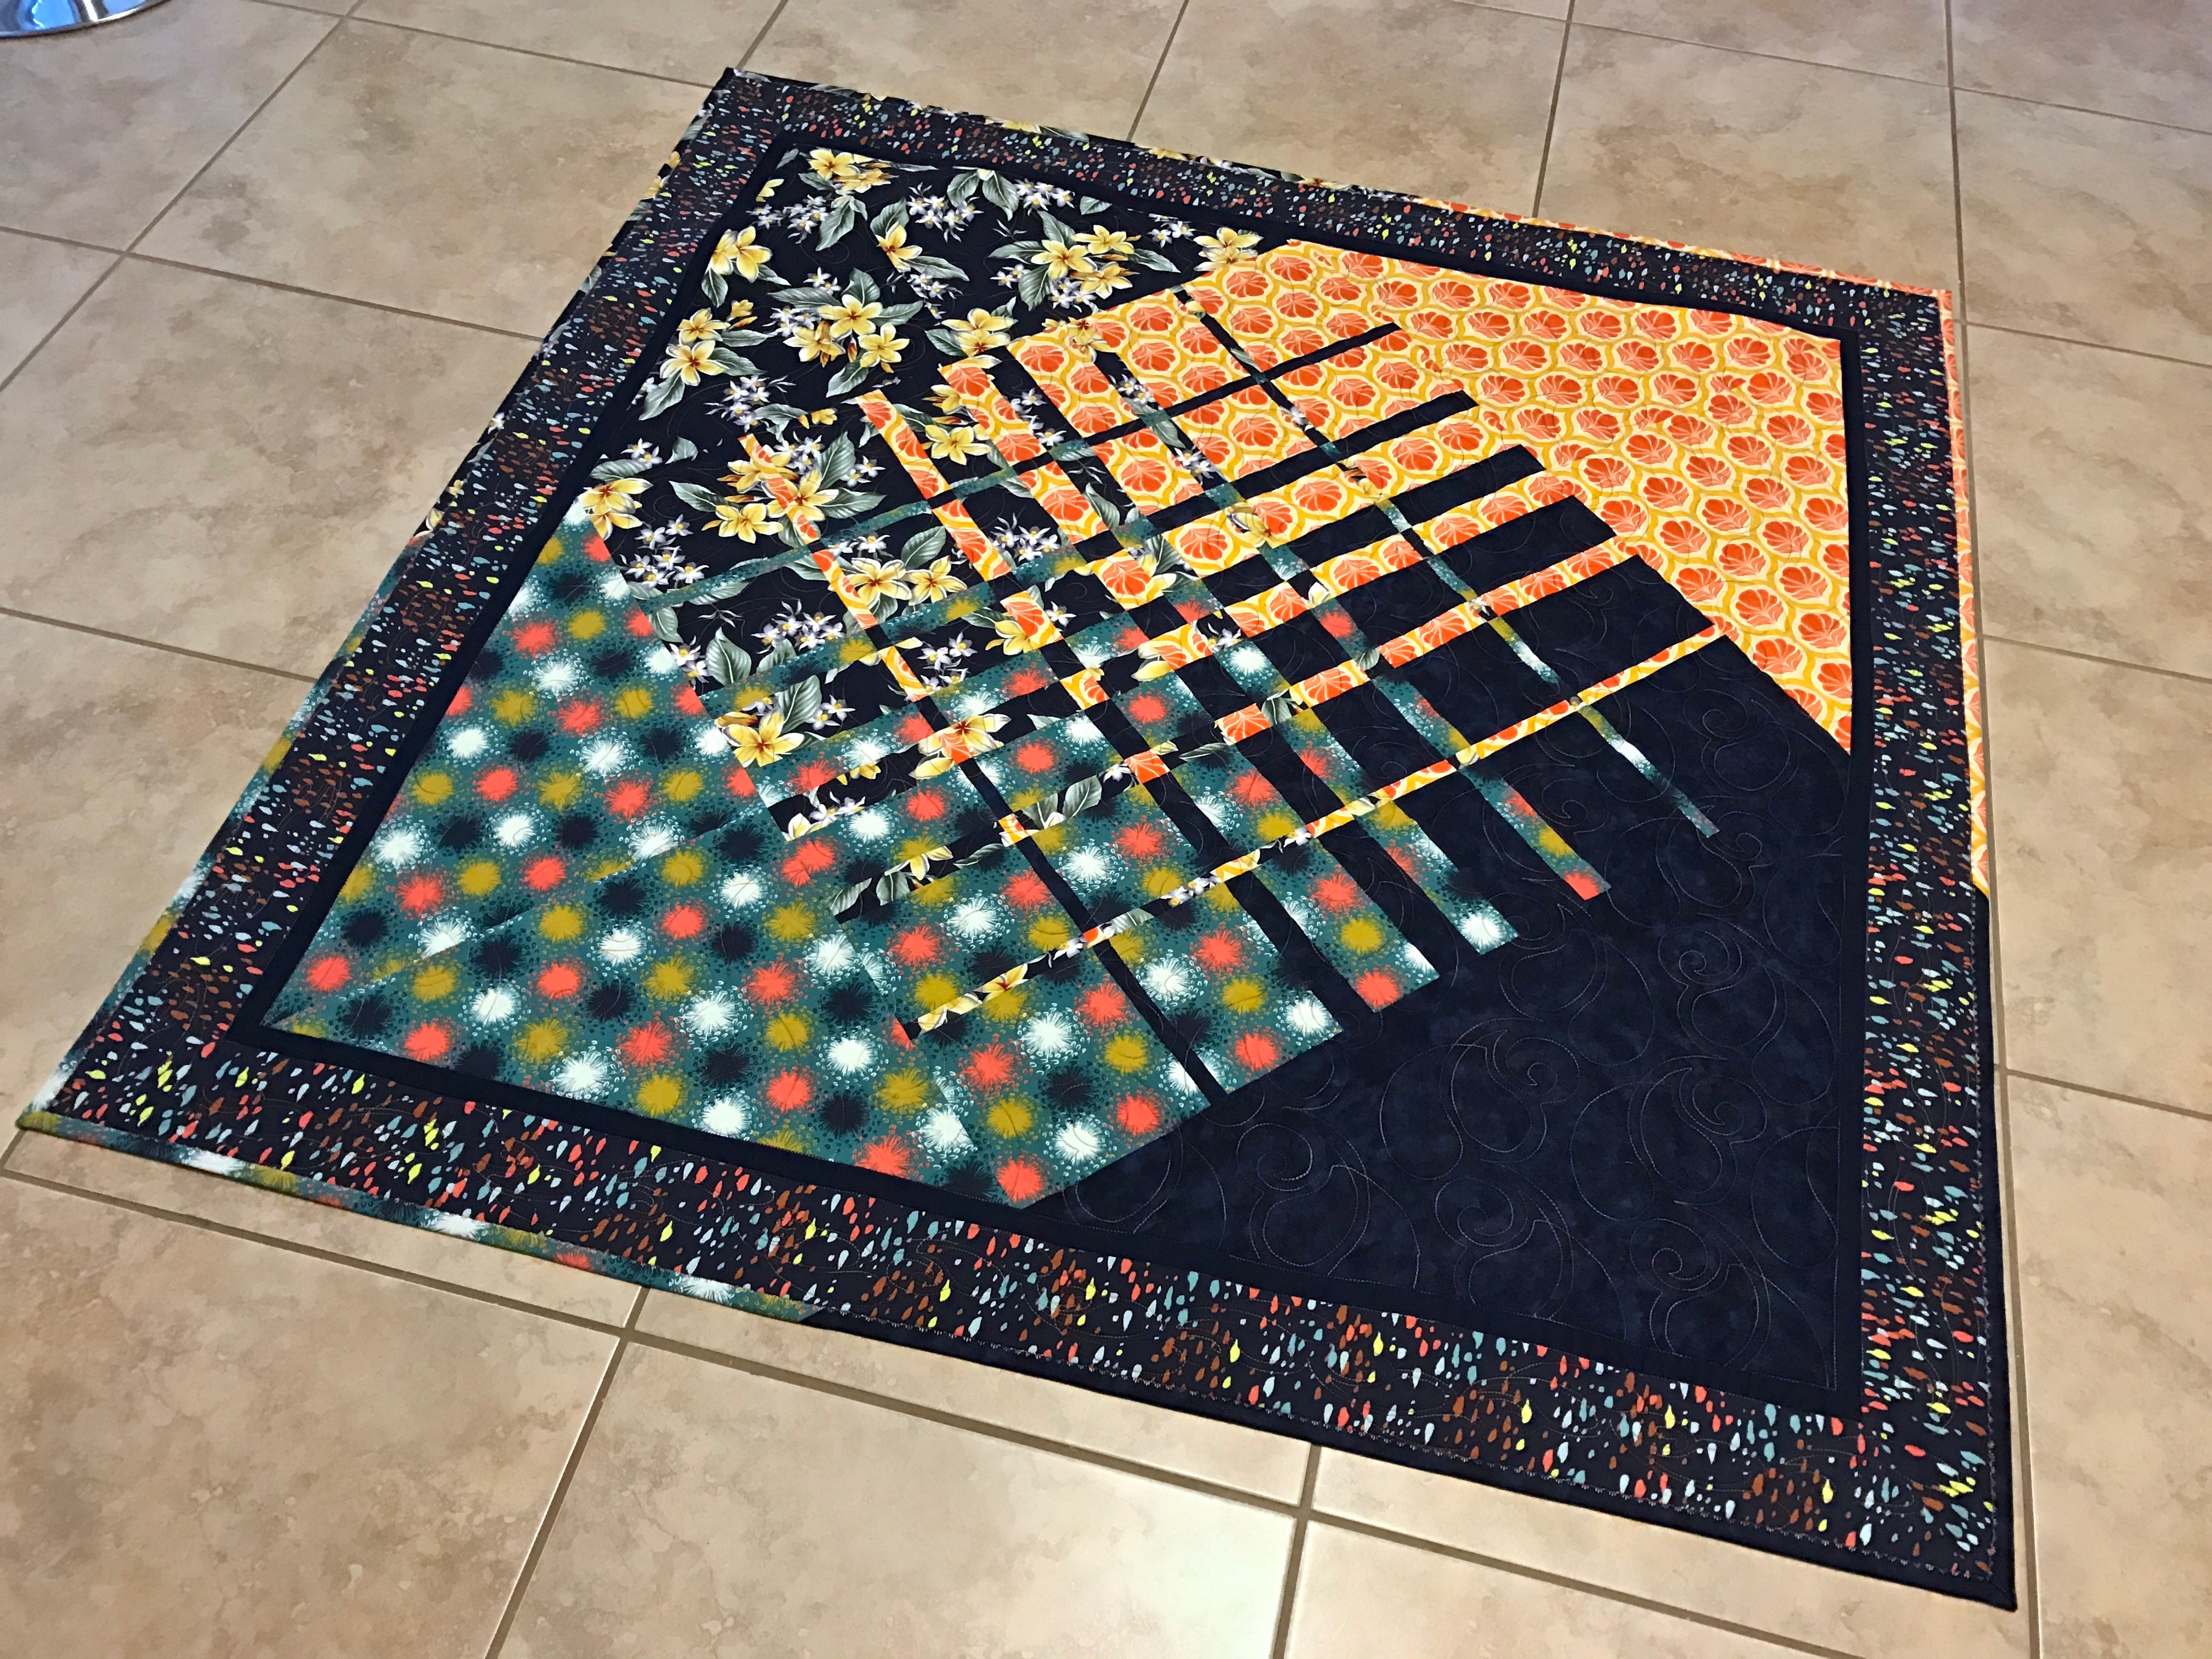
I didn’t stop there. Here is the first pass at the convergence quilt – and I got it wrong! The ombre/turquoise is right but the batik/ombre is backward – I wanted the dark to go from wide to narrow and I inadvertently did the reverse.

Convergence II

Doesn’t look awful like this but the balance is not what I was aiming for – I wanted the two dark parts of the ombre to be at opposite corners from one another. I must have laid the ombre/batik panel upside down when I cut the strips. Fortunately, I have another dark ombre piece and enough of the batik to recut/resew/and recut those strips – wasn’t planning on having to do that, however.

This is one of those times it’s a good idea to stop and walk away from it all. Take a breath and come at it again tomorrow.

Season’s greeting to anyone who has bothered reading this far.

Possibilities #1

That pile of fabrics with the Ombre fabric as central has been calling out to me. So this morning I decided to have a go. My idea was to keep the ombre as intact as possible and to set up some kind of convergence idea using the other blending/contrasting fabrics.

Well that didn’t work! The strips of contrast fabrics kill the ombre – they’re way too strong; they overwhelm the ombre fabric. I’ve gathered them up and put them aside to use them in something else.

Ombre Idea #1

So then back to Ricky Tims basic convergence quilt idea – four squares of blending/contrasting fabric which are cut into graduated strips, sewn together in one direction, then sliced again in graduated strips and stitched once more. The question is what will go with the two blocks of the ombre.

I tried a light and dark turquoise – the darker fabric is lifeless against the ombre.

Possible Ombre Idea #2

The lovely lined fabric doesn’t have near enough contrast to work at all.

Ombre Idea #3

For the moment I’m contemplating this selection – the turquoise should make the overall assembly bright and the paler batik blends reasonably well with the two halves of the  ombre fabric…

Ombre Idea #4

I will walk around that for a day or so before cutting further – at the same time going through my stash again to see if I have any other fabrics that might work better.

My first convergence quilt had strong contrasts and worked out well.

Convergence Quilt #1

The contrasts with the ombre fabric aren’t so defined although the ombre sets up a workable contrast in two quadrants. The challenge is finding appropriate fabrics for the other two quadrants.

Convergence Quilt – in progress

This convergence quilt in progress was created in a class I taught a year or so ago – the participant had two lovely contrasting ombre fabrics which blended together amazingly well. I don’t have a second ombre so I’m trying to set up the contrasts another way.

This is how improvisation works – one idea doesn’t pan out, you try another until something just feels right. I’m working on the feels right part – not there yet!

Another Quilt To A New Home

I gave away another quilt this morning. It’s going to a new home and I’m happy for it. I know it will be used well and appreciated.

Quilt Top – Convergence Quilt

I need to draw up a list of friends who would appreciate receiving a quilt and give more away. I have three which I’ve put out to use myself and some of the rest in that closet need to move on.

I’ve given away about half of the quilts I’ve produced since I began quilting 15 years ago. If I have them hanging around too long I grow attached to them and it becomes harder to send them on their way. I like keeping particular ones on hand as examples for classes but I have photos of every quilt I have made (front and back) and, you know what, that will have to be enough.


Convergence Quilt #1 – Top Completed

img_8034

So here is the top completed. The original convergence block is the center of the quilt, with triangles matching one of the predominant colours on each side. Those triangles were difficult – in the end, I laid the sewn convergence block on the floor, laid paper under one side, then drew a triangle – the base of the triangle was the length of the block side, 45° angles to form what is an isosceles triangle! Where the two sides met created the apex of the triangle (which I made sure was a 90° angle). (I remembered to add seam allowances to each side of the triangle.)

I didn’t have enough fabric left to create the triangles in a single piece although overall there was enough fabric – if I made two smaller right angled triangles, stitched them together on what would become the diagonal of the overall block. Then I had enough width to accommodate the edge of the convergence block.

Once the triangles were attached, I added a 3/4″ sashing piece for stability – the sides of the triangles on the outer edge were all on the bias and needed to have something attached that would retain the overall shape. I cut the sashing on the length of fabric (since I had just enough length of the Kona solid I used). Then added a 4 1/4″ border from a fifth fabric that I’d bought as part of the set with the other four fabrics.

Now I have a 54″ square top. I need to think about what to do with the second side (back). I bought another 1/2 m. of each fabric, as well as 2 1/2 m of the dots fabric for the back. Flying geese? Half square triangles? Strips? Crazy quilt? Lots of possibilities. I’ll wake up with something in mind, I’m sure. That’s how these things seem to work themselves out for me.

Convergence Quilt #1

Yesterday I drove to Parrsboro to retrieve my quilts from the Art Lab Exhibit. No sales – wasn’t expecting any. Lots of nice comments in the guest book, though.

When we were hanging the quilts three weeks ago, Michael asked me if I’d ever tried a quilt using the Fibonacci Sequence of numbers (0, 1, 1, 2, 3, 5, 8, 13, 21…). I never have but I googled Fibonacci Quilts and found a gazillion examples!

Turns out that modern quilters began playing with this idea quite some time ago. One of the earlier quilters to explore intersecting graduated, spliced fabrics in two directions was Ricky Tims. He used a slightly different sequence of numbers but the effect is similar. His book: Ricky Tims Convergence Quilts offers a variety of ways to play with this idea.

cover-rickytims

Book Cover

c2

Example from the book

Quilts called out to me today. I put the shirt/jacket to one side (I have to take the back princess seams apart and reduce the fullness of the side back panel to smooth out the fit of the back of the garment – I’ll get back to it likely tomorrow because once I solve the back fit problem the assembly of the garment will go very quickly!).

I went to my fabric stash and chose four complementary fabrics – two with strong patterns, two more muted. I had 1/2 m of each fabric – I cut 20″ blocks from each, pressed and starched them. Lined them up, trimmed them, sewed two together, folded them right sides together, then cut the following strips from each pair: 1″, 1.5″ 2″, 3″, 4.5″, and 7.25″ (that used up most of the width of the fabrics).

I interleaved the strips, then stitched each set together giving me two graduated panels. Here they are with the strips assembled in one direction:

img_8012

The second step is to cut the panels again, with the fabric rotated 90°. I laid the two pieced fabrics right sides together, strips horizontal, then cut vertical strips again, using the same dimensions, then interleaved them once more. This produces a single panel with the four colour blocks converging into one another:

img_8017

My “convergence” panel #1

My finished panel is 34″ x 34″ – now I need to do something with borders to extend the quilt top so I have a lap size quilt (~ 45″ x 60″). That means asymmetrical border elements so I end up with a top that is longer than wide. I’m thinking I might want to use this panel on point, making the strips diagonals… something like this example below – I’d want to offset the panel somewhat more than this one so I could then add more asymmetrical borders to the enlarged square. 

diagonal

Convergence block on point…

I’ll work on this some more tomorrow. Tims calls these “mystery quilts” – he’s right! It’s hard to anticipate how the spliced, interleaved fabrics will look. I’m happy with this first attempt – I’ll want to play with it some more using strong coloured fabrics with more muted patterns to see how that might turn out. I can see I might be engaged in this cutting, sewing, cutting, sewing for quite a while – there’s lots to learn here…