Organized…

Round 2 Set Up

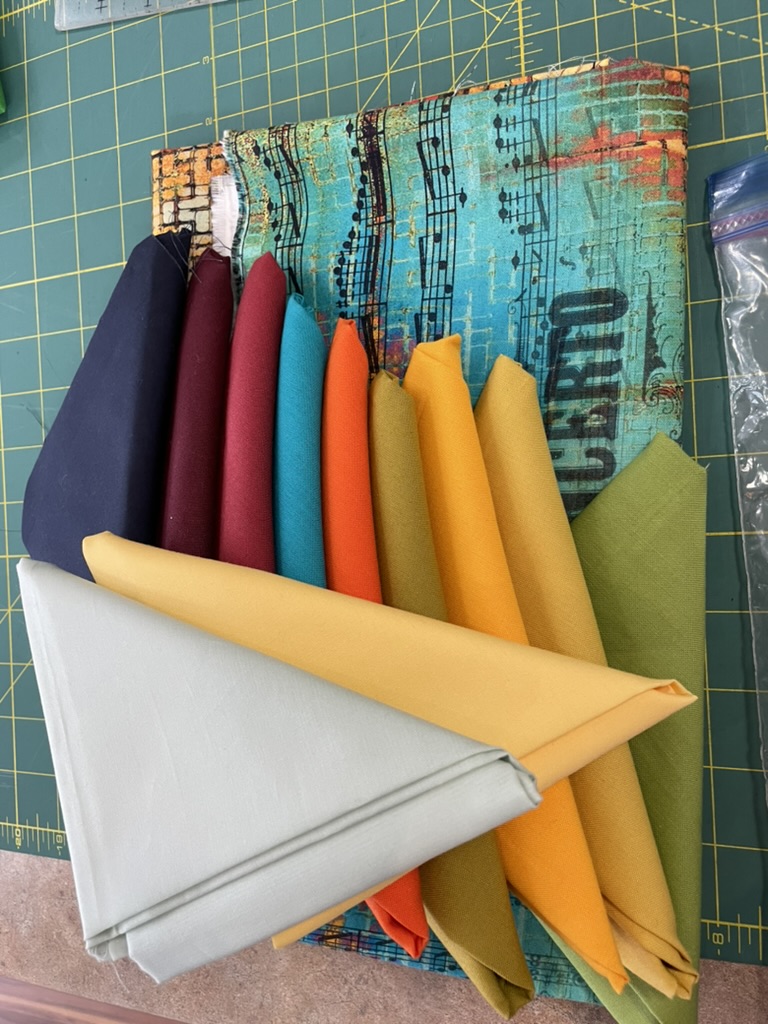
So how do I organize the fabrics, the cutting, and the collecting so I can make ~20 different blocks? I figured out I needed to cut and sort three different sizes from each of the fabrics – 3/4″, 1 1/4″, and 1 1/2″. I sorted the sizes into different boxes (I had neither enough room nor boxes to sort colours, greys, and background light fabrics into separate boxes, so I sorted just by size.

3/4″ Sorted

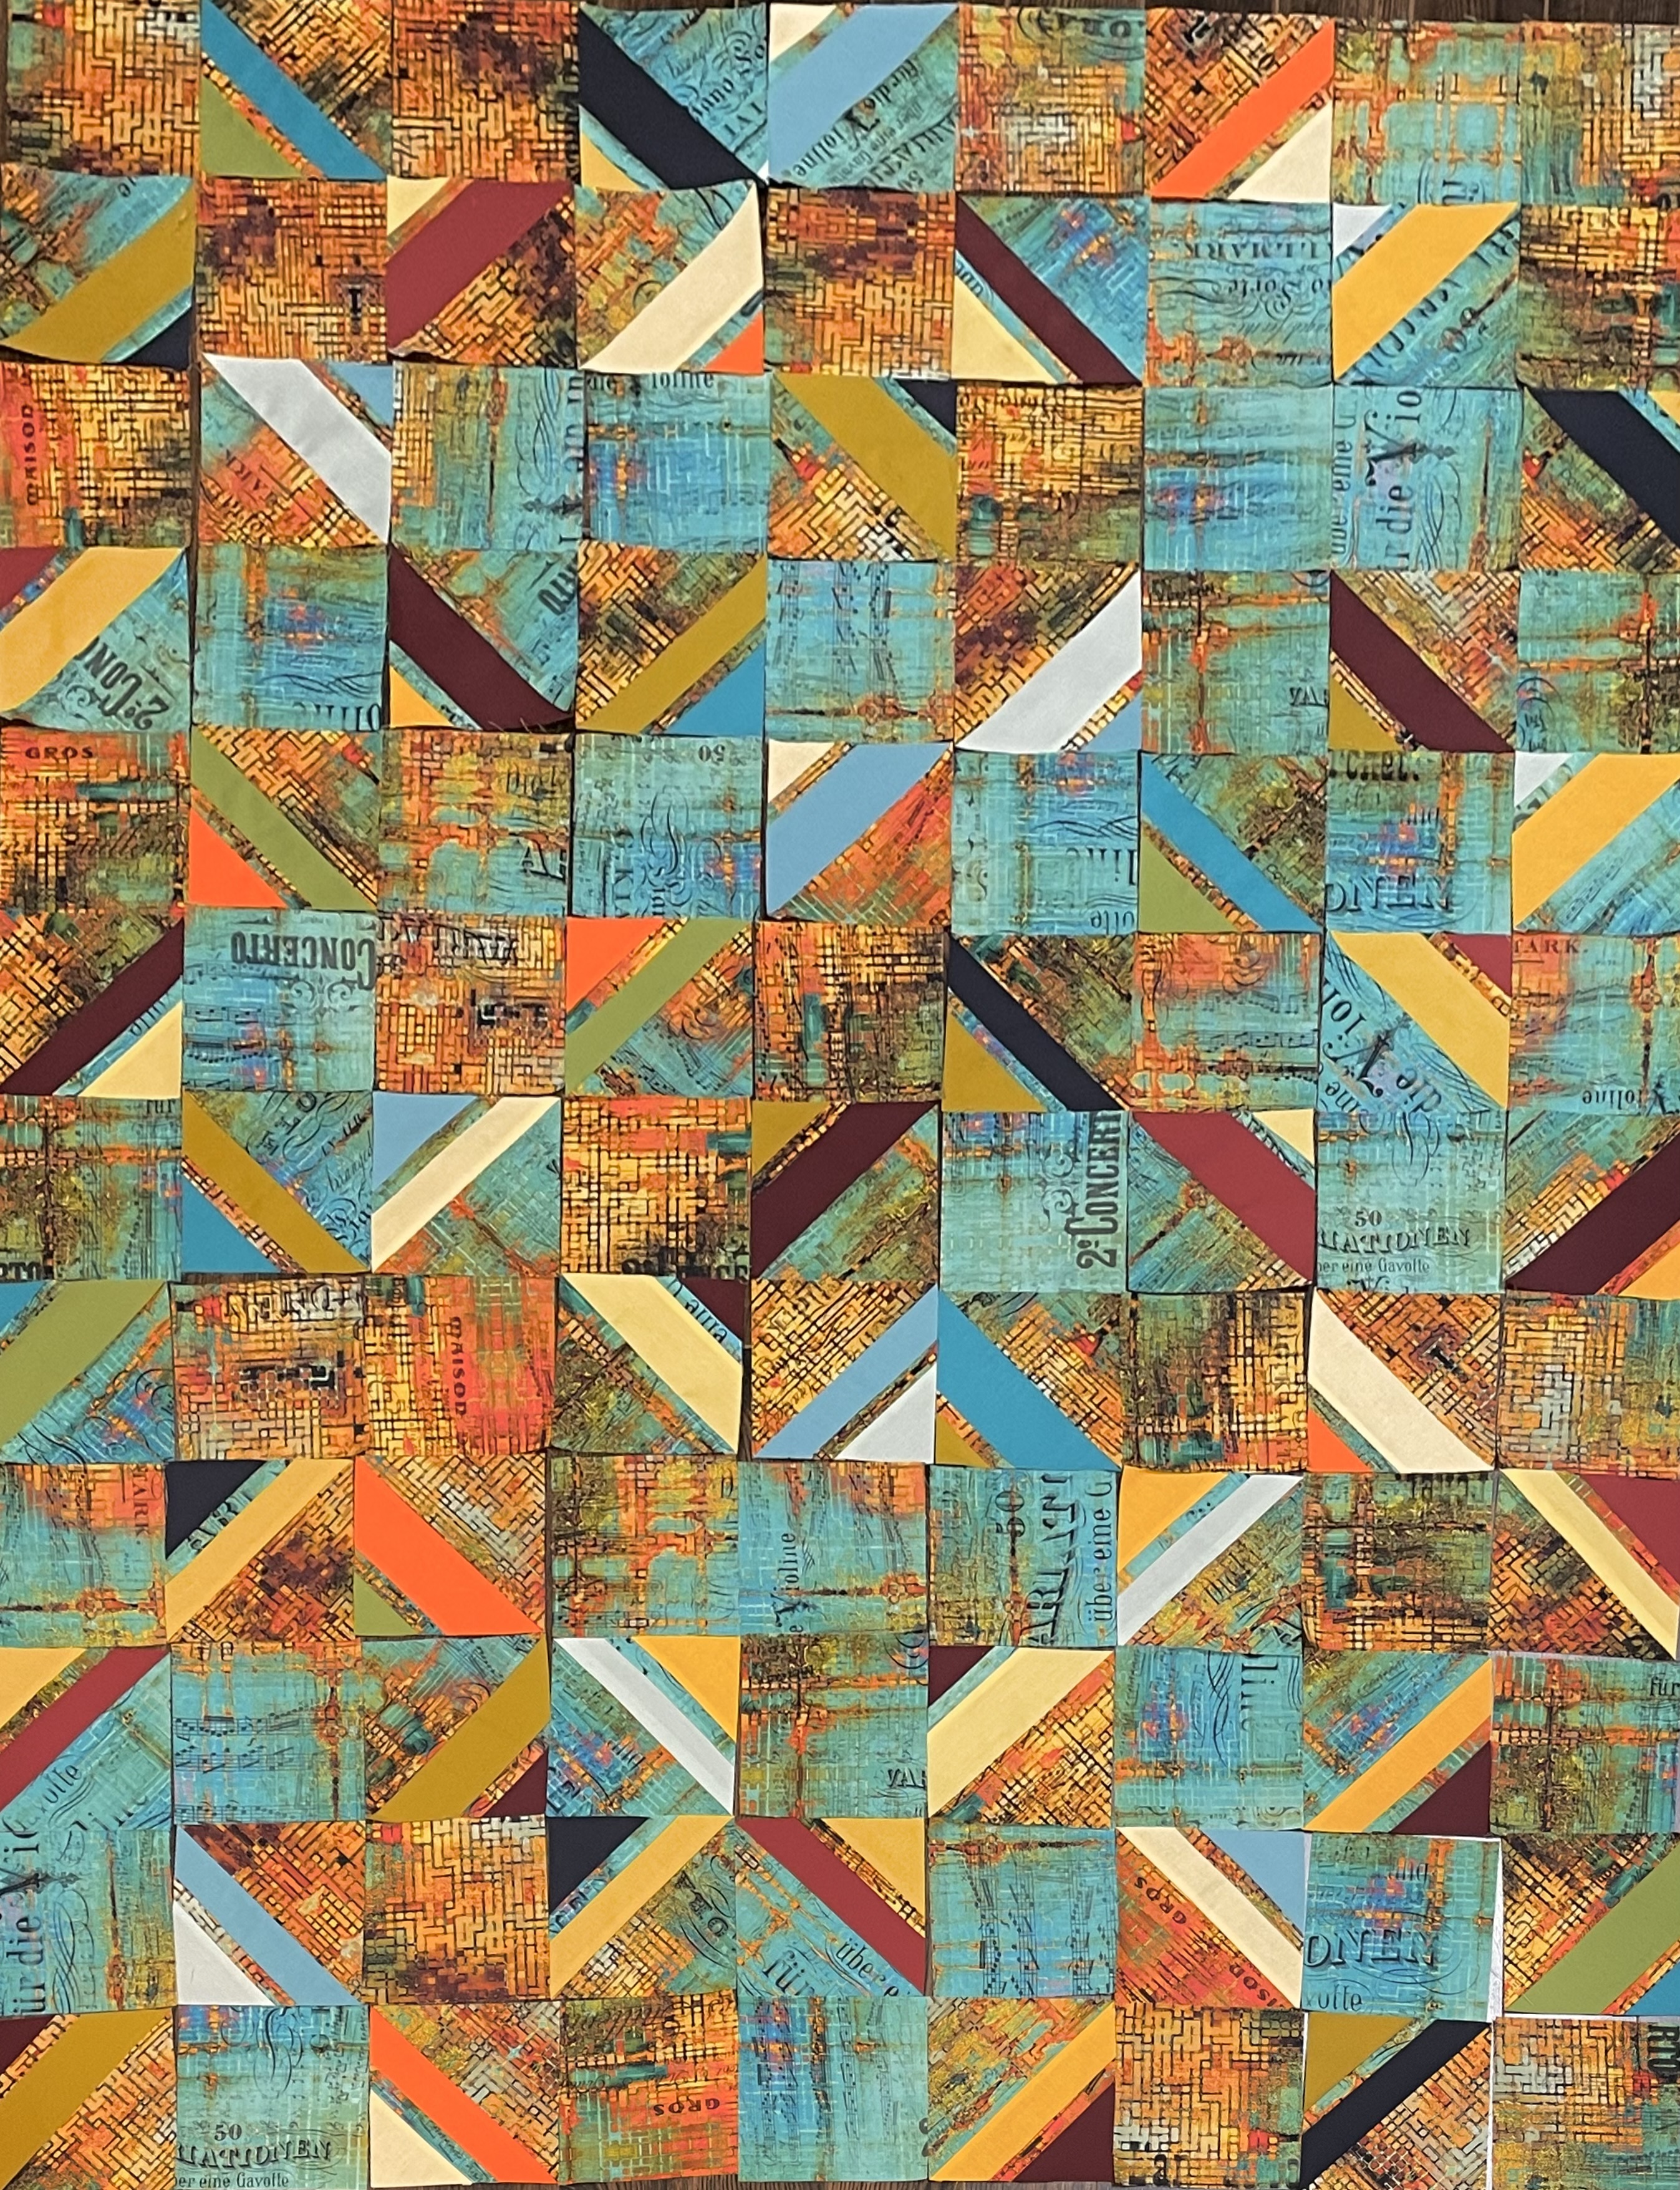
I did the cutting and sorting yesterday. I also bordered and trimmed all 20 center squares (3″ blocks”). The bordering went quickly because I was able to chain piece the strips one side at a time. This morning I laid out all 20 of the bordered squares

Top: Bordered Centre Square / Middle: 1 1/4″ Strips To Add; Bottom: Level 3 Stitched

I’ve decided to add 1 1/4″ strips to 15 of the blocks, but to use the narrow 3/4″ strips with 5 of the blocks – so they’re not all the same construction.

Blocks with Level 2 Narrow Strips – Ready To Sew

The remaining blocks will have 1 1/4″ strips at Level 2, with narrow 3/4″ strips at Level 3. All blocks will have the same strip width (1 1/2″) for the outer round.

Now, I’m ready to sew. I’m starting with the 5 blocks with narrow strips. First I’m going to set up all the strips by joining background to the colour and grey strips, then add the joined strips to the centre bordered squares. Next, I’ll continue with these blocks adding the next two sets of strips to complete these blocks. Last I will work on the remaining 15 blocks, working on each level for all 15 blocks.

Although I can’t actually chain piece, this will be more efficient than completing one block at a time. This way I can audition the coloured and grey strips with all of the blocks at the same time and get a sense of the coordination I’ll be looking for when I go to assemble the blocks into the top.

Once I have these blocks completed, I still need to create at least a dozen blocks from just the light background fabrics to intersperse among these coloured blocks. I’m after a minimalist feel to the quilt so I need to reduce the amount of colour in the overall layout. I’ll tackle that problem when I’ve finished these bright log cabin blocks.

Time to start sewing!

I’m Back

I haven’t been travelling, just getting on with life with small projects I haven’t bothered to report on.

Boomerang Quilt Completed

I finished the Boomerang Quilt ten days ago (seems longer than that somehow). I took it to Sew With Vision to show the gals how I used the fabrics I bought there. Sally wanted me to display it to advertise a class we’re scheduling – you never know whether there will be any interest or not.

I’ve been working on darning some socks – one pair for me, two pairs for friends. I’ve another sweater needing restoration sitting with my knitting waiting for me to make time to work it.

A while back I came across another minimalist quilt which I’ve begun working on. It’s based on the Log Cabin block which I haven’t made in a gazillion years. Made from scraps, I thought it worth trying. I have no idea what size the quilt in the image turned out to be; I want a lap quilt – so something that’s approximately 50″x 65″.

Improvised Block – 9 1/2″

My first try gave me an idea for proportions – some wider strips, some thin, ending with a wider outer strip which includes the seam allowance. I want a trimmed block that is 9″ square finishing at 8 1/2″ square. My test block works, but it’s too large at 9 1/2″; I started with a square that is a bit too large and it’s bound by strips that are a bit too wide. By shrinking the square by 1/2″, and the first strips by 1/4″ I should end up with a wider outer strip and be able to trim to 9″.

Now for a second block with some revised measurements to see what I end up with. I have a bunch of “Grunge” fabrics shading from off-white to cream. The “background” of the quilt will be a blend of the light with orange/gold/deep red and various grey/dark grey elements inserted in the strips.

Off to sew.

Quilt Back

Pieced Back

It’s taken the entire day to piece this quilt back using the extra blocks, small scraps and other leftover fabric all because I didn’t have a backing fabric on hand. Looking at the panel I almost see it as another quilt – not quite, though, because the left side has a rather boring patch right in the middle. That was where I started piecing, trying to use the larger leftover pieces and wasn’t being concerned about placement or size. In fact, I was simply trying to create a 26″ x 72″ panel to use on the back and didn’t think I could actually be making a second separate quilt!

This is just the backing for the “boomerang” quilt (I don’t have a name for it, yet). Now to cut some batting, layer the three parts, and pin them together. I haven’t yet set up an embroidery for quilting the quilt – that’ll be tomorrow’s part of the project.

Finished Quilt Top

Finished Quilt Top

A blizzard outside today, so I’ve been sewing all morning. I just completed the quilt top with the pieced inner sashing and the border. I like how the border print brings the whole project together. There’s now enough colour movement and border fabric elements within the panel to invite the eye to look around.

I added the narrow sashing to the border before applying the border to the panel so I could do a single mitre including the narrow sashing – easier than mitring the two elements separately and trying to get them lined up.

Now I have to come up with an idea for the back. I have quite a few leftover blocks (with boomerang) and some rectangles I assembled from leftover triangles along with scraps from the blues. I don’t have any “backing” fabric, per se; my plan is to use the scraps to make as large a panel as I can, then fill in with something that goes with the blues in the top.

Better get cracking…

Quilt…

This is where I began on Jan 18th (https://www.pinterest.ca/pin/219480181832790827/)

I liked the simplicity of the design, although I thought I’d try using print fabrics to create the blocks. I also didn’t want a square, a good lap quilt has to be a rectangle so it covers the body as well as the feet when you use it, even if it’s created as an art piece intended for hanging!

So from the beginning I was using this “trajectory” quilt for inspiration not to duplicate it. Also it’s a paper pieced work – I hate paper piecing so I constructed a set of templates (based on a 6 1/2″ block) to cut my block elements.

Then I went through the fabrics in my stash – came up with several shades of blue but nothing to contrast with it so I went shopping.

In the end I came up with more blue and some yellow/chartreuse pieces.

I cut the block pieces, matched the lighter yellows to the softer blues, the darker chartreuse with the stronger prints and navy pieces.

The Block Pieces Ready to Assemble

With the blocks sewn I laid them out – the challenge was establishing a gradient within a rectangle – not as easy as you’d think.

First Layout

Deadly!

My pale blues read beige and I probably should have reversed the pairings using the brightest yellows with the navy elements; the darker chartreuse with the pale elements – in any case an acceptable quilt but nothing outstanding about it. Here’s where I realized it’s much easier to make quilts that “pop” with strong, large print or batik fabrics!

I had bought a yard of a much larger print fabric which tied the blues/yellows, intending to use it for the border, but I decided I needed to incorporate some into the panel.

I made several new blocks using that fabric in the corner.

Second Layout

Not much better. You barely notice the large print. Nothing is moving your eye around the panel and the upper left corner just sits there.

I thought about my problem for four days while I sick with the norovirus and decided I needed both less and more of the larger print fabric. I made some new blocks this morning.

Third Layout

In addition to the few hints of large print, I took away several of the very pale blocks, replacing them with darker elements, I also moved other blocks around mixing up the array quite a bit more. After looking at this arrangement for a while I decided I could finally start sewing rows.

Final Layout / Partially Assembled

Still not one of my better quilts but at least I can live with this. When the panel is assembled, my intention is to insert a narrow gradient sashing (maybe 3/8″) using the yellow/chartreuse fabrics, ending with a 3 1/2″ border using the large print. Who knows, I may even decide to add some appliqué, although I have no idea what that would be – I can certainly break up those deadly light fabrics with small large print circles….

The original inspiration piece worked for a number of reasons: first the quilter used solids (four yellows, three greys), easier to match up than prints; she worked in an 8×8 square array which allowed her to establish a symmetry not possible with 7×10. (My reason for choosing 7×10 instead of 8×11 had to do with the finished size of the panel and with a wide border ending up too large for a lap quilt.)

While the centre panel is settled, the sashing/border is not (and I’ve not yet given any thought to the quilt back). There’s still a lot of sorting out to be done here.

Finished – At last

Season’s greetings!

I started playing with this quilt on Oct 12. Ten/eleven weeks ago. I just finished hand stitching the hidden binding on the back! Finally – my Christmas day project – to get this quilt done.

Once I had the quilt top assembled I found I could move along again. I made the decision to use the Holtz fabric intact on the back rather than cut it up. I had to incorporate the two pieces I had in order to have enough to complete the back – that’s even after inserting a 14″ strip I assembled from bits and pieces leftover from the quilt top – a much better use of that very busy fabric!

I would have completed the quilt with a conventional binding, except I didn’t have enough of the bronze cork fabric to do that. So in the end I used the leftover strips from the backing to make a hidden binding.

I’m glad the quilt is finally completed. I kept avoiding it because I knew I wasn’t going to be happy with the finished project – nothing there that pops out to say “notice me!”. In fact, I may decided to showcase the quilt back, which I think is much more interesting, in upcoming exhibitions.

So on to the next project – a couple of wall art pieces which I’ve been thinking about for over a year! Time to start working on the first of them.

Catchup

It’s days since I posted anything but I’ve been chugging along as always.

Danish Paper Stars

Danish Paper Stars – it’s become a seasonal tradition to make stars to share with neighbours and friends. I’ve made a total of close to 60 this year. I started with about 45 – which I distributed the other evening (one star per apartment). When I got home I realized I didn’t have enough left for friends so last evening I made another 15! That’s it for stars this year. It takes me about 8 minutes to make a star. [The website I found a couple of years ago describing how to make the stars is still functioning so click here if you want to try your hand at making a few!] [If that link doesn’t work try here.]

The Quilt Top – it’s been a chore but I finally managed to piece the panel together. I rummaged through my stash looking for fabrics to border it with. I came up with something.

The challenge with the burgundy “cork” fabric is that it’s directional so I’ll have to consider how to use it on all four sides – it will require some piecing, I think. Deciding to include a thin strip of the backing fabric ties the whole thing together. It don’t see any appliqué that will enhance this panel which is already way too busy!

Can’t say I’m ecstatic about this creative effort – the background fabric [Free Spirit: Tim Holtz, Eclectic Elements, Abandoned, Rusted Patina PWTH126] turned out to be much busier than I anticipated. I loved the colour combinations, but cutting it up just accentuated the “busy-ness” and adding the solids as I did made the whole panel out of control. That’s the challenge of improvising – it doesn’t always work out as you’ve imagined it.

The Rusted Patina fabric should have been used as very large pieces which is what I’m going to do on the back. I managed to purchase enough from a number of online sources to do that. I want to see what making a small strip through the dominant backing fabric will do. In any case I want to use up what I have. I don’t intend doing anything more with it. Lesson learned!

I just keep carrying on.

If you have time I recommend Barb Emodi’s recent Substack piece: Comes With The Territory.

So, This Was My Idea

Remember when I started this quilt I had a wonderful bright fabric with yellows/oranges/ turqoises/blues. Because the solids weren’t quite light/bright enough, I added a couple more to liven the array.

I had an idea in my head based on a quilt I’d seen on Pinterest

Another HST Idea

to use the print as my background, the solids as accents, with the solid triangles formed from three strips.

This afternoon I finally got back to sewing on this quilt (I’ve been avoiding it for over a month). It didn’t take long to sew the strips for the “solid” triangles, pair each strip with a strip of background print fabric, cut the HST.

56 HST with Solids

Each strip pair gave me four blocks – I just needed to lay them out interspersing them with background blocks.

Tentative Layout 9×12 Layout

I find it very interesting that when I look at the pieces on my floor the yellows/oranges stand out, but the photo brings out the turquoises/blues! The pale yellow solid elements brighten the ensemble. The pale blues are lost among the music elements of the background. The orange solids, the burgundy stripes connect with the background print (on the floor – not so much in the photo), and the navy doesn’t do much of anything. I’m not sure I see much point in playing around with the layout – I don’t think it will make much difference to this rather drab quilt top.

My challenge now is to come up with some way to make this layout interesting. Would a solid sashing in one of the lighter yellows accomplish that? Use the background fabric for a border? What about circle appliqués (of different sizes) cut from the solids placed in some kind of cascade?

Whatever I do, it will have to involve the solids because that background fabric, which I thought would be striking is so busy when cut up, that it overpowers everything else!

Got any suggestions? I sure don’t know where to go from here.

Since I began working on the project, I’ve had a hunch I wasn’t going to be happy with the outcome. My fallback position was to assemble the array, make it into a quilt (with batting and a backing), then use it to make a jacket! Looking at the potential panel, however, I don’t think the jacket would be outstanding, either.

I hate it when the work goes sideways as it has here.

An Idea…

I was looking at the print fabric and the solid fat quarters and thinking I didn’t have “light” in my collection. So I eliminated the colour to see what my tonal contrasts looked like – not too bad, but I could use a bit more light in my colour assortment.

Also, I want to showcase the print even though, in a sense, it’s the background. I found an idea on Pinterest I thought might accomplish that for me:

You have to stretch your imagination to visualize the white above as my print fabric, and the print triangles as my solids. Even further, I’m thinking I will break up the triangle with strips from at least two different solids and include a narrow strip of the background fabric as well.

Just playing around with scrap fabric I start to get a sense of what this idea might yield:

Playing Around

Now imagine that bullrush print as my bright yellow/orange/turquoise/green fabric, those triangle elements as the bright solids above and you get a glimmer of where I think I’m heading. I have more bullrush fabric and a couple of different brown/taupe solids to add to the above – tomorrow I’ll do those and include them to the array.

There is actually a pattern for this quilt online: Lagoon Quilt Tutorial but I’m not planning on following it. The block size in the pattern is 4 1/2″ – I want to end up with 5″ or 6″ blocks (not sure which yet). My final quilt size will be more rectangular then the Baby or Lap quilts for which Erika @ KitchenTableQuilting gives dimensions. Her triangles are “solid”, mine will be striped. Lots of differences. What I’m taking from the quilt photo is the inclusion of squares from the background fabric – in my case, the foreground fabric! What I didn’t want was to bury that very interesting print amidst the solids – this way I can showcase it.

One thing stopping me from proceeding at the moment is that I don’t have enough of the print fabric. I’ve ordered some (because my local shop has none left), and I’m waiting for it to arrive! (I’m also in hold mode because my right wrist has decided to be painful – arthritis that will take a bit of time to settle down – cutting with a rotary cutter is almost impossible and I tried but can’t cut with my left hand). As soon as the fabric arrives (and my wrist settles down), I’ll get to work on this quilt.

Finished This Morning

I chose to complete this quilt with a facing/hidden binding (mitred corners) and did the hand stitched blind hem on the quilt back this morning.

The quilting took just three days – that’s because I elected to quilt the top in 4-block squares. That meant each row had to have a half design (because the top was constructed with 9 columns). I decided to stagger the quilting blocks so the half block elements alternated from one side to the other – half using the right side of the design, the other half using the left. Nobody but me will ever notice. All anyone looking at the quilt will see is the fact that it is quilted! I chose thread to match the background fabric on top; the bottom thread matches the blue/grey background fabric – same weight Wonderfil variegated, just a different colour. I embroidered the standard label I always use in a dark navy blue – I usually mute it to blend in but decided this time to make it stand out!

[BTW, no dragonflies, no embroidery – in the end I decided to let the circles be the focus of the work. In the photo you can see the colour and density change from bottom to top of the quilt – which was intentional.] I pieced the quilt back from scraps left over from the quilt top.

I was showing this quilt (top finished but not quilted) one evening last week to two friends when I realized if I build my next quilt using some version of half-square triangles, that would allow me to pull four-five quilts from my collection to go with it – my Parrsboro showing coming summer could become a collection of quilts created from half-square triangles! Each quilt would be seen differently because the HST theme would provide a new context. So now to think about block sizes and ways of combining the main fabric with the solids so the solids don’t take over the quilt – I want to showcase the print!

The print is Eclectic Elements – Abandoned (Rusted Patina) by Tim Holtz for Free Spirit. What grabbed me about the fabric was the rich colour pallet in yellow/oranges and turquoise/greens. When I pulled the solid fat quarters from a nearby box (conveniently at hand on the table in the shop) and laid them on the print the whole came alive. I figure there has to be a way to use the solids so they create a background and the print becomes the dominant feature (rather than the other way around – which is what I fear may happen)! My idea is this: start by cutting 4 1/2″ strips from the print, then cut 2 1/2″ strips from the matching solids, sew them together in pairs, then create a tube from the print strip and the two solids strips, from which I can then cut half-square triangles! I may want to subdivide the solids even further before I pair them with the print – to break up the concentration of solid colour….

I need to play with this idea using scraps to see what actually happens!