Second Fidget Quilt

Second Fidget Quilt

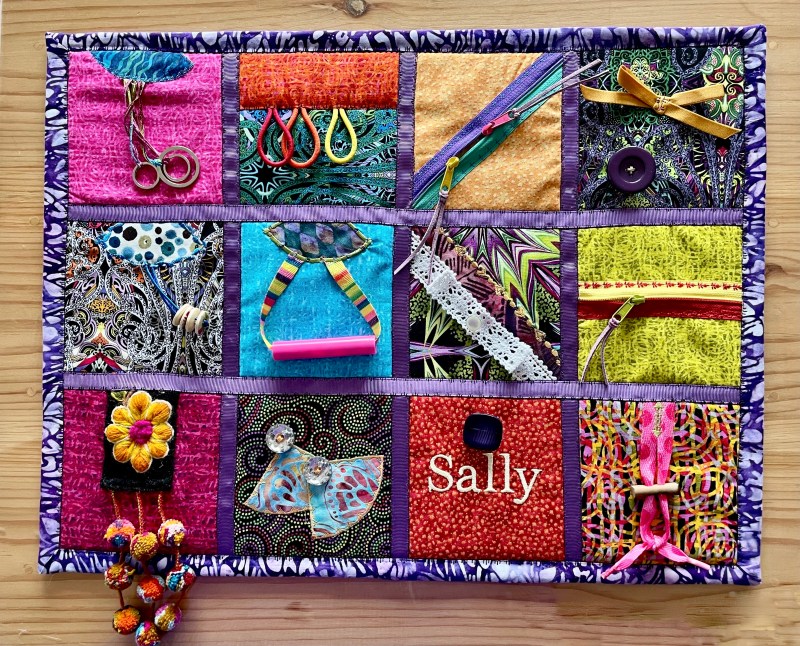
It took a couple of hours yesterday to set up the 12 blocks. This morning I laid them out on a piece of batting, added some stiff interfacing and stitched down the grosgrain ribbon to cover the joins (I didn’t sew the blocks together because I wanted the finished project to be larger rather than smaller – I gained 1 1/2″ on the width and 1″ on height by doing that).

Next, I embroidered my signature on the backing:

Back of Fidget Quilt

After embroidering a signature, I aligned the backing on the other layers, sewed the binding to the back of the project, folded it over the front and decorative stitched it in place.

I discovered when I was finished, that I’d put the backing on upside down! My signature is at the top left on the back of the quilt., instead of bottom right which I’d intended. Wouldn’t have happened had I done what I always do and hand stitched a label in place. Oh well. Lesson learned. Check backing twice before adding the binding (just hope I remember to do that checking!).

This time I focused more on texture with some velvet (which came from some pillow covers I made for my sister 25 years ago). I added a small circle of ripstop which has a crinkle sound when you scrunch it, but stitched flat it just feels “shiny” and makes little noise. I included a square of PUL fabric – that makes a sound when you rub your fingers over it.

I added a velcro fastening; a snap which is tight at the moment, and various beads and loops which move on ribbon or elastic. There is a small zippered pocket (which has a hidden object attached on the inside). The zipper with three pulls has no opening.

I made this second quilt as a prototype. I took the original quilt into my local sewing shop on Friday afternoon and the gals thought it would make a great class. Tomorrow this quilt will go to the shop to be displayed. All I have to do is prepare a description of the project and send that along with photos so the class can be advertised.

Now I need to do some actual experimenting with ideas for some 6×6 pieces. I also want to create a quilt based on the motif of the back of the last Drunkard’s Path quilt – Planets With Moons – a combination of large and small drunkard’s path blocks. I think 5 columns separated by a bit of sashing would be interesting.

Back of Planets And Moons

I’ll start on one of those projects tomorrow.

Fidget Quilt

Fidget Quilt 20″ x 16″

The wife of a friend of mine has recently moved to a full care facility. Her Alzheimer’s and other chronic ailments finally made it impossible to look after her at home. Looking for ways to stimulate her, her husband came across an article in a local newspaper about “fidget” quilts and sent it along to me. Easy to make.

Yesterday, I gathered some leftover charms (5″ fabric squares), laid them out in a 4×3 array, then dug around in my stash of “stuff” to see what I could find. Lots of zipper tape scraps – I selected the long pulls (for arthritic hands which have difficulty grasping) – big buttons, shoelaces, toggles, small buttons, hair elastics, key rings, ribbon, lace, an empty thread spool (I keep them, they’re useful for something now and again), some leftover cutouts from the back of the latest Drunkard’s Path quilt.

I began constructing blocks by adding stuff, one block at a time. I threaded four wooden buttons on some bright blue elastic (leftover from making face masks) and attached them with one of the quarter circles. I threaded one shoelace through the empty thread spool and attached that with another quarter circle (using a decorative edge stitch). A piece of lace which I left loose in the middle, adding a stemmed button in the centre to hold it in place. I mixed and matched pieces of zipper tape with contrasting slides (a single slide on one zipper, two slides meeting in the middle on the second).

Some elements I arranged across the background square, some on the diagonal. I found a woven, embroidered, woolen belt with small pompoms from my Peru trip, cut off one end and attached that. I used a buttonhole stitch to attach a pink shoelace to another charm slipped a toggle on, tied the ends with a reef knot (didn’t I manage to cut off one of the plastic ends while trimming the whole thing – grrrr – I stitched it, wrapped it in thread, and dipped it in glue to stiffen it, Not as good as the original shrunk plastic, but I’d gone too far to replace the square and do it over again).

I set up an embroidery with Sally’s name and stitched it out. The hair elastics I attached beside one another on another background square. I added ties to the zipper pulls (and a dab of glue to keep the ties from slipping off). I looped three key rings onto some thin ribbon. I used contrasting polyester embroidery thread to attach the elements – another textural element.

I stitched the squares to a piece of quilt batting, added grosgrain ribbon to cover the joins, then cut a very heavy weight craft interfacing to stiffen the project. Finally I added backing fabric and binding.

There you have it – a fidget quilt. The whole project took 5-6 hours. Now to find out which aspects Sally is drawn to and which she ignores.

I suggested to the family a couple of other possibilities – playlists of her favorite music on some device which she can operate herself or one of the staff could turn on for her regularly. Photo books made from family photos, favorite places she’s lived/visited, etc. Children’s picture books with good illustration, simple story, interesting ending. Children’s audio books.

There are lots of possibilities for stimulating her and keeping her in touch with her life.