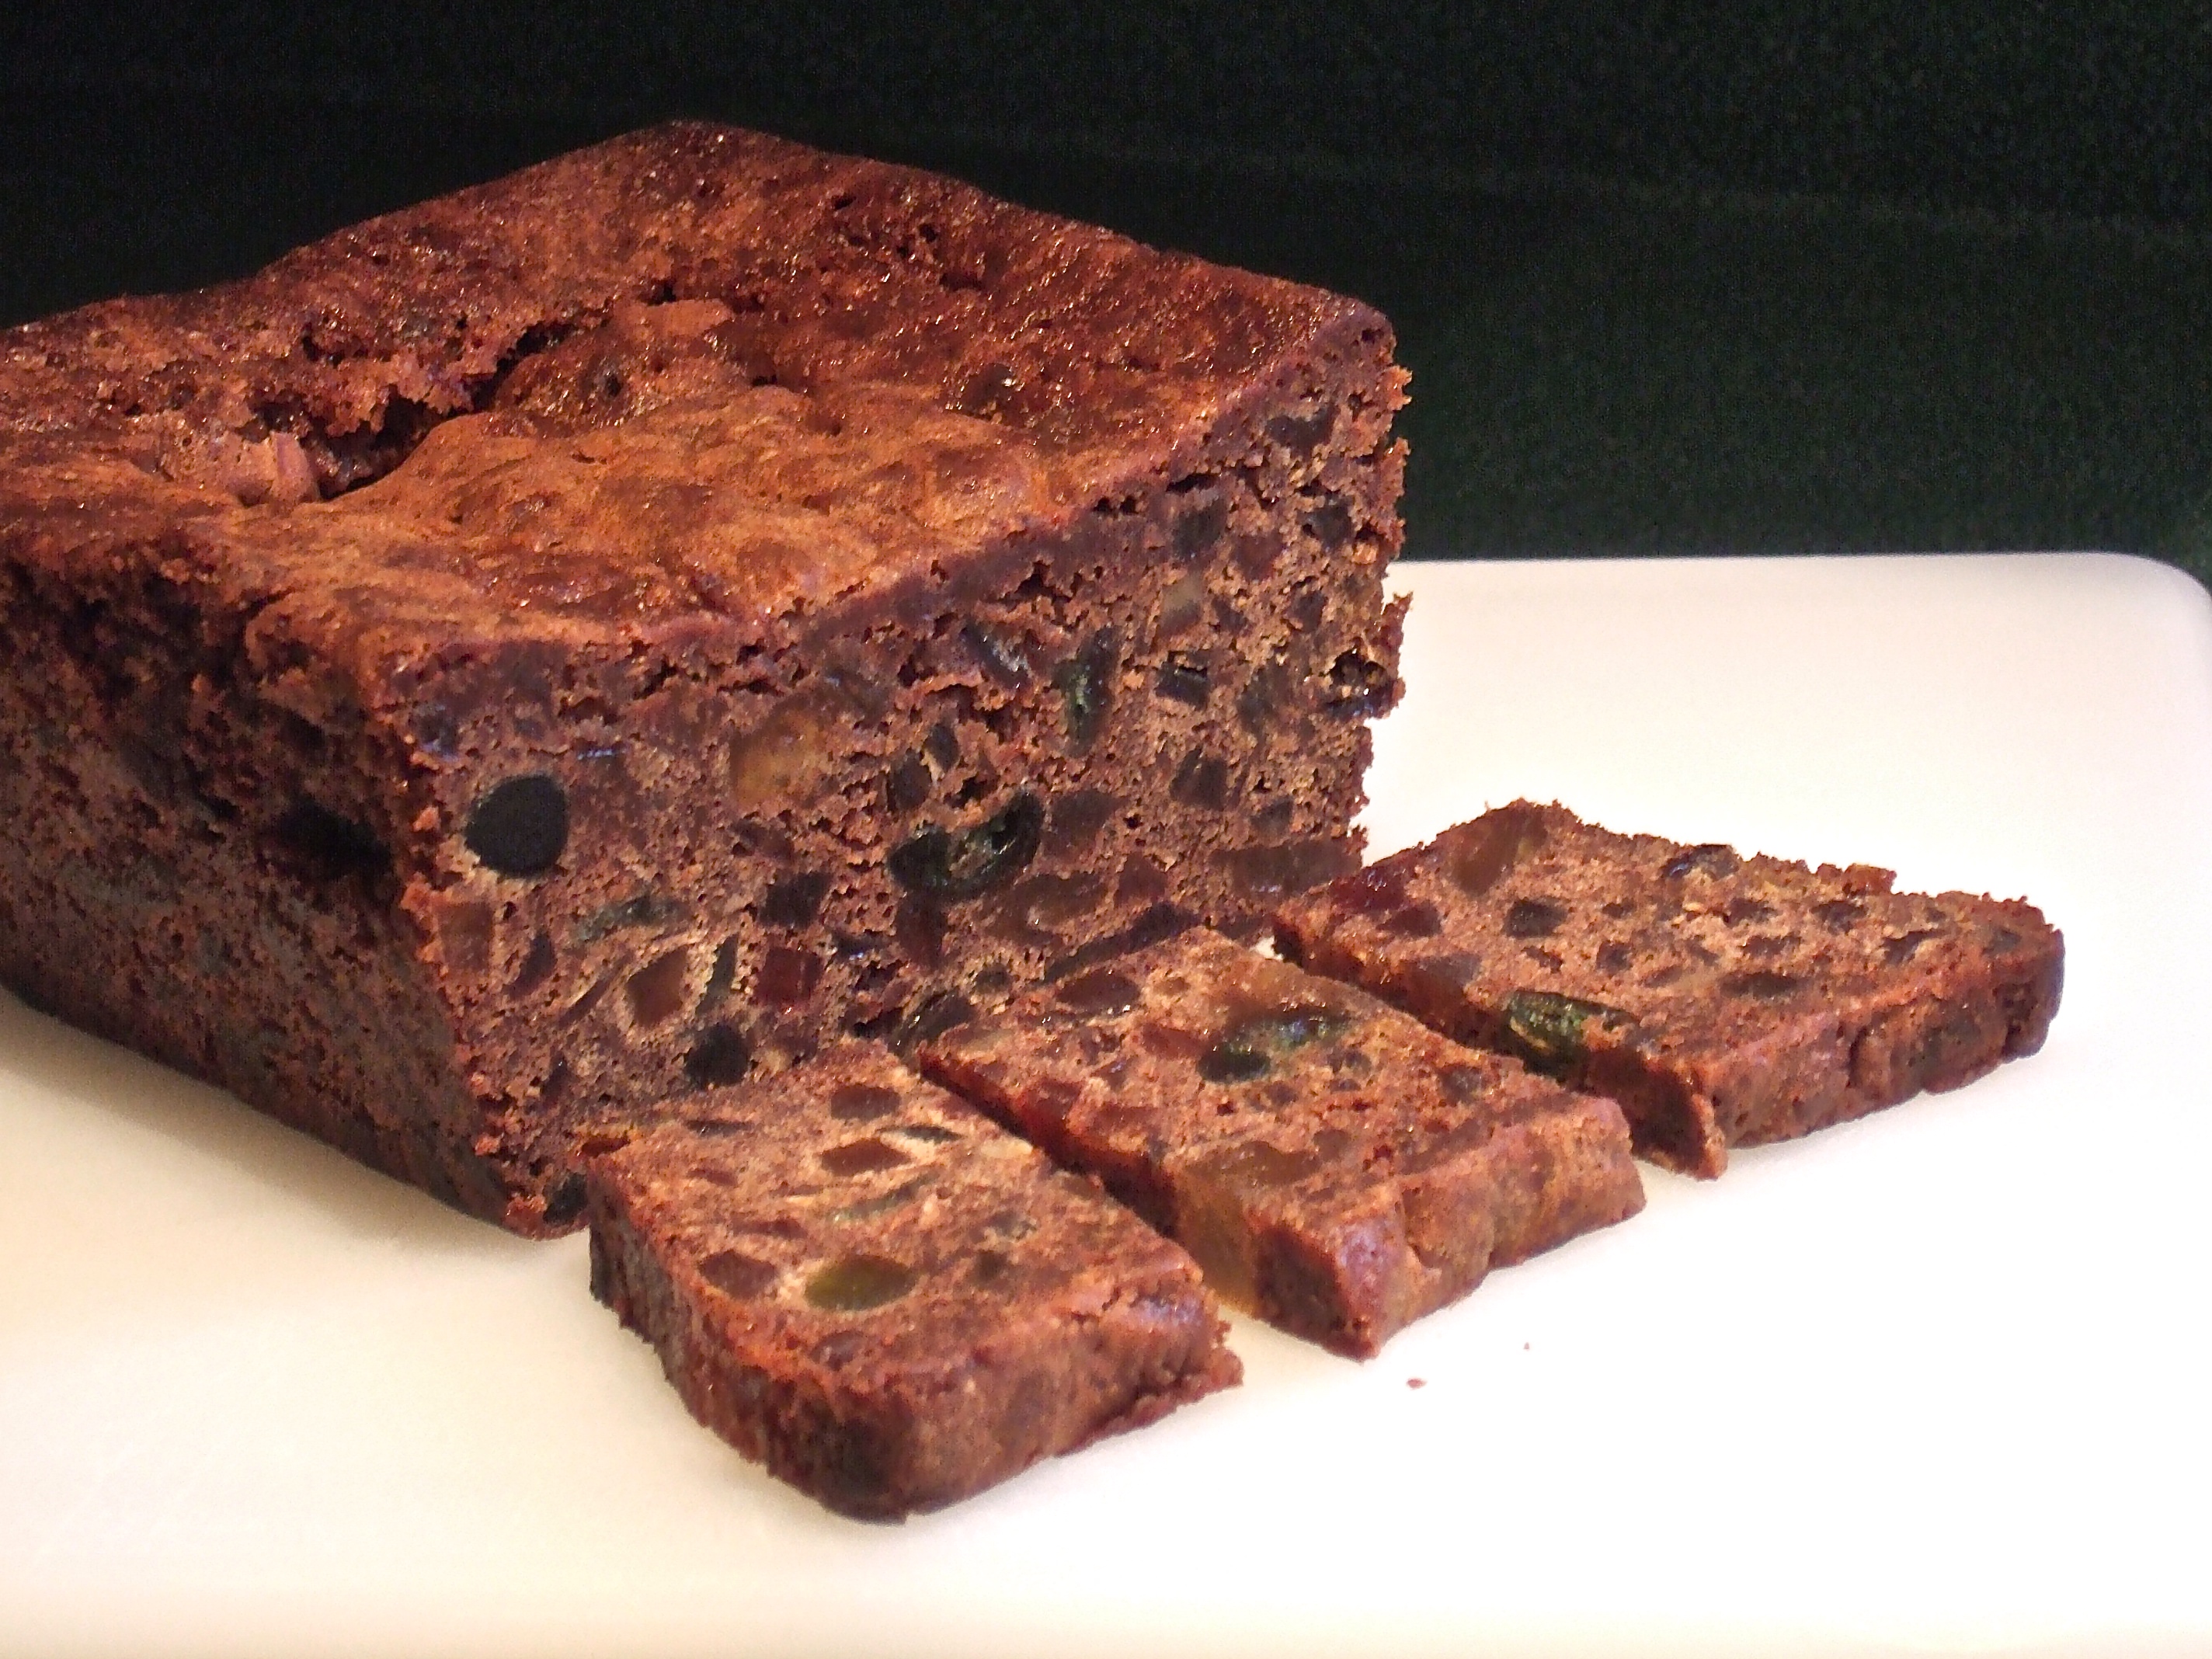
This was my kitchen counter last Saturday as I was getting ready to make this year’s batch of Fruit Cake to give as gifts. The candied fruit, raisins, dried cranberries, and orange marmalade had all been soaking in dark rum in the large white Tupperware bowl (with secure lid) for a week. It was well marinated and ready to be turned into fruit cake.
This is what it looks like after it’s been cooled for several weeks in the fridge:
Aged Fruit Cake
The point of making the cakes this early in the season is to allow the rum that has been incorporated into the fruit to slowly release into the cake – which it does by Christmas.
I end up with a very flavourful, rich cake with the fruit nicely distributed. I don’t brush the tops with more rum – that does’t seem to be necessary. The rum in the fruit softens the outsides so the whole cake is dense and dark and delicious.
I just had a friend in for coffee – she wants to make fruitcake for a few gifts. So I shared a wee taste with her so she could know what it comes out like. The cake got her stamp of approval.
We’ll be making those cakes together in the very near future, I have no doubt!
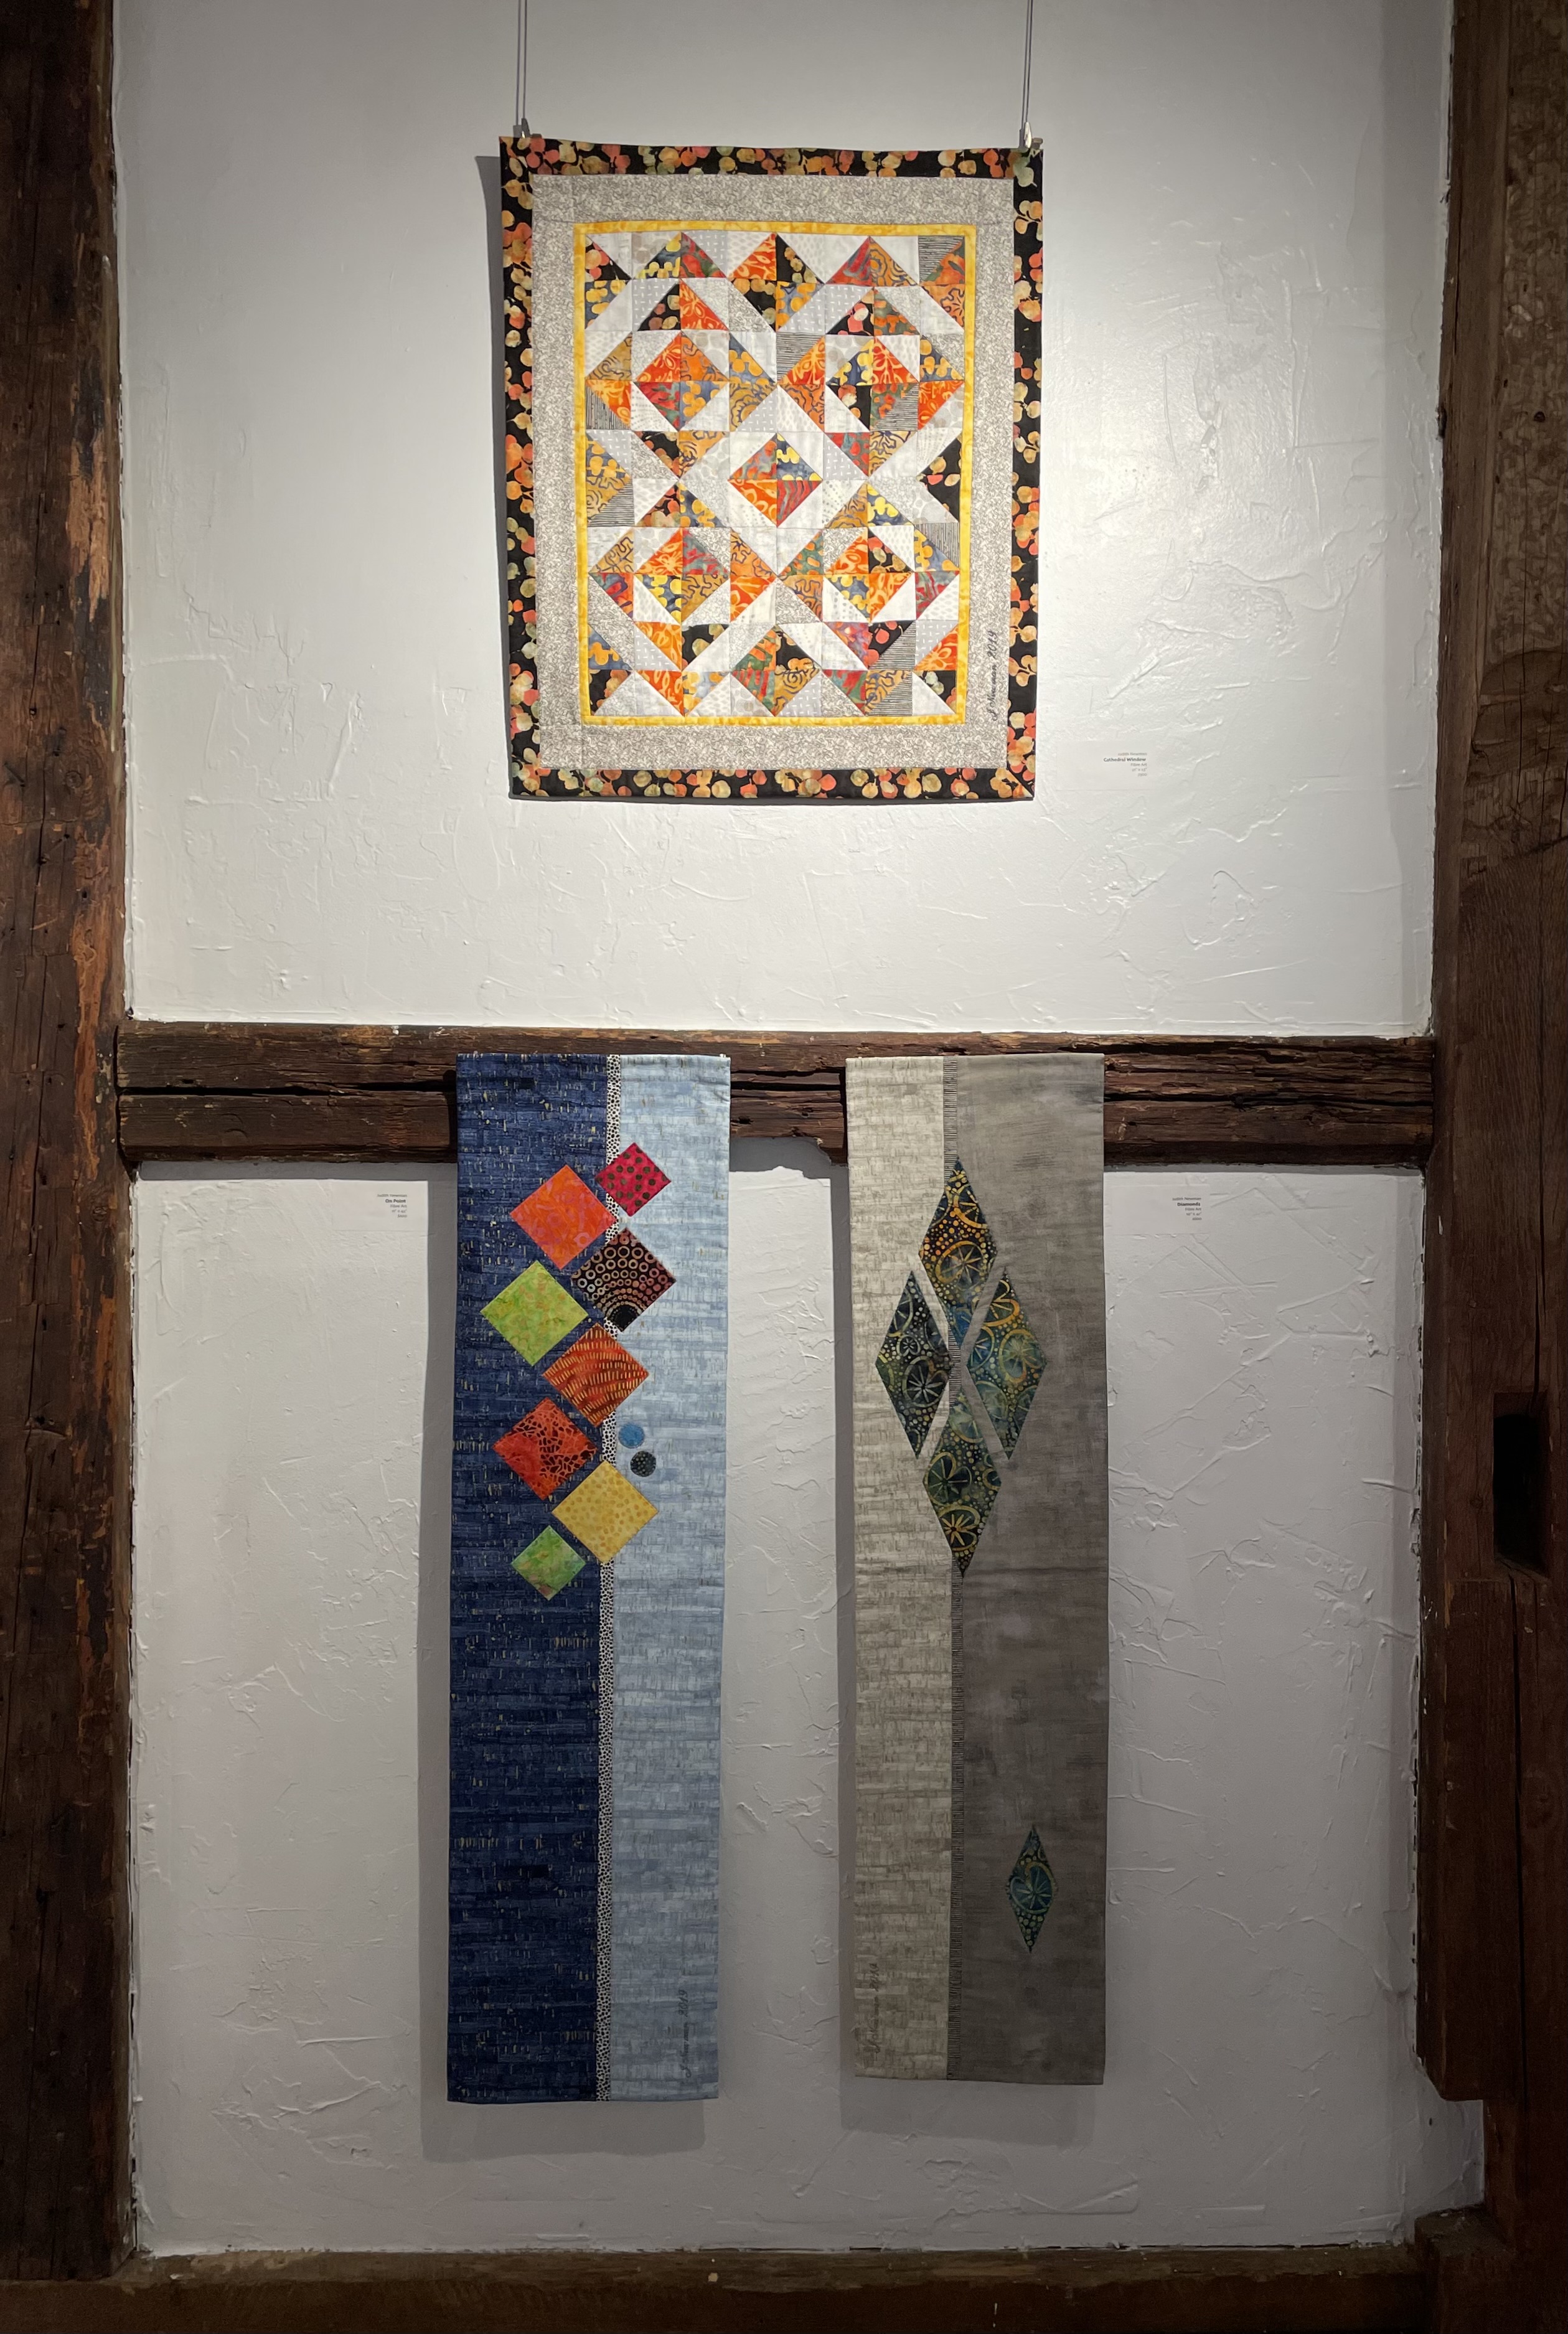
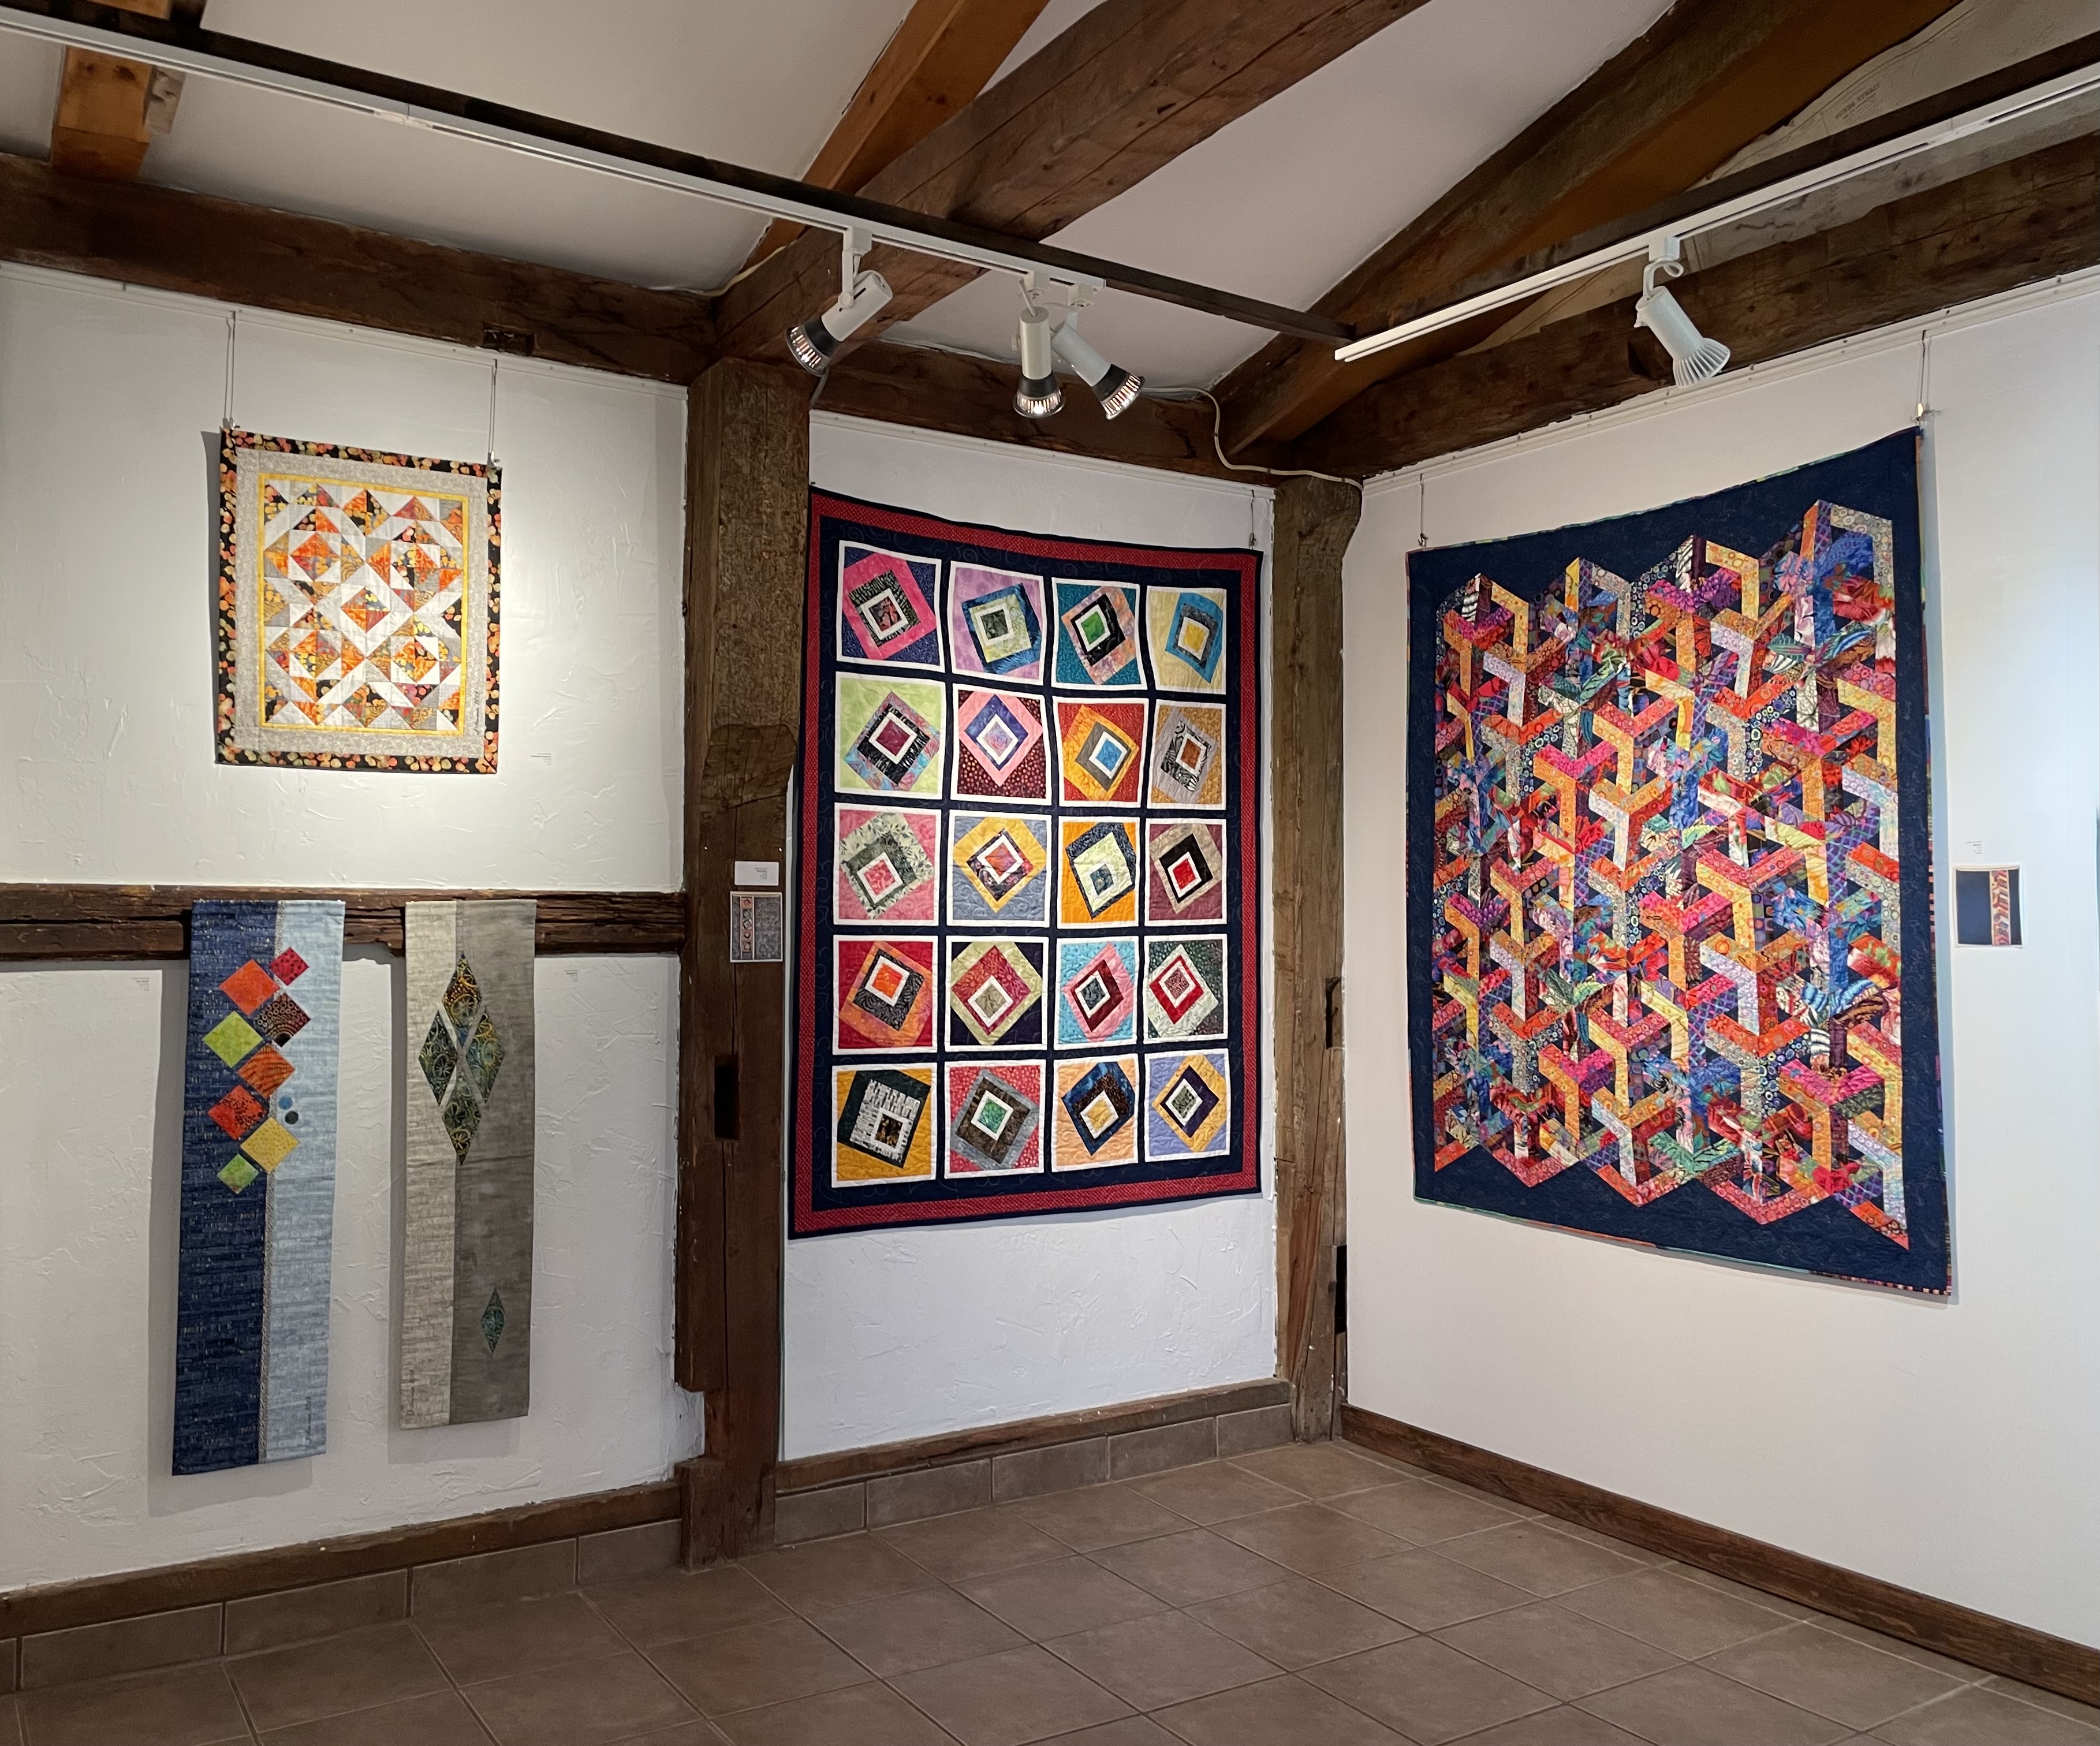
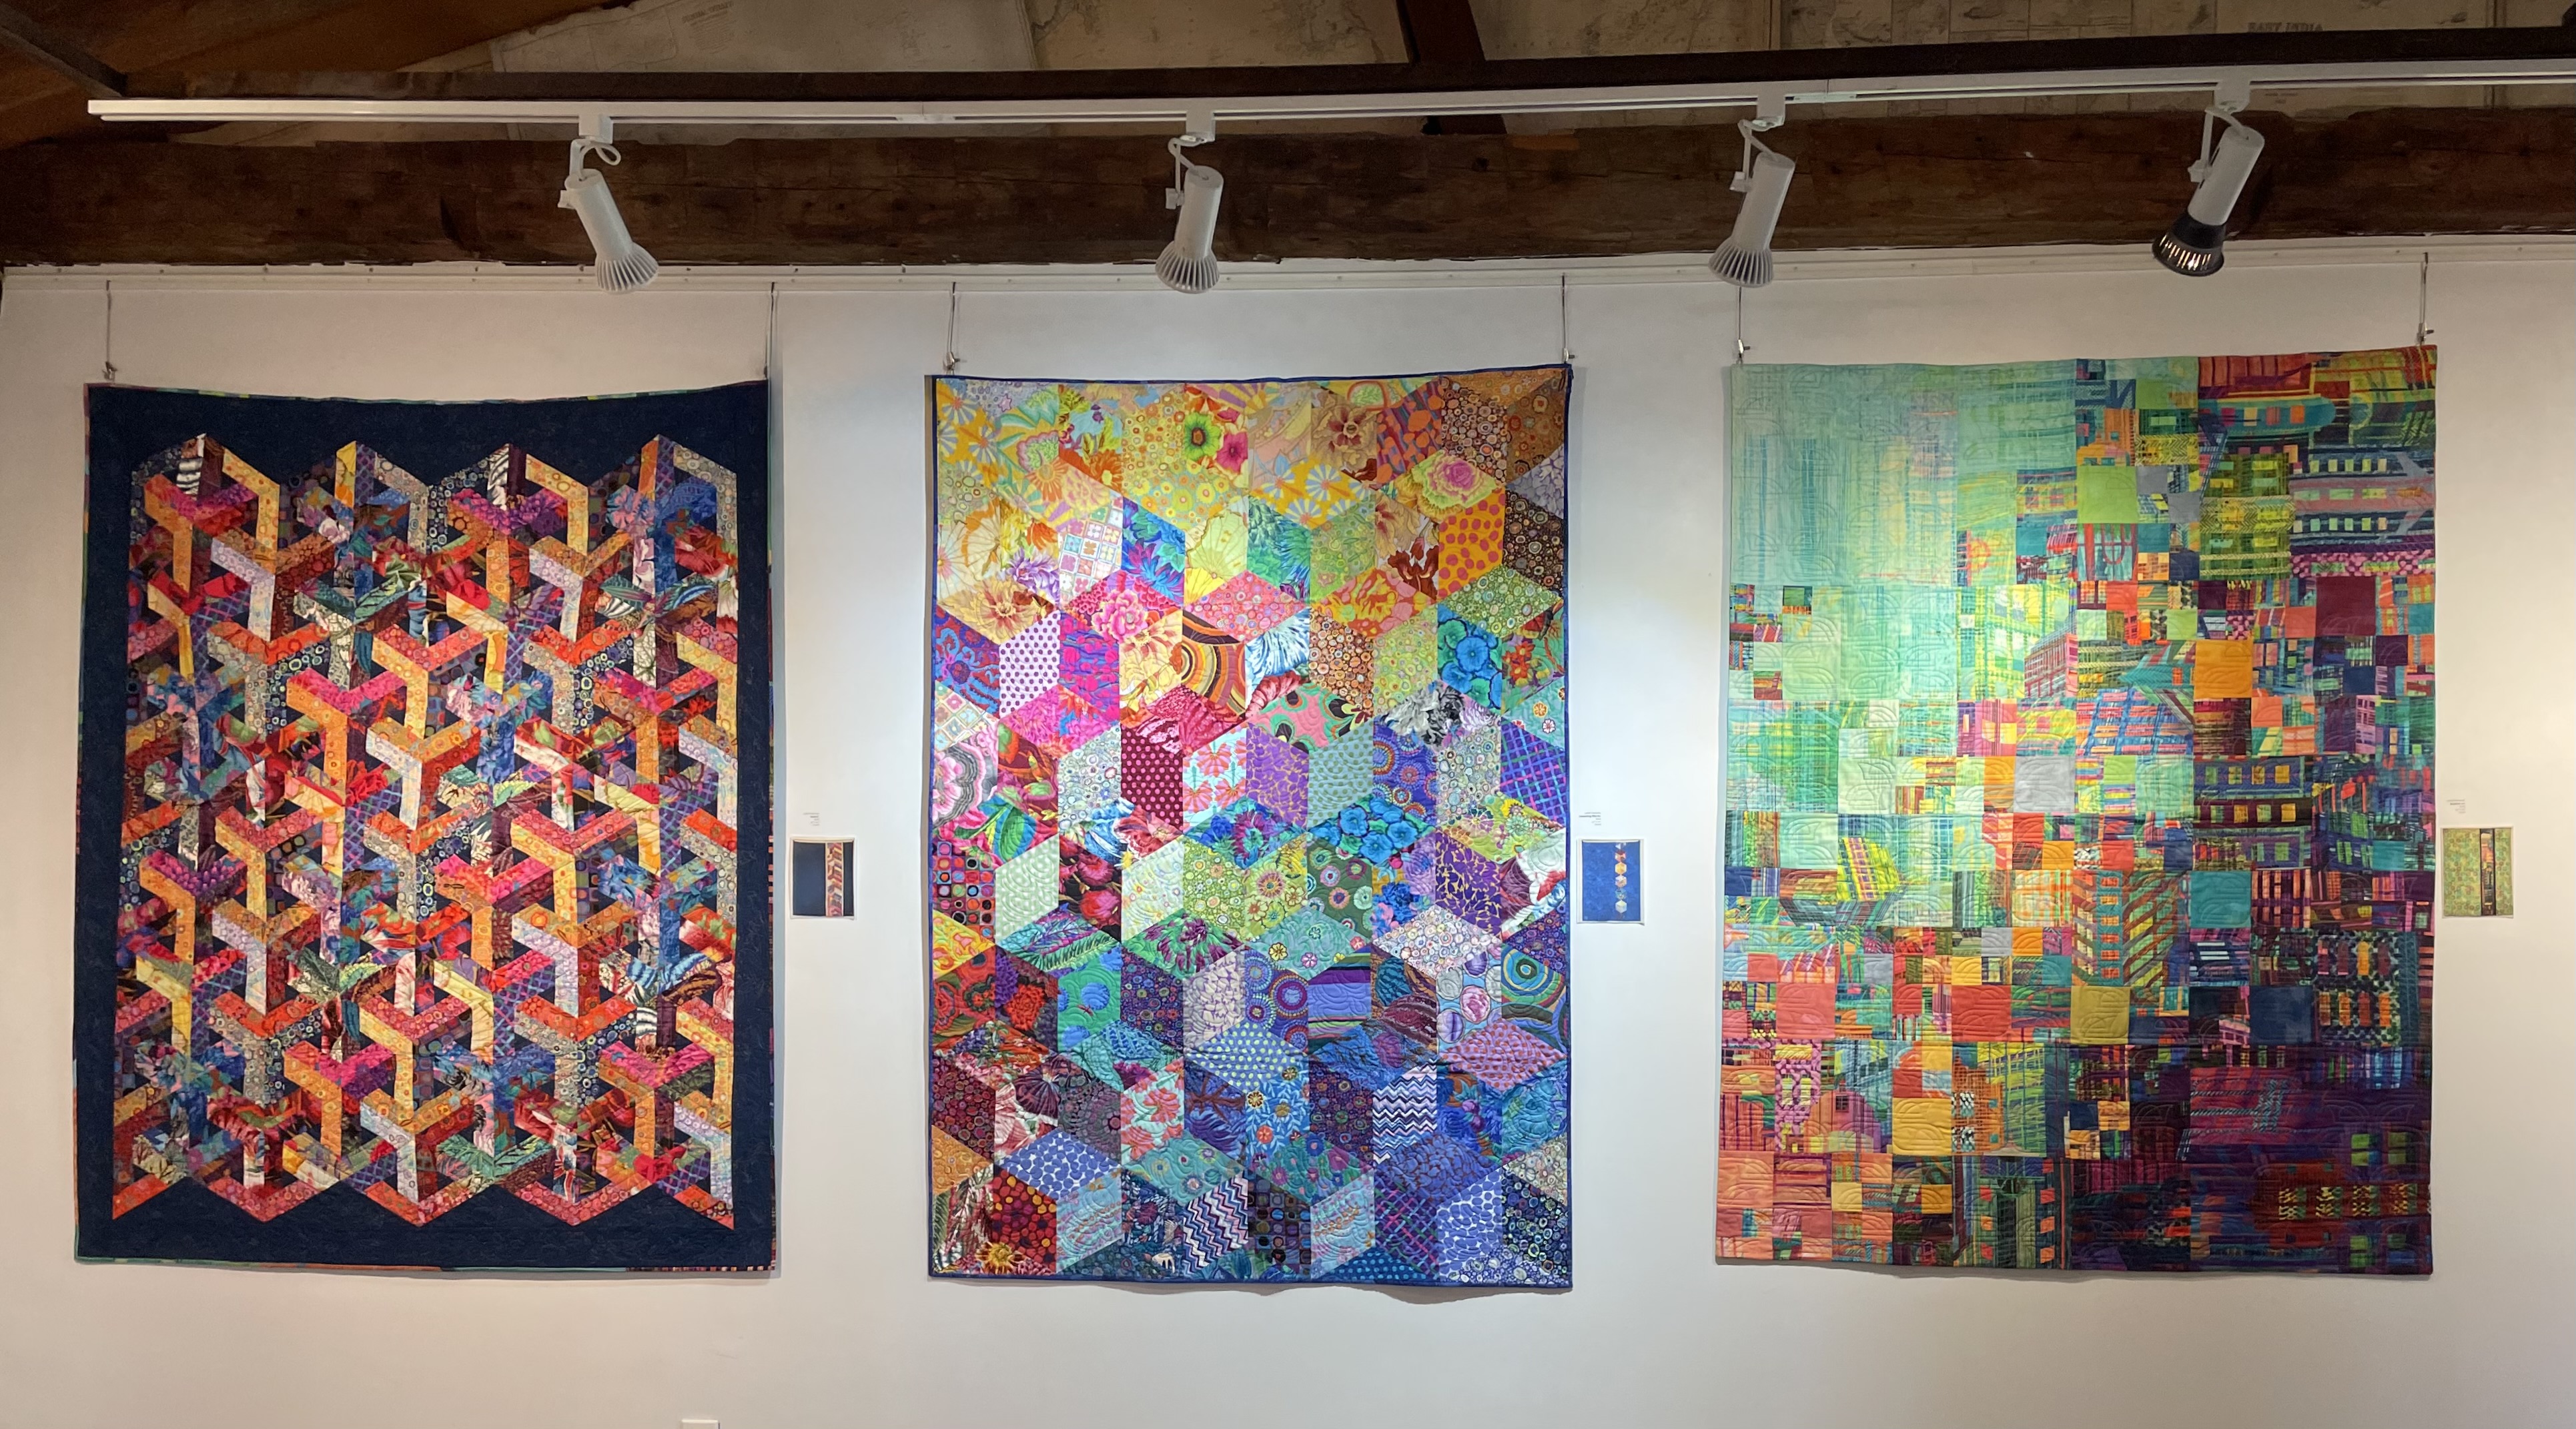
I was in Parrsboro hanging the first show today. It turned out the third woman who was supposed to be in the show with Colleen and me couldn’t make it, so Colleen and I shared the space between us.
Here’s what I hung (plus one more Bargello piece):
Bargello #2Cathedral Windows On Point DiamondsMad TeslaEscherTumbling BlocksSkyline #1 Material Matters! Quilts and Fibre Art
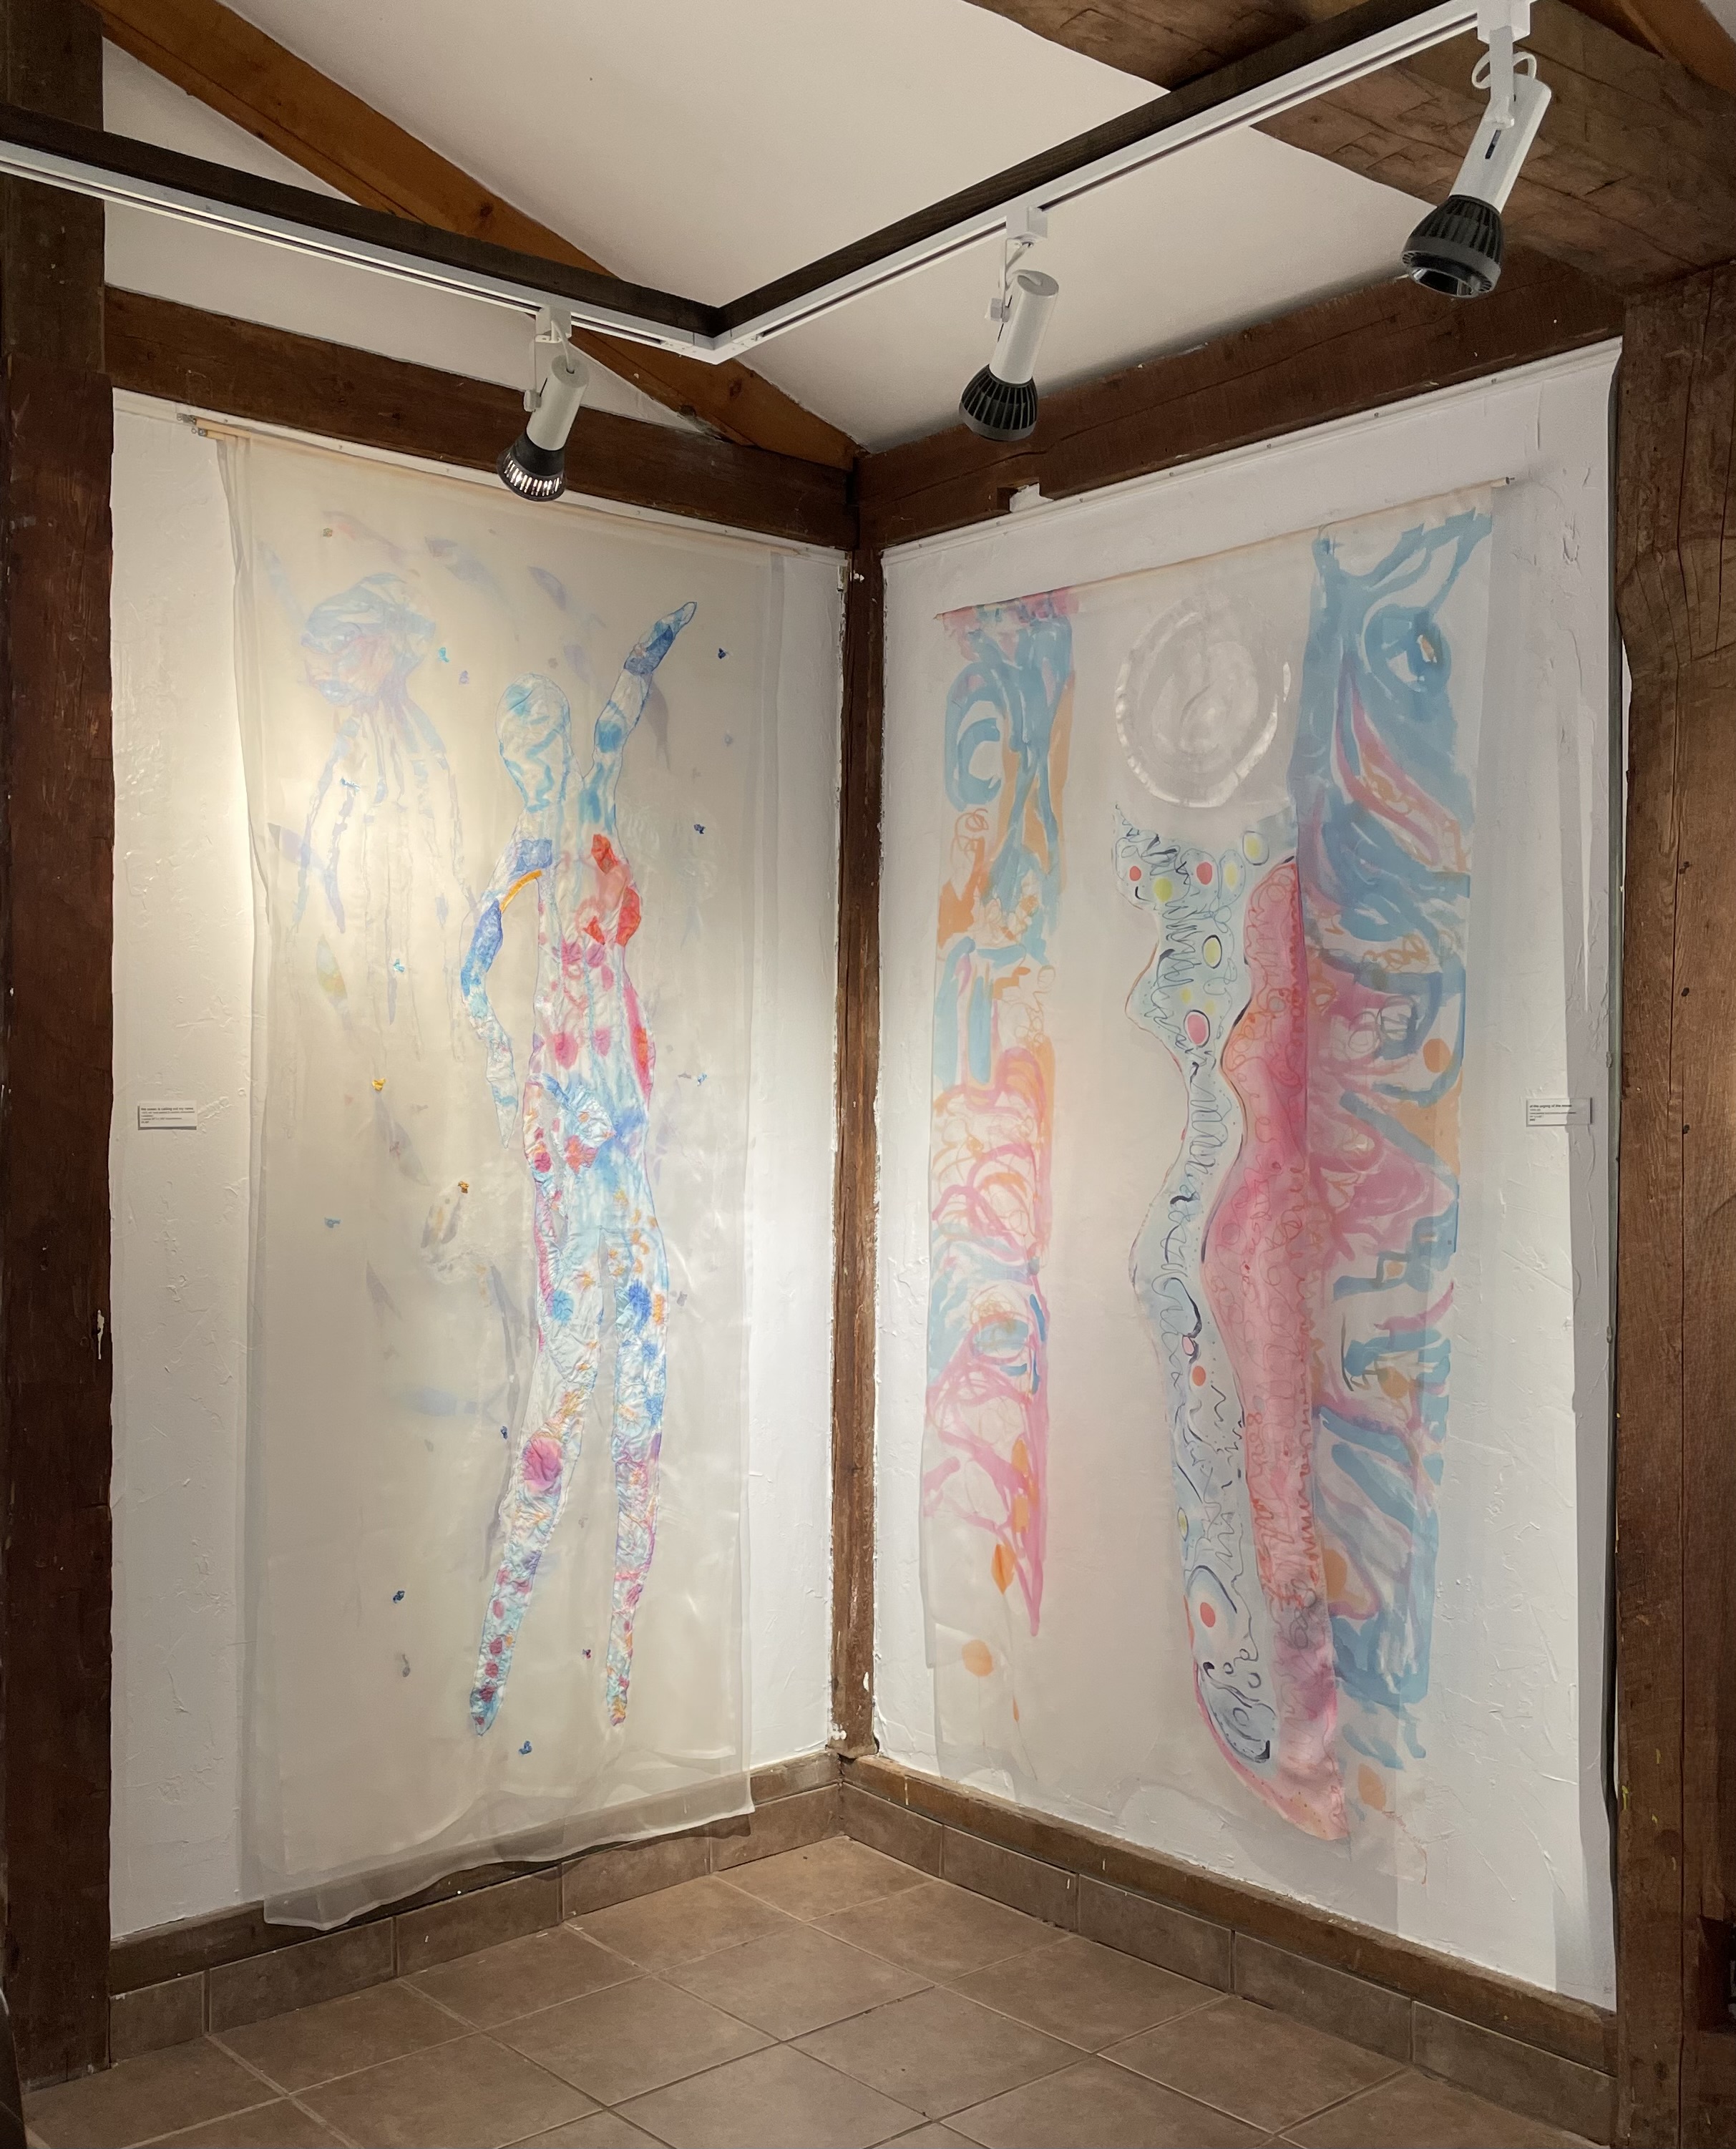
These pieces are by Colleen Davidson – she calls them “Moving Through Water”
Colleen Davidson Moving Through Water
You couldn’t have imagined two such different kinds of fibre work! Yet they hang together very well.
I work with traditional quilting materials using traditional quilting techniques. I play with colour and pattern/texture.
Colleen’s works here are on silk organza which she paints and cuts out and appliqués and stitches. The effects are very interesting and ephemeral! Her pieces all have the translucence and movement of water as the silk ripples with the slight air currents in the room.
I’ve never thought about creating anything like that – but as I work on new things this coming year, I must think about how to move toward more abstract creations!
The show is at Art Lab Studios and Gallery – 121 Main Street, Parrsboro. The show hangs until late Friday afternoon, Nov. 22. Do drop in if you’re in the vicinity!
You can see it’s a minimalist design – first introduced at the Scandinavian Furniture Fair in Copenhagen in 1979, Variable was one of the first prototypes derived from the Balans concept, by Hans Christian Mengshoel. I bought mine at the Danish House on the St. Margaret’s Bay Road (that store is long gone). I must have bought in ’79 or ’80. It’s travelled with me wherever I’ve lived.
It’s amazing to sit/kneel on. Although there is no back, you’re forced to sit in such a way that your lower back is supported. I’ve used it at my computer desk – even designed my desk surface height so that when I’m on this seat the desk height is perfect for my back and arm length. I can sit on the chair for long spells.
However, my Balans chair is showing its age – it’s been getting creaky. I’ve tightened the bolts regularly (one of the bolts in the cross piece is stripped and won’t fully tighten any more) but the creaking hasn’t completely gone away. I’ve even glued the cross piece to stabilize it better; that hasn’t helped. So I decided to replace it.
A quick search located me several variations on the chair – some original ones from Varier (the original maker) although not with the stained birch colour I have and for lots of money! I checked around for a knock-off. They’re out there. I found one on Amazon
Same base height as my Balans chair but the overall chair height was likely a problem. I ordered one anyway (not too expensive) and it arrived within a couple of days. I had no trouble assembling it. Next, I tried it out. The 4″ padding turned out to be 3″ too high! My desk and all of my sewing tables were built to be 3″ lower than a standard table top – this chair with all that padding had me sitting higher than was comfortable.
I could return the chair, but rather than go through that hassle, I decided to reupholster it. First I checked with a local upholstering company (I’ve used them before) – I didn’t need new fabric, just wanted to have the seat and kneeling pads reconfigured with 1″ foam and the fabric reattached. I was quoted a price that was more than I’d paid for the chair. I decided to tackle the job myself.
It wasn’t difficult removing the staples from the undercover. I decided, rather than fighting the remaining staples attaching the fabric to the plywood seat (and there were a lot of them), to cut the fabric away. With some effort I was able to remove the 4″ piece of composite foam. I replaced it with a 1″ polyester woven batting and reattached the fabric. Now I have a usable chair.
I also removed the front stabilizing bar – it got in the way of my feet. I’m still deciding whether to remove the second stretcher – I’ll leave it there for now.
I was short a sewing chair for my serger/coverstitch sewing machines (I have two Humanscale Pony Saddle Seats – one at each of the other sewing stations). I tried this chair there. With the seat lower, it feels right. So that’s where it sits for now.
I’ve decided to give my original seat a facelift. I’ve dug out some upholstery fabric leftovers – there’s enough of the fabric I have currently on that seat to redo it. I’ll tighten all the bolts one more time. I’m guessing my original Balans chair may have another 45 years of life in it yet!
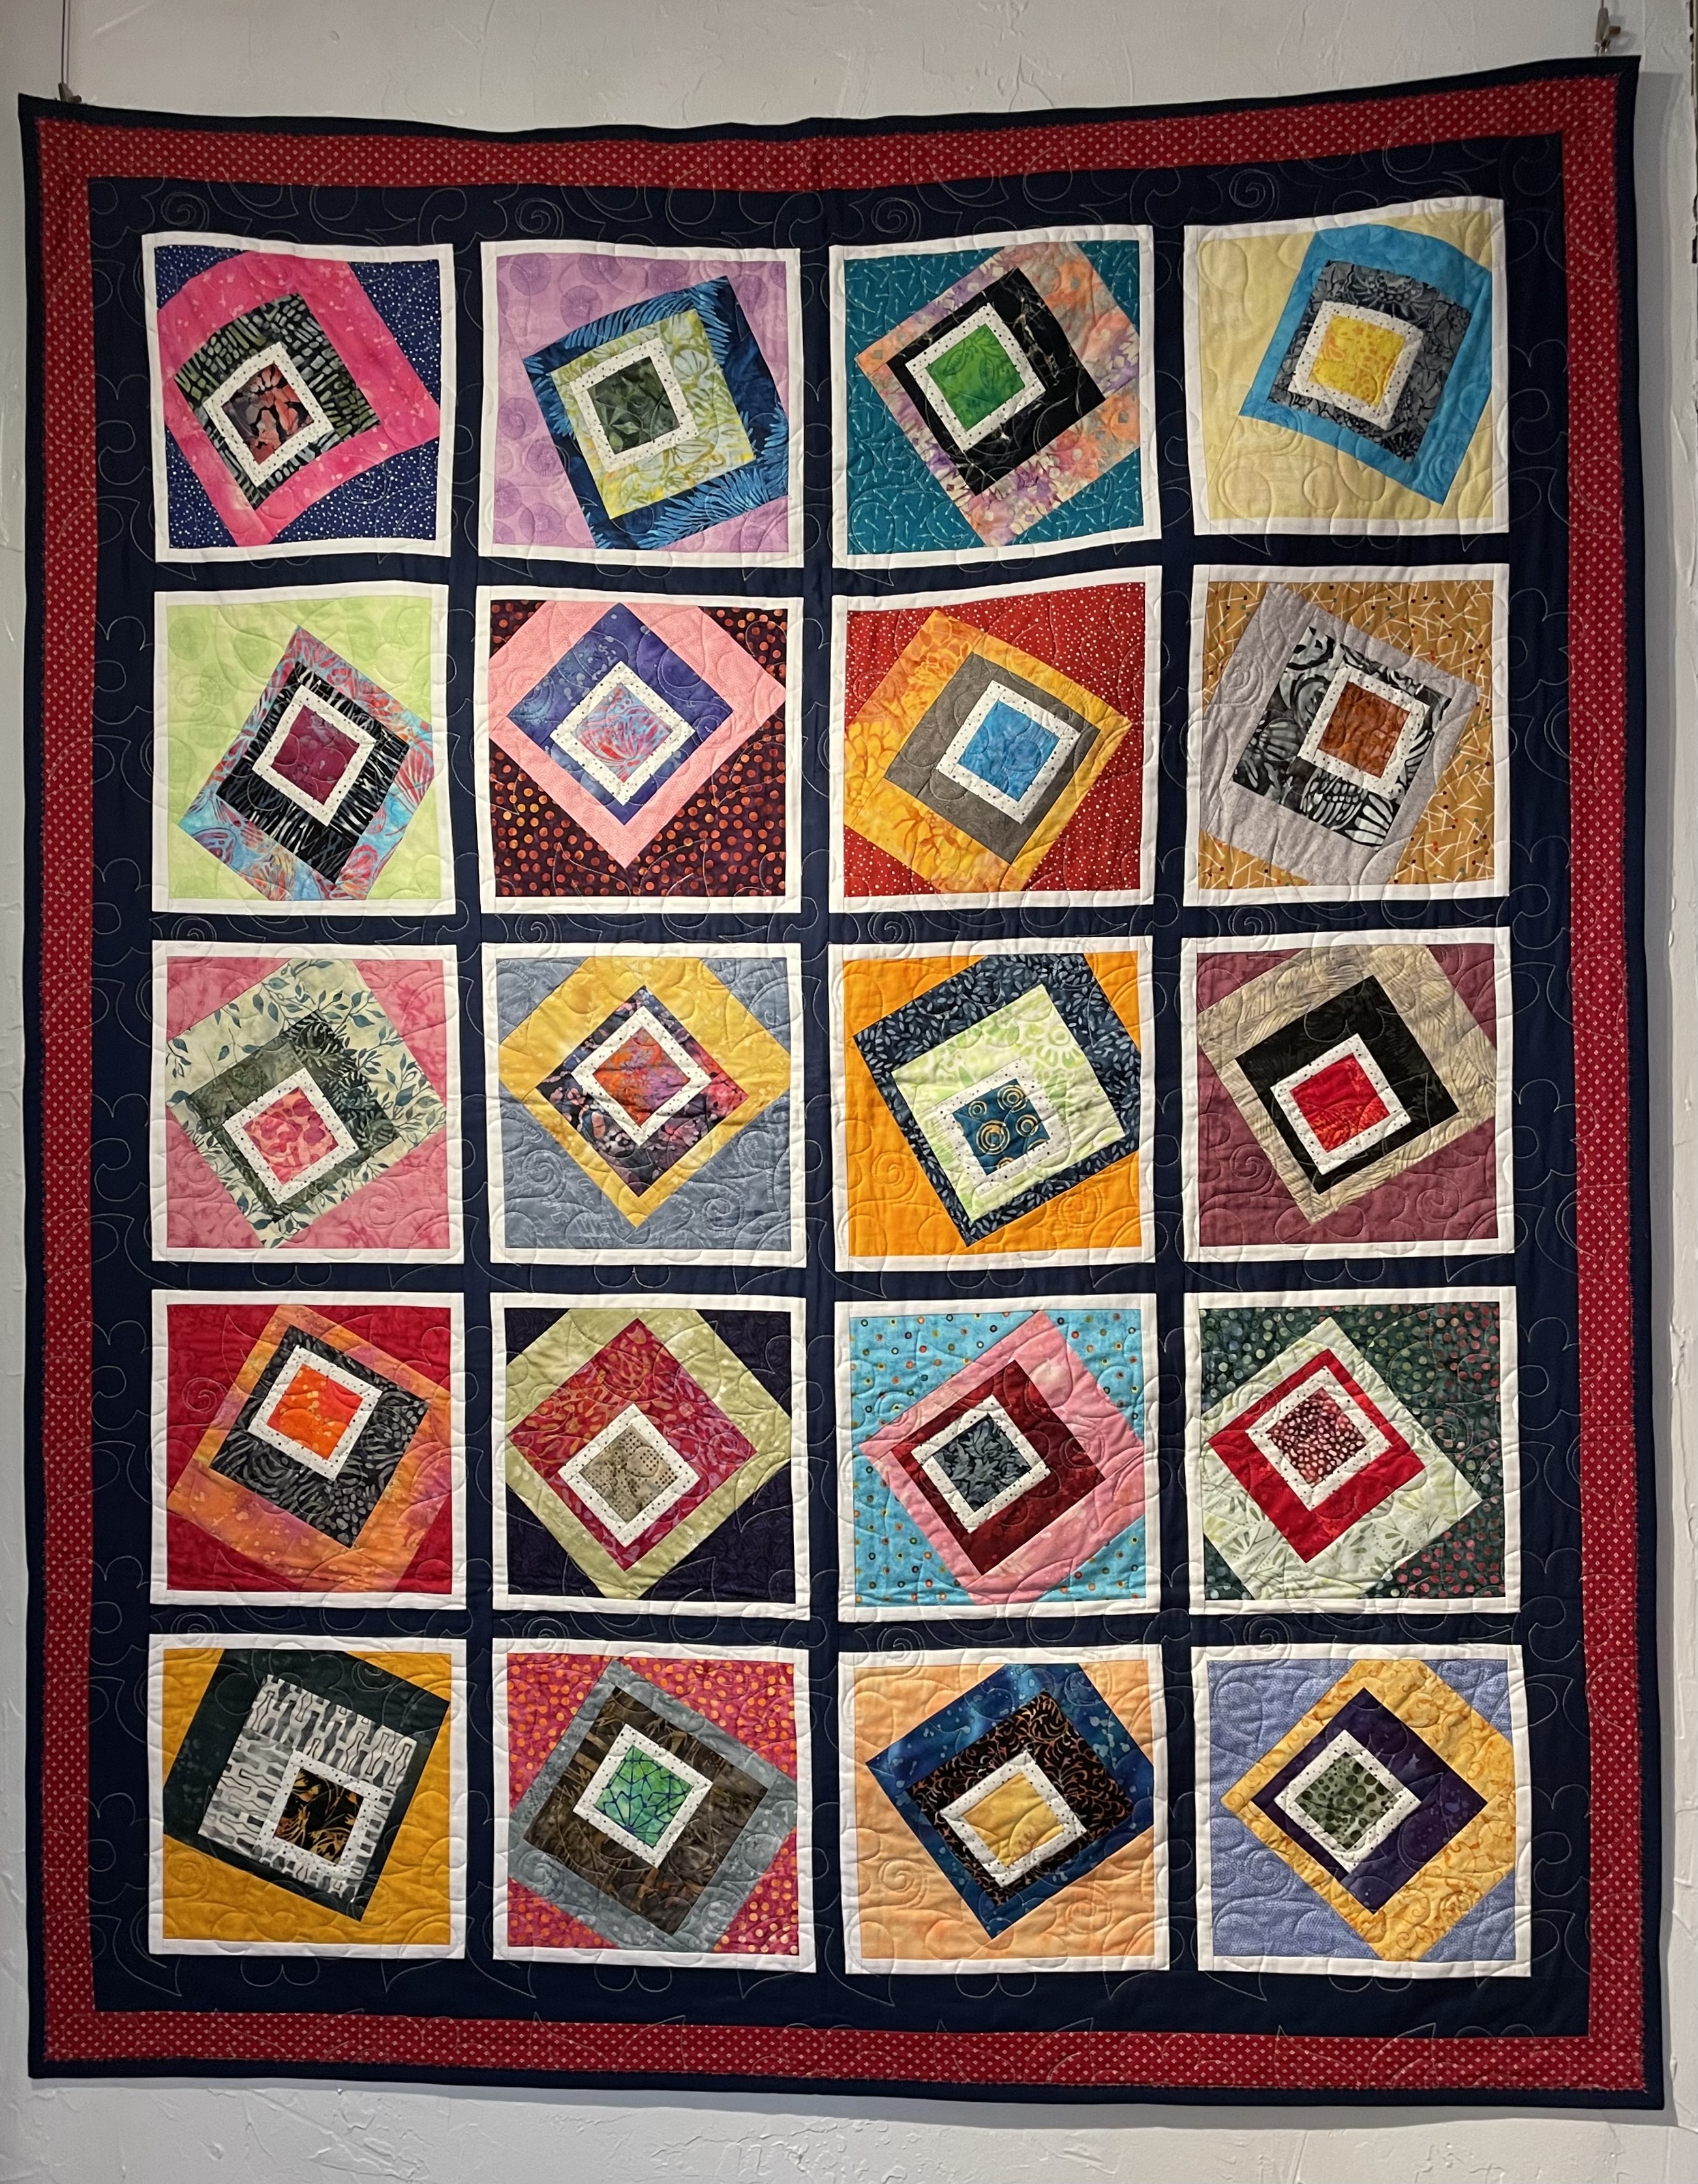
I finally finished this quilt this past week. It turned out to be a lot more work than I anticipated. I thought I was making a simple quilt block – square-in-square but that didn’t work out because of the colour flow I was after. In the end I had to construct each triangle element from scratch! Which took a lot longer.
The back took a lot of “walking around” time – I just couldn’t settle on an idea. One Tuesday evening when my friend Neha was here sewing with me (that’s another story) I made up five square in square blocks from leftover bits – that broke the log-jam and I was able to sort out a 15″ strip to insert in the backing fabric.
Then there was the matter of layout – I sewed most of the dark blocks together to begin with but then had to disassemble the partial panel because the colour flow wasn’t working. To get a decent colour flow, I ended up pinning triangles, and trapezoid pieces on top of the developing panel on a design wall I improvised in order to get a clearer colour placement. Then I had to take blocks apart to insert the new required piece.
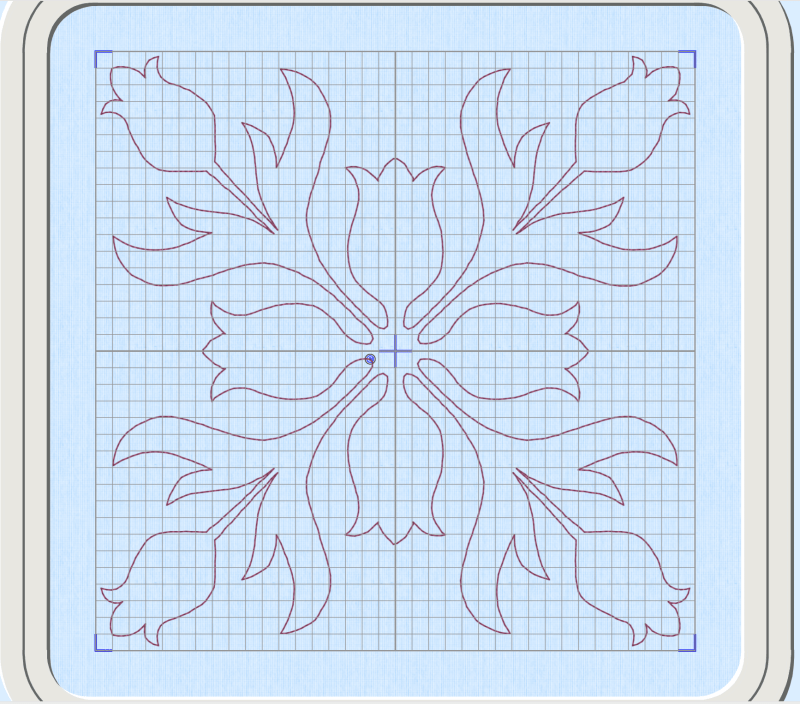
I put the layers together. I created two possible block patterns using my out-of-date Pfaff Premier 2+ software (it still runs on my Mac but not for much longer I’m expecting – then I don’t know what I’ll do, because the cost of a subscription for the software on MySewnet is crazy expensive!):
Block 1Block 2
I chose Block 1 after doing a test run with some muslin and batting. I wanted the simplicity of the curves in the first design; I will use the Block 2 design on another quilt sometime.
Because the blocks were placed in the quilt on-point, I had to quilt on the diagonal. When all 44 blocks were filled in, I still had 18 triangle half blocks along the sides with 2 quarter blocks at one end to complete the quilt.
I also changed thread colour to match the colour gradation – I stitched the dark corner with an almost black variegated thread, the top left corner I quilted using white; in between I used three different grey variegated threads to blend with the changing colour. I used a light variegated grey on the back throughout.
I used the off-cuts from the backing for binding – which allowed me to match up the design on the back. I finally added a label.
I finished yesterday by hand basting a hanging sleeve at the top so I can display the quilt. (I still have 8 quilts that need hanging sleeves – gotta get those done over the weekend.)
In my newsfeed from the New York Times this morning was this article by Carlos Lozada:
An immigrant from Peru, Lozada details the conundrums he faces daily regarding his immigrant identity. I was deeply moved by his writing. Moved enough to write a personal note to him at his email address at the NYT. (I don’t expect him to answer.)
His opinion piece evoked a memory of what Joy Kogawa had to say in Obasan, her novel written in 1981. I felt compelled to find those words again and share them with Lozada.
Here is the letter I wrote him:
Carlos,
As I was reading your piece, I can’t tell you how it resonated for me. What’s interesting is I was born here in Canada, my mother was born in Canada, my father was an immigrant as were all my grandparents; I personally feel more “immigrant” these days than at any other time in my life (I’m heading toward 82!). In today’s actively antisemitic world I feel my token “jewishness” separating me from my “christian” friends and neighbours. The conundrums you describe are present in my life in such subtle ways but they are there.
I feel my “immigrantness” weekly when I visit two young Afghan families recently come to Canada. I spend a couple of hours a week with each family chatting in English, reading children’s books in English, to help them learn a language they are working so hard to learn. I visit weekly for these young women to help them overcome the isolation a lack of common language forces upon them. These new permanent residents to Canada have become like grandchildren/great-grandchildren in the almost two years I’ve known them.
I can’t imagine their decision to leave Afghanistan and their families behind. I know the facts of their escapes through Iran, arriving in Turkey as illegals, the unimaginable luck of making contact with a Canadian citizen sponsorship group who helped bring them to Canada. I’m not an official part of that group (my youngest sister is), but through my investment of time these past two years, I have come to feel a small bit of what my grandparents must have experienced, who knew they would never see those they left behind, many of whom a few decades later would have ended in Nazi crematoria. Both sets of grandparents left Lithuania and Poland/Ukraine respectively and arrived in Canada in the early 1900s. I have no names of those left behind but I am absolutely certain many relatives did not survive WWII.
Canada, like the USA, is a nation of immigrants, yet so many people seem disconnected from that reality. In Canada, we’re a bit more aware of our crimes against the First Nations people – our halting attempts at reconciliation keep reminding us that we displaced them, disenfranchised them, demeaned them and that everybody else has immigrant origins from all over the world.
We are experiencing in Canada a growing sentiment that we don’t want more immigrants, we need to keep “these people” out – they’re taking “our” jobs (in spite of the fact that Canadians don’t want to do the jobs they are willing to do), making housing impossible to find (that’s really the fault of those of us who made development decisions fifty years ago), overrunning our healthcare system (who actually made the decisions to cut back spending on medicine, education, dentistry, social work, … forty years ago?). We need these new people for their willingness to work hard, for the cultural diversity they bring to us, for their talents and skills which enrich our community.
Shortly after it was published (1981) I read Joy Kogawa’s novel “Obasan” – there’s a passage in it that has stayed with me these 40+ years – written words of the Aunt (Obasan) who had been born in Canada but sent with her family to a Japanese internment camp during WWII:
—————————————
“The entire manuscript was sixty pages long, I skimmed over the pages till I came across a statement underlined and circled in red: I am Canadian. The circle was drawn so hard the paper was torn. Three lines of a poem were at the top of the page.
Breathes there a man with soul so dead Who never to himself hath said: This is my own, my native land!
The tanned brown edges of the page crumbled like autumn leaves as I straightened out the manuscript.
The exact moment when I first felt the stirrings of identification with this country occurred when I was twelve years old, memorizing a Canto of “The Lay of the Last Minstrel.”
So many times after that I repeated the lines: sadly desperately, and bitterly. But at first I was proud, knowing that I belonged.
This is my own, my native land.
Then as I grew older and joined the Nisei group taking a leading part in the struggle for liberty, I waved those lines around like a banner in the wind:
This is my own, my native land.
When war struck this country, when neither pride nor belligerence nor grief had availed us anything, when we were uprooted, and scattered to the four winds, I clung desperately to those immortal lines:
This is my own, my native land.
Later still, after our former homes had been sold over our vigorous protests, after having been re-registered, fingerprinted, card-indexed, roped and restricted, I cry out the question:
Is this my own, my native land?
The answer cannot be changed. Yes. It is. For better or worse, I am Canadian.”
—————————————
Securely Canadian having been born here myself, I still feel Obasan’s struggle as somehow my own.
Your NYT piece has evoked all those same feelings about country and belonging that I found those many years ago in Kogawa’s writing,
I taught a class yesterday at Sew With Vision on “Basic Alterations” – taking clothing in at the waist, under the arms; shortening pant/jeans legs, adjusting straps, etc. I wanted the two gals to understand there’s not a lot you can do to make a RTW (ready to wear) garment bigger; however, you can make adjustments to make something smaller.
For example, my high-belly measurement is much larger than it was ten years ago (related to my age and the meds I take). Not much I can do about dropping the weight from that location. So when I was buying a vest for fall wear, I bought 1XL to fit my belly, which meant it was too big around the hips, and the armholes needed adjusting. I could have done some complex taking apart, but instead, I just took darts in the shoulder seams (and hand stitched the dart to the lining so it laid flat); I did the same at the hips – a dart in the side seam from waist to hem by machine, then hand stitched the dart down. Now the vest fits decently and looks fine.
The one enlargement adjustment I do to make something bigger is to add elastic gussets to the waist of pants when the waist just gets too tight (my hips and thighs have stayed the same size for more than 20 years!). [I’ve previously described how I add elastic gussets to pants: https://jmncreativeendeavours.ca/2018/04/02/elastic-inserts/]
Back to the class – while the gals were working on small adjustments to garments for themselves and their children, it became obvious they had a few tools. Because I wasn’t expecting to do any sewing myself, I’d neglected to bring my sewing kit with me (https://jmncreativeendeavours.ca/2017/12/12/sewing-tools-organizer-finished/). We had to hunt through the shop’s tool collection (of dull very well used tools) to find what we needed. I told the gals I’d make them up a list of necessary sewing tools.
I’ve laid out my tools, clustering those in the same category.
Measuring Tools
Rotary Cutting Ruler 6″ x 24″ – a good first measuring cutting tool
A measuring tape with both metric and inches on both sides
A metal 15″ ruler with both metric and inches
A slide ruler with notches for measuring and marking short distances
A small plastic ruler for checking short measurements (metric and inches)
Cutting Tools (these are going to seem expensive, they are, but expect to pay a lot more than you anticipate to get good sharp tools – I like KAI scissors – they feel good in the hand, they’re sharp and bit less costly than some other good brands)
8″ shears – for cutting out garment patterns (I use a rotary cutter for cutting out patterns but there are curves that sometimes call out for shears)
4 1/2″ embroidery scissors – I use these for snipping and cutting small pieces
3 1/2″ precision embroidery scissors for removing stitches and close cutting
A sharp seam ripper (I change them as soon as they feel dull; I buy them in quantity to have plenty on hand and within easy reach)
A Seam Ripper Clipper (in photo above)
A 45mm rotary cutter with a supply of spare blades always on hand (I order in bulk online)
A Self-healing Cutting Mat – I recommend starting with a 24″ x 36″ mat (I have a 3′ x 6′ mat that covers my entire cutting table – expensive but useful)
Rotary Cutting Rulers and Templates – start with a 6″ x 24″ ruler
A Shape Cut Template/Ruler – this makes cutting strips of fabric very easy
Shape Cut Ruler
Marking Tools
Heat Erasable marking pens (Frixion are the most common, but I’ve bought acceptable ones in sets online)
Clover Chaco Liner – makes a fine chalk line (can purchase refills)
Chakoner – a heart-shaped chalk line drawing tool
A Fons and Porter or Bohin mechanical pencil with white lead (I have other colours, too, but I use the Frixion pens for marking on light fabrics and the chalk liners or pencil for marking on dark)
Post it notes, small and larger – I use them to identify cut fabric for both sewing and quilting
Masking Tape – I mark fronts and backs of garment pieces, for example, so I know what is what
Fine Sharpie Permanent Marker – another tool I keep at each sewing machine
A .7mm lead mechanical pencil (with .7mm HB lead) – perfect for pattern drafting on paper
Medical Exam Table Paper 18″x125′ ideal for tracing garment pattern pieces
Bobbins and Bobbin Holder
A supply of empty bobbins for each different sewing machine – each colour thread needs its own bobbin! You always want an empty bobbin around and each machine may take a different size bobbin (even from the same company)
A bobbin holder or box to keep bobbins in order and easily accessible and storable
Thread – there’s no point in sewing with cheap thread! Your machine won’t like it and the garment or quilt won’t like it either! I suggest
Aurifil 50wt cotton thread (variegated in two shades of grey for quilt piecing) – this is a lovely, strong, low lint thread, although expensive
Wonderful 50 weight cotton thread – a bit heavier than Aurifil but I use it for quilting a lot
Gutterman polyester thread (50wt)
Mettler polyester thread (50wt)
Coats and Clark polyester thread (50wt) – this is my least favourite but do use it to match with fabric when I have to
Other Useful Tools
A brush for cleaning lint from the sewing machine
A “HumpJumper/Seam Jumper” multi-purpose tool (the tool I have for lifting the presser foot for thick fabric also has a small hole for inserting a new machine needle – handy
A fine crochet hook for pulling threads hidden beneath quilt top or bringing pulled threads to the back of a knit garment
A Snag Repair Tool (Snag Nab-it) to bring pulled thread to back of knit fabric
A Large Safety Pin – for pulling elastic or ribbon through channels in garment or other sewing construction
A roller of sticky tape – great for picking up threads on your ironing board or fabric
Fray Check fabric glue
Glass Head straight pins (I like 1 1/16″ length – I find shorter ones harder to handle).You want glass heads because the iron won’t melt them! You want bead heads because they’re much easier to pick up
1″ Curved Safety Pins for holding a quilt sandwich together (these small pins are a good size – the larger ones are awkward to sew around when quilting)
Washers – the largest you can find in the hardware store – great for holding paper patterns on fabric – much better than pinning – you need at least 6 (8 is better to have on hand; they’re inexpensive)
In addition to the feet that come with your machine, you will want extra feet for different jobs – you can find sets online that come with both a low-shank and high-shank adaptors (the set I have from Love/Sew works on both my old Singer Featherweight and my Brother Quilter)
NEEDLES – you need lots of spare needles – you need a fresh needle every time you start a new project (when I’m quilting, I change needles every 30,000-40,000 stitches – in other words, I change my needle two to three times during the quilting process). I buy needles in bulk – in boxes of 100 – for the needles I use most: Universal 80, Embroidery 75, Quilting 75. I also use Top-Stitching 90, and various Stretch/Ballpoint needles, Twin Needle 75 4mm & 6mm, also it’s useful to have Denim /Jeans needles 90 for working with denim. Schmetz and Inspira (as well as Klasse) are all sturdy needles which come in many sizes and for all fabric types [https://www.schmetzneedles.com/pages/sewing-machine-needle-chart?srsltid=AfmBOopLOpsA-oGFmbcXGBllCANtjbRxzSIvBejuXQKS0Bgcuf11qDSv] Just remember: dull needles can ruin your project, and there’s nothing worse than breaking a needle and not having a new needle on hand
A pin holder with a magnetic mouth used for storing discarded needles and bent pins – you can also use a large pill container with a lid, even a mason jar – something to collect used sharps
A magnetic pin holder
Magnetic Pin Holder
Sewing Machine Needles
Ironing Board and Iron – if possible keep your ironing board always set up – makes it much easier to just get a project going. You want a good pad and cover – I have a felted wool padding and I use a heavy twill unbleached cotton to make my table cover – I make a new cover every two years or so
A sewing table at the right height for your body (I had mine made for me – lower than a standard table height because I’m short and my upper arm measurement is somewhat long) – a dedicated sewing table means you can keep your machine set up and ready to go.
An adjustable stool – I have what’s called a Saddle Seat that I can adjust to the perfect height to keep my shoulders down and relaxed when I’m sewing (I actually have two of them which I move around as I need them). Even though they don’t have a back support, the seat forces you to sit with your knees below your hips which puts the lower back in a good position for extended working (although if you’re quilting or making a garment from scratch, you’re pressing as you go which gets you standing and moving to and from the ironing board a lot).
A Cutting Table at a comfortable working height – I created mine from a teak dining room table on a double set of wood bed lifts – makes it the perfect height for me
My Sewing Studio
Shelves and drawers and containers for storing fabric, notions, zippers, thread, patterns, tools
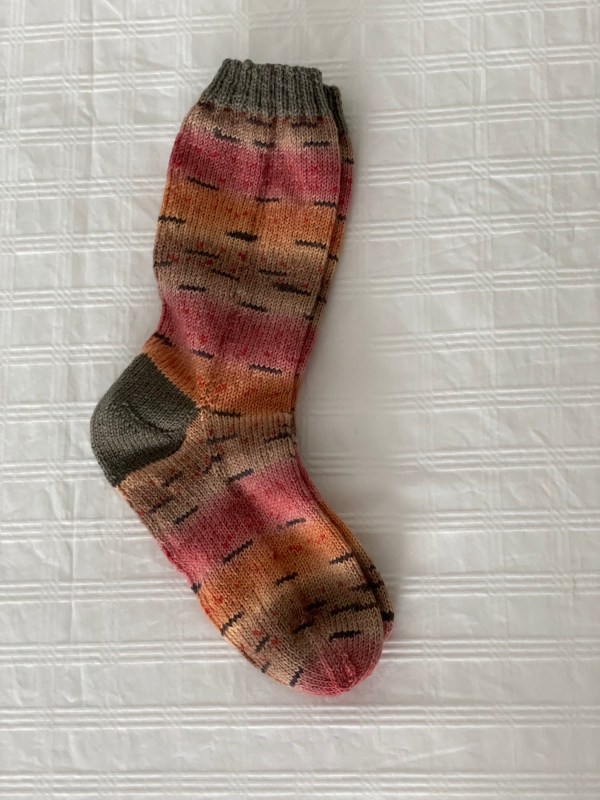
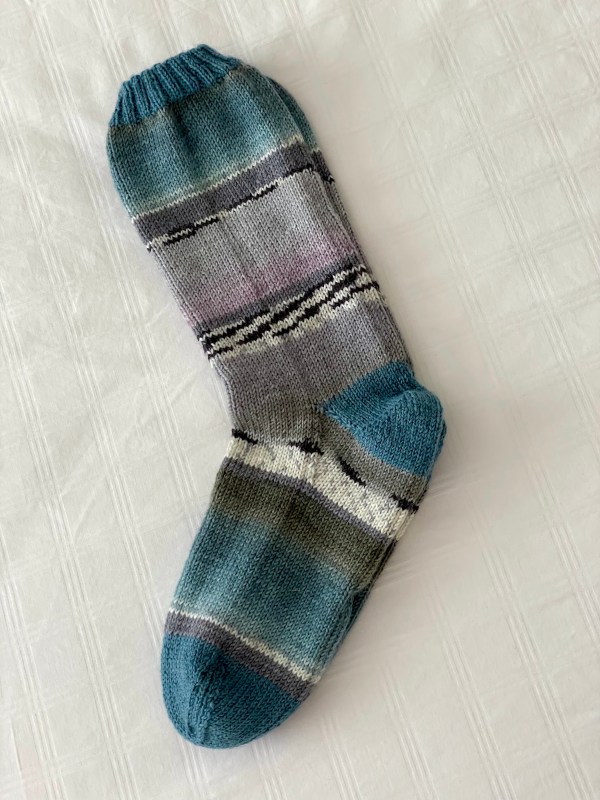
I’m working away at my yarn stash – these yarns are turning out interesting socks. I like how the golden pair has dark accents. The long repeat on the blue sock creates an interesting colour flow.
The blue sock was a surprise! I knit the contrasting cuff from a 4-ply yarn in my stash – that’s all I ever use. However, I’d bought the blue yarn at Woolworks in Mahone Bay not realizing it (and the three other balls I had picked up) were a 6-ply! When I started knitting the leg the yarn felt funny…heavy in my hand, uncomfortable. I’d probably knit close to 20 rows before I thought to look at the label – only to discover I was working with 6-ply yarn. I had three choices: unravel what I’d done and substitute a different 4-ply, change my needles to a larger size (needing to unravel what I’d done and work with a different number of stitches), or keep knitting the socks. I decided to keep knitting.
As it is, the cuff, heel and toe are knit from 4-ply; the rest of the sock is 6-ply. I’m confident that whoever gets these socks won’t ever notice the difference. What surprised me was how different the heavier yarn felt in my hands. I didn’t like it. And of course, using the smaller 2.5mm needles I’ve used to knit at least 100 pair of socks made the sock more dense than if I’d knit using 3.0mm needles. The problem with the larger needles is having to use fewer stitches if I wanted the socks to turn out the same size – the number of rows would also be different – everything was an unknown. I kept working with my 2.5mm needles.
I knit almost every evening for relaxation – the sock production is a by-product but not my primary motivation. I find my mind slows down when I’m knitting in front of the TV. My attention isn’t on the screen entirely and at the end of the evening I’ve another 20-30 rows completed – I’m not wasting my time but I’m also not rushing to finish the socks – I’m just relaxing!
I returned the other three balls of 6-ply yarn even though they each had a lovely colour scheme. I exchanged them for 4-ply balls. I didn’t like the colours as they appeared in the ball but I’m discovering they’re knitting into interesting socks! I’ve one sock completed, the second half done – a pattern I didn’t expect emerged. It was challenging finding a starting place to match the first sock but I succeeded in the end. I will end up with a pair of matched socks from this new ball of yarn.
Been gone a month – I’ve been busy sewing and knitting, and engaged in my daily/weekly routine but for some reason I haven’t managed to sit at the computer and describe what I’ve been up to. So let’s get to it.
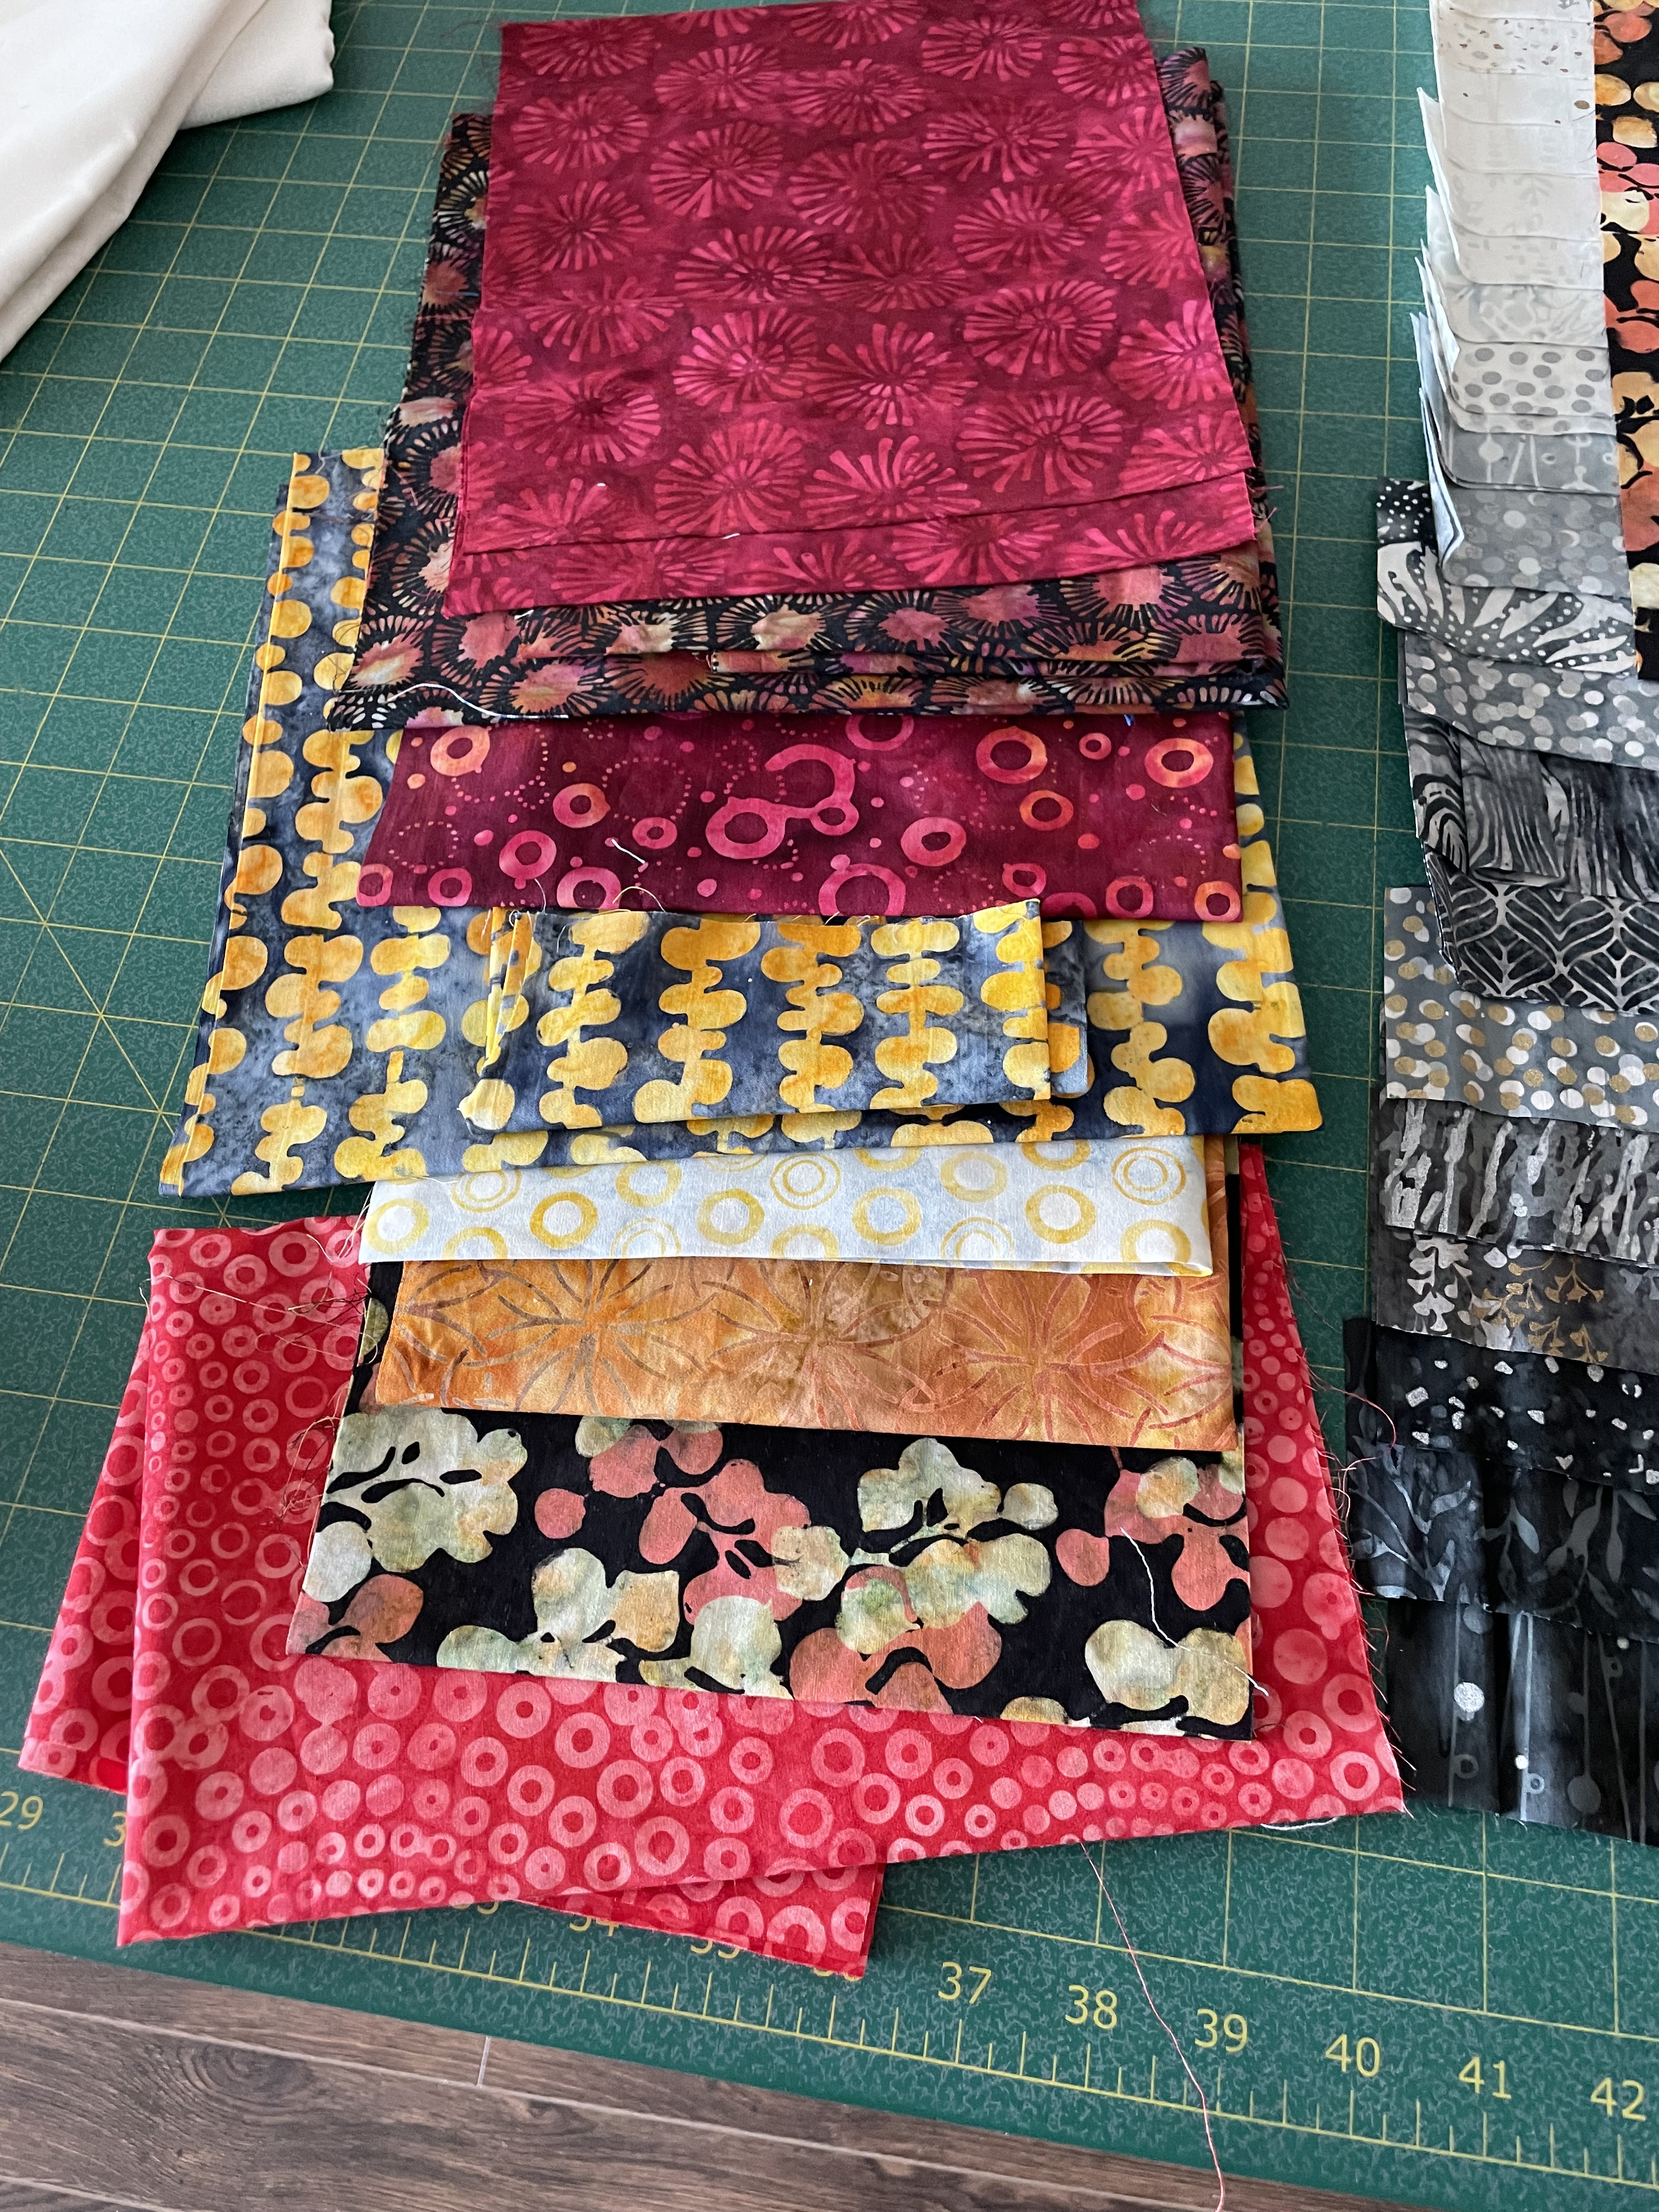
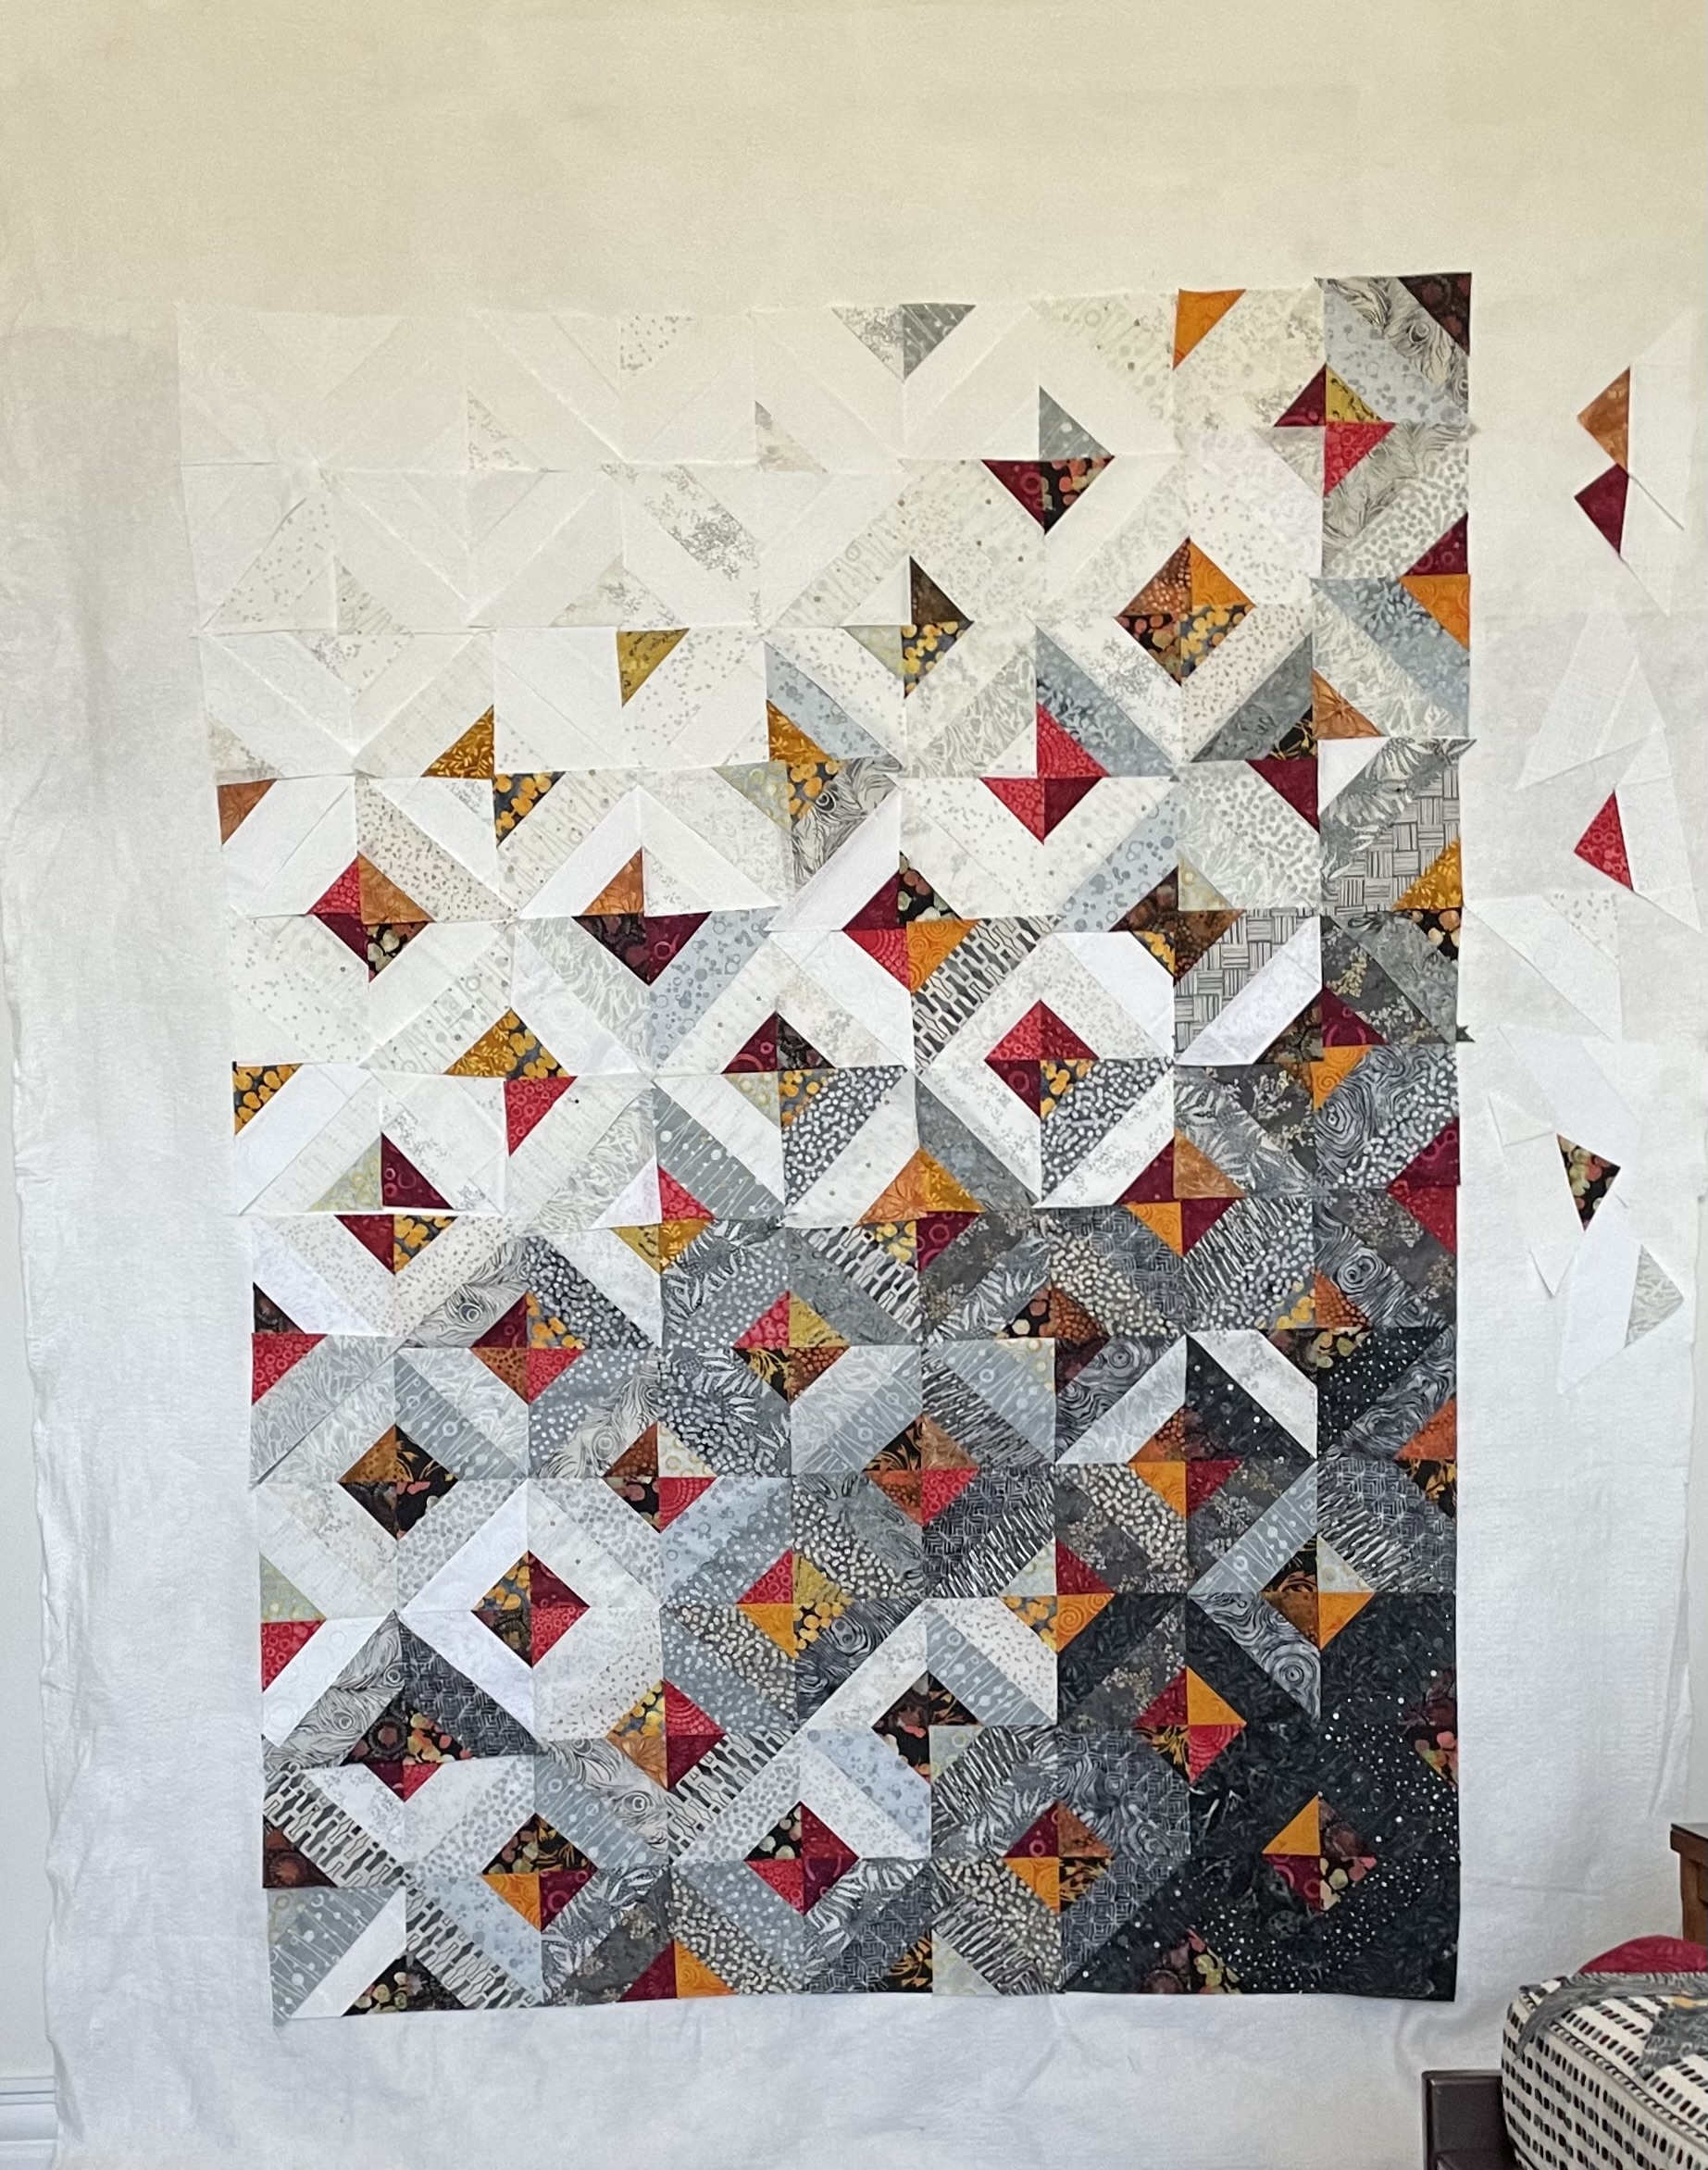
Mid August, I wanted to start a new quilt. I looked through my fabric stash and decided to use a jelly roll I’ve had for a couple of years.
Jellyroll Strips Laid OutContrast FabricsContrast Fabric With JellyrollSquares In Squares
The jellyroll fabrics (20 strips) ranged from black to white with many gradations of grey. Dull on its own – I decided I needed some strong contrasts. Because the strips were batik, I selected bright batik scraps to contrast with the black/white. I decided to make “square in square” blocks, cut them into triangles on the diagonal, then arranged them in squares again. All is fine, until I try arranging the resulting squares into a larger array only to end up with a hodgepodge I wasn’t happy with.
First Attempt
There’s a hint of a gradation from black to white but it doesn’t work overall because each of my blocks has light/medium/dark elements and to get a good colour flow I need some blocks that are very dark and some that are completely white. To make that happen I had to make many more blocks from scratch.
Second Array
This time, I established a dark corner and a light corner and tried filling in. I was working on my cutting table, rather than on my floor beside the cutting table as I usually do, because I’d injured my right knee and couldn’t get up and down. It didn’t occur to me at that moment that I could set up a design wall using a length of batting hung from a rod in my spare room (in front of the closet door) to hold the triangles/squares to audition placement – that came later.
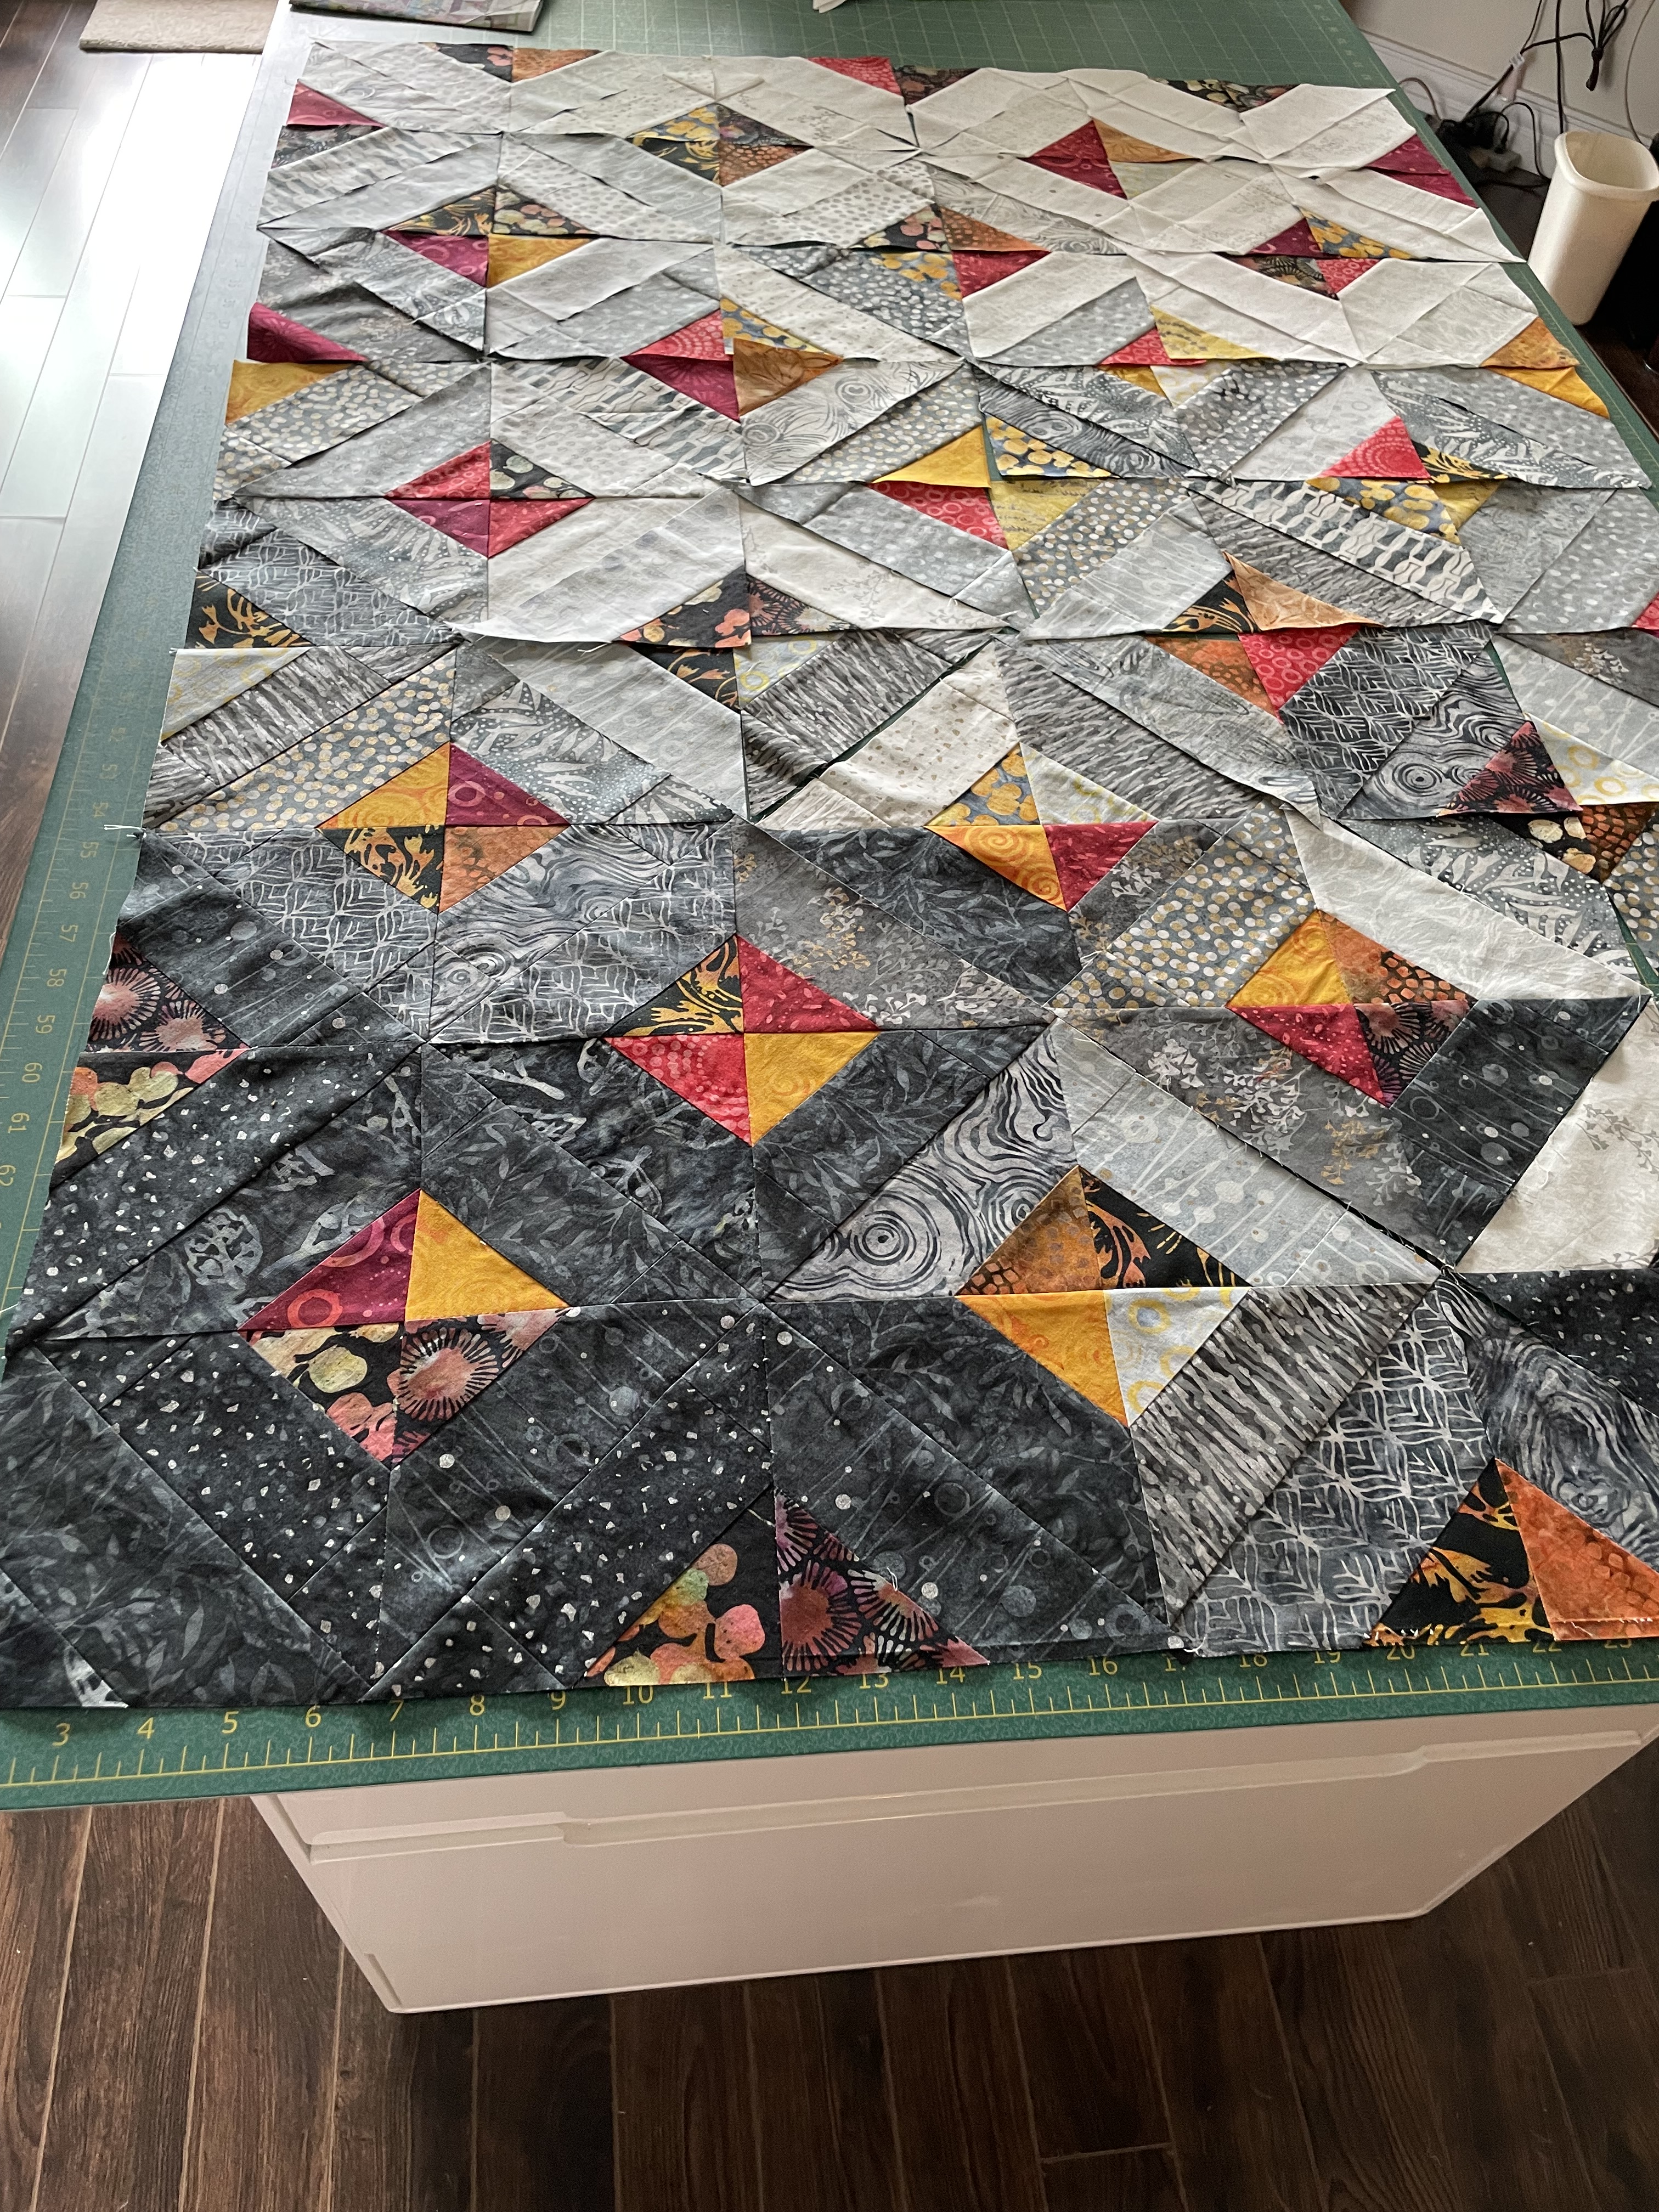
So I filled up my cutting table with a layout I thought would be the darker bottom half of the quilt top. I made the mistake of actually sewing these blocks together into a 6×12 array. I was planning on filling the cutting table again this time with the top half but then I couldn’t see what I’d already constructed. This was when I set up a design wall:
Array #3
I placed the assembled bottom half of the panel at the bottom of the wall and started laying out more blocks. Two things were immediately obvious: 1. I didn’t have enough “black” extending from the lower right corner and 2. the grey extended too far across in the middle of the emerging piece. I’d also run out of triangles at this point and needed to make another 60 or so.
By this time I had stopped making squares in squares and instead I cut trapezoids from the jellyroll strips (I had to open the second package I had on hand) as well as triangles from the contrast fabrics. I’d figured out that working with reassembled squares wasn’t helpful – I was better off constructing just triangles where I could control the colours I was juxtaposing and had more freedom when placing them.
Array #4
Close, I thought but I still wasn’t completely happy with the colour flow so I played with it over the next few days – shifting blocks in the top half, and pinning other triangles over existing triangles in the sewn bottom portion.
Final Array
It took a couple of days looking at the design wall and moving and pinning elements until I was finally satisfied with the look of my panel. Yesterday, I took a photo, then very carefully stacked the pieces in the top six rows, numbering each stack so I knew the order and orientation of the pieces in each stack. Then I carefully repinned and labelled the changes I’d made to the bottom panel – knowing I would have to take much of it apart in order to get the arrangement I wanted.
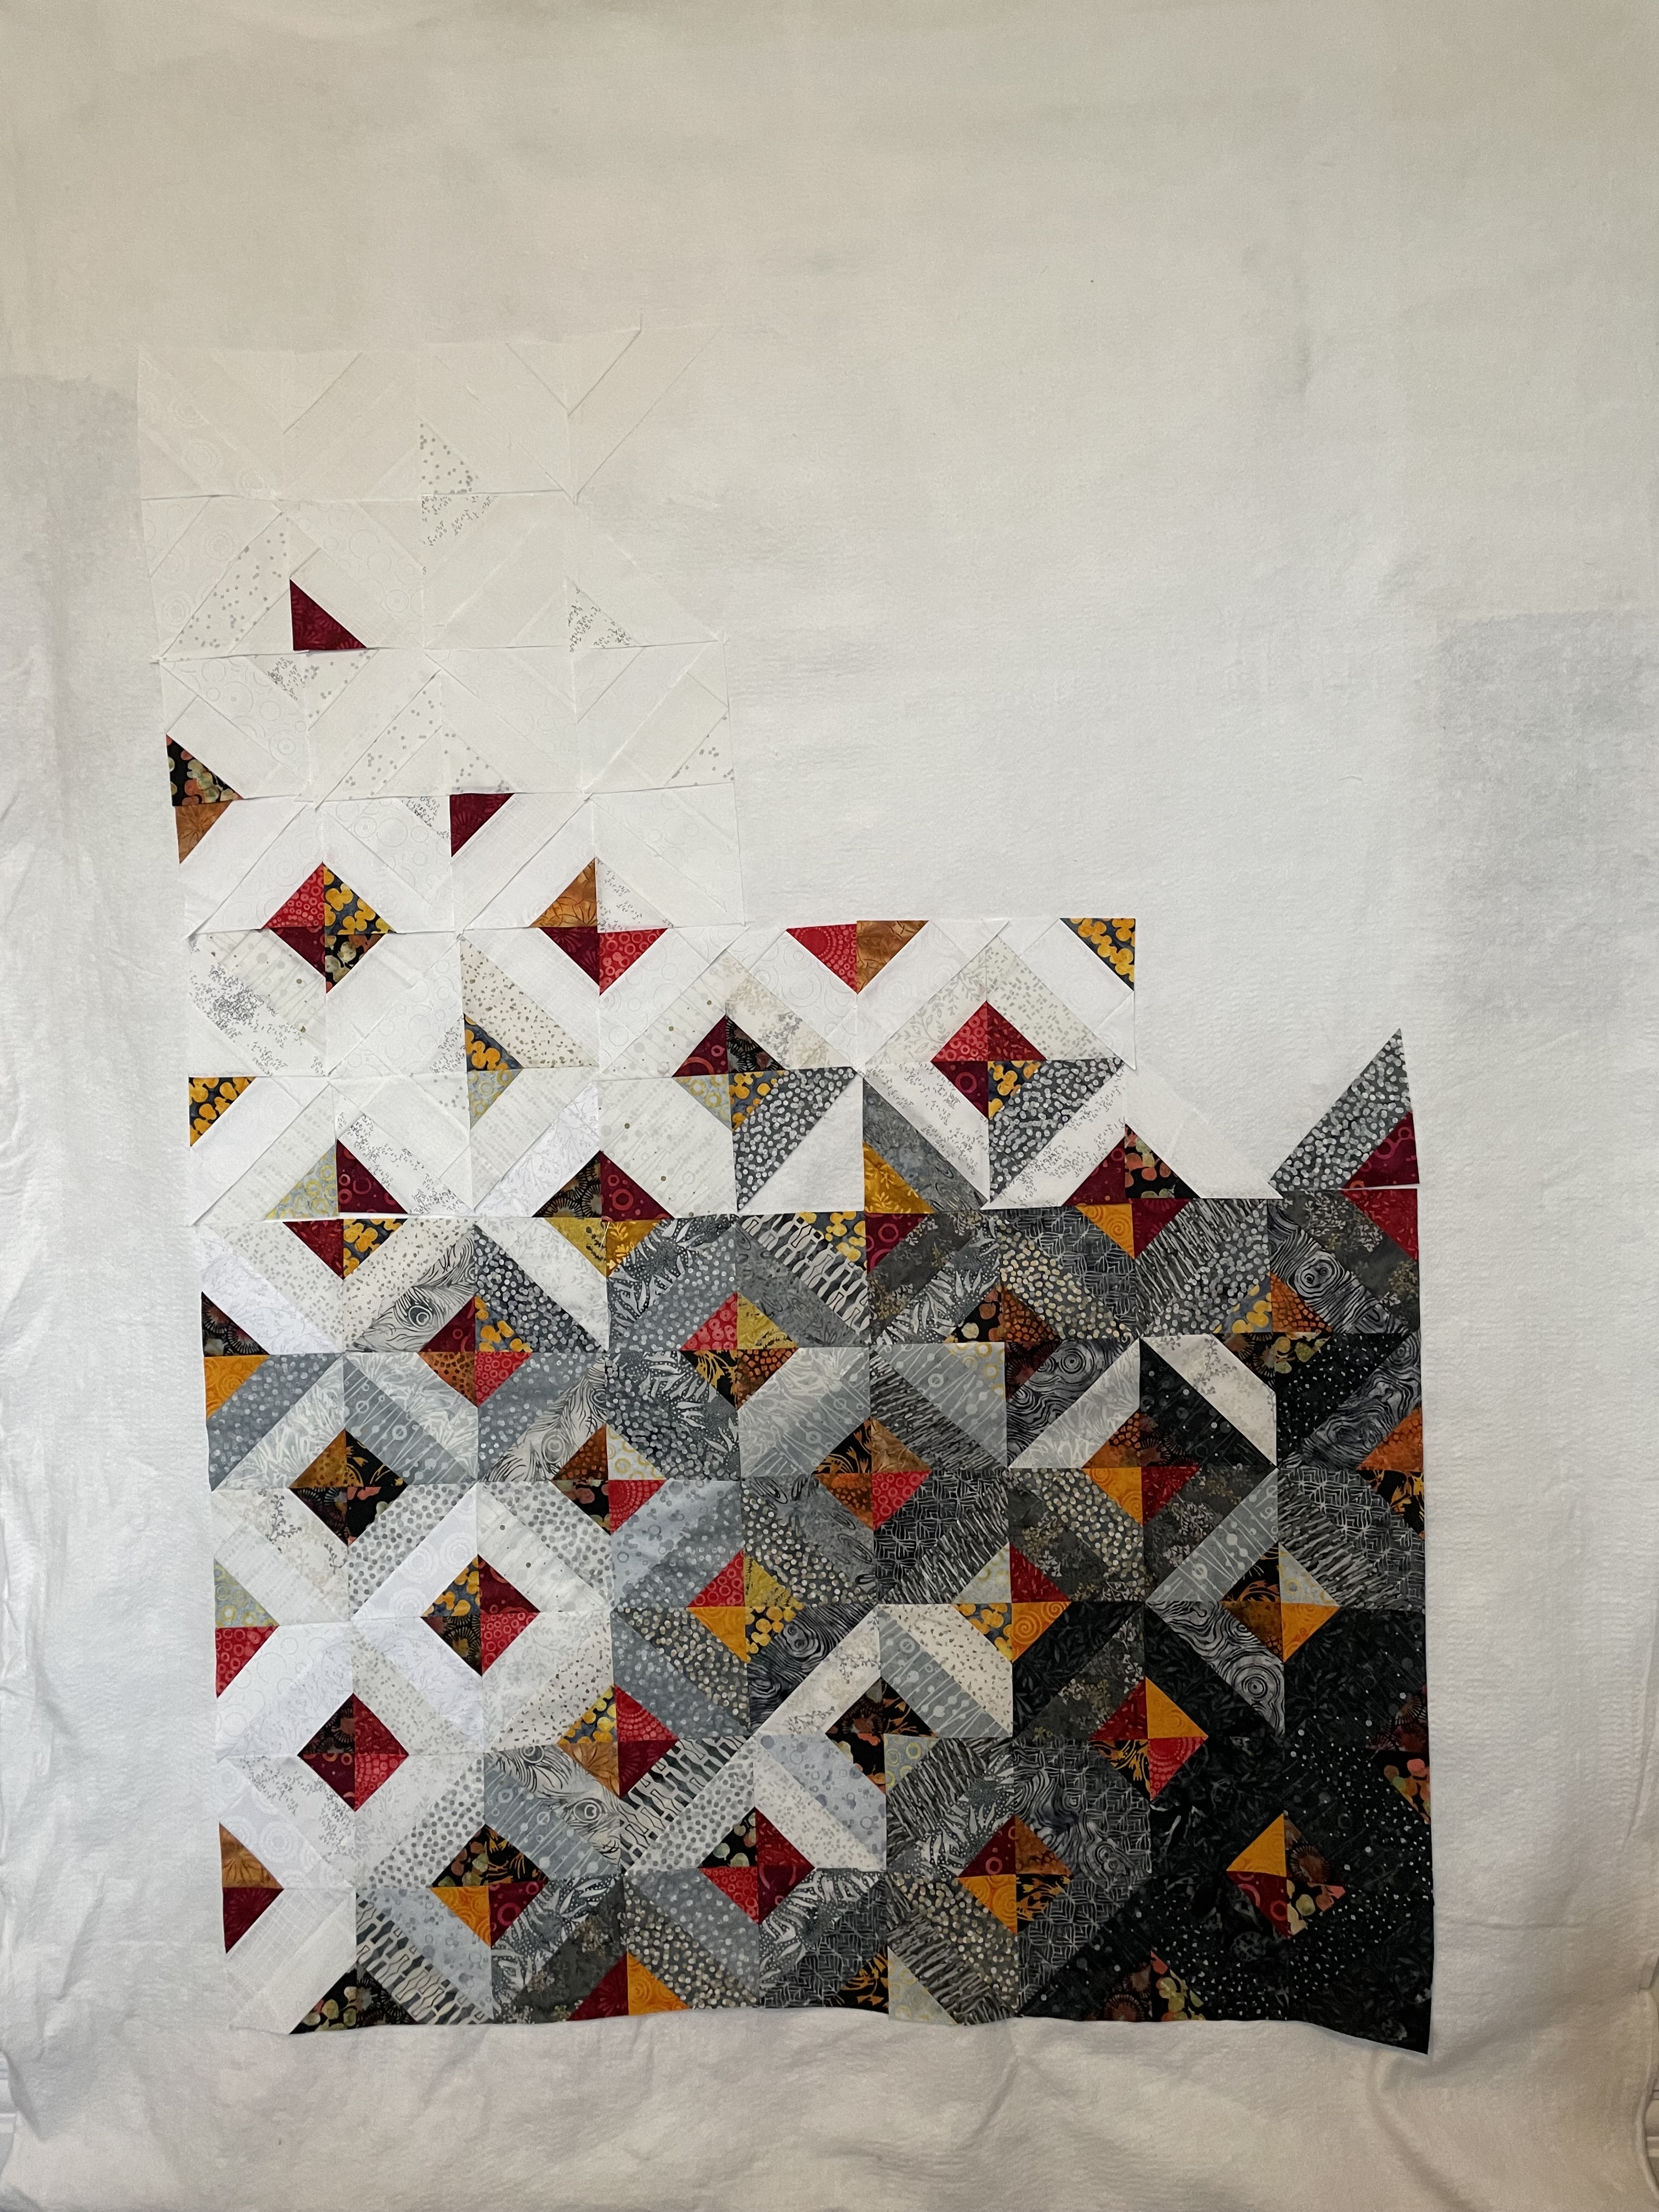
It’s taken the better part of two days to reconstruct the bottom half of the quilt top:
Reassembling In ProgressFinished Bottom Portion
Now I have the bottom portion of the array back together – many of the changes were subtle ones, mainly involving extending the darker batiks further across the panel, limiting the lighter, brighter trapezoids and triangles until the mid area.
Tomorrow I’ll start sewing the six top stacks together, row by row – it won’t take long because I’m not having to carefully unstitch many interlocked seams!
As you can gather, this whole process would have been much easier had I planned out on graph paper what I was thinking about, but that’s not how I seem to work. I much prefer just starting and building and designing as the project unfolds. I find improvising so much more interesting because I have no idea where I’m going to end up. Always a surprise and satisfying. It’s how I write as well – just get some words on the screen and see where they take me. I never know what I’m writing about until I get well into something and an ending emerges. That’s my creative process.
I have no idea what I’m going to do with the back – do I want to make another 36 of these triangle elements for an insert or do I want to try something else – still thinking about that.
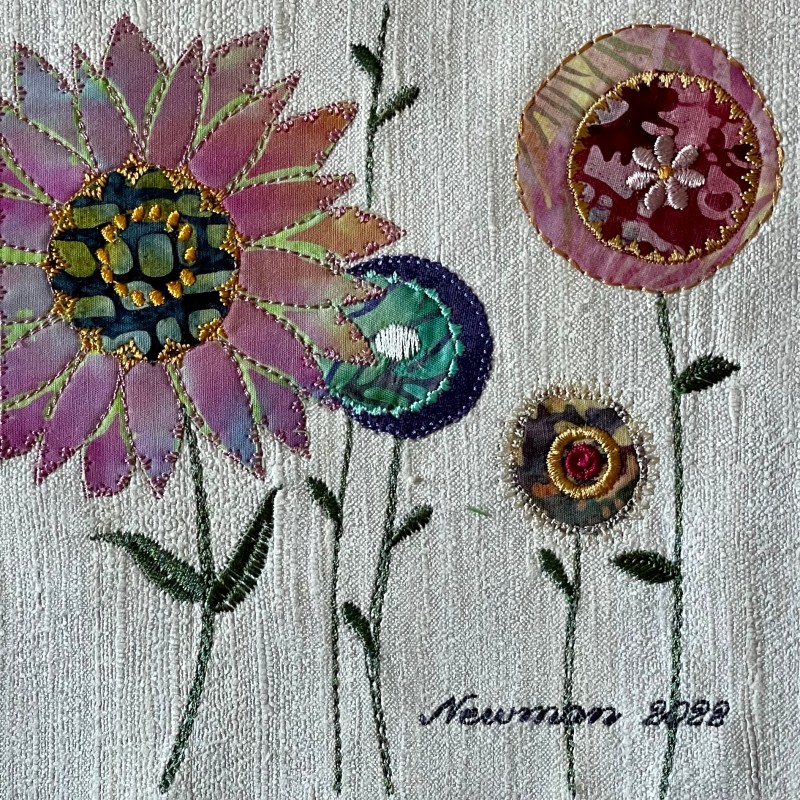
I have just completed this series of twelve 6×6 wall art pieces. You may remember the previous efforts in 2022 and 2023. Early in the spring Brandt Eisner sent out an invitation to participate in another “pop-up” 6×6 show. I agreed to participate and decided to play with “flowers” one more time.
An Original 6×6 Wall Art PieceSecond Iteration of 6×6
This time I decided to make the panel more abstract – one or two fabric circles appliqué with an embroidered abstract flower stitched on top, filled in with some leaves that I’d thread paint. I did several mock-ups.
I’d managed to get the construction of four pieces done (with four more partially assembled) when Brandt sent a note that the show was being cancelled. That stopped me dead. It was the middle of June – I was working toward an early July deadline – and I stopped. Just couldn’t get going again.
Two weeks ago, I finally picked up the silk background squares I’d prepared, pulled out the box of circles, and began assembling some 6×6 arrangements. Once underway, I was able to keep working on the project and this afternoon I finished the pieces, completely mounted on blank canvas frames, with paper backing and saw-tooth hangers.
This project is ready for the November Craig Gallery solo show!
“Christians, get out and vote! Just this time! You won’t have to do it anymore. Four more years, you know what? It will be fixed, it will be fine. You won’t have to vote anymore, my beautiful Christians. I love you, Christians. You got to get out and vote. In four years, you don’t have to vote again. We’ll have it fixed so good, you don’t have to vote.” [trump speaking in Florida 7/26/2024]
I searched “Did trump actually say christians get out and vote…” – just to confirm he’d said it as Brodner quoted. It wasn’t that I didn’t believe Brodner, I was interested in finding out more about the context and whether any of the major news outlets would bother to report the comment.
I definitely found headlines, so trump’s rantings are garnering some attention. They need a lot more attention. Given the overall context of his “speeches” I’m taking the words at face value – vote him into office and that’s the end of meaningful presidential elections. I suppose he could be saying that he’ll have changed the political reality to such an extent that even if there were to be elections whether Christians vote or not won’t matter because any election would simply be pro forma.
I’m on the sidelines in this US election. I don’t have a vote. I’m Canadian. I’m fascinated with the way the election has changed since last Sunday when Biden announced he was passing the torch to Kamala Harris. Energy was palpable almost immediately. I am hoping she can maintain and grow support for her campaign because trump winning the election would be horrific. At least that’s how I see it from my vantage point in Nova Scotia, Canada.
Not only would a trump win be dreadful for the US, it would change lives in Canada in some expected and many unexpected ways. The economic impact would be felt here instantly. But more egregious would be the way in which our political conversation would change – becoming even more partisan, more vicious, more divisive on all sides. We don’t need that.
So I watch the campaign with more than a little concern. I read trump’s words as invoking a dictatorship – support me this time and that’ll be the end of it – I’ll make sure you’ll never need to vote again.
I’m hoping Harris can build and sustain momentum – the US needs her to win. The rest of the world needs her to win.
Go Kamala, go girl!
But I don’t have a vote….
[PS: If you don’t know much about it check out Project 2025 – it’s the GOP/Trump blueprint for a trump presidency – the document itself is 900 pages long, but this synopsis will fill you in.]