To start 2026 – a synopsis of some of the many positive things that happened in 2025. It’s a long read but worth the time – it will help you reframe and see all the doom and gloom differently.

I recommend you read it.
To start 2026 – a synopsis of some of the many positive things that happened in 2025. It’s a long read but worth the time – it will help you reframe and see all the doom and gloom differently.
I recommend you read it.
I start though my pile of email this morning and near the top is Michael Cohen’s daily newsletter. I know about his history as trump’s fixer. He’s carrying a lot of bitter baggage. But boy can he write. Lovely shaped pieces of prose, with flow, and punch, and always a sharp, clear ending statement.
I don’t always agree with him. I just enjoy reading him.
I have to share today’s piece: https://therealmichaelcohen.substack.com/p/peace-over-a-piece-of-pie?utm_source=substack&utm_medium=email&utm_campaign=email-restack-comment&r=cgren&triedRedirect=true
This was the second paragraph – I could see the political cartoon by someone like Steve Brodner or Ann Telaes so clearly, I burst out laughing!
Let me put it plainly: this is what happens when you replace competence with cronies and let self-interested acolytes cosplay as statesmen. You don’t get diplomacy. You don’t get strategy. You don’t even get common sense. No; what you get is a surrender plan so lopsided, so humiliating, so cosmically stupid that even Zelenskyy, a man fighting for the literal survival of his country, had to politely pretend not to bang his head against the nearest wall.
I could copy the rest of the diatribe – that’s what it is – but just check the link above and read it. It’s stark. It’s angry. It’s funny. And he’s hit the nail on the head!

If you’re not a TV personality
If you’re not a rock star
If you’re not a winning athlete
If you’re not an important politician
If you’re not a TikTok influencer
If you’re not an insecure teen…
Then you need to know, NOBODY IS LOOKING AT YOU.
You worry about what to wear to your friend’s birthday party – you try on several different combinations of garments, nothing feels right; you may even shop for something new.
All wasted effort and energy.
Because when the event is over, nobody will remember what you wore! Nobody paid any attention to what you were wearing. Likely, if asked, they probably can’t tell you what colour your eyes are!
I don’t remember when I realized I was mostly invisible. In part, my invisibility is the result of my age – 82 is pretty old and nobody pays any attention to old women. However, nobody’s paid any attention to how I look for quite some time.
I remind people when they mither about what to wear, “Nobody is looking at you!”
That doesn’t mean I should take no pains to be reasonably well put together – but I shouldn’t be dressing in some interesting way because I want the approval or the attention of the people around me – because they aren’t paying attention.
I could commandeer attention the way the late Iris Apfel did – you have to admit you couldn’t miss her. And I bet she had great fun dreaming up outfits with great panache! (I never met her. Just came across photos from time to time.)

My wardrobe is conservative.
But I have a knit sweater collection with unusual bright patterns
I have several unique quilted jackets I’ve made
I even own some bright neckwear (I do love Iris’ collection of necklaces – the question is how does she manage the weight of it all?).
But I’m most comfortable in a turtleneck with a light wool sweater and a simple pair of pants.
I dress for comfort.
I don’t dress to be noticed.
That’s because I know no-one is looking at me!

I finally finished the sixth pair of socks last evening. Done. Completed.

A friend asked to make 6 pairs of socks for her daughter and granddaughter for Christmas sometime in June (July, August, September, October, November, December – 6 months) – enough time to make 6 pairs of socks.
But the “job” felt like it was taking over my life. This wasn’t relaxed knitting. I felt compelled to knit at least 20 rows every evening, if I was to meet this deadline. I have knit a pair of socks in 2 weeks, but that was because the TV program I was watching was particularly interesting, or my knitting stamina was better at that particular time. While relaxed knitting it probably takes me closer to 3 weeks, maybe even 4 – although I knit most evenings, some evenings I might not.
Even though I actually had enough time, I felt the pressure. It was a relief, last evening, to finish the toe on the final sock!
Now I can return to the socks I put aside when I started these 6 pairs.
Buy Anything…But American!
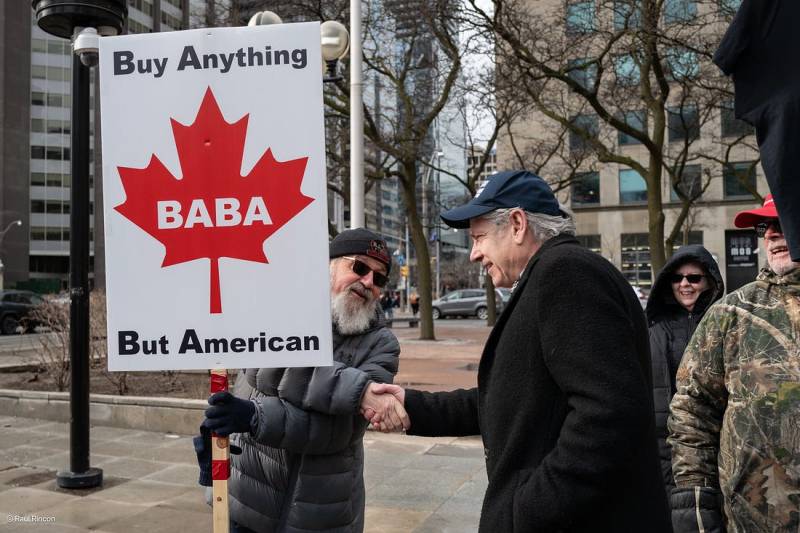
This was an image from Charlie Angus’ Substack post today: https://charlieangus.substack.com/p/canadas-people-power-movement-deals?utm_source=post-email-title&publication_id=2946092&post_id=176364927&utm_campaign=email-post-title&isFreemail=false&r=cgren&triedRedirect=true&utm_medium=email
Perfect for a small patch for the windshield (or a bumper sticker)
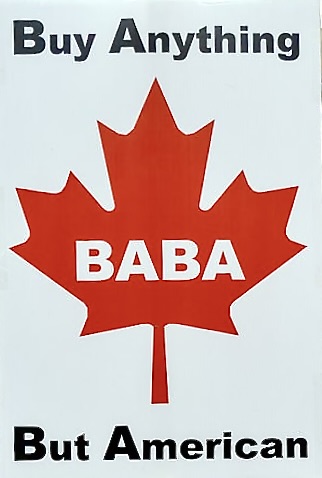
I know I shouldn’t have done it (copyright and all), but I couldn’t resist – I turned that sign into a logo I can use.
Charlie’s piece: Canada’s People Power In Action is about the negative economic impact our grassroots boycott of US products is having in the US and the positive impact it’s having here in Canada.
…new statistics reveal the staggering impact that Canada’s boycott is having on the United States. The American liquor industry is reporting an 85% drop in sales to Canada. That is a staggering hit.
We need to remind ourselves to keep this going! There are alternatives in the grocery stores – from Mexico, Peru, France, … and if you can’t find one, maybe this isn’t the week to buy that particular item.
This boycott matters!
Much of the response in the US is that we’re mean, they’re the victims, innocent bystanders…
The United States still doesn’t get it.
Our feelings aren’t bruised. We are deeply offended by the attack on our sovereignty as a nation and the disintegration of the rule of law south of the border. The response has been a national campaign of grassroots resistance.
This is people power in action.
We have been using our purchasing power to strengthen the Canadian economy – we can definitely do that in a more focused way.
The boycott may be disastrous for the MAGA economy, but it is creating a unique opportunity for Canada. We need to seize the moment.
Now to find our voices and make our political leaders understand together we need to build Canadian economic independence – not based on projects like the Keystone XL pipeline (which does nothing to reduce our dependence on fossil fuels, even if it was offered to trump as an inducement to engage in trade talks – a waste of time – his fickle decisions are no guarantee of economic stability for us – not worth the paper they will be written on!).
We have to find ways of increasing our spending and investing here at home in projects that establish new industries which support (rather than degrade) our environment, which build a different kind of military (let’s learn from Ukraine and Finland – warfare is changing very fast), which strengthen our Canadian cultural activities and showcase all Canadians.
There’s lots of work to be done – let’s get going!
Me, I’ve printed out the “sticker” above, it’s going in the corner of my windshield, today.
Today’s headlines make me want to scream! The guns may have stopped for the moment – but the Middle East hasn’t changed! The hatred bubbles beneath the cheering and weeping and parades on both sides.
Nobody is writing about it. Everybody is pretending trump pulled off a miracle – no cease fire forced by a bully is going to hold – it’s all a sham.
When will the next round of violence break out, I have no idea, but it will – likely in the West Bank where nobody is doing anything to stop Netanyahu’s settlers from taking land from Palestinians! My guess is, it will be quite soon, within 6 months? a year?
But you can’t tell me the Middle East has been changed. Not while Netanyahu is still in charge of Israel.
His intention to eradicate Palestinians hasn’t changed. trump may have threatened/strong armed him into going along with this Gaza deal, but there’s still Palestinians surviving in a destroyed Gaza and there are Palestinians in the West Bank.
Who knows, there may even have been a secret deal worked out between trump and Netanyahu during that White House visit that nobody is talking about – wouldn’t put it past either of them!
I don’t feel joyous today because the guns have stopped for the moment. We’ve been here before – the guns stopped for a short while, then Netanyahu resumed open conflict.
Why is this time any different?
I don’t understand the jubilation.
I certainly don’t feel any optimism!
Here’s a comprehensive list of what trump and his regime have done to the US:
The TikTok video takes 1 minute and 23 seconds – it shows clearly the nearly complete conversion of a “democratic” US to a fascistic dictatorship. It’s not coming! It’s arrived.
Charlie Angus posted that there’s a “No Kings” protest happening in Toronto coming Saturday – everybody nearby is invited to attend:
There may be one near you, if you live elsewhere.
If you’re in the US here’s a link to the gazillion of gatherings planned throughout the country:
9 months! That’s all it’s taken to dismantle the social, economic, governmental structure of the US. Even those of us who sit here in Canada have to be concerned – that country is too close for comfort. Too many of our own citizens laud what’s been going on – the chaos could start to spill over – it already has in provinces like Alberta with those folks who welcome the “51st state”!
So, do something. If nothing else, keep abreast of what’s been happening and make sure friends and family also know what’s going on!
One pair left to go (already working on ’em).

I finished this pair a couple of nights ago (4th of October, I think). I immediately started the final, 6th, pair. That means I should be finished all six pairs of Christmas socks for my friend’s order by the end of October.
It will be a relief.
Although I usually knit for a couple of hours almost every evening, knitting on these socks has been working under pressure and has made it harder than usual. I have often felt I can’t put them down, I need to knit a few more rows, I have to keep going…
I’ve enjoyed the yarns. Because these socks are a tad smaller than my usual women’s size 7 1/2-8 socks they’ve gone a bit faster. But that hasn’t mattered. I’ve felt the pressure, nevertheless.
I’m looking forward to getting back to knitting when I feel like it, and not knitting when I don’t!
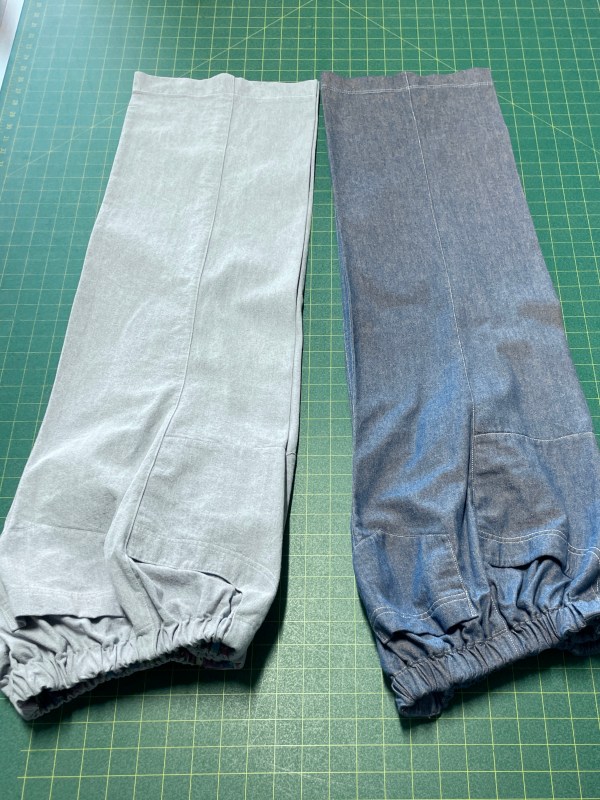
I may not have written much but I’ve been making pants these past few weeks. Why, you might ask, with a closet full of summer and winter pants, I doubled down on making pants?
Well, the weather in Nova Scotia has been unending sunshine. We don’t get weather like this. The “normal” in NS is a day of sunshine sandwiched between two days of rain! If it’s one thing we can count on here is lots of rain, all summer long. Then September comes and we get our best weather into the middle/end of October. Sunny, if a bit cool, days wonderful for being outside. For six weeks, maybe seven, we get our best weather of the year.
Not this year. It rained for most of June, days on end, and then July came and the sun came out and it stayed. In fact the weather has been so dry it’s been considered a drought! Wells have gone dry. Activity in the woods has been banned. We’re conserving water because the water level in the watershed lakes is extremely low.
The outcome of all of this is, after Labour Day when that one “fall’ day would normally arrive and I’d change over to winter clothes, that day hasn’t yet happened. I realized I needed a couple pair of fall coloured, if somewhat light in weight, pants to wear in this shoulder season that we never have! Something a bit heavier than the summer cotton pants and lighter than my fall corduroy or denim pants/jeans.
In addition, Sally at Sew With Vision asked if I’d do a class on making a basic pair of pants. I’d agreed. So I dug out my Japanese Monpei instructions and took a look at them. Monpei are constructed using 4 rectangles based on hip measurement for width and from waist to a smidge above the floor for length.
To create a crotch, the traditional Monpei uses a gusset based on two crotch triangles. I wanted the crotch to be incorporated into the front and back of the pants. So I decided to draft a pattern first.
I started by drawing two rectangles – one for the front, one for the back. I marked the vertical centre line (to use as the grain line), and drew in the horizontal crotch depth (including ease and seam allowances at waist and crotch).
I shaped the crotch using the measurements suggested for the gusset and drew the appropriate triangle to the front and the back along one side at the crotch depth. (In the Monpei instructions, the gusset triangles are cut from the top edge of the rectangle and repositioned at the appropriate depth along one side – the centre front/back seam.

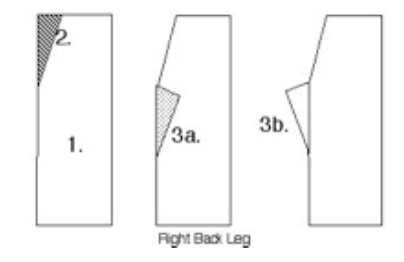

In my drafting the centre front edge remained straight (because I need to be able to pull the pants over my hips and my waist and hip measurements are almost the same). I used a French curve both front and back to round out the crotch shape.
Then I shortened the centre front crotch length by 1″ and rounded the “waist” with the French curve, because my front crotch length is shorter in the front than the back.
I drafted pieces for a pocket to be placed on top and incorporated into the waistband and side seam (pants without pockets are useless!), and a pocket facing. Finally I created waistband facings.
Because the Monpei gives me a rather nicely fitting pair of pants I decided to go ahead with the basic design without comparing my drafting to any of the several pull on pants patterns in my pattern stash.
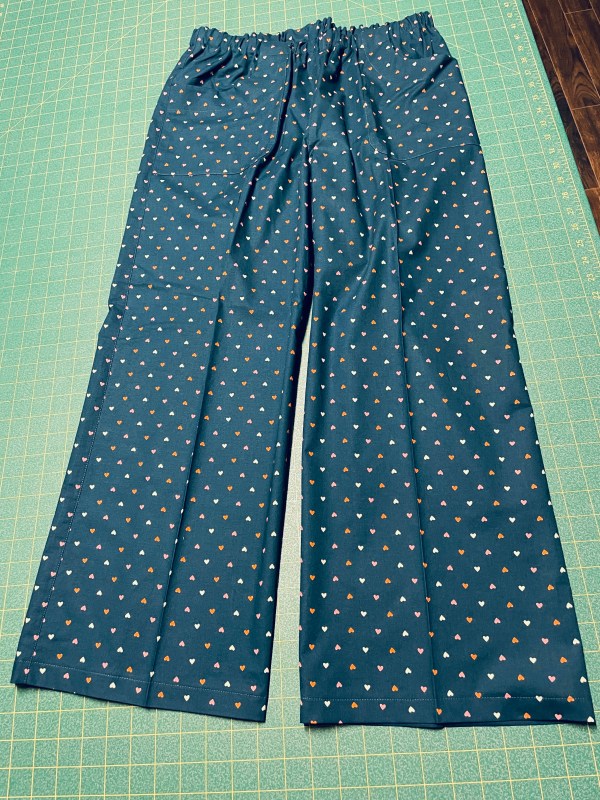
Using a Polyester/rayon knit fabric, I ended up with these:

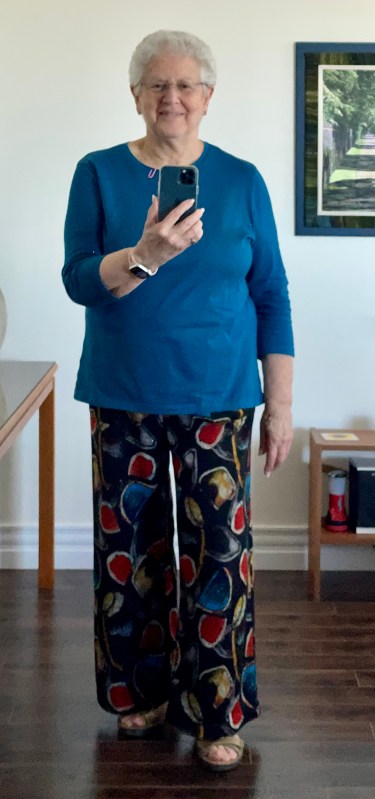
Although you can’t see them, the front pockets are there.
I made two pair of denim pants using the same basic construction but added a fish-eye dart down the centre back and shaped the side seam to narrow the legs a bit. I also added a back pocket to conceal the top of the fish-eye dart.
Then I tackled pants for Sally!

First I made a muslin from the Monpei pattern I drafted using Sally’s measurements (no pockets – although I added the waistband facing elastic, and hemmed the legs so I could gauge the fit). The crotch depth worked well, but the legs were a bit short. Next I made the pants for Sally adjusting the leg length and adding pockets.
The plan is to display the Monpei/pants in the shop so people have an idea of what they’d be making when they registered for the class. (I have a hunch Sally is intending to wear them!)
So I’ve been sewing, just not writing about it.
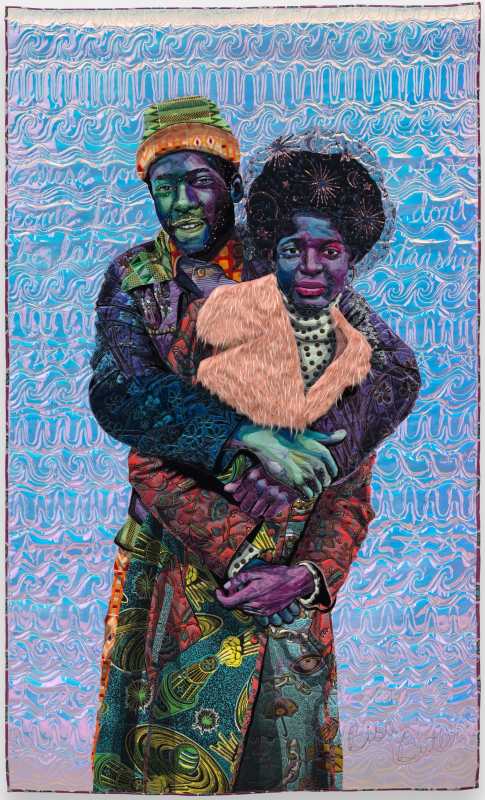
I’ve written about Bisa Butler’s fibre art before. I came across a new Colossal piece today about her latest work.
Butler’s work is simply amazing with texture and depth and brilliant use of fabrics and stitching…
I don’t come close, I have to say.
Her pieces are large, each must take quite a bit of time to execute. I wish I had an opportunity to see them in person. Not going to happen. My travel days are pretty much over. But if you ever get a chance to see her work, jump at it!
Harnessing the power of empathy, Bisa Butler presents a tender, evocative suite of new works in her current exhibition, Hold Me Close at Jeffrey Deitch. The artist is known for her chromatic, multi-patterned quilted artworks exploring Black history, identity, and craft traditions. Her elaborate pieces combine materials like printed cotton, silk, sequins, beads, and velvet to create both large-scale tapestries and intimate vignettes.
