New Wall Art Projects

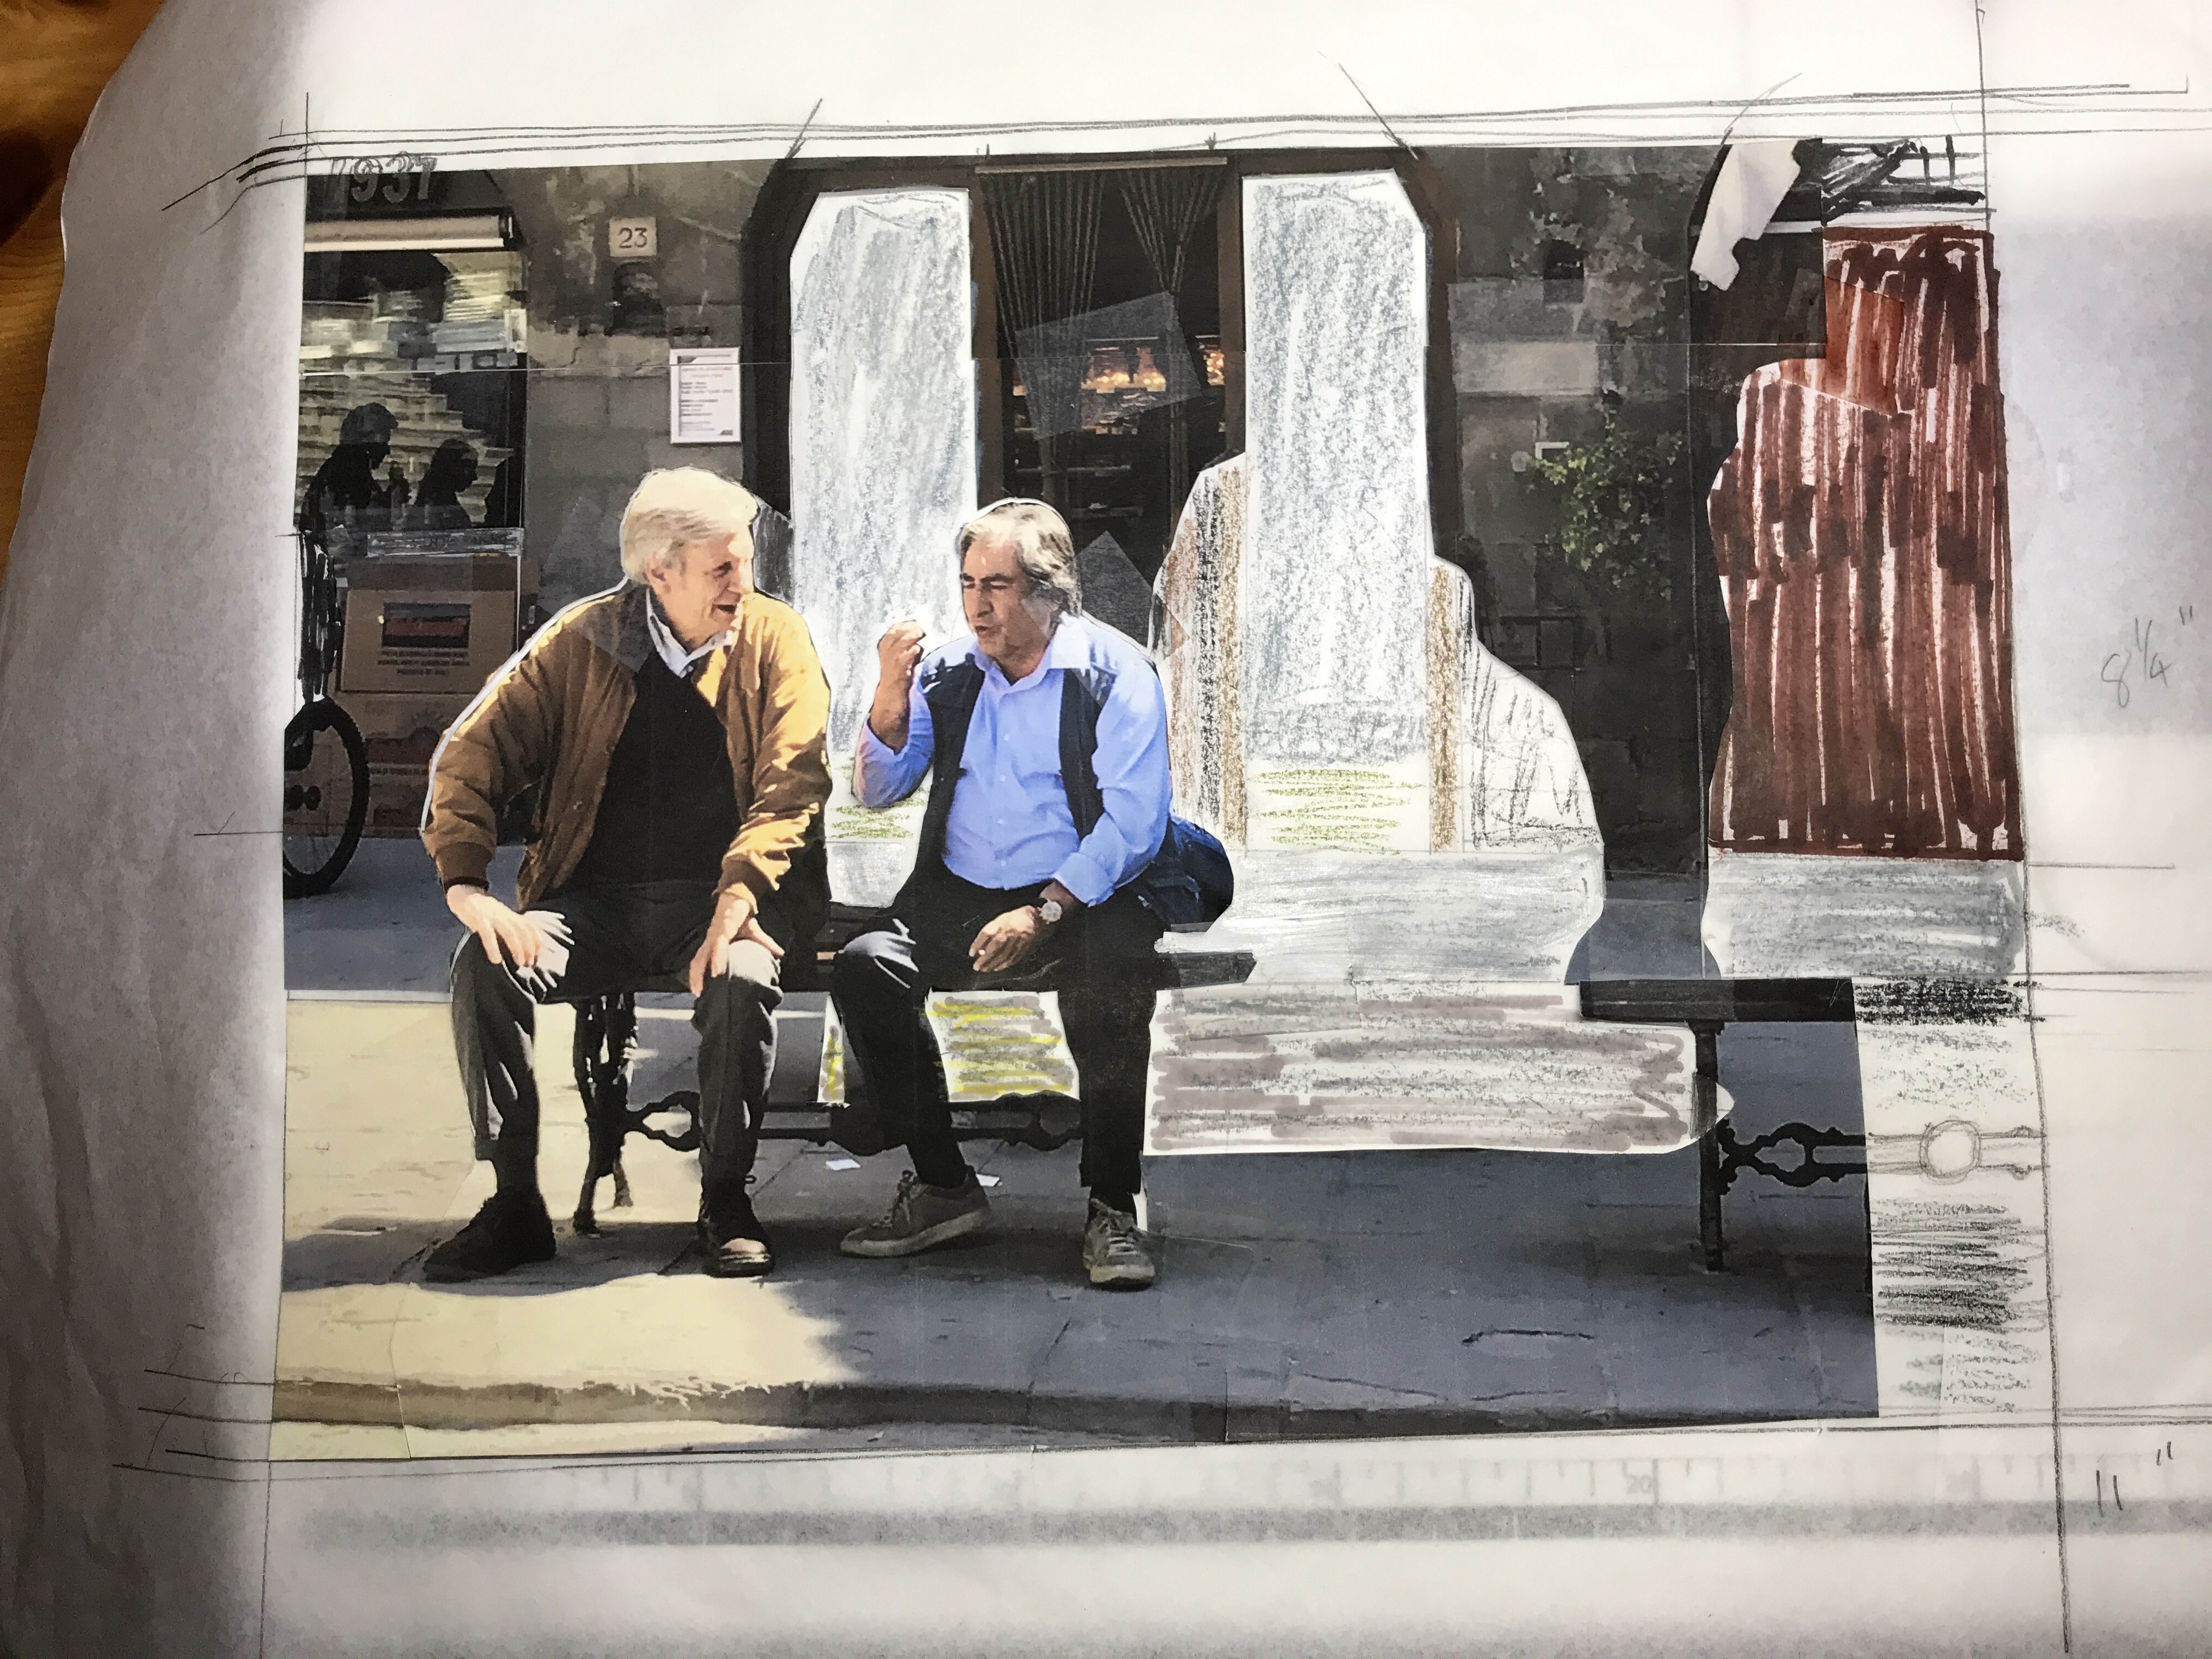
I took this photo in the main square in Cortona, Tuscany in April. We were visiting the city and enjoying the food and the shops and just wandering around – these two men deeply engrossed in conversation caught my attention. I’ve known from the outset this would become the basis of a wall art project.

Enjoying The Morning Sun

I started playing with the image yesterday – first I wanted to remove the other people, to isolate the companions. The blue-shirted gentleman is making a classical Italian gesture – thumb pressed to first and second fingers moving his wrist back and forth; in his other hand he has a cigarette. I want to bring the viewer’s eye to this man.

Morning Sun – Initial Steps

With the other people removed and just the shops behind, the men now stand out – I removed the advertising from the supermarket windows – I will do them in the same dark colours you can see through the open shop door. I intend to keep the partial bench on the right (having taken away the woman who is reading and smoking).

Looking at this image now, I think I want the men to be on the right side – it’s got something to do with the speaker being stronger in that position. I’m about to try cutting off the building on the right and repositioning it on the left, reversing the bench so it is cut off at the left edge – that will also allow me to strengthen the greenery growing on the stones of the facade behind.

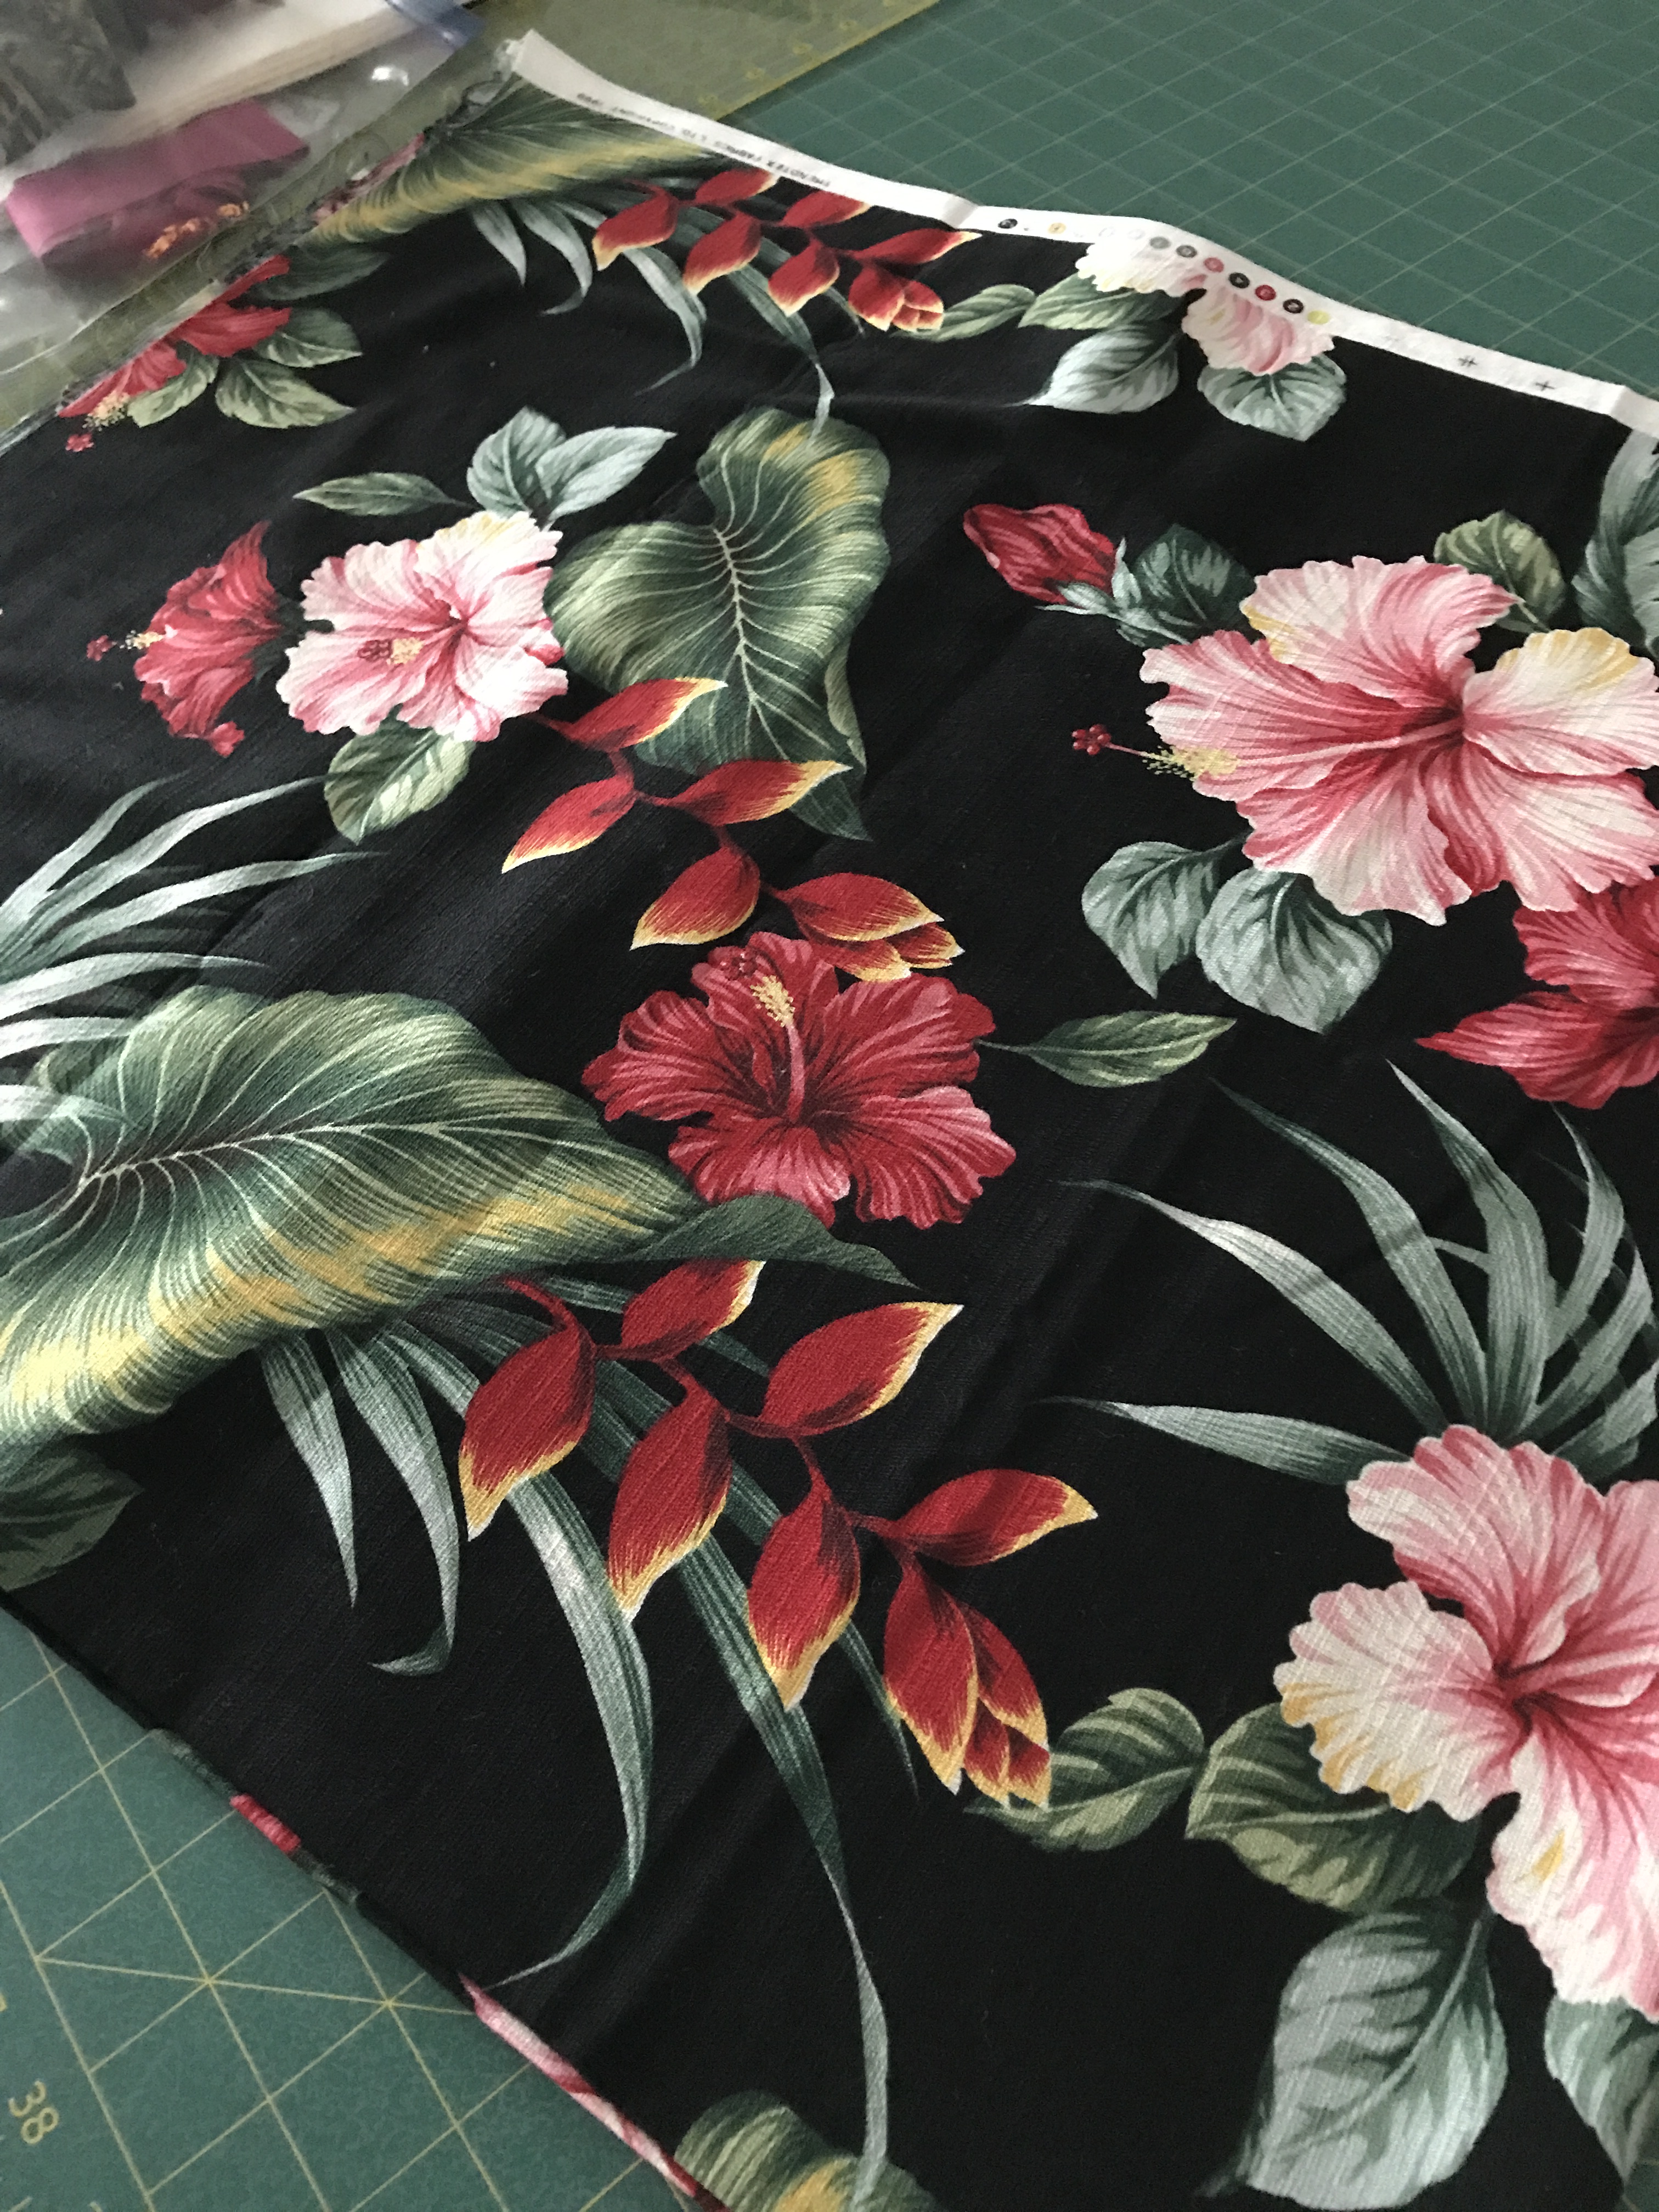
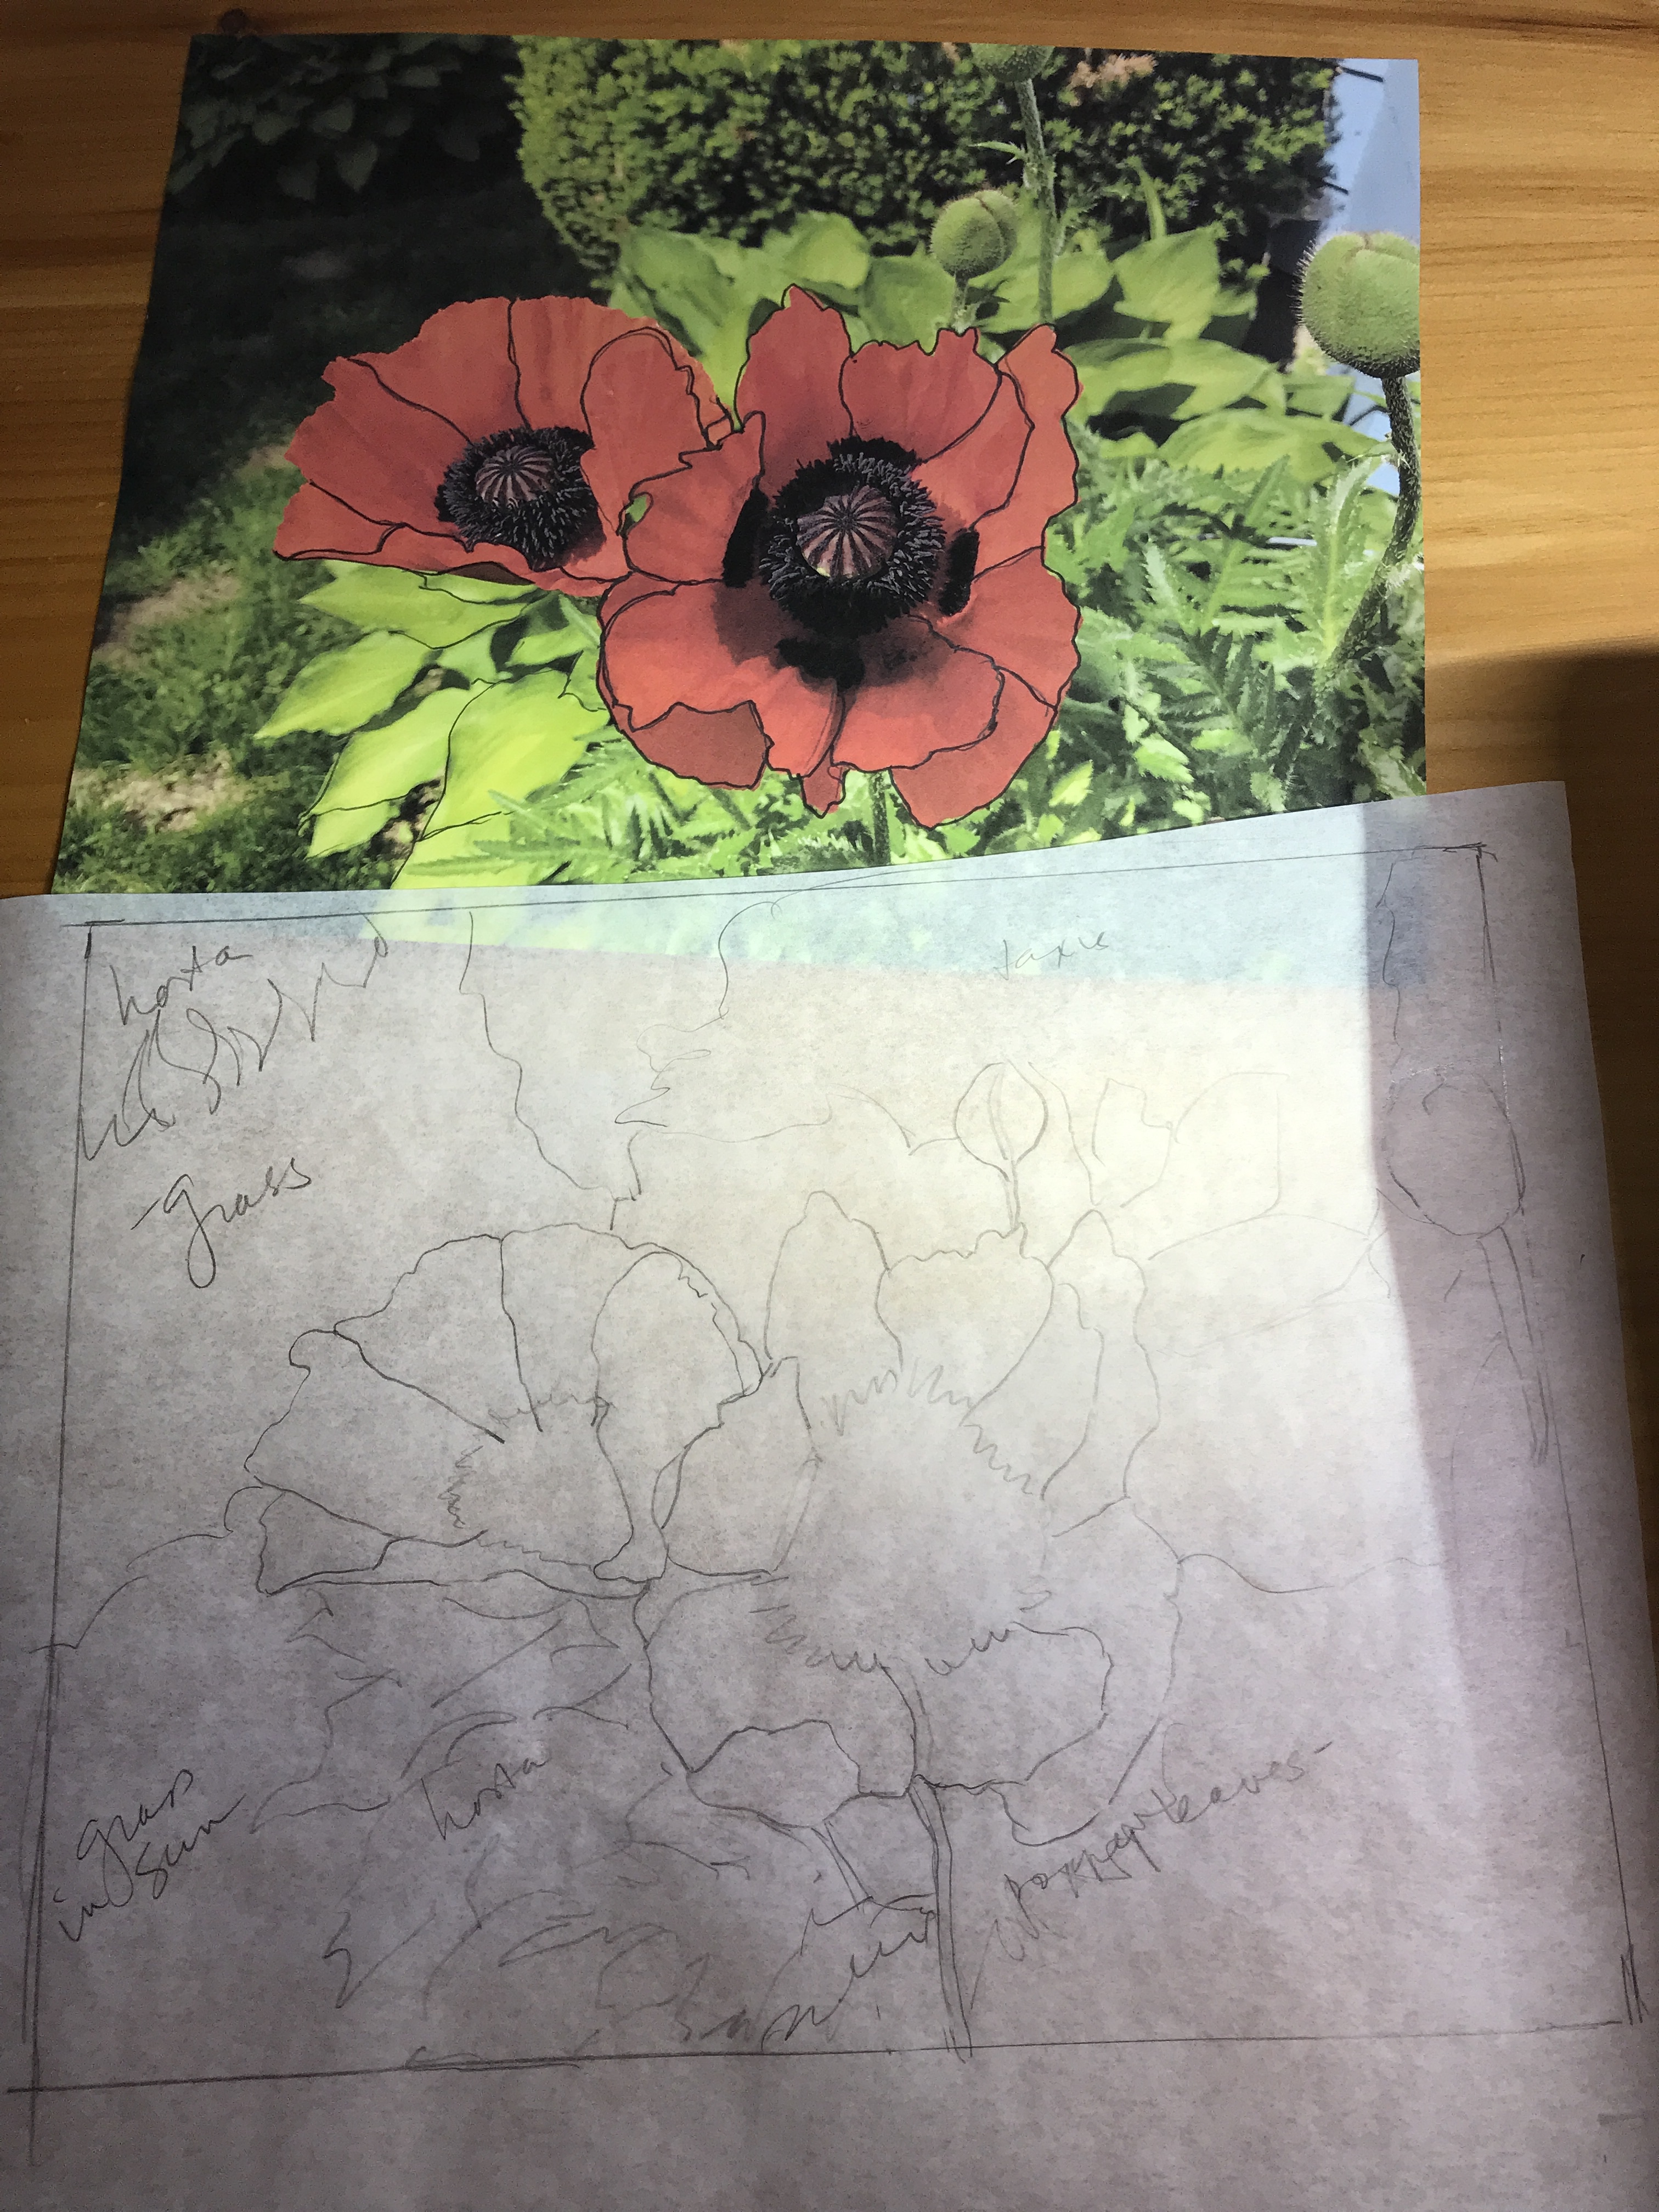
It’s not enough that I’m taking on this project, I’m also working on a second. I took photos of some poppies in Marlene’s front garden this summer and these two oriental poppies are striking. I started by outlining the petals so I could do a tracing which I’ll use for cutting out red fabrics. They’re growing beside a light green hosta, with a taxus shrub behind and a darker hosta in the top left corner.

Oriental Poppies

Tomorrow I will start looking for fabrics I can use to construct both these images. Generally I work on one piece at a time. For some reason both have been insistent I begin work on each of them.

Double Convergence – Completed

Just Finished. Today I completed quilting the remaining wide border, created an embroidered label, attached a narrow hidden binding to the quilt edge and hand stitched it into place.

Double Convergence – Quilt Top

The quilt is relatively small – 45″ square – which means it could actually be a wall hanging or a smallish lap quilt/throw. I decided to finish with a hidden binding because I didn’t want to complicate the quilt top any further. The wide border mirrored the double convergence and that felt like it was enough.

Double Convergence – Quilt Back

I used the fabric from the back for the hidden biding – stitched it on the front using a 1/4″ seam, then folded the 1 1/4″ strip under leaving me with a 1/2″ binding. You don’t really see the invisible binding unless you’re up close and looking carefully.

A bit of explanation about the quilt back – I needed a narrowish insert to accommodate the quilt width. I had a small amount of ombre fabric left and decided a strip of ombre as it was worked perfectly – no piecing, except to extend the length of the strip. There’s enough interest in the fabric itself that it accents well.

That’s quilt #7 since the end of August – I’m planning one more for the Parrsboro show this coming summer. Now to turn to wall art pieces – I have lots of ideas, I just have to begin creating!


text

My 5 Essential Quilting Tools

I’ve been trying to track down another seam ripper clipper to have at my embroidery machine and they’re hard as hen’s teeth to locate and get to Halifax. I bought my original online at Nancy’s Notions in Wisconsin – the tool isn’t expensive but the cost of getting one here is prohibitive! It got me thinking about what are my essential quilting tools.

Essential Quilting Tools

Here they are:

  • a seam ripper clipper – it has a small but sturdy/strong point that easily slips under a 2.5mm stitch and fits nicely in my hand. Insert it under a stitch and when you continue pushing, it cuts the stitch on the sharpened interior edge below the point. I needed it yesterday when I had to take out 1000+ quilting stitches to redo the quilting. It’s a must have tool – way better than a conventional seam ripper because there’s less likelihood of cutting the fabric
  • self threading needle – I like to leave tails when I start and end embroideries/quilting which I then embed in the sandwich. A self threading needle with an open back end is easy to thread – place it in the fabric, push the threads into the open eye, pull thread through and trim
  • very sharp small scissors – useful for lots of tasks including trimming threads close to the fabric; definitely essential when I’m doing appliqué work
  • fine pointed 3.5″ tweezers – I can’t manage without these – they’re perfect for grabbing the pulled up bobbin thread when I’m starting a seam – I always have a pair right at hand at each of my machines. Perfect for pulling out loose threads when I’ve taken out a quilted seam.
  • Frixion heat erase pens – I just finished the internal panel of the double convergence quilt I’m currently working on. I was doing an edge-to-edge quilting with three different embroideries adjusted to fit the quilt – I had to do a lot of marking to position the starts and ends of the embroideries/quilting elements. Press the panel and the markings disappear (I’m guessing they would reappear were I to take the quilt out into below zero weather or put it in the freezer….)

These are my five essential quilting/sewing tools; can’t function without them. I highly recommend having one of each at each machine in your sewing space.

Double Convergence Quilt Top

I’ve spent days looking at the double convergence panel not knowing how to finish it. I finally decided to add a narrow dark border, then complete the outer border using the four fabrics I used to construct the convergence.

I thought about a second narrow border bringing in another contrasting colour but I couldn’t find anything in my stash (and my stash is large) that felt right – red? pink? green? yellow? I had a grey batik with small yellow circles, that was as close as I could get to something that possibly worked. In the end I elected to stick with just the four fabrics.

Double Convergence Quilt Top With Borders

To construct the outer border, I was limited by the amount of grey and turquoise fabric I had left. I was able to find some of the ombre online and ordered a yard (at great expense!) so I had options with constructing the ombre corners but I had barely enough grey and turquoise left to make a 6″ border.

I thought about adding a bit of dark fabric where two fabrics met, but when I photographed the layout I didn’t like how that broke up the unity of the border.

Top Layout With Joins Marked

I also thought about using a mitre to make the joins but I didn’t have enough fabric to make that work.

Looking at the finished panel I’ve decided to finish the quilt with a hidden binding – I have no more grey batik or turquoise and I think using the ombre for a traditional quilt binding will just add unnecessary detail.

When completed the quilt will be a rather small throw/lap quilt or a largish wall hanging – it’s ended up an awkward size, but I can’t see any way of extending the “length” that wouldn’t mess up the symmetry, so this is it.

Tropical Flowers III

Yesterday I finished a second leaf. For the moment I’ve left the medium teal unstitched and I think I like how it looks. I’ve covered the grey with the light teal thread and the dark areas are stitched but I like the texture leaving the medium coloured area as is, for now, at least.

Second Leaf

Next I will tackle the red/pink anthuriums – they will actually be a bit easier to work on because the colour moves in a way that will make the stitching flow. Probably not today, though. This morning I went back to the double convergence quilt top.

Tropical Flowers II

One leaf done – a second underway and weeks of work left to do.

One Leaf Done; Weeks Of Work To Do

The question is why bother? Why didn’t I just fussy cut the flowers, fuse and edge-stitch them in place and leave it at that? Good question. The thread painting, in spite of the large amount of work involved, adds interesting texture and dimension to the fabric turning it into a piece of wall art. I probably should have thought more about the size of the piece before I began, choosing fewer elements, but this panel does make an interesting art object. So I committed myself to the work. In addition, the fabric raw edges are inclined to fray because the bark cloth is loosely woven – thread painting lets me densely edge stitch creating a sharper outline for the flowers and leaves.

Tropical Flowers – Bark Cloth

I started with printed bark cloth given me by a friend – 4 one metre pieces with different coloured backgrounds. I chose the blue to work with here but you can see from the black piece just how clearly printed the flowers are. The fabric provides a lovely foundation for doing thread painting.

Tropical Flowers – A Selection

The first step is to choose a few flowers/leaves and cut them out. Next I apply a fusible web to the back of the fabric, pressing the whole thing flat, then fussy cutting before removing the paper backing from the fused web – the paper makes cutting out much sharper. Once the flowers are fused to a background fabric, thread painting can begin.

So that’s where I am in the process. It will take many hours to fill in the colour gradation of the leaves and flowers – I’m working to eliminate the grey using light values of the adjacent colours so “grey” won’t mean grey when I’ve done thread painting – there will be pale green, or pale teal, or pale pink where grey currently is found.

The flowers/leaves on the black backed fabric don’t have grey, instead the fabric has appropriate light shades for each element, making the decision-making process somewhat easier. But now, back to the teal leaf which I began yesterday….

Possibilities #7

Finally finished this convergence quilt yesterday. Got the binding done and label sewn on. Two sets of mistakes that went together – totally unexpected and unplanned. It definitely worked out quite well.

Finished Quilt Top

I’m happy I took out the narrow vertical turquoise stripe – it disrupted the left-right movement of the convergence flow. Replacing it with the narrow turquoise border was a good decision. I didn’t have enough grey crackle fabric to complete the binding so I incorporated a turquoise piece I trimmed from the backing after I’d finished quilting. I ran out of binding as I was coming to the join and inserted another small piece of turquoise to complete it. I like where that insert landed.

Fiished Quilt Back

To create the quilt back I set up a “jellyroll race” using leftover bits of fabric from the top, with a narrow strip inserted and two unequal sashing strips. Using the turquoise for the backing sets up an interesting flow from top of quilt to the back. There’s enough turquoise in the top that when you flip the quilt over you retain the connection between top and bottom.

The ombre fabric I ordered online arrived Friday so I will now work on completing the double conversion quilt featuring the ombre fabric.

But before I can get to that, I’m have to work on the thread painting wall hanging.

Detail – Thread Painting Floral Wall Art

I started the thread painting last Tuesday as part of a class I’m teaching (I stitched the dark green parts of this and another leaf although you can’t really see what I’ve done in the photo). We meet again coming Tuesday and I have made no progress on the stitching work. Nevertheless I need to move on to framing the piece so I’ve trimmed it, I’m in the process of adding a bit more batting to the edges to allow enough background to balance the floral arrangement and provide support for the borders. Then I have to set up the marking (using Friction heat erasable pens) so I can apply the borders – have to get that process well underway before Tuesday – not completed, but started so I can demonstrate how I add borders. The framing of the piece won’t hinder the massive amount of thread painting I will still have to do.

Possibilities #5

Yesterday I removed the turquoise vertical strip and resembled the quilt top panel – much happier with the flow across the two sets of strips – they’re not interrupted with that contrasting element that really didn’t work well.

Hodgepodge with turquoise vertical stripe removed, sashing and borders added

The colour was right, though, and I used the turquoise fabric to sash the panel – the narrow contrasting sashing provides closure to the panel and brightens it.

The border – that was a challenge – I had several grey fabrics in my stash – I tried all of them. At one point I thought one of the taupier ones would look OK (I used two different Grunge taupe fabrics in the brightly coloured strips) but in the end I used wide strips from the grey Crackle (Moda) I’ve had in the stash for a while (I thought the fabric pattern was long out of stock but I just found more in a wide range of colours online so I bought two yards to replace the piece I’ve used).

Now on to a backing panel with a wide strip of some kind. How I choose to quilt this will also make a difference to how the final quilt will look – quilting design, thread colour should help tie the elements together as well.

Possibilities #4

Today, I looked at the two sets of discarded strips and decided they could go together and kind of work. The miscut ombre strips needed lengthening to match the pieced strips – I used my last bit of ombre (from the dark brown end) to extend them. I sewed the two sets of strips together this afternoon. The width proportions were the same so I put them together  wide/narrow, wide/narrow until they were assembled.

Hodgepodge

I don’t like the turquoise strip in there, however – I might actually take it out because it interrupts the flow of the strips in both directions. I’ve ended up with a panel 36″ x 43″ – reasonable proportion for a throw/lap quilt with narrow sashing and wide borders added.

Tomorrow I will take out the turquoise strip, then see what I can do about a narrow sashing and a wide border to get me to around 48″-50″ in width, 56″-58″ in length.

And here I am quilting when I intended to be making pants – the corduroy is sitting on the dresser waiting for me to get to it; the pattern is there, too. I wanted to get both pair done by the end of the holidays – nope! It’s quilts instead. Gotta follow the inspiration.

Oh, and I never work on more than a single project at a time, and here I am deeply engrossed in two.

Possibilities #3

This morning I constructed a new black ombre/batik panel (from the fabric I had left over yesterday) and then assembled the convergence. Yesterday when I cut the two parts into strips at the same time, my strips were exactly the same width. But cutting the second panel today meant there were slight variations in the pieced strips so assembling the large panel proved finicky because many of the joins did not align precisely…. I had to make lots of small adjustments.

Convergence Panel Assembled

However, now I’ve got the balance the way I want it with the two darker elements of the ombre opposing one another as are the two contrast fabrics.

The question is where do I go from here. I need a narrow sashing of some kind but I’m not sure what it should be. Also I have no more ombre (I’ve ordered 2m online but it probably won’t arrive for a couple of weeks) to set up wide outside borders to make a decent size throw quilt. Right now the panel is ~36″ x 36″ – I want to end up closer to 60″. That means more piecing of some kind – at the moment I have no idea where to go from here. Next question is whether there is a way to end up with a throw that’s longer than wide – that means doing something asymmetrical with sashing and borders.

The surprise with this piecing is while the ombre shading comes through due to the wider elements constructed from the darker ends of the fabric, it’s actually a rather weak colour flow. The turquoise livens up the panel but now the question is whether I should introduce more fabrics to build around this panel or wait till the ombre fabric arrives and see what I can do with that. Lots of possibilities….