Amazing World Map


My sister sent me a link to this image yesterday with the note “Imagine quilts like this!”

Rachel Evans

Rachel Evans makes colorful world maps out of Spirograph-produced patterns.

Can you just imagine a quilt map done with large pattern fabric?

I’ve pinned the image on my Pinterest board along with many other ideas. I’ll probably never do a quilt like this but it’s fun to think about trying one.

Intersections II

In case you think I haven’t been working at the sewing machine, I have been. I’ve got the top for the Intersections Quilt pieced and sewn. (Remember the original post about the quilt?)

DSCF2571

I have the back pieced and the “quilt sandwich” (top, batting, back) is assembled and the layers are pin-basted. I’m hoping this week to begin quilting them together.

Intersections

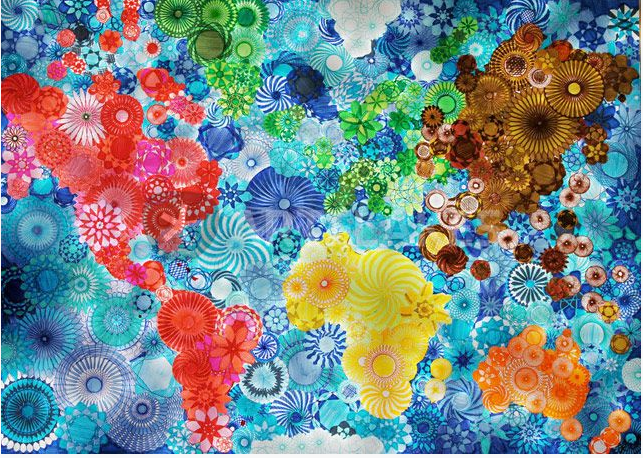
Thinking about starting a new quilt so I went through my scrapbook of quilts I might like to make and decided Intersections by Cheryl Malkowski (Hoffman Timeless Treasures – free pattern) would work well with the green scrap bag I purchased from Keepsake Quilting some time ago. Here’s the picture of her finished quilt:

Intersections

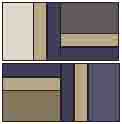
It’s constructed as an 8 x 10 block quilt – with a finished quilt size of 68″ X 85″ – too big for me to handle. I’d like a finished size of no more than 48″ x 64″. The basic block is this:

block1

They get assembled in groups of 4 to form a pinwheel at the center

block2

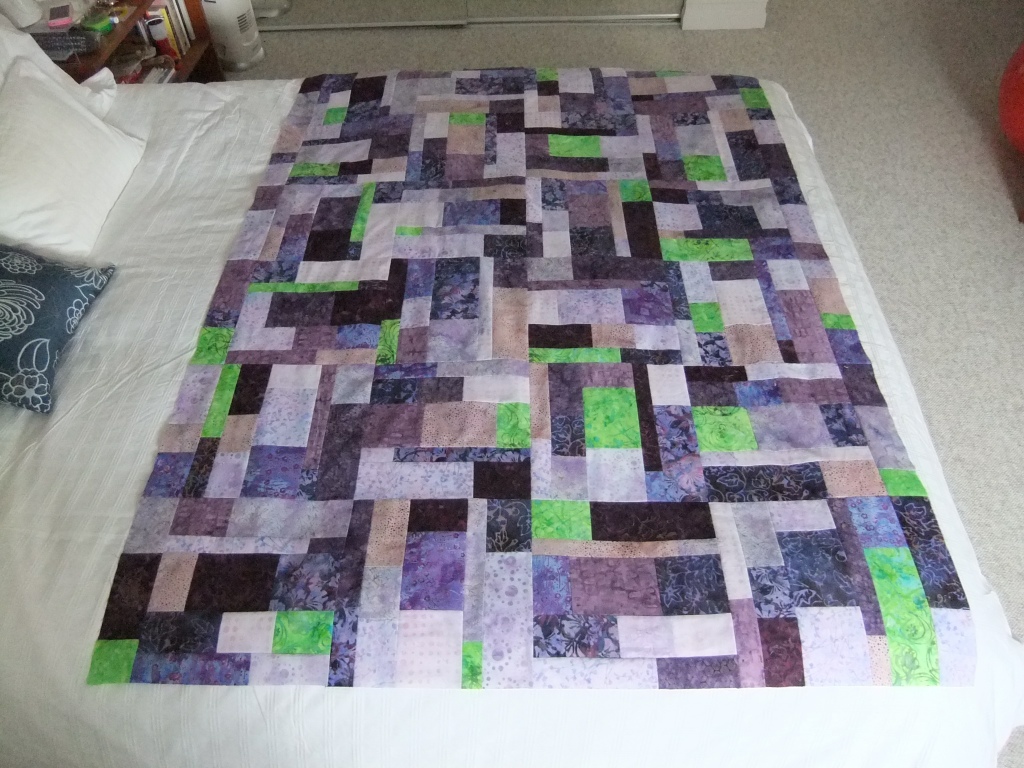
I have 12 fabrics to work with (9″ x 44″) – I need a quilt constructed from 6 x 8 blocks – to give me complete pinwheels – so how large does each block have to be to fit within my dimensions?

Turns out 7″ finished blocks will work – so I need to cut from each fabric:

  • 4 blocks – 4″ x 7 1/2″
  • 8 blocks – 2 1/4″ x 7 1/2″

I did a sample to see how it would work (these are scrap fabrics not fabrics from the set of greens):

IMG_2122

This let me know my dimensions will work – BUT – I will have to more meticulous in my piecing because the finished block should be a 14 1/2″ square – and this one isn’t quite!

The assembled blocks will be 42″ x 56″ – which will allow me to add a 2 3/4″ border around the outside to make the final dimensions: 48″ x 62″. A good lap quilt size.

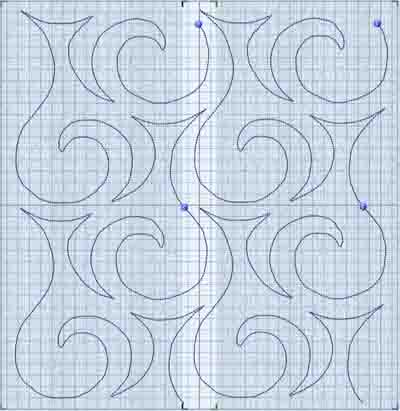
I also played around with some ideas for quilting the finished quilt – I think I may go with this one for each block:

quilting

This will give me an overall design for each of the finished 14″ x 14″ blocks which I will be able to do in my grand dream hoop. I don’t have a longarm quilter, I quilt in the hoop of my embroidery machine.

[Interested in the Mathematics of this quilt? Click here for the description embellished with the math involved!]

Kaffe Fassett Quilt 3

FINALLY! I finished the quilt I began before I went to Portland. I have been working on quilting the quilt for the past week or so; I still had ten blocks left to quilt and got them all done this morning. I then added the binding and label. Finally that quilt is done – I’m ready to move on to a new idea.

IMG_2098 IMG_2099

It’s a two sided quilt – I hesitate to call one the front and the other back – although I did consider the blocks the “front” when I was constructing the quilt. However, I like the second side equally well – I was pleased with how the bright strips sashed with the royal blue tones down the very strong green fabric. The embroidery I created to quilt in the hoop had four elements – one down the sash on the left of the block, the small square, along the bottom sashing, then finally the large square. That left some sashing/small blocks to be embroidered along the outer edge and top – but those elements went quickly.

It Arrived – Benartex Fossil Fern Fabric

20130604-172019.jpg
The box of fabrics arrived this morning – 90 fat quarters in all the colors of the rainbow. They’ll be fun to work with, combining them with other fabrics I have in the stash. The collection, made by Benartex, is called “Fossil Fern”. While the fabrics are in a “family” there is quite a lot of variation in the batik pattern.

Purple Quilt Finished

20130523-000315.jpg
Finished the purple/mauve “low-volume tiles” quilt yesterday. I was pleased with how the whole concept worked – the color family with a single contrast color. The quilting works well, too.

20130523-000718.jpg
The back of the quilt – just a simple strip to extend the width of the backing fabric.

Magic Squares Quilt #3

I had a “scrap bag” from Keepsake Quilting with twelve 9″ (width-of-fabric) cuts of fabric in coordinated colours. 9″ yields 4 strips @ 2 1/4″ (rather than the usual 2 1/2″) – enough to make a 44 X 62 quilt.

Image
With each Magic Squares quilt I can see new possibilities – I can see at least two more ways of combining the blocks. In this version, I put together pieces from two “magic” squares so that I had the alternating light and dark center squares. The border was assembled from left over pieces from the panels made from 4 strips sewn together to make the blocks for the “magic” square. the back used the extra blocks.
Image
This time I took extra care to align the seams so that the points were accurate. The seams came out pretty well – helped by the fact that all the seam edges are bias so I could nudge the matching a wee bit, then press using Best Press to flatten out the blocks.
Image
This project isn’t as easy as it looks – the piecing is straightforward, but because you sew once, cut blocks, sew two blocks together, cut along the diagonals (which creates a bias edge), sew the larger blocks from 4 “corner” blocks – the amount of cutting, sewing makes it unlikely that everything will align perfectly – so you have to take care with the seaming and cutting.

Half Log Cabin Quilt

20130509-165814.jpg

This quilt started with a photo of a Kaffe Fassett quilt, done in shades of red/pink/yellows… I came across the bulrushes fabric in my local fabric shop, was taken by the peach shades in the fabric, bought a couple of coordinating fabrics then came home and raided my stash-ending up with 14 fabrics that worked well with the bulrushes. Cutting the pieces took a bit of time, stitching the blocks went faster than I expected. I played around with a couple of different block arrangements and decided to use the one that created diagonals from the square element of the block.

20130509-170625.jpg
This is the back of the quilt.

Purple Modern Quilt

20130509-082239.jpg

I enrolled in a Craftsy class on Modern Quilts by Elizabeth Hartman. This idea was for a quilt made using a block structure but to have that structure not be obvious. Her quilt was done in greys with a yellow accent. I had this collection of quarter yard purple fabrics. I added the sharp bright green as a contrast. I made it lap size which required double the number of blocks (24) and I added a narrow border to each side to widen the quilt just a bit. However my modifications blend in so that you don’t see the border as a separate piece but as a continuation of the whole.