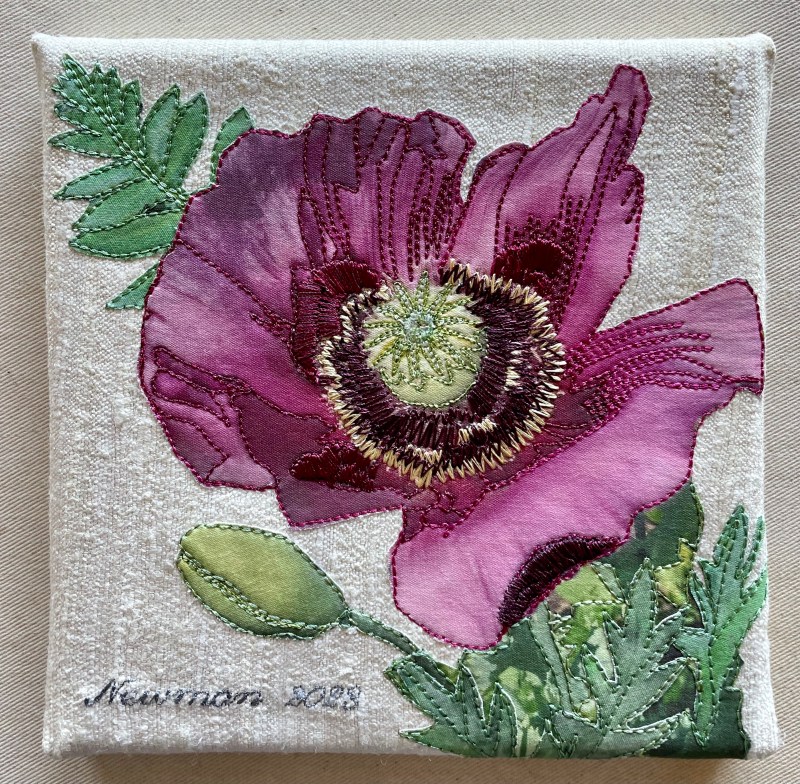
I finished up the panel I was working on yesterday and completed a second today. I’ve got a better handle on how to make the outline flower stand out by how I position the underlying circles and setting the leaves so they appear to be under the flower petals. I also downsized the signature a bit so it’s less prominent. I think this idea is now working.
An Original 6×6 Wall Art PieceSecond Iteration of 6×6
Remember my 6×6 wall art pieces? Brandt Eisner was in touch again a couple of months ago with an invitation to join his summer “Squared Away” Pop-up show mid-July. Again, “the only requirement is the work should be 6″x6″ in total and be hangable on the wall”.
So, OK. I need to come up with another idea. I’m still stuck on floral interpretations.
First Attempt
Ignore the black framing. My idea was to create a machine embroidery in the shape of a free-motion flower outline, which I stitched over an offset fabric circle fused to a raw silk background fabric. I liked the overall placement of the embroidery but the flower centre wasn’t strong enough, and I wanted some leaves, so I free-stitched some then coloured them in with water soluble Inktense coloured pencils. The leaf colour isn’t strong enough, I need to come up with a way of adding appliqué leaves. Also the blue thread on the blue fabric is very dull. I need stronger colour to create a better contrast.
Second Attempt
Definitely more colourful, but the floral print overwhelms the flower outline! Here I tried two overlapping circles, with some leaves I cut from scraps in a box where I store leftovers, but neither are effective. I tried calming the detail in the print fabrics with the Inktense coloured pencils which helped obscure the detail of the fabric but then the flower outline disappears! And I don’t like the leaves.
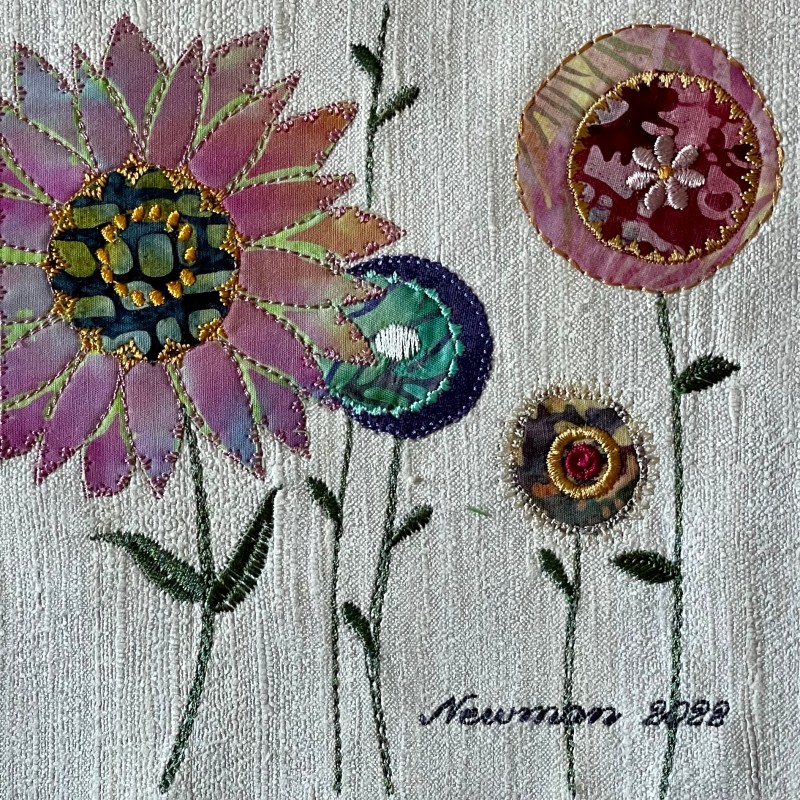
Third Attempt
This version is closer to what I see in my minds-eye. The silk background fabric gives an overall subtle texture to the piece. The dark, small patterned fabric sets up a background, the flower outline is a good contrast and stands out. I used a small fabric circle as background for the embroidered flower centre (using the precise positioning capabilities of my embroidery machine to position the embroidery). I overstitched the flower centre elements to emphasize them. I added some leaf shapes cut from fabric scraps backed with fusible web (glue) although I haven’t yet stitched them, I will do that tomorrow. I also tried out the position of the signature which is a bit too large. I have to scale that back a bit.
I’m getting closer to knowing what I’m doing.
Brandt asked for up to eight pieces of art. I will create eight pieces for the show. I have a month to make them; I expect I’ll have them done in a couple of weeks. Then I can move on to the next project!
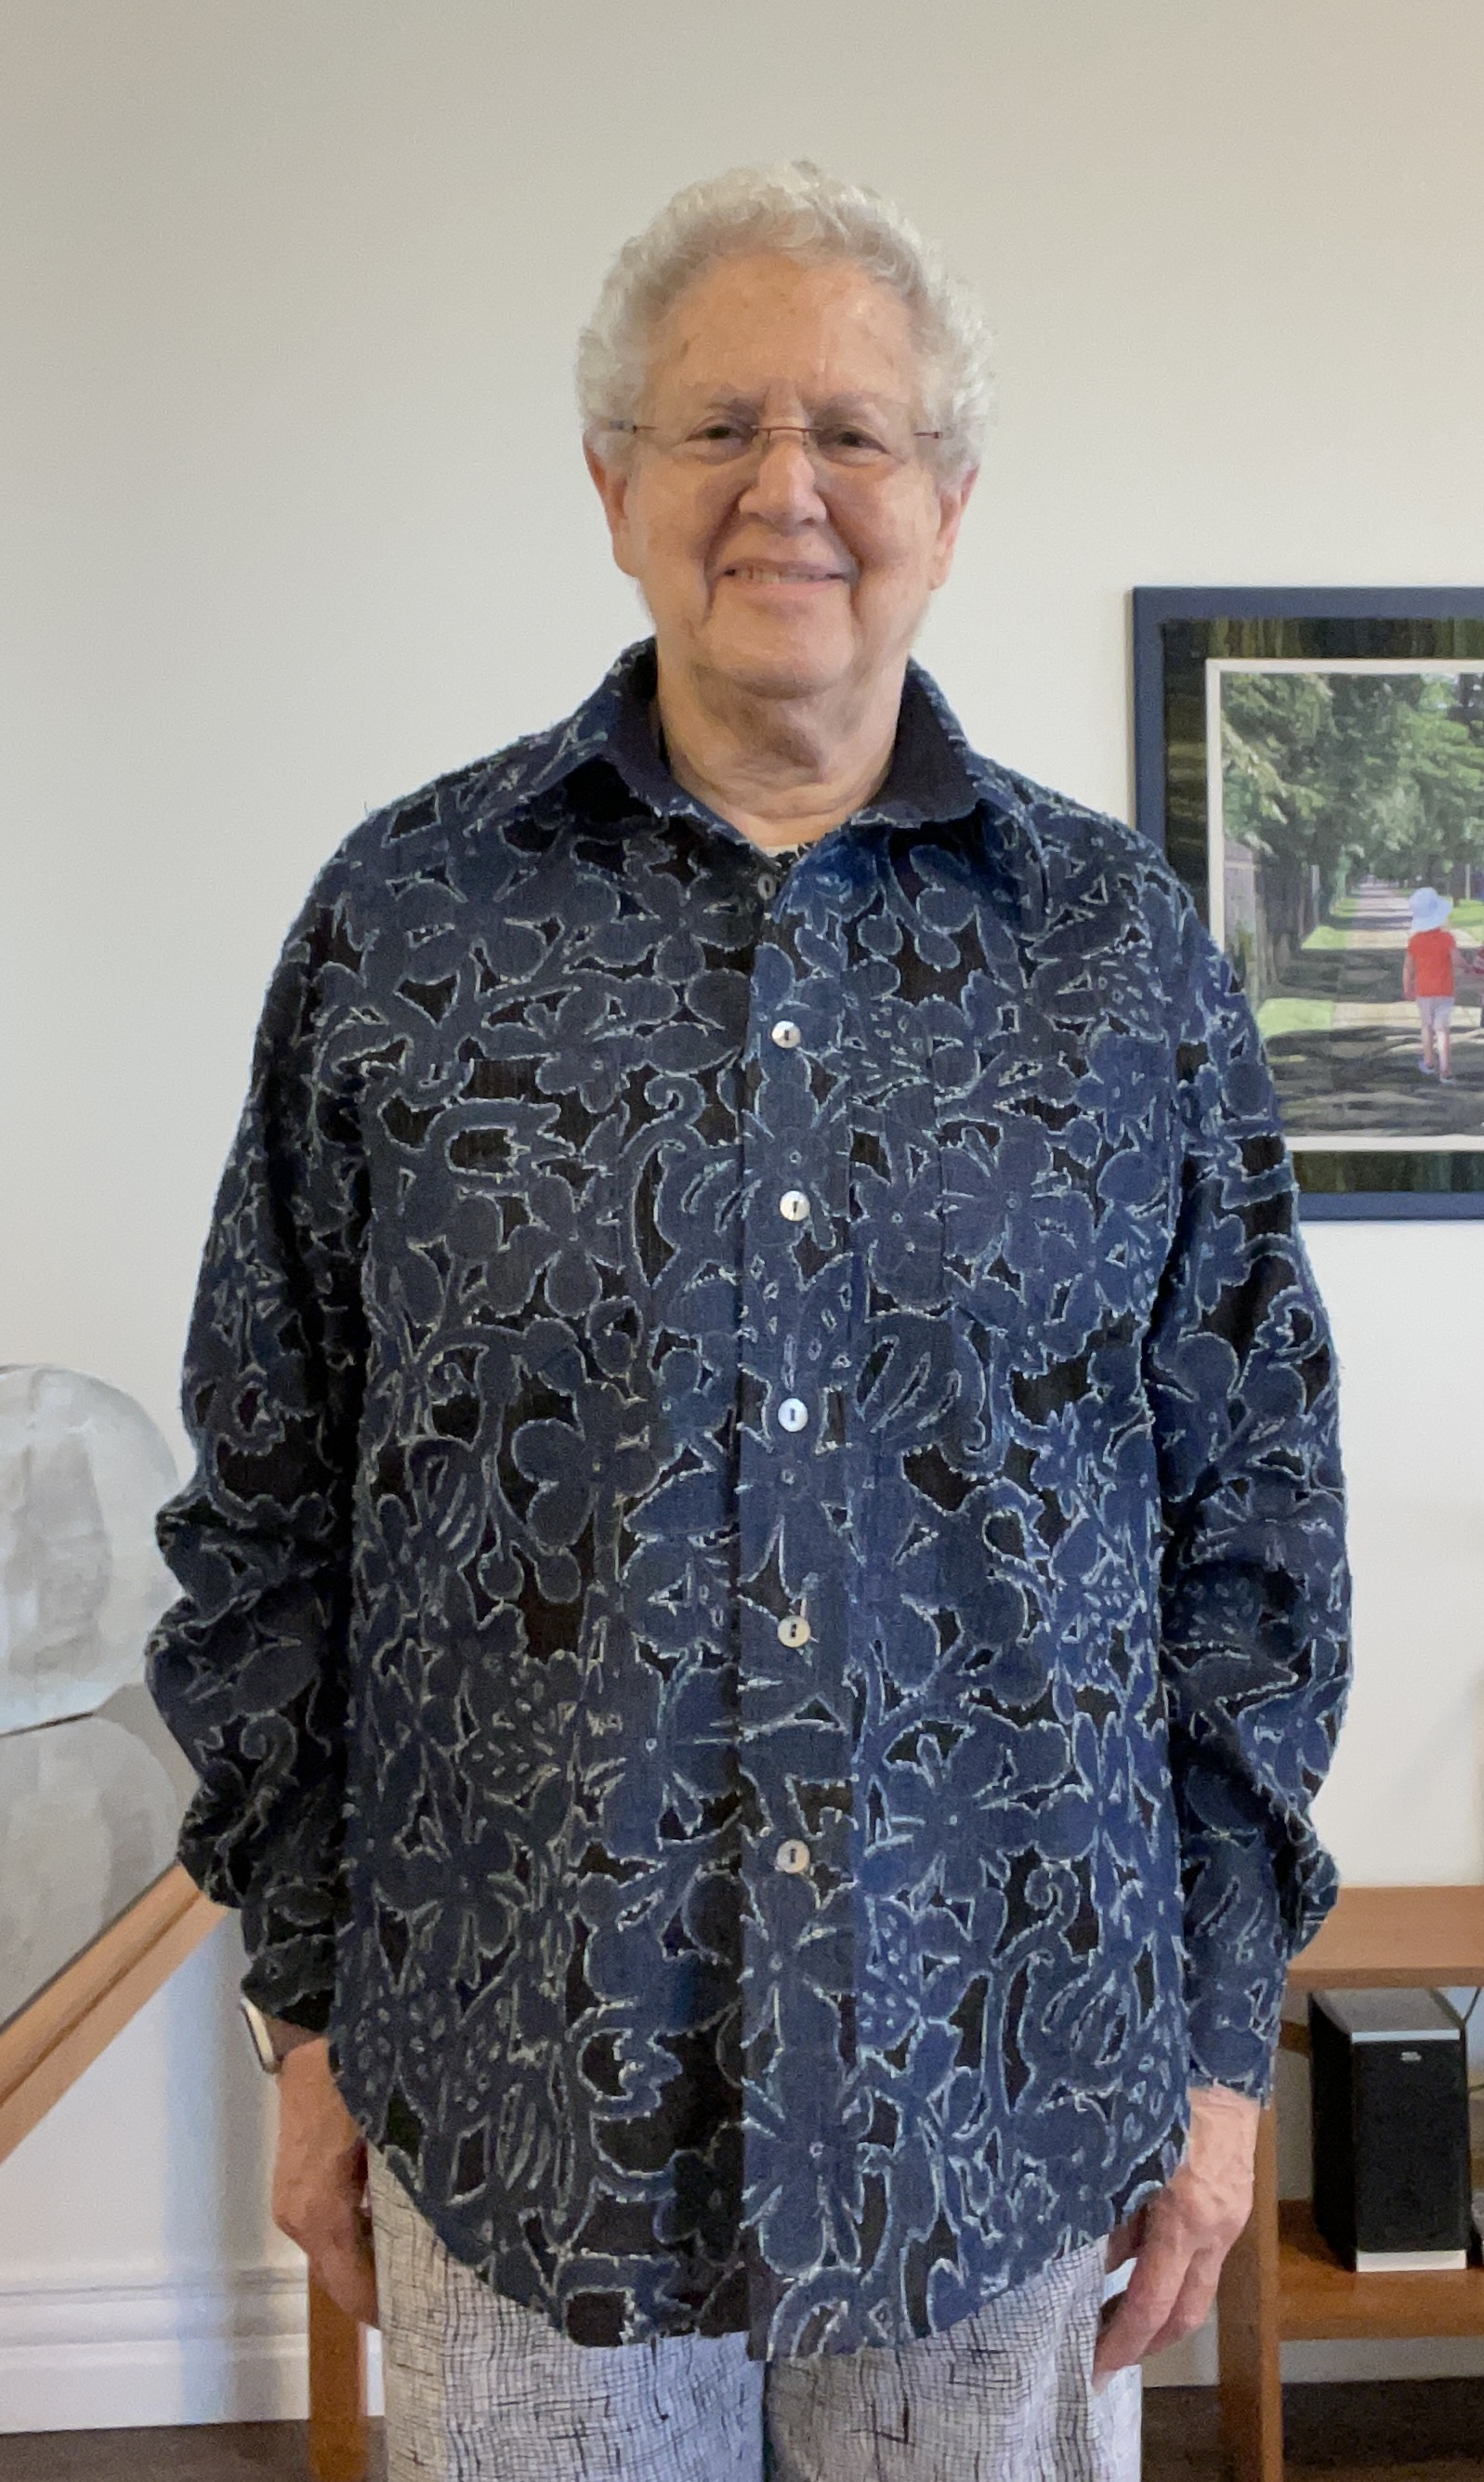
Here’s the finished denim “lace” jacket. Turned out rather well. It will be a useful garment to have in my wardrobe this summer.
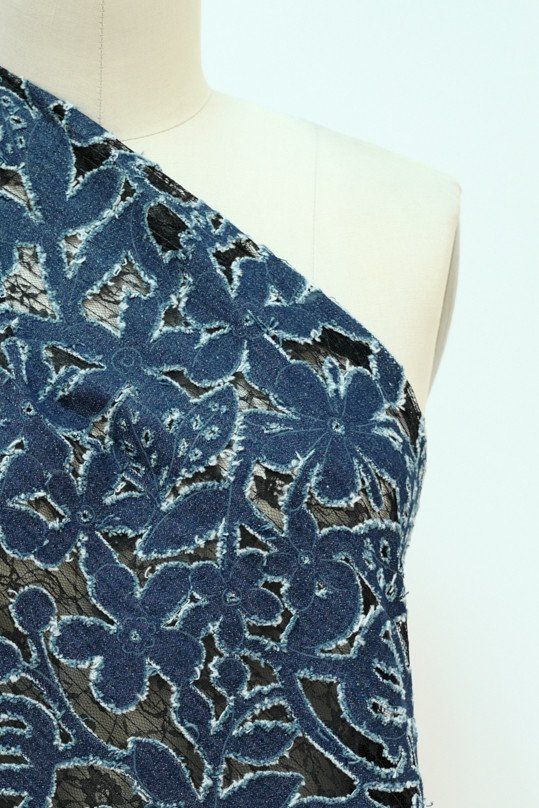
I bought the fabric from Marcie Tilton at least three years ago ( I didn’t keep the receipt – I just remember the fabric was expensive but it had my name on it – BTW I just checked, there is none on the website now, not a surprise). In the photo below you can see the lace backing to stabilize the cutwork in the denim.
I started by backing the fabric with a fusible lightweight polyester interfacing because I wasn’t planning on lining the finished garment and I thought it would be easier to work with. That went more easily than backing the eight metres of silk dupioni when Marni and I were making her wedding dress!
Once the fabric was backed, I cut out the garment. I used a navy silk dupioni (which I had in my stash) for the facings, sleeve plackets, and the inner yoke. The silk gives a stability to the shoulder area that the denim lace didn’t have.
Sewing the shirt together was not simple! The denim lace was made by stamping out a floral pattern from a lightweight cotton denim, then backing it with a polyester lacy fabric to fill in the “holes” and hold the denim in shape. However, when you go to sew the seams the lace backing was stretchy so I had to be very careful not to pull on the edges while stitching. The collar, collar stand, and cuffs were particularly difficult to work with because of the different weights of parts of the denim lace. I did a lot of careful, slow seam ripping as I was sewing the cuffs in order to get the edges to fit precisely.
Assembling the shirt took quite a bit longer than I expected it to, but I’m happy with how it turned out in the end.
I started this garment last weekend. I worked on it during the week; today I added the sleeves (I’d already put the sleeve plackets in using Pam Erny’s 2-piece placket), serged the seams, top stitched them, sewed the sleeve/side seams, serged those seams, serged the bottom edge and stitched up the hem; made buttonholes, and machine sewed the buttons!
Check out the buttons – all different (if small). Just to highlight the many colours in the fabric. The fabric – a raime – has been in my stash for a number of years – I don’t remember when I bought it from Marcy Tilton (lovely fabrics, but expensive).
I lined the yoke, collar, collar stand and cuffs with a teal silk dupioni. It offers a hidden bit of contrast that nobody but a person who sews garments will notice, but I know it’s there.
I always intended making the raime into some kind of shirt. The question was how to position the pattern pieces on the fabric to get the most out of the print. After playing with pattern placement, I decided to cut the shirt using the width as the grainline (the crossgrain). This meant the garment could be symmetrical, more or less. I broke up the symmetry with the pockets and cuffs – largely because I didn’t have another repeat which would let me mirror the print I used for the front. I also positioned the back so the bold elements near the bottom would centre on the back – didn’t look right when off centre.
I still have another Marcy Tilton fabric in the stash – a “denim lace” which just had my name on it. I’ll cut that out soon to make another shirt/jacket. It’ll look very dressy but I intend wearing it with jeans!
Denim Lace
I set up the iPhone tripod so I could take some photos of the shirt. A bit on the big side – more jacket than shirt, but it’ll be fine with a pair of white pants and a t-shirt on a sunny summer day!
I’m conducting a workshop on Saturday with a group of women interested in learning how to do heirloom sewing. In preparation for the day I made a new panel myself (in part because I need a couple of new nightgowns to replace two that are just about to rip apart from long wear).
I started the panel with a lace insert, added pintucks to each side, followed by a row of decorative stitching, then tucks, some hemstitching, more decorative stitching, finishing with a final row of hemstitching. I added an entredeux to the bottom where the skirt of the nightgown will be attached.
This panel is ready to be made into a nightgown.
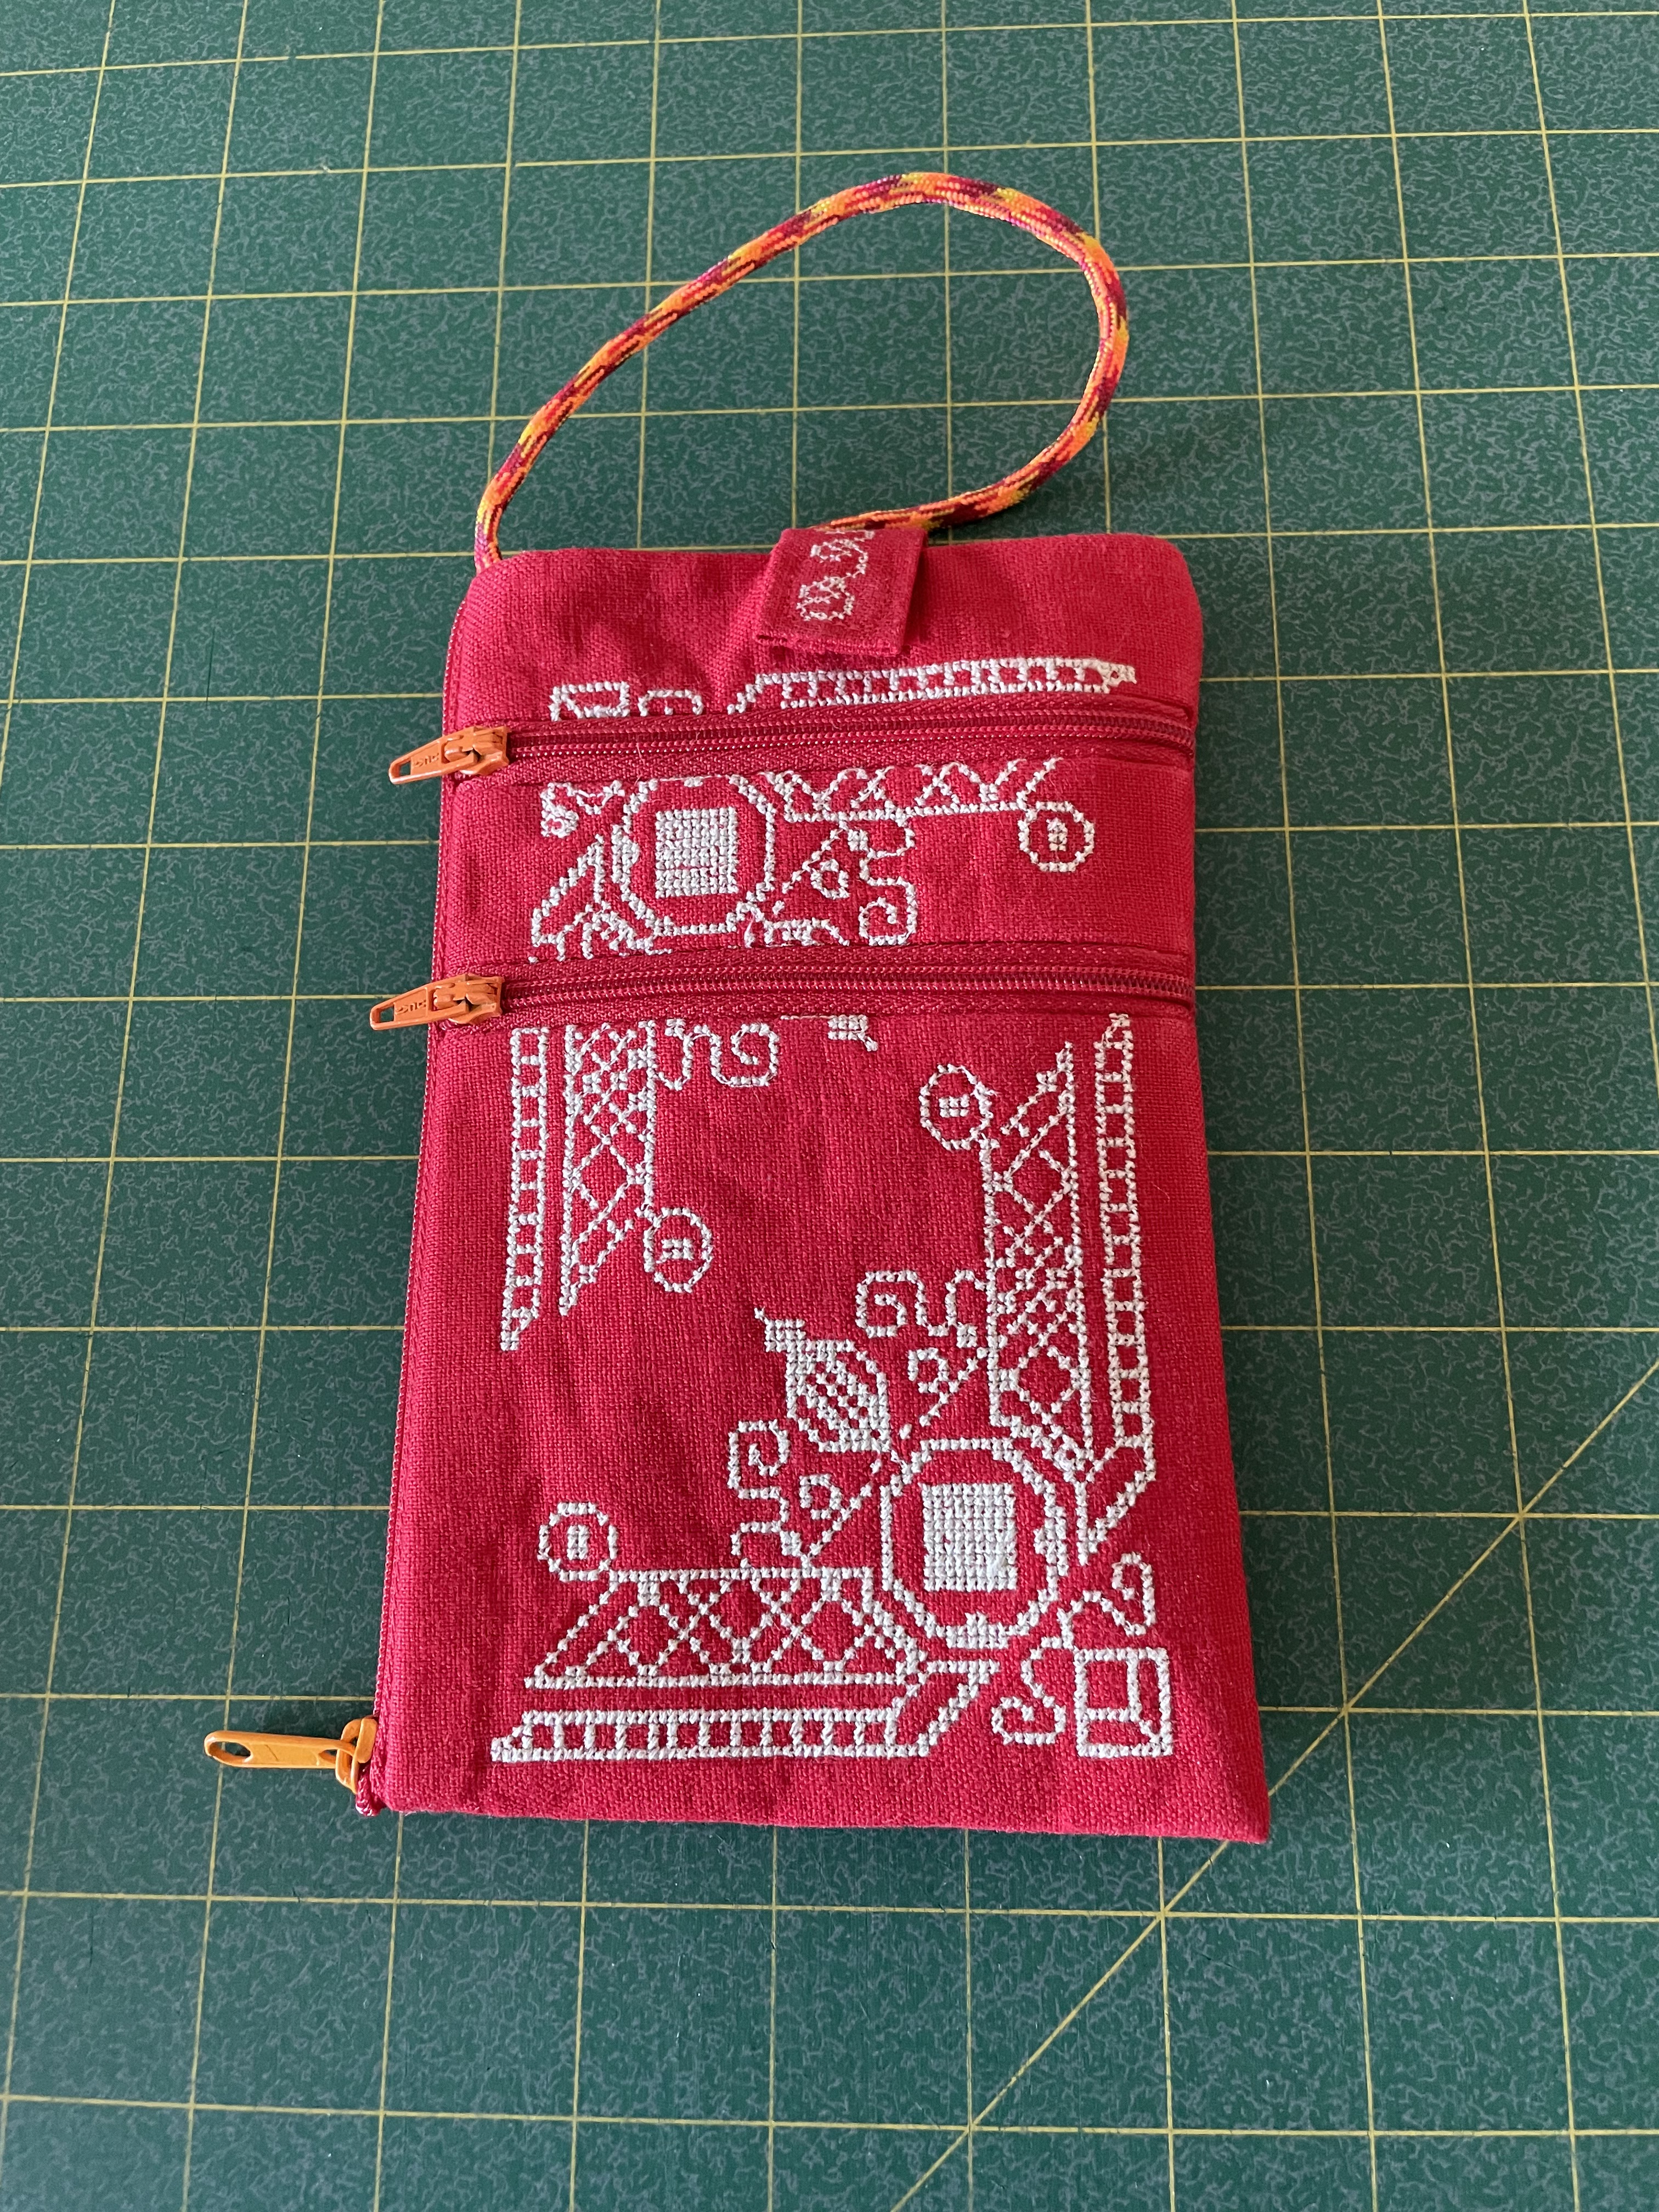
A couple of weeks ago, in preparation for a workshop on constructing a small bag with lots of zippers, I made this embroidered iPhone Case. I used a scrap of linen I had on hand, did a cross stitch embroidery in a contrasting thread, then made the bag. I chose zipper tape that blended with the fabric colour, but added contrasting zipper pulls. Because I have made so many, I can whip up a zippered bag in under a half hour!
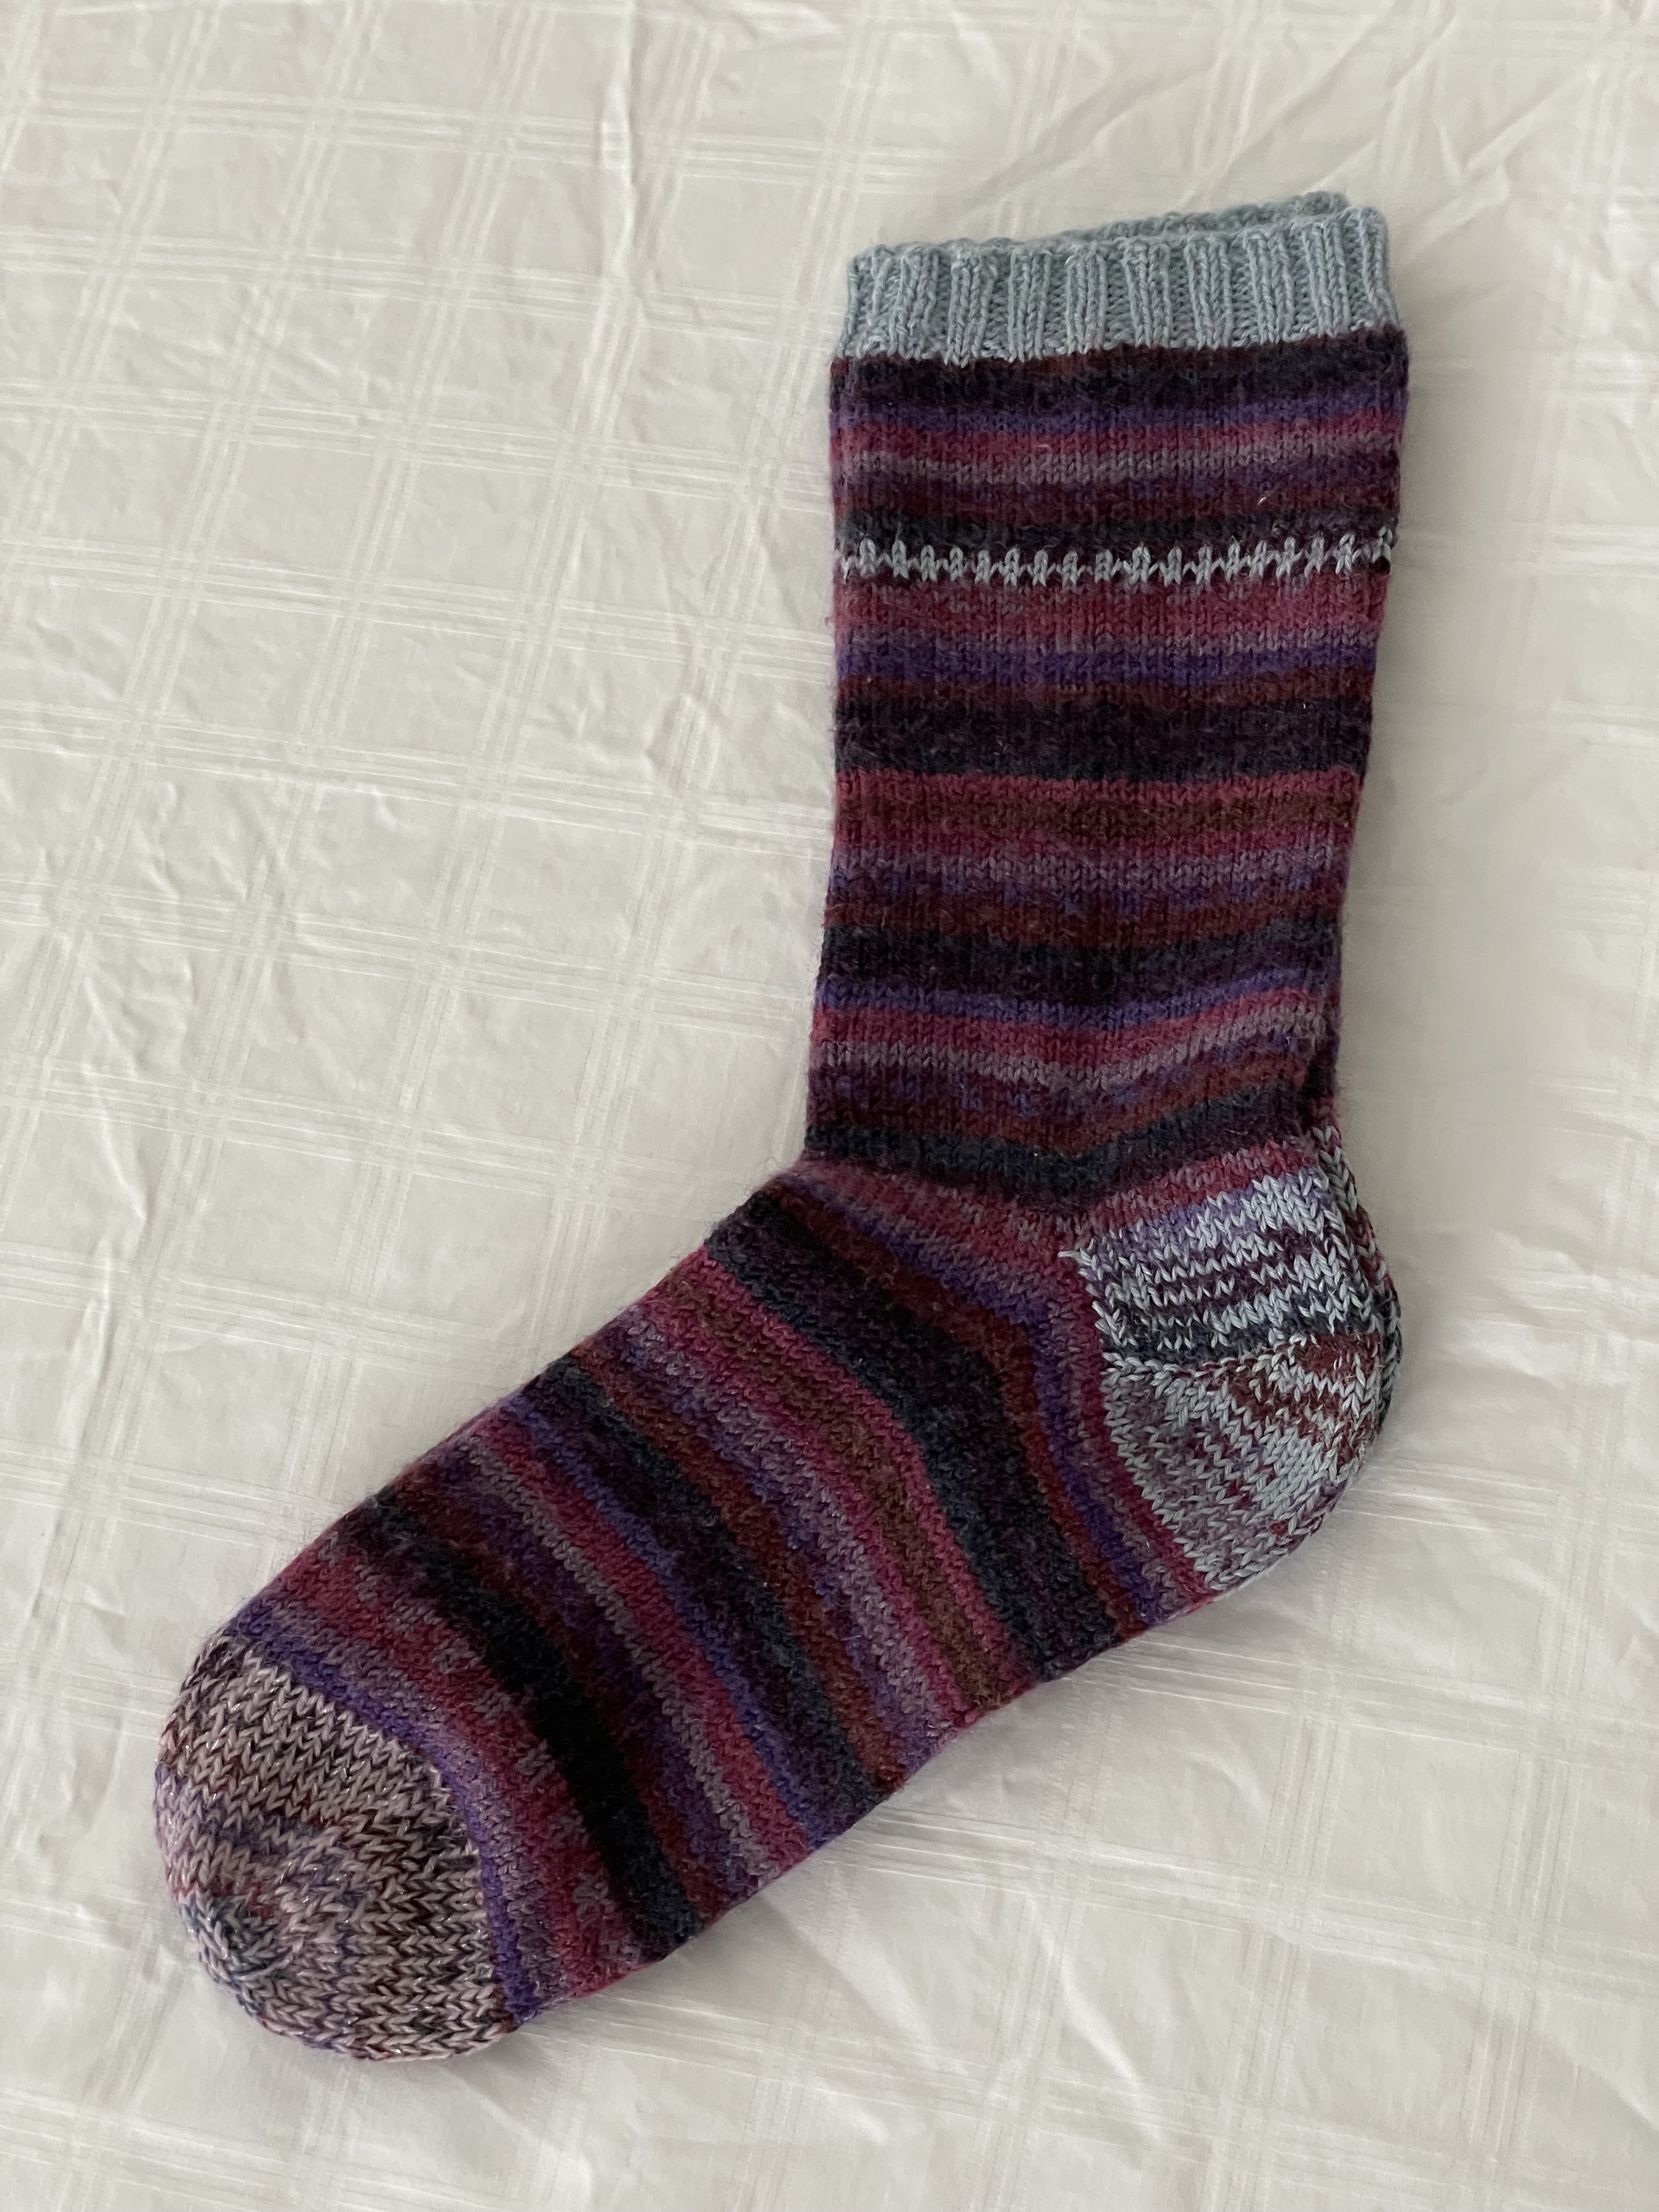
Also, I always have a pair of socks on the go. This pair took at least a week longer than usual because other things kept getting in the way of my knitting time. They are now done.
And last, I had two pair of socks with holes in the toes – first time in 25 years – since I started knitting socks!
New Toes!
It takes me an evening to knit a new toe. These socks are repaired – like new – and back in my sock drawer. I’m working on the second pair – they needed more radical attention – both toes and heels were seriously weakened – I decided to salvage the legs and knit new feet. The first of that pair is getting close to finished.
So Saturday I will be helping the gals with their heirloom sewing. On Sunday I hope to cut out a tailored shirt from a very wild linen print I’ve had in the stash – my intention is to wear it as a light summer jacket.
I’ve been remiss about keeping up with what I’ve been working on; I’ve been busy, nevertheless.
A younger friend is getting married on June 8. She needed a wedding gown. She tried shopping for one but wasn’t enthusiastic about what was available. I suggested she make one.
I sent her a photo of the wedding gown worn by Meghan Markle – stunning in its simplicity. Completely plain, a silk organza over a woven silk, princess fitted dress with sleeves and a clean neckline; no lace.
Same thing – clean lines, nice neckline, sleeves, and pleated skirt (which falls gracefully like a princess cut). Then I went to an online fabric store in India specializing in silk – FabricsandTrims. I’ve bought fabric from them before so I knew what we would be getting. I was suggesting an off white silk dupioni which would have a bit of sheen but also some texture and would drape nicely.
Marni a quilter; hasn’t done much garment making, but if I would help her, she was willing to take the risk. So she bought the pattern, we ordered the silk and the interfacing. She picked up thread, and an invisible zipper. We were set to go.
We traced the pattern, made a few small adjustments. Then we worked on a wearable muslin – potentially a light-weight summer dress. As we worked our way through the muslin, which went quickly with each of us sewing different parts of the garment, I made adjustments to the dress which I transferred to the traced pattern. It took us as I recall three sewing sessions to make the muslin which is definitely wearable!
Now for the silk. We’d already applied the interfacing to five of the eight metres of silk so that was ready to be cut. Our challenge was this – the skirt at the bottom was 51″ wide, our fabric was 42″! So I had to make both the front and back skirt in sections. I chose to embed the seam I created on the inside of the side pleat so it would be more or less hidden. We made a mock-up of the skirt using black quilting cotton to check the position of the seam – it was fine. Finally we cut out the dress (which took just 4 1/2m of fabric – better to have too much than not enough!).
Trusting that the adjustments I’d made to the pattern were accurate, and with both of us sewing, we began constructing the dress. First the bodice, next the bodice lining. Marni serged all the remaining edge seams on the sleeves and skirt to keep them from fraying. We added the band to the front and back of the bodice (and bodice lining), and sewed the neckline seam. Next we attached the sleeves. Now we assembled and added the front and back skirt panels. Here’s when the invisible zipper was installed and the back seam finished. Last we stitched the underarm and side seams. In two sewing sessions we had a completed dress.
Today we did the finishing – hemmed the bottom on the machine using a blind hem foot; hand stitched the hem on the sleeves, and finished with a hook and a loop to close the top above the zipper.
Done.
The finished “Upton” dress
There’s one last decision to make – Marni wanted some kind of embroidered embellishment on the band joining bodice and skirt. I made some flowers using two layers of silk organza with a tear-away stabilizer.
Flower Appliqué
Whether to add the flowers or not is her last decision. I prefer the dress unadorned. However, I sent the appliqués home with her – she can decide what she prefers.
A happy bride-to-be. I even wrote Cashmerette letting them know how pleased I was with how well the pattern worked out for us.
We began the project on April 4. It took us 11 sewing sessions to make two dresses.
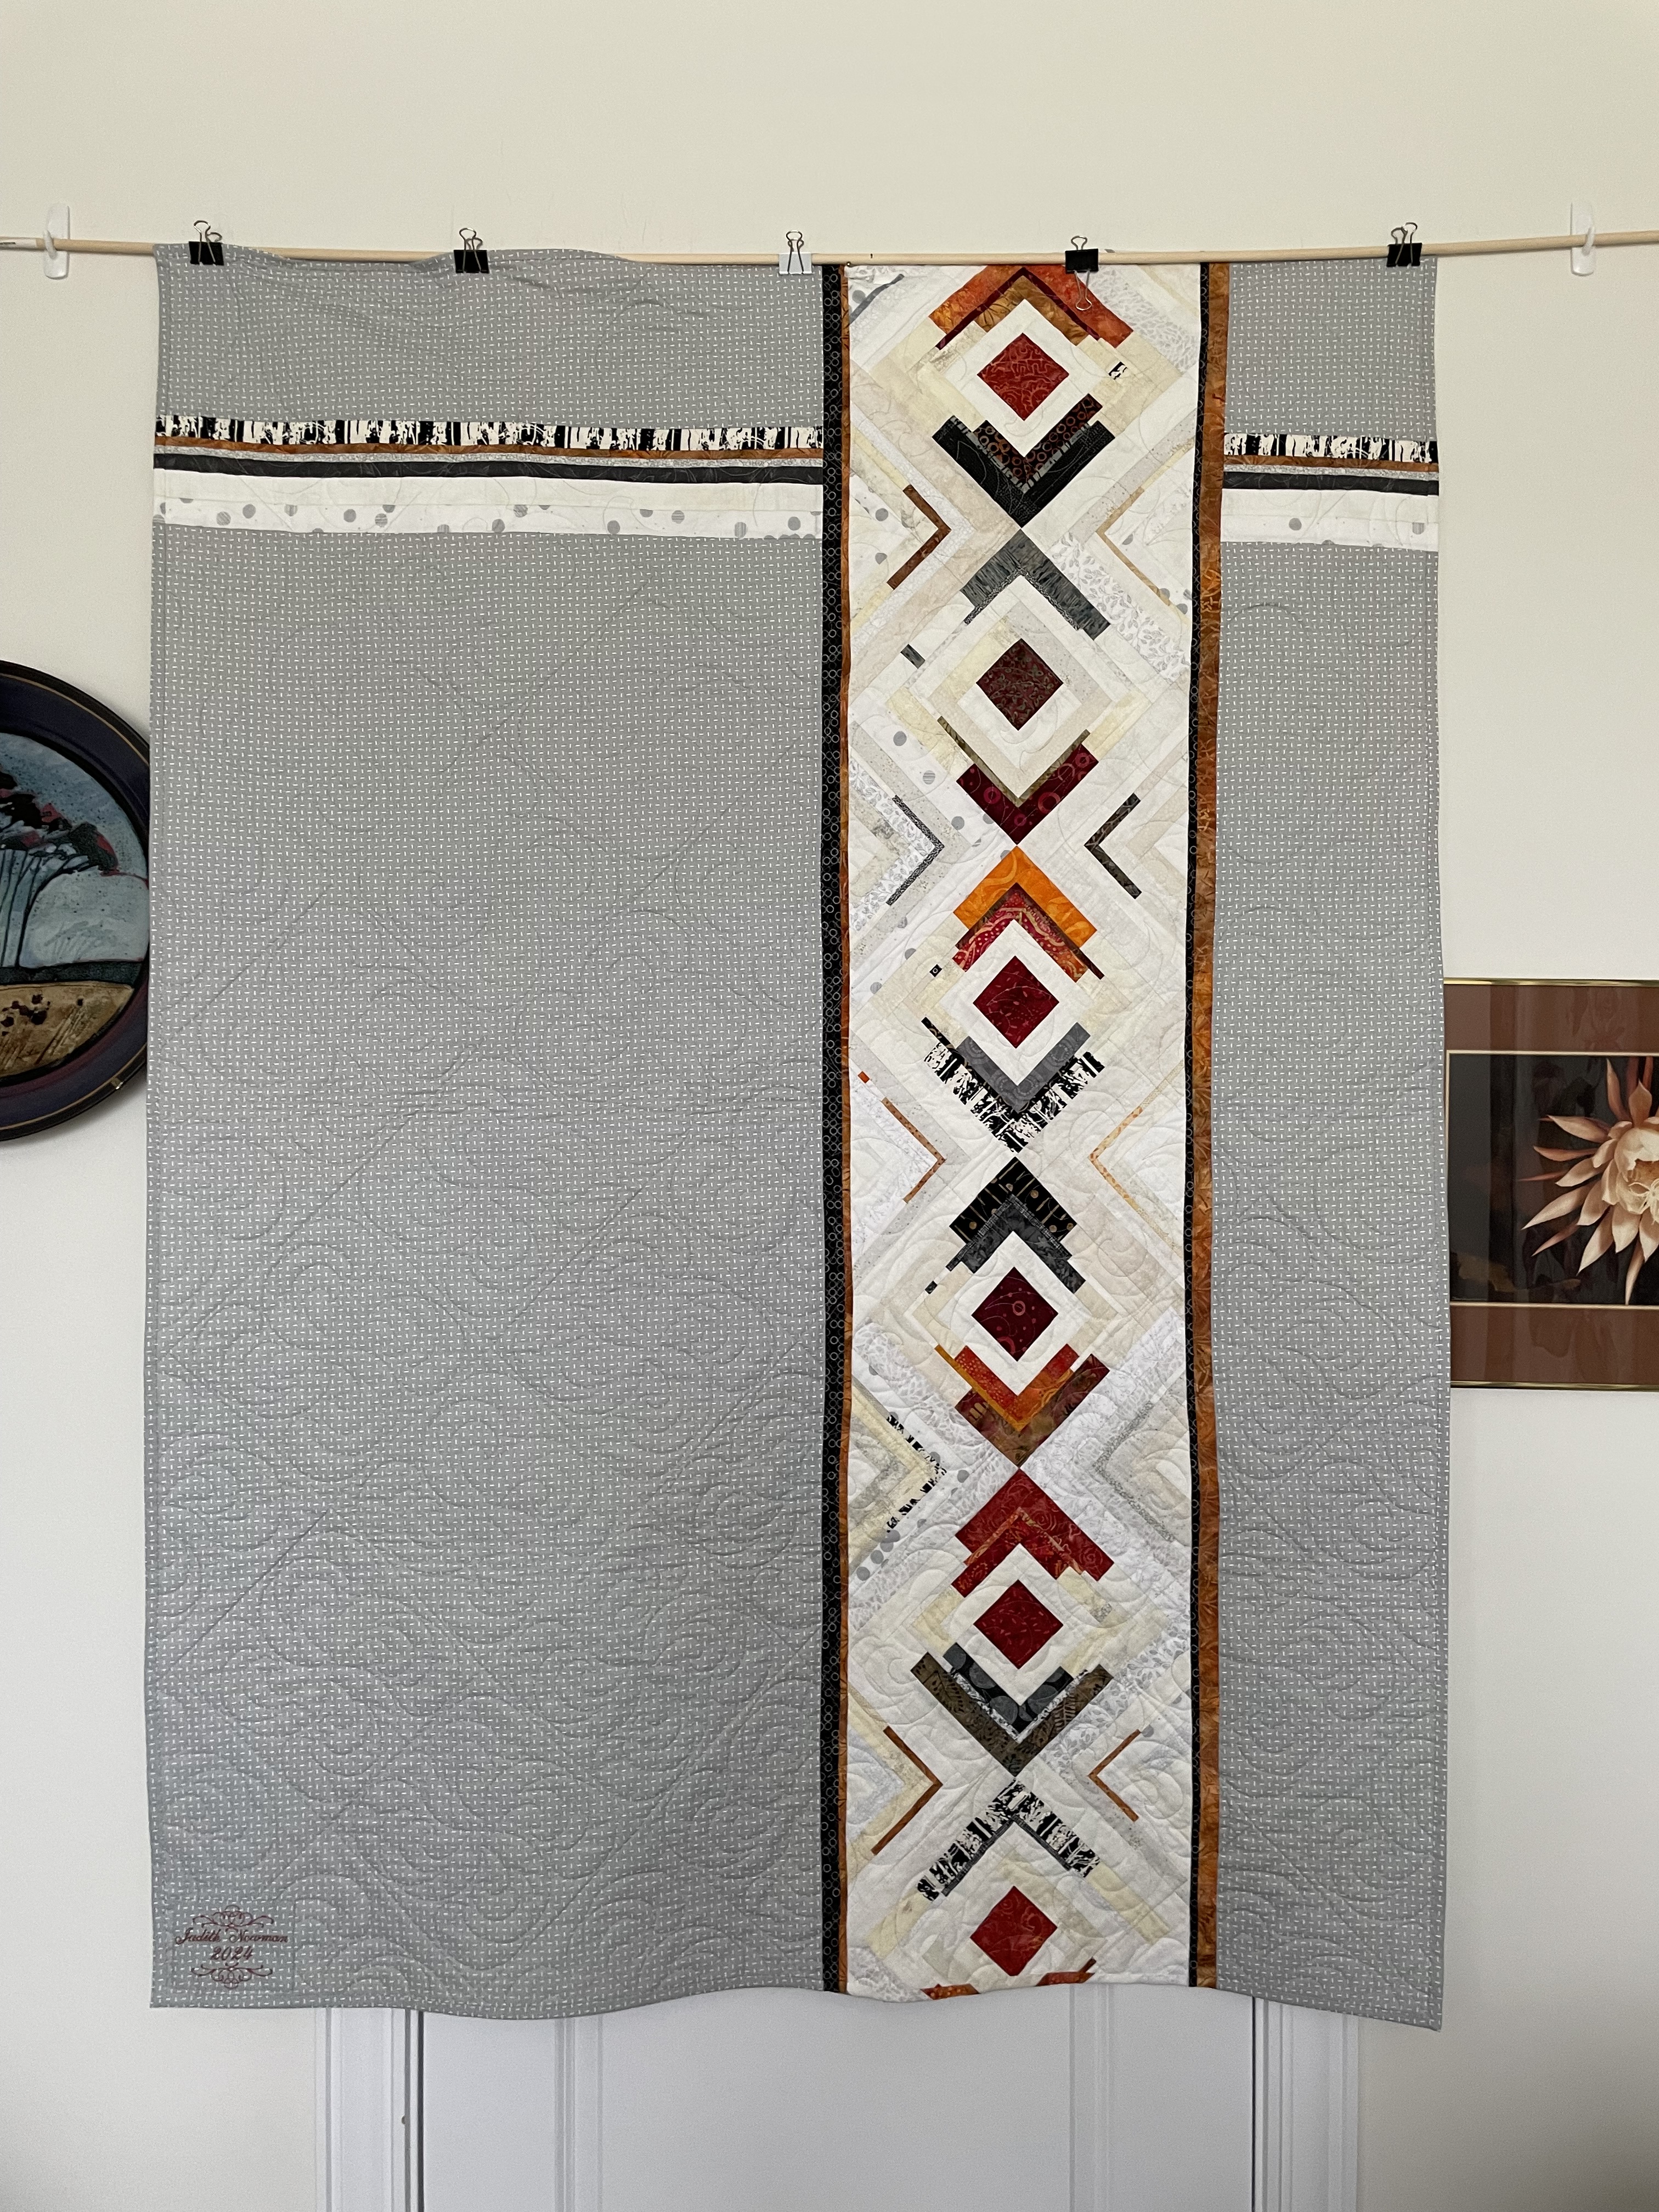
It took longer than I had planned (a variety of distractions took over and slowed the quilt work), but this quilt if finally completed! Piecing the back needed improvisation – I was short about 8″ of backing fabric so I inserted a horizontal strip. In the end I decided to use the trimmings from the back to do a narrow 1/4″ binding which I hand stitched on the back.
I’m pleased with how the quilt turned out. I like the range of shades in the “background” elements and the placement of the strong log cabin blocks (in fact all the blocks are constructed as log cabin, although the dimensions of the background blocks (light coloured ones) is different than the brighter coloured ones – this was necessary to vary the placement of the thin elements in each block.
I still have a box full of strips from this quilt that I’m going to have to do something with – I have no idea what yet, but I think if I start sewing strips together I’ll come up with some kind of block I can use for a new quilt.
Coming weekend I’m working with a group of women on the Zippered iPhone Case. One of the gals wants to use a #5 coil zipper (a standard zipper is #3 coil) on a somewhat larger case. So I figured I ought to try one myself.
Zippered Case with Decorative Zipper
There’s a challenge to working with a decorative zipper! Because it’s placed on top, it’s not simple to attach it to the fabric and lining. The accommodations I made for the front pockets were relatively straight forward, but adding the side zipper made it impossible to slip the open-end lining into the back…
Botched “phone” pocket!
Because of how I applied the side zipper which involved stitching down the lining, it was impossible to slip the phone pocket in behind the zippered pocket on the side!
I have to take this whole project apart and start over – I need to come up with some other way of adding the lining to the zippered side pocket so it lets the phone pocket slip in where it should go.
Yesterday a friend asked me to shorten a T-Shirt for her using my Coverstitch machine – that’s the machine that does those two close rows of stitching at hemlines on ready-to-wear clothes. Expensive sergers have the capability of doing a coverstitch. My Baby Lock Evolution serger does, but it’s time consuming and a pain to convert from serging to coverlock and back, so a number of years ago I bought a Janome coverstitch machine! I now use my Baby Lock to serge, and my Janome to coverstitch. (My advice is if you don’t have a serger and are looking for one – buy a good mechanical serger that just serges and a separate coverlock machine to hem – together they’ll cost quite a bit less than a computerized serger with coverstitch!)
In the factory, hems are cut precisely and the coverstitch hem is done so the hem edge is enclosed in the stitching. I find it hard to achieve that 100% of the time because you’re sewing blind when you’re stitching the coverstitch – that is, you’re sewing from the outside of the garment, the raw edge is hidden underneath as you’re stitching, you can’t see it, so I do my best to fold and press the hem exactly, measure the hem depth, and set the “fence” on my coverstitch machine to that depth. But invariably I’ll miss a spot or two. On garments for myself, I don’t worry about it too much – I’ll hand tack the spots where I missed, but I did want this job to be done well. So I opted for not cutting the hem, but stitching it first, then trimming off the excess.
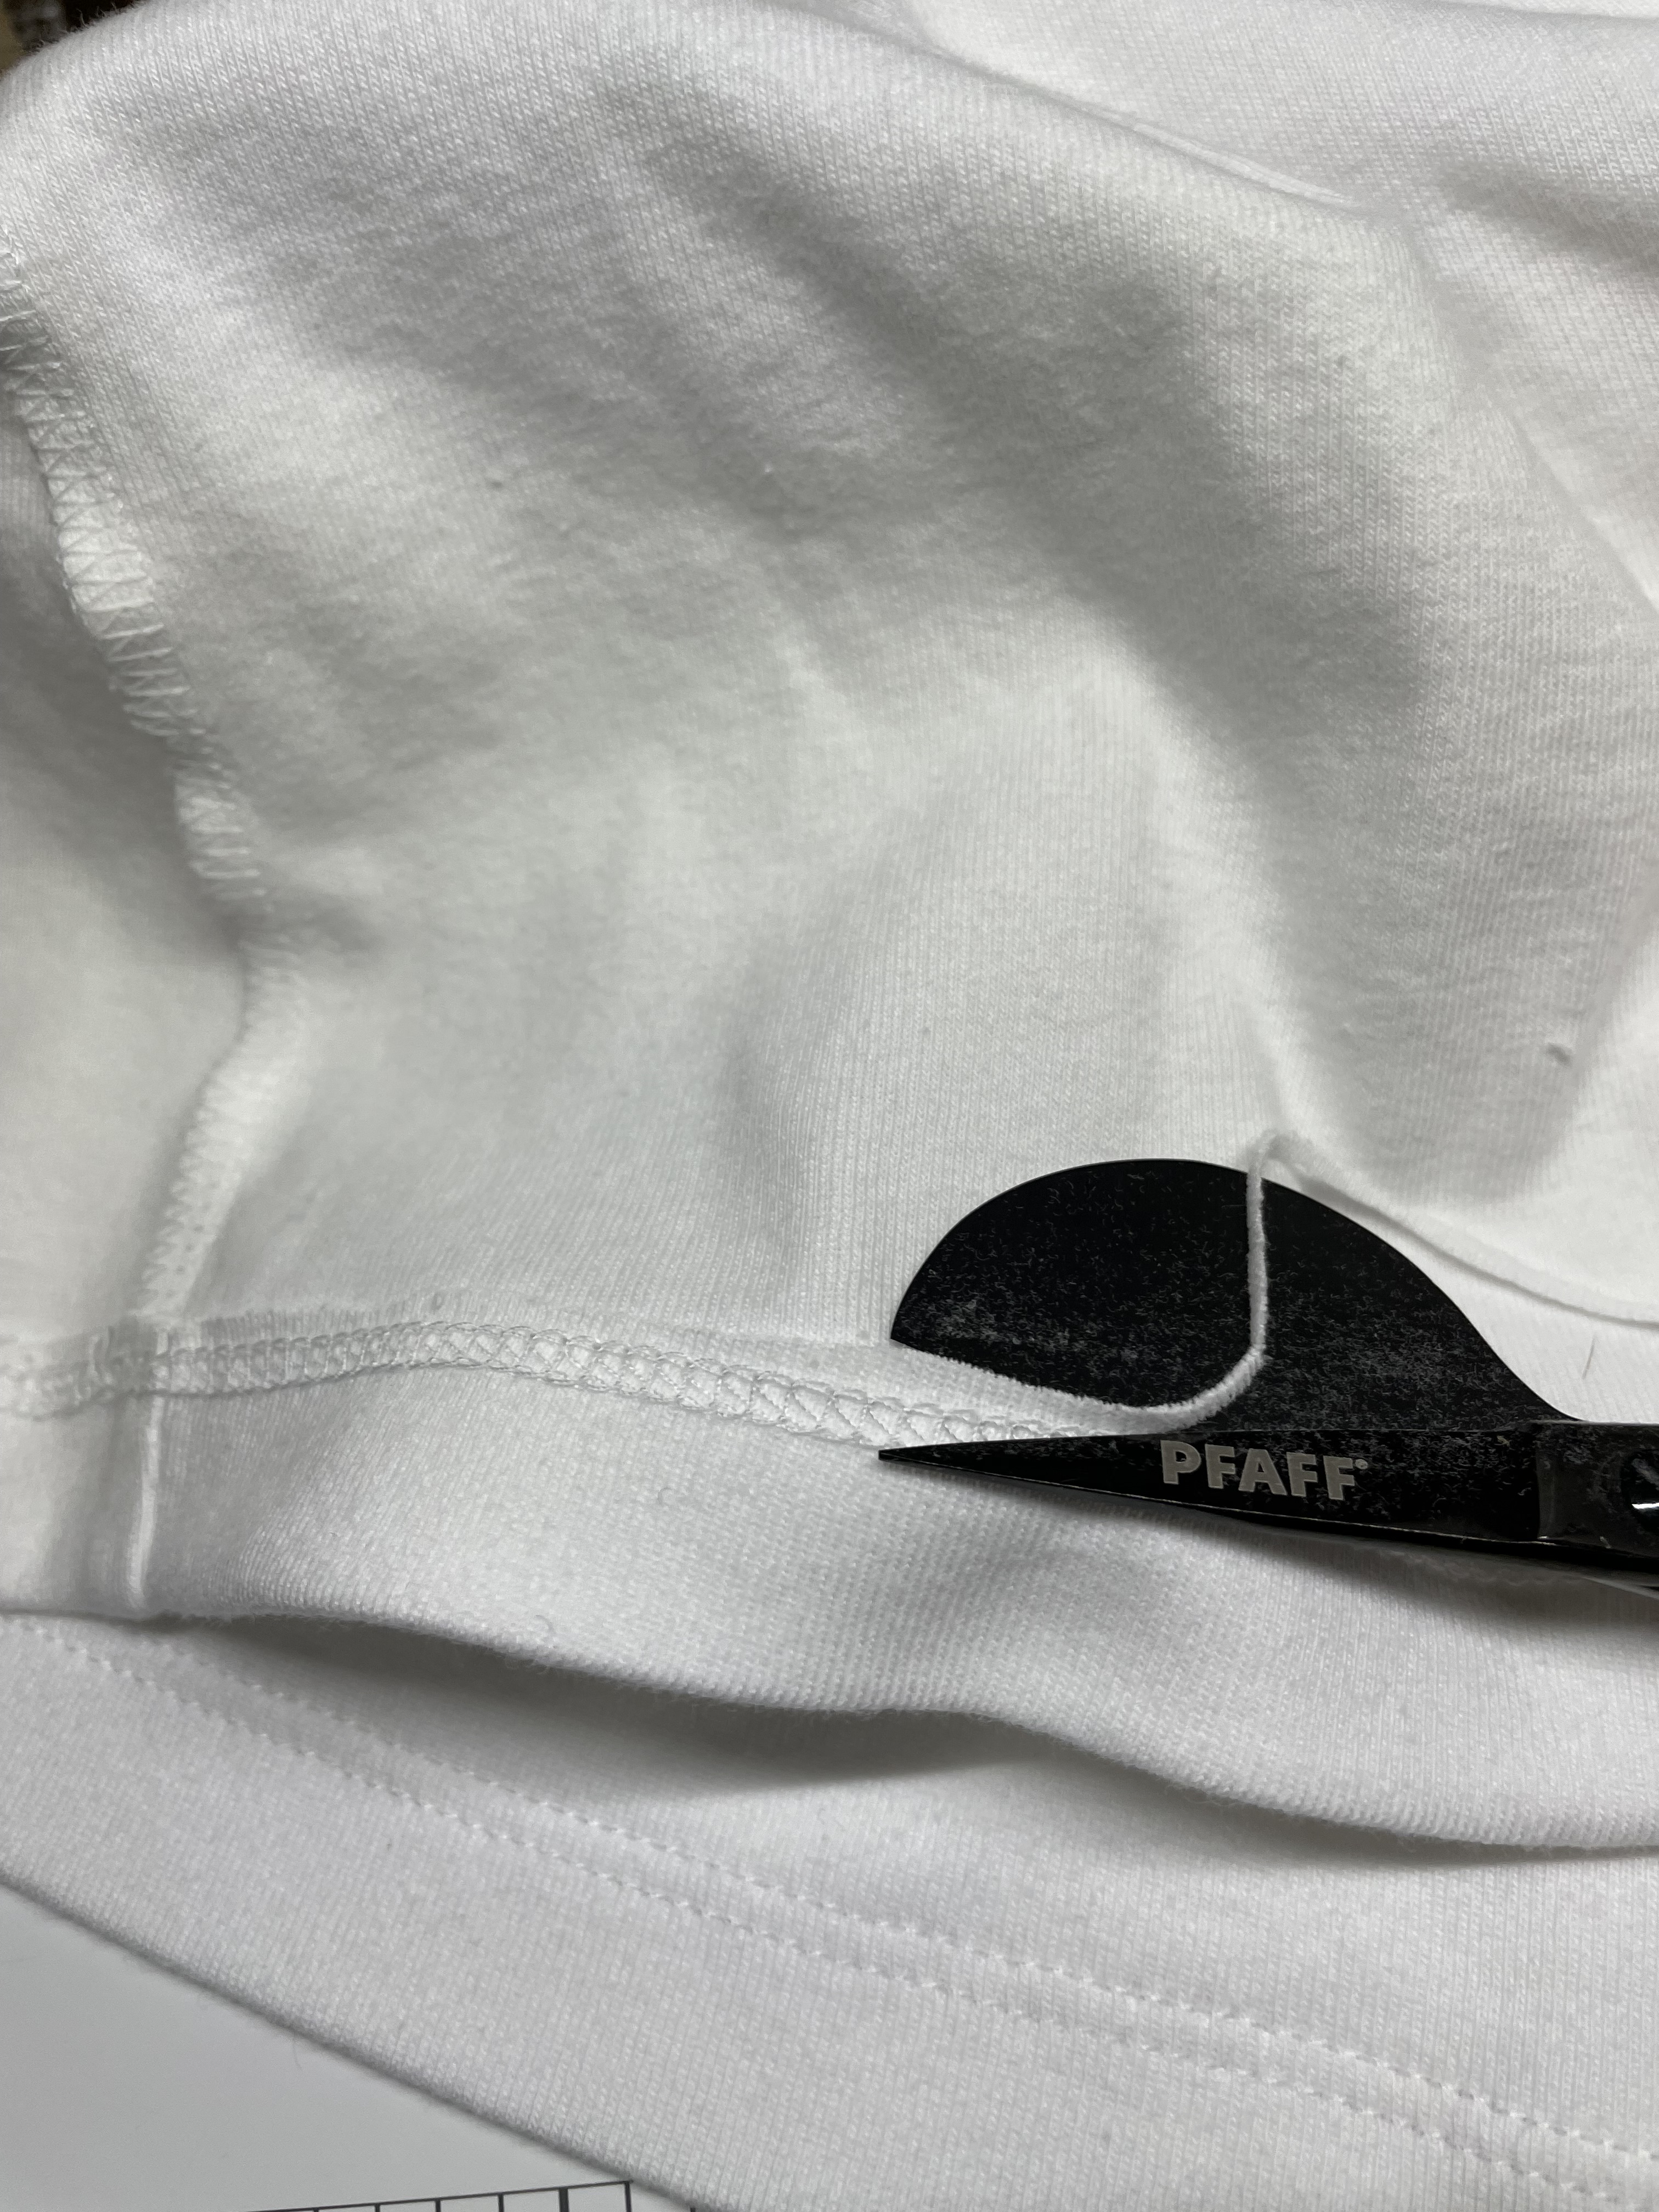
To do that I used my duckbill scissors. You may not have seen scissors like these before but if you’re a serious garment sewer they’re very handy to have.
Duck Bill Scissors
I have two pairs – a larger one and a smaller one. I use the larger ones on heavier fabric and the smaller ones on very fine. They work by snugging up against the stitching from the underside and cutting close to it just missing the stitches themselves.
That’s easier said than done, however, because the pointed blade is on top of the stitching obscuring it, making it difficult to see precisely where you’re cutting. It’s easy to nick the stitching. What I figured out today was if I trimmed the hem more or less in the vicinity of the stitching (I used the duckbill scissors for that), then I could come back, and, holding the hem over the index finger of my left hand which makes the excess fabric beyond the stitching to stand out, I could trim the small amount that was left very close to the stitches without cutting the stitching! In other words I took the time to cut twice, the first time a rough cut, the second time against the hem stitching. It worked – I didn’t cut any of the stitching!
Lord knows why I didn’t figure that out before today!
Responding to my reinforced / visible mended sweater Donna DeCourcy wrote:
“I think your darning is wonderful and you really have created a unique item with more life for the garment. My comment is this: I think your friend has a good idea with adding a little more darning at the shoulder, only because it will draw the eye upward rather than linger in the middle. I had an art teacher once who taught us to be conscious of where the eye travels through an art object and my eyes stayed on the darning you already have. That is it! That is my 2 cents, for what it is worth.”
I wasn’t going to anything further but Donna’s argument made sense to me – instead of keeping the eye at my thickened middle, I should add further reinforcement closer to my shoulder to draw the eye toward my face, which I did last night.
Further Embellishing on Right Shoulder
With the sweater on, it’s obvious I still need to do more! I need more darning closer to the center – a couple of small patches like the ones just at bust level yet attached in some way to the work I did last night.
I can see this project may have no end! Once that’s done, I’m sure I’ll decide I want some darning on the back as well!
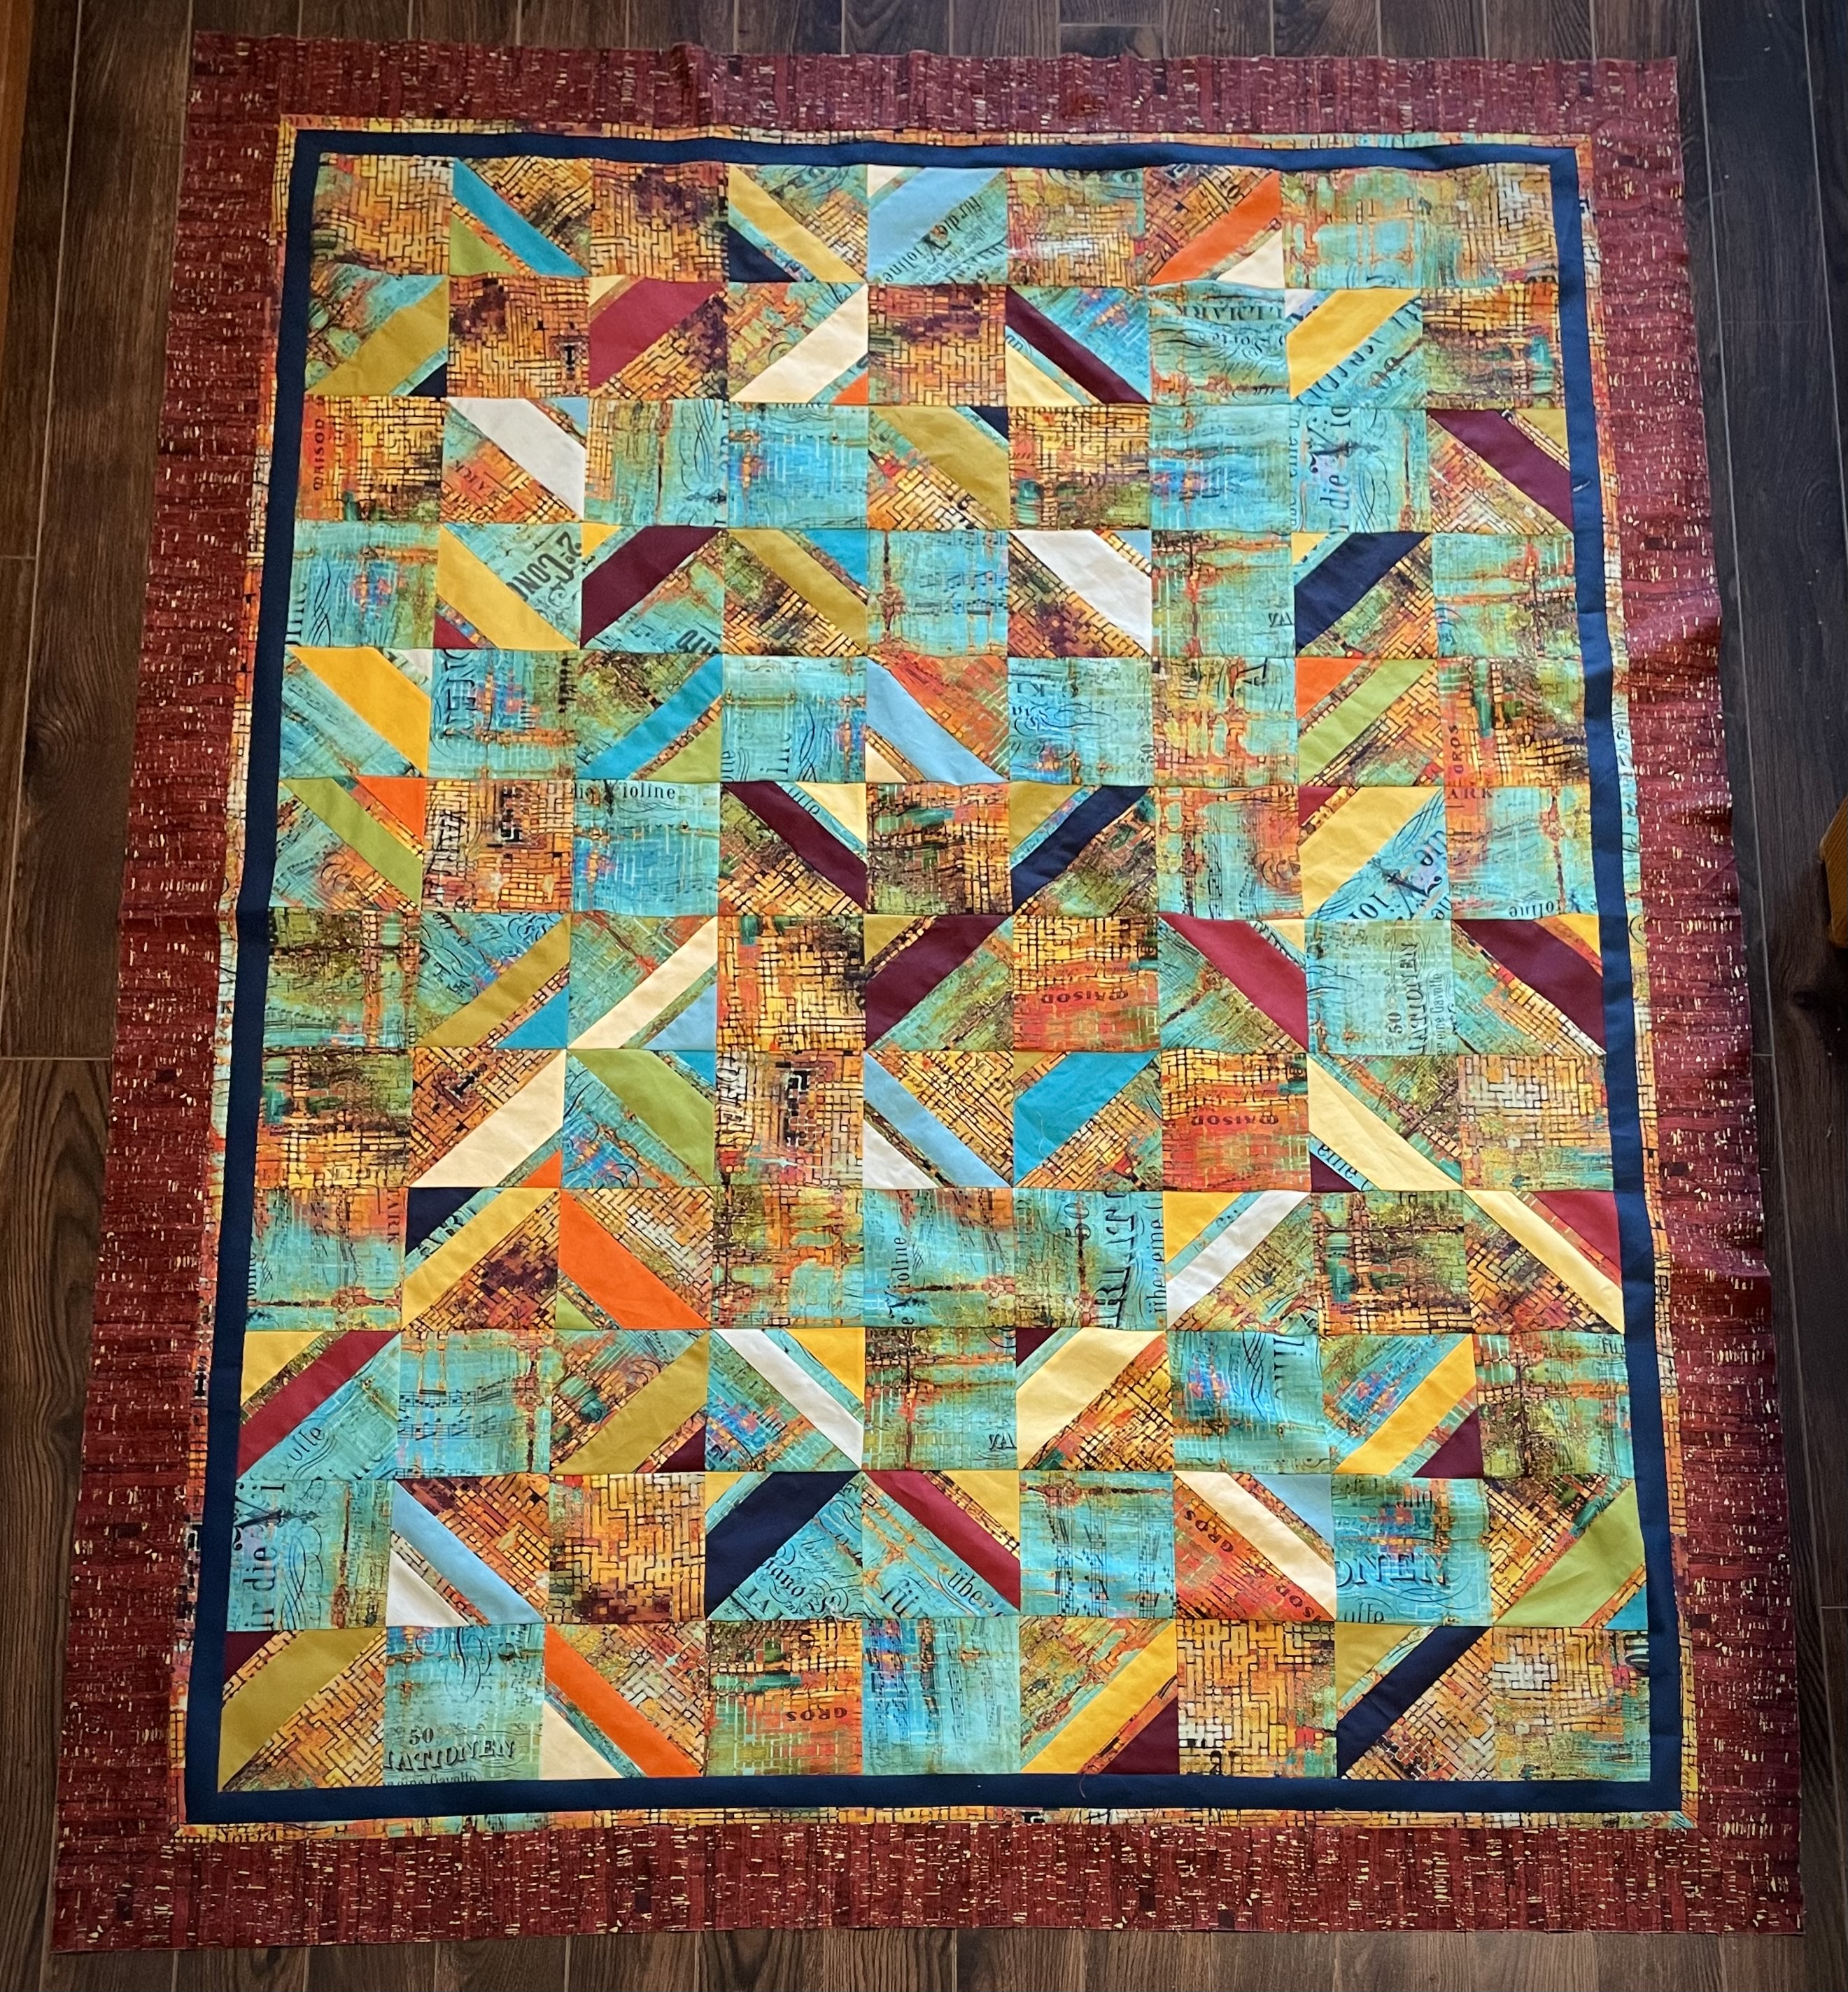
Here it is – the finished quilt top. It’s not the idea I had in my head when I started! It’s what I’ve ended up with, however; I can live with it.
It’s just another half-square triangle quilt; nothing special. The border pulls it together. I’d never have guessed I was going to use the “cork” fabric to finish the project but the brick colour brings out the various reds/oranges/yellows in the print fabric and the solids. One of the benefits of having a relatively large fabric stash.
Did I tell you about the discussion I had with a friend about “the stash”? I’ve decided I can call my fabric collection a “stash” as long as I’m using it to create new work. The moment I stop, it becomes a “hoard” and I turn into a hoarder!
Gotta keep working – I’ve more fabric and supplies in my apartment than I can use up in a lifetime. In the end I will die a hoarder!
Sally mentioned the other day, when I dropped into Sew With Vision about something, she’d like to hang it. I’m all for that. It’ll be interesting to see what people think of it.
Now onto the back. I’m going to use what I have left of the Free Spirit: Tim Holtz, Eclectic Elements, Abandoned, Rusted Patina fabric along with some border remnants, and the unused blocks I set aside. I want to see how large swaths of the fabric works, against a small amount of detail.


