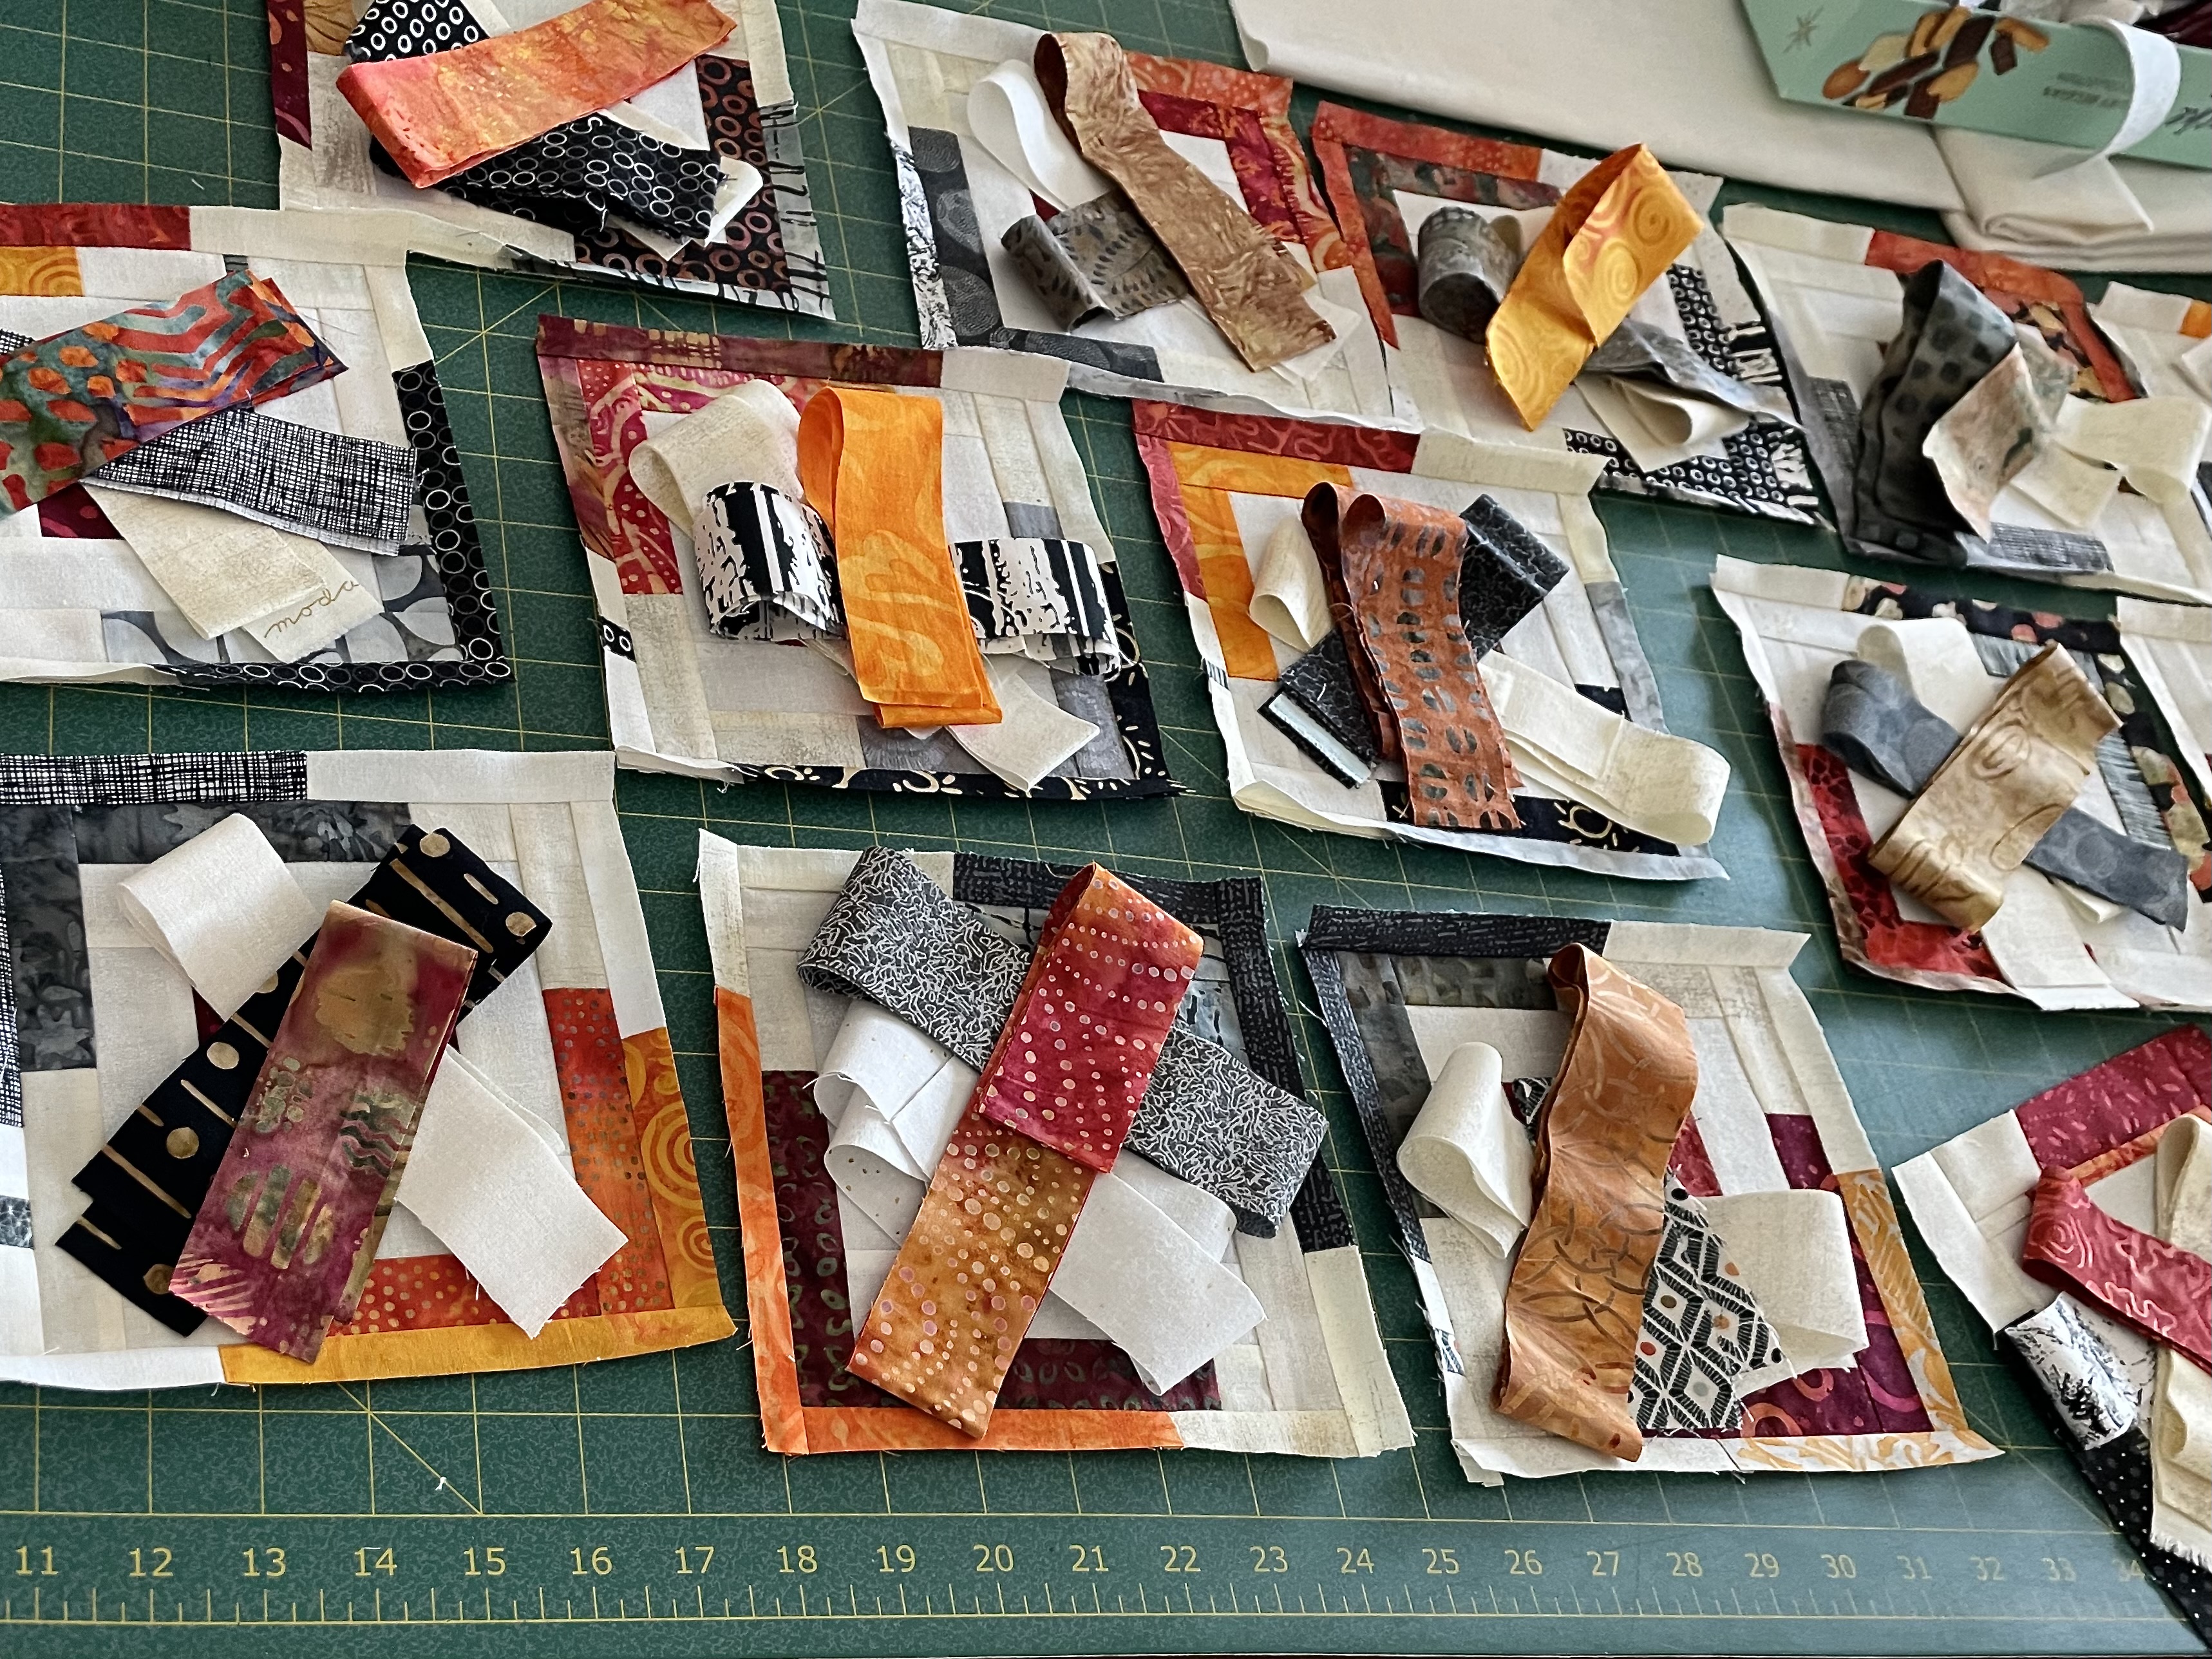
I have completed five blocks. I don’t have a design wall so I’ve laid them on the floor in my sewing studio area. Although it’s difficult, I can still manage to get down, and then up again, as I move blocks around on the floor.
This is a first go at laying out blocks – I will actually complete all 19 blocks I’m working on before making any decisions about placement. I don’t intend to use all of them in the quilt top – I’m building as many as I am so I have some for the back (or a second quilt – I have a ton of strips of all three sizes – another quilt is taking shape in my head). I will also need a bunch of predominantly “white” blocks to fill in many of the spaces. I will also need many half blocks to fill in around the edges – how many will depend on how many I put in the rows and columns.
What I have on the floor at the moment is a placeholder – it will get changed as each new block is auditioned in the array.
I spent the morning adding the round of narrow strips to each block. That sewing didn’t go quickly because I can’t chain piece anything – each strip had to be constructed as I worked my way around a block; no two strips are the same. I’ve made an effort to not use any fabric more than once in each round to avoid duplicates when I start joining blocks.
Once I was finished adding the narrow border to each block, I laid them all out and placed the strips for the next round on each, doing my best to avoid repeating, in this final round, any fabric I used in previous rounds. I will check that each block has no repeated fabrics when I go to sew this outer round of strips. I have enough different fabric strips to be able to do that. That’s the case for both the “reds” as well as the “greys”.
So how do I organize the fabrics, the cutting, and the collecting so I can make ~20 different blocks? I figured out I needed to cut and sort three different sizes from each of the fabrics – 3/4″, 1 1/4″, and 1 1/2″. I sorted the sizes into different boxes (I had neither enough room nor boxes to sort colours, greys, and background light fabrics into separate boxes, so I sorted just by size.
3/4″ Sorted
I did the cutting and sorting yesterday. I also bordered and trimmed all 20 center squares (3″ blocks”). The bordering went quickly because I was able to chain piece the strips one side at a time. This morning I laid out all 20 of the bordered squares
Top: Bordered Centre Square / Middle: 1 1/4″ Strips To Add; Bottom: Level 3 Stitched
I’ve decided to add 1 1/4″ strips to 15 of the blocks, but to use the narrow 3/4″ strips with 5 of the blocks – so they’re not all the same construction.
Blocks with Level 2 Narrow Strips – Ready To Sew
The remaining blocks will have 1 1/4″ strips at Level 2, with narrow 3/4″ strips at Level 3. All blocks will have the same strip width (1 1/2″) for the outer round.
Now, I’m ready to sew. I’m starting with the 5 blocks with narrow strips. First I’m going to set up all the strips by joining background to the colour and grey strips, then add the joined strips to the centre bordered squares. Next, I’ll continue with these blocks adding the next two sets of strips to complete these blocks. Last I will work on the remaining 15 blocks, working on each level for all 15 blocks.
Although I can’t actually chain piece, this will be more efficient than completing one block at a time. This way I can audition the coloured and grey strips with all of the blocks at the same time and get a sense of the coordination I’ll be looking for when I go to assemble the blocks into the top.
Once I have these blocks completed, I still need to create at least a dozen blocks from just the light background fabrics to intersperse among these coloured blocks. I’m after a minimalist feel to the quilt so I need to reduce the amount of colour in the overall layout. I’ll tackle that problem when I’ve finished these bright log cabin blocks.
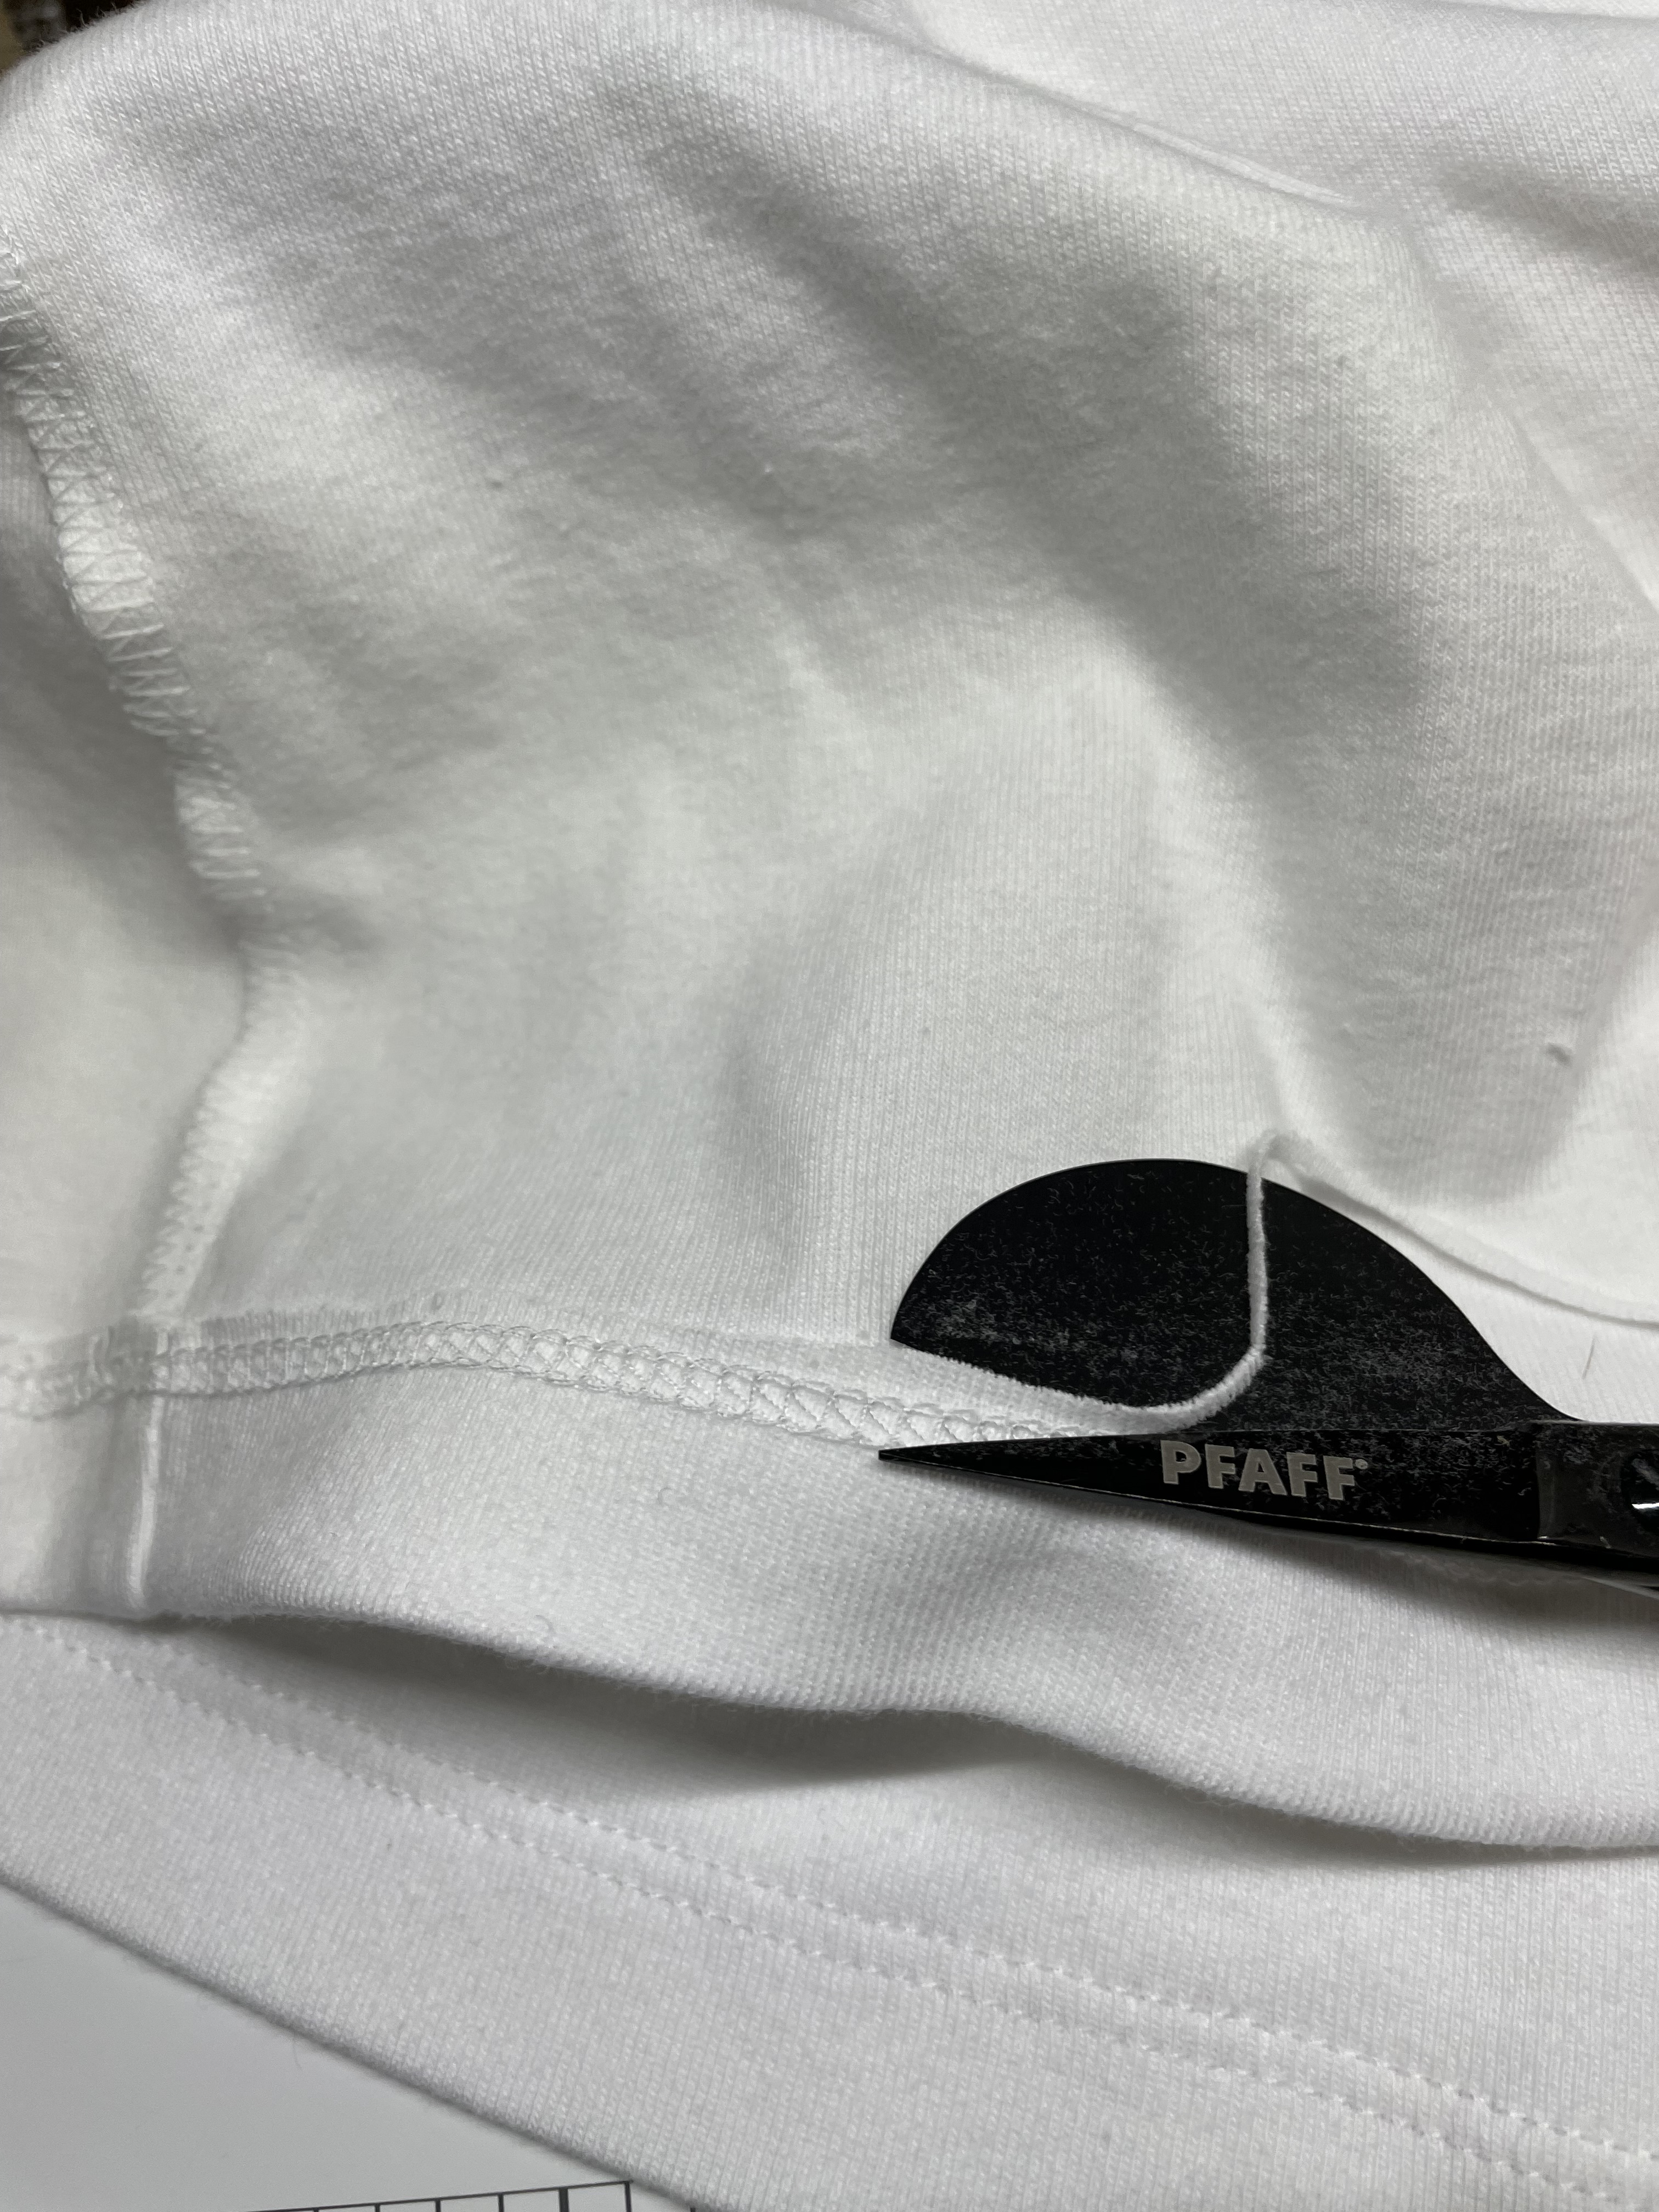
Yesterday a friend asked me to shorten a T-Shirt for her using my Coverstitch machine – that’s the machine that does those two close rows of stitching at hemlines on ready-to-wear clothes. Expensive sergers have the capability of doing a coverstitch. My Baby Lock Evolution serger does, but it’s time consuming and a pain to convert from serging to coverlock and back, so a number of years ago I bought a Janome coverstitch machine! I now use my Baby Lock to serge, and my Janome to coverstitch. (My advice is if you don’t have a serger and are looking for one – buy a good mechanical serger that just serges and a separate coverlock machine to hem – together they’ll cost quite a bit less than a computerized serger with coverstitch!)
In the factory, hems are cut precisely and the coverstitch hem is done so the hem edge is enclosed in the stitching. I find it hard to achieve that 100% of the time because you’re sewing blind when you’re stitching the coverstitch – that is, you’re sewing from the outside of the garment, the raw edge is hidden underneath as you’re stitching, you can’t see it, so I do my best to fold and press the hem exactly, measure the hem depth, and set the “fence” on my coverstitch machine to that depth. But invariably I’ll miss a spot or two. On garments for myself, I don’t worry about it too much – I’ll hand tack the spots where I missed, but I did want this job to be done well. So I opted for not cutting the hem, but stitching it first, then trimming off the excess.
To do that I used my duckbill scissors. You may not have seen scissors like these before but if you’re a serious garment sewer they’re very handy to have.
Duck Bill Scissors
I have two pairs – a larger one and a smaller one. I use the larger ones on heavier fabric and the smaller ones on very fine. They work by snugging up against the stitching from the underside and cutting close to it just missing the stitches themselves.
That’s easier said than done, however, because the pointed blade is on top of the stitching obscuring it, making it difficult to see precisely where you’re cutting. It’s easy to nick the stitching. What I figured out today was if I trimmed the hem more or less in the vicinity of the stitching (I used the duckbill scissors for that), then I could come back, and, holding the hem over the index finger of my left hand which makes the excess fabric beyond the stitching to stand out, I could trim the small amount that was left very close to the stitches without cutting the stitching! In other words I took the time to cut twice, the first time a rough cut, the second time against the hem stitching. It worked – I didn’t cut any of the stitching!
Lord knows why I didn’t figure that out before today!
I haven’t been travelling, just getting on with life with small projects I haven’t bothered to report on.
Boomerang Quilt Completed
I finished the Boomerang Quilt ten days ago (seems longer than that somehow). I took it to Sew With Vision to show the gals how I used the fabrics I bought there. Sally wanted me to display it to advertise a class we’re scheduling – you never know whether there will be any interest or not.
I’ve been working on darning some socks – one pair for me, two pairs for friends. I’ve another sweater needing restoration sitting with my knitting waiting for me to make time to work it.
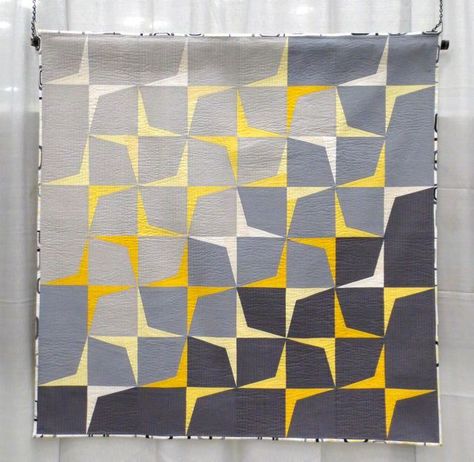
A while back I came across another minimalist quilt which I’ve begun working on. It’s based on the Log Cabin block which I haven’t made in a gazillion years. Made from scraps, I thought it worth trying. I have no idea what size the quilt in the image turned out to be; I want a lap quilt – so something that’s approximately 50″x 65″.
Improvised Block – 9 1/2″
My first try gave me an idea for proportions – some wider strips, some thin, ending with a wider outer strip which includes the seam allowance. I want a trimmed block that is 9″ square finishing at 8 1/2″ square. My test block works, but it’s too large at 9 1/2″; I started with a square that is a bit too large and it’s bound by strips that are a bit too wide. By shrinking the square by 1/2″, and the first strips by 1/4″ I should end up with a wider outer strip and be able to trim to 9″.
Now for a second block with some revised measurements to see what I end up with. I have a bunch of “Grunge” fabrics shading from off-white to cream. The “background” of the quilt will be a blend of the light with orange/gold/deep red and various grey/dark grey elements inserted in the strips.
It’s taken the entire day to piece this quilt back using the extra blocks, small scraps and other leftover fabric all because I didn’t have a backing fabric on hand. Looking at the panel I almost see it as another quilt – not quite, though, because the left side has a rather boring patch right in the middle. That was where I started piecing, trying to use the larger leftover pieces and wasn’t being concerned about placement or size. In fact, I was simply trying to create a 26″ x 72″ panel to use on the back and didn’t think I could actually be making a second separate quilt!
This is just the backing for the “boomerang” quilt (I don’t have a name for it, yet). Now to cut some batting, layer the three parts, and pin them together. I haven’t yet set up an embroidery for quilting the quilt – that’ll be tomorrow’s part of the project.
A blizzard outside today, so I’ve been sewing all morning. I just completed the quilt top with the pieced inner sashing and the border. I like how the border print brings the whole project together. There’s now enough colour movement and border fabric elements within the panel to invite the eye to look around.
I added the narrow sashing to the border before applying the border to the panel so I could do a single mitre including the narrow sashing – easier than mitring the two elements separately and trying to get them lined up.
Now I have to come up with an idea for the back. I have quite a few leftover blocks (with boomerang) and some rectangles I assembled from leftover triangles along with scraps from the blues. I don’t have any “backing” fabric, per se; my plan is to use the scraps to make as large a panel as I can, then fill in with something that goes with the blues in the top.
I liked the simplicity of the design, although I thought I’d try using print fabrics to create the blocks. I also didn’t want a square, a good lap quilt has to be a rectangle so it covers the body as well as the feet when you use it, even if it’s created as an art piece intended for hanging!
So from the beginning I was using this “trajectory” quilt for inspiration not to duplicate it. Also it’s a paper pieced work – I hate paper piecing so I constructed a set of templates (based on a 6 1/2″ block) to cut my block elements.
Then I went through the fabrics in my stash – came up with several shades of blue but nothing to contrast with it so I went shopping.
The FabricsIn Black/White
In the end I came up with more blue and some yellow/chartreuse pieces.
I cut the block pieces, matched the lighter yellows to the softer blues, the darker chartreuse with the stronger prints and navy pieces.
The Block Pieces Ready to Assemble
With the blocks sewn I laid them out – the challenge was establishing a gradient within a rectangle – not as easy as you’d think.
First Layout
Deadly!
My pale blues read beige and I probably should have reversed the pairings using the brightest yellows with the navy elements; the darker chartreuse with the pale elements – in any case an acceptable quilt but nothing outstanding about it. Here’s where I realized it’s much easier to make quilts that “pop” with strong, large print or batik fabrics!
I had bought a yard of a much larger print fabric which tied the blues/yellows, intending to use it for the border, but I decided I needed to incorporate some into the panel.
I made several new blocks using that fabric in the corner.
Second Layout
Not much better. You barely notice the large print. Nothing is moving your eye around the panel and the upper left corner just sits there.
I thought about my problem for four days while I sick with the norovirus and decided I needed both less and more of the larger print fabric. I made some new blocks this morning.
Third Layout
In addition to the few hints of large print, I took away several of the very pale blocks, replacing them with darker elements, I also moved other blocks around mixing up the array quite a bit more. After looking at this arrangement for a while I decided I could finally start sewing rows.
Final Layout / Partially Assembled
Still not one of my better quilts but at least I can live with this. When the panel is assembled, my intention is to insert a narrow gradient sashing (maybe 3/8″) using the yellow/chartreuse fabrics, ending with a 3 1/2″ border using the large print. Who knows, I may even decide to add some appliqué, although I have no idea what that would be – I can certainly break up those deadly light fabrics with small large print circles….
The original inspiration piece worked for a number of reasons: first the quilter used solids (four yellows, three greys), easier to match up than prints; she worked in an 8×8 square array which allowed her to establish a symmetry not possible with 7×10. (My reason for choosing 7×10 instead of 8×11 had to do with the finished size of the panel and with a wide border ending up too large for a lap quilt.)
While the centre panel is settled, the sashing/border is not (and I’ve not yet given any thought to the quilt back). There’s still a lot of sorting out to be done here.
I finished this pair last evening after having done absolutely NO knitting for six days. I came down with a norovirus a week ago – vomiting, diarrhea – which lasted four days and then I was too lethargic to do anything but binge watch a TV series on Britbox – Waking The Dead. I finally picked up the sock again (the second sock just needed a toe), finished it, then put stitches on for a new pair.
That’s how it goes – no empty needles in my apartment. Otherwise, how would I rationalize evenings watching TV? I can knit through just about any genre, except tennis! I can’t keep track of the shots and miss the best rallies if I don’t keep my eyes on the screen. I was delighted Sinner defeated Djokovic in the Autralian Open semi-final and then went on to win the tournament Sunday. It’ll be very interesting tennis over the next few years with Sinner and Alcaraz competing – they’re both such young, yet wonderful athletes. Great variety to their games (not just slugging it out from the baseline – no fun watching that). I’m looking forward to the unfolding tennis season this year – lots of great matches to come.
Back to the socks, I realized after the first sock I was probably going to put this pair in my sock drawer. Now that they’re finished, that’s where they’re going. I was even going to put them on this morning but didn’t because they’d have been too loose inside my boots. In the end I haven’t gone out in the storm, I worked on the current quilt (more on that in the next post).
Andrea knows I’m into “faces”. She’s always on the lookout for new ones. Yesterday I got this note with a photo: “My morning latte – had to send it along to start your day! lol“