Last night I added fusible web to the back of 9 grey fabric strips, then cut out circles of varying sizes from each. I placed them on the panel, then decided I did need a wee bit of colour against the grey so I added just a few coloured circles in the background. I’ve pinned the circles in place; next I need to press them, then edge stitch using decorative stitches with contrasting thread.
The addition of the small circles pushes the large circles back, foregrounding the small circles. I’m hoping the addition of the bright narrow inner border with a wider outside medium grey will stabilize the whole panel. I’m also thinking I might add just one or two small circles through the borders as well – we’ll see.
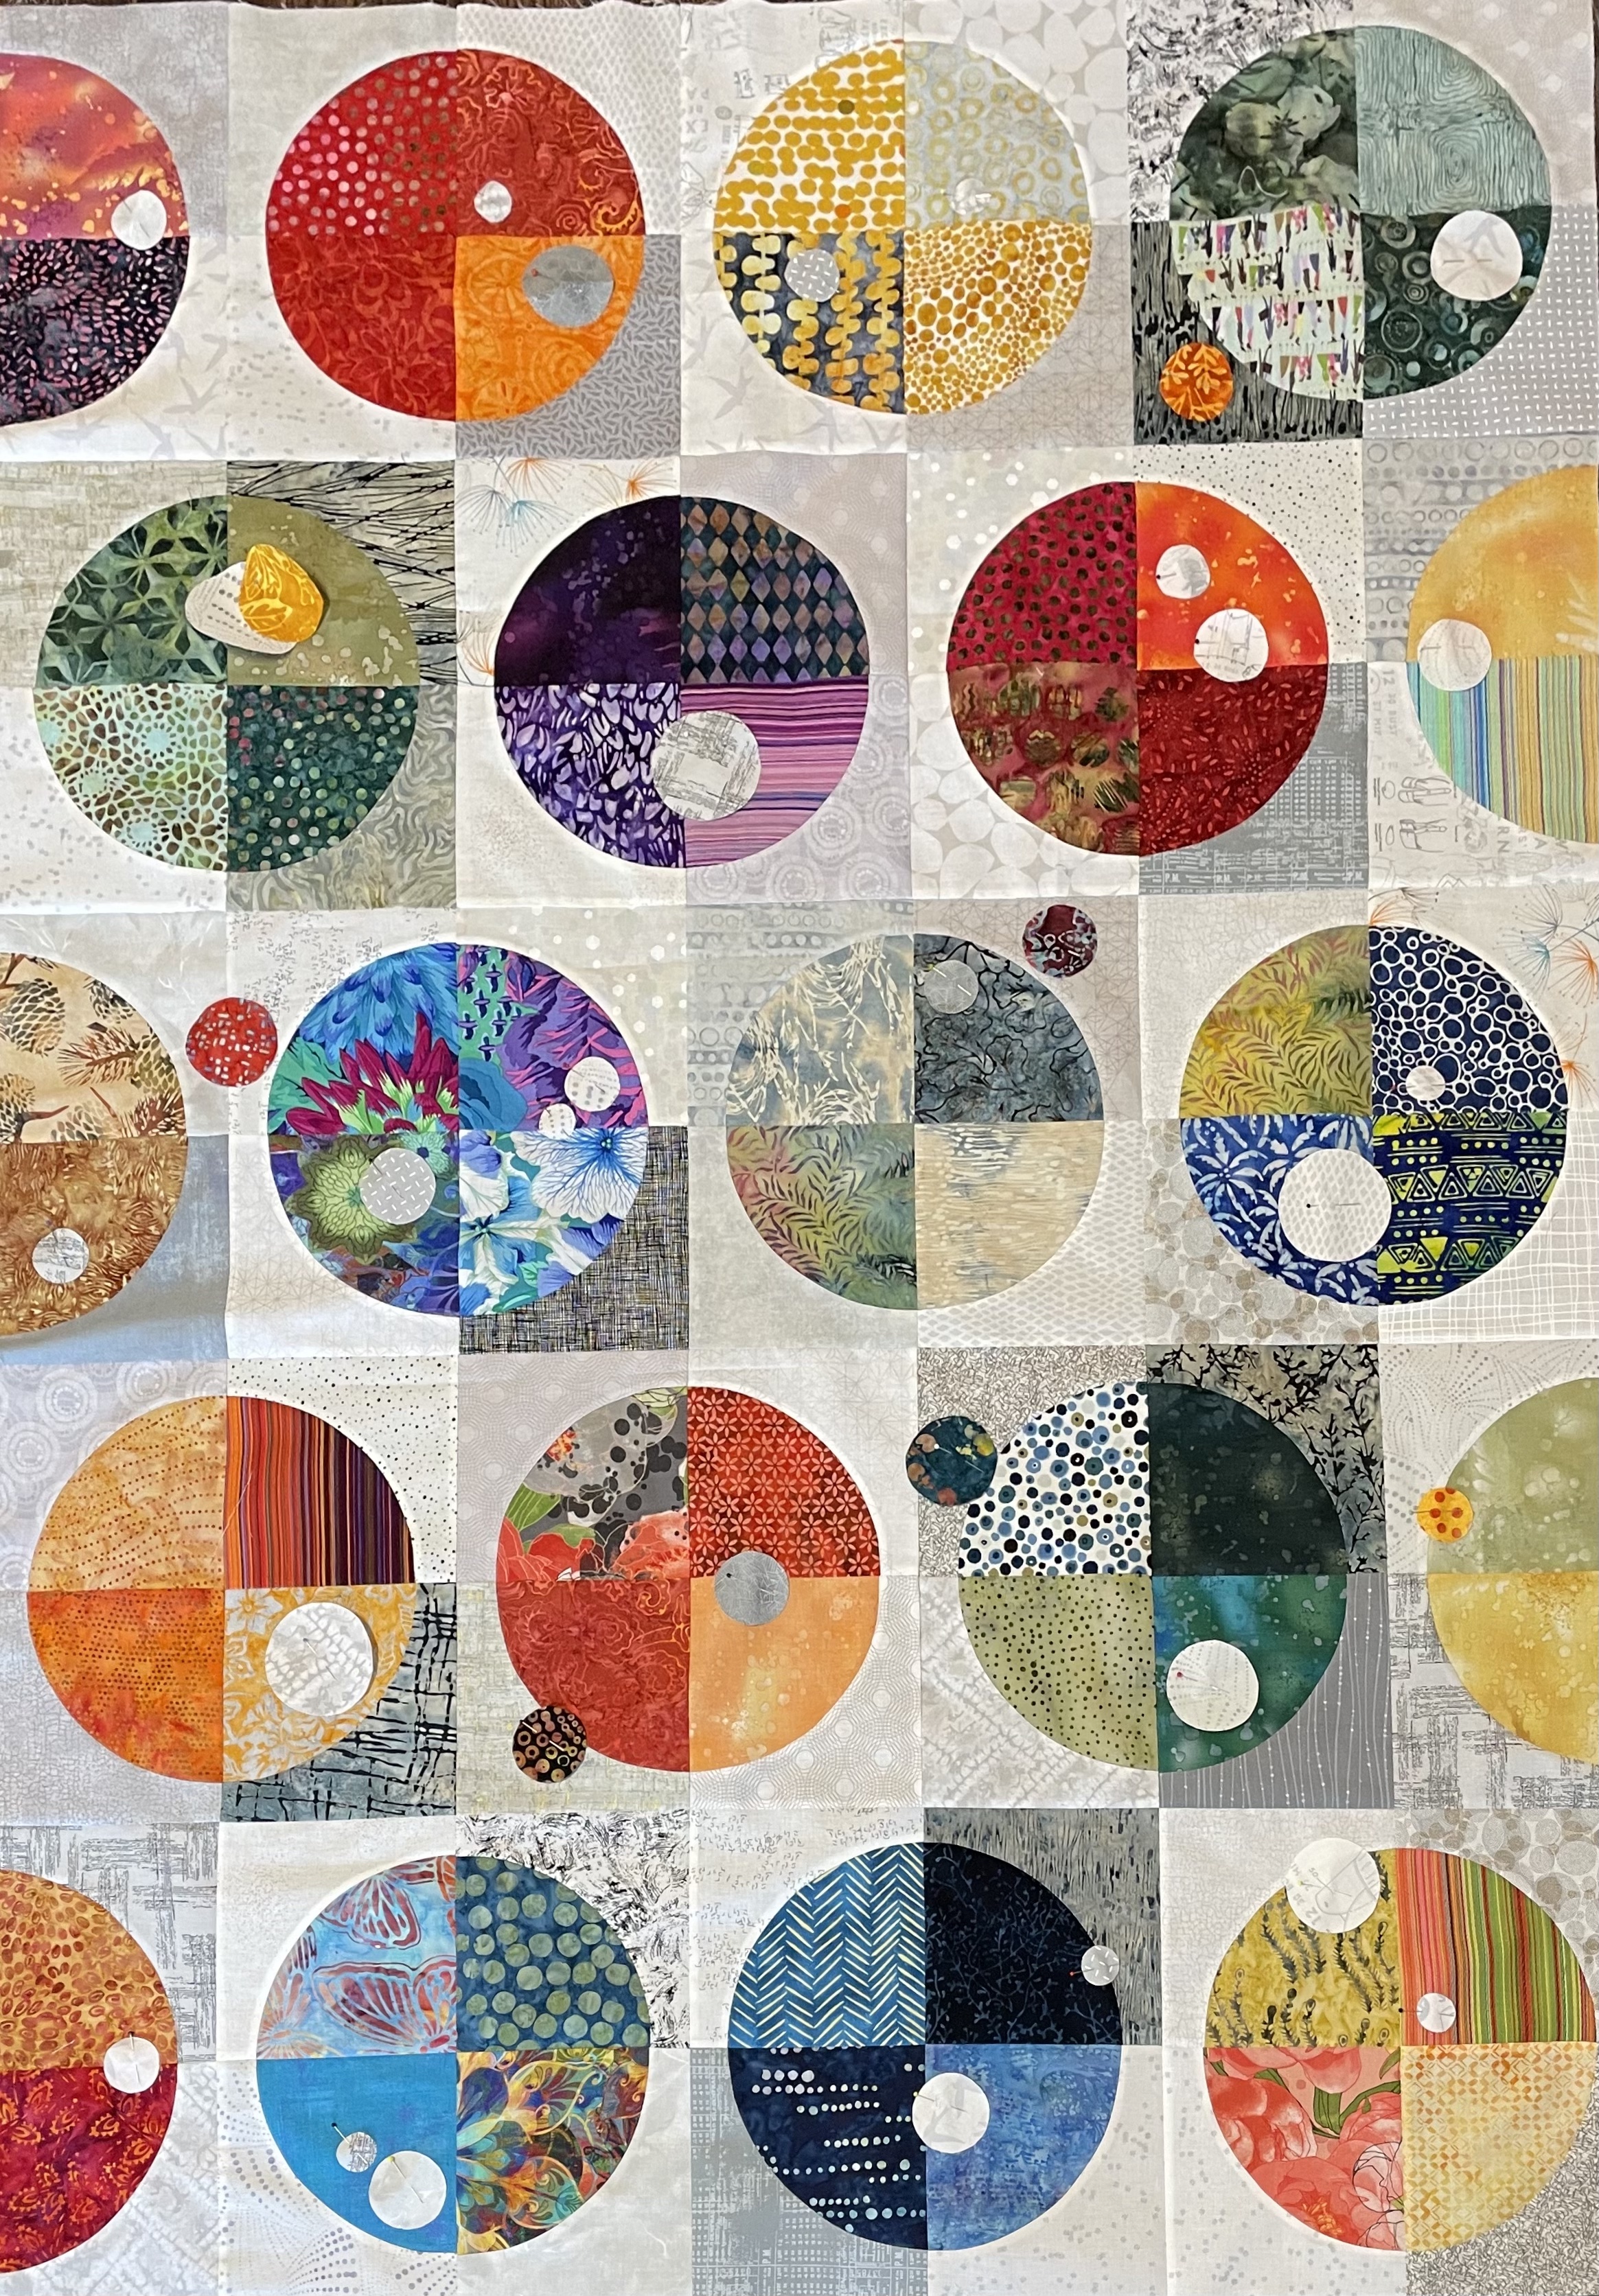
With a healthy amount of rearranging of blocks I finally settled on this array and sewed the panel together. It always surprises me how different everything looks when it’s all sewn together. The joins are not perfect but they’re more than passable – always an accomplishment when sewing curves that have to join on the circumference. I’m also happy with the distribution of the grey background colour flow.
My next idea is to appliqué smaller grey circles (in three different sizes) randomly on top of these circles to break up the regularity of it all. I’ve selected 10 of the greys I used in the background, I cut 4″ x 15″ strips, now I have to apply fusible web (Pellon 805) to the back each, then cut out circles. My plan is to use bright threads to edge stitch these small circles in place.
I’ve also picked out a bright batik that echoes the range of colour in the panel to use for a narrow inner border, then add a medium dark grey wider outer border.
It’s taken me three days to sew all 70 Drunkard’s Path blocks. It’s a rather slow process – I mark the centre of each piece with a small cut, place the “L” piece on top of the quarter circle, match and pin the centres, then align the right end of the curve and pin it, finally I align the left end, carefully place it under the presser foot, and slowly stitch my way around the curve. Many people prefer having the quarter circle piece on top, but I find I can ease the curve together more easily when the “L” is on top.
This is not a typical Drunkard’s Path layout. I’ve picked up the blocks and tried arranging them in a different way, but I seem unable to do anything other than lay out the blocks in alternating circles! So alternating circles I guess it’s going to be!
I’ve moved blocks around playing with colour placement; this may be where I stop. Next step will be to create rows and finish assembling the quilt top.
I know I want an outer sashing, although I have no idea yet what colour to choose. That raises the question of whether I want narrow internal sashing around the blocks as well. I think not. The sashing will need to be in some strong colour with a grey border outside. I think a grey sashing would fight with the existing grey backgrounds; a colour will fence in everything.
I cut these quarter circles Sunday. Today I cut the grey/white “L” shaped pieces (as well as clearing up piles of fabrics sitting on surfaces around my sewing room).
I decided to group the quarter circles more or less by colour into sets of 4 then lay them out on the floor. Not half bad. by staggering the rows I get 7 blocks across each row leaving the half circles on opposite sides on alternate rows which sort of hides them. To make this work as a full array I need 10 rows which gives me full circles at the top and bottom edges. In all, I end up using 70 quarter circles which means I will have to cut a bunch more for the back when I’ve finished the top.
Next I have to try laying out the background pieces.
Possible Bottom Row
Except for the bottom left corner (which is too brown in tone) the other background elements look like they might go together. Now I need to pick up these pieces, and complete adding background to the other circles.
Here’s where I wish I had a large design wall! I don’t have a big flannel sheet hanging in my apartment because I don’t have wall space for one. I have to resort to the floor in my studio. I’m OK getting down but getting back up is not as easy as it used to be. So I won’t be able to do a full layout at one time. I’m going to have to work row by row, picking up the pieces as I go along piling them carefully so I can sew each drunkard’s path block. When I have them done, I’ll play with layout again.
Background Added (Tentatively)
Now I need to spend time looking at the array to make sure I’ve distributed the background reasonably well.
I had two piles of fabric on my cutting table – a stack of bright ones, a pile of light greys/off whites/darker greys. I’ve walked around them for nearly a week. I started cutting today.
I cut quarter circles from seventy-eight different bright fabrics (many from scraps large enough for the quarter circle, as well as fat quarters and other fabrics I had on hand; I cut 6 1/2″ strips from the background greys, then eighty 6 1/2″ squares from the strips. It took me nearly five hours to get that much done. My next move will be cutting the background “L” pieces from the squares so I can construct the blocks (that’s going to give me eighty smaller grey quarter circles as “waste” that I have to use for something!).
Last week I’d cut a couple of 6″ test background blocks – too small. Sewn to the bright quarter circle element my background would have phased out to nearly nothing at the sides. Fortunately I’d only cut four 6″ squares so I didn’t lose a lot of fabric. But that mismatch stopped me going any further for the better part of a week!
Test Layout of Four Drunkard’s Path Squares – Not Sewn
Today, I cut four background squares into “L’s” to see whether 6 1/2″ would work. I laid them out with quarter circle elements. I think this will be fine.
Once I have all the elements cut out, I’ll start laying them on the floor to see what kind of colour flow I get – BEFORE I even start assembling the blocks.
I’m planning on a 7 x 9 block quilt – my finished blocks will be 6″ – that will give me a top panel that’s 42″ x 63″. I’ll add borders to that to make the quilt a bit larger. No idea yet what I’ll use, that will depend on how the colour flow of the top shapes up.
I haven’t given up on Drunkard’s Path yet. Instead of the dull colours I started with, I’ve pulled 44 bright fabrics from my stash, mostly batik (and in the in end I may use only batik – I have lots more fat quarters to choose from), as well as a pile of blacks/whites/greys.
The idea this time – I intend cutting the quarter circle elements from the bright colours using the blacks/whites/greys as background. This idea comes from a quilt I came across on Pinterest
Here’s my plan – a 7 x 9 quilt – using 6″ blocks that gives me 42″ x 54″ which I can extend with borders to a largish throw.
My next step is to cut sixty-three quarter circle elements from the bright fabrics (there will be duplicates), and 63 squares from the blacks/whites/greys (selecting more from the lighter end of that collection), then sew them together.
I won’t know what this is going to look like until I get the pieces cut and laid out on the floor and then play around with layout. The quilt above uses the blocks in a straight layout – I may break that up somewhat to create a layered effect with some circles on top of others as I did with the Skyline Quilt #3.
BernieLynn wrote questioning the “L” part of the drunkard’s path block – she wasn’t seeing what I was describing. So here it is.
A drunkard’s path block consists of two parts: a “pie” or quarter circle and an “L” or complement to the circle:
Drunkard’s Path block elements
You can purchase acrylic templates of various kinds; you can make your own.
To construct a template first you need to decide on a block size (remembering to add the outside 1/4″ seam allowance – hence 6 1/2″ (for a 6″ block) or 6″ (for a 5 1/2″ block) etc.).
Draw an outline for your block. Next construct a quarter circle (using a protractor, a plate, …) using a radius between 1/2″ to 2″ shorter than your block size, making sure the arc ends are symmetrical. This creates your “pie” shape. The line you’ve drawn is the seam line. The complement is the “L” shape.
To construct seam allowances you draw another line 1/4″ from the quarter circle arc on EACH side of the arc line (I use a different colour pen to draw these two lines to differentiate them from the original arc line). Using template plastic, trace the quarter circle piece using the arc line farthest from the apex of the arc – this is the “pie” cutting line. Reposition the template plastic and trace the quarter circle using the arc line closest to the “pie” corner – this is the cutting line for the “L” piece (it’s a smaller quarter circle).
Drunkard’s Path Templates
You end up with two quarter circle templates, one a half inch larger than the other.
Drunkard’s Path Templates
To cut the “pie” pieces from fabric, cut a strip the width of the 1/4″ circle radius (the length of one side); to cut the “L” pieces, cut a strip from the fabric the length of one side of the desired pre-trimmed block size – this will be wider than the strip for the “pie” pieces. [For my blocks I cut 5 1/2″ strips for the “pie” pieces; 6 1/2″ for the “L” pieces.]
In my block I’ve made my overall trimmed block size 1 1/4″ larger than the radius of the “pie” piece:
Trimmed Block
When I’ve finished sewing blocks together there will be a 1″ border around each circle or partial circle.
Skyline #3 – Blocks Laid Out
But you can construct drunkard’s path blocks that have no border around the quarter circle. These are a bit trickier to stitch because you are working with just 1/2″ of fabric on the ends of the “L” shaped piece to end up with a 1/4″ seam allowance for joining the blocks:
Drunkard’s Path Block from “Let The Trumpets Sound”
It’s all up to you and how you want your final project to look.
In this case I want the circles to be circumscribed within the blocks rather than touch the edges of each block as I did in Let The Trumpet’s Sound.
In my first drunkard’s path quilt I circumscribed the circles. My circles, this time, will be a bit larger in relation to the size of the block.
I had started stitching-in-the-ditch on each side of the sashing ten days ago or so – got a few rows done and then put the quilt aside. I just couldn’t carry on – not sure why that was because I knew if I started sewing it wouldn’t take me terribly long to stabilize the sandwich.
Skyline #2
This morning I finally picked up the project and stitched the remaining sashing, and around the outside. The back is nicely flat – the top has a bit of fullness but a good spraying with BestPress and a steam iron and it should be starched and pressed enough to give me a flat surface to quilt.
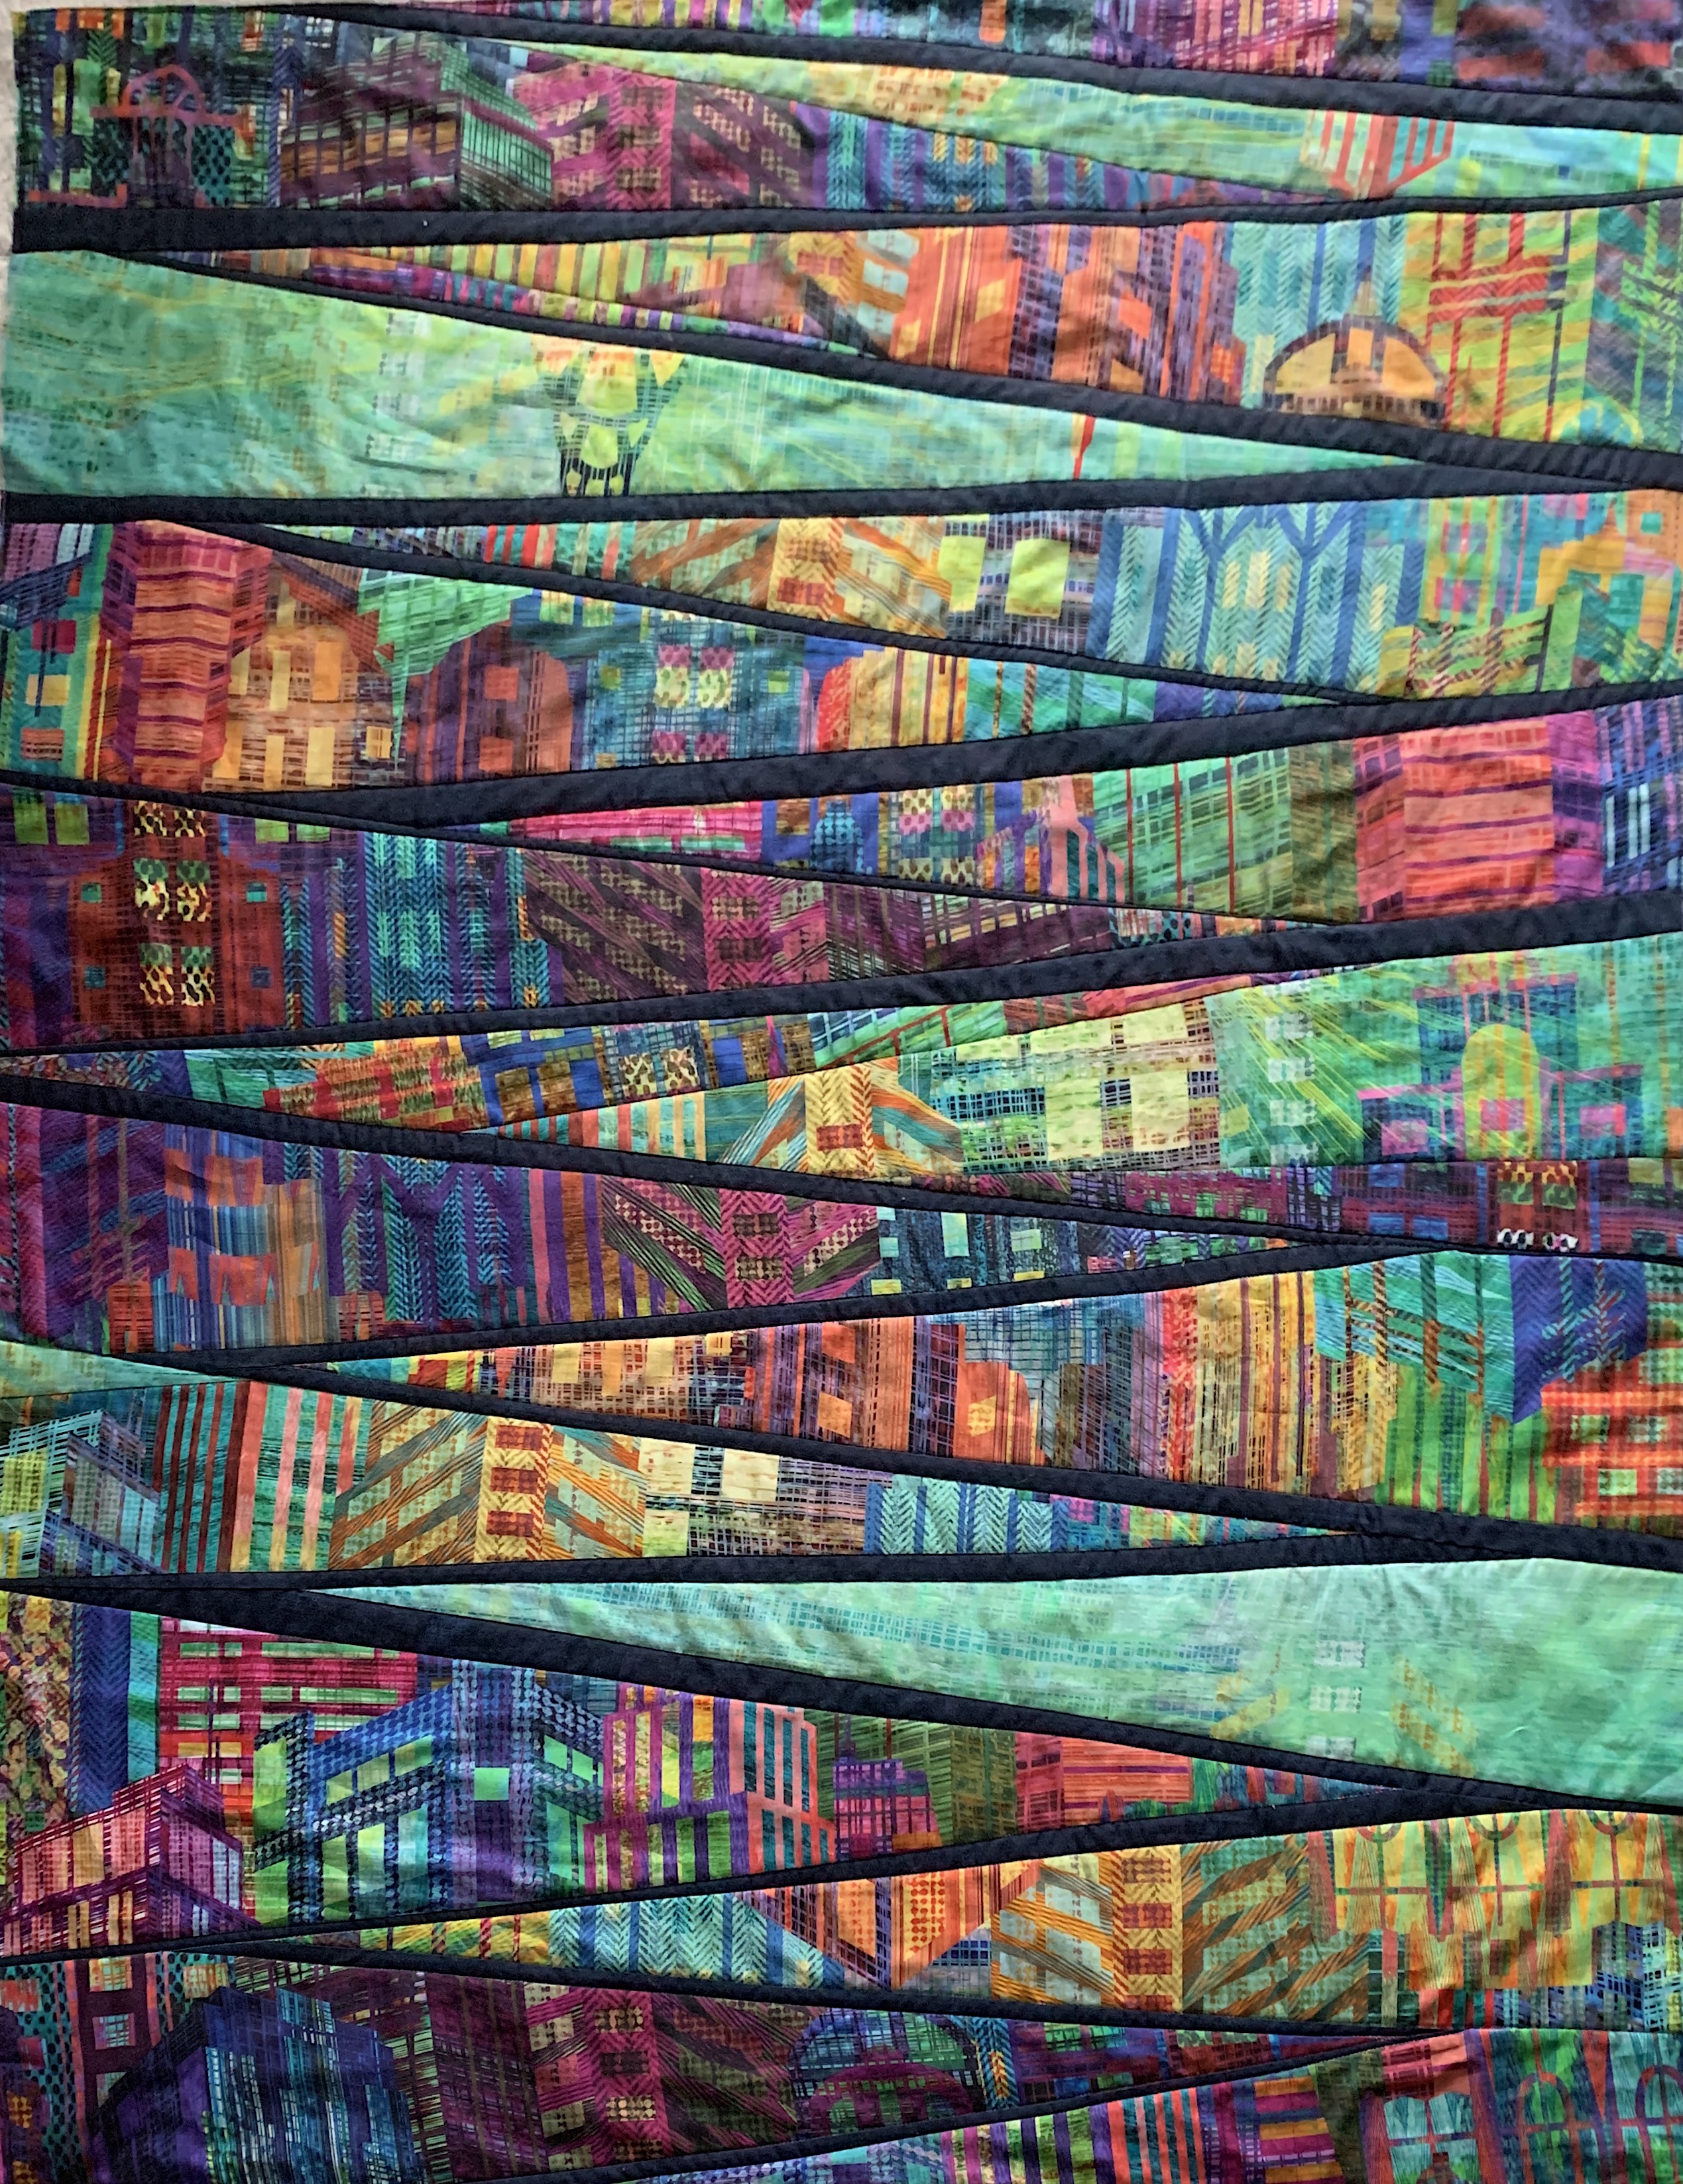
The question is what do I want to do next. I can’t leave the project as it is – there isn’t enough quilting to make the whole stable so I have to add a lot more stitching. I simply cannot do consistent free-motion work, my stitch length is inconsistent and my lines wobbly; I’m never satisfied with how it turns out which is why I quilt-in-the-hoop. But given the shape of these wedges that isn’t an option here. I’m leaning toward echo stitching the wedges and leaving the sashing alone. Once I start there will be no stopping until each of the 20 wedges is relatively densely stitched. Do I want to echo-stitch 1/4″ or 1/2″? Maybe a combination of both. What colour thread? Probably a mixture of the variegated threads I used on Skyline #1.
Tomorrow, I’ll start the process and see how it looks.
I’ve also been thinking about Skyline #3 – drunkard’s path blocks. Probably 8 1/2″ blocks with some 4 1/2″ blocks as filler. I may even try a “porthole” or two.
I just made an 8 1/2″ pair of templates (I have a commercial pair that size, but the pie-shaped piece is quite a bit smaller / the “L” shaped piece larger – I want the joins to be closer to a 1/4″ seam allowance…)
8 1/2″ Templates
Then I constructed a pair of test blocks:
8 1/2″ Test blocks
which turned out rather well. My seam allowance from the edge of the curved seam is closer to 1/2″ – that leaves me with two options: trim the block to 8″ (giving a finished 7 1/2″ block) or remake the templates. I’ll sleep on that decision.
I want a finished quilt size to match the other two Skyline projects – 48″ x 64″. If I wanted a border then I could actually go smaller or fewer: set up a 5 x 7 block array (40″ x 56″) – actually the fewer might be just fine. I’m better off staying with the finished 8″ block because that makes it much easier to do a few finished 4″ blocks as filler.
I also now have to think about a balance between my Skyline fabric and some Grunge inserts – I want some bright Grunge fabric to broaden my colour range. The Skyline is colourful, but when it’s cut up and reassembled some of the brightness disappears.
I’ll start by cutting the Skyline into 9 1/2″ squares – that’s large enough to cut out both drunkard’s path template pieces without a lot of waste, then mix and match the two elements to see what it will look like… After I finish quilting Skyline#2.
Just this minute finished this quilt top. I haven’t yet finished quilting the tipsy squares – the fabric for this quilt called out to me and I had to cut the blocks, then the circular portions leaving an “L” shaped piece, and I couldn’t leave the pile of “L” shaped pieces sitting there so I started working on the blocks.
The blocks are what is called “drunkard’s path”. It’s a classic quilt block with a curved bite removed from one corner. There are a gazillion possible arrangements for these blocks, but I thought this fabric collection called out for complete and partial circles – bubbles.
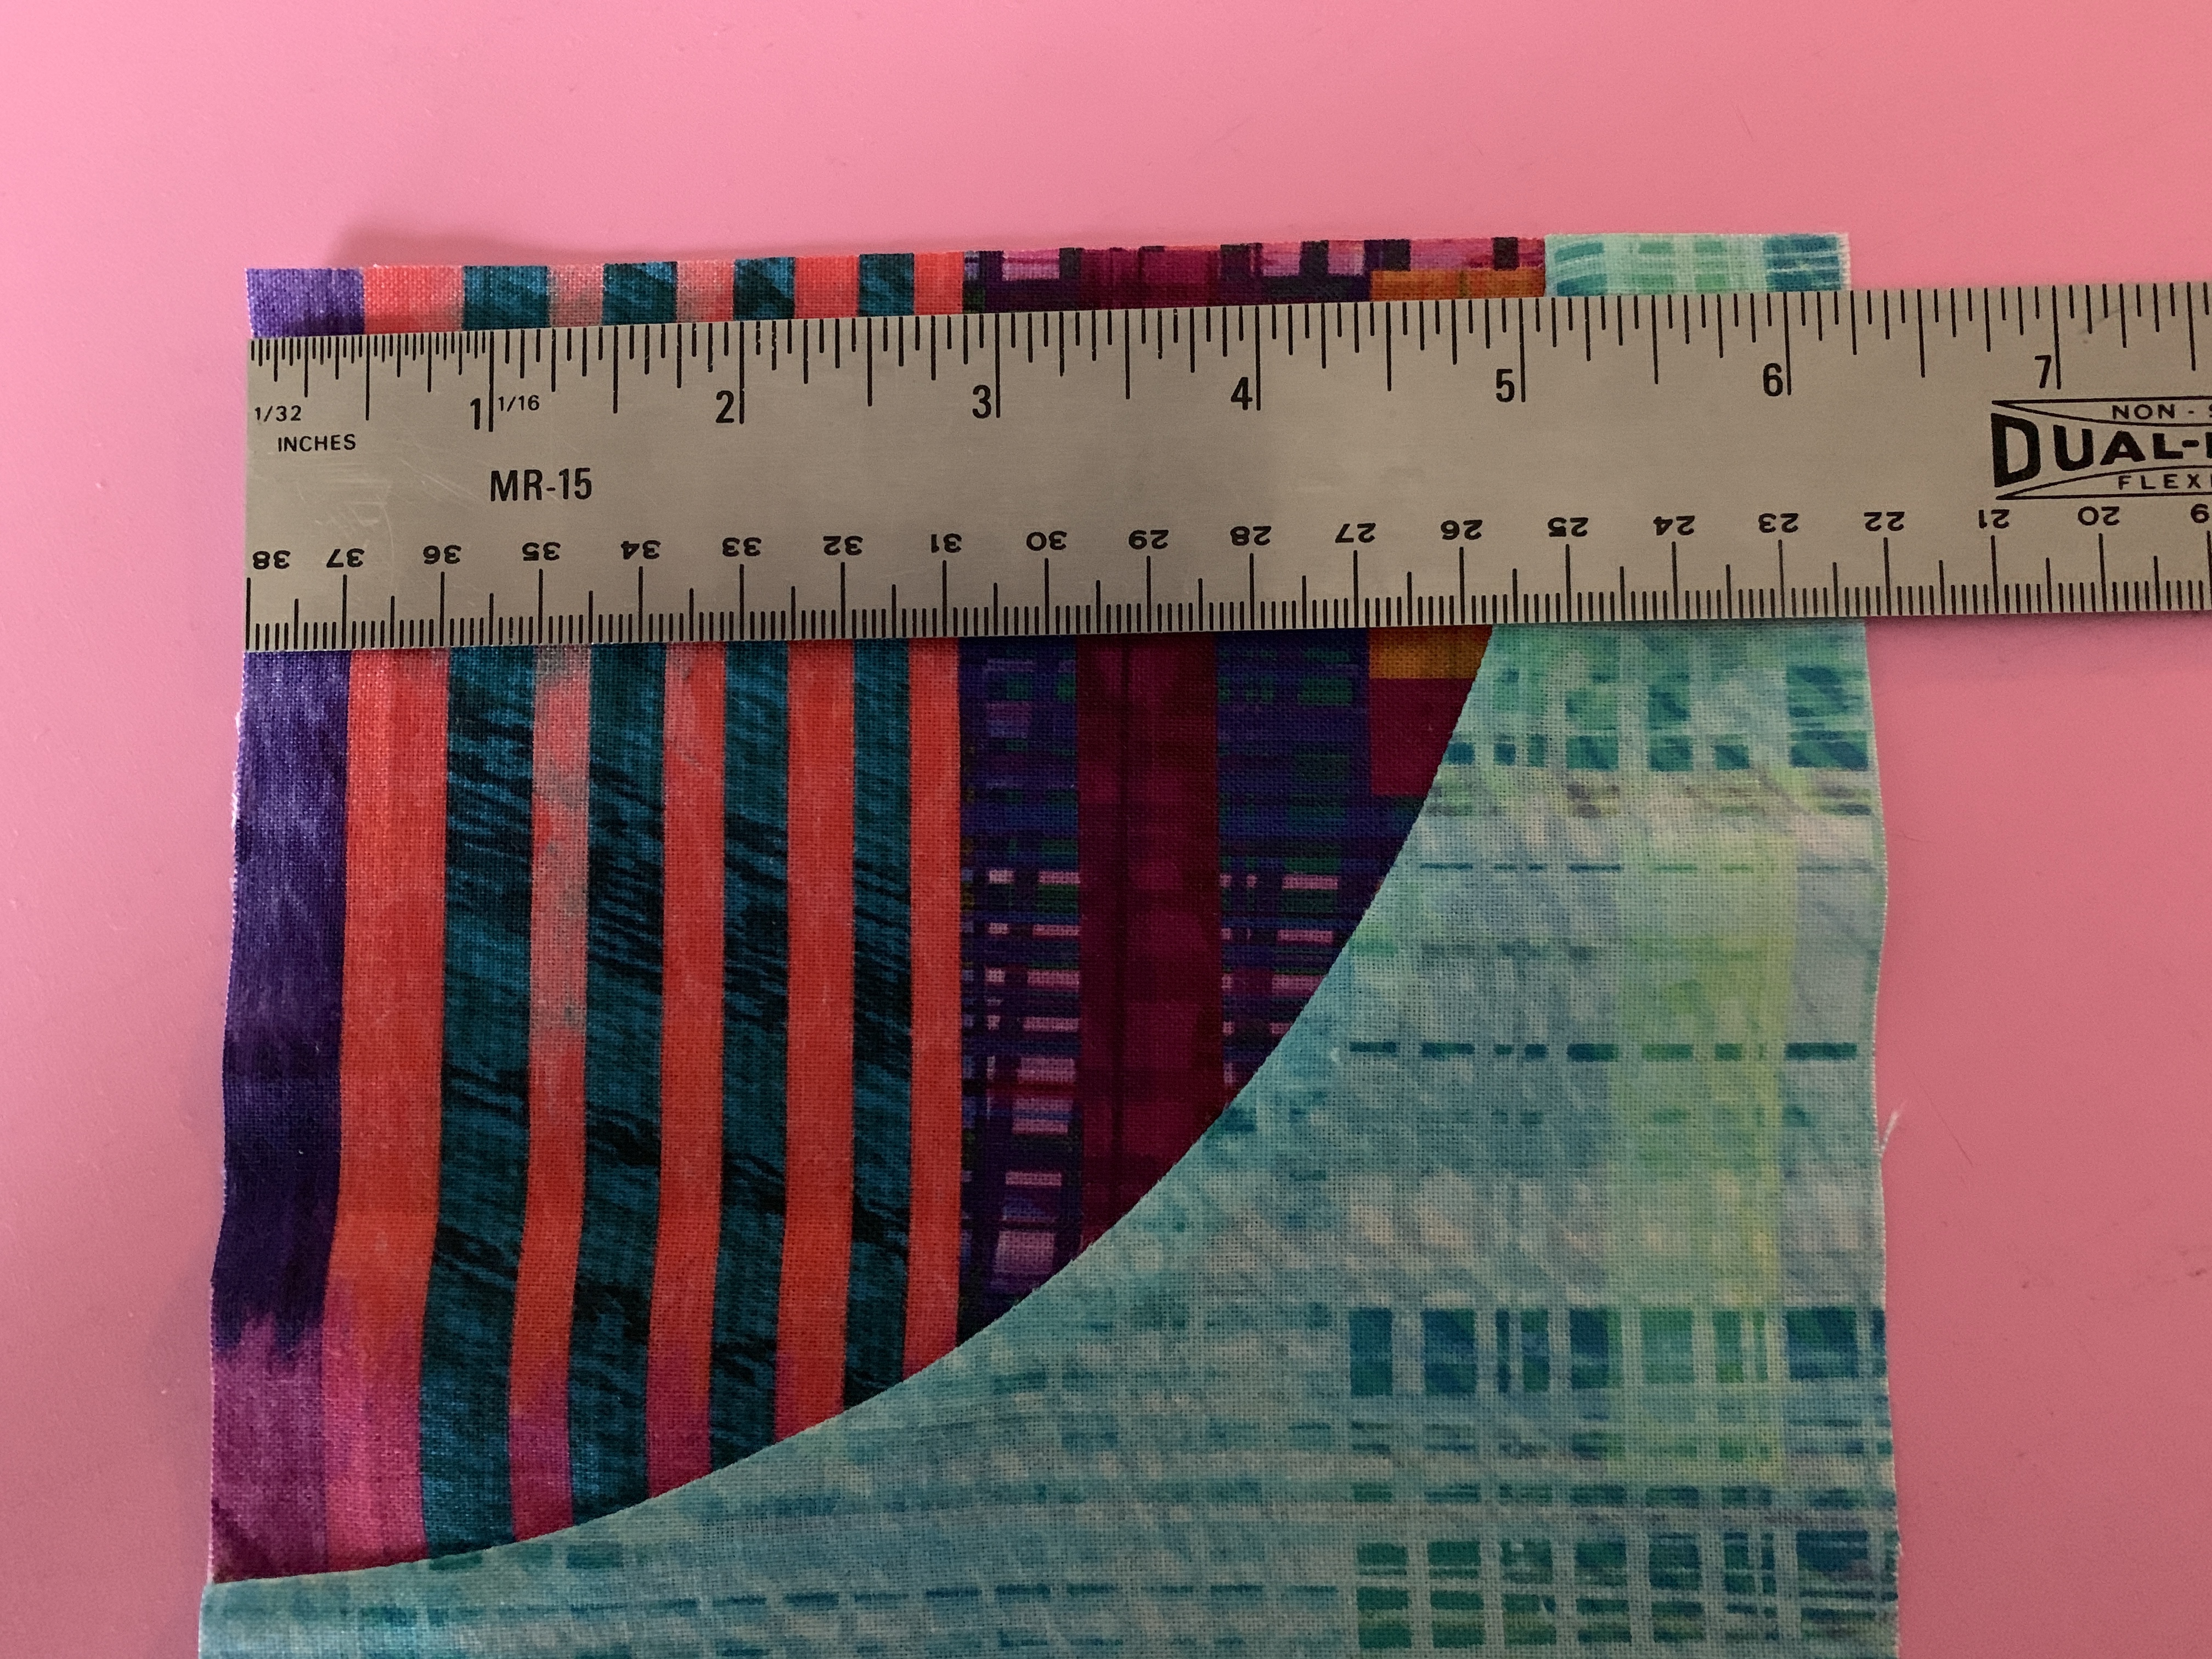
Sewing drunkard’s path blocks is not for the faint of heart! The challenge is to smoothly fit a convex curve to a concave one. Cutting the corner piece was relatively simple – I’d bought an acrylic template that allowed me to cut consistent 5″ circular pieces with my rotary cutter. To end up with a 6 1/2″ block I actually began with 7″ squares of fabric, cut the 1/4 circle, then trimmed the ends of the “L” 3/8 of an inch so when I aligned the two antagonistic curves they would actually match up. I sewed a bunch of practice blocks before tackling these ones for the quilt. By the time I got to sewing this fabric I had pretty good control over the process and almost all of the blocks could safely be trimmed to 6 1/2″. My finished block size is, therefore, 6″. It took some fiddling to get the block to work – 1/4″ seam on the curve was essential – actually just a tiny bit shy of 1/4″ worked best. The instructions I read recommended using 5 pins along the curve – I found I just needed two – one in the middle of the curve, the second at the end – then carefully fitting the “L” to the 1/4 circle (the latter on the bottom) allowed me the best control. I was surprised how quickly I could construct the blocks.
While I was making blocks I did enough for an insertion in the backing. That strip is also assembled. Tomorrow, I’ll construct the backing and set up the quilt for quilting. THEN I have to get back to the tilted squares to get the quilting on that quilt done.
I have four more quilt ideas waiting their turn. I have fabric for some of them – the difficult part is being patient and not starting anything else until these two quilts are finished.