Improvisation #6: Japanese Quilt

IMG_7452

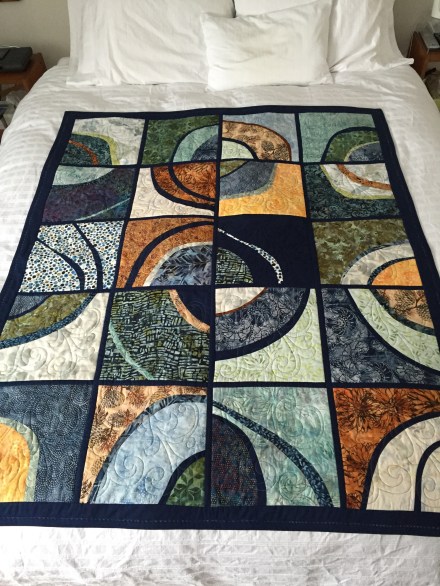
Finished dimensions: 52″ X 64″

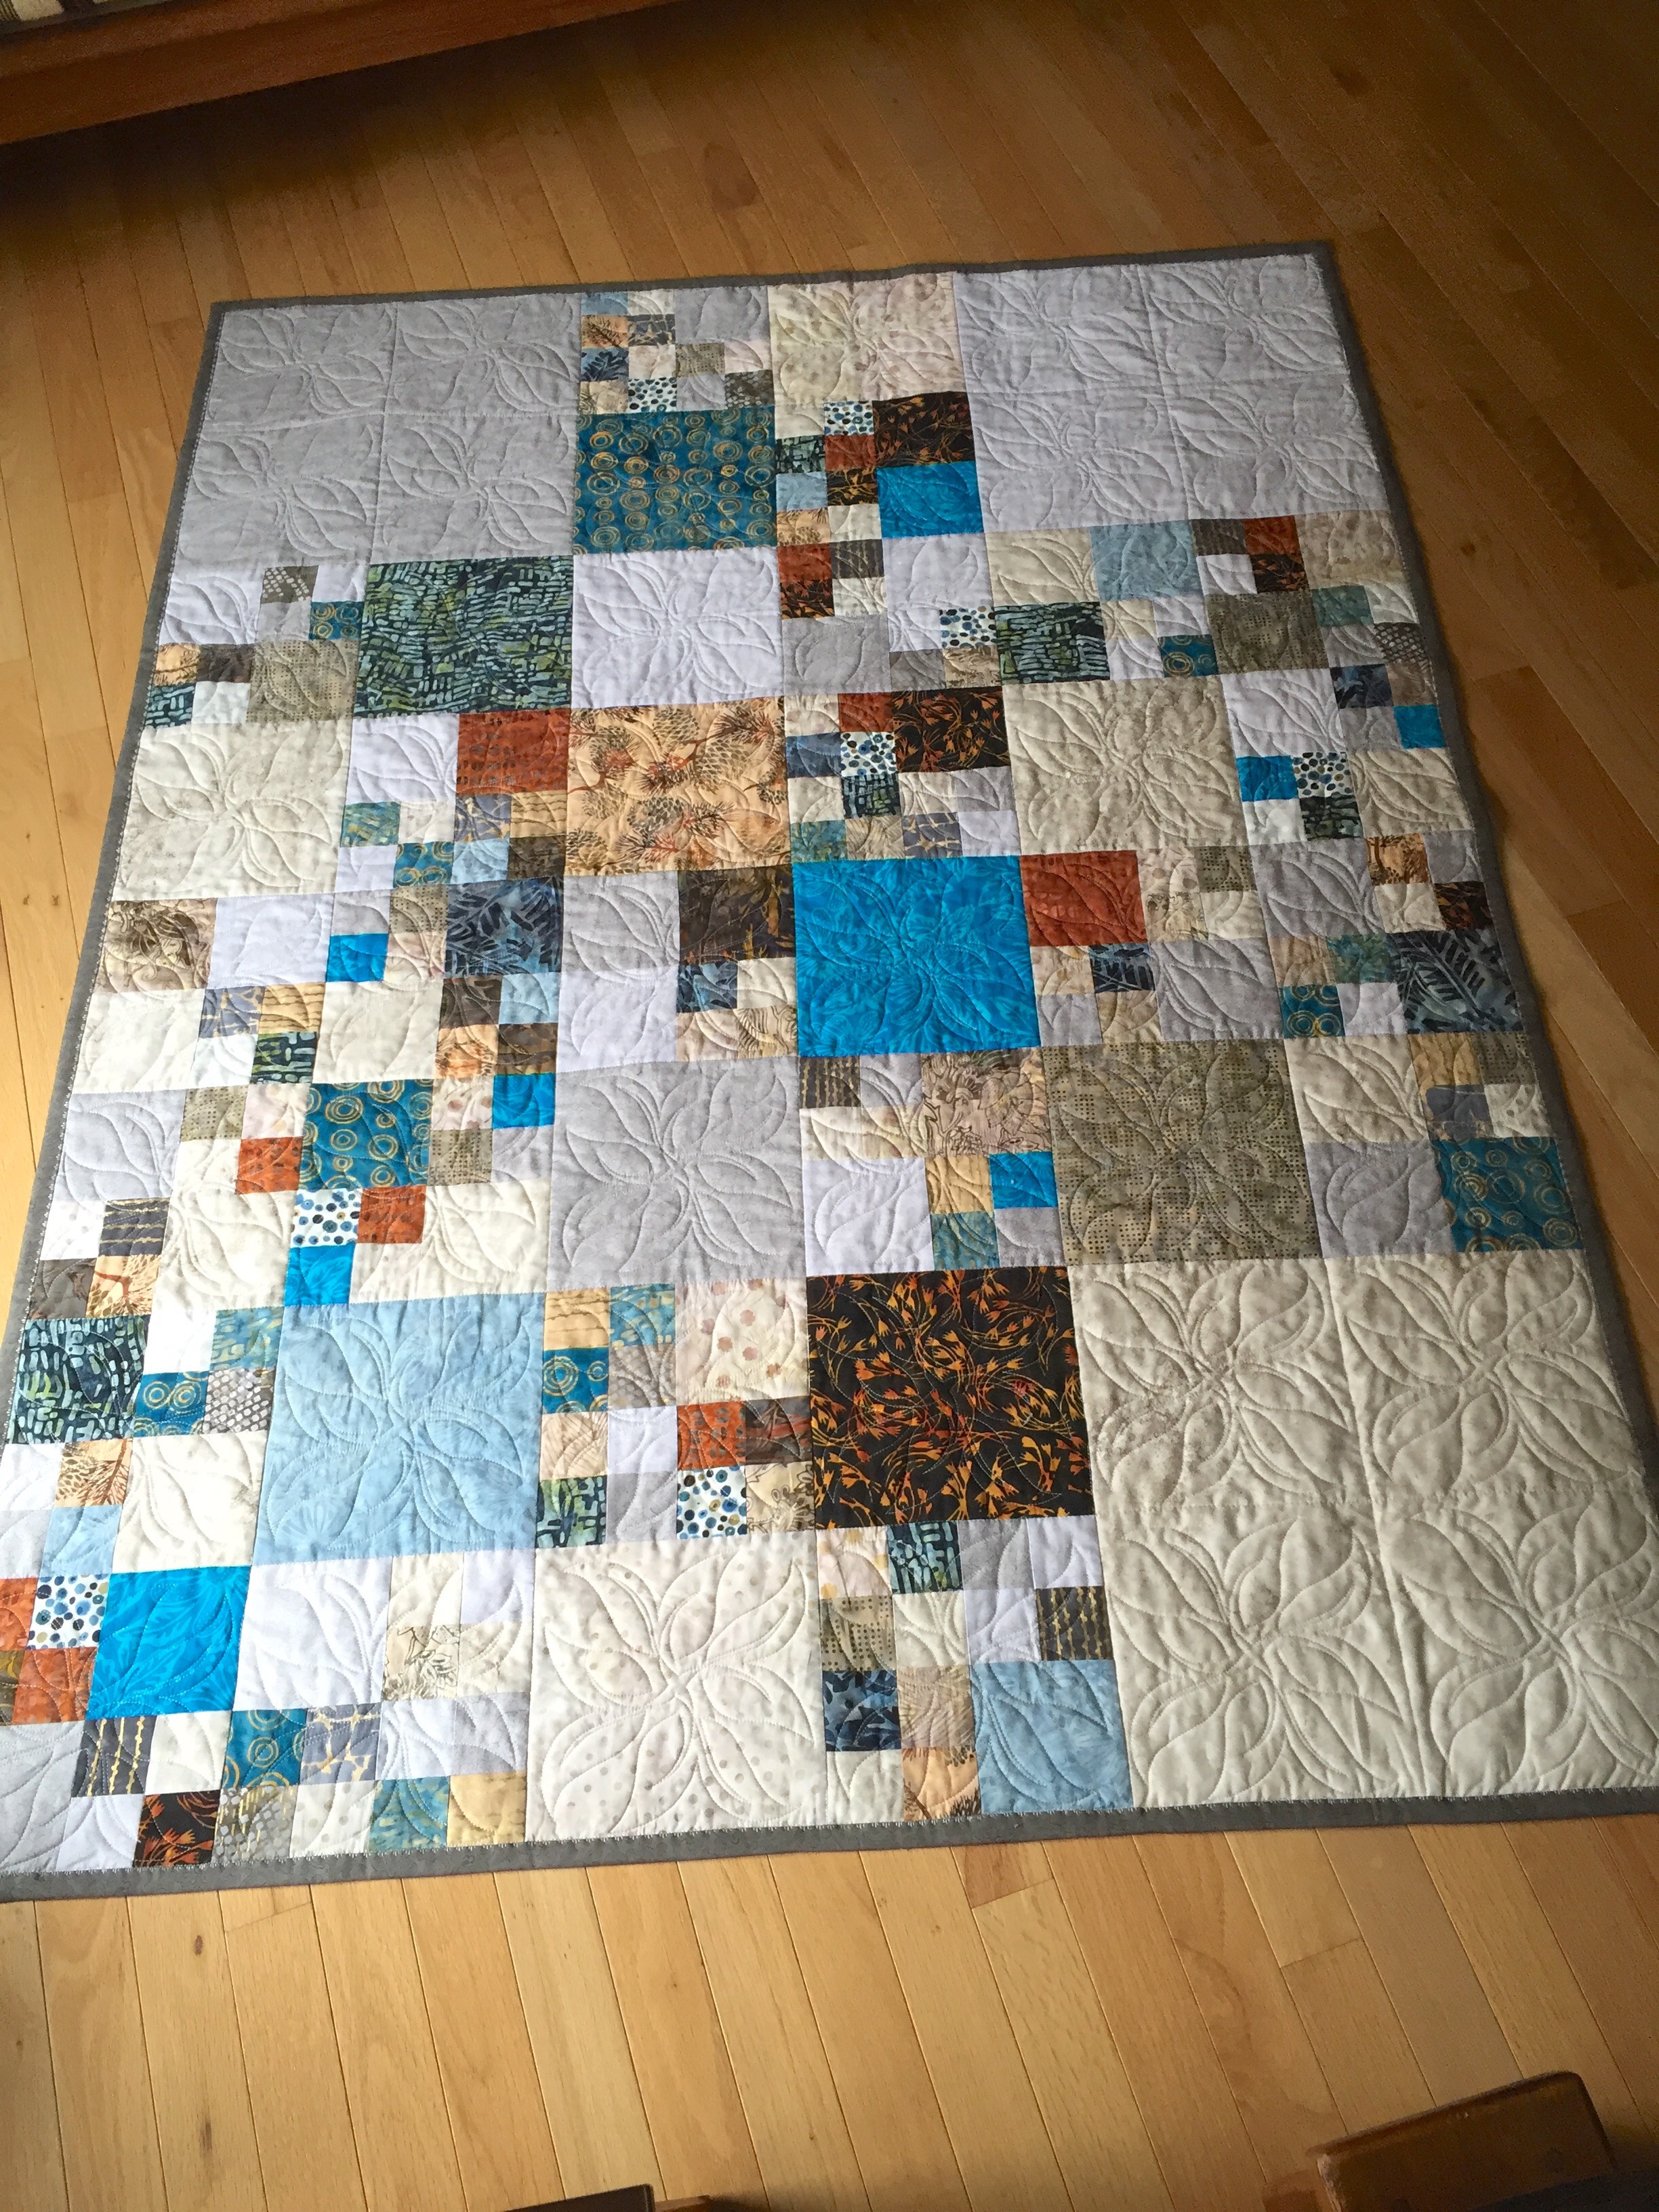
Just this minute finished this quilt top. I haven’t yet finished quilting the tipsy squares – the fabric for this quilt called out to me and I had to cut the blocks, then the circular portions leaving an “L” shaped piece, and I couldn’t leave the pile of “L” shaped pieces sitting there so I started working on the blocks.

The blocks are what is called “drunkard’s path”. It’s a classic quilt block with a curved bite removed from one corner. There are a gazillion possible arrangements for these blocks, but I thought this fabric collection called out for complete and partial circles – bubbles.

Sewing drunkard’s path blocks is not for the faint of heart! The challenge is to smoothly fit a convex curve to a concave one. Cutting the corner piece was relatively simple – I’d bought an acrylic template that allowed me to cut consistent 5″ circular pieces with my rotary cutter. To end up with a 6 1/2″ block I actually began with 7″ squares of fabric, cut the 1/4 circle, then trimmed the ends of the “L” 3/8 of an inch so when I aligned the two antagonistic curves they would actually match up. I sewed a bunch of practice blocks before tackling these ones for the quilt. By the time I got to sewing this fabric I had pretty good control over the process and almost all of the blocks could safely be trimmed to 6 1/2″. My finished block size is, therefore, 6″. It took some fiddling to get the block to work – 1/4″ seam on the curve was essential – actually just a tiny bit shy of 1/4″ worked best. The instructions I read recommended using 5 pins along the curve – I found I just needed two – one in the middle of the curve, the second at the end – then carefully fitting the “L” to the 1/4 circle (the latter on the bottom) allowed me the best control. I was surprised how quickly I could construct the blocks.

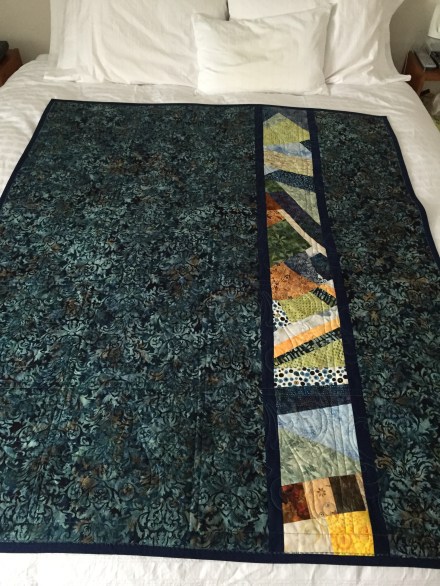
While I was making blocks I did enough for an insertion in the backing. That strip is also assembled. Tomorrow, I’ll construct the backing and set up the quilt for quilting. THEN I have to get back to the tilted squares to get the quilting on that quilt done.

I have four more quilt ideas waiting their turn. I have fabric for some of them – the difficult part is being patient and not starting anything else until these two quilts are finished.

Improvisation #5: Quilt Top Completed

IMG_7427

Just finished assembling the quilt top. Can’t decide whether to leave it as it is or to add a bit more border to it… I cut a 2 1/2″ strip for the border, probably should have used at least 3″ – If I added another couple of inches what would I use – a solid? a bit from the backing? I’ll have to think about that some more.

Now to move on to the five blocks for the backing strip – my backing fabric is 44″, quilt top width = 52″ – I need a strip at least 12″ wide to give me enough fabric for the backing to allow the embroidery/quilting to work.

OK, now to get to it…

Improvisation #5: More Progress

IMG_7426

Last Wednesday, the day before I was supposed to leave on a sewing trip to San Francisco, I came down with a dreadful gastroenteritis (norovirus). I was violently ill for two days and a zombie for three more. My brain ground to a halt. All I managed to do was watch “Lie To Me” – a TV series from 2009-11 on Netflix – all 46 episodes (worth watching, BTW!). Not kidding! All I could manage was to sit there immersed in the story and characters (I took small breaks for a bit of soup and ginger ale/water). I couldn’t even think about walking into the sewing room.

This morning I got up, showered, dressed, had a small amount to eat and sat down at my sewing machine – and began framing the blocks I’d made. I got two rows done, with sashing (and one longitudinal outside border), before stopping for the afternoon.

There are a ton of things to keep track of here and I’m controlling most of it, but not all of it: colour arrangement, block orientation, frame orientation… I had laid out all 20 blocks on my office floor and carefully picked them up in order (I’d added masking tape with row/column identification on each block), but once I started adding the framing I kind of lost sight of block orientation and when I went to add the sashing I found I needed to change block position a bit to be able to match up the framing seams. To use the framing fabric efficiently, I stitch two sides (10 1/2″ in length – these become top/bottom) then add the two longer pieces (11 1/2″ – these become the sides) – so a 45″ strip (with selvages cut off) gives me exactly 2 shorter and 2 longer pieces. As I work on the next two rows, I will try to keep an eye on block orientation as well when I add the first framing strips to the sides. Lots of variables to keep in mind on this quilt.

I have fabric for the backing and five blocks already made for the insertion so I’ll be able to move on quickly with the sewing here. A couple of days and the top and backing will be done. I created an embroidery for the quilting before I closed down to travel – my intention is to edge-to-edge quilt this using my embroidery machine – the embroidery has been set up to allow me to align ending and beginning. That’s because my framed block is 11″ and although I have a 360 X 350 mm reversing hoop it limits the kind of design I can create – can’t have any overlapping in the center because the bulk of the quilt creates just enough distortion that it’s impossible to get a decent alignment across the center. So my plan is to use the 360 X 200 hoop and quilt from edge-to-edge! That will be toward the end of the week.

Improvisation #5: Progress Report

IMG_7403

Here’s what I’ve got so far – not necessarily ending up in this orientation and still six blocks to construct for the top. I’m loving how bright this is. Each block has been interesting to make up.

Now that I know what I’m doing, I’ve been able to prep the fabric so I have what I need for the blocks and I’ve tidied up the stacks of fabric (have to put them away tomorrow). Last night I set up each of the blocks – took a backing square (trimmed all of the fabric pieces to 12″), chose two contrast fabrics and a center and put them to one side, until I had all the backing squares set up. So sewing blocks today went much faster because I wasn’t having make all the decisions as I went along.

I’ll get the six blocks for the top finished tomorrow (and perhaps three more to add to the two I have already for the back). I have backing fabric for the quilt which I bought the other day and lots of stuff in the stash for binding.

I still don’t know how I’m going to join the blocks – they need some sashing – the question is whether to sash them symmetrically or to do something wonky with them. I’ll have to ponder that a bit when I have all 20 to play with.

Improvisation #5: The Blocks

The quilt was obviously on my mind during the night because when I got up this morning I knew I wanted to head to the fabric shop for some fabrics in a range of bright colours to use as the large “background” element for each block.

I have ended up with 1/3m of 25 different fabrics (6 fabrics from my stash).

Fabrics for “backgrounds”


Why so much fabric you wonder – well, I figured out the easiest (if most wasteful) way of building that large block is to start with a 12″ X 12″ square of the “background” fabric. Take the block I want to offset, trim a couple of corners off, then lay it on the 12″ X 12″ square.

Block on background


I found if I pulled the block in 1/4″ from the top and left edges of the “background” fabric I can cut out the triangles needed to construct the large square (leaving me with a large piece of background fabric lying beneath the block as leftover, oh well – it’s large enough to use for something else).

Background pieces ready to be sewn


Now I sew the background pieces to the block.

Complete block sewn


Once the triangles are sewn to the block it’s easy to trim it to 11″ and guess what – the pattern is aligned – had I figured that out yesterday I could have salvaged the fabric I ended up discarding.

Finished block

Here are four blocks finished and trimmed to 11″ X 11″. You can see what I mean by “offset” and “background. Each block will be different except for the white with blue dot fabric framing the center square in each block. I’m thinking I will frame each of these 11″ X 11” blocks with a solid white (maybe a slightly off white) narrow frame, and then sash between the blocks. Although a very dark blue framing might work. I’ll have a better idea about what to do when I get all 25 blocks done – 20 for the quilt top, 5 for the quilt back.

IMG_7387

Four finished blocks – 11″

So now I know what I’m actually doing, I can proceed to make up my inner square assembly for the remaining 21 blocks, cut out a 12″ square from each of the background fabrics, and full steam ahead! Yeah.

Improvisation #5: A Quilt Begins


Improvisation is a messy business. This is the current chaotic state of my sewing room. Piles of fabric everywhere. I have an idea I want to execute but not sure yet which fabrics to use. I know the blocks will be similar. The final block size I’m aiming for is 10.5″, but I expect each block will be unique – that the internal construction will vary.

I started this improvisation by selecting fabrics from various boxes, largish pieces, small scraps (enough for a 3″ square). This afternoon I began by choosing 24 different pieces and cutting a 3″ square from each.

Here’s the idea – a small square embedded in a somewhat larger square (white with blue dots – the only fabric common in all blocks), which is asymmetrically embedded in a dark square, which is embedded, again asymetrically, in a brighter square, and last, the four layers are set into a final “square” but this time offset and truncated.


This was a first try – not entirely successful. I created the final size block I wanted (actually a bit larger for good measure). But directional fabrics aren’t going to work for the last square! I haven’t yet figured out how to piece that final large square in the most economical way possible – it would be relatively easy with solids. With this linear print I was able to orient three of the segments in the same direction but I wasn’t able to get the fourth piece to align without wasting a lot of fabric (I elected to go for economical to see if I could get away with it, can’t). So I will take this block apart and try again.

In the meantime I’ve decided to build the 24 blocks as far as the 4th square.

Then, I’ll look at them all and make a decision about fabric for that final square – I am likely going to have to go fabric shopping for a couple of different, yet complementary fabrics. Then there’s sashing and a border – not anywhere near that yet!

I love the challenge of problem solving my way through an idea to a completed quilt. Nothing could be more boring than following someone else’s directions. So I’ve learned to be comfortable with the mess involved with improvising.

Quilted Coat

A year and a half ago I made a reversible quilted jacket. I’d had the fabric quilted on a long-arm quilter, cut out the pieces, sewed up seams, bound them with a complementary fabric. The challenge was to figure out a way of creating a faux pocket on the reverse side to allow access to the real pocket on the outside. I achieved that by improvising with a zipper.

Last spring I bought Sandra Betzina’s coat pattern thinking I could use similar techniques I used for the jacket. I liked the tall collar and the contrasting bands. I thought it wouldn’t be too difficult to accomplish the look.

So I had more fabric quilted. Last week I cut out the pieces with some modifications: I cut set-in sleeves from the jacket pattern instead of raglan used in Sandra’s coat; I cut the body a half inch wider on both fronts and the back at the side seams. I decided not to make the welt pocket in the pattern but to recreate the patch pockets (with zipper on the inside) used in the jacket.

I started, following the instructions, by joining yoke and body (front and back) with a contrasting strip. (This was my first mistake – I should have ignored the pattern instructions and thought the assembly through on my own – I should have bound the front edge in the dark fabric before sewing in the contrast!) I’m going to have to take the contrasting join apart, bind the front edges, then restore the contrast band. I constructed and attached the pockets to the outside. 

I inset a bound zipper on the second side first, however, to allow access to the patch pocket, covering the zipper with the patch pocket on the outside. (That substantially reduces the bulk of the fronts.)
The contrast in the back works fine. No need to redo that.

Setting in the sleeve and binding the armhole, underarm and side seams went without a hitch. Tomorrow I’ll inset the second sleeve.

The collar is ready to be attached – I figured out how to apply the appropriate contrast to each side. I can’t add the collar, however, until the fronts are bound because I want to bind that neckline seam with the appropriate contrasts to each side for the second collar contrast used in the coat pattern!

Buttonhole placement will take some thought – I couldn’t easily include them in the contrast seams like Sandra does. I will have to make bound buttonholes like I did with the jacket (covering the construction with a facing using the side two contrast fabric).

I’ll share more after I finish the garment.

Improvisation #4


The inspiration for this quilt was simple – start with three predominant neutral colours, then mix in a bunch of coordinated batiks and improvise based on a few (3) large 16 1/2″ blocks, a dozen or so (in the end I had 13) 8 1/2″ blocks, two 4 1/2″ blocks from each fabric, and a large number of 2 1/2″ blocks.

I began by laying out the three large neutral blocks, next the 8 1/2″ coloured blocks, the 4 1/2″ blocks, then the small blocks which I’d created by sewing short strips of two batik fabrics then cutting pieces 2 1/2″ wide block pairs. I couldn’t sew long strips together because I wanted more colour combinations than that would have given me. So I mixed and matched shorter strips to get 4-5 pieces from each. The few small block pairs I had left over were incorporated into the back.

I quilted the whole using a 200 X 200 embroidery hoop with an open flowing embroidery design that just about filled the hoop. Before I did that, though, I gave some thought to simply stitching randomly spaced vertical and horizontal lines across the quilt surface. It may look simple, but stitching those lines is a manual task, quite time consuming, and hard on my neck and back. So in the end I opted to embroider the quilt blocks with an 8″ X 8″ design.

Final dimensions: 48″ X 64″. A good size for a lap quilt. I bound the quilt using the same fabric I used for the accent strips on the reverse side. As usual, this is a reversible quilt.

New Quilt

Take knitting – I can’t leave the needles idle – finish one pair of socks, I have to start the next.

It’s become the same with quilting. One quilt finished, the next starts.

Here’s the one I’ve just begun: 

I had a  jelly roll of forty 2.5″ strips of batik fabrics in shades of blue / turquoise, I went to the stash to pick out some complementary fabrics in the same hues as well as some greens that would blend – from these I cut 2″ strips from the width of fabric. 

Why 2″? Well, my idea was to build blocks from six strips of batik with a complementary background – I auditioned several solid colours, decided white created the liveliest contrast.

For a lap quilt I want a finished width of about 45″ – six standard 2.5″ strips would give me 12″ blocks (too large for my purposes). I wanted to end up with a 5 block X 7 block quilt so I needed blocks no larger than 9″. Six 2″ strips result in a 9″ finished block. So I trimmed the jelly roll strips to 2″, cut a bunch of 2″ white strips and started improvising.   

10 blocks  done – first I arranged them in rows with all the stripes in the same direction, but tried flipping a couple.

Then I took a photo from the end on: 

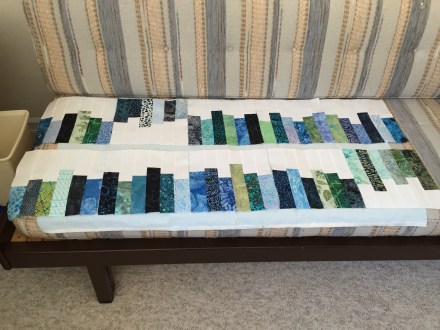
Now that’s an interesting idea!  Still a 5X7 quilt but with the columns having horizontal stripes and now maybe a contrasting vertical sashing.

That’s where I am at the moment – 10 blocks created, 25 to go….

Modern Quilt II – Finished

Finished the quilt today. I wasn’t sure how to quilt it – initially I was planning on echoing the curves at 1/2″ intervals but the shape of the curves in each block is quite different and I thought the finished stitching wouldn’t resonate from one block to the next. So in the end I set up an open embroidery design (240 mm x 240 mm) which had to be embroidered using my 360/350 hoop which stitches half of the design, then gets turned 180 degrees and the second half of the design is stitched. By changing the top thread colour (I used a “blendable” thread) to blend with the predominant block fabric I was able to have the stitching present but not too dominant. 

Happy with the finished quilt. Definitely got a lot of practice sewing curves – which is what I was going for.

Still enough fabric left from that set of batiks to make one, and maybe two, more quilts.