“Double Vision” Quilt

A while back I purchased and downloaded a quilting book by Louisa L. Smith: “Double Vision Quilts“. She makes interesting quilts by “layering” – using raw edge appliqué on structured pieced backgrounds to create an illusion of shapes such as curves without having to do curved piecing which is an advanced sewing skill!

double-vision-book

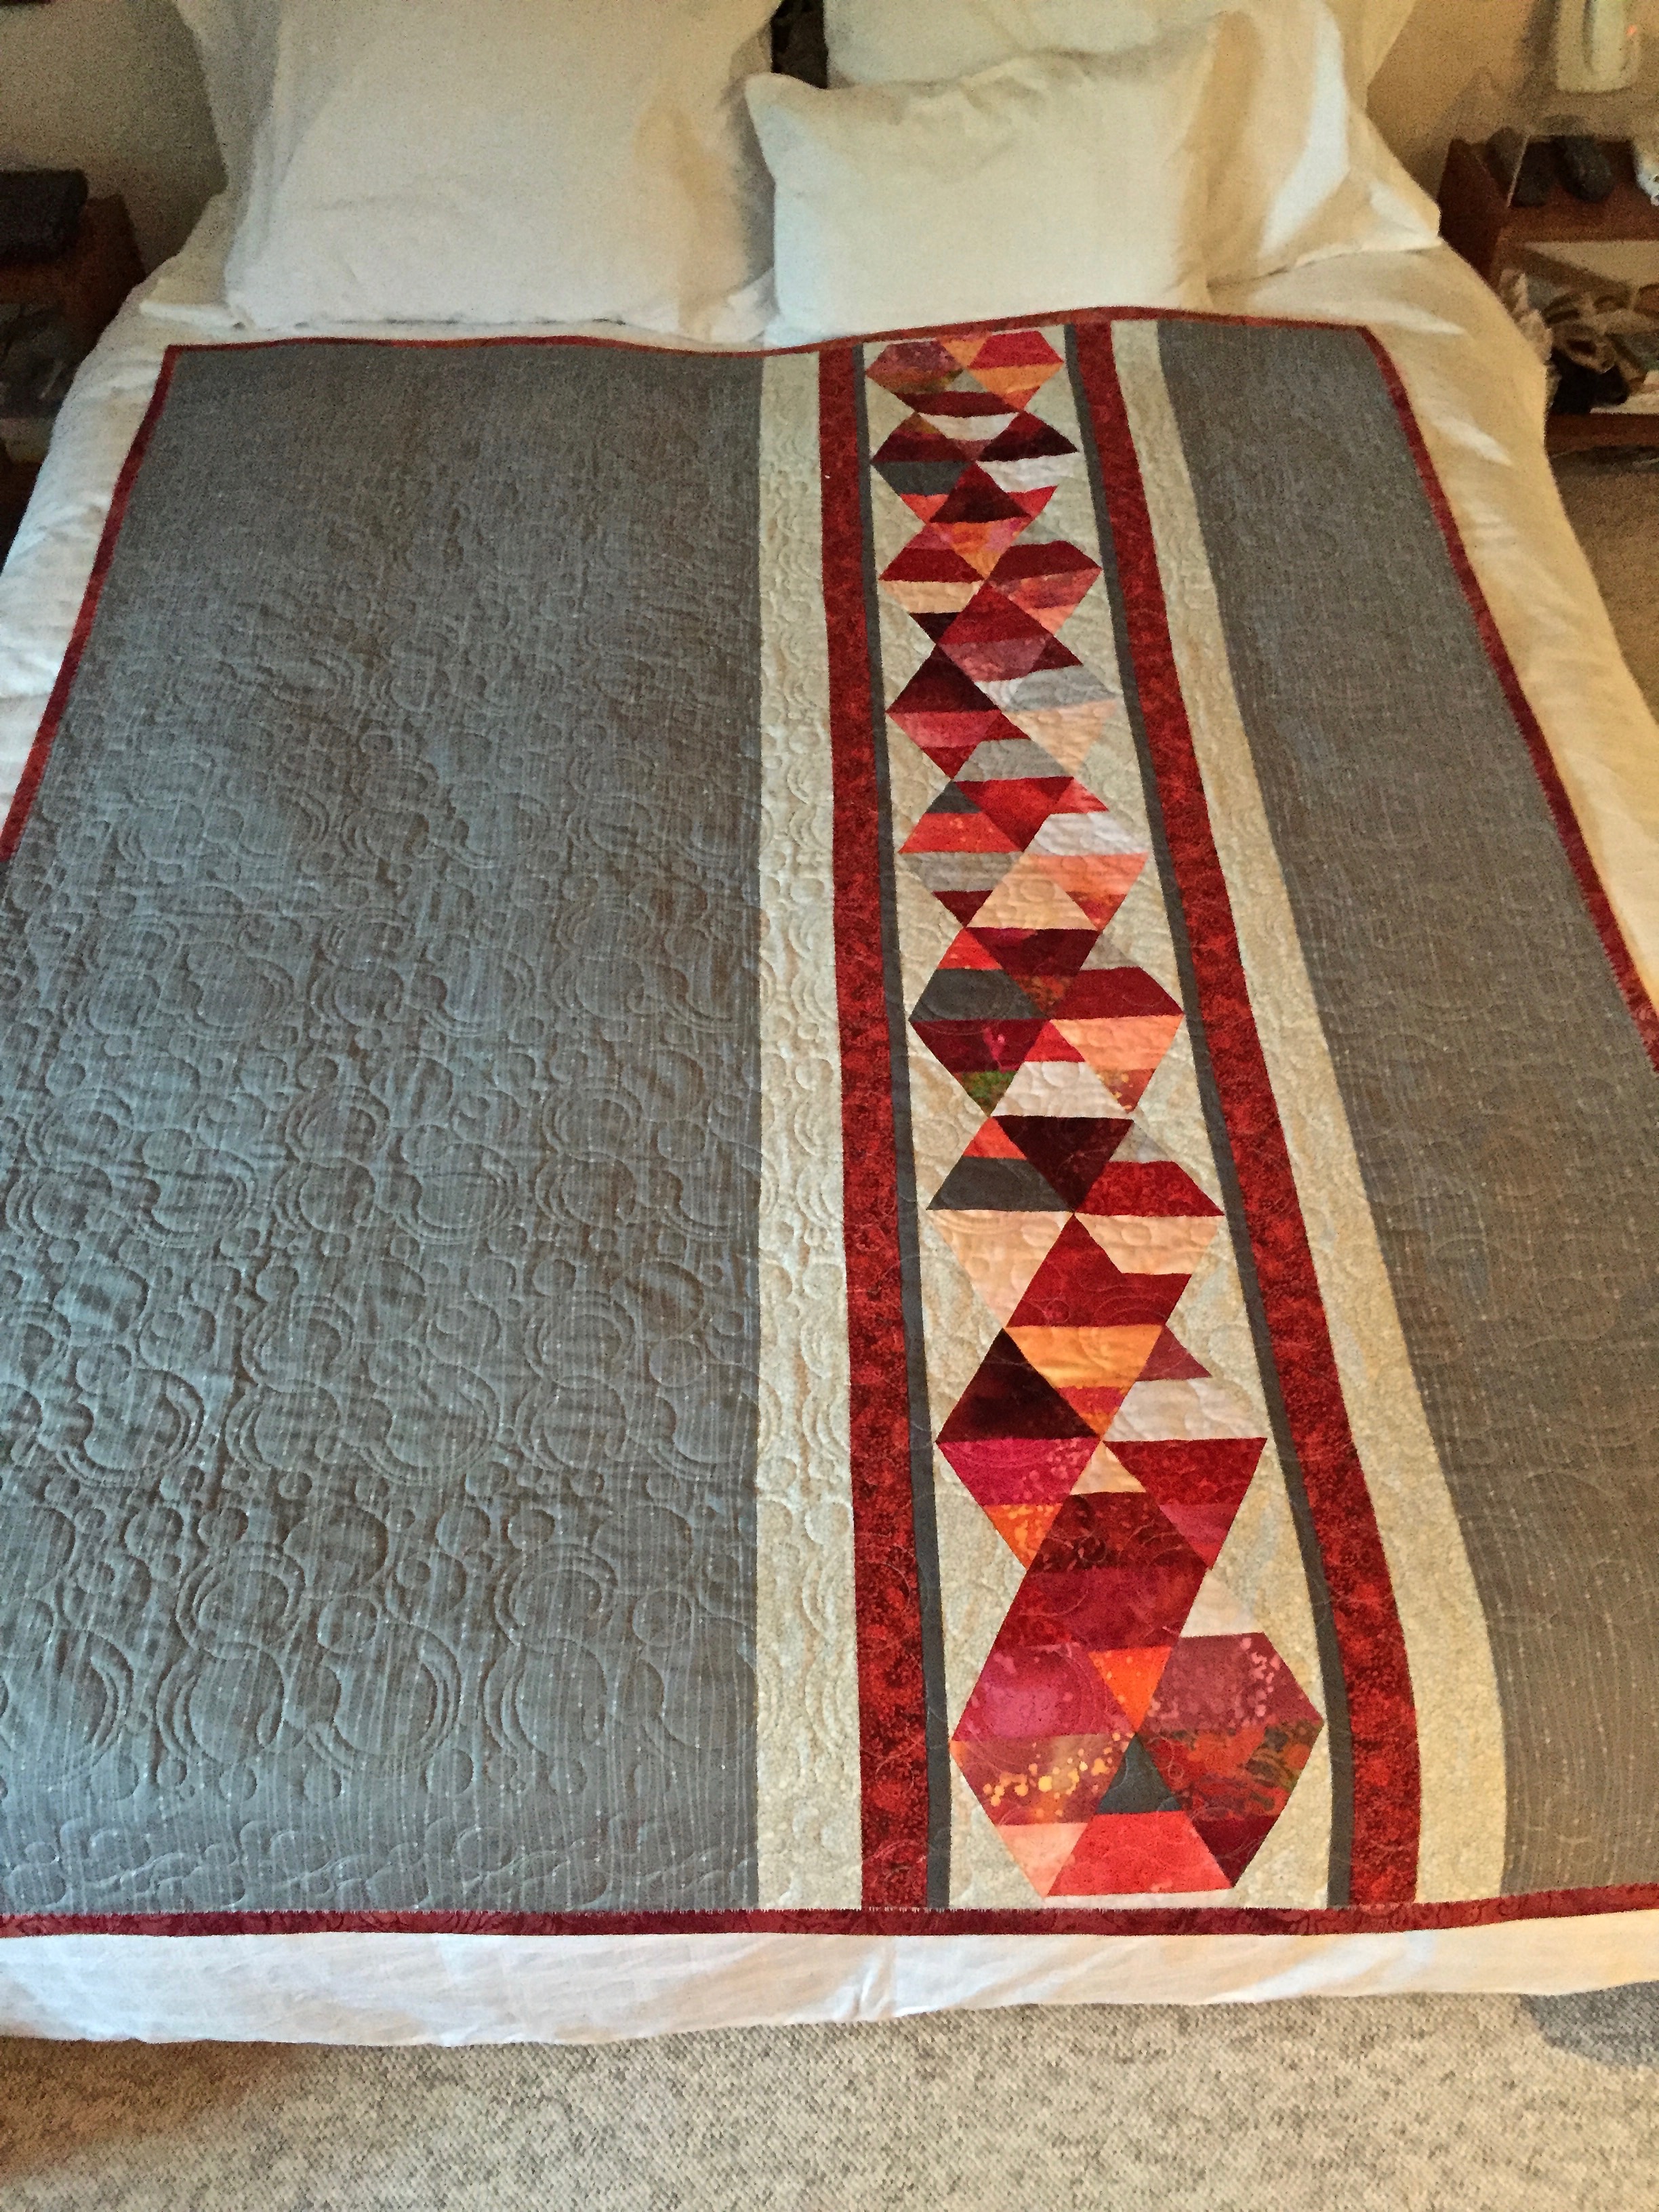
Her quilts are all quite lovely – beautiful colours, interesting ideas. The one that caught my eye was a quilt she calls “Circular Anomaly” – the quilt has a pieced under layer which shades from black to white (bottom to top and from left to right). The top appliqué layer uses dark red to a golden orange from top to bottom – starting with “X” shaped pieces at the top in dark red on the light under colours to the golden orange on the darkest colours beneath. The finished quilt is intended, I’m guessing by its size, to be a wall hanging.
anomolyI liked the idea but wanted to make a full sized lap quilt so I increased the number of background blocks as well as the block size – my finished panel ended up at 41″ X “54” – which means I will also want to add a border of some sort to make the quilt 47″ X 60″.

I considered other colour combinations: blues for the background with green appliqué elements or green background with purple-blue appliqué, but in the end I decided I really liked the colour combination Smith used so to start the project I scoured my fabric stash (scraps, largish pieces, fat quarters, other quilting fabrics) pulling out all the black-grey-whites I had. There were quite a few although not quite enough for the  under panel so I bought 6 more 1/4m fabric pieces in greys. I had a lot of reds – from very dark to golden orange; I’ve gone with what I have:

img_9653

Fabric for “circles”


I cut out one hundred twenty (I needed 108 but wanted to have extras so I could control the colour flow) 5″ squares from the black-grey-white fabrics and assembled the 9 x 12 base layer:

img_9010

Background layer

Next I had to figure out what size “X” and “circle” elements I’d need and how many (I’m not following Smith’s directions, right? So I had to calculate this for myself). I began with Smith’s templates but upsized them by screen-capturing the two elements, then printing them at 115% which, in the end, gave me the size I was after.

img_6170
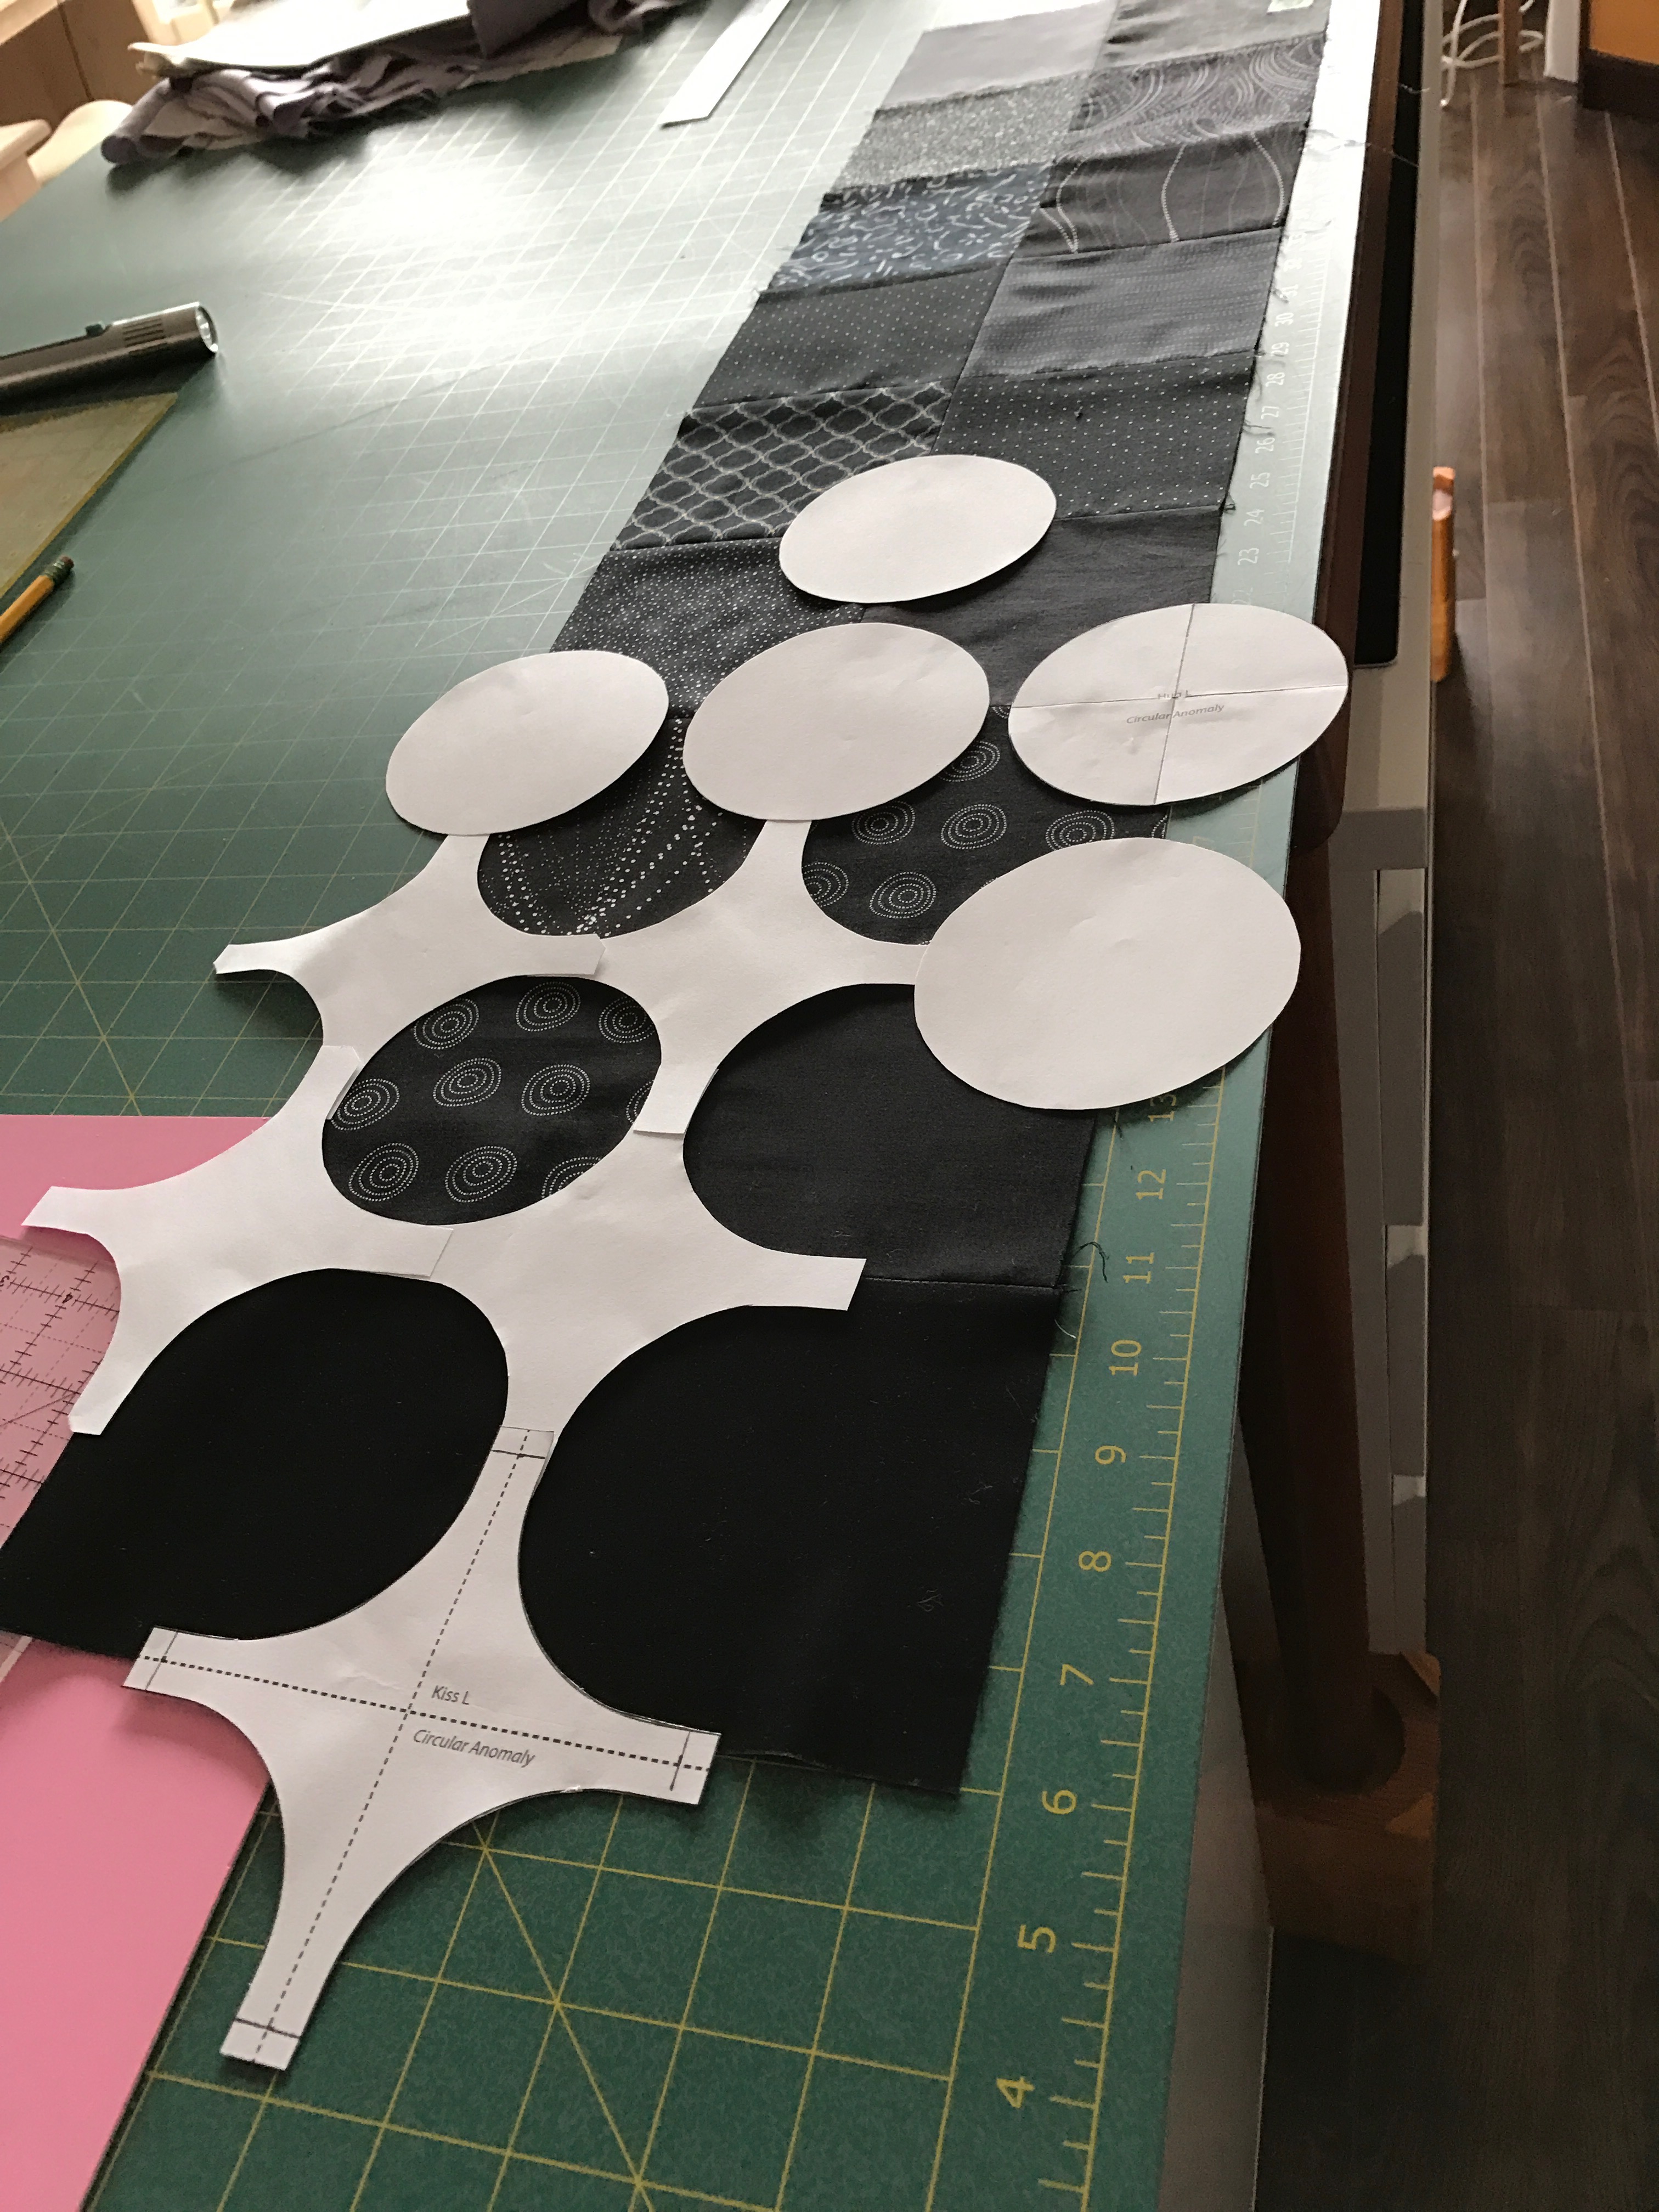
I decided a finished circle of 4″ would work; the “X” ended up with a 2.5″ arm length from the center to allow a bit of overlap.

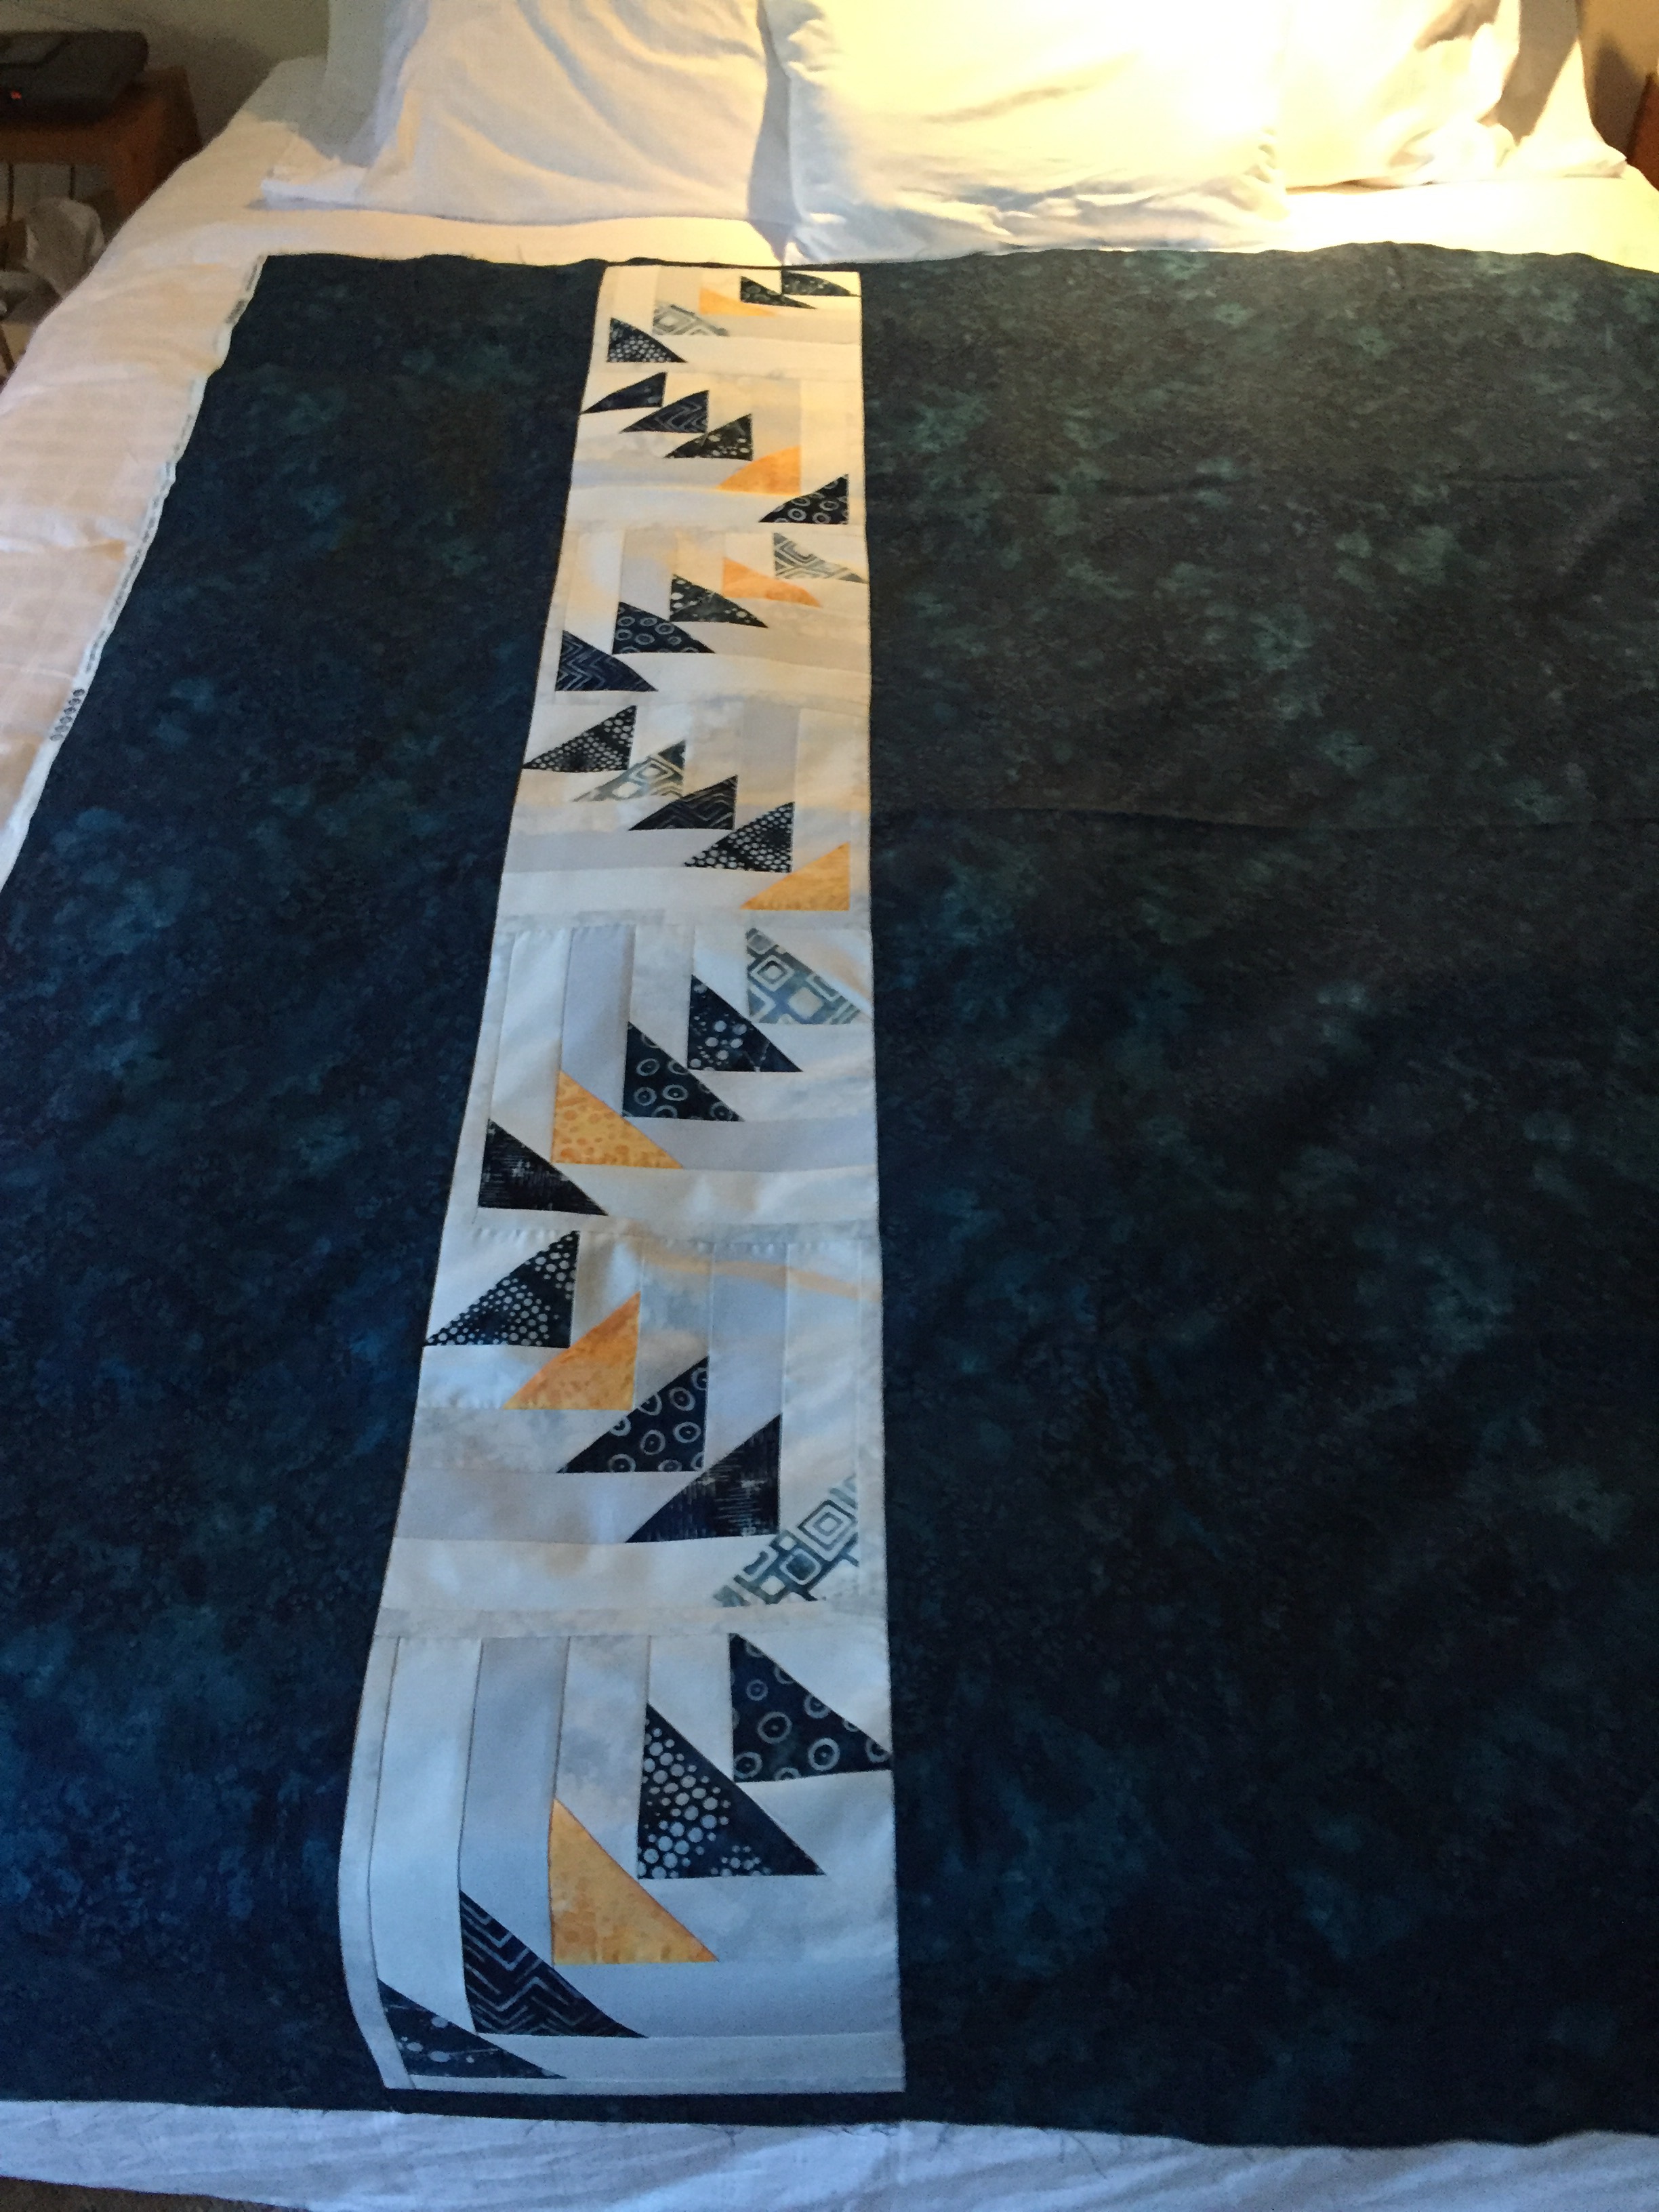
I cut 4 1/2″ strips of “Wonder Under” – Pellon’s 805 light weight fusible paper backed iron-on adhesive, drew the circles and “X”s on the paper side of the strips, then fused the strips to the back of the red fabrics. So far, I have carefully cut out the “X”s and pinned them to the background being careful with the colour gradient from dark in the right top corner to medium red along the diagonal :

img_6161

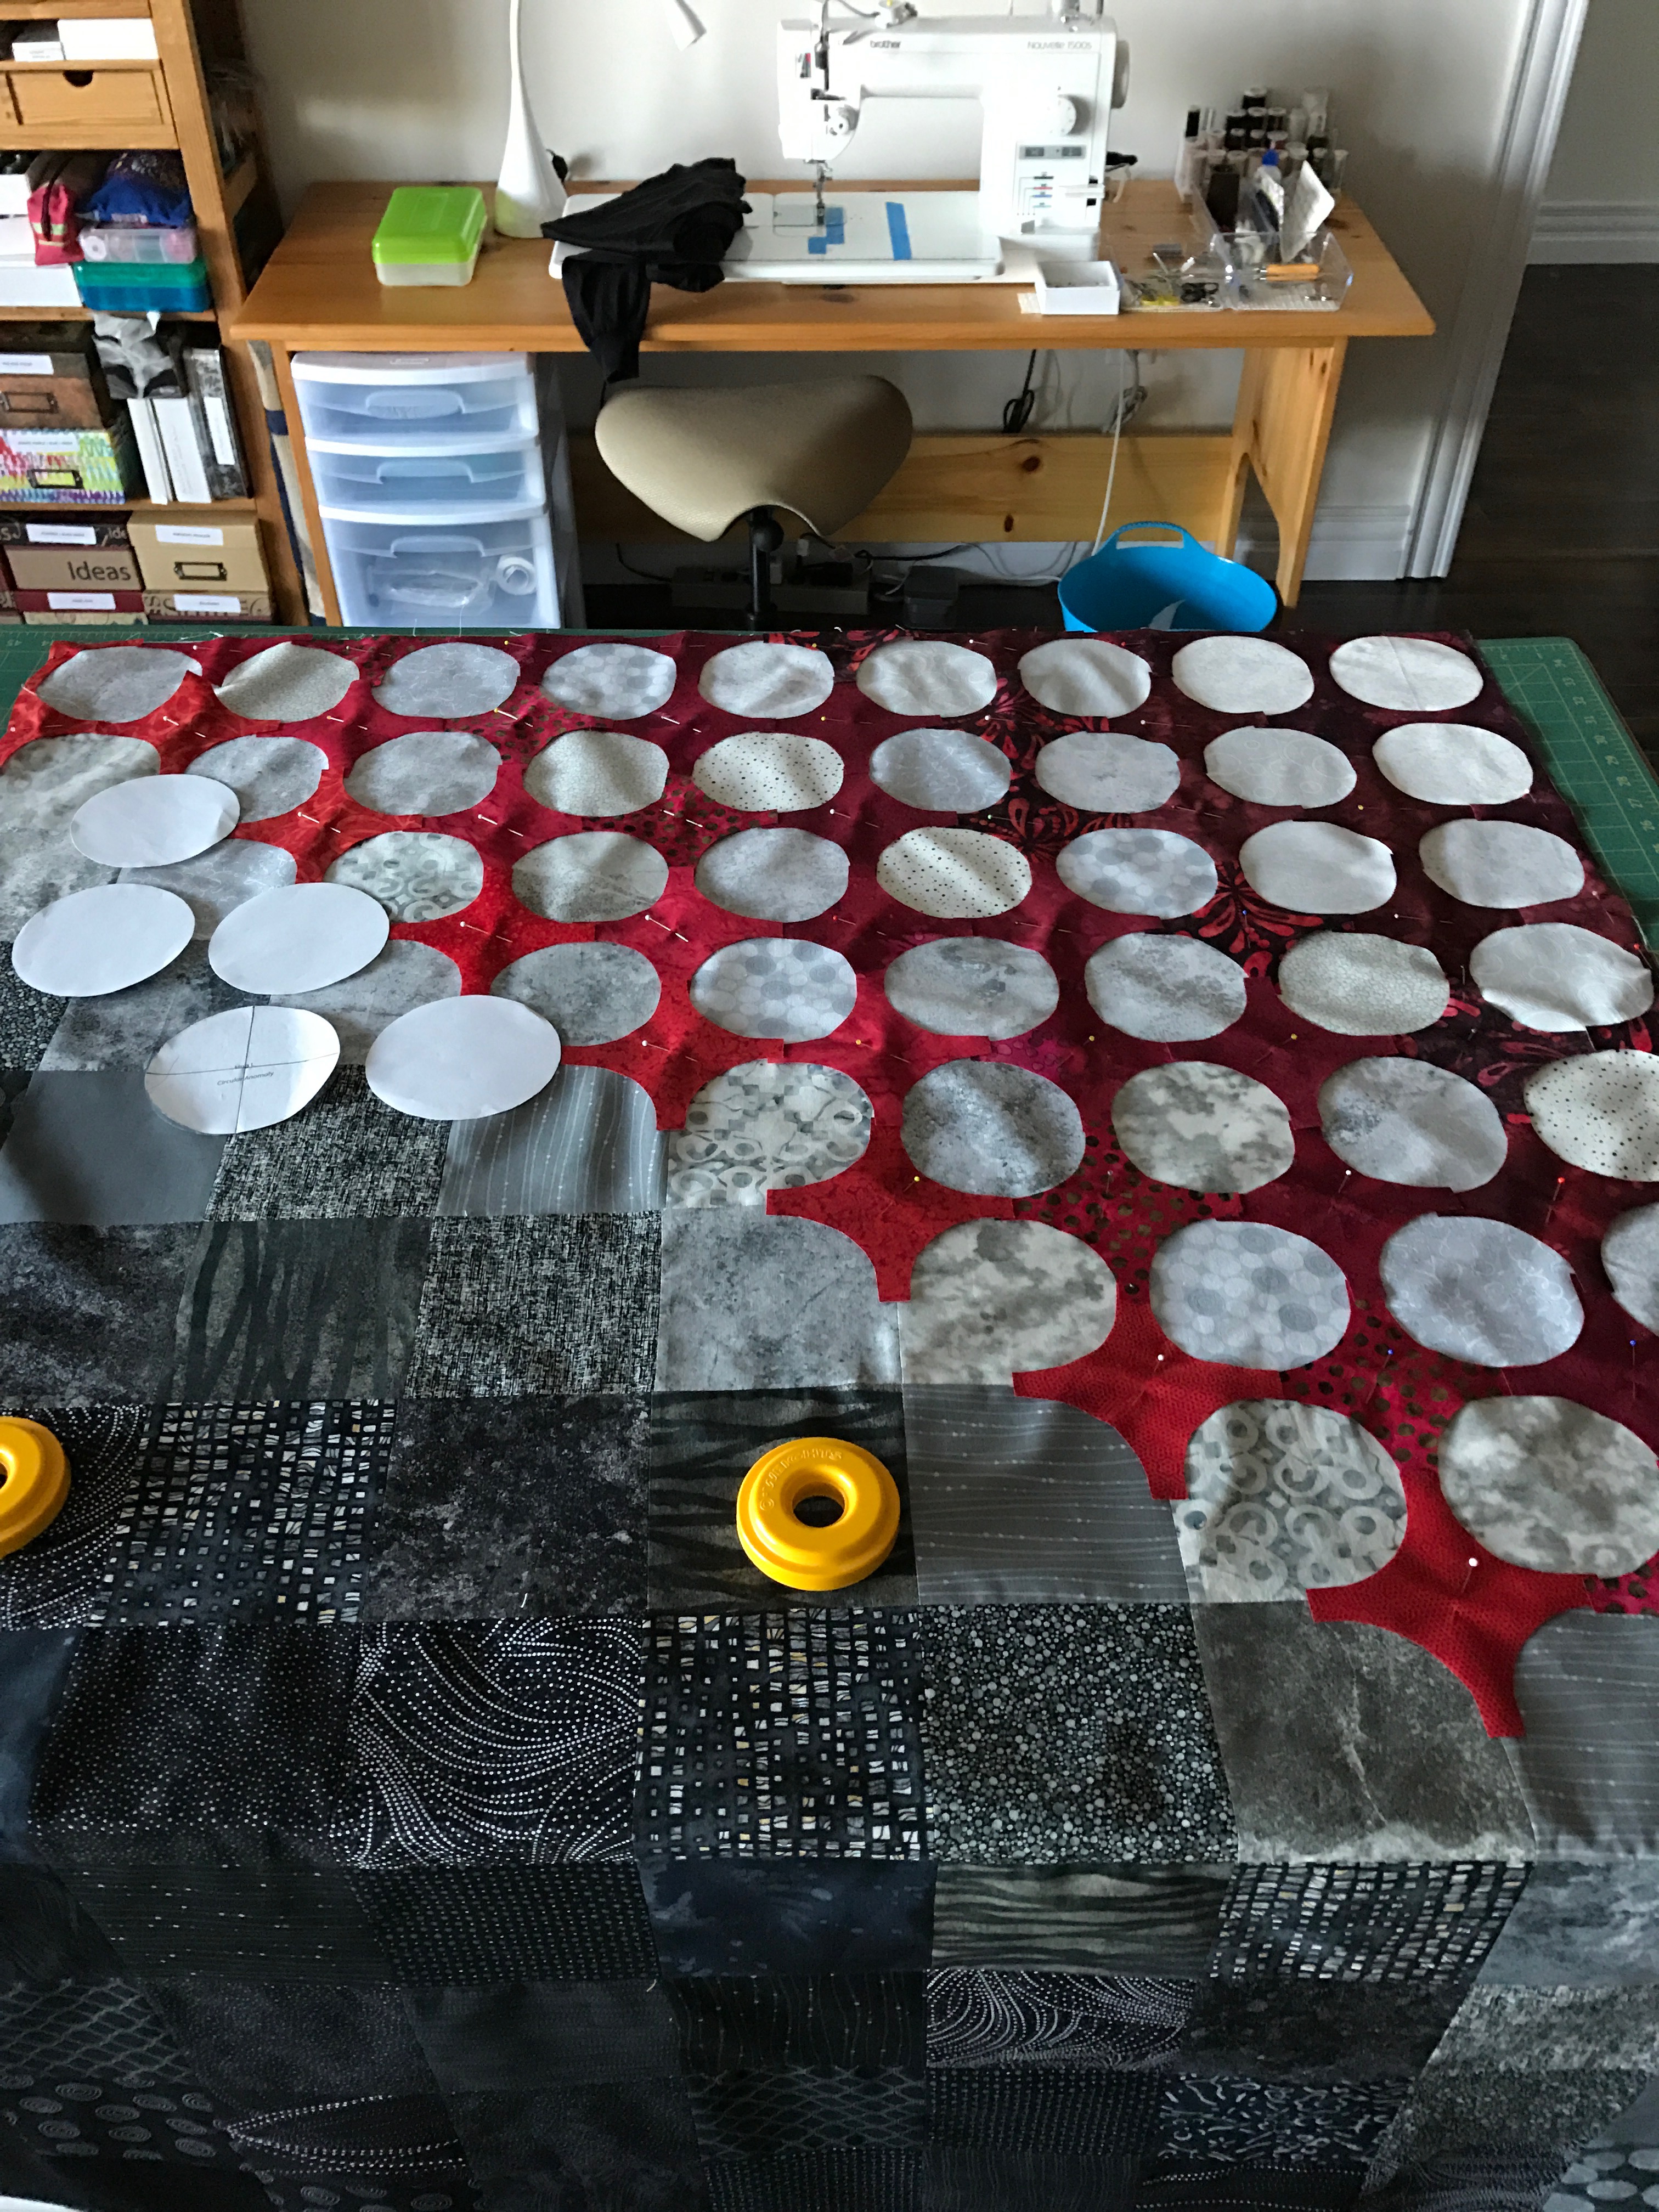
“X’s pinned in place

Next step: carefully fuse the X-shaped pieces to the background before creating and cutting out the circles. I’m aiming for asymmetry here, so there will be more circles than “X” pieces. Once all the pieces are fused in place I will need to edge stitch them to the background. To do that I’m intending to cut my batting and apply and pin it beneath the background to bypass the interfacing step. The batting will provide enough stability (the cotton sticks to it nicely) that I should be able to control the stitching process. I’m planning to use a small blanket stitch rather than satin stitch which I think will be heavier than I want (Smith did use a satin stitch in her quilt).

Once the top stitching is done, have to think about some kind of quilting to hold the top-batting-backing together. The design does call out for some kind of stitching within the circles and the “X” pieces rather than an all-over quilting design but I haven’t yet figured out how to do that – I want to try hooping the quilt as 9″ blocks (4 background squares at a time) and embroider within the circles and “X”s. I will have to see what single-run design I can come up with to fill the positive and negative spaces in an interesting way.

More later as I progress further.


Fibonacci #1 – Completed

I spent the afternoon finishing the Fibonacci Quilt. Last evening as I was nearing the end I was thinking about the binding – my first inclination was to bind it using the solid Kona dark blue but decided that wouldn’t add anything of interest to the quilt. I dug out what was left of the original fabrics, realized I had more than enough to cut two 2 1/2″ width-of-fabric strips from each. My idea was to extend the triangular corners into the binding, carrying the diagonal lines past the border. It took quite a bit of pinning and fitting to align those diagonals but in the end they worked – the most obvious of the matches is the yellow diagonal on the right, but they’re all done that way.

This could be considered a “medallion” quilt – the center block element (in this instance offset as a diamond) is constructed from the Fibonacci series of fabric strips, surrounded by large triangular panels of the individual fabrics, set off within a narrow navy sashing and finished with a contrasting border!

Quilt Top

Quilt Top

I edge-to-edge quilted the inner panel – I had worked out the dimensions of the embroidery to fit within the navy sashing. My calculations were close enough that eight rows filled the panel end to end without having to fudge the spacing between rows. It’d hard to tell from the quilting detail below that the rows actually overlap – that is, there were spaces in each row filled by elements in the next row. This is usually how long arm quilting designs are created – rows of nested scrolls. It’s much more difficult to plan out when I’m quilting in the hoop on my embroidery machine because while I’m quilting in rows, each row consists in this case of 4 1/2 repeats each of which has to be precisely connected to the adjacent stitch out for the rows to work! The inner sashing was stitched in the ditch; the outer border was quilted using a modified version of the main quilting motif.

This is the most intricate quilting I’ve attempted and it worked out very well. The new embroidery machine and the larger sewing table definitely helped. It was also nice to be able to do the hooping of the fabric on the cutting table rather than on my knees on the floor!

img_8056

Quilting Detail

For the back I used leftover scraps from the original fabrics assembled randomly in a crazy quilt array. The block is quite large pieced into the backing fabric.

img_8057

Quilt Back

I’ve named this quilt Fibonacci #1. There are, in fact, many different ways of using this number series to construct a quilt. I have to let the ideas percolate for now but there will be more quilts based on the number series…

Convergence Quilt #1 – Top Completed

img_8034

So here is the top completed. The original convergence block is the center of the quilt, with triangles matching one of the predominant colours on each side. Those triangles were difficult – in the end, I laid the sewn convergence block on the floor, laid paper under one side, then drew a triangle – the base of the triangle was the length of the block side, 45° angles to form what is an isosceles triangle! Where the two sides met created the apex of the triangle (which I made sure was a 90° angle). (I remembered to add seam allowances to each side of the triangle.)

I didn’t have enough fabric left to create the triangles in a single piece although overall there was enough fabric – if I made two smaller right angled triangles, stitched them together on what would become the diagonal of the overall block. Then I had enough width to accommodate the edge of the convergence block.

Once the triangles were attached, I added a 3/4″ sashing piece for stability – the sides of the triangles on the outer edge were all on the bias and needed to have something attached that would retain the overall shape. I cut the sashing on the length of fabric (since I had just enough length of the Kona solid I used). Then added a 4 1/4″ border from a fifth fabric that I’d bought as part of the set with the other four fabrics.

Now I have a 54″ square top. I need to think about what to do with the second side (back). I bought another 1/2 m. of each fabric, as well as 2 1/2 m of the dots fabric for the back. Flying geese? Half square triangles? Strips? Crazy quilt? Lots of possibilities. I’ll wake up with something in mind, I’m sure. That’s how these things seem to work themselves out for me.

Convergence Quilt #1

Yesterday I drove to Parrsboro to retrieve my quilts from the Art Lab Exhibit. No sales – wasn’t expecting any. Lots of nice comments in the guest book, though.

When we were hanging the quilts three weeks ago, Michael asked me if I’d ever tried a quilt using the Fibonacci Sequence of numbers (0, 1, 1, 2, 3, 5, 8, 13, 21…). I never have but I googled Fibonacci Quilts and found a gazillion examples!

Turns out that modern quilters began playing with this idea quite some time ago. One of the earlier quilters to explore intersecting graduated, spliced fabrics in two directions was Ricky Tims. He used a slightly different sequence of numbers but the effect is similar. His book: Ricky Tims Convergence Quilts offers a variety of ways to play with this idea.

cover-rickytims

Book Cover

c2

Example from the book

Quilts called out to me today. I put the shirt/jacket to one side (I have to take the back princess seams apart and reduce the fullness of the side back panel to smooth out the fit of the back of the garment – I’ll get back to it likely tomorrow because once I solve the back fit problem the assembly of the garment will go very quickly!).

I went to my fabric stash and chose four complementary fabrics – two with strong patterns, two more muted. I had 1/2 m of each fabric – I cut 20″ blocks from each, pressed and starched them. Lined them up, trimmed them, sewed two together, folded them right sides together, then cut the following strips from each pair: 1″, 1.5″ 2″, 3″, 4.5″, and 7.25″ (that used up most of the width of the fabrics).

I interleaved the strips, then stitched each set together giving me two graduated panels. Here they are with the strips assembled in one direction:

img_8012

The second step is to cut the panels again, with the fabric rotated 90°. I laid the two pieced fabrics right sides together, strips horizontal, then cut vertical strips again, using the same dimensions, then interleaved them once more. This produces a single panel with the four colour blocks converging into one another:

img_8017

My “convergence” panel #1

My finished panel is 34″ x 34″ – now I need to do something with borders to extend the quilt top so I have a lap size quilt (~ 45″ x 60″). That means asymmetrical border elements so I end up with a top that is longer than wide. I’m thinking I might want to use this panel on point, making the strips diagonals… something like this example below – I’d want to offset the panel somewhat more than this one so I could then add more asymmetrical borders to the enlarged square. 

diagonal

Convergence block on point…

I’ll work on this some more tomorrow. Tims calls these “mystery quilts” – he’s right! It’s hard to anticipate how the spliced, interleaved fabrics will look. I’m happy with this first attempt – I’ll want to play with it some more using strong coloured fabrics with more muted patterns to see how that might turn out. I can see I might be engaged in this cutting, sewing, cutting, sewing for quite a while – there’s lots to learn here… 

I’m Back – Show at Art Lab 2016

I’m finally settled into the apartment! There are still a few things to do but for the most part it’s now home.

Yesterday I traipsed to Parrsboro with 10 new quilts and 3 wall art pieces. They’re on show at Art Lab till Sept. 7. We spent the afternoon hanging the exhibition and I was delighted with how well the pieces all show.

Improv #7 – Finished

IMG_7739

Quilt Top – Improvised Piecing

Another modern quilt completed. My goal was to complete ten quilts for the showing in Parrsboro in August. DONE! They’re all very different.

What constitutes a “modern” quilt – “Bold colors and prints, high contrast, graphic areas of solid color, improvisational piecing, minimalism, expansive negative space, and alternate grid work. (Modern Quilt Guild)”

More and more I’m being drawn to create simple but very bold quilts with strong colours and contrasts. I consider each new quilt an opportunity to extend my piecing and quilting skills. My boredom tolerance is low – I could never do the same quilt twice without pushing the design boundaries in some significant way.

In this quilt I was after a completely improvised top with a more traditionally pieced second side. In fact, in this quilt I’d be hard pressed to identify which side is “top” – in this quilt either side could be.

Quilt Back - Flying Geese

Quilt Back – Flying Geese

I felt under quite a bit of pressure to complete this quilt – tomorrow I have a friend coming to help me pack up my sewing room for the move and I really wanted to have this quilt finished. On Friday I could see an end might be in sight. I got just over half quilted on Saturday; finished the quilting yesterday, then bound it, last thing – added a label to the flying geese side.

With the quilt done, I was ready to move on. I spent the rest of the afternoon getting the packing of my sewing room under way. I carefully stowed each sewing machine (with its accessories) in its case. I packed each small tray/box of loose stuff in shoe boxes (saved for the purpose). Tomorrow I’ll get all the small boxes into a few large china barrels and move on to taking the shelving apart and breaking down the table assembled from Ikea parts – all ready for when the movers arrive in a week. The day bed is being picked up Thursday – it’s being recovered to be used in the sitting roomIMG_7675

My sofa is also being recovered for the sewing studio.IMG_7677

I’ve arranged for both pieces of furniture to be returned to the apartment. Looking at the fabric swatches I suddenly realize teal seems to be the colour I’m gravitating toward these days. Not hard to imagine this quilt draped over the back of either of these! Maybe that was unconsciously driving my colour selection for the quilt!

I don’t know how I’m going to occupy my time for the next month – I will have some knitting with me. It’ll be a time to read the unread books in the libraries on my phone. And there’s some travelling scheduled as well. I know the month will go quickly. I’m just impatient for the move to be over and to get myself settled into the new space.


Improv #7 – Quilt Back

Flying Geese – corner to corner

I made just eight blocks for the back (needed only seven) but I want to do a whole quilt top using fabric from my scrap box. I think I can arrange the triangles in some interesting random array.

You can see I did add a bit of golden yellow in the insert – I thought the teal hues alone were a bit drab given that the top used a limited colour palette.

I’ve now pinned the top, batting and back together and am ready to quilt the sandwich. I’ve set up an embroidery design for the 360 x 200 hoop – by my calculation it should take 35 (5 x 7 array) repeats to edge-edge quilt the whole thing.

Quilt Improv #7

Quilt Top


I was supposed to teach a class on how to take a piece of fabric (a ~7″ square, for example), slash it, insert a narrow strip, slash a second time, crossing the first insertion, and insert a second narrow strip. The first insertion is easy, the second takes a bit of adjusting. I called the quilt “pick-up-sticks”.

Rather than make another Pick-Up-Sticks quilt for myself, I decided to use the technique to create a wide panel the length of a quilt top and insert it into a length of background fabric for the top. Not difficult to do – I cut two 16″ WOF pieces, cut off a segment at a time, slashed the fabric (rotary cutter and ruler), laid out the pieces, then added insertions.

A slashed segment


The trick with this technique is to keep the pieces laid out in order so you can tell which bit gets joined to what! Also I was careful to mark the “top” edge of the uncut fabric, as well as the top edge of the growing  strip – that’s because I was cutting my large sections of fabric as irregular quadrilaterals, not as rectangles, so I needed to be able to align the bottom of a finished segment with the top edge of the subsequent one. 

I created the full panel with seven segments. The piecing went quite quickly. I used 1/2″ inserts (1″ strips) which made up for the seam allowances and maintained the original dimensions of each uncut segment.

Now for the second side (I hesitate to call it a back because there will be quite a bit of piecing involved).

Flying Geese Block


Flying geese blocks – they require precision in the cutting, in the stitching, and in the trimming. I finished one block when I realized I needed a narrow strip on two sides to provide contrast for the final triangle to show up against the background fabric! Now I’m thinking I want a wee bit of a golden yellow in there as well – maybe as strips to join these blocks into a panel to be inserted into the background fabric….

Shadow Quilt – Just Finished

IMG_7701

Quilt Top

Just finished! Label and all. Took the better part of three days to quilt all the blocks. What I like about this embroidery is that it fills the block completely. In fact, after I pin basted the layers, I didn’t stitch in the ditch to tie the top / batting / backing together. I left the pins in and simply embroidered each block – 48 blocks, plus the borders (24 repeats) and corners (4). I used a 200 x 200 quilting hoop for the blocks, the grand endless hoop for the borders – I love using the endless hoop because I don’t have to remove the hoop from the machine, just move the quilt edge along after each embroidery (once I figure out where I want to position it for the placement I’m after). The borders go very quickly.

IMG_7703

Quilt Back

The backing started out with 2 1/2″ strips – sewn together in pairs – had I thought about it a bit more I’d have been better off using 4 1/2″ WOF cuts and cut the triangles from those – the diamonds would have stood out better. Not that there’s anything wrong with what I’ve done. I will have to try another quilt using half diamonds from a single fabric to see what that will turn out like.

This is quilt #9 for the showing at the end of August. I have time to make one more before I pack up my sewing room. I bought fabric last week – IMG_7705

My plan is to cut two 16″ WOF strips from the dark print and 1″ strips from the soft, pale blue/grey (which will give me 1/2″ inserts). I will do an improvisational strip like one I used on the back of an earlier quilt – but this time the strip will be much wider and will be the top of the quilt.

IMG_3147

Quilt Back from Pick-up Sticks Quilt

I have been thinking about the back of the new quilt as well – I bought a couple of  sets of fat quarters in shades of teal (dark and light) when I visited Keepsake Quilting two years ago – one of the sets includes just 6 pieces of fabric – that will be enough to do something within an overall backing fabric – no idea yet what colour the backing should be – somewhere in the teal family, I’m guessing, to go with the top. Tomorrow I will cut the fabrics for the top and begin piecing and see what I end up with.

I love starting new projects – I never quite know what I’m going to get.

Quilting Again

Finally finished the clean out of my townhouse on Friday. There’s still stuff to be given away and put in the trash, but the big purge is done!

So yesterday I was able to resume quilting. This quilt was about half done – I had 16 design repeats left to embroider; I did 10 after fighting with my embroidery machine for an hour: it was refusing to sew with the cotton variegated thread I had been using without breaking it repeatedly. 

I did the usual things: rethreaded both top and bottom thread, change the needle, cleaned lint from top thread path, cleaned out the bobbin thread area…. I even tried straight stitching on scraps with the cotton thread, with polyester – the problem was the cotton thread, perhaps a weak spot, because eventually I was able to embroider/quilt with it and was able to complete the quilting. Trimmed the excess and bound the quilt.

Quilt Top

Quilt Back


This is Quilt #8 which I’ve completed for the show in Parrsboro end of August. #9 (shadowed blocks) is pin basted and ready to be quilted. I set up a block design and a border embroidery last evening – I’ll begin working on that today. 

I am hoping to create a 10th quilt before the move. I won’t have access to my machines for three weeks and will be busy setting up the apartment early August. I know what I want to create for the top (still pondering what to do with the back). So I’ll get started on the quilting and do the prep work for #10 in the next few days.

Happy to be sewing again!