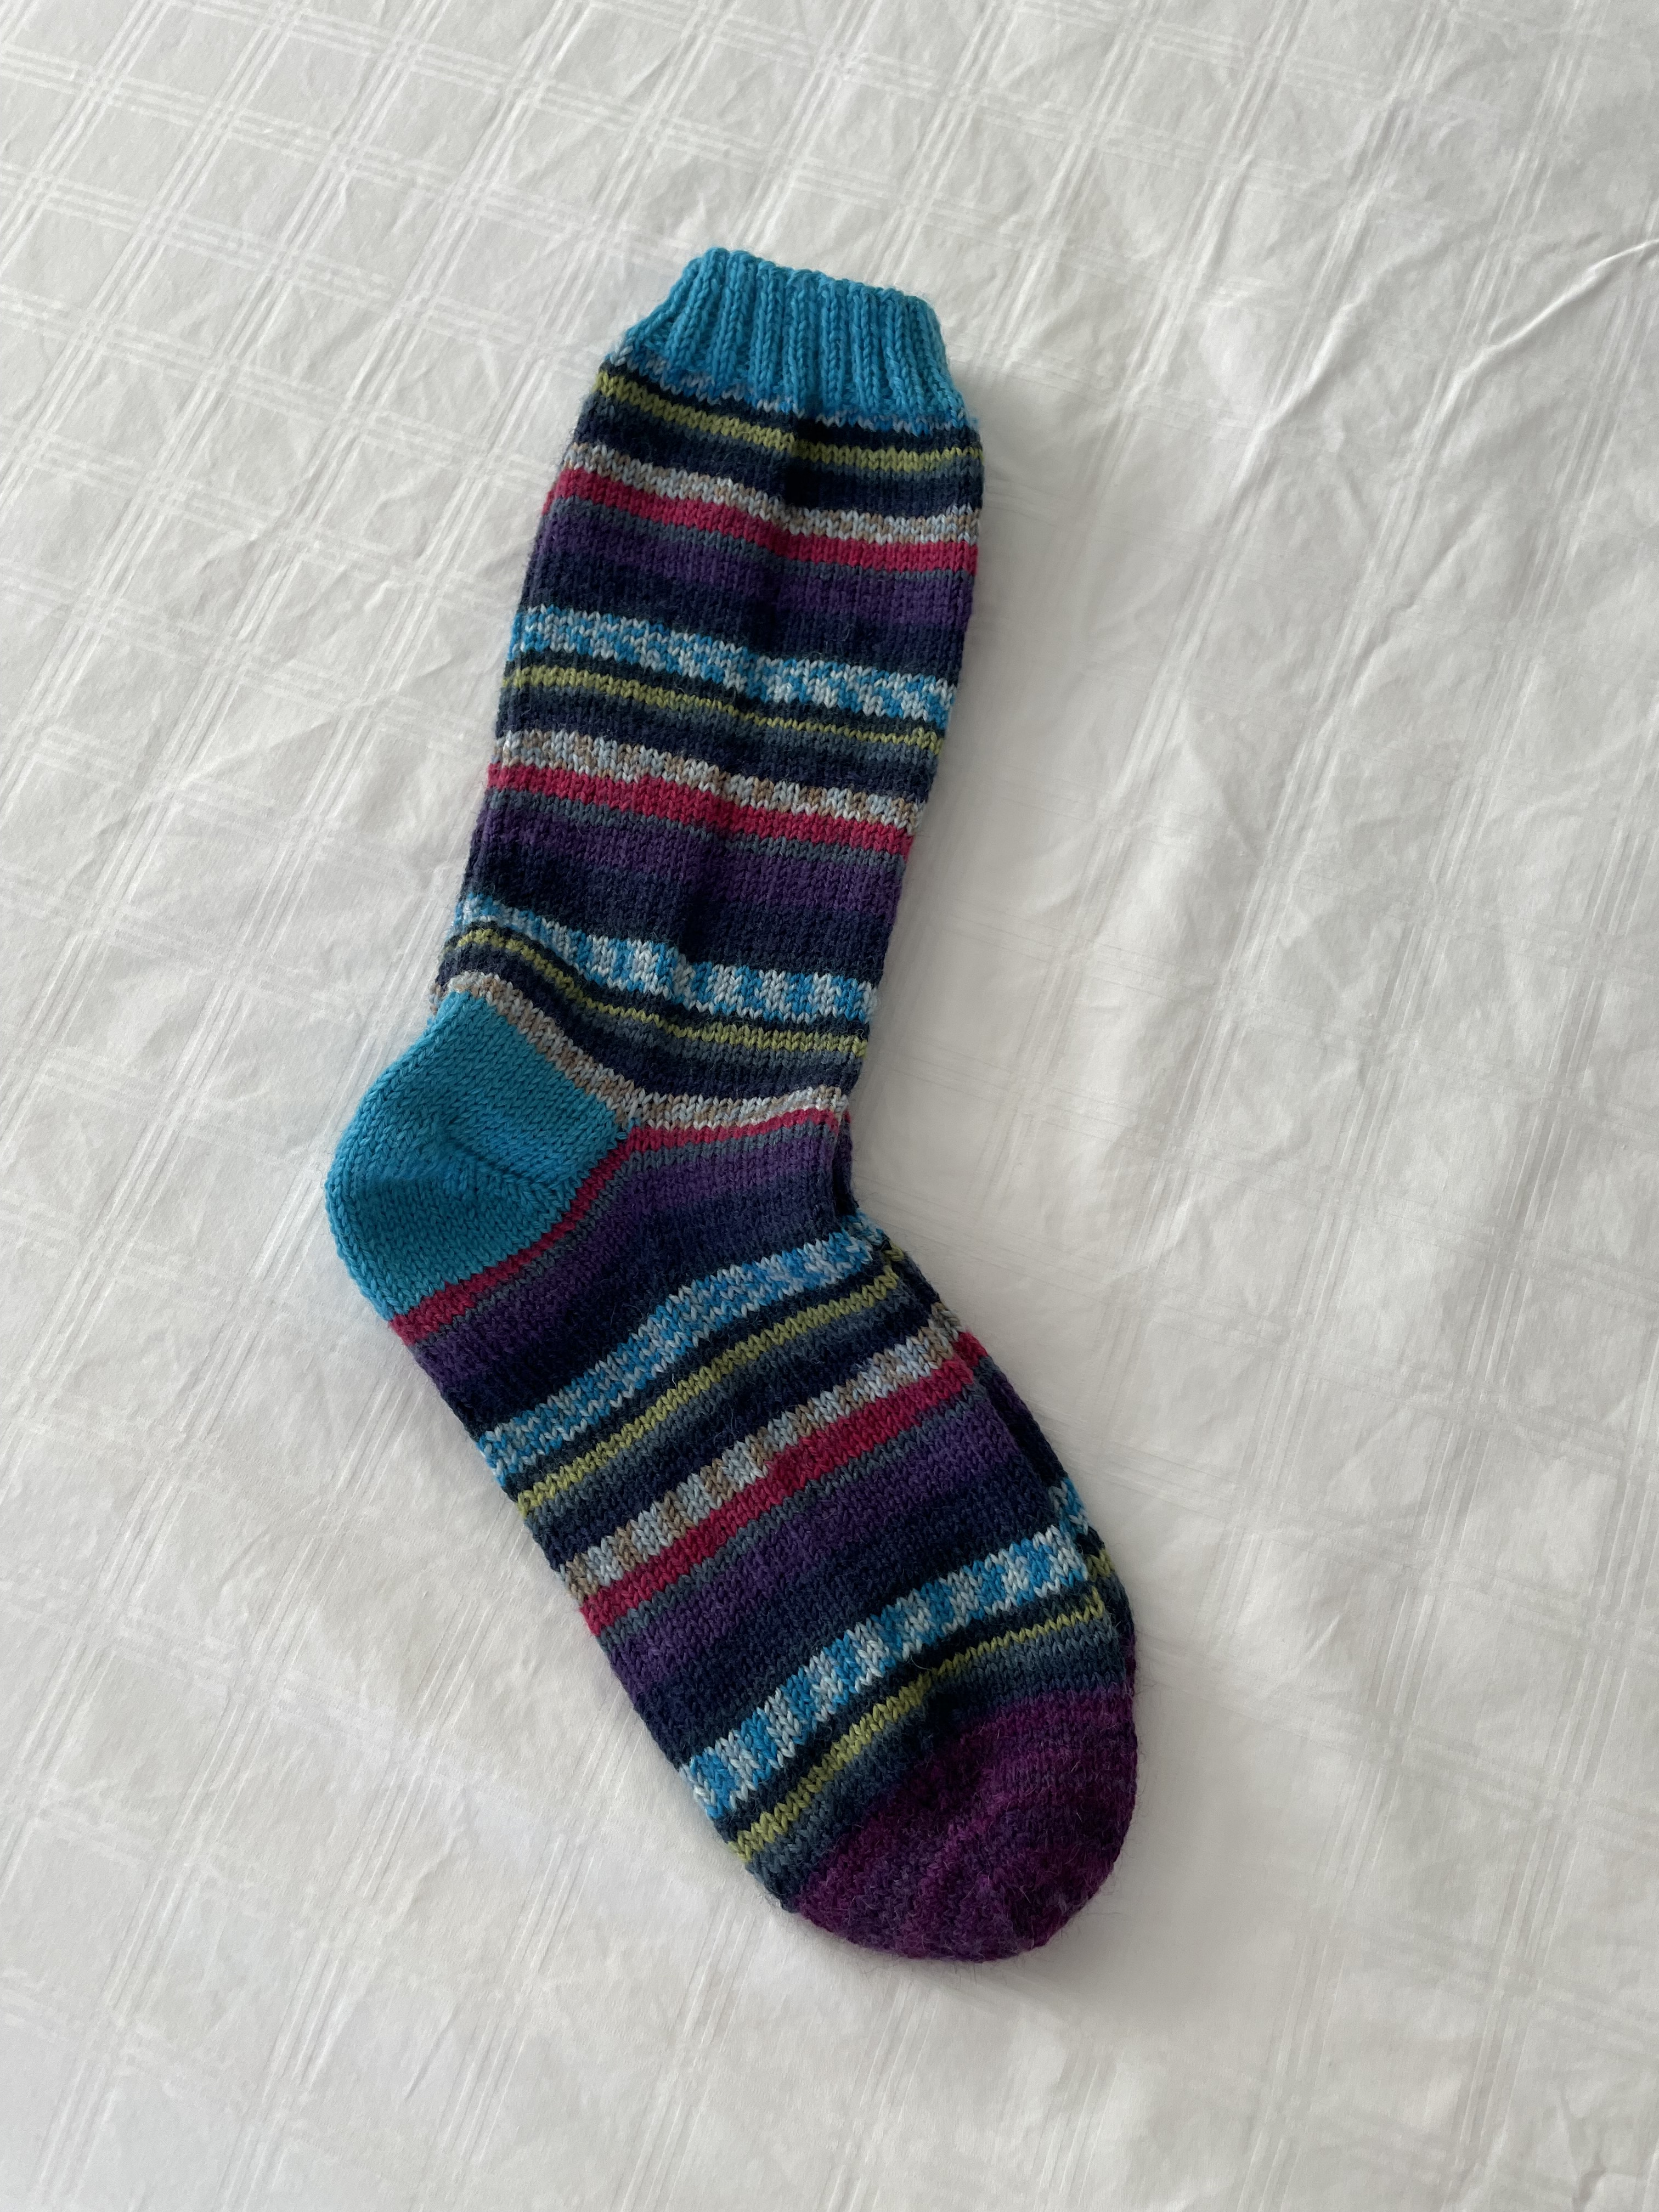
Finally finished this pair of socks – not sure why it was slow going but it was. I knew before I started I wasn’t going to have enough turquoise to finish the toes – dug out the purple variegated to finish the toes. So on to another pair.
Finally finished this pair of socks – not sure why it was slow going but it was. I knew before I started I wasn’t going to have enough turquoise to finish the toes – dug out the purple variegated to finish the toes. So on to another pair.
While I’m waiting for the white/black fabric I ordered from Newfoundland to arrive so I can finish the Delft #2 quilt top (should arrive sometime this week), I’ve caught up on a couple of other things: I made a new iPhone carry case and I recovered my ironing board.
I’ll start with the ironing board.
I don’t recall how I stumbled across an ad for a wool ironing board pressing mat but it was advertised for half-price. I’d never have paid full price, I’d have used batting leftovers under a new cover but the price was reasonable so I ordered one. It arrived promptly, I trimmed the 18″ x 54″ wool felt piece to fit my board (had to use some trimmings to lengthen the pad, I fused the pieces together using fusible tape for joining batting pieces), then recovered the board with an unbleached twill. A nice clean ironing surface with that terrific wool pressing mat underneath it. It works very well – glad I bought it.
It took about an hour to recover the board – I had the piece of unbleached twill tucked away from the last recovering – I serged the edges of the twill, and used my heavy-duty staple gun to attach it to the bottom of the plank (I left two previous coverings beneath the wool pressing mat – that extra padding can’t hurt).
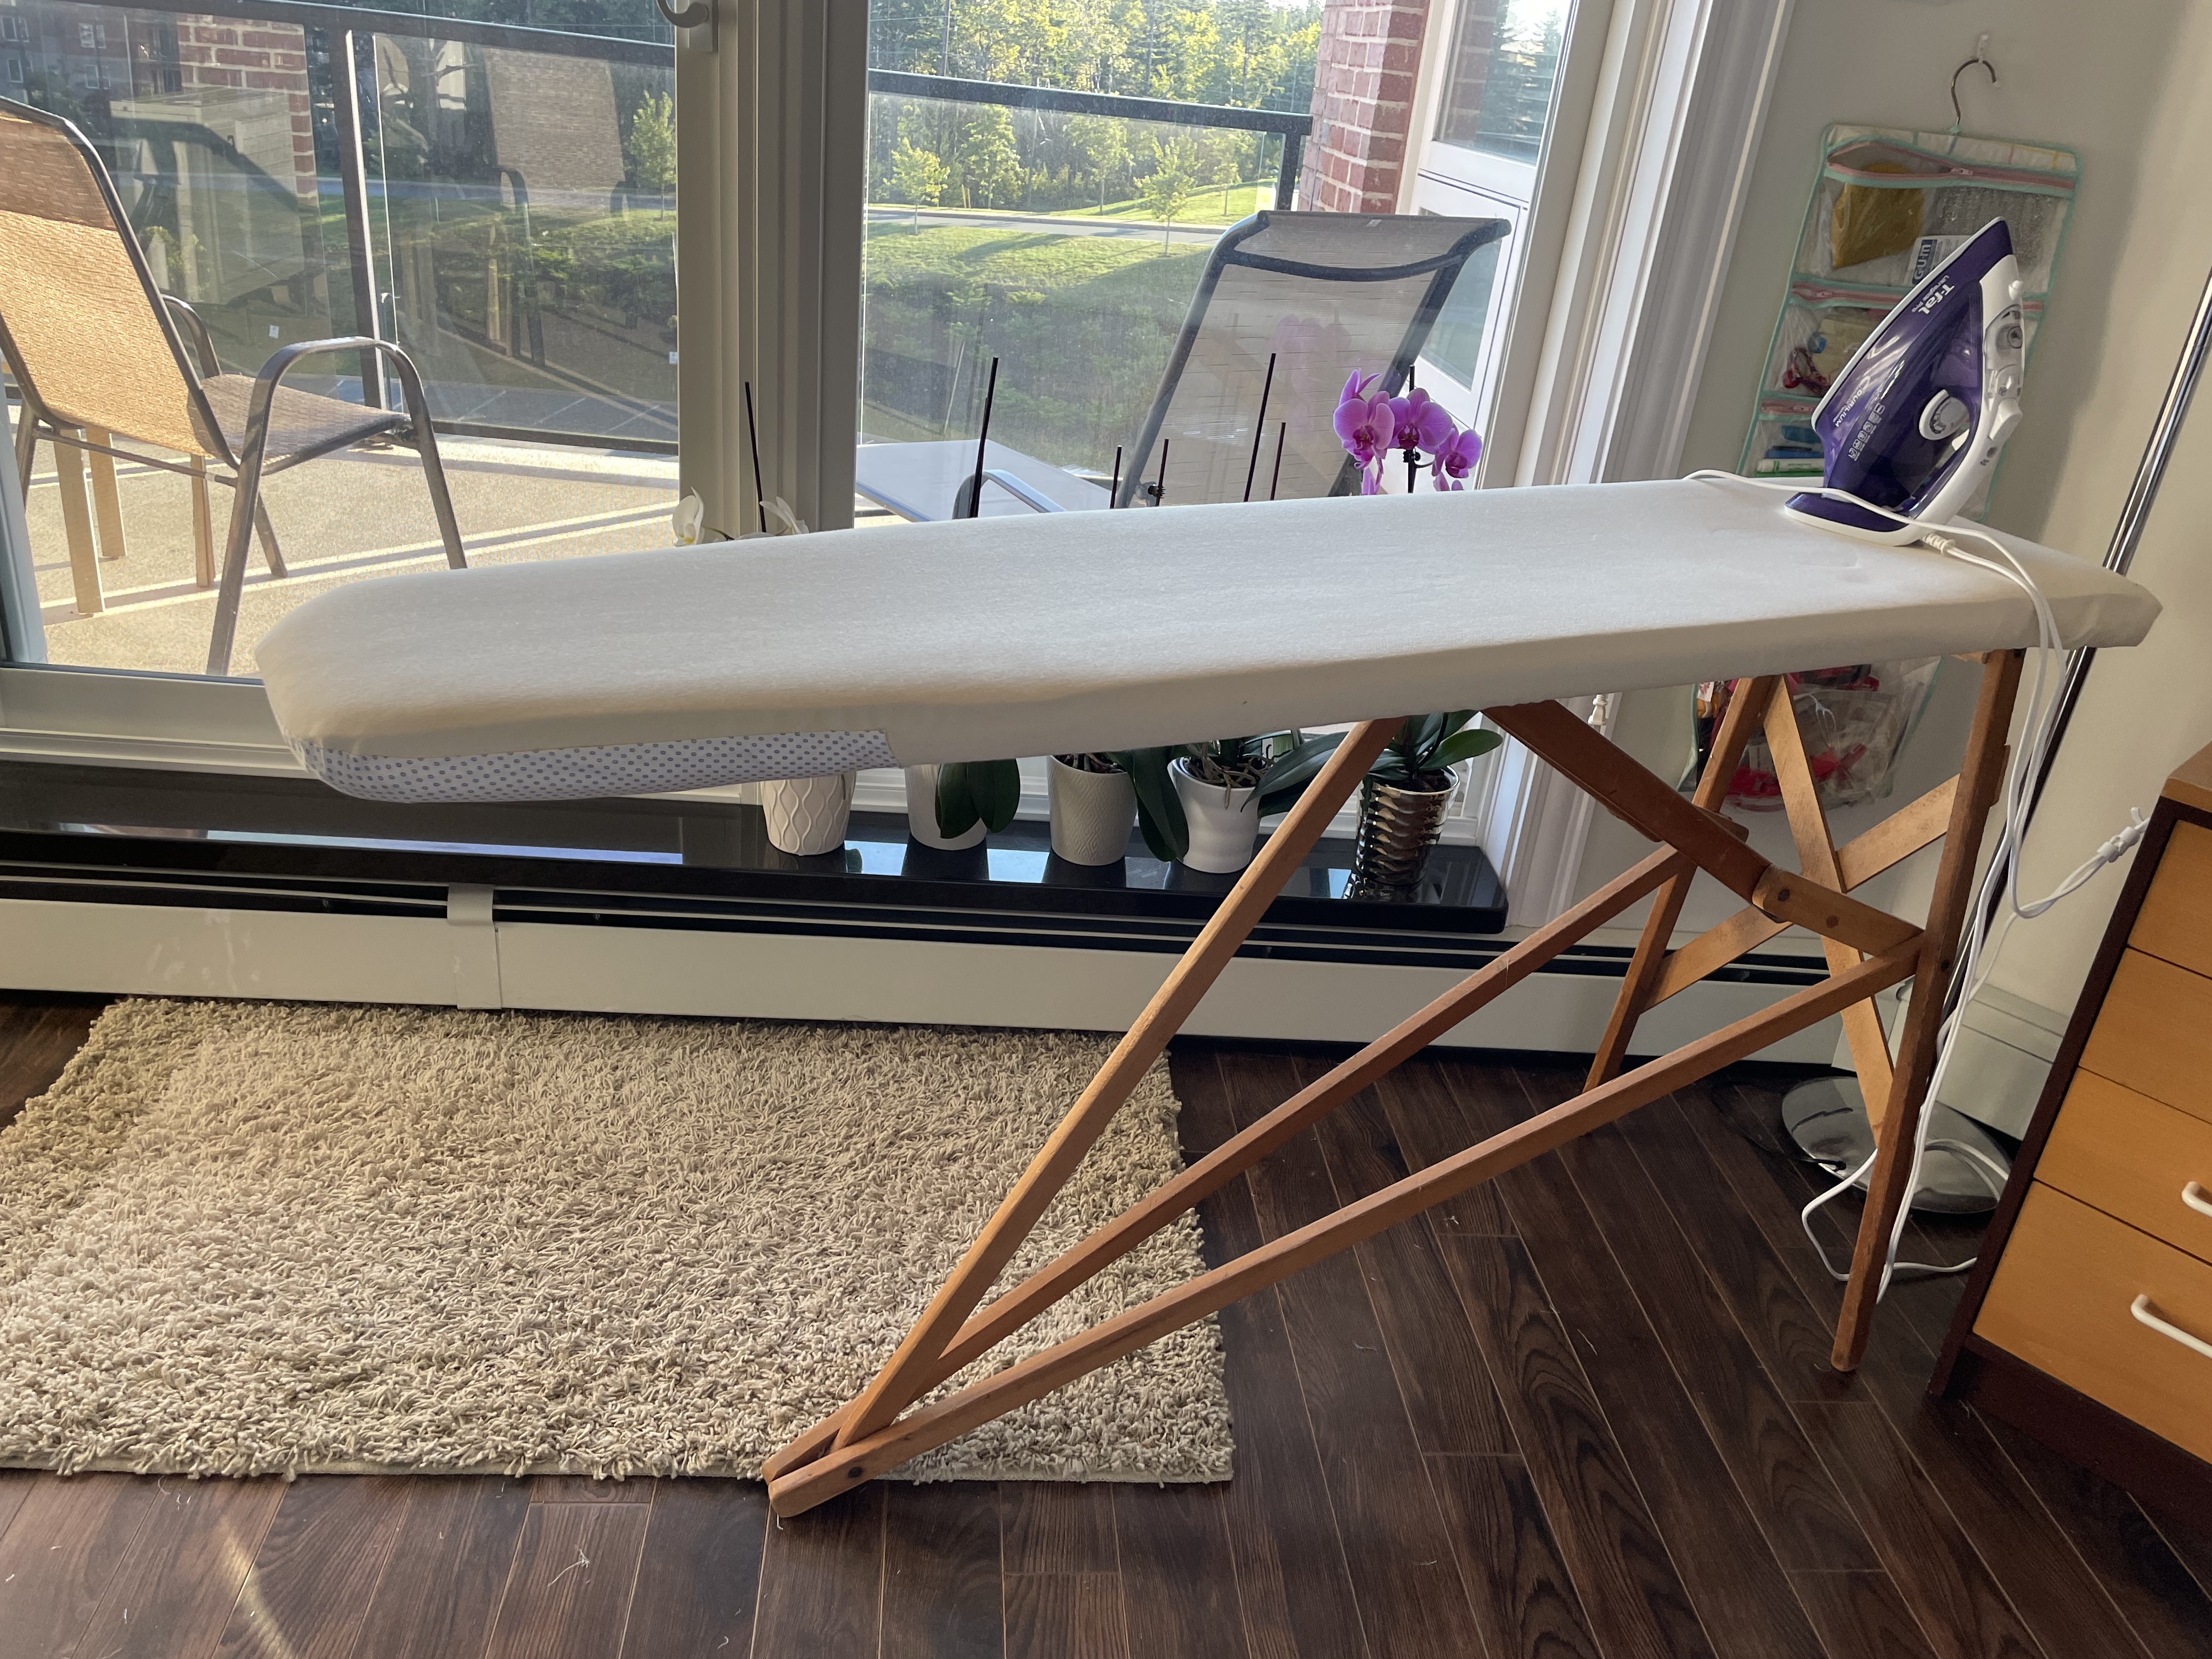
My ironing board has history. I bought it somewhere around 1964 from the Salvation Army Store in downtown Toronto for $1.50. Even then it was a relic – I’m guessing at least 50-70 years old but still solid and serviceable. The board itself was a shaped plank covered with several layers of flannel underneath a cotton covering nailed in place. At the time, I left that original covering in place and recovered the board with fresh fabric. I have recovered it many times since – at some point I removed all previous coverings and started new. The time before this recovering was when I moved into the apartment in 2016 – five years ago. The accumulation of Best Press (a pressing starch) had scorched the twill and I felt it was time to recover the board.
I’ve tried metal ironing boards but they don’t compare with my antique. This board is a comfortable height, slightly wider, and close to a foot longer than a standard metal ironing board. Now that my board has a fresh twill cover with the wool pressing mat beneath I’m in business for at least another five years.
The ironing board itself is an heirloom – it should be passed down in the family; for sure, I should itemize the wool pressing mat in my will – it’ll last generations. However, I don’t imagine anybody will realize the value of this treasure and it will be taken to the dump when I’m finished with it. Sad.
Second diversion – I made a new iPhone carry case yesterday.

I wanted the case a small amount wider than the one I was using. I’ve stopped carrying a purse of any kind – I’ve consolidated what I carry with me so that it all fits into this small zippered pouch. In its original iteration the case had a single side pocket. I’ve added two more zippered pockets to the last couple I’ve made.
The previous version was a good size for my iPhone with cough candy and gum in the side pocket but when I decided to carry my essential ID – drivers’ license, car permit and insurance certificate, health card, a credit card, as well as a small amount of cash, I needed to add a couple of pockets. However, as I stuffed in those new additions the whole thing was just a bit too small to easily get the ID and other cards in and out. It was time to make a new case.
I had enough leftover kid leather from a skin I bought in New York at a leather warehouse in 2012 to cut a 5 1/4″ x 15″ rectangle. I cut two narrow strips from one end so I could insert zippers for two shallow pockets. It took less than an hour to assemble the pockets, and complete the pouch, but it turned out just a bit too wide, so I opened the lining bottom, and trimmed about 3/8″ from the seam side. Should have been a shade less than 1/4″ – the credit cards and other ID fit in the pockets better, but there’s no comfortable spot for my chapstick! The phone catches on it when I slip it in. Looks like I have two choices – make another just that slightly wider, or leave the chapstick behind!
It’s a lovely day today – another of those bright sunny hint of fall days we get in late August/early September (Alistair MacLeod refers to it as “The Closing Down Of Summer”). Taking a ride with a friend to the Parrsboro shore to pick up farm fresh eggs. Looking forward to the day.

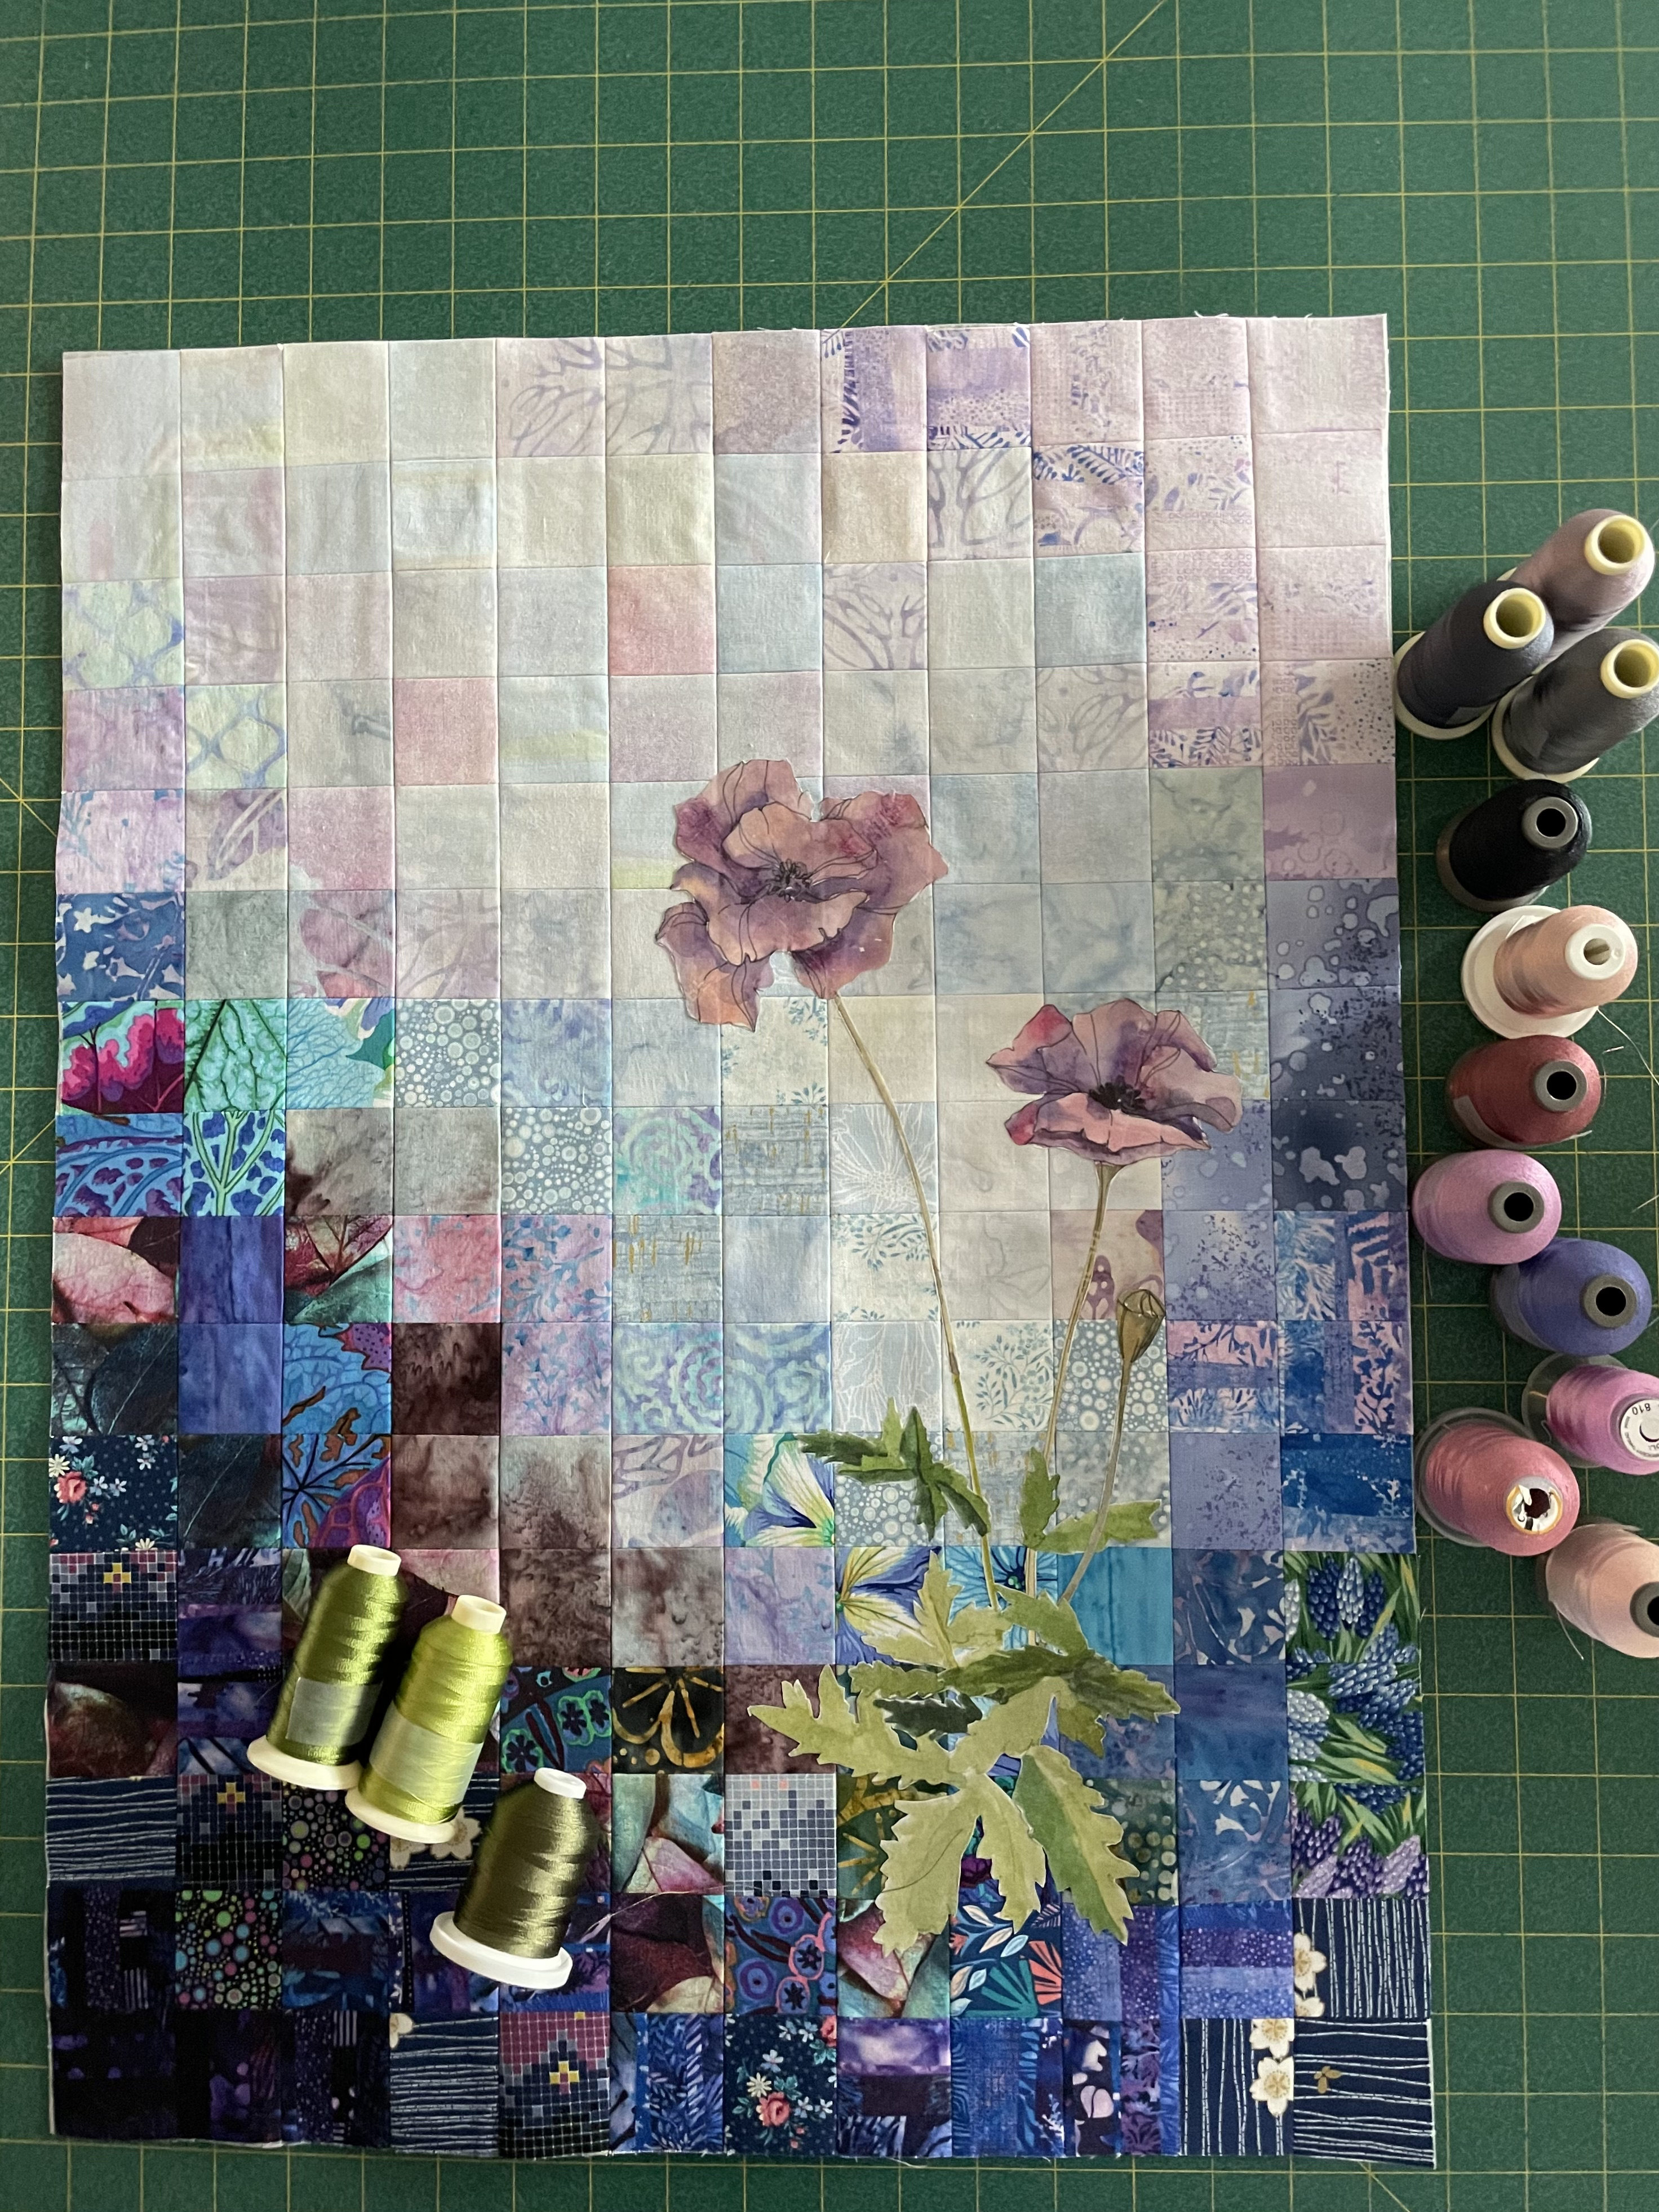
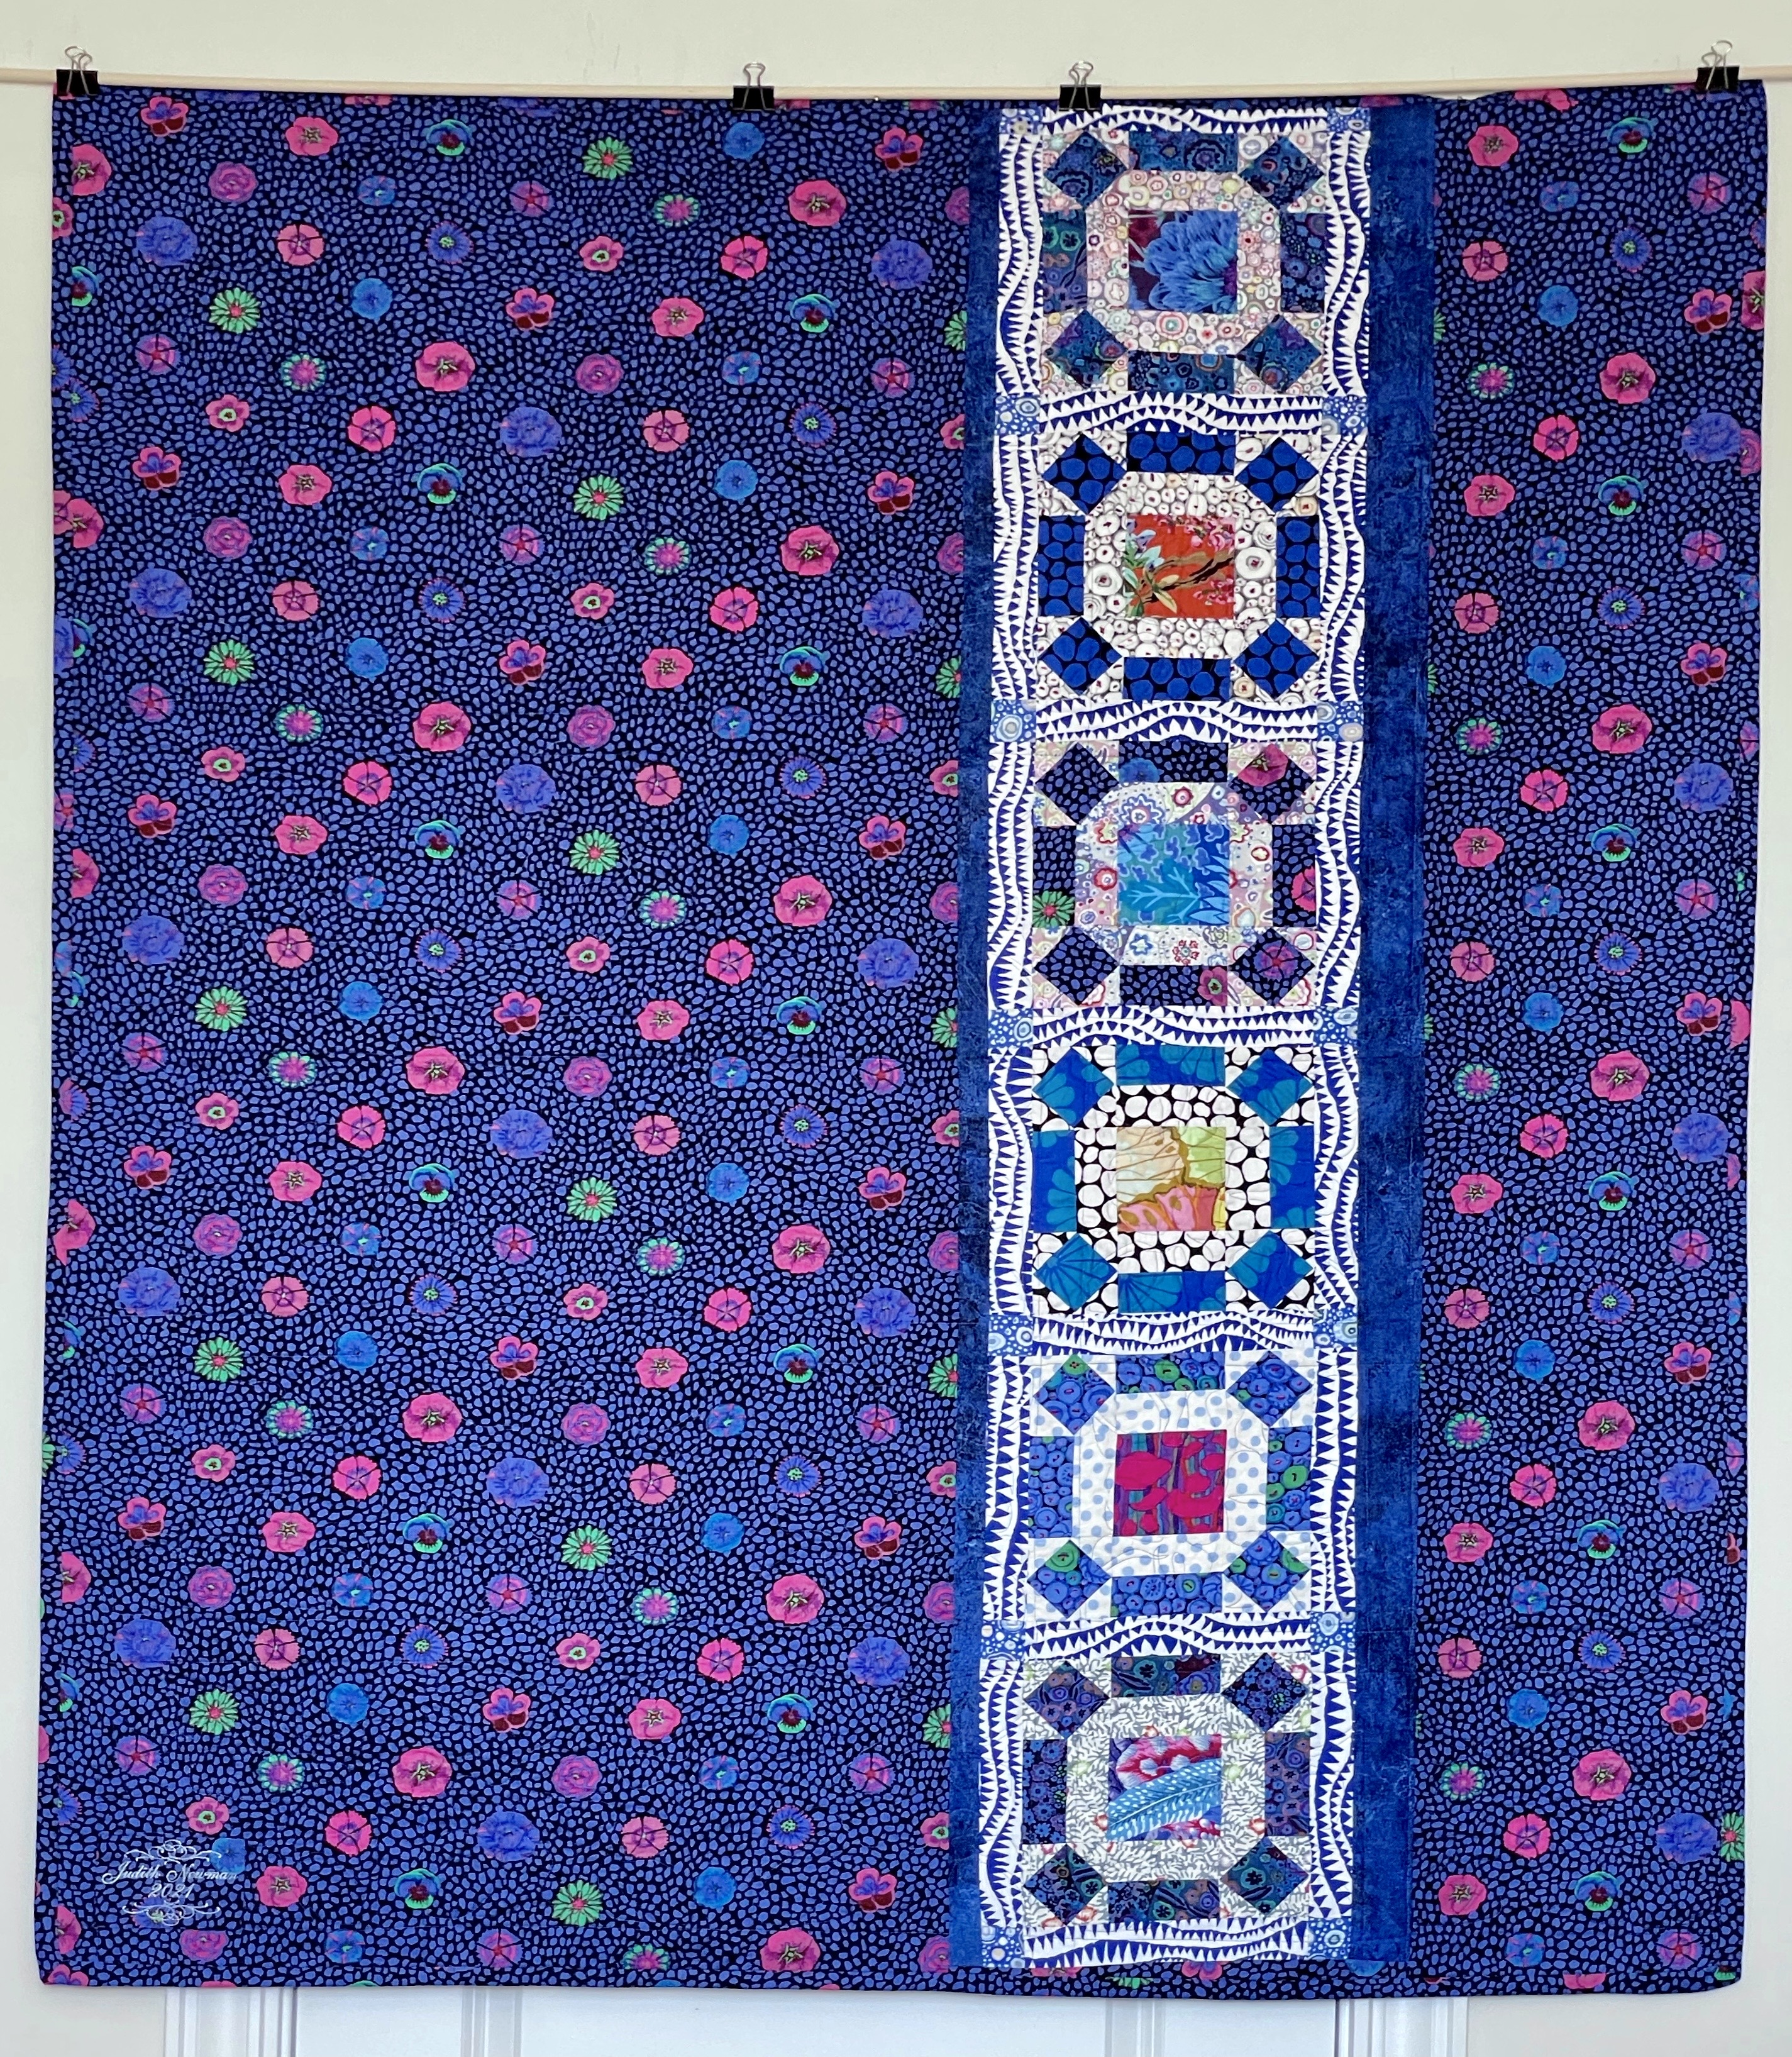
I just finished adding the sashing/corners to the blocks and now have a completed panel. I find it interesting how much the sashing overpowers the blocks. Were I to leave the top as is, it would be a predominantly “white” quilt. To offset that, I plan on adding three borders: a narrow inner border using the dark blue/black stonehenge fabric (at the bottom of the photo), another even narrower border using the black dots/pepper fabric I used for the sashing corners (that’s on the way from Newfoundland – hope it arrives late this week/early next), and finally a wider outer border using the blue/green petunias at the bottom of the photo. Those borders will turn it back into a blue quilt, and downgrade the intensity of the white sashing.
The back will use the petunias with the strip I created on the weekend, also bordered with a narrow piece of stonehenge and maybe also the dots/pepper fabric as well.

In order to carry on, I have to go back to Mahone Bay to pick up another metre of the petunias! I ordered 2 yards which would have been enough for the backing but isn’t enough to do the borders on the front as well. I’m not going to cut the 2 yard piece I have, I will cut the front border pieces from the new piece I have to buy! Besides, I’m having to wait for the black/white fabric to arrive from Newfoundland!
In the meantime, I’ll go back to the purple poppies wall piece I was working on several weeks ago. This will give me time to work on thread painting the poppies.
Now I have to spend some time looking at the blocks and their position in the array! There are three variables in play – the fabrics of the inner square, the fabrics of the first triangle, the fabrics of the second triangle. I’m trying to keep them all different so there are no two centre fabrics in a row or column; then I’m trying to have not two same fabrics touching. I’ve almost got it – I see three spots where the inner and outer triangles are the same fabric and I may not be able to move anything more to alleviate that. There are also some adjacent diagonals (which I’ve decided to ignore). More important is whether I have the colour distributed broadly around the array – it’s not bad – I will have to look at the blocks tomorrow to see if I still feel that way.
The issue is at this point I have almost no degrees of freedom – the only way I can gain more is the make the seven blocks for the quilt back and see if that combination accommodates some swaps. It’s probably a good idea to do that before I attach the sashing because once the sashing is attached I’m not going to be able to do any moving around!
The quilt is going to be colourful, for sure.
PS: I’ve been asked about measurements for the block. If you’re interested in constructing a quilt top like this, click here for information/measurements for creating/setting up the blocks. If you decide to try it, be sure to make a couple of test blocks using scrap fabric.

I finished this pair of socks last evening, finally. I knit on them most evenings (since the last pair was finished) but I didn’t knit as much as usual so these socks have taken the better part of three weeks (I normally can manage a pair in two weeks.
I was drawn to the colours in the ball of yarn although I couldn’t tell that the pattern would evolve as it did with maroon strips and a repeating pattern embedded in in ombre with greys and golds.
A nice pair of socks, if I say so myself.
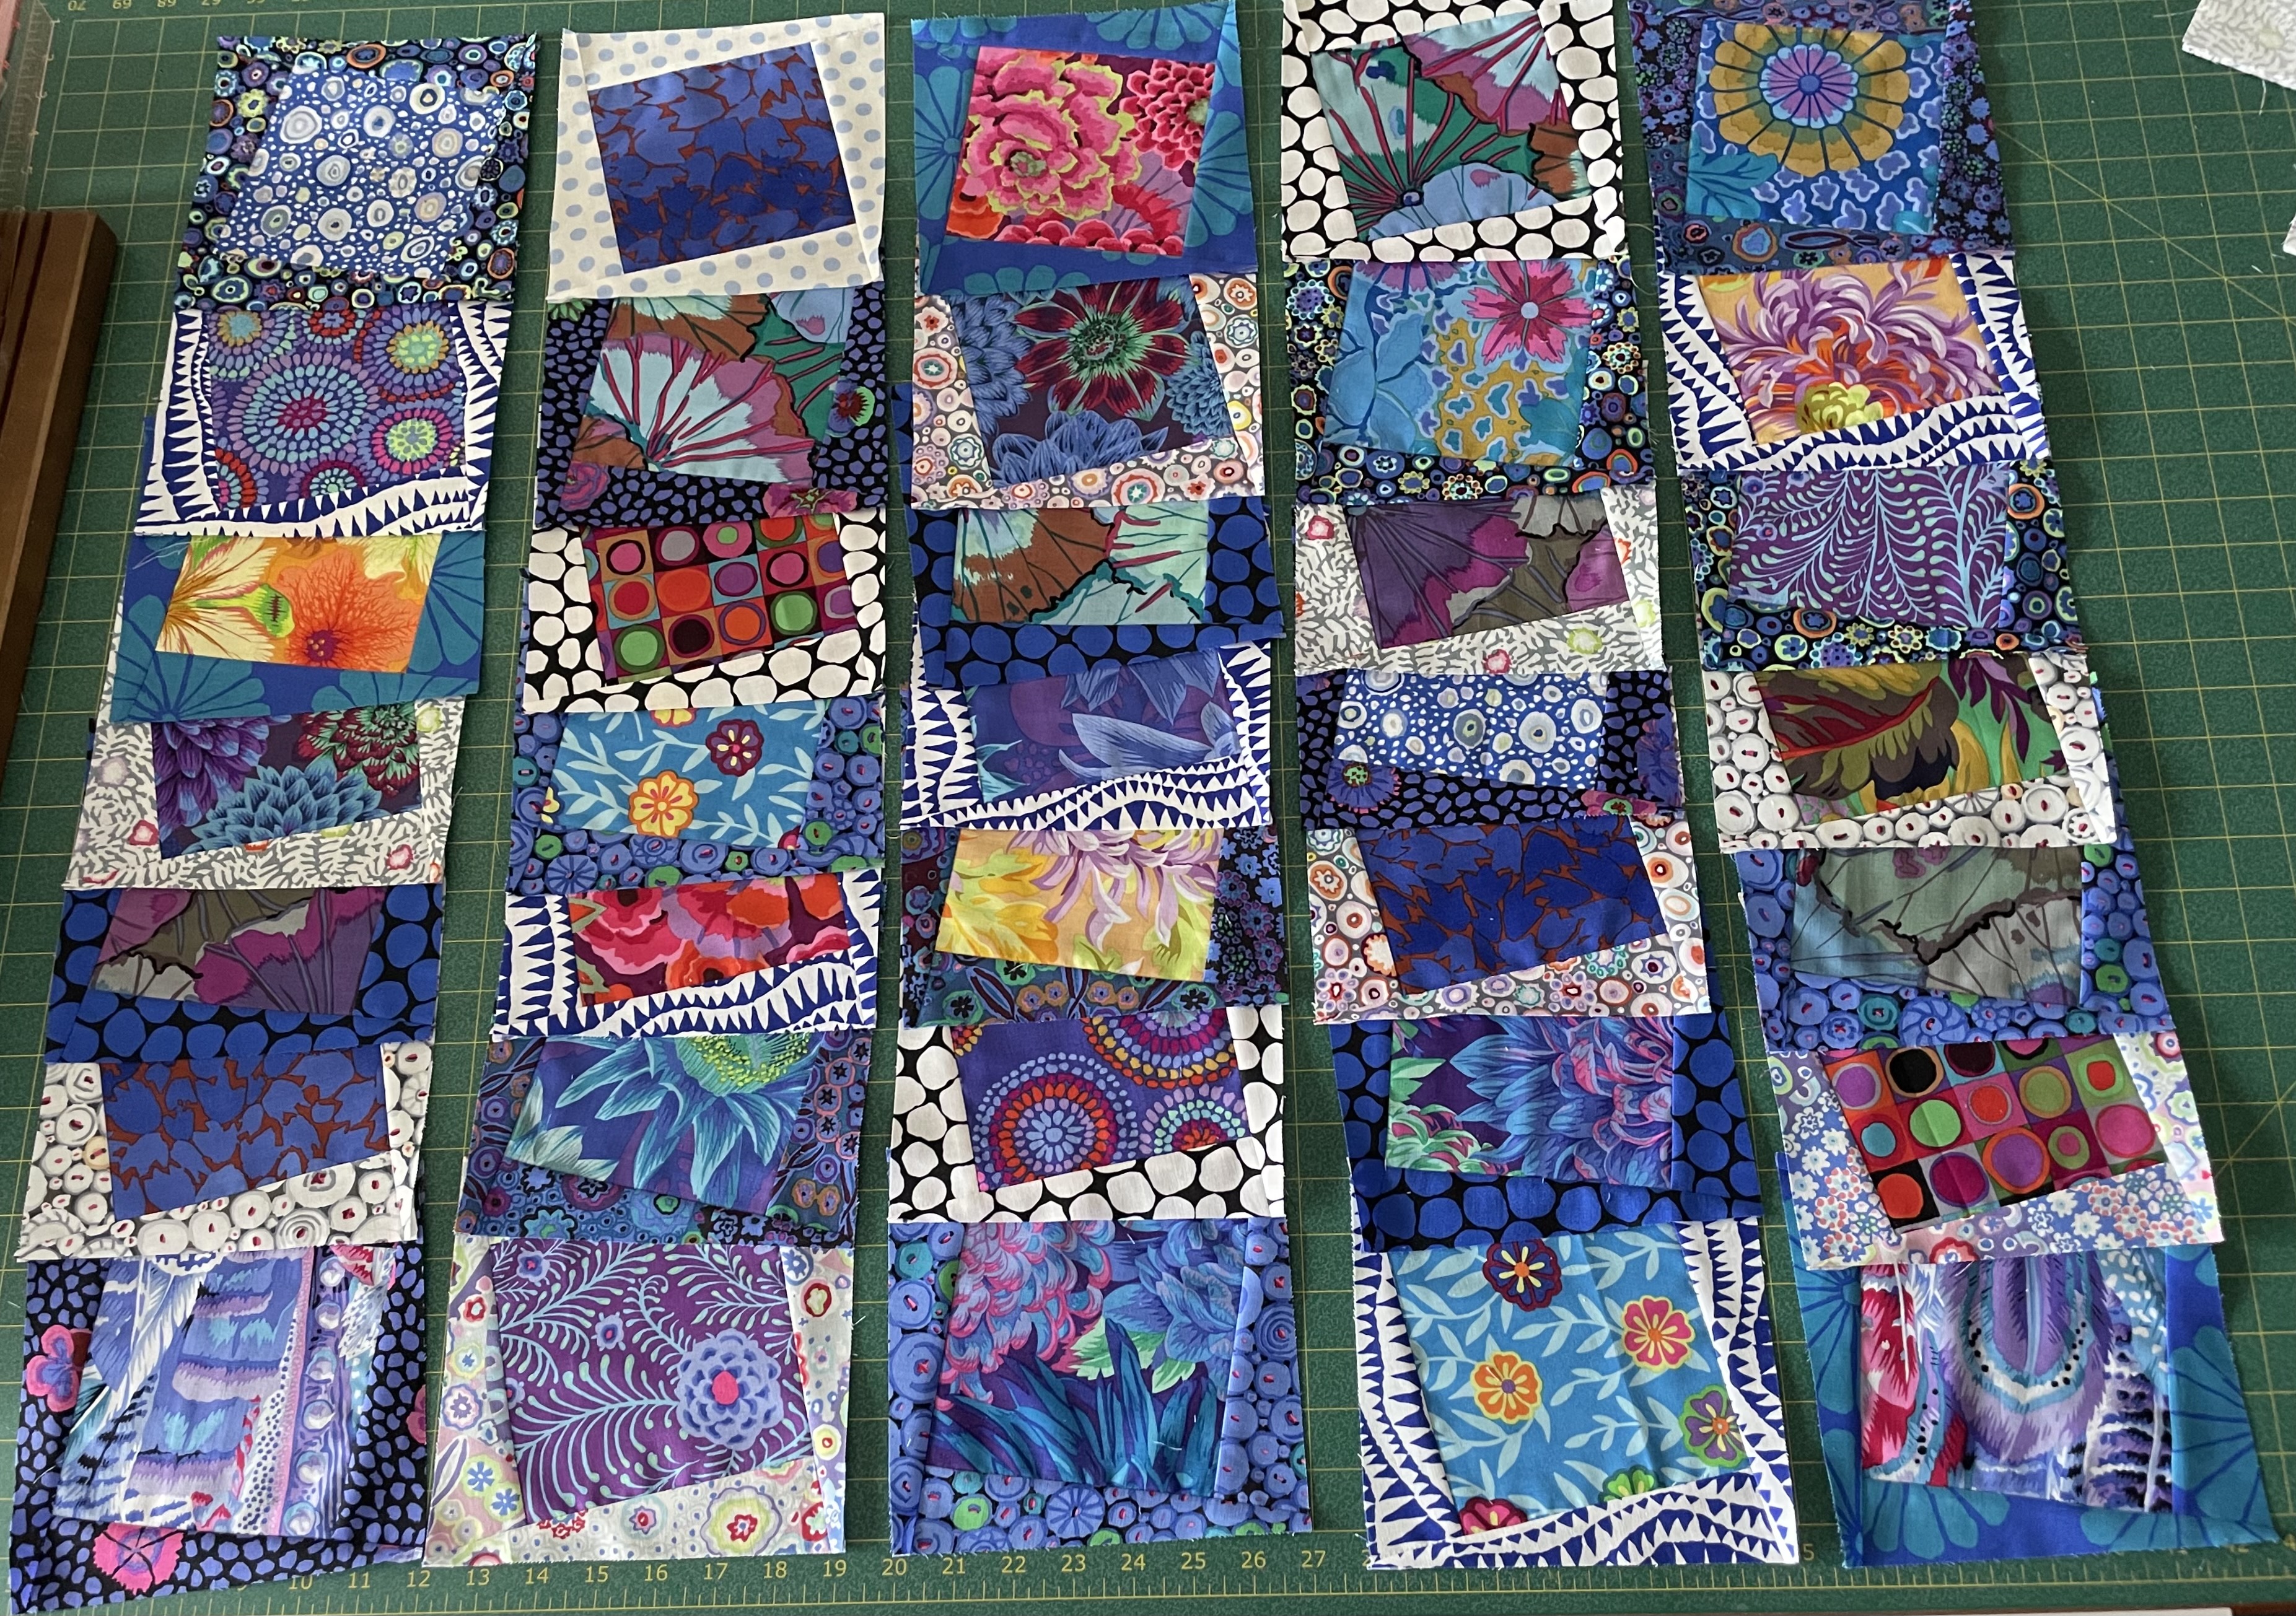
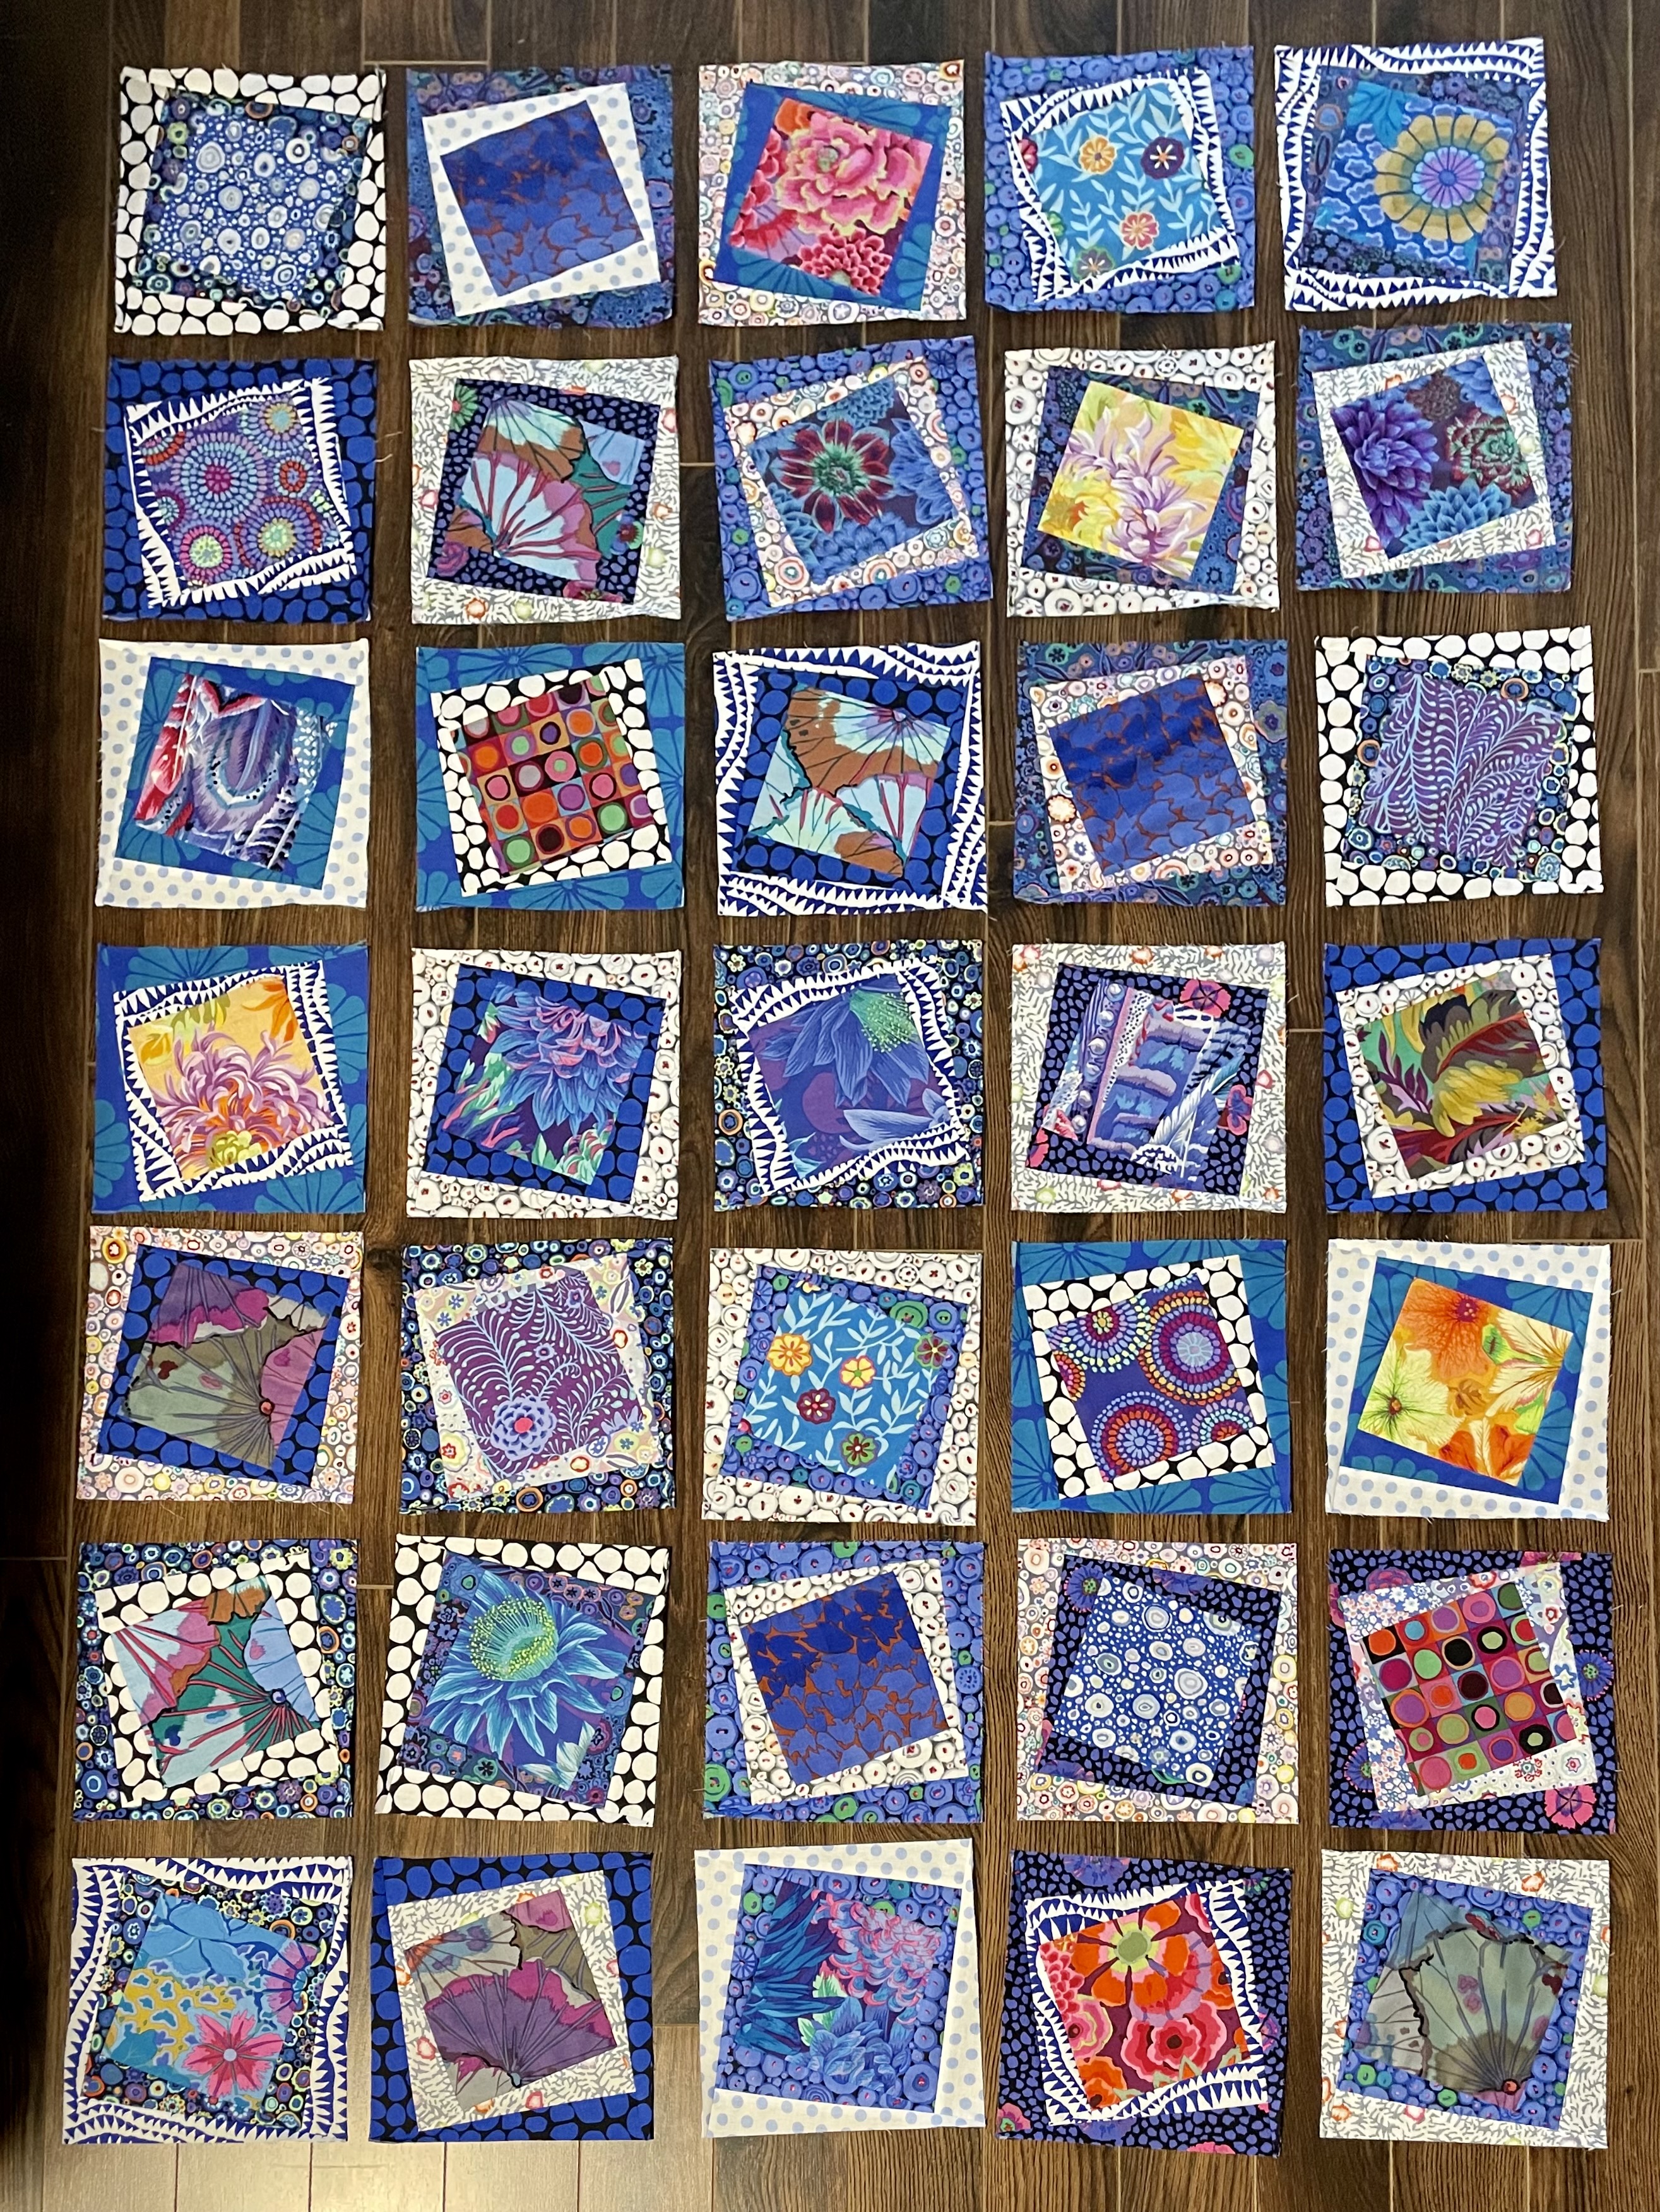
This is where I got to yesterday – all 35 blocks partially assembled with a triangle border on each. Today I began adding the second triangles to each block – I have 14 blocks done.
Then I was up early this morning going through my stash looking for something to use as sashing. I found a white fabric with black dots I thought would work but I didn’t have enough to do all the sashing, so after aquafit I went shopping for sashing fabric. I found one very close to the one I’d dug out of the stash. I also had a very small amount of a complementary white with larger black dots and had my fingers crossed there’d be enough in that piece to cut the 48 small squares I needed (I was lucky and there was!).
So here is what the setup is starting to look like:

I’m planning to alternate blocks with dark triangles with blocks with light triangles. That gives me alternating rotation as well since I cut all the light blocks in the same direction, all the dark on the second diagonal.
The sashing will be a wee bit narrower than the placement in the photo and will look fine once I have all the blocks completed and laid out.
So enough for today – back at it tomorrow. I expect the quilt top will be finished sometime on the weekend.
And then I have to start planning for a course I’m teaching in a couple of weeks – Industrial Techniques for the Home Sewer. My plan is to help people work their way through a relatively simple garment of their choosing while showing them some of the technique I’ve acquired over the years from various people I’ve taken classes with as well as other short-cuts I’ve figured out for myself.
I’m going to make myself a jacket from some kantha fabric I bought from Marcie Tilton a couple of years ago.

I drafted a pattern from a jacket I bought at Gumps in San Francisco (looks like they’ve dropped the interesting clothing they had in the store) and made it from a kantha bedspread I bought online. I’m not sure whether I will line the jacket or not – quite likely not, but in that case I do need to bind all seams (I did pick up some faux suede to do just that). It’ll be a good example to illustrate details not in a pattern that make a garment more interesting and professional looking.
In the responses I got yesterday there was some confusion about how I cut the triangles for the second Delft quilt. For the inner triangles the rectangles are 8 1/4″ x 2 1/4″ – half cut on the diagonal in one direction, half cut on the opposite.

When you lay the two sets of triangles from the same fabric on top of one another they have the 90° angle in the same place. However, as you can see, were you to lay the dark set on the light set the 90° angle is on the opposite corner.
Here is the first set of triangles cut and placed upon the centre square (5 1/2″ x 5 1/2″) – they’re ready to be sewn. I’ve tentatively laid out the squares as they will appear in the quilt top – once the first triangles are attached I won’t have a lot of freedom to move these blocks around because I want adjacent blocks to be offset 90° from each other – the triangles determine that arrangement. In this array, I’ve cut all the light triangles to go in one direction, all the dark in the other.

When I have these assembled and trimmed to 7″ I will add the second triangle to each block – using a dark triangle against a light one, and a light triangle against a dark one.
Here are the rectangles cut for the second set of triangles – 9 1/2″ x 2 1/4″ – I haven’t cut them yet because I figured I’d mix up the inner and outer triangles which are very similar in size; they won’t be cut until the inner triangles are all attached. I’ve laid the rectangles out with the light fabrics face down – both sets of fabrics will be cut the same on the cutting board but because the light rectangles are face down, the diagonal cut will be 90° offset from the diagonal on the darks.
I have to think about this carefully before making these cuts because the light/dark cuts have to be opposite to the light/dark cuts for the first triangles! I think this presentation is correct for making that cut.

Now it’s time to begin sewing. If I’m organized about it, I should be able to chain piece the rows by adding one triangle to each square, then the second, etc.

I was walking the Bedford Pier last evening with a friend and stopped to chat with this fisherman – he was having no luck, hadn’t yet caught anything. Apparently there were mackerel schooling in the Basin, some of the other folks along the pier had caught some. After we chatted we walked to the end of the pier. On our way back, as we were walking past, I stepped back to capture him just as he was recasting. I cropped the photo a bit but didn’t do much else.

I finished hand stitching the binding to the back of the quilt last evening. Usually, I would stitch the binding to the back, fold it to the front, pin, then use a decorative stitch to attach it to the front. But this time I wanted a 5/8″ binding but to use just 1/4″ of the sashing so it would balance on the outside with the rest of the quilt which meant when I trimmed the batting/backing, I left 3/8″ beyond the quilt top. To make sure I captured 1/4″ of the top under the binding, I had to align the sashing on the front, stitch 1/4″ from the top edge, then fold the binding to the back over the extended batting/backing. Even though I was careful pinning it in place, I knew top stitching on the back wasn’t going to give me a perfect stitching on the front, so I hand stitched the binding in place (not my favourite job).
With this quilt now finished, I started playing with the leftover fabric:

I used scraps to construct two offset squares by attaching a double set of triangles to each side – the triangles in two sets – cut from rectangles on opposite diagonals. When attached this rotates the square to the left or to the right.
In these test blocks I was trying to sort out a couple of things – I wanted to see what placing the shark’s teeth as both the inside and the outside triangle would look like (I don’t like either and may not use that fabric in the block construction, maybe instead as a narrow sashing); I was also playing with the dimensions of the triangles which I haven’t quite worked out yet (I need the triangle to be cropped leaving 1/4″ in the finished square so the next seam brings it to a point. Mine aren’t yet quite long enough – I have to redraft the triangles and try another pair of test blocks.
I have laid out my fabric leftovers in three piles – light/medium/dark. I intend making a 5 x 7 block array which means I will need 35 centre squares. Gathering No Moss used the medium fabrics for the centres and I may do the same here which will free up the lights/darks for the inner and outer triangles (17 blocks rotating to the right, 18 blocks rotating to the left). I still have to decide whether all left rotating blocks will be dark inner/light outer triangles, all right rotating light inner/dark outer, or if I will distribute lights and darks more or less randomly!
Lots of decisions.
I finished quilting the 30 blocks; next the sashing. I figured I had two options: edge stitching or stitching-in-the-ditch. I did a bit of both knowing I was going to have to take out whichever one I didn’t like.
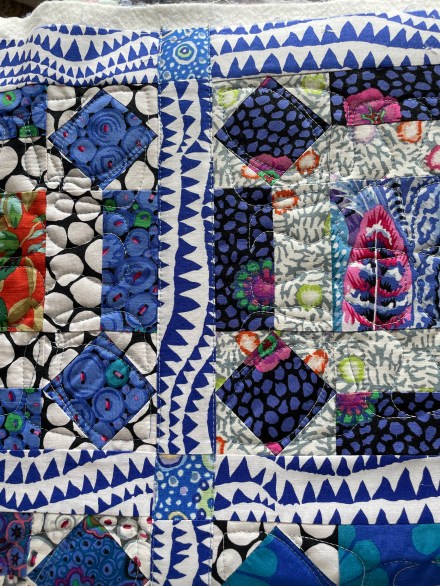

On the left is the edge stitching (on the vertical sashing), on the right stitching-in-the ditch. The difference is subtle but I prefer the stitching-in-the-ditch. So I started taking out the edge stitching. Thank goodness I only did one horizontal row and a bit of the end sashing. That’s a job for working in front of the TV tonight.
I’m quitting for now but I will carry on quilting the sashing tomorrow.
