The Canadian 2017 Quilt Bee

The Canadian Quilters’ Association has invited quilters across Canada to be part of The Canadian 2017 Quilt Bee to commemorate Canada 150. The quilting bee will actually take place in Toronto June 14-17, but those of us who can’t get there can participate by making 12 1/2″ slab blocks (even quilt tops). The goal is 1000 quilts for kids at Ronald McDonald Houses across Canada. The requirements: 1 small piece of Canada fabric inserted into each quilt slab. No specified quilt block design, just include a piece of Canada cloth and make the slab 12 1/2″.

Local fabric shops are participating in the event – holding slab making days. The Friday afternoon women, here in my building are joining in, too. A week tomorrow we’re planning on spending the day making 12 1/2″ slabs.

I stopped off at my local shop this afternoon and picked up a half-dozen pieces of Canada fabric and came home and quickly turned out 3 slabs!
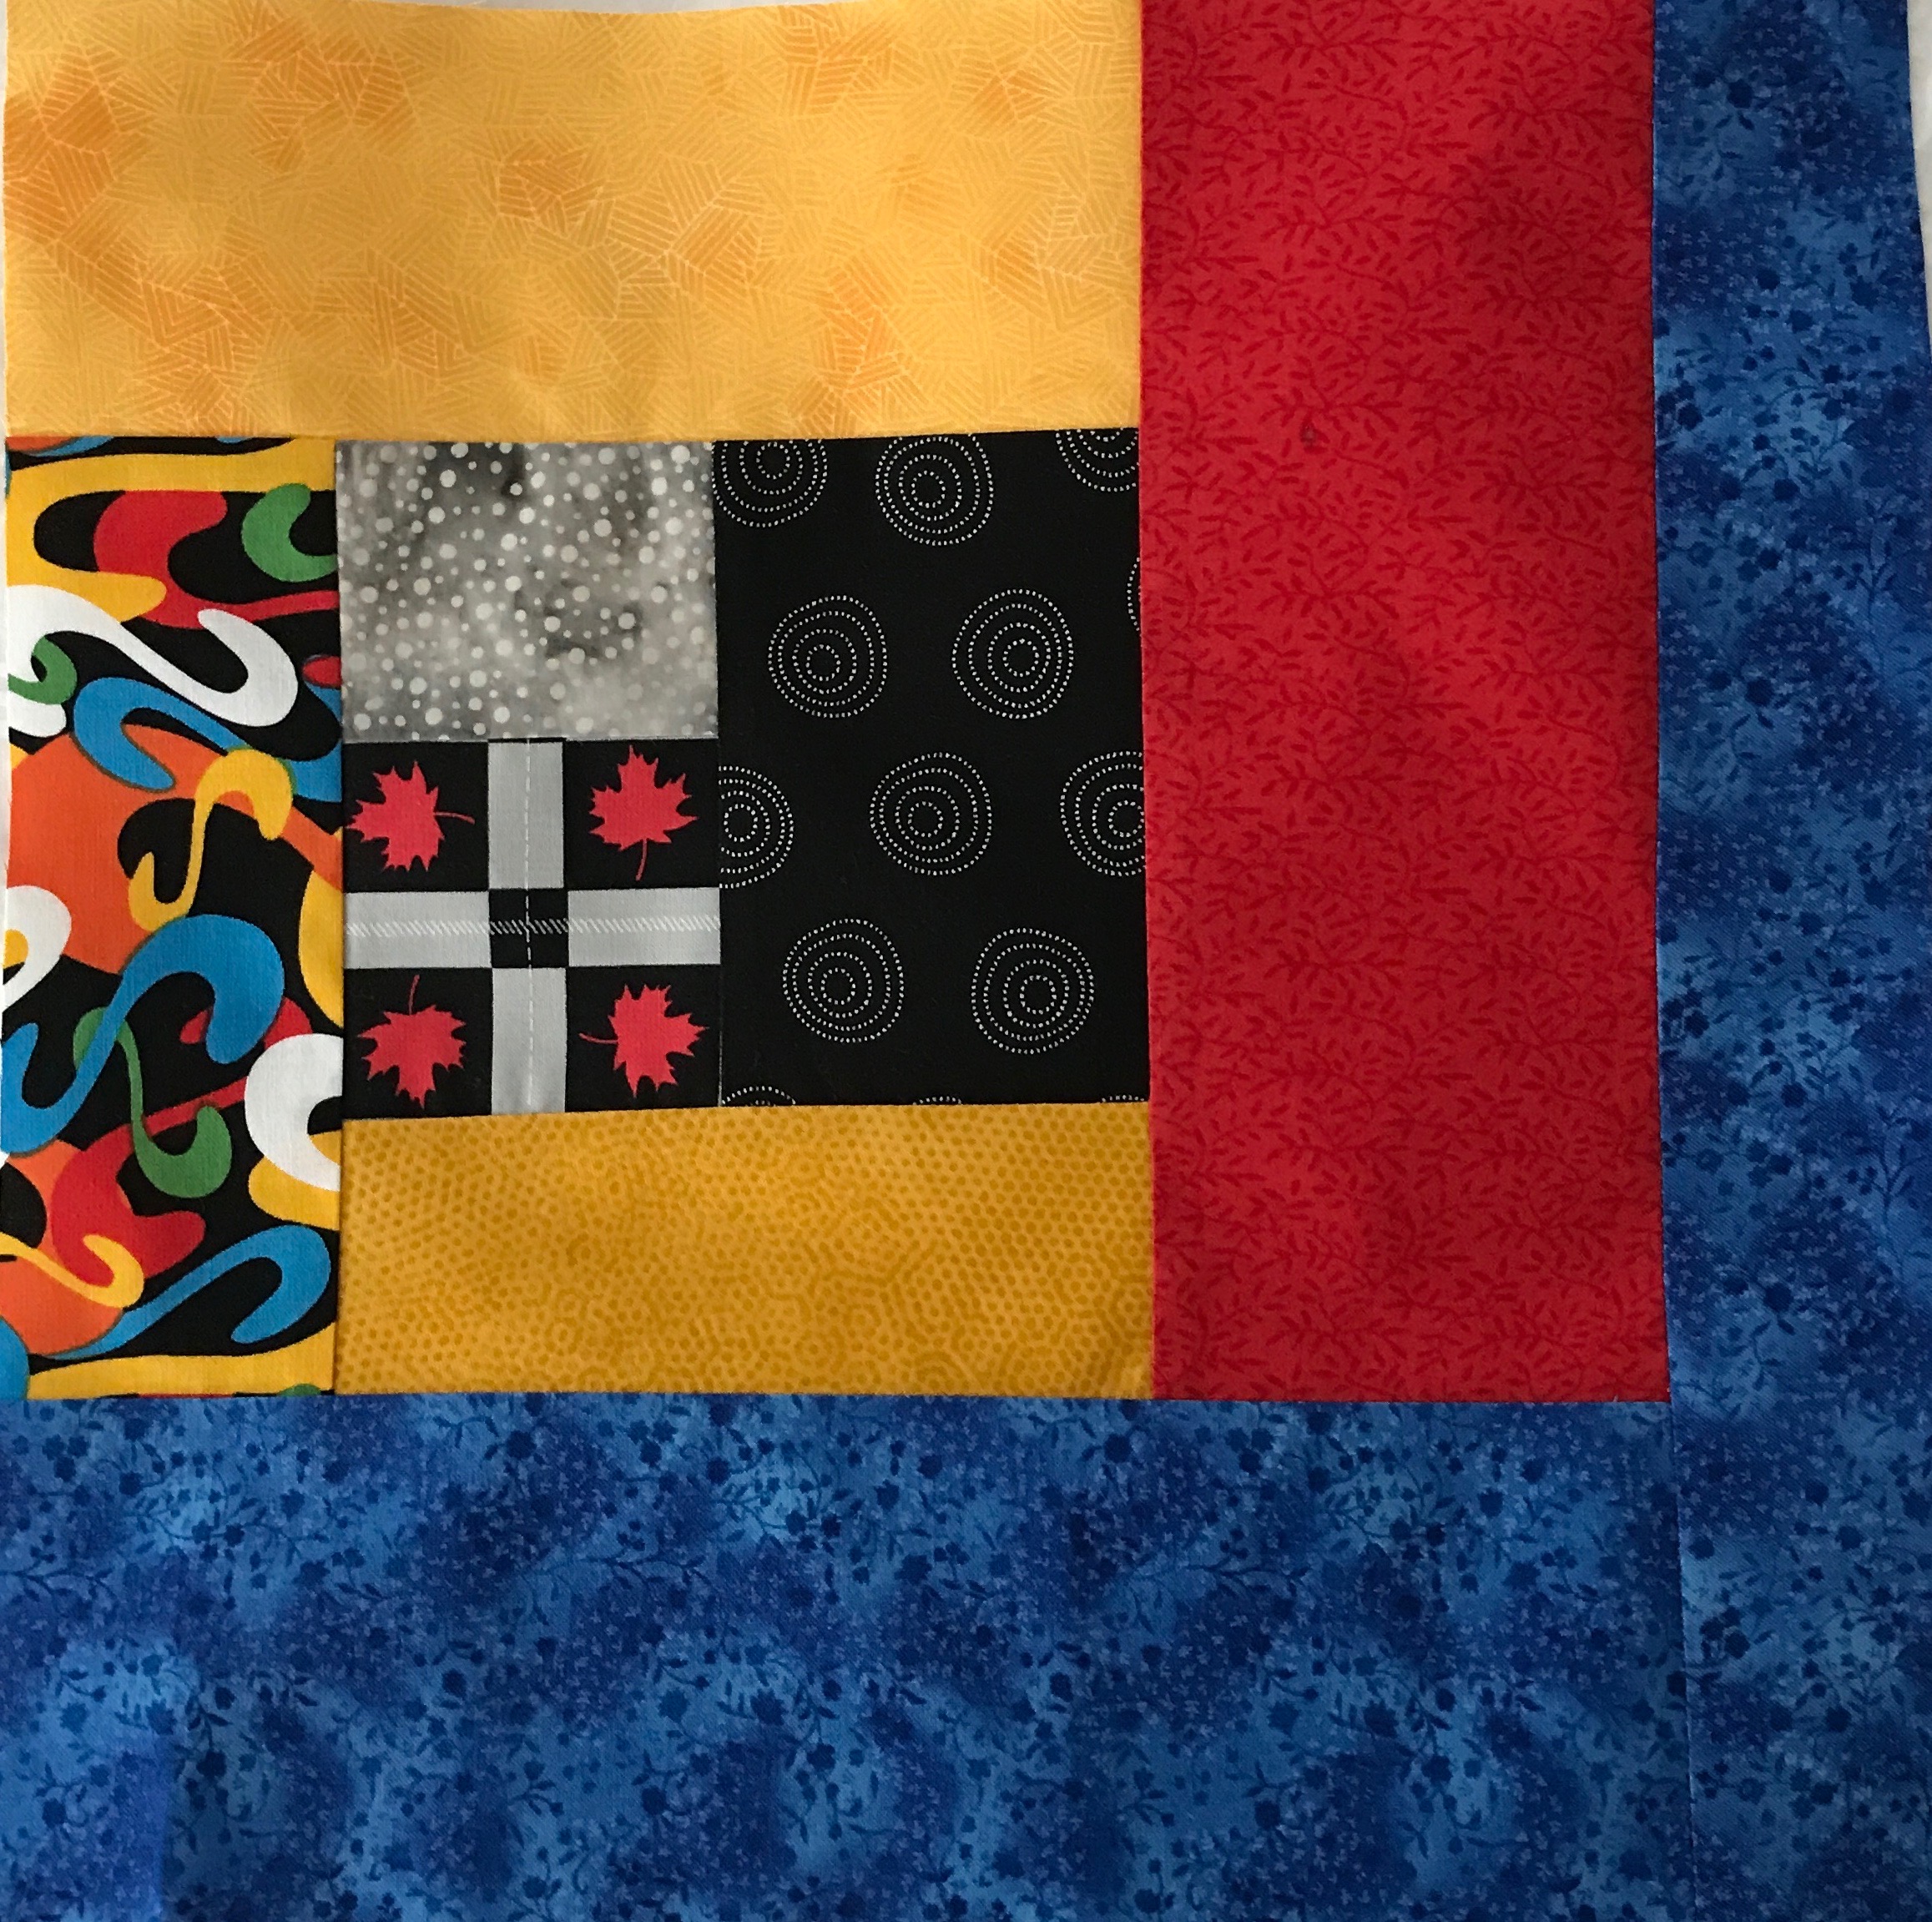
Improvised Slab #1

Improvised Slab #2

Improvised Slab #3

As you can see my slabs are improvised – started with a bit of Canada fabric, surrounded it with something colourful, and continued to build out the slab until I had enough to trim to 12 1/2″. They’re wild! Nothing subdued about them. I’m sure they’ll coordinate with slabs sewn by other women. I figure 1000 quilts will require close to 25,000 slabs! That’s a lot of piecing but with many willing hands I bet the Association will meet its goal.

There was one horrendous mess on my cutting table by the time I’d finished these three  – I’ve just tidied up. I have three more pieces of Canada fabric so over the next week I’ll probably build another three slabs. I’ll do another couple when the women get together next week.

12 X 12 Quilt

I mused about the teal/indigo fabrics I had for a couple of days and decided in the end to limit the quilt to just the set of twelve fat quarters (I put the rest away). To use my set of twelve indigo fat quarters, I decided to make a 12 x 12 quilt based on Elizabeth Hartman’s “Low Volume Tiles” quilt from her Craftsy Class: “Inspired Modern Quilts“).

I based my quilt on Hartman’s design but had to adjust the sizes of my small blocks because once I cut the first 13″ square I knew I had to fiddle to cut a second set of 12 blocks – there wasn’t enough fabric for a second 13″ square. So the dimensions of my small blocks are a bit different than hers in order to be able to use the fabric I had – there was just enough with a 5″ x   8″ leftover piece of each fabric which I used in my side borders.

The idea behind this quilt is to take 12 fabrics, cut 13” (or whatever large size) blocks you want by stacking and cutting them into the same 12 sections. Next you sort them shifting fabric #1 to the back of the stack for the second small block, fabrics #1,2 to the back of the stack for the third small block, fabrics #1,2,3 to the back of the stack for the fourth small bloc…. You get the idea:

12 Blocks – Stack ‘n Whack – Sorted

When you’ve done the setup, each stack has 12 fabrics, arranged so that a different one of the 12 fabrics is at the top of a stack before you begin laying out the large blocks and the fabrics in each stack are in the same sequence, just shifted by one so when you sew the blocks, each block has all 12 fabrics with no repetitions!

I intended to end up with 10 1/2″ blocks (having started with a 13″ square) – I trimmed my stitched sections to 11″) and assembled them into a 3 x 4 array:

12 X 12 Stitched Together

That’s a small quilt, however. I had cut a second set of 12 small blocks from the residual fabric from my indigo fat quarters – so I stitched together the second set of twelve blocks. It turns out that I was lucky to have chosen 13″ as my starting size because I wouldn’t have had enough fabric to create the second set of 12 blocks had I started with 14″!

One other thing – I removed one of the light fabrics from the collection before I began cutting, substituting a bright green for block #12. I wanted one colour to pull the other fabrics together.

My Finished Double 12 x 12 Quilt With 4″ Borders Added to the Sides

My finished quilt top is a 4 x 6 array with added 4″ side borders to give me a final width more in proportion to the length. Finished quilt: width 50″; length 64″. I lost a tiny amount from both width and length with the trimming I did in order to able to fit the blocks together. But in a design like this you can’t tell where the trimming occurred. You really aren’t able to see the “blocks” or where the main joins are.

Now to come up with an idea for the back. Yesterday I bought some backing fabric and 1/4 m of four teal/indigo batiks to add to some others I have but didn’t use in the quilt top. I had to do that because I didn’t have a single scrap left from the original fat quarters I started out with.

From My Fabric Stash

Fabric Stacks

Nearly two years ago I returned from a road trip to Toronto via Center Harbour Vermont so I could visit the Keepsake Quilting shop. I’ve been buying fabric from the online shop for years. This was a chance to actually see the entire selection.

I was looking for green batiks to make a quilt for Noah. However, once I’d made my choices, I couldn’t help looking around and ended picking up two different fat quarter collections of indigo/teal – eighteen pieces of fabric in all.

Having just finished the Japanese Strip Quilt, I was looking through my stash and decided it’s time to use these indigo fabrics so I opened the packages, spray starched and pressed each piece. I realized I didn’t have enough light coloured fabrics so I made the rounds of my nearby fabric shops and bought several 1/4 m selections.

Now the prepared fabrics are sitting on my cutting table – along with a 1/2 m length of a bright green to use as an accent.

I just have to decide what to do with them! I want something “modern” but probably constructed using traditional elements. Can’t make up my mind, is the problem.

For example I could set up half-square triangles and recut them:

Disappearing HST

I could cut squares, stack them three/four at a time, wonky cut them, and sew, mixing and matching to create blocks.

Wonky Log Cabin

I could just make 4 HST at a time and cluster them:

HST Clusters

I could cut rectangles and arrange them somewhat randomly:

Japanese Blocks

Or I could just cut and sew, improvising as I go along!

Don’t know where to start yet.

Japanese Strip Quilt – Finished

Here it is – the finished, bound quilt (just a label needed – I’ll do that later this afternoon when I get back from some errands).

Quilt Top

I did the quilting from top to bottom in line with the strips, instead of across the quilt. I wanted to emphasize the flow of the piecing. I was lucky my quilting design was the perfect size for the side borders and fills that space nicely (It was pure luck that I was able to balance the border quilting on each side!). It took a lot of precise positioning to make the embroidery joins work but it would take a hawk eye to detect the slight misalignments I decided to live with. I used a variegated white/grey/black thread, top and bottom and I like how it turned out on the back. On the front, the stitching blended well with the coloured strips. However, I darkened the light stitching in the dark strip ends because otherwise the alternating strip ends were obscured and that was a detail I worked hard to achieve.

Quilt Back

The back has worked out well. The pieced insert brings colour and interest to the back. The side borders of the strip blend well with the backing fabric yet effectively set off the insertion. I used strips of the backing fabric (which I had found in a second shop after I’d pinned the sandwich together) for binding. I’ve finally learned 2 1/4″ binding strips are better than 2 1/2″ – I have less fabric to fold under on the front of the quilt – easier to manage when I’m pinning the binding in place on the quilt front after first stitching it to the back.

I would have liked the quilt to be a wee bit longer but I was limited by my original 66″ length of backing fabric – all that was left on the bolt. The quilt is still a respectable 62″ long.

Failed Attempt

Failed Attempt

I needed to piece an eleven inch strip to insert into the single width of backing fabric I had (that’s the primary reason I piece the back of my quilts – to get the width I need for the quilts). I had lots of small amounts of the Asian print fabrics I’d used for the top so I cut single 2 1/2″ strips, sewed them together in pairs on both edges, cut triangles which resulted in 2 1/2″ squares. I assembled the squares into a central row then filled in the sides with another row of the small squares and edged with a set of light coloured triangles to set off my pieced strip against the dark backing fabric.

I decided to construct the insert panel along the diagonal so incorporating the triangles would be straight forward. Nice idea. However, in spite of the fact that I trimmed the triangles, the further I got into the panel, the more it bent away from the straight! I took tucks in strategic seams only to find my next diagonal row was even further off. With the panel half assembled, I gave up.

Unused Small Half-Square Triangles

I gathered up the unused small squares and triangles, looked at them for a while, paired the small squares, then joined two pairs to create five inch squares – I ended up with nine which I aligned on point down the middle of my cutting table (in the end I needed only eight). I had lots of the Kona solid “pepper” fabric I’d used on the quilt top – I cut 6 1/2″ squares (which I cut along the diagonal) and inserted the triangles in the spaces between the pieced squares. Finally I added two narrow strips of one of the black/white fabrics to offset the panel against the backing fabric.

Pieced Back Using Small Half-Square Triangles

So my efforts weren’t entirely in vain. I have tucked away my failed attempt. I inserted my new panel into the backing fabric (offset twelve inches from one side along the length). I pin basted the quilt sandwich and you can see I’ve begun quilting the quilt. My finished quilt will end up 49″ x 62″. My quilt design (in a 360 X 200 hoop) has worked out to 7″ x 13.7″. I’m quilting along the length of the strips rather than from side to side (to complement the strips rather than stitching across them) – I will end up quilting seven rows, each row requires 4 complete and 1 half repeat to cover the quilt from edge to edge.

So far, I’ve stitched two rows and started the third. It’ll take me another two days to finish the quilting. I plan on binding the quilt with some of the backing fabric I was able to find yesterday in the sister shop across the harbour from where I bought the original backing fabric.

I’m already planning my next project – a spring raincoat using PUL fabric (Polyurethane Laminate used to make diaper covers among other things) in black with bright umbrellas which I came across a month or so ago. Now to find a pattern….

Starburst Quilt – Finished

It’s called “Starburst” (pattern from the Missouri Quilt Company)  but with this combination of fabrics in this particular layout you don’t really see the starburst, unfortunately. I’ve also mentioned earlier that the background fabric didn’t set up enough contrast, particularly with the paler batiks to highlight the starburst effect.
img_8184
However, I’m happy with the finished quilt. The dark narrow border and binding help strengthen the contrast and the quilting design used draws a bit of attention to the diagonal lines.

The back, on the other hand, I think has stronger contrasts:

img_8185

While the dark elements blend into the backing, the lighter “framing” makes the whole design come alive. So on the whole, I’d say the quilt worked out quite well. It’ll get added to the collection.

Now back to “Wind Waiting” – the pilots need quite a bit of thread painting – that’s up next.

Starburst Quilt Back

Yesterday I collected a bunch of fat quarters and large leftover pieces in the colour families used on the front of the Starburst quilt. I bought two dark navy fabrics planning to use one on one half of the back, the second on the other side. I found an image of a simple quilt, planned it out so it would fit the dimensions of the Starburst top. Today, I cut out the pieces, sewed them together and stitched up the back.

Starburst Quilt Back

Starburst Quilt Back

I also managed to assemble the quilt sandwich – top, batting, back – and now I’m ready to create some kind of simple single run design for quilting the whole thing. The blocks on the top are 6″ square – I’d like something that fills each block and brings out the diagonal of each half-square triangle. Don’t know what that is, yet. But I’ll come up with something tomorrow, I’m sure.

Here’s The Question…

Pilots: Printed on Fabric

Pilots: Printed on fabric, laid on background

Here’s the question – I’ve been looking at the art piece and wondering how might it look if I printed the figures on fabric, fussy cut them and fused them to the scene instead of trying to create them (shadows and all) from different fabrics?

pilots-detail

Here’s the detail, right? Lots of little pieces to be very fussy cut and fused to a base fabric – very time consuming. Doing the appliqué work will also be time consuming because I will want to stitch in all those colour demarcations, but what I get is a more realistic look to the figures which are the focus of the piece.

All I’ve done so far is print each pilot on EQ Printables Fusible Fabric and carefully cut each. I haven’t yet fused them to the background. The way we see the sun on their clothing gives the viewer a sense of the light – some brightness but not full sunshine. I can’t achieve that through piecing, even if I’m extremely careful with fabric selection.

I guess what I have to do is try one of the guys and see how he turns out – maybe Brian (the one on the left). Whichever way I do this, I think it makes sense to refrain from filling in the grasses/shrubs until after I’ve got the figures in place, that way I can build up the grass around their shoes as I go along and not as an afterthought.

In case you hadn’t noticed – this fabric wall art requires a gazillion decisions and unlike oil/acrylic painting there’s no going back – you have to live with whatever decision you choose to execute.

Double Vision Quilt IV – Completed

Finally done – the binding turned out to be a very fiddly job – I decided in the end a single fabric binding would clash with the border no matter what fabric I chose because the gradation from the dark burgundy to golden yellow was so great. The solution: to have the binding mirror the border with the joins aligning as closely with the border slanting seams as I could manage it.

Finished Quilt Top

Finished Quilt Top

It’s taken three days of measuring, sewing, unpicking, re-sewing, to make the joins look continuous. I’ve done a pretty good job although close scrutiny would show I missed by a wee bit on some of the connections but hey, this is a quilt after all, so I decided to live with the minor imperfections that showed up when I was stitching the binding on the right side.

Binding - Detail

Binding – Detail

In the end I decided to piece a simple back since the front is so complex and for some reason (which I can’t explain) I thought placing the strip on one edge was what was called for. The binding I knew would also add some interest to the back.

img_8116

Finished Quilt Back

I quilted using straight vertical and horizontal lines midway between the circles. So far, I haven’t quilted the border although that is still a possibility. It’s probably a tiny bit wide to leave unquilted. For now I’m putting the quilt aside to move on to other projects.

Who’d Have Thought…

Yesterday I pieced and attached the border for the circles panel. I had originally intended bordering the top using an almost black and an off white printed fabric. But when I opened out the border fabrics and laid out the panel on them, it looked all wrong. So I decided to try a border of graduated colours.

I auditioned the fabrics and thought it could work. Next I cut 3 1/2″ strips and placed them adjacent the panel. I cut pieces, mitred them together (including the corners) and attached the border to the quilt panel. But something didn’t feel quite right. I took some photographs. And when I looked at them I could see my problem: the bottom border had the mitres going in the wrong direction – your eye is pulled immediately to the yellow bottom left corner:

img_8096

First Bottom Border

I was going to live with it, but this morning when I got up I decided to fix that border. I knew I couldn’t just realign the joins – my border would be too short. So I started from scratch, cut new strips (or used what I had leftover from the first border), sewed them together and attached the border to the quilt,

img_8099

Second Bottom Border

It’s really quite interesting how that mitre direction makes such a difference. Now the colour story flows from top left to bottom right and the eye moves around, sees the shades of pale greys fading into the medium greys, into the darker greys/black at the same time the yellow blends with the oranges and reds rather than standing out.

Wouldn’t have thought it would make such a difference.

I have my embroidery machine set up with rayon thread (I have selected several shades of red), a new embroidery needle (an embroidery 75), my sewing star foot (which has an open toe), and a narrow blanket stitch. The quilt top has been pinned to batting and I’m now ready to stitch around all the raw appliqué edges. I won’t get to that until Thursday – tomorrow I have to return to Parrsboro to pick up the two quilts I left behind for the art exhibit featuring all the artists who had shown during the season.