Kantha to Jacket – Finished

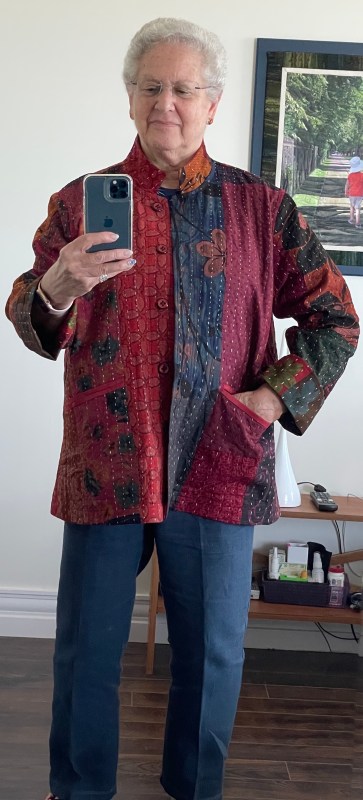
I started with a Kantha bedspread which I’d purchased six or more months ago in preparation for doing a workshop on making garments from these textiles.

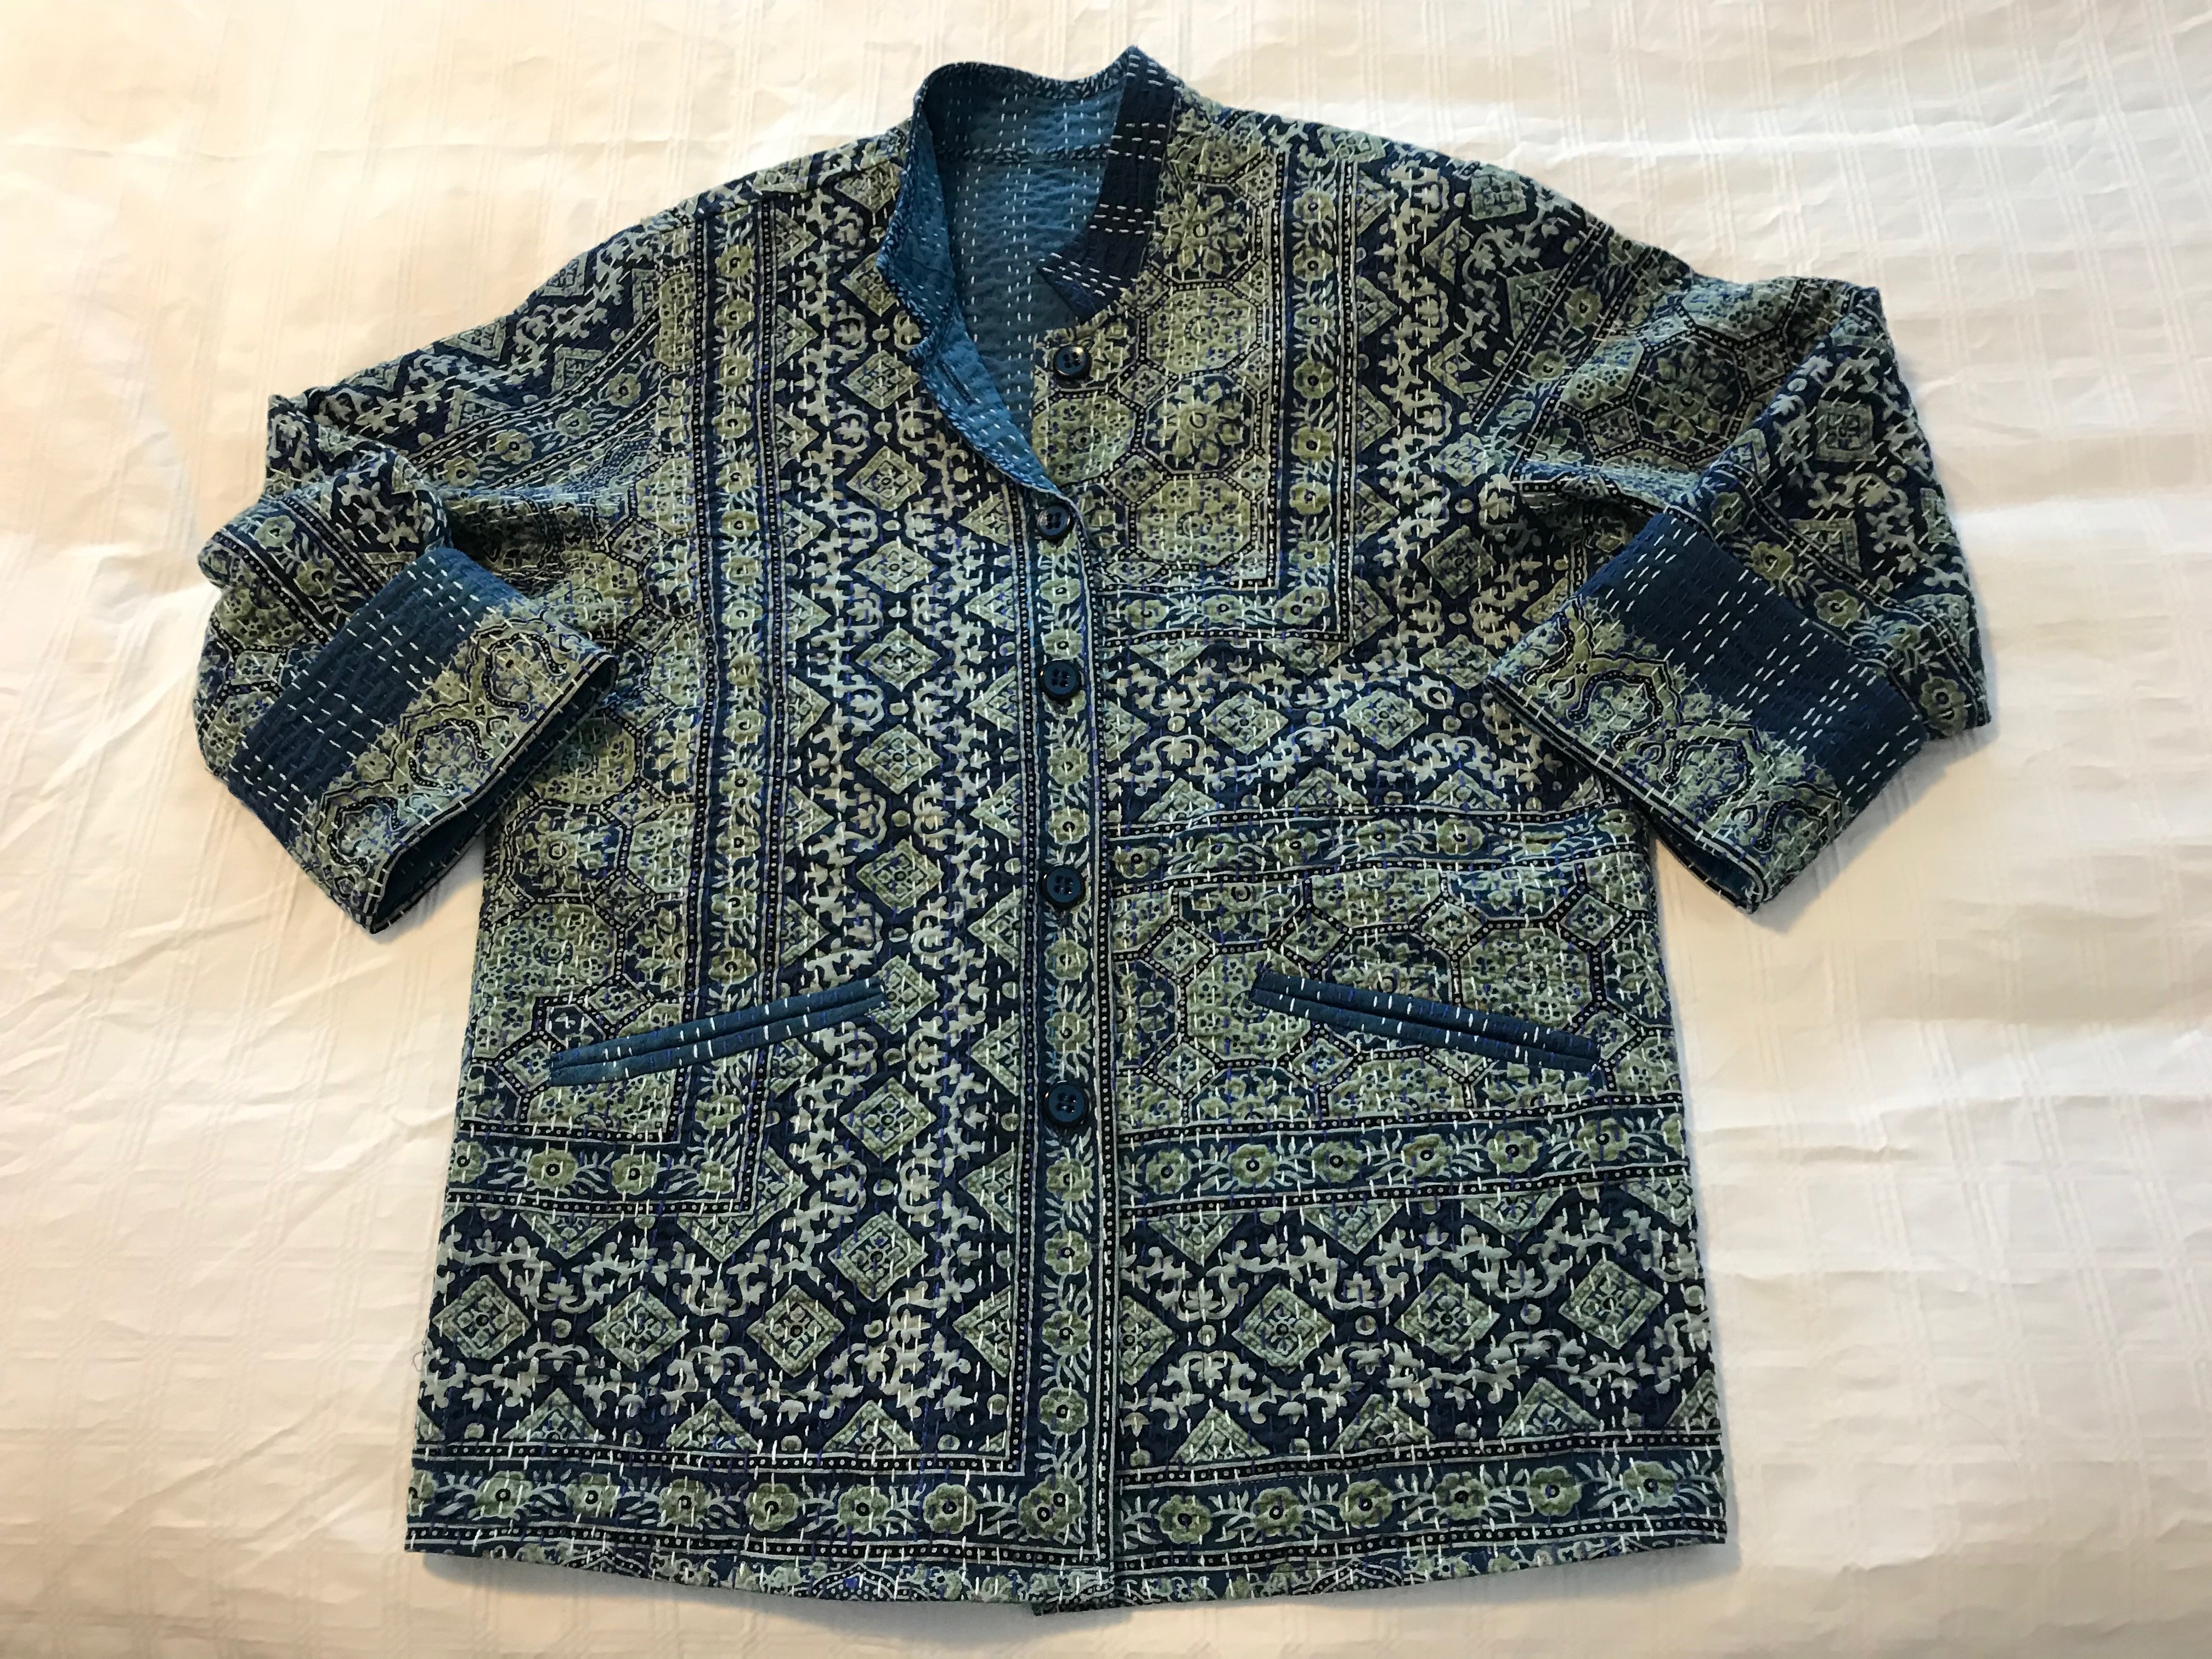
I did the workshop at the end of February. I started by cutting out a jacket for myself – two fronts, a back, two sleeves, two cuffs, a collar, two pocket backing pieces. Then I cut out front facings, a collar facing, a hem facing, and narrow bias strips for binding the seams.

Prior to the workshop, I sewed the bound/double welt openings for the slash pockets – so I could show the gals attending the workshop how I did that. I bound each pocket back piece, and attached one to each front behind the pocket opening. Then I attached the front facings, sewed and bound the shoulder seams before adding the mandarin collar. I bound the collar seam. That was as far as I got with the jacket – I didn’t want to finish it, I wanted to be able to use my garment to show how I stitched and bound the seams, how I faced the jacket hem and so on.

Since the workshop, the jacket has sat on one side of my cutting table waiting for me to complete it. First I finished the Moons/Planets quilt, then I constructed the baby quilt. This week I got back to work on the Kantha jacket.

I set up and sewed the buttonholes on the right front “placket”. That’s easier to do when the fronts are relatively unattached to the rest of the garment. (In fact I should have added buttonholes before sewing the shoulder seams and adding the collar!) Then I sewed in the sleeves, bound and top stitched them. I sewed the sleeve underarm/side seams, bound and top stitched those seams as well. I sewed the side seam of each cuff (to which I’d already added an edge facing), then serged the cuffs to the sleeve ends. I didn’t bother binding that seam since it’s concealed under the cuff which folds back over the sleeve.

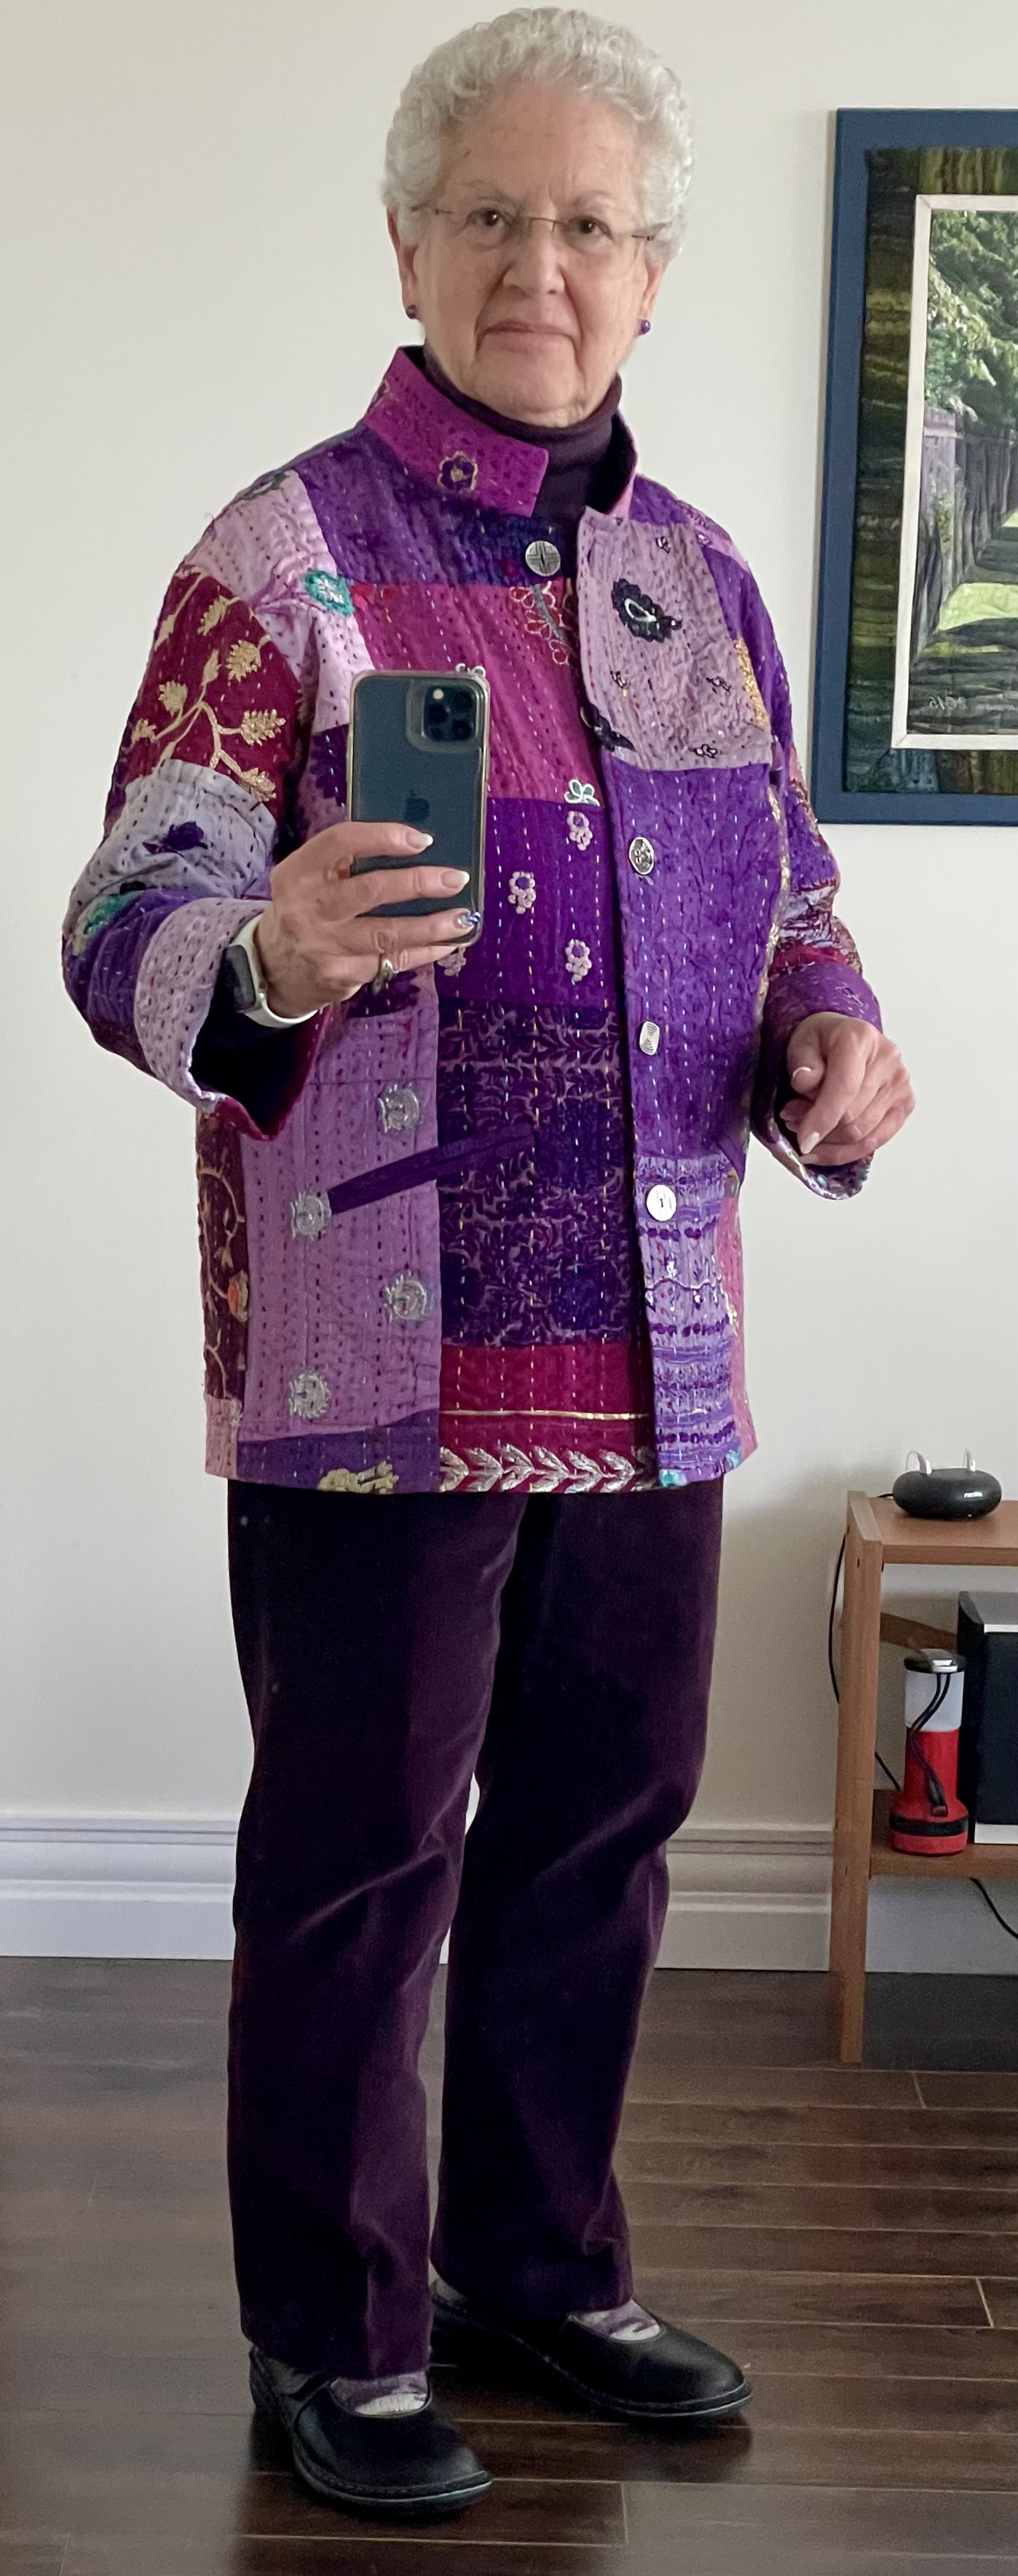
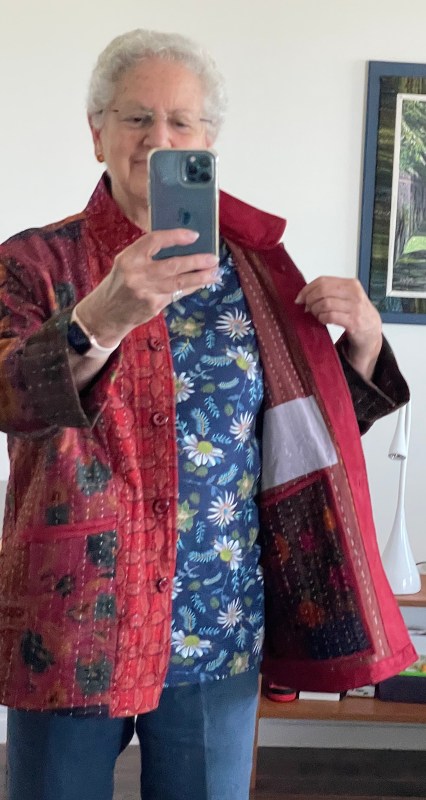
I finished the bottom with a facing and then I added five buttons – all 23mm metal buttons, each one different. (You can see that if you click on the jacket front to get to an enlargement of the photo.)

The thing I had to be careful of were the beads that were either glued or sewn to the heavily embroidered Kantha. I removed any which were in the way of the seam allowances – I didn’t want to hit one with a sewing machine needle! I left beading in the centre of the pieces alone.

The jacket is now finished. All I need is an opportunity to wear it. I will likely just put it on one day with a pair of jeans.

PS – With the jacket on:

Kantha to Jacket

I’m getting organized to do a day long workshop in February on taking a Kantha bedspread and turning it into a jacket. I’ve probably explained what a Kantha is before but I’ll do it here again:

Kantha (meaning: “patched cloth”) refers both to the tradition of producing unique, quilted blankets (making something useful and beautiful out of discarded items), as well as the craft and stitch itself (a small, straight running stitch in Bengali embroidery). Here’s a link describing the work: https://www.shopdignify.com/pages/what-is-kantha

I got my inspiration from Meiko Mintz’s wonderful Kantha garments!

Here is my latest Kantha – a heavily embroidered pieced silk bedspread (with beading I’m going to have to watch carefully as I cut and sew the fabric):

A Silk Embroidered Kantha

The Meiko Mintz jackets are large and flowing

I’d love to wear something like that but I look better in a more tailored shape. In any case, I have pulled a bunch of jacket patterns from my pattern collection to share with the gals enrolled in the workshop.

I wouldn’t make any of these jackets as they are, but they provide ideas (and sizes) for necklines, front openings, pocket placement, sleeve shape and fit that give us a place to start. I’ll be suggesting the gals check out the Peppermint “West End Jacket”– it doesn’t look like anything but the pattern has lots of potential. It’s actually free but you can make a donation to Peppermint (which I did). You can download an A0 version as well as the tape-together PDF download. I was able to have the A0 version printed on large paper. Much easier to work from.

Now I have to modify and trace the Peppermint pattern pieces. I intend making the collar wider and pointed, I will keep the front drop shoulder but delete the back yoke (keeping the placement of the shoulder seam), change the patch pockets to welt pockets, make the jacket a bit longer and compensate by adding a couple of extra inches to the front so the jacket hangs straight, add a bit of flare to the front (not the back – I want the back to hang straight). Next I will trace the modified pattern pieces in my size, cut them out and start to play with placement on the Kantha – I want to showcase as much of the elaborate embroidery as possible, avoiding beading where I can (removing beads if I can’t miss cutting or sewing into them).

I’ve sent the gals a blurb about supplies and other information they need so they’re prepared for our Feb 25th day. I’m looking forward to seeing what they end up creating!

A Birthday Gift

I had enough bedspread fabric leftover from my kantha jacket to make one more – this one a birthday gift for a very long time friend.

A number of years ago I made her a quilted pieced jacket which still fits her and I discovered I still had the pattern. So I cut out a new jacket from the remaining bedspread pieces and quickly sewed it up.

Her birthday isn’t until the 27th but I took the jacket to her yesterday. I hope it gets to be worn and enjoyed. I know I’ve been getting lots of complements on mine.

I created double welt pockets and button loops from the very last leather scraps I had – that’s it for that kid skin I bought in New York many years ago. I used a dark batik to bind and face the seams and edges. I found some nice metal buttons to finish it off. I particularly like the fabrics that landed on the back! Wonderfully colourful.

I still have a few bedspread scraps left – they’ll likely become zippered bags when I get around to making another batch.

I continue to be inspired by the amazing kantha garments made by Meiko Mintz – her new website is worth a look even if you can’t afford (or aren’t willing to spend that much on) her gorgeous creations. I keep thinking about making large flowing jackets like hers but I know I’d not feel comfortable wearing them – which is why I stick to my more tailored jacket style.

Kantha Jacket #3

King Size Silk Patchwork Kantha Bedspread

I started this jacket when I thought jacket #2 was a flop and hadn’t yet worn it. I bought this silk patchwork kantha bedspread on Amazon intending to toss the second one and make another from the bedspread.

This time I kept the back straight (taking out the fullness I’d put into Jacket #2). I did leave some fullness in the front – turns out to have been good decisions.

Kantha Jacket #3

I worked from the more “blue” end of the bedspread using the fabric as efficiently as possible – two fronts, one back, two sleeves, two cuffs, a collar, and two pocket backings (on the inside behind the pocket welts). I still have enough fabric leftover to make a second jacket!

I used very soft leftover kid leather pieces to construct the welts for the pockets. I also used leather on the inside of the collar. I debated about making leather welt buttonholes but I wanted vertical buttonholes so decided, instead, to machine stitch them. The “pocket” is formed by binding and stitching a rectangular piece behind the welt opening.

You can’t see the seams but every seam has been bound using a dark blue batik fabric. I used that fabric for the front facings. I also used a rather heavy weight interfacing on the front edge just slightly narrower than the facing so it doesn’t show but it gives a firm body to the front edge.

I’m happy with the colour arrangement both on the front and back.

Kantha Jacket #3 – Back

The construction of the bedspread is much better than the Marcie Tilton kantha fabric I used in Jacket #2. The piecing is straight, the quilt stitching is closer and for the most part straight (although there were spots where the stitching was a bit odd but I was able to avoid them). The cotton backing fabric shrank somewhat with washing giving a puffy texture to the silk top but that has pressed out to a large extent.

I’m very happy with the final result. Total working time – maybe 6 hours (spread over 2 days).

Now I’ve got to get going on the Christmas cakes! I’ve assembled all the ingredients, the butter has been sitting out over night, everything is ready to go. First, turn on the oven to 320°F, second get out my lobster pot and wipe it clean. Then weigh the dry ingredients in a medium bowl, mix the wet ingredients in my largest bowl. Put them together, carefully spoon the batter into parchment lined loaf pans (just 3/4 full!) and let them bake for a couple of hours.

My apartment is going to smell heavenly.

Kantha Jacket – A Small Fix

Inside Patch

As I explained earlier, I had to patch the inside of the right front panel of the jacket in order to keep the quilt stitching ends from pulling out. As far as I was concerned that relegated the jacket to “demonstration garment” status – not a wearable muslin. But Saturday at class one of the gals suggested I put a pocket over the patch.

Good idea.

Here’s what I did:

Right Front With Pocket “Patch” Added

It’s not a beautiful fix – I couldn’t cut down the size of the sewer’s dream patch because of where the thread ends were located. I partially closed the top edge leaving a hand-size opening in the middle. Probably not a pocket I need to use – the two outside pockets are more than deep enough to hold keys, even my phone.

For now, the jacket feels “finished’.

I haven’t decided yet whether to remove the flare I put in when cutting the fabric – it’s not a complicated fix – just open hem finishing at the side seams, then open the binding on the sides, trim the sides sort of straight, rebind the sides and resize and restitch the hem finish. I want to wear the jacket with heavier clothing to see what that does to the flare when the jacket is on.

It’s never too late to make that adjustment.

Finished Kantha Jacket

Here’s the finished jacket – from the front, from the side, and showing the sewer’s dream patch on the inside of the left front (to hold the loose quilting threads in place).

As far as I was concerned the jacket was a demonstration piece from the get go – not likely something I was going to add to my wardrobe (because of the wonky back as well as the other problems I encountered with the fabric itself).

When I cut it out, I’d added a bit of flare both front and back – I was being influenced by the Meiko Mintz Kantha jackets which I think are gorgeous (if expensive, when you calculate US$ to CAD$ with shipping and tax – they’re out of my league which is why I’ve tried making my own even if my fabrics aren’t as wonderful as hers).

From the front the jacket looks fine – I’m happy with it. However, from the side, the flare in the back is pronounced! I can also see I need the centre front to be a bit longer to align with the side seams (which, by the way, are actually vertical and not pulling to the back).

Not an impossible fix – it means taking in the sides (removing the amount of the flare at least from the back and maybe a wee bit from the front).

I’m leaving the jacket as is until Saturday when I meet the gals – so they can see the issue themselves and make suggestions – I want to see how they’d go about fixing the problem.

I will remove the flare when I cut out the new jacket from the Kantha bedspread – at least from the back. I may keep a bit in the front.

Kantha Jacket #2

I made a jacket from a Kantha bedspread a couple of years ago. I’ve worn it a great deal. I get lots of complements on it.

Kantha Jacket – Front

Around that same time I bought a couple of yards of Kantha fabric from Marcie Tilton – I liked the patchwork idea and the colours of the assembled fabric. It arrived, I put it aside to make sometime in the future. Two weeks ago, that future arrived.

I am teaching a class to help folks streamline their garment sewing and to let them learn techniques that make their work more professional looking. I decided to use that Kantha cloth to make another jacket.

Partially assembled Kantha Jacket #2

I laid out the fabric and as I attempted to place my pattern pieces I discovered three things: 

  • first, the quilting stitching had many obvious stop/starts (with loose thread ends) in strategic locations in the fabric and I wasn’t able to work around all of them; 
  • second, there was a bright green patch (completely out of tune with the rest of the patchwork) obviously sewn on as an afterthought to cover some flaw beneath; I was able to avoid it for the jacket
  • third, the patchwork piecing was incredibly poorly done – I was able to cut out the jacket fronts and the sleeves with the lines of patchwork being relatively parallel with the length of the potential garment, but I was unable to find any location on the remaining fabric to cut the back on the straight of the patchwork. I cut out a jacket back with the lines obviously tilted off centre to the right (this was the least wonky placement I was able to find).

To contend with the begins/ends of the quilting threads I had to pull the quilting thread ends through to the back and fuse a layer of sewer’s dream across that area of the fabric in order to make sure the threads stayed put. The jacket I’m making is unlined so I’ve been binding all of the seams – I hope they’ll stay together). The welt pockets (you can see them on the front panels at the top) are, I hope, secure.

I was making the jacket as a demonstration for the class. I’ll finish it so the women can see the finished garment,  but likely I won’t wear it with the wonky back – I have to see how obvious it is when I put the jacket on.

I wrote MarcieTilton.com letting them know I wasn’t happy with the fabric! The answer I got back:

The nature of Kantha is the beauty in its imperfections. Sounds like you did everything possible to make it work. I hope your wear the jacket with pleasure and that others enjoy your creativity.

Not a lot of consolation, there.

Last week I spent some time on Amazon looking at Kantha bedspreads and came up with a patchwork one that looked interesting – it said “silk”. The colours were bright and the quilting stitching looked close together and straight.

The quilt arrived two days ago

Patchwork Kantha Bedspread (Silk?)

This is a much better quality fabric from which to make a jacket. Great colour variation, good stitching, not a lot of loose quilting thread ends AND the piecing is straight!

As soon as I’ve finished this current jacket I will cut out another from the bedspread (and who knows, it may actually be silk?)

I’m about to wash it carefully on gentle cycle in my washing machine and dry it in the dryer – I need to shrink the bedspread as much as possible so the garment will be stable once I’ve made it up. I need to go through my batik stash to find something to use for binding the seams; if I have nothing there I’ll pick up some at one of the local fabric shops.