Medallion Quilt – Carrying On

This project is totally unexpected – I thought I was starting a much larger quilt by building a central block on which I was going to improvise further. The responses I got to the panel were interesting, however – suggesting this was a complete piece as it was.
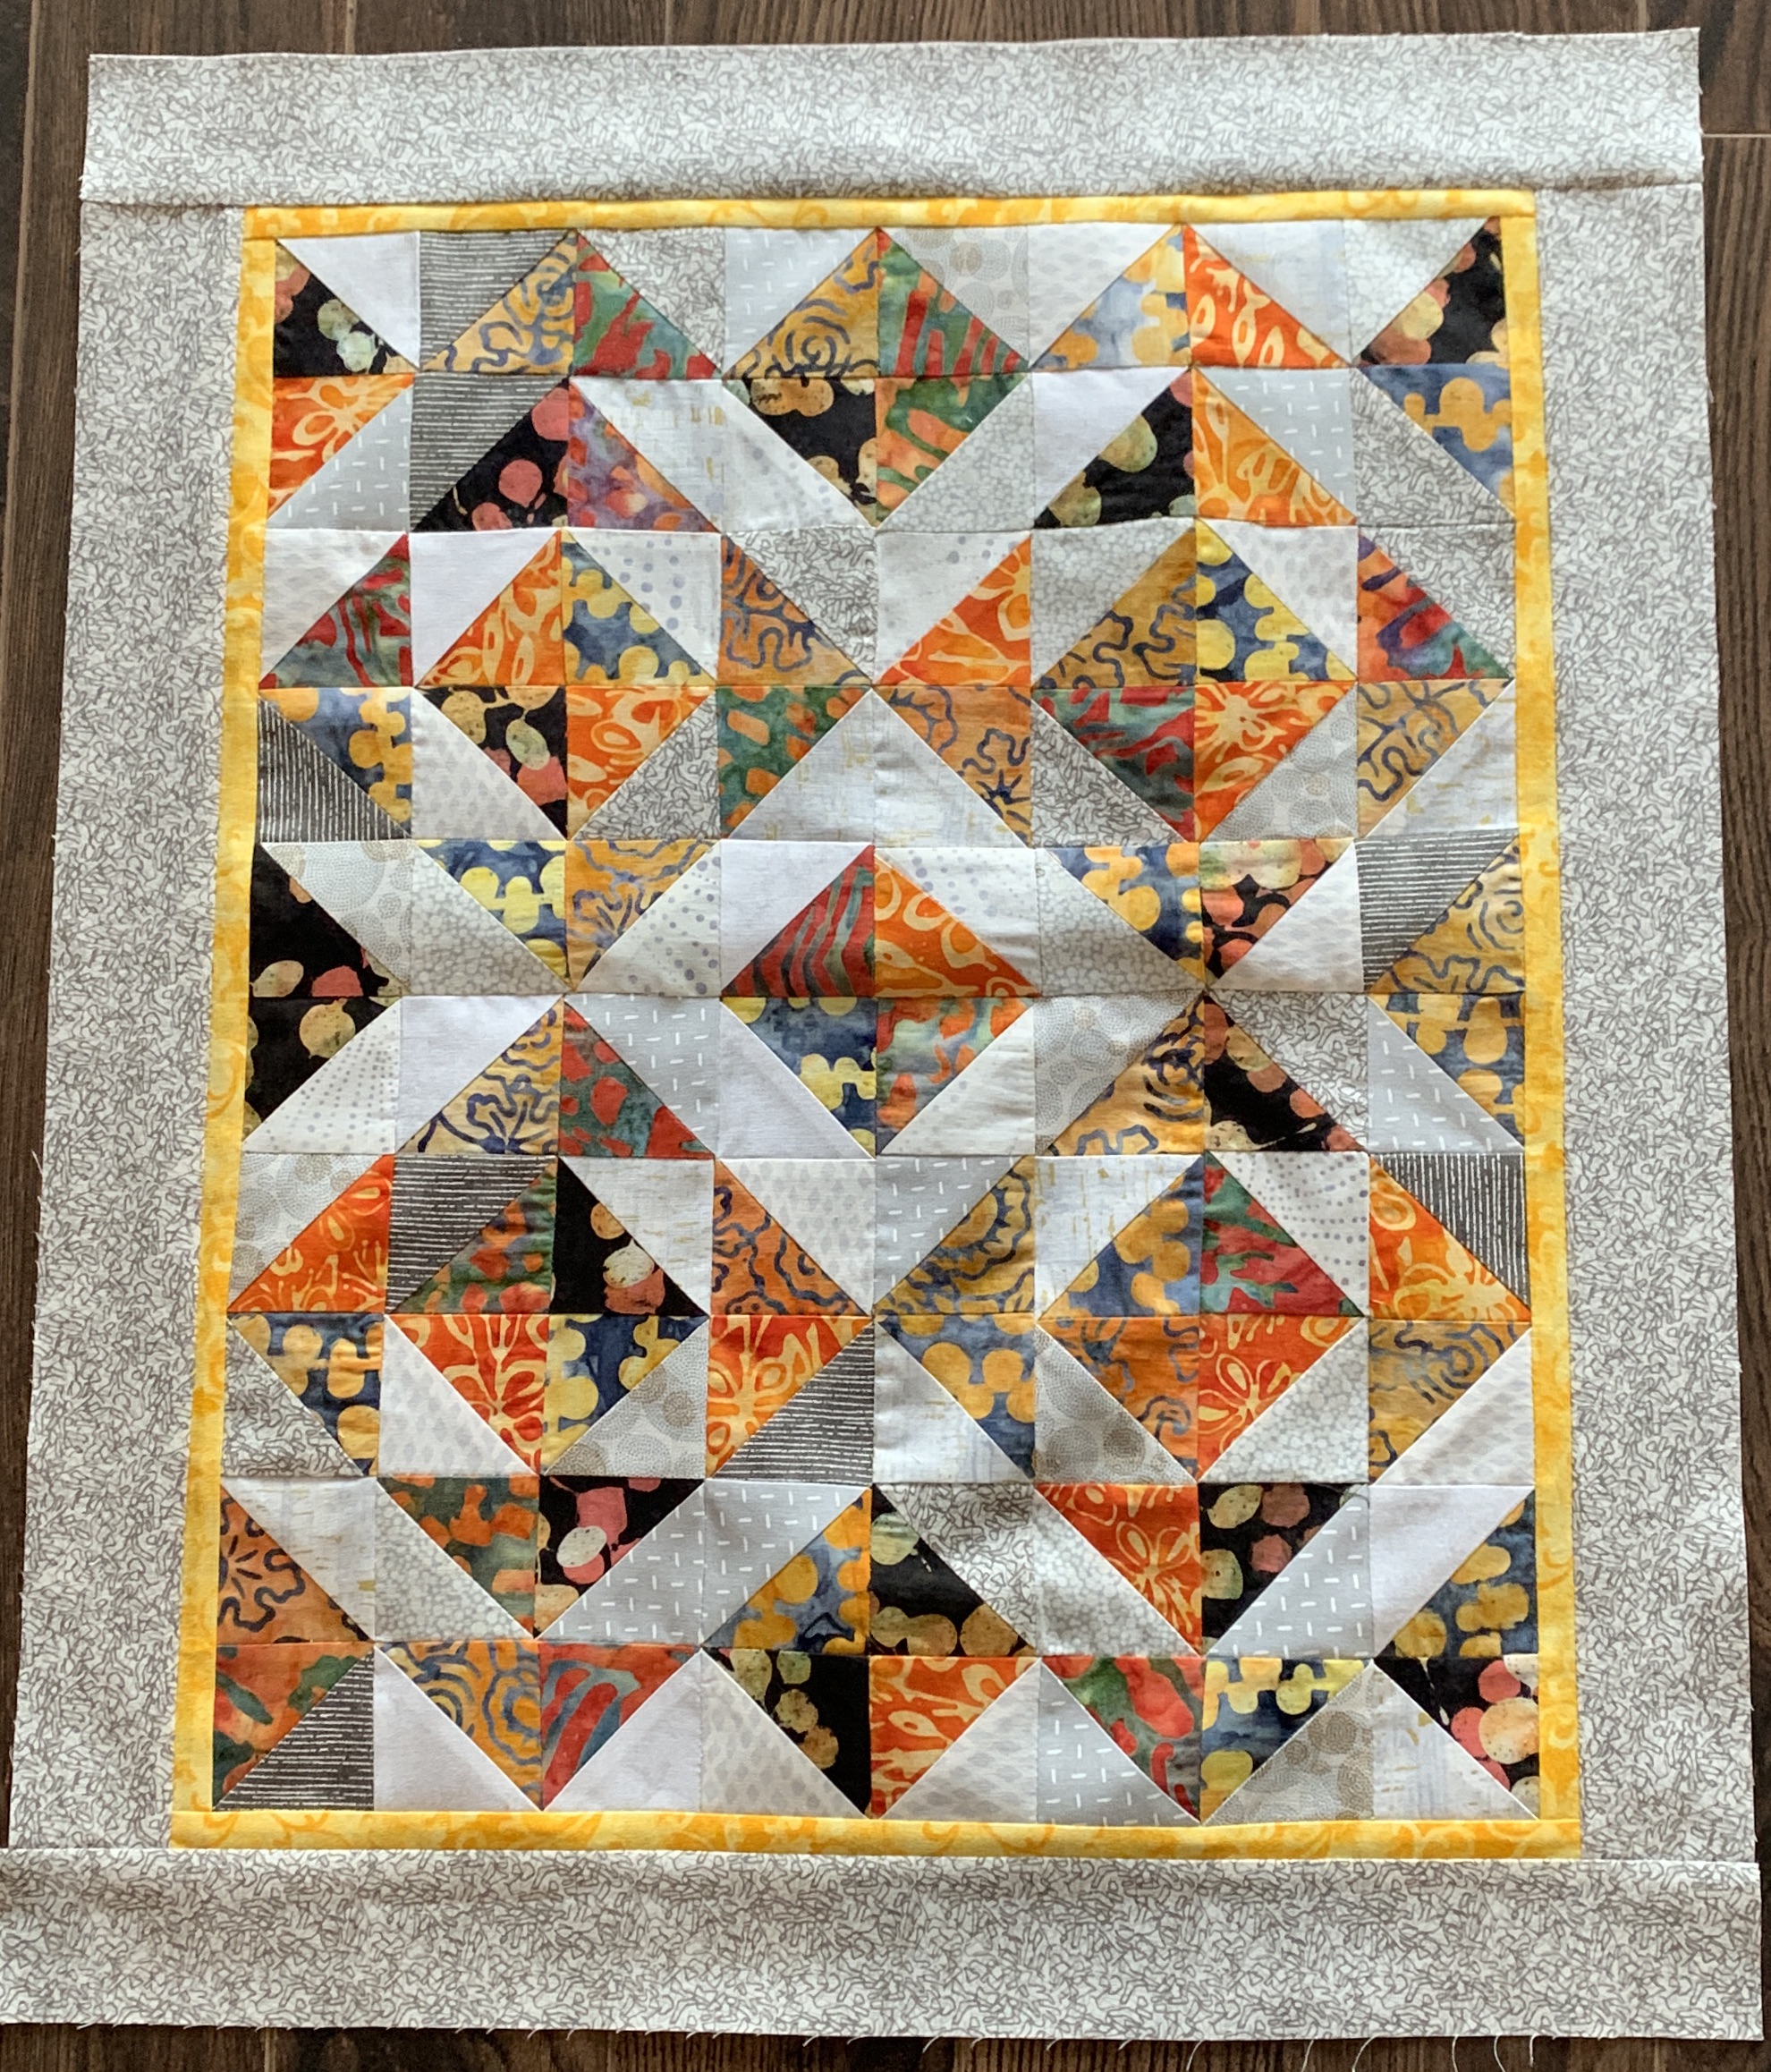
Medallion Quilt

Worth considering. If it was a piece on its own it still felt unfinished to me – I thought it needed another narrowish border. After auditioning quite a few fabrics from my stash I decided this wild, vibrant batik (which I used in the blocks themselves) was precisely what the emerging piece needed.

I mitred the corners because if this is a wall art piece it needs the finesse of mitres and I’ve overcome the butted piecing of the grey border by stitching in the ditch in both directions creating the illusion of squares in the corners.

I’m not finished stitching in the ditch – I stitched the borders and began on the diagonals. I will continue that tomorrow, emphasizing the squares on-point and the triangles.

It’s so interesting how I start in one direction and find I’m actually going in another – totally unexpected, and yet interesting. It’s about colour, it’s about shape, it’s about visual impact.

I’m not going to do a standard quilt binding – definitely a hidden binding since the outer border stands comfortably alone. The challenge will be establishing a seam allowance that successfully fudges the slight shortfall in a few spots and yet manages to catch the border fabric so it won’t pull out and fray and leave enough width to the border for it to look even.

We’ll see where this goes.

Medallion Quilt II – Comment

Just on the phone with a very close friend who thought my medallion panel was striking just as it is – make an effective wall art piece, she thought.

Medallion Quilt – Centre

I certainly wasn’t seeing it that way – in my head I was working on something much larger. Now I have to rethink the whole thing. Maybe just one more border in a darker grey to finish it off?

Decisions, decisions….

Medallion Quilt II

Funny what calls out to you when you sit down to work. The small triangular cut-offs from the Nine Shades Of Grey quilt said “Play with me” – so I did. I began by sewing them together into half-square triangles, then laying them out in blocks, formed rows, and stitched the rows together. I was trying to mix up the colours so they weren’t adjacent (and I was pretty successful doing that). I ended up with an 8 X 10 array with a bordered square on point in the centre. My piecing isn’t perfect but it’s close enough to live with as it is.

Medallion Quilt – Centre

Once I had the small half-square triangles sewn into a panel, I decided to enclose it with a narrow border rather then a wider one. Had I been doing a wall panel, I’d have used the golden fabric as a piping, but I thought for a quilt it probably needed to be a narrow strip of accent fabric. And then the medium mottled grey seemed to settle the whole panel down – it’s strong enough to stand out and yet sets up the yellow which brings out the golden shades in the batiks.

I have no idea where to go next! Medallion quilts are usually square, but for a comfortable throw/lap quilt it wants to be longer than wider so I went for a rectangular panel. I will see if it’s possible to increase the length with perhaps two insert rows in top and bottom edges as I build the quilt borders out.

Time to look at Medallion quilts and see what inspiration I can find for taking this quilt further. I think I want to keep the “Nine Shades Of Grey” idea going in this project which means whatever I do next should use the grey fabrics extensively with perhaps just hints of the bright batiks – who knows….

Nine Shades Of Grey

Here is one of the quilt tops I worked on during the weekend. I stitched and trimmed 95 blocks – this layout uses 88 (8 x 11 will stitch up to 44″ x 60.5″ with a 3″ border I will end up at 50″ x 66.5″ – a good lap size quilt).

Nine Shades Of Grey

The point of the quilt top was to assemble something fairly simple that I could do in that sewing retreat setting without having to focus carefully on what I was doing. I had five bright batik fabrics to allocate to ten blocks each of the nine grey fabrics – I thought that would give me plenty of latitude. Was I wrong.

Distributing the grey tones wasn’t so difficult but the batik triangles in the corners? Very difficult to get them to work out – still not completely happy with how some of the adjacent triangles are from the same fabric! I’m leaving the blocks on the floor for now so I can walk past it and think about how to exchange some of them.

Then I decided I would insert a single block of each batik fabric with a different grey corner – the question became where to put them and how to align them. I’ve decided the array looks best with the grey corners facing in the opposite direction to the bright corners.

That’s it for today. I see what I think in the daylight tomorrow.

Sewing Retreat

This weekend I’m at scenic White Point Resort two hours from home sewing with 27 other women all busy at work.

White Point Beach

Yesterday was a stormy day with lots of surf. Today just a calm ripple. Too cold to be sitting watching incoming waves.

Busy At Work

Can you imagine – we’ve just lost power! Disaster! Sewing machines dead, iron cooling. Thank goodness it’s a bright sunny day (if cold) so there’s lots of light to keep cutting and placing and pinning, all important prep work.

Zippered Bags For Christmas Gifts

I managed to complete 30 zippered bags for Christmas gifts yesterday. I’d had them all cut out – outer fabric, batting, lining, zipper tape, grosgrain tape for the tabs – all I needed was to assemble the bags. Done before supper time.

I’d prepped two quilts before coming – I started working on them last evening. When power returns, I’ll carry on. Blocks for one are constructed and ready to be sewn together. I’m more or less half way through the blocks for the second quilt.

I leave around noon tomorrow. I will have accomplished quite a bit.

Quilt On The Go – Finished!

Finished this quilt this afternoon. I’ve been working steadily on it since early last week. First doing all the edge stitching on the appliqué (154 fused elements), adding the borders, setting up the quilt, then quilting the “blocks”.

I’d created a single run design (enlarged and modified from a previous quilt [there’s a l-o-n-g story here about embroidery software not working after upgrading my iMac OS to Catalina!]) for a 227mm x 227mm block – it was four circles in a 2×2 array which meant I needed to embroider/quilt 30 repeats and then do  5 more half-block embroideries to complete the centre panel. I used the half-block motif scaled in width to accommodate the 3″ border. In all, it took 4 days to do all the quilting.

Quilt Top

Here’s the pieced back – I didn’t have quite enough of the dark blue fabric so added in a block of the main fabric, along with the longitudinal stripes.

Quilt Back

You can sort of see the quilt block as it sits over 4 of the underlayer blocks – it’s a curved pinwheel which was large enough to overlap the appliqué circles and follow the curves of the “x” pieces.

Quilting Detail

The finishing was interrupted on Tuesday because I had to spend the day preparing for an art quilt class I was teaching on Wednesday. I finally got to binding the quilt this afternoon.

The quilt is finished, label and all.

Quilt On The Go – VI

This is the completely edge-stitched, bordered top panel.

Bordered Panel

The photo doesn’t do this panel justice – I have nowhere to hang it and photograph it in a way that allows me to align it perfectly. I laid it on my bed and adjusted the sides as best as I could with my photo software. But you get the idea here.

The narrow chartreuse inner border was a good idea – it brings out the brighter greens. The wider darker blue grunge border stabilizes the blues in the panel. I’m also happy with the subtle diagonal flow in parts of the piece.

Now to build a back

Fabrics For The Backing

These are the two main fabrics I’m planning on using – I also want to build in a bit of piecing using the blues and greens from the top. That’s a job for tomorrow.

Yesterday I sat down at my iMac to play with my Pfaff TruE3 embroidery software to discover it won’t run on my recently updated operating system!

The first line problem is the dongle driver which is incompatible with Catalina (the new OS 10.15); there may be problems further in I don’t know about and can’t know about until I get past the registering of the dongle.

It infuriates me – I bought the software for a whopping amount of money a year and a half ago and now I can’t use it. I immediately contacted Pfaff TruE3 Embroidery Software support who replied they had no information on whether the dongle manufacturer was planning a dongle driver update! TruE3 was only compatible with Mojave (10.14). No help there, obviously.

So by the weekend I’m in a bind – I can stitch out embroideries I’ve already created but I can’t modify them to any great extent and I can’t create anything new.

I’m going to have to ask around among the women I know who have invested in Premiere+ and see if I can spend a bit of time on their computer creating a design to quilt this new quilt with – that’s if that software will actually run on an updated Mac!

Quilt On The Go – V

I’m making headway – I’ve got all the circles edge stitched and about 2/3 of the Xs – It’s taken me several hours each of the last three days to get this far. Tomorrow afternoon I hope to be able to finish the remaining Xs.

Circles Appliqué Quilt – Edge Stitching

I’m stitching using embroidery rayon (in many different colours to more or less match the fabric I’m stitching – the stitch is a narrow blanket stitch (l: 2mm, w: 1.5mm) making sure I’m using the needle down position so I can pivot the fabric to keep the stitching along the raw edge.

Once I’ve finished the edge stitching, I will add a narrow chartreuse inner border, and a navy/teale grunge outer border to finish the top. I have fabrics for the second side – I will do some piecing as I assemble it so my narrow width of fabric can be extended to fit the width of the quilt.

What I have no idea about is how to quilt the sandwich! The last time I did a quilt like this I simply stitched the underlying block edges as squares through the circles and Xs. However, this time the arrangement of circles and Xs doesn’t lend itself to that. I’ve discussed ideas with several people and heard many suggestions. Were I doing the quilting on a long-arm quilter I’d just do some open curvilinear design but I will be stitching in the hoop so I need to come up with some kind of “block” idea that will fit within my 360mm x 200mm hoop. (I have a large reversible hoop but I’ve learned the hard way that whatever design I create has to not cross the centre line.) I need to let this percolate for the next week or so when I’ll be ready to do the quilting.


Quilt On The Go – IV

Alright – here are the circles and Xs pinned to the background. The result is the illusion of circles (greens) on circles (blue) which is what I was after.

I laid the panel on the floor and photographed it – the circles that were in the wrong place stood out dramatically – I made a few swaps although that wasn’t so straight forward since I had precisely the right number of circles and crosses to fill the panel with just a couple left over. I thought I was going to have to cut more but I got away with what I had by moving a few around.

Circles / Xs pinned

Now comes the painstaking task of pressing the pieces in place so I can then edge stitch them with a decorative stitch. I’m hoping the Wonder Under holds better than the Heat ‘N Bond I used on a previous quilt – I had to use white glue on some of those circles when they began separating from the backing. It will take me the better part of a week, I’m anticipating, to edge stitch all of these 154 elements.

I still have no idea yet where to go from here – I think I want a navyish small print (a grunge?) for a narrow border, then a wider border in chartreuse – I will have to go shopping with the panel to decide what might work because I haven’t anything in my stash that suits the colour scheme in the panel.

Quilt On The Go – III

Here’s how the appliqué work is beginning to shape up – I fused Wonder Under (Pellon 805) to the back of 4 1/2″ x 17″ strips of 30+ fabrics ranging in colour from pale yellow/green to a very dark green. I made the decision to cut the circles from the lighter fabrics and the crosses from the darker ones (that may be a limiting decision but I had to start with some kind of order from which to begin).

So far, I’ve cut a bunch of circles and have pinned them on the blue background and I’ve started interspersing crosses  – I’ve been placing/pinning as I’ve cut out circle and cross elements – I think at the moment I need to cut out more crosses and see how close I can get to the bottom right edge with them, then fill in the rest with circles.

Circles & Crosses

NOTHING is fused in place! I have to get the space filled with circles and crosses, stand back and look at the whole from a distance, take photographs to see what the whole looks like, before putting an iron to the quilt top. I have a feeling I may have too many light coloured circles in that upper left corner (over the darkest squares of the background panel) – I think I will want to drop a few darker circles in that quadrant – just trying to visualize what that would look like.

I’ve done maybe half of the cutting out of circles and crosses. I need to spend the rest of the afternoon and evening getting the rest cut out before I attempt placing more elements. The crosses when placed side by each create circles from the background panel – I want to bring out more of the blue in the middle of the quilt top so that will mean more crosses in that area.

The good thing is everything is just pinned at this point – I can still change my mind about all of it.