 I bought a Kauffman “Japanese” fat quarter bundle called “Atmosphere“ from Craftsy – I don’t usually buy quilt kits – I prefer to improvise but the colours in this fabric collection looked as if they would blend with my new bedroom chair (which they did). The quilt is simple, long wide strips for the centre panel with short strips to finish the “row” – the rows are alternated. The point was to showcase the colour gradation from one end of the centre portion of the quilt to the other. The border was pieced from strips of the remaining fabric in the collection.
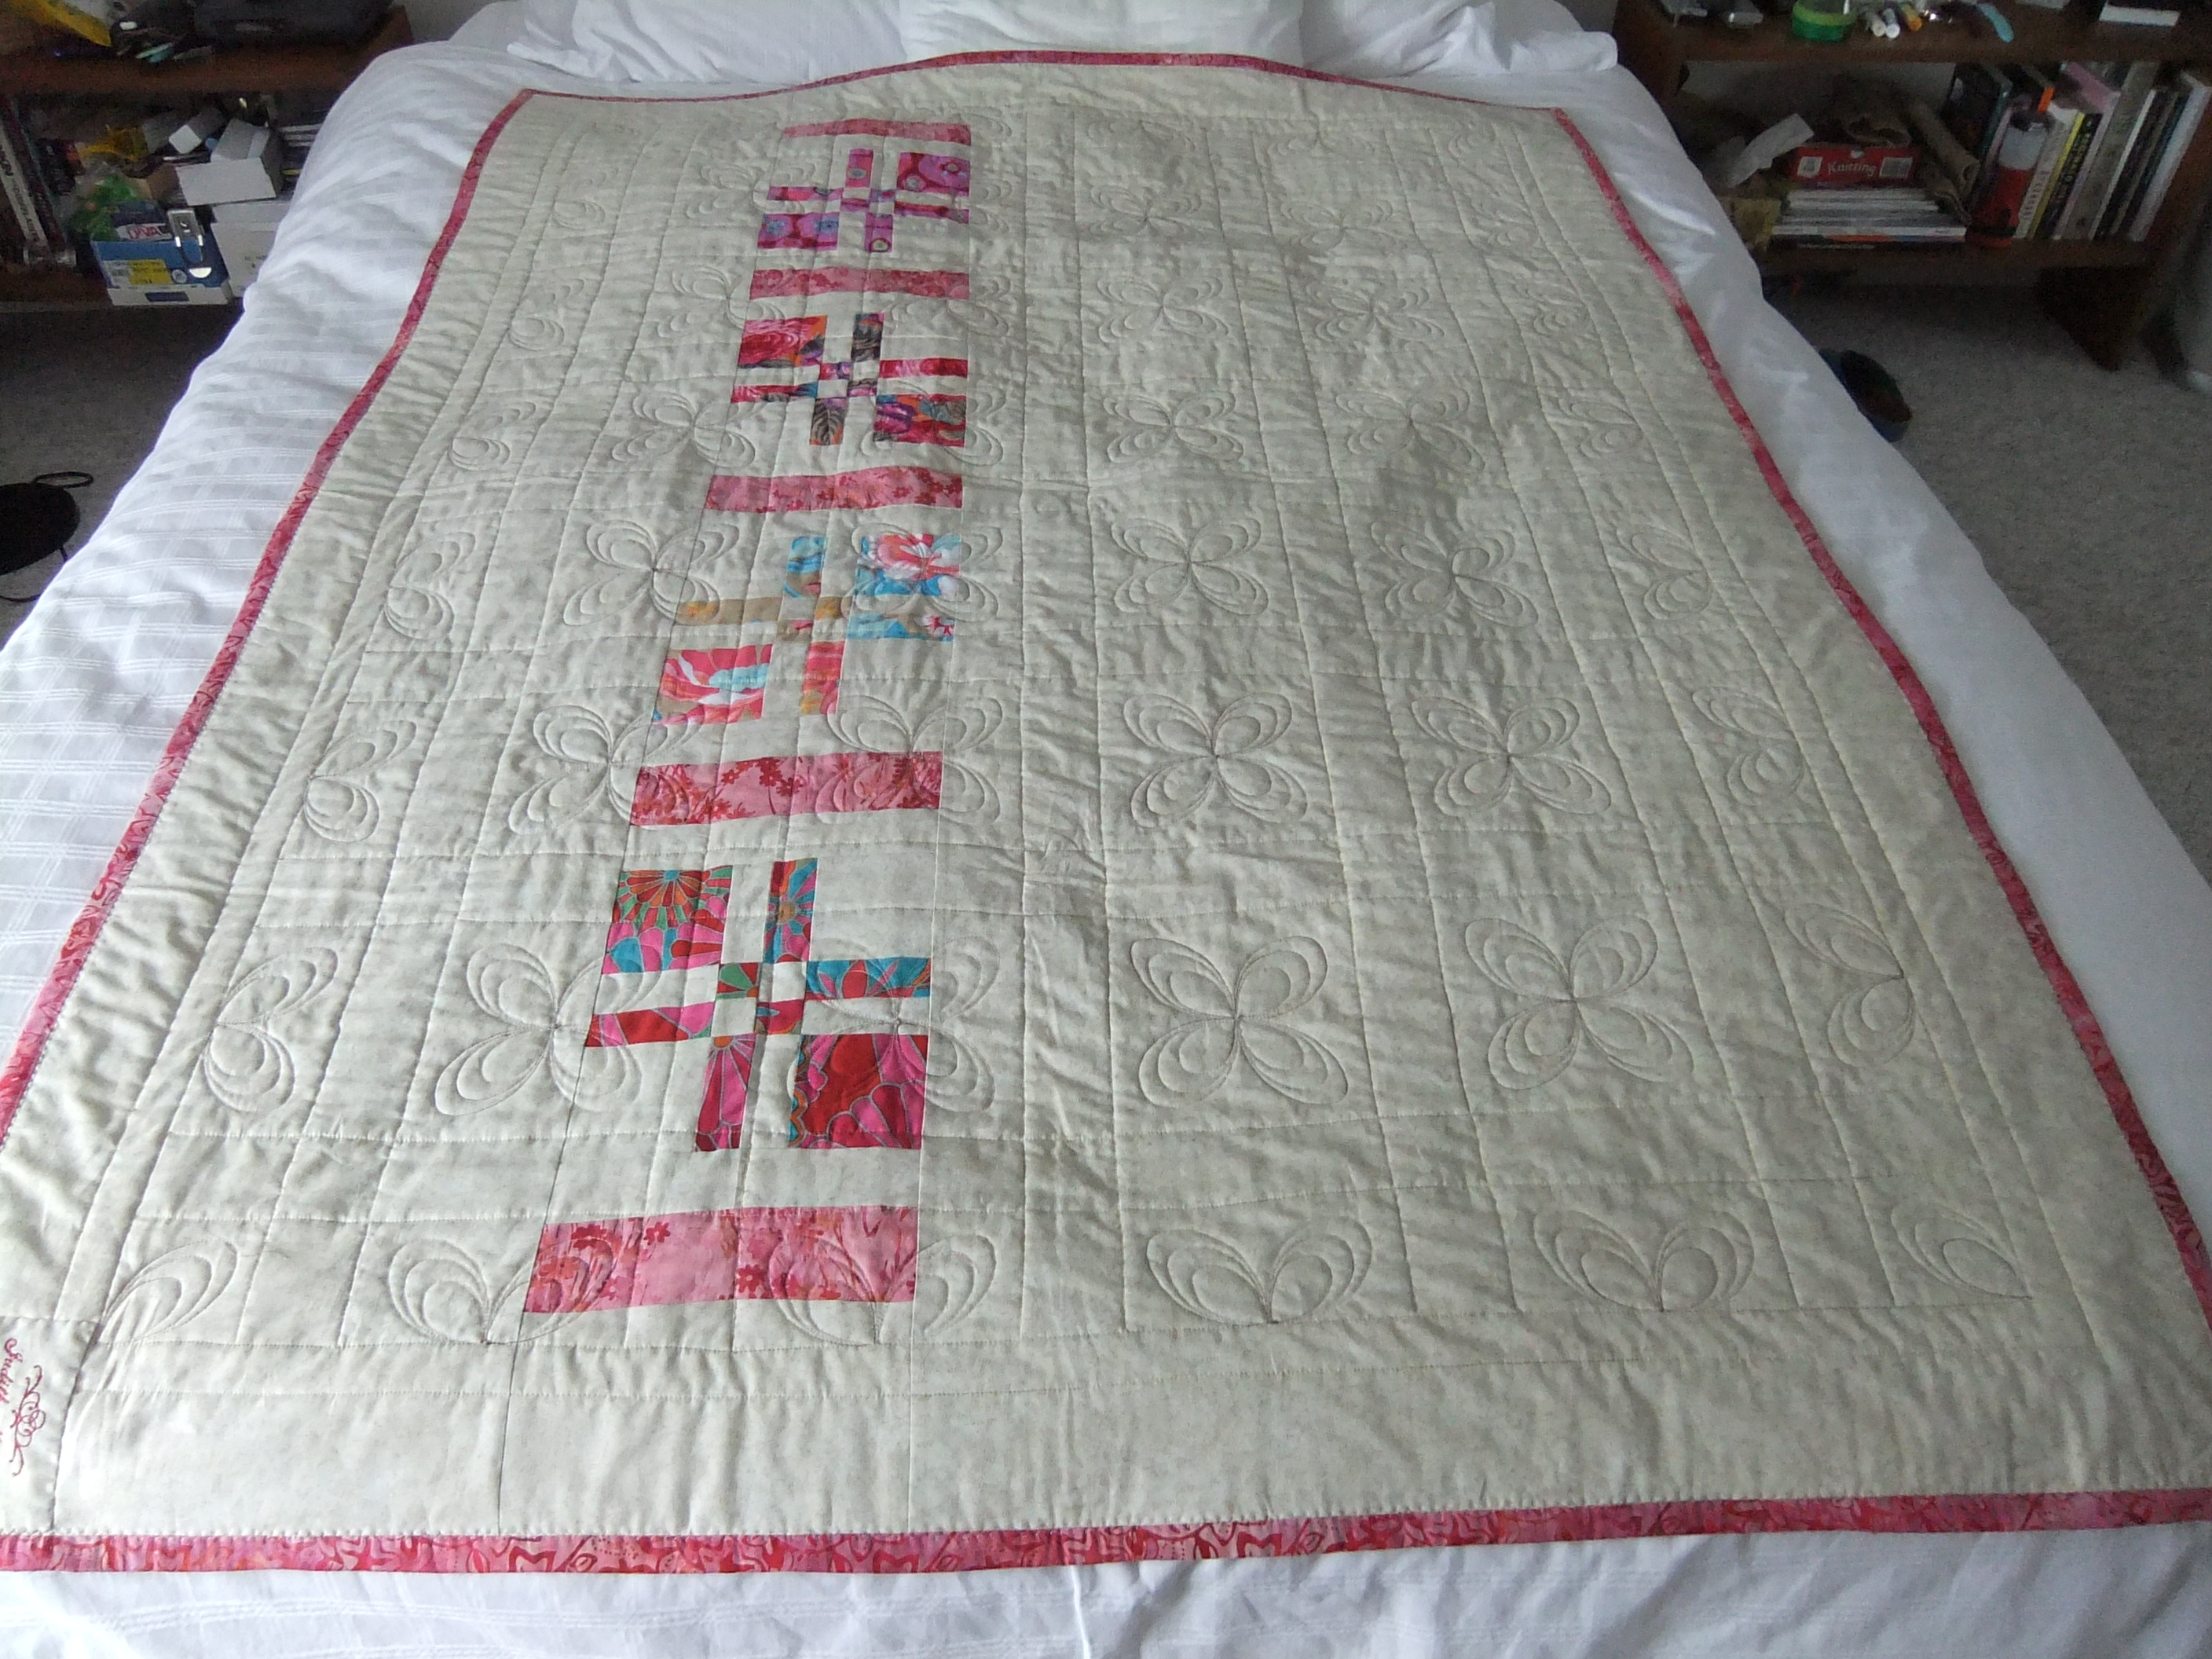
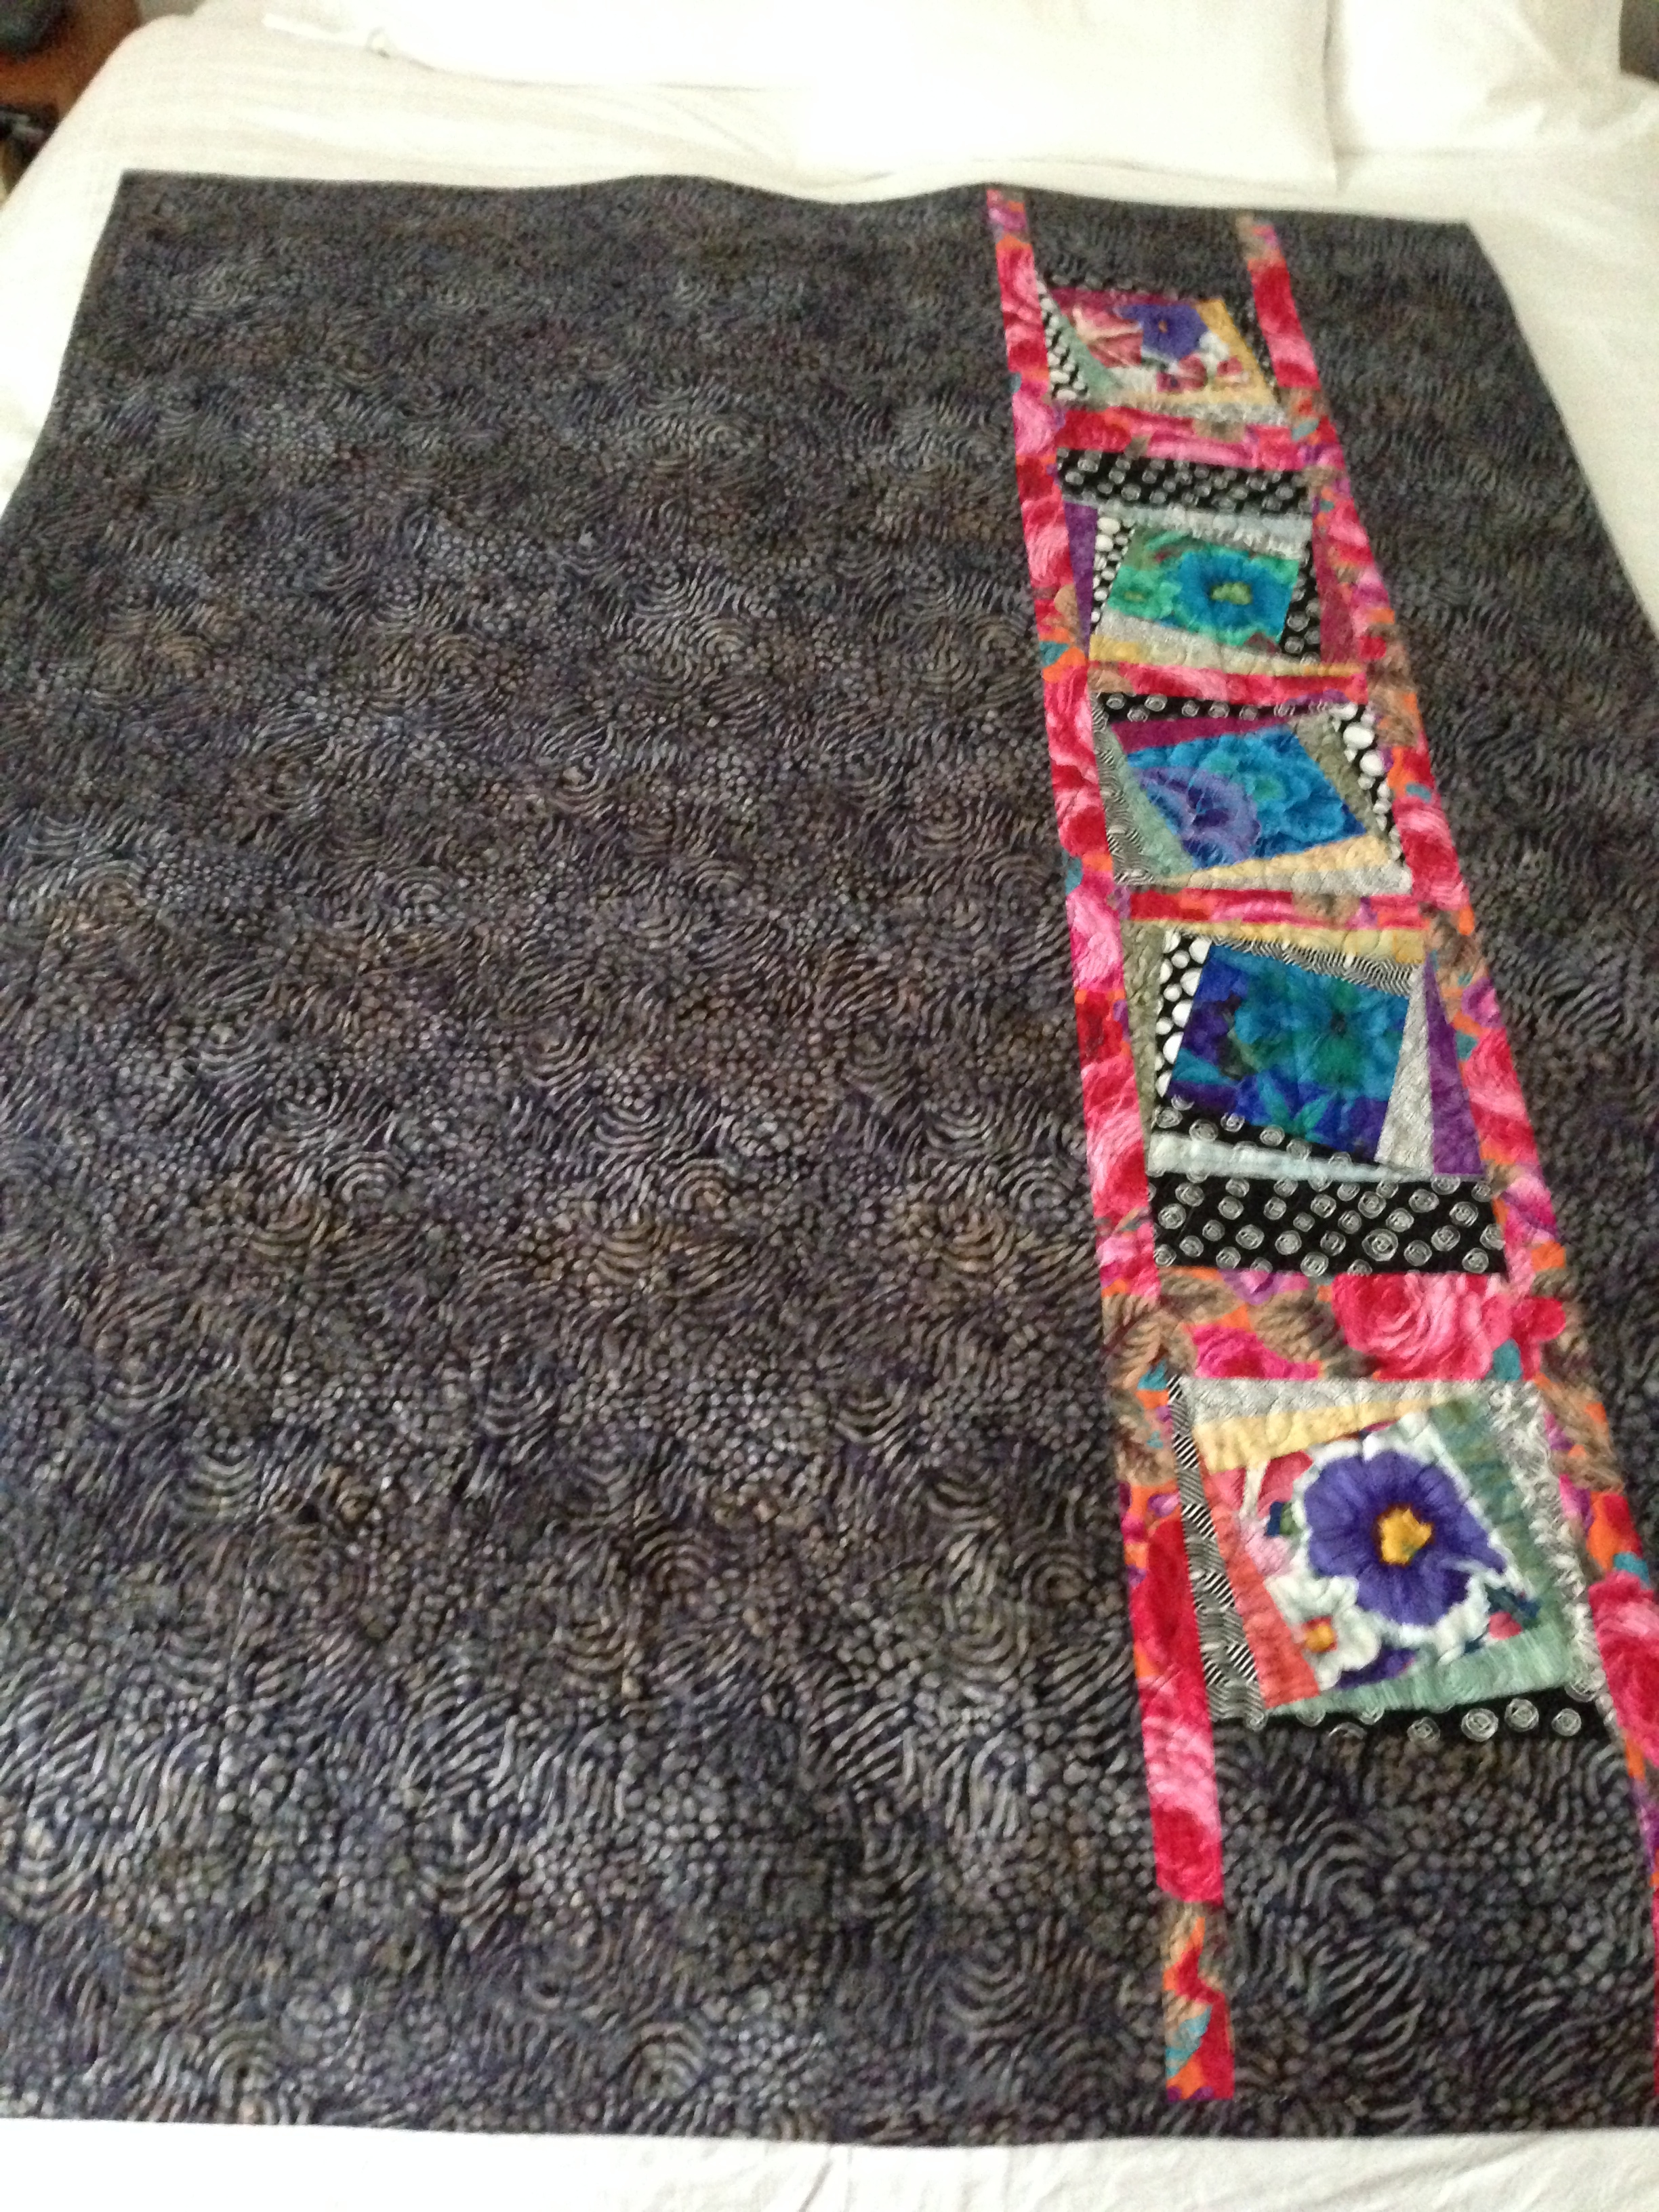
 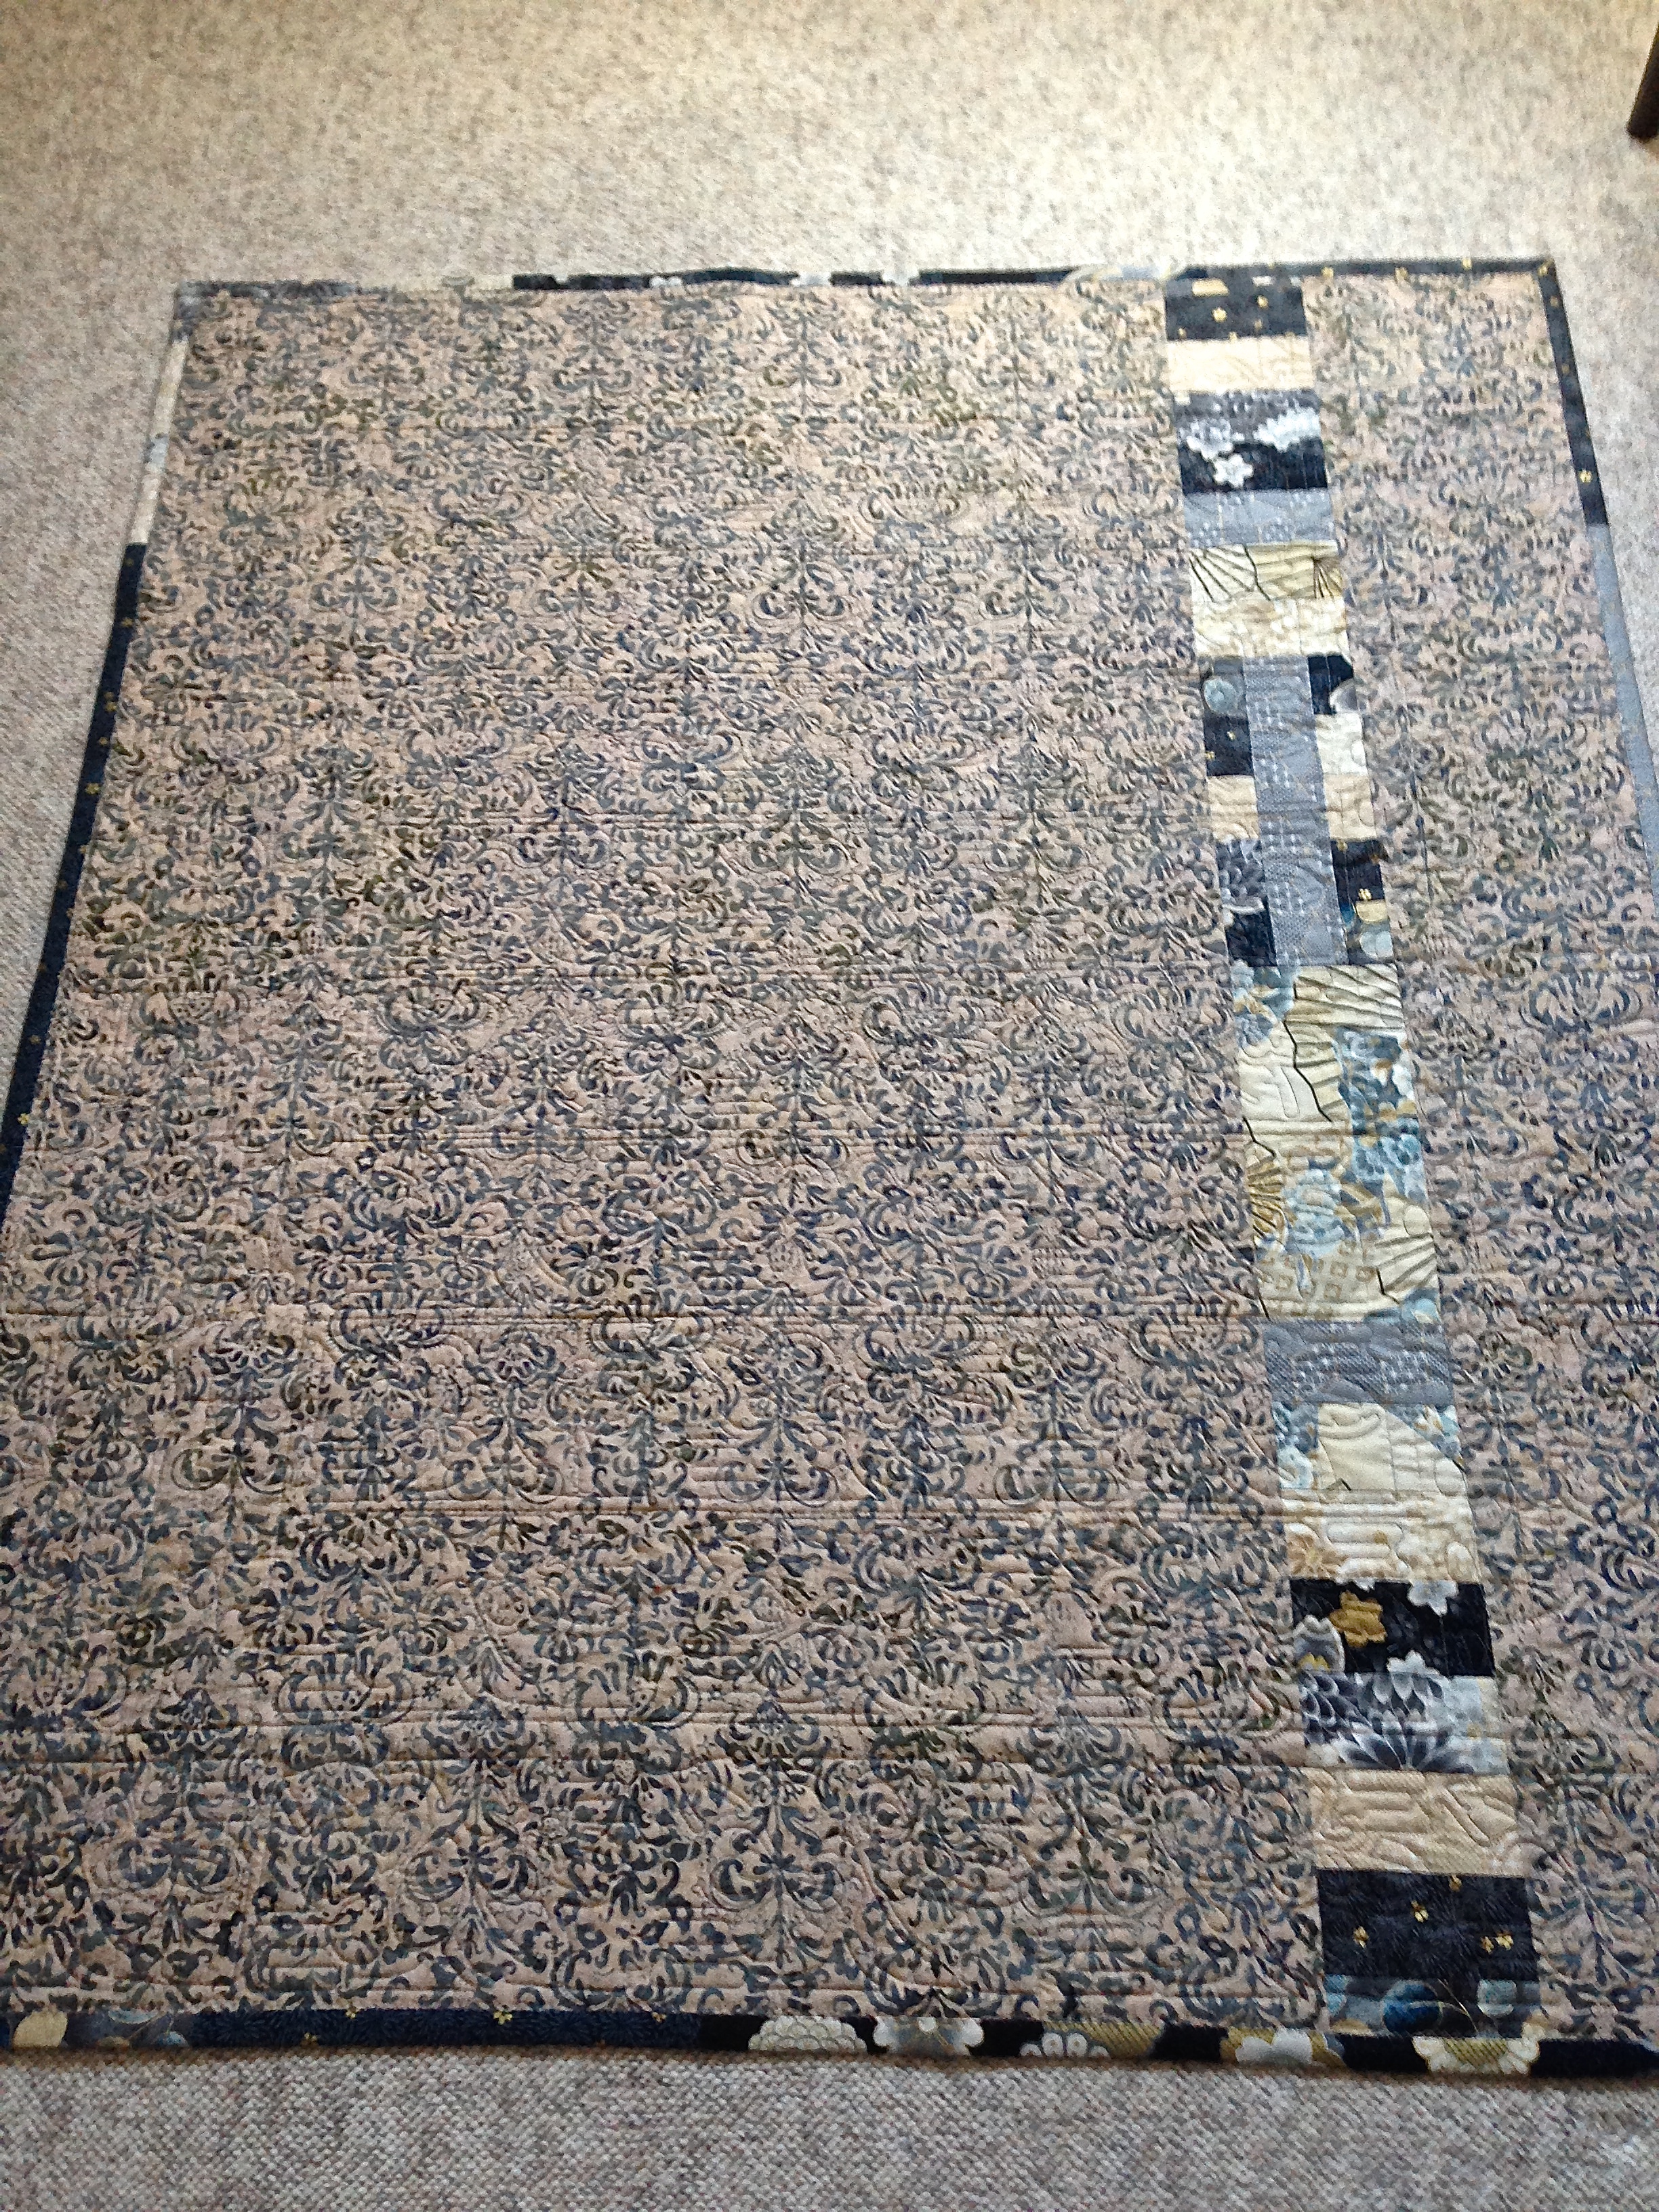 The back of the quilt uses a batik fabric I happened to have in my stash – the right shades to work with the patterns on the front. I needed to widen the back so I added in a strip using scraps from the Kauffman fabrics. There was barely any of the Satsuki fabric left over (just small pieces of two of the lighter fabrics)!
  I quilted “in the hoop” using a design I created from an image I had. I sized it to fit within the width of the central panel strips, using three repeats for each of the eight panels. Then I adjusted the size of the embroidery to accommodate the border width and length. I used a Sulky blendable thread which worked with both the light and dark fabrics.
Quilting
Quilting Without a Pattern I

Here is the first of the Joe Cunningham quilts – he calls the idea “The Three Crazy Sisters“. The quilt is based on a three-strip block – in his example, the three strips were all cut 2 1/2″ wide. I adjusted that: two strips were 2 1/2″ wide, the third was 2”. What he did was improvise the middle strip – used a second colour (only) of whatever length to which he added a piece of background to make the strip the same length as the other two in the block. I did the same, most of the time, but sometimes I used the pieced strip on one side.
I made 35 blocks, then laid them on the floor and played with the layout. I alternated direction of the blocks – horizontal, vertical, horizontal… When I was done, I pulled three blocks and added in solid blocks – it’s the red one that draws the focus for the quilt.
I used leftovers from the Japanese Quilt along with more of the Japanese indigo wax katagami fabric I bought at my local fabric store (meant for garment sewing, but lovely for quilting).

I used a second of the indigo wax katagami fabrics for the back, along with leftover blocks from the front. I used a third katagami fabric for the binding with a strip of red batik as an accent.
Kaffe Fassett Quilt 8
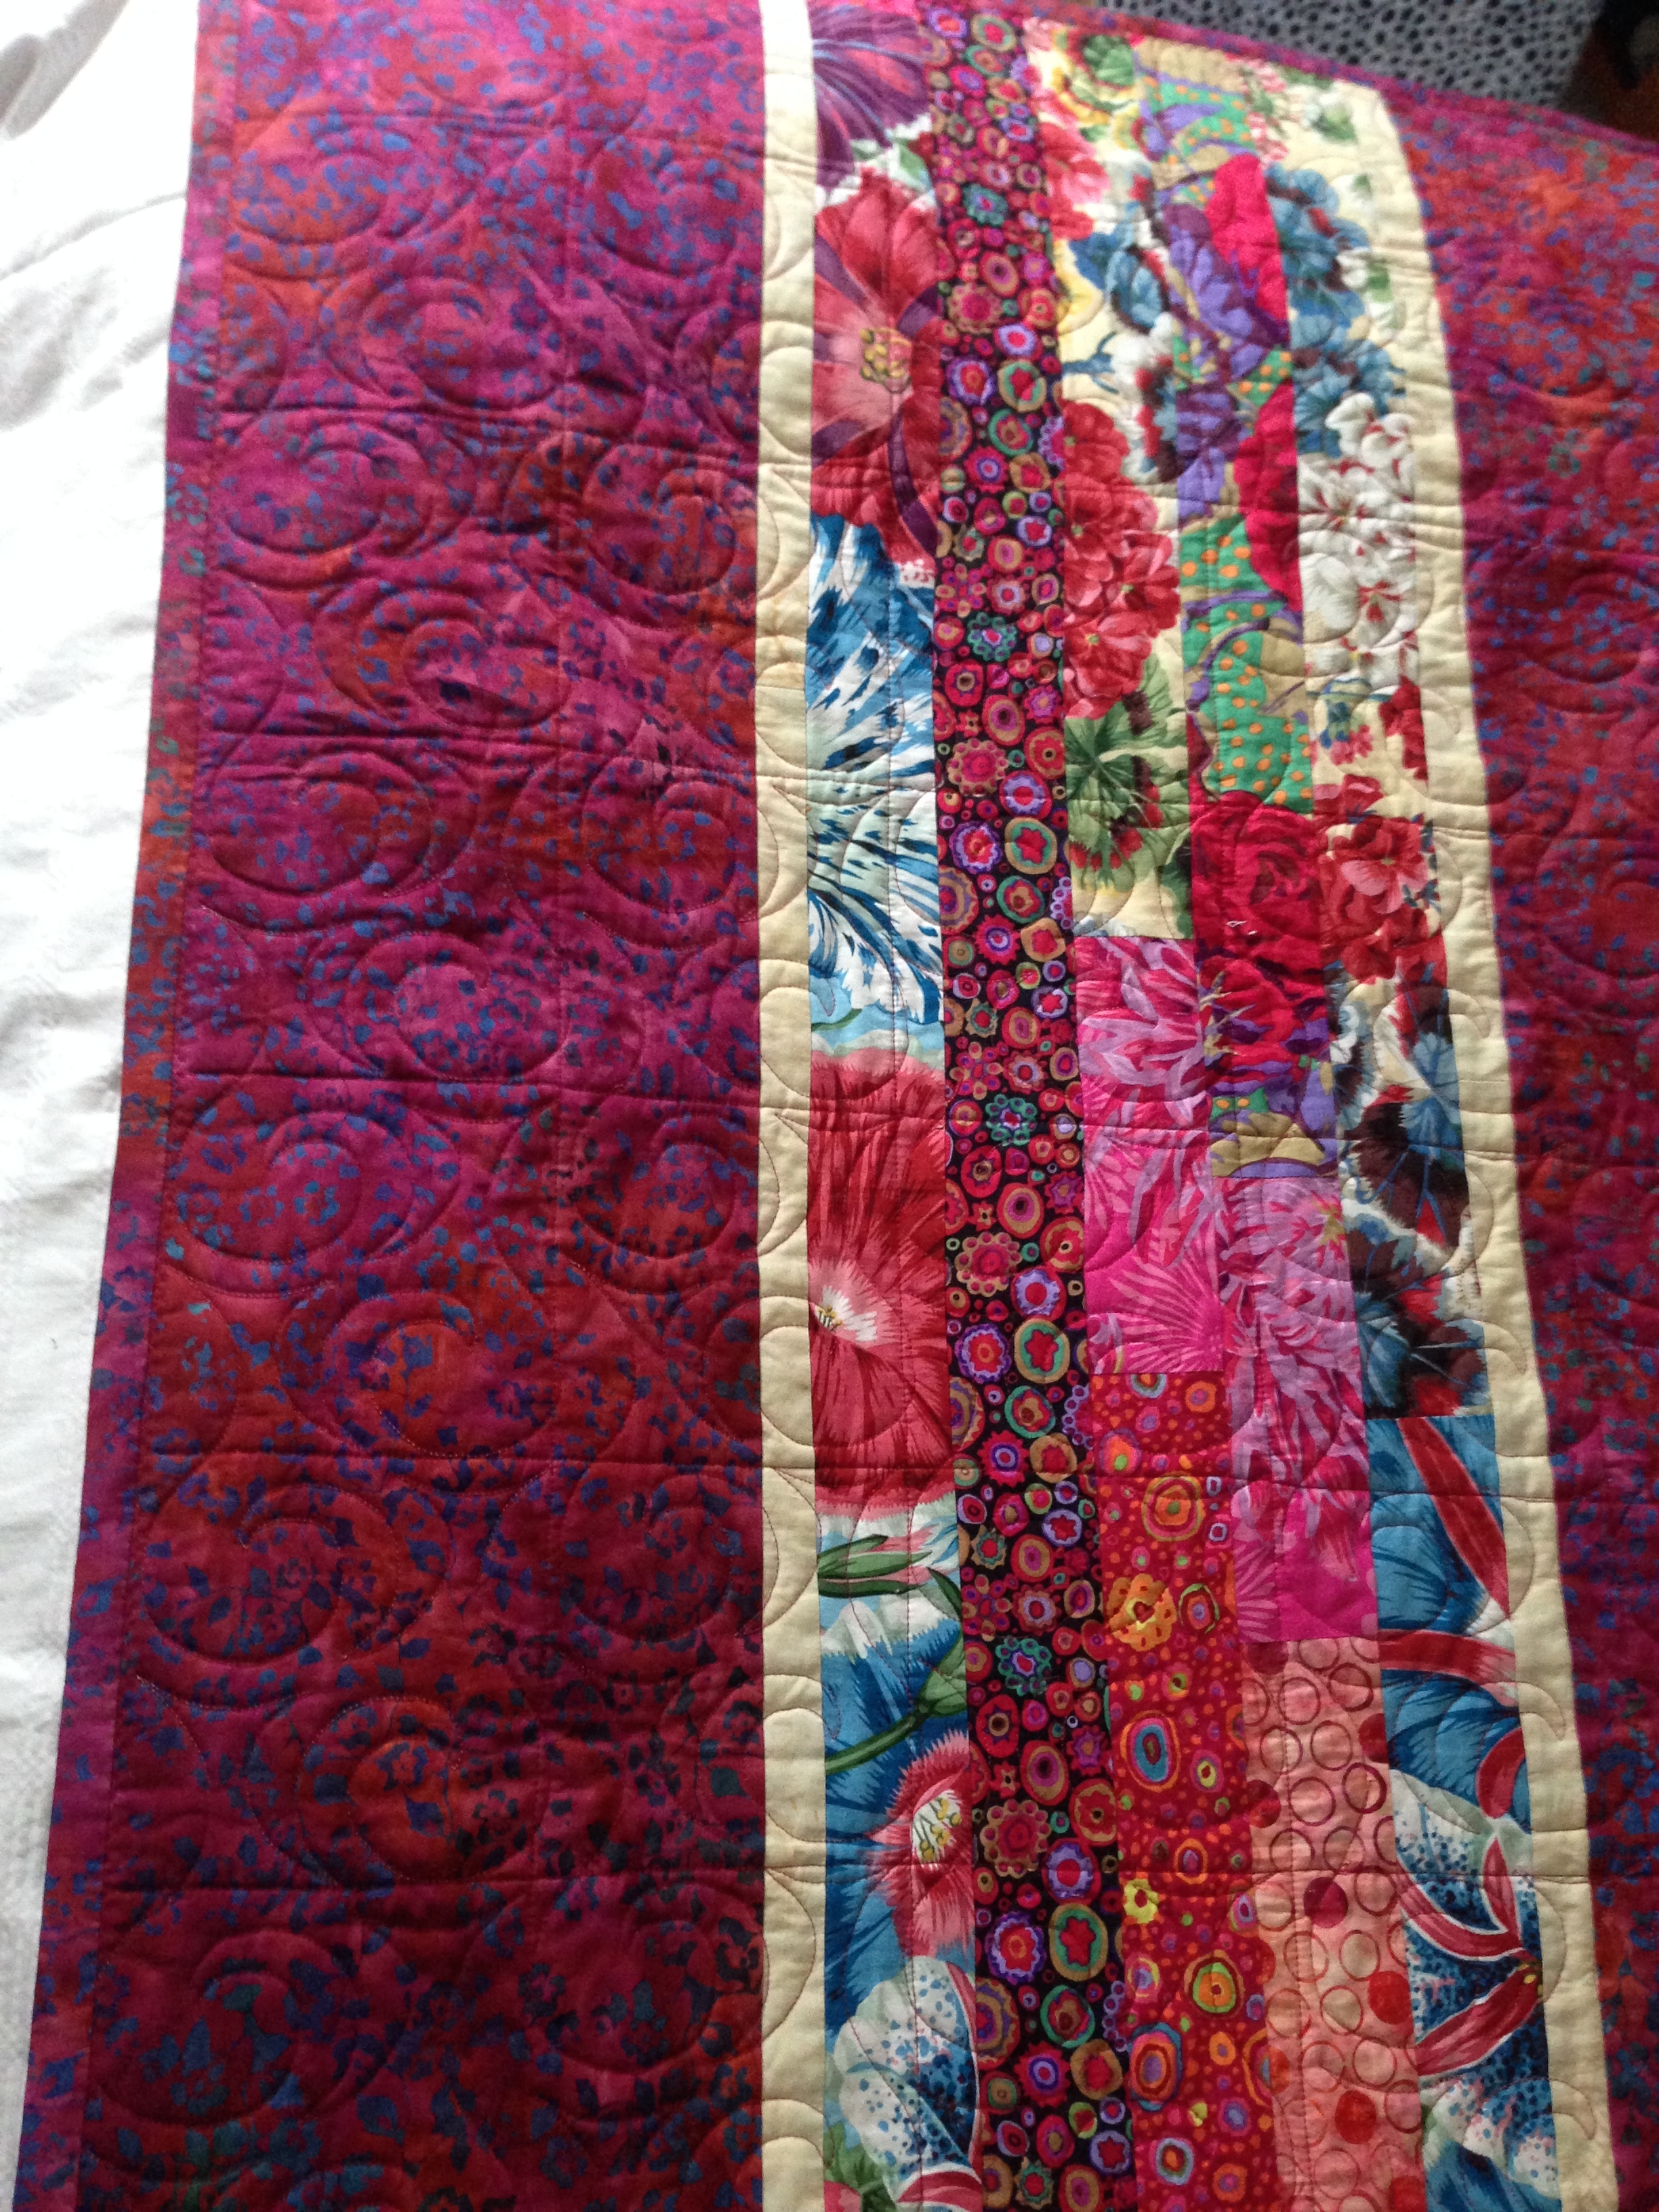
This quilt uses a combination of Kaffe Fassett large print fabrics with contrasting pieces of Fossil Fern (Benartex). The quilt turned out quite a bit larger than my other quilts – not quite a twin bed size. So the back had to have an embellishment to extend the single length of backing fabric I had.
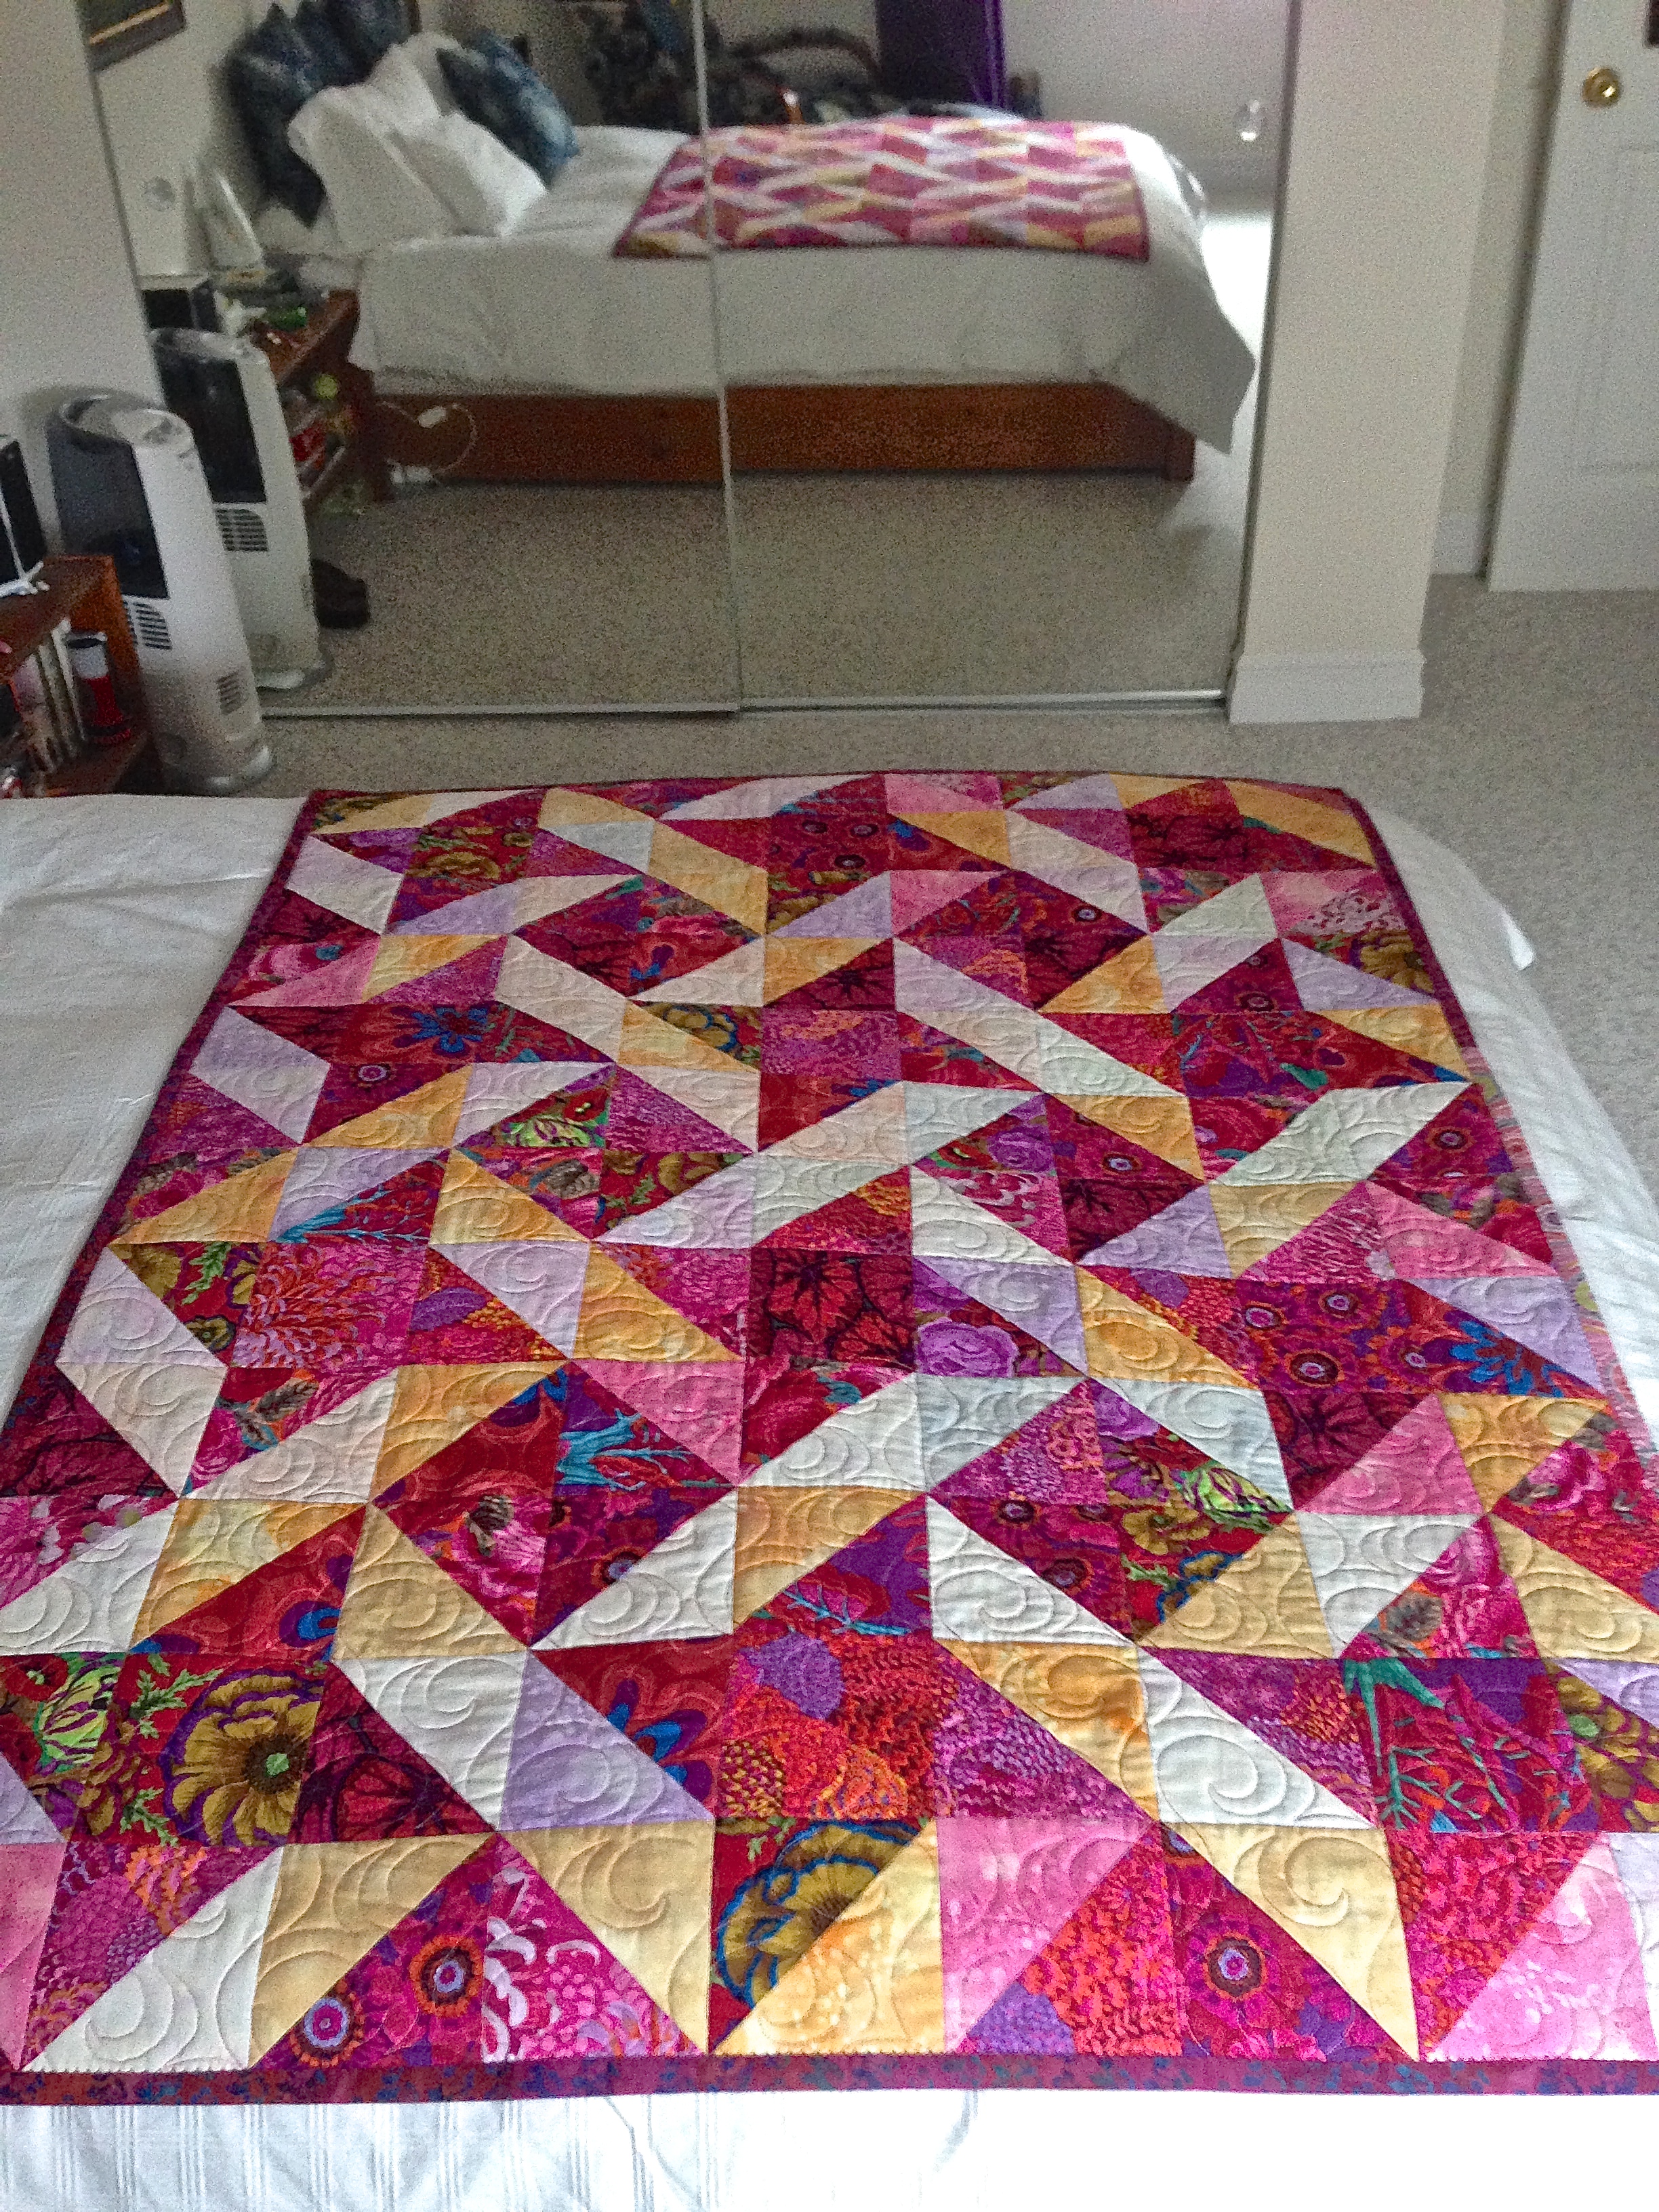
[Someone asked whether I had a pattern – I didn’t – I’d seen a photo and could immediately see the whole was constructed as a 9-patch with a “solid” square at the centre (I used a KF fabric centre) and surrounded it with 8 HST squares which I constructed from the KF fabric and a light fabric (I used a number of different Benartex light Fossil Fern fabrics I had in my stash). I’d suggest using the same pale fabric throughout if you’re new to quilting – easier to see how to arrange the blocks.
The HST are arranged to form a 4-point star around the centre square. The outer corners are triangles from the KF fabrics. All my KF fabrics were in shades of red or deep pink so they all blended and could be placed against one another. My quilt top was a 3 x 4 array of the 9-patch blocks. Where they join you have a square, on point, made from four different KF triangles.]

The quilt was embroidered in my 360 X 350 hoop using a large design I created – that allowed me to quilt 4 squares at a time!
Quilting Without A Pattern II

I finished this quilt this morning. It’s based on an idea of Joe Cunningham – Pattern-free quilt making (a Craftsy class) – Fantasy Four Patch. The idea is simple – take two fabrics (one dark, one light), cut 1 strip from each: 5 1/2″, 4 1/2″, 3 1/2″, 2 1/2″, 1 1/2″. Sew them in pairs to make 6 1/2″ strips, then cut the strips: 5 1/2″, 4 1/2″, 3 1/2″, 2 1/2″, 1 1/2″. Again, sew together in pairs to make 6 1/2″ blocks! Now start laying them out to make a design pleasing to you – there are no rules here. I wanted a 5 X 7 array so I needed 35 blocks. I could have done a 6 X 8 array which would have needed 48 blocks – you get the idea.
This was my idea – to draw the colour concentration from the dark fabric toward the light fabric to get a colour flow. I tossed in three small bits of contrasting fabric to catch the eye.
The binding carries on the colour flow extending the dark into the light.
Because this is a small quilt (~42″ X 54″) I was able to back it with a single (unpieced) WOF (width of fabric) panel so there’s nothing to show on the back.
I enjoyed making this quilt. It went very quickly.
Japanese Quilt
 Finished this afternoon, the lap quilt made using half-square triangles using the Japanese sample fabrics that I bought at the yard sale in Portland Oregon last spring. I didn’t arrange the blocks in any of the usual half-square triangle patterns – Instead I set up two blocks near the “top” and worked in a “frame” around them, then filled in the remaining space creating diagonal rows – at the same time I was also trying to create a bit of colour flow – difficult because the colourful floral blocks were so different in hue. The border took a bit of care, I wanted the diagonal joins to flow from the diagonal lines in the pieced top – I found the way to do that was to make sure the seams aligned first, basted them in place to make sure the line worked, then stitched the rest of the border piece. The overall effect I wanted was to have an indigo quilt with colourful triangles embedded in it. I used the indigo fabric with the circles on the back – A WOF (width of fabric) piece was wide enough for the backing so there is no embellishment on the back. Notice the embroidered dragonflies on the top. I quilted in the hoop using a sashiko single run overall design in each block and a modification of the design in the border. I intentionally used a dark navy variegated thread front and back so the embroidery doesn’t stand out but creates a quilted look. The striped binding was a third indigo fabric from the collection that had the other two.
My Kaffe Fassett Quilts
Just got the Pinterest Weekly and found a quilt I’d made (photographed on my bed) attributed to someone else! I thought I ought to set the record straight: I have done seven quilts, either using Kaffe Fassett fabrics, or based on photos of his quilts I’ve found online.
#1: At the time I didn’t have any Kaffe Fassett fabrics so I took his idea (which I’d seen online) and made it using batiks I had in my stash. The backing is a single fabric.

#2: I had no sooner started #1 when I realized I could do something more with the way the colours were assembled and started #2 – setting it up to tell a colour story. The back of this quilt is also a single fabric.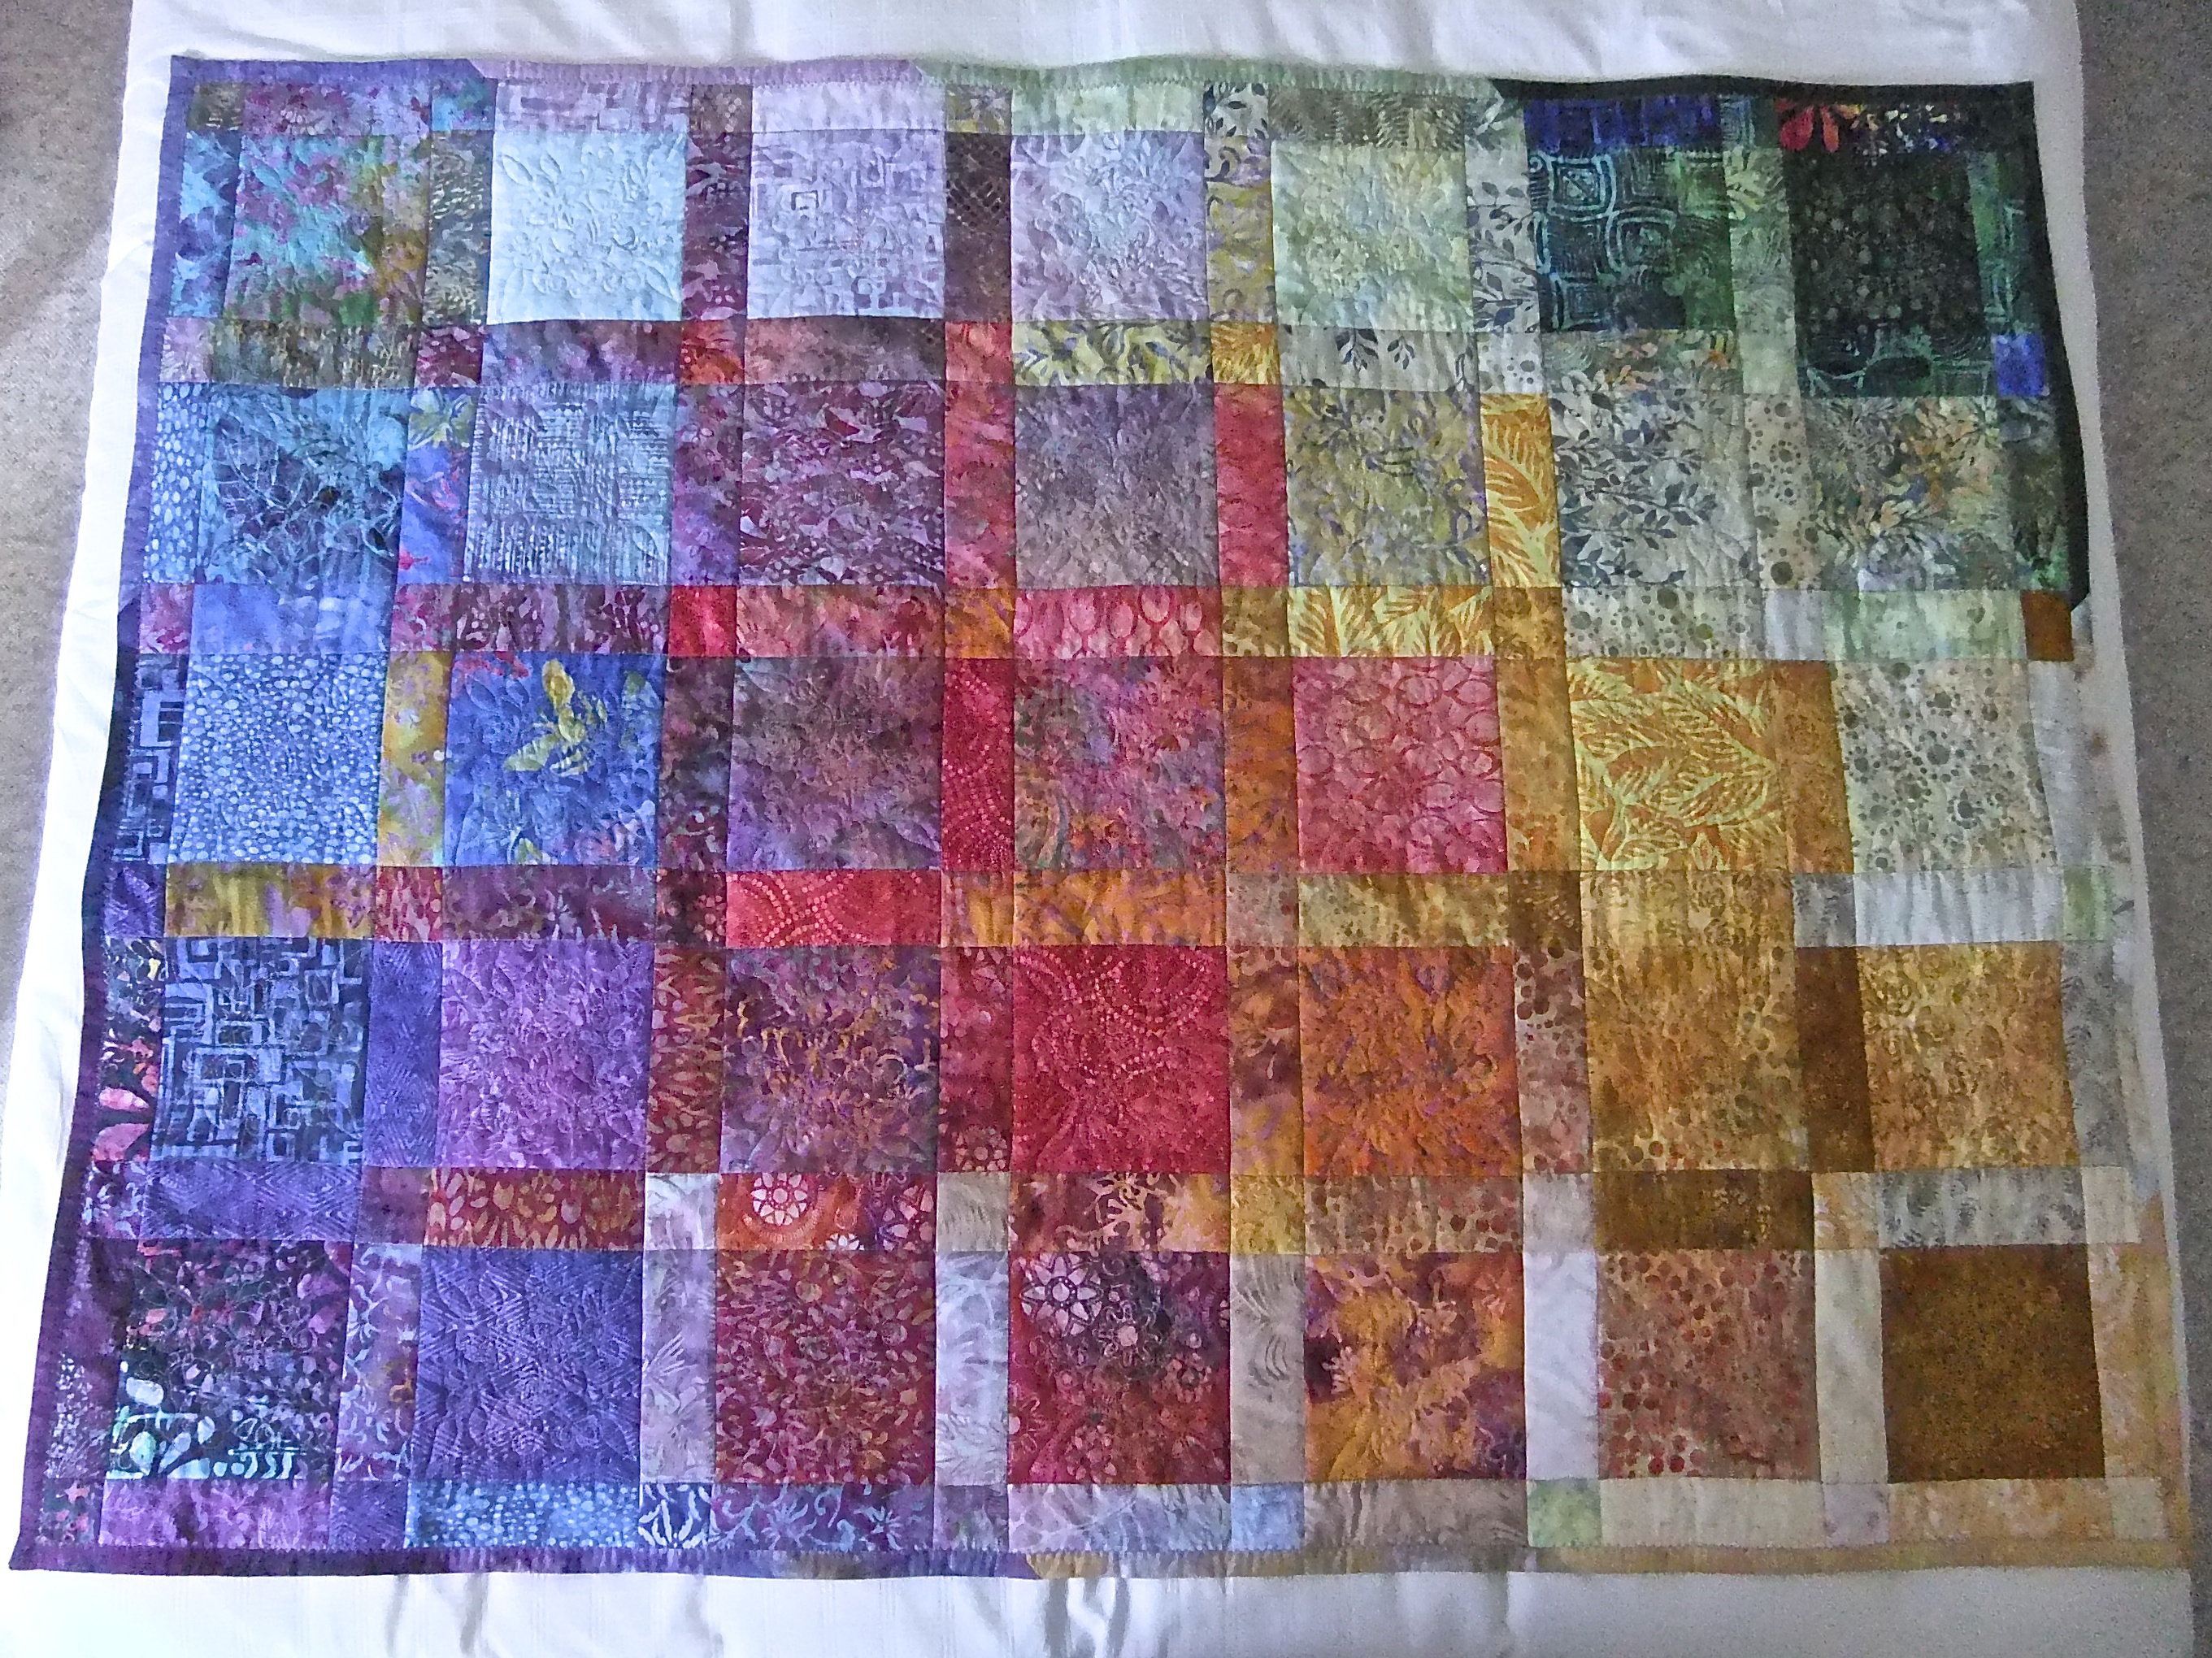
#3: The idea of a colour story grew when I came across the Kaffe Fassett diamonds quilt – this quilt has 650+ pieces including diamonds and borders and partial diamonds on the outer edges. Back of quilt is still a single fabric.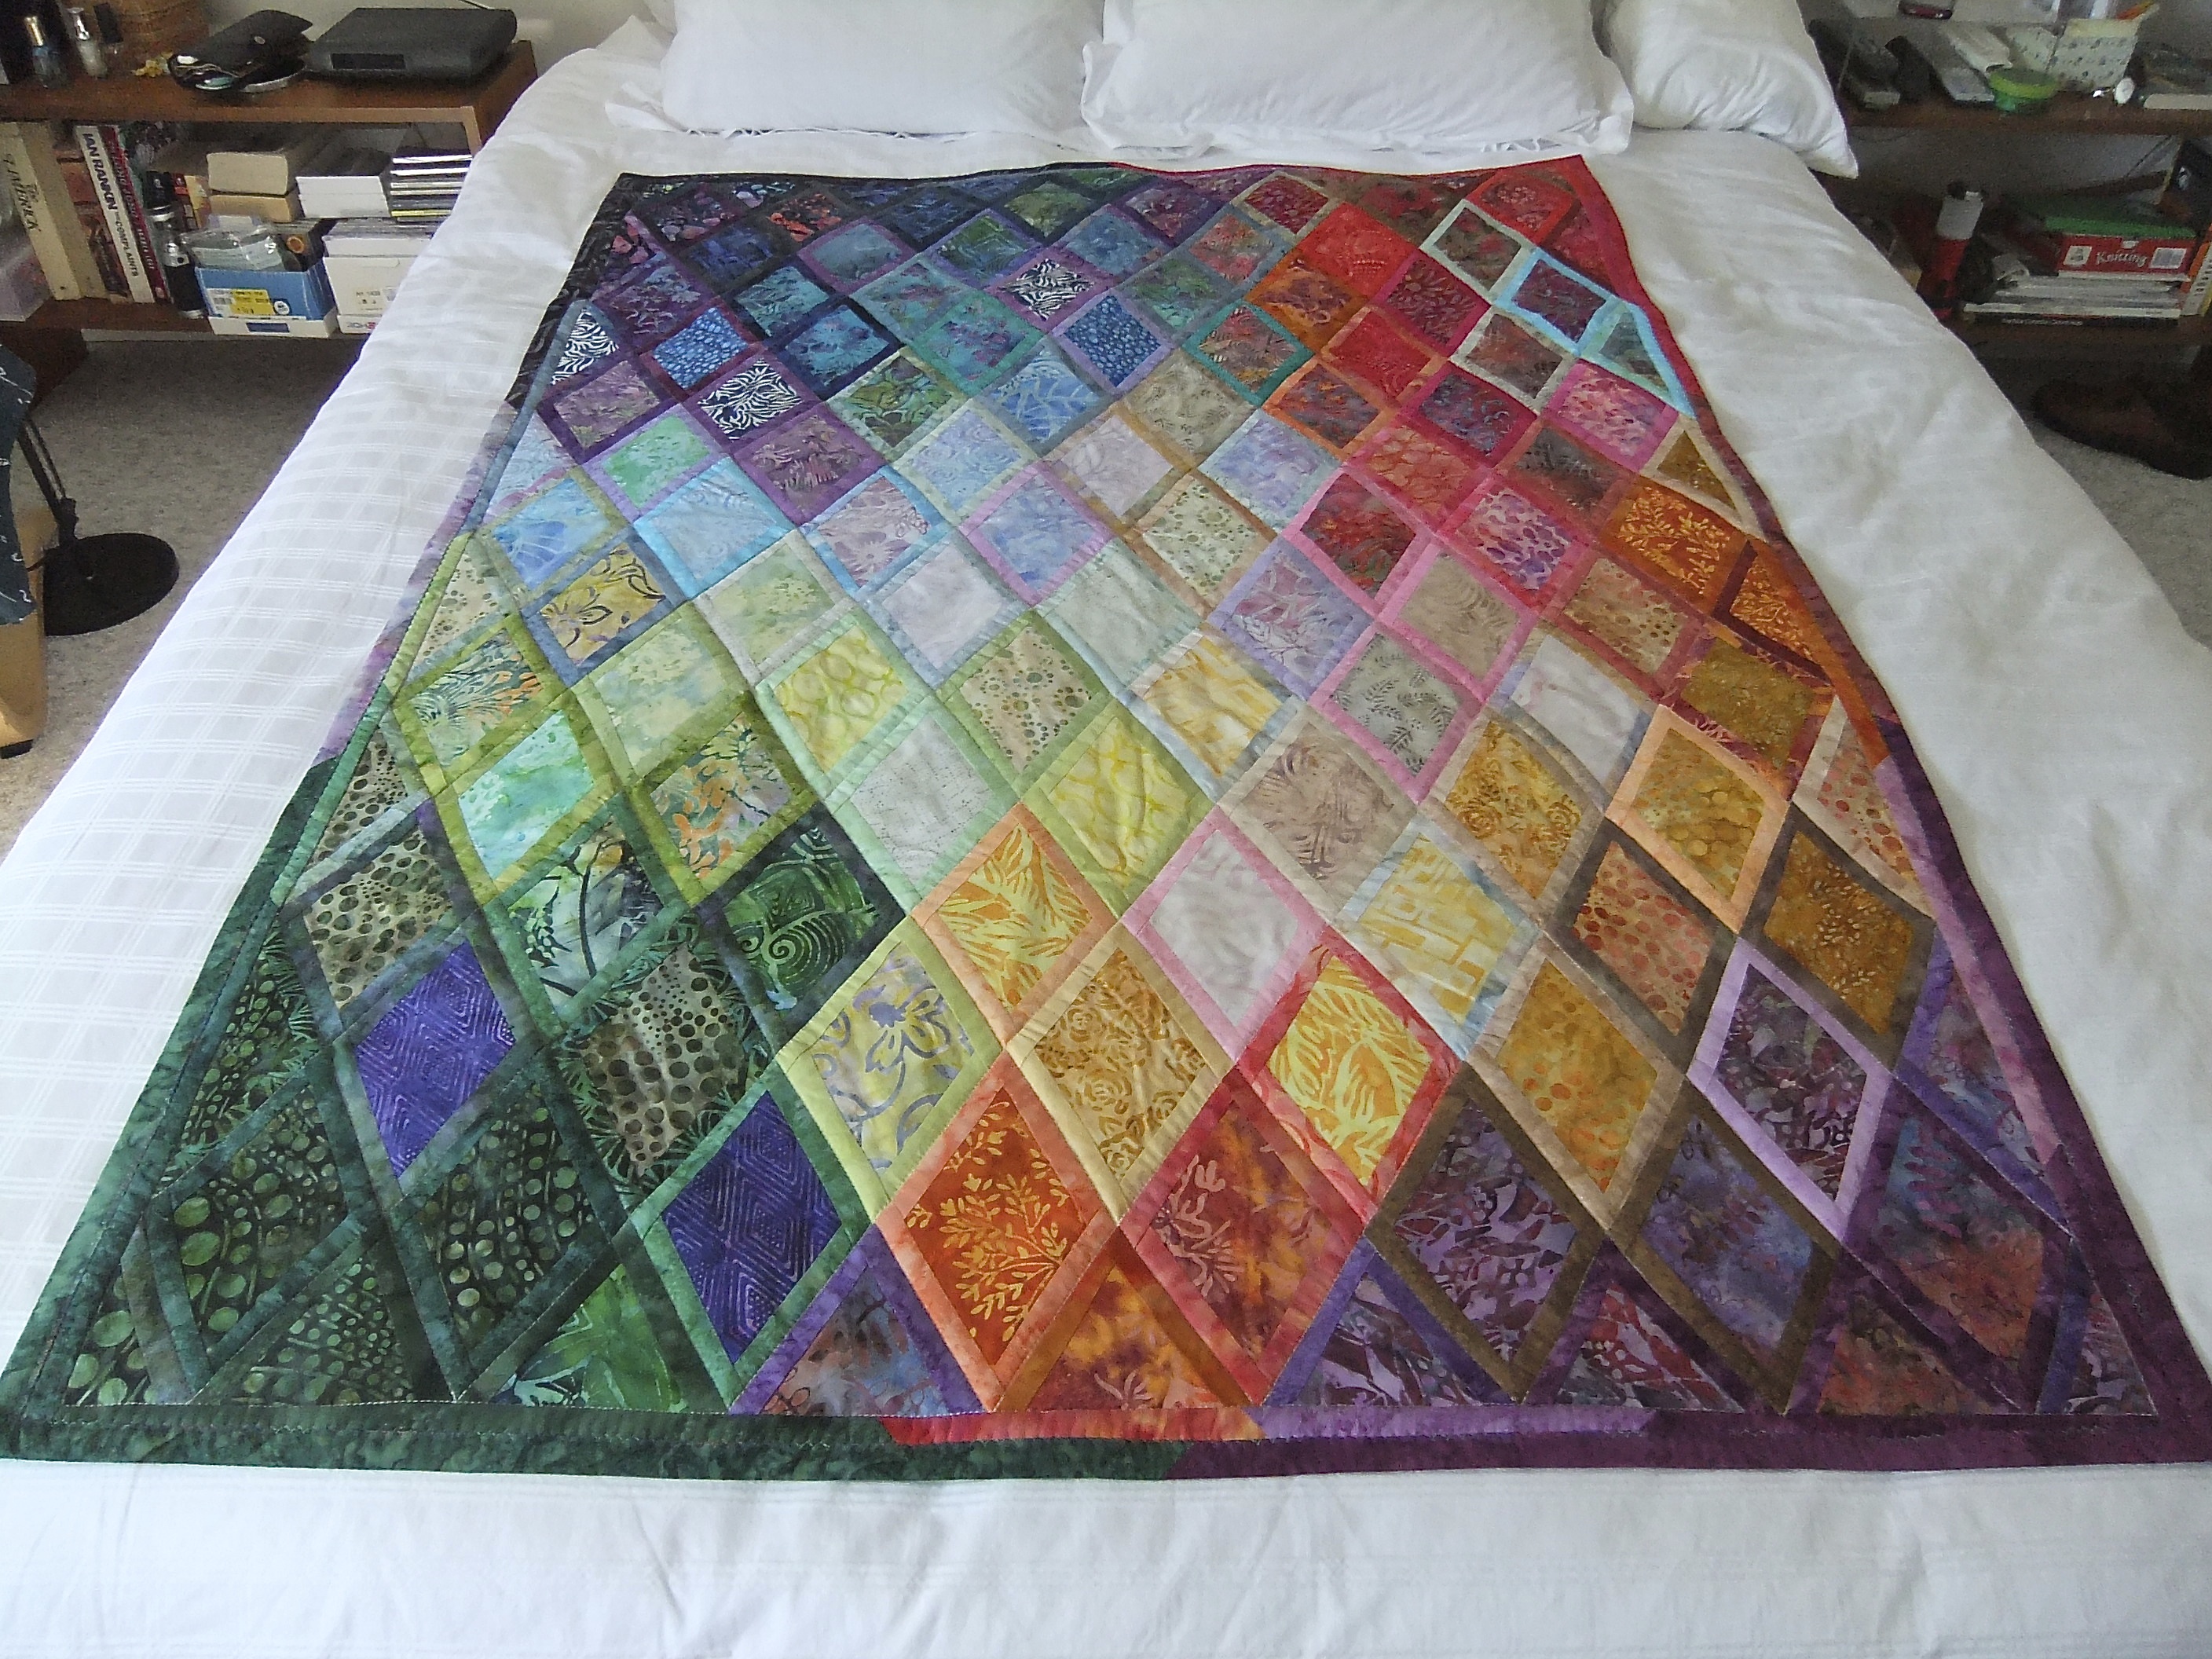
#4: This quilt uses Kaffe Fassett fabrics but is built on a vanishing 4-patch. This was one of the first quilts where I did something interesting on the second side – I had to because the quilt was wider than WOF (width of fabric) and I needed more width than my backing fabric provided.

#5: A Kaffe Fassett idea (from one of his books – although I worked entirely from an image on Pinterest) using batik fabric from my stash. The back of this quilt is a single run of fabric.
#6: This is the quilt I found on Pinterest attributed to someone else! It’s both Kaffe Fassett fabrics for the squares as well as based on a Kaffe Fassett quilt (again from an image of a quilt he did which I found online). This quilt has a pieced second side using left over bits of fabric from the top using a “jellyroll race” technique to make the inserted strip.


#7: This quilt uses Kaffe Fassett fabrics for the central squares of each block – it isn’t a Kaffe Fassett design, I don’t believe. Again the inspiration came from a photo I found online. The back is also pieces using leftover blocks from the front of the quilt.
So these are my Kaffe Fassett quilts to date – either made with Kaffe Fassett fabrics or from images of quilts he’s done which I’ve found online. I still have quite a bit of Kaffe Fassett fabric in my stash so there will be more quilts…
In The Park 3
Just finished!
 Couldn’t resist hanging it in my living room for now. All along I’ve intended the piece for my sister since these are her two oldest grandsons (she has five). The fabric I used to frame the work wasn’t anything I expected – but yesterday in the shop Pat hauled out a bolt of dark green striped batik and it tied together all the colours in the piece. I added a muslin panel to the back to hide the mess of threads from all the thread painting.
I have to say, I was pleased with how the work turned out. I know what I’m going to attempt next – maybe start it on the weekend. The problem with all of this work, pieced quilts as well as these art quilts is that making them becomes addictive – it’s the challenge of figuring out how to make something work – once I start, my OCD tendencies take over and I can’t stop – “I’ll just do this one more thing…” I say to myself and suddenly the creative process has taken over my life!
In The Park-2
Still a work in progress – but I made some decisions a couple of days ago – the major one being that I would use printable cotton fabric to create the boys. That meant returning to the original photos, upsizing each boy so he would fit the background appropriately. I printed the images this morning, let them dry thoroughly (as the directions describe), fussy cut them carefully, then applied them with a medium iron. Using a 60 universal needle, I stitched around the outside of each using Wonderfil Invisifil thread – it’s a very fine polyester thread that blends with the fabric and permits very small stitches.
 I also decided to stop fighting the large rhododendron bush beside the tree – I removed all the previous fabric and stitching (took a couple of hours of carefully picking out thread!). Today, I decided to print that element on printable cotton as well. In Photoshop I sized that part of the photo to fit the space where I wanted it to be, printed it out, cut it, pressed it, and stitched it into place. It looks way more realistic than what I’d had before. Now I need to do some thread painting to bring out the shaded areas of the bush so it appears three dimensional.
I still have a lot of careful outline stitching to do on each boy. I also need to thread paint the gravel quite a bit more – I had done a bit when I lay the grey fabric in place but now I need to carefully create a more gravel-like texture there.
My plan is to bind the image using a natural coloured raw silk fabric I have, then “frame” the piece with some kind of batik that will complement the image – I’ll have to shop for that (it may not be a batik – something like Northcott’s Stonehenge Colorado might work well).
This is where the piece is, today.
In The Park-1
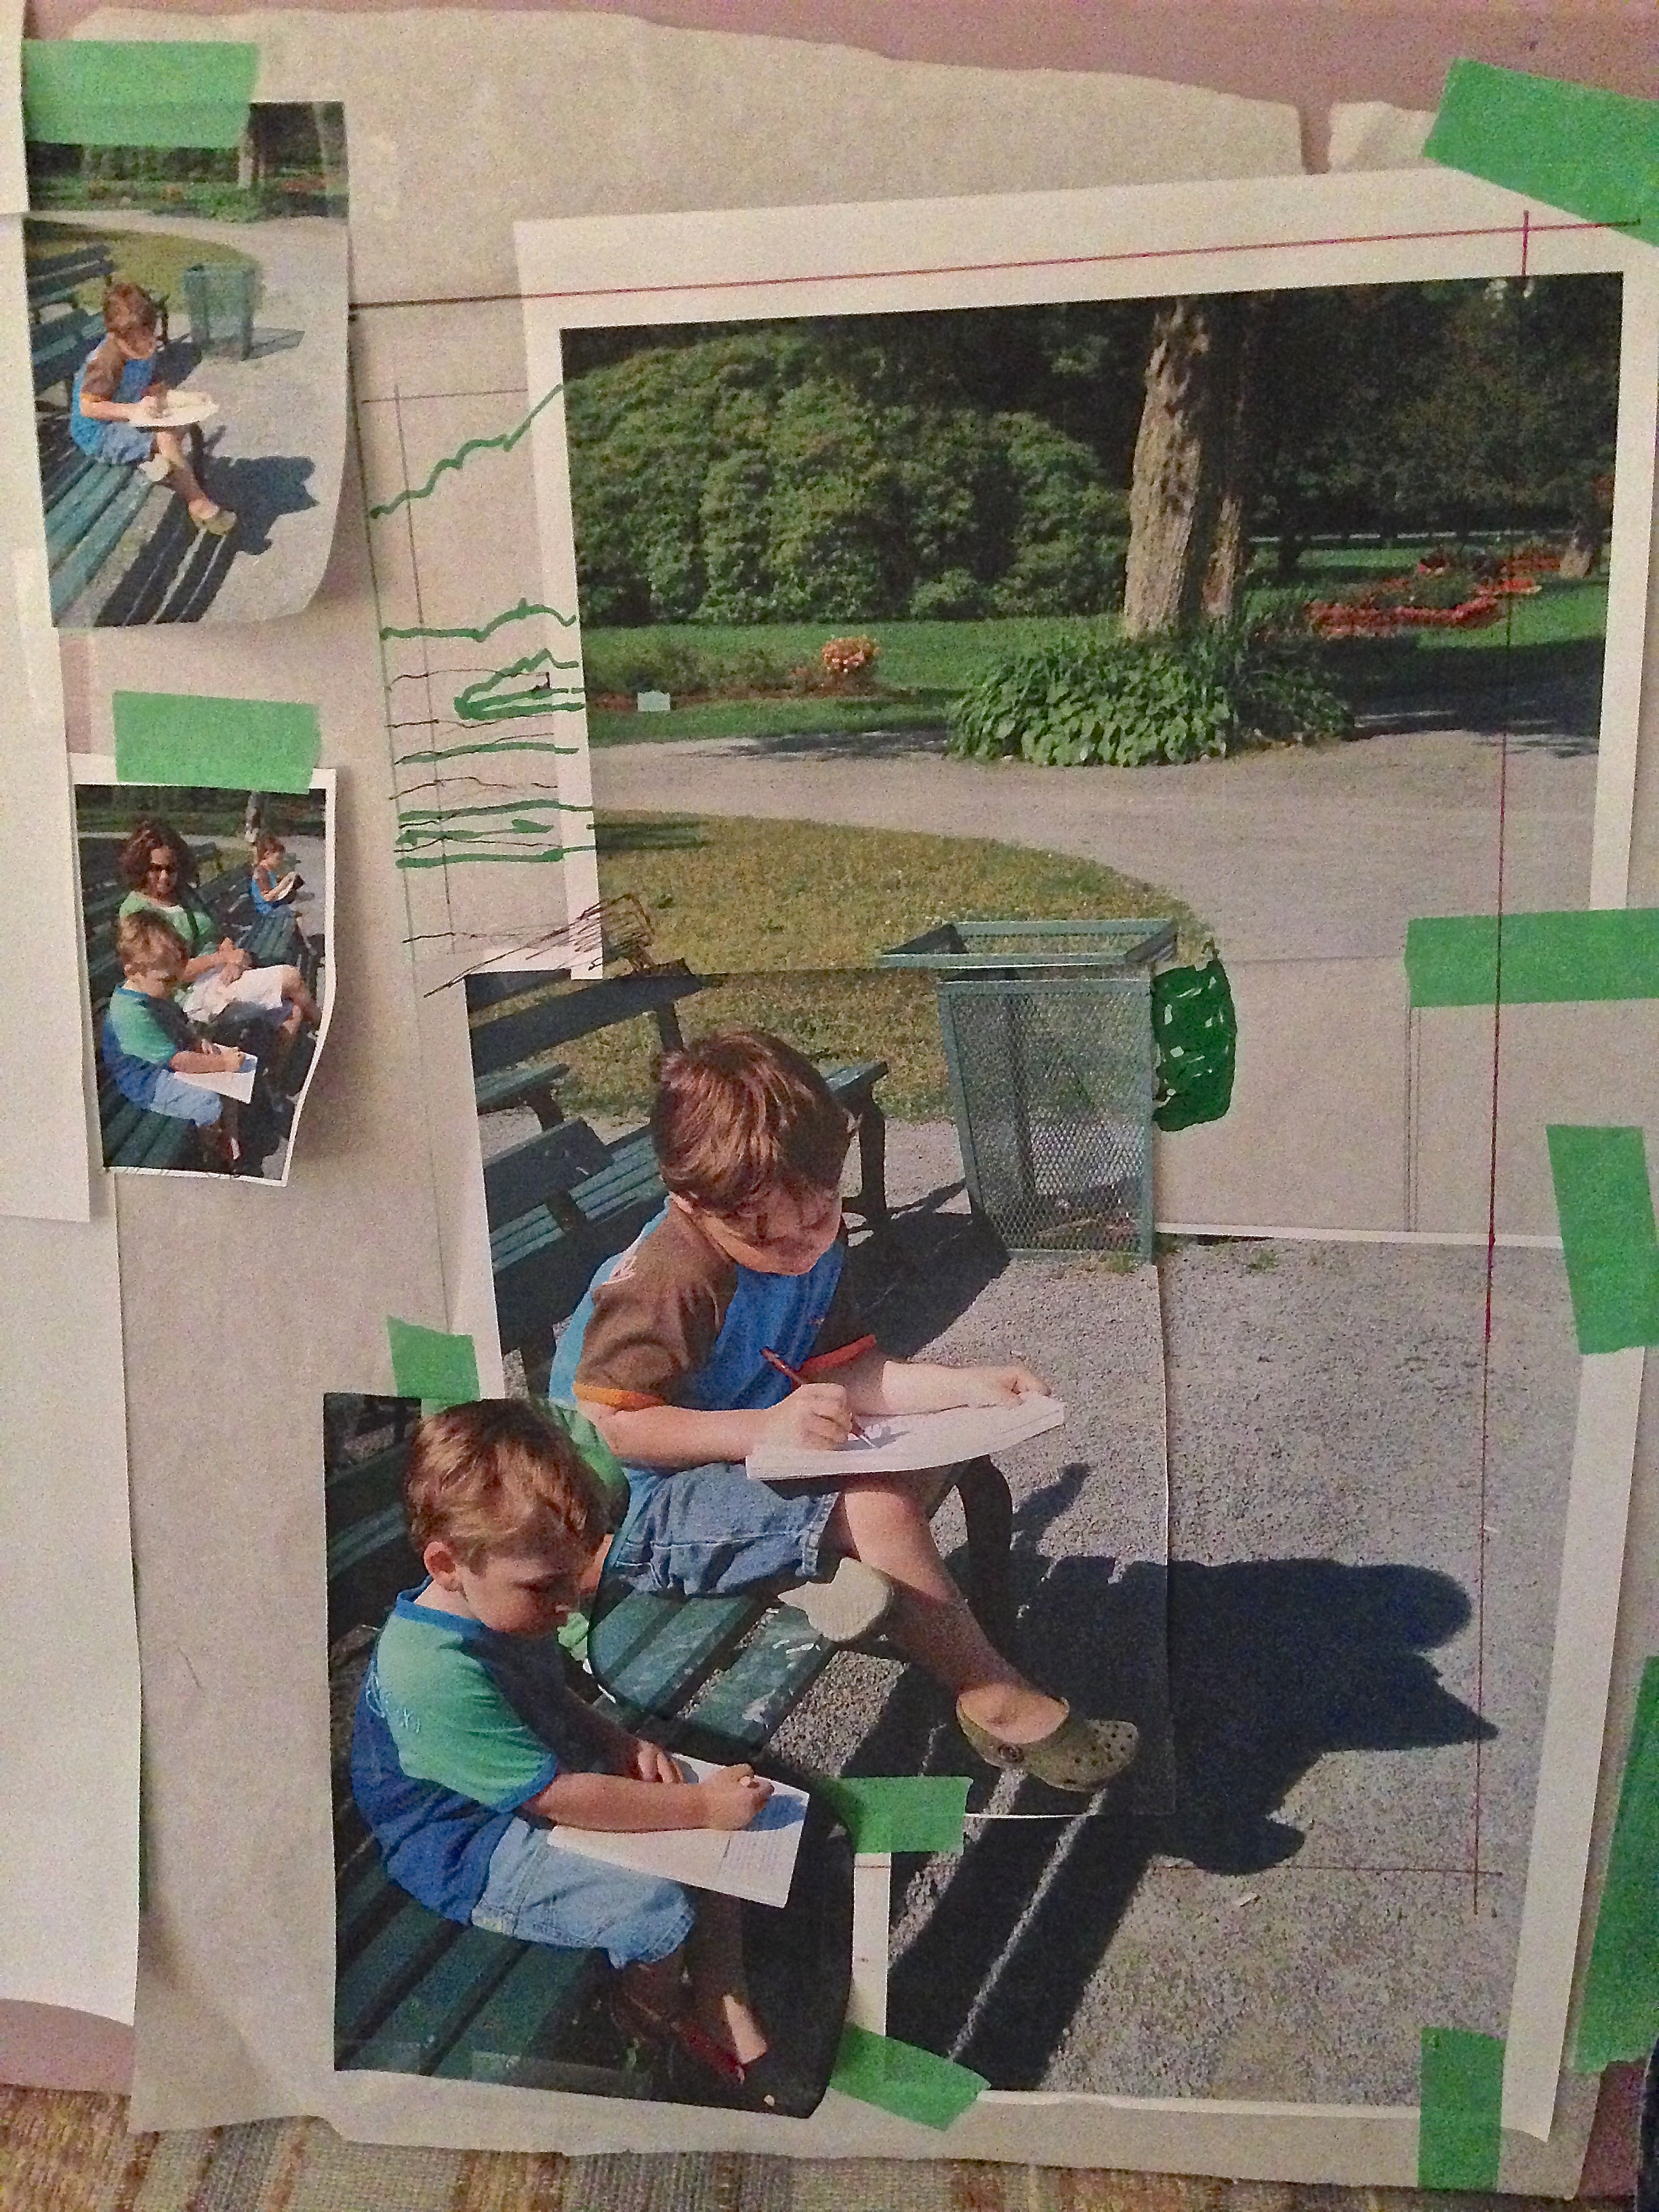
After finishing Asparagus Field in late September, I started a second art quilt: I had photos of my two oldest great-nephews taken a number of years ago when they were 4 1/2 and 6 on a visit to the Public Gardens (in Halifax) – I decided to combine two photos into a single image so both boys would be in the work. I enlarged the photos using Photoshop and printed out sections from which to assemble the piece which I wanted to be ~15″ X 23″.
 I began by setting up the “quilt sandwich” – a grey stonehenge fabric for the gravel path (which I used to cover the entire piece), batting and heavy fusible stabilizer on the bottom. I marked out the finished dimensions, stitched the sandwich together and didn’t get much further than that – the stumbling block was the boys’ hair – it’s the highlight of the piece and I had NO idea how I was going to create it. I played unsuccessfully with yarns of various kinds. In the end I decided to try machine embroidery thread laid on a sticky stabilizer, then stitched into place. It kind of works – I’ve done half-a dozen trials but I’m not quite satisfied — that stopped me doing anything else.
At the beginning of the week, with my shirts all done and no new quilt started, I thought – it’s time to get back to this art piece. So I dug out the box of fabrics and got to work. I added a strip of dark fabric to the top edge, below that I used a bright green for grass, then started creating “shapes” for the rhododendron bushes and threes and the large tree closer to the boys.
The image gets built up from top to bottom, from background to foreground. I added in bits of coloured fabric for the flower beds. Next some shadows for the bench, the trees outside of the scene on the left side, under the big tree at the top.
At this stage, the boys are still the paper cutouts with the “hair” pinned on. Not happy with that hair!

Next the grass gets extended and stitched, the gravel gets filled in with free-motion stitching, then comes the benches – just fused in place at this point (the boys are still those paper cutouts pinned in place).
Three days into the project and here’s what I have:
 The elements of the background are all in place: the shadows, the benches, the grass patch behind and above the benches, the tree with a hosta patch around it, one of the large rhododendrons in the Gardens, two small flower beds, and some trees in the background. I have stitched them all in place – I need to do much more thread painting: the hosta could use some more leaves and flower stalks, and the rhododendron still needs a lot more stitching using a lighter green thread (I’ll probably use a variegated to give some variation to the texture of the shrub).
So far, the boys are still in paper (with the latest attempts for hair pinned on). I’ve carefully traced all the elements needed to construct the boys, figured out an order in which to assemble them, I’ve prepared fabric swatches with double sided fusible interfacing – so tomorrow I’ll start constructing the boys – the bodies and clothing are straightforward – it’s the faces and hair that are still challenging me! I thought I might try setting up a portrait embroidery but my software isn’t sophisticated enough to produce a decent rendering of the faces – so I’ll use a combination of oil pastels and permanent marker to hint at the facial features. The hair – still not sure how I’m going to accomplish that but something will work out, I’m sure.
So all that’s left is to create the boys, and do more thread painting before I add the boys to the background. Oh yes, and last – add my signature with a date!
Fossil Fern Quilt – Done
 This is the completed Fossil Fern Quilt. Quilted in the hoop, with stars in the border (used a grand endless hoop which makes the job quite simple), and a pieced binding to bring out the colours of the piecing. The back is solid – no piecing this time, in the end, because the quilt turned out small enough that one WOF (width of fabric) was enough to cover the back – it’s the same blue fabric of the wide border.
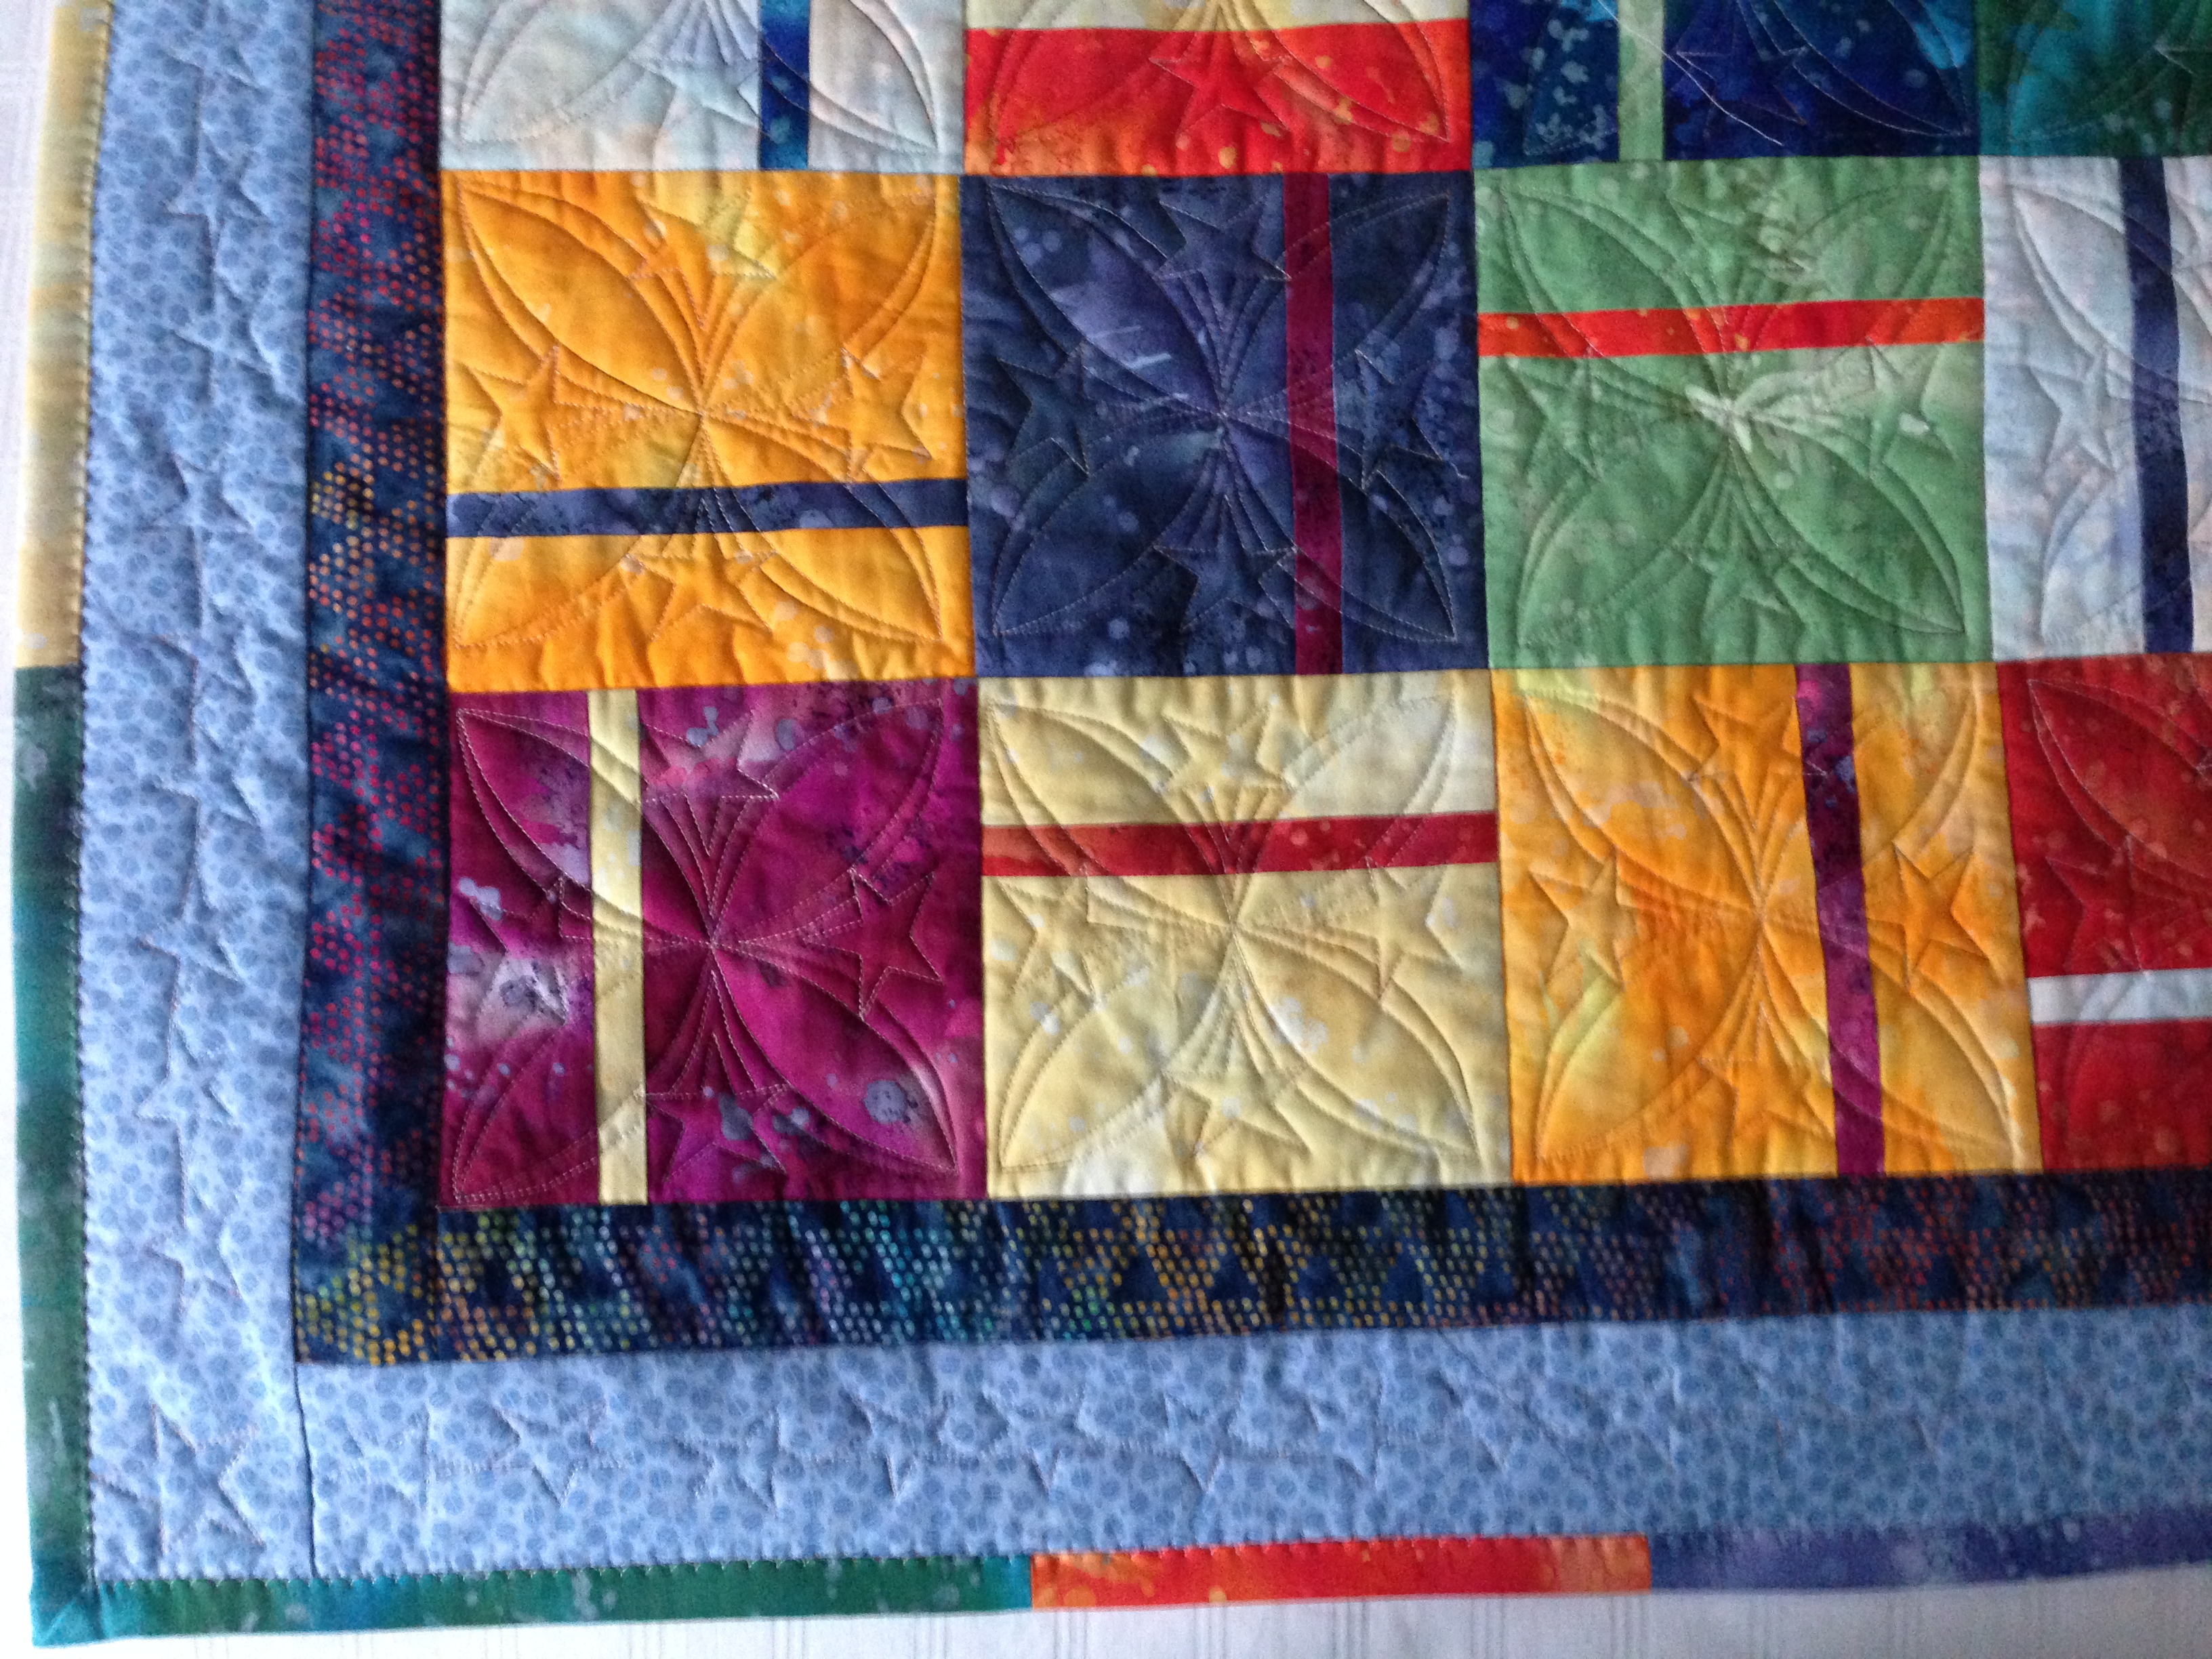 Here is the quilting detail – the star border, the loops with stars the quilting element.
This will likely be a baby quilt for a boy – the blue back kind of determines that, although I wouldn’t be adverse to giving it to a baby girl, but it might not be seen as “appropriate” and therefore not used. So probably a baby boy it will be. For now, it’s hanging in a closet with the rest of the completed quilts waiting for new homes.
