Drawstring Bags – Done!

Just finished the last of the drawstring bags for Christmas gifts – eighteen here, twenty-one in all. Just in time for tomorrow’s Friday afternoon knitters get together.

Drawstring Bags – Eighteen Completed

For the most part I was able to fabricate these bags using fabric for the outside and lining, for the drawstring channels, buttons, wooden beads, from the supplies I had on hand. I did have to buy 6mm grosgrain ribbon and a few wooden beads to finish the last few but for the most part I used what I had. That doesn’t mean there was no cost associated with the bags but it feels differently (like free) when I don’t have to go out and buy specific supplies for a project.

Now back to quilting the Layer Cake Quilt. Hoping to finish it this weekend.

Seven Done – Fourteen To Go

Just finished the seventh shoe bag – fourteen to go.

Shoe Bags

Here is this year’s Christmas gift (last year I gave small zippered bags) – a drawstring bag for carrying shoes during the winter. They’re not large enough for sneakers/running shoes, but if it’s a snowy day and you’re wearing boots, then this bag is perfect for bringing along a pair of “lady’s” shoes. It’s also a great size for carrying knitting or a hand sewing project, a book, art supplies, even makeup.

I was originally given a drawstring bag by a Japanese friend and it was immediately obvious the design was better than any I’d ever made – it was lined, made with separate channels for the drawstrings, and a buttoned pocket on one side.

I was limited by the width of fabric strips I was using – I’d pulled from the 9″ scrap bags (Keepsake Quilting puts together sets of coordinating fabrics using twelve 9″ width of fabric cuts of both printed and batik fabrics) fabrics I didn’t think I’d want to use in a quilt. So the final size of each bag was limited to 8 1/2″ x 16″ (don’t forget 1/4″ seam allowances). The drawstring channels are constructed from two 2 1/2″ x 17″ strips of fabric, sewn to form a circle, turned right side out and folded – long, raw edges together – and pressed. Each channel is inserted (raw edges to the opening) between the outer bag and the lining (which is placed right side together over the stitched outer bag). The top edge is sewn with a 1/4″ seam. The lining is pulled over the bag, the bottom end serged and the lining pushed inside the bag. I used narrow grosgrain ribbon for the drawstrings, used some smallish wooden beads (with large holes) to secure the ends. The drawstrings are strung through both channels, one from each side.

The first three bags have already been gifted – they were samples to establish size and production details. They lacked front pockets – didn’t think of adding the pocket until I started cutting the scrap bag fabrics – after cutting the two 17″ pieces for the length of bag I had just the right amount left for a lined pocket!

So now back to the sewing machine to assemble another batch – it’ll probably take me one more day to finish up the twenty-one bags I need.

Moth Holes

Embroidery to hide moth holes

Friday afternoon Joyce showed me the wool sweater she was wearing – a couple of moth holes in the front. She wondered whether they could be repaired. I assured her they could (there were two smaller holes near the first one as well) with a well placed machine embroidery.

I spent some time locating an embroidery design that would sit over the holes, not be too dense, and I could set up to curve toward the shoulder. I turned the sweater inside out, used “Whisper Web” interfacing (a light, cut away), hooped the right front side, chose mauve/rose rayon embroidery thread, then stitched out the design. I added two small sections of close zigzag to obscure the larger hole further, and stitched out a single leaf over a second small hole nearby.

The completed embroidery is subtle but it does the job.

PS: I just returned the sweater to Joyce, she tried it on, and she’s thrilled with it! I’m happy she’s happy.

A Foot Pedal Bag

Foot Pedal Bag

I picked up my new Pfaff Creative Icon embroidery machine on Thursday. I knew when I bought the Creative Sensation Pro II a year ago that I would upgrade to the Icon when it became available because of the many improvements. First thing I did after unpacking the machine and embroidery unit was to try it out – without reading the manual! I figure the icons and gestures on the new touch screen on the machine would be relatively intuitive and they were. The manual also happens to be on the sewing machine but I’ve downloaded it from the Pfaff site and installed it on my iPad. I wish I actually had a physical users guide – I like having the manual beside me as I’m trying to figure out how something is done, flipping through the pages and writing notes to myself to remind me about various techniques – I haven’t so far figured out how to add notes to the pages on my iPad.

I found an embroidery design I liked that would be large enough to fill one side of the bag – I chose some rayon thread and stitched it out on a piece of cotton backed with low-loft needle-punched cotton batting as stabilizer using the medium size hoop (260mm x 200mm). Adding my name offered a few challenges but in the end I figured out how to use a built-in embroidery alphabet, scale down the embroidery, and position it where I wanted it without a lot of frustration.

The second side of the bag I pieced using 2″ scrap strips in two directions. I didn’t bother embroidering the resulting pieced fabric. What I did find challenging was using the reverse button – it wasn’t until I was nearly finished the strip piecing that I discovered a small indicator light that let me know when I was “in reverse” – I kept looking for that information on the touch screen. There’s a second indicator light next to the reverse light – I’ve tried finding out what the light is for in the user’s manual but haven’t yet been successful. There’s a small embossed icon above that second light that hints at an end tie-off but I can’t seem to make the light come on…

I added a zipper, lining, and stitched up this bag for my foot pedal and power cord. Very handy to have when taking the machine anywhere or for packing it away (which I never do!).

Today, I worked on the Icon to finish the Improv quilt top and to piece the back (I usually do piecing on my Brother straight stitch quilting machine). The straight stitching on the Icon is very good, and the upgraded IDT (integrated dual feed – a built in walking foot, in other words) does a great job – I stitched five narrow strips together for the quilt back starting at the same end each time – no bowing. The resulting pieced panel was perfectly straight.

I have to say, I’m liking this machine.

Remodelling t-Shirts

t-Shirt With Lowered Neck & New Neckband

With the medallion quilt completed, today, I turned to clearing up the piles of stuff in my sewing room. At least six weeks ago I pulled four t-Shirts from my closet with the intention of lowering the neckline. The shirts had originally been high crewneck long sleeve t-Shirts which I’d bought so I could shorten the sleeves and end up with sleeves just above my elbow – that’s not something you can purchase, trust me.

I wore them last year, but realized I wasn’t wearing them this year because the neckline was too high. So I moved them from the closet to my sewing space intending to remodel the neckline. Finally got to that today. Started by cutting off the crewneck ribbing and dropping the front about 2″. Then I cut 1 3/4″ x 24″ strips from some t-Shirt fabric I have on hand, serged the folded strip to each t-Shirt neckline. Remodelling complete. The contrasting neckband doesn’t look bad at all. And it lays flat – I tried them on. (I should have used dark serger thread to stitch on the new neckband, but hey, the stitching can’t be seen on the outside.)

Remodelled t-Shirts

It’s true, t-Shirt weather is just about over here in Nova Scotia – maybe one more day warm enough to put on a short sleeve top. But these shirts are now ready for next warm season.

Dropped Neckline

Stretch Cotton t-Shirt

This is actually the second t-Shirt – the first was a disaster (too big and too long – the culprit was the light weight black and white knit I bought in San Francisco – too loosely knit, I think). It went into the trash pile.

I bought the fabric for this shirt at my nearby Pfaff dealer who stocked some very nice stretch cotton knit this summer. This red stripe was the only one of those fabrics that suited my colouring, too bad. 0.8m (60″ wide) was enough for a t-shirt for me. The fabric sewed easily – didn’t have to fight it.

Red Stripe t-Shirt

Given my floppy upper arms, I like a sleeve that comes almost to my elbow so I lengthened the short sleeves. The pattern also uses a facing for the neck edge – nobody finishes a t-Shirt neck with a facing – I serged a doubled (24″ x 1 1/4″) strip to the neck edge (1 1/2″ shorter than the length of the neck so I could ease the neck edge into the seam). I also cut 1 1/4″ from the bottom edge – I’m short, and didn’t need the shirt to come below mid-stomach.

I cut out the shirt a couple of days ago. I was able to sew it up in under 2 hours this morning. I pressed the neck band toward the body and top stitched it 1.5mm from the seam to keep it flat. Cover-stitched the sleeve and bottom hems.

The Pattern is a Burda pattern I’ve had for ages (I tried finding some hint online about when the pattern was first released but came up empty although many people have made it – lots of photos of finished shirts). The size 14 fits me reasonably well. It’s easy to make with the 1/4″ seam allowances included in the pattern – makes fitting sleeve curves straightforward because you don’t have to fight the excess fabric in a 5/8″ allowance.

Burda 3197 Pattern (Vintage)

Now I need to go through my fabric stash and see if I can find another suitable knit to make at least one more of these shirts (then I’ll be able to cull some of the older ones in my closet).

Beige Pants

Same pattern, cut out with the same modifications I used with the pink pants, and these came out larger – had to take in the sides 3/8″ at the top and from mid hip to hemline. Obviously the difference is the fabric in spite of the fact there’s no spandex in this fabric either….

The front has turned out fine, happy with that, but below the bum is a wee bit baggy. Not much I can do about that at this point – the pants may tighten up a bit with washing, although I prewashed the fabric. Sitting in them may also round out the backside some.

The pants are certainly wearable. 

This morning I dug out some navy cotton twill (no spandex) that I will wash tomorrow, as well as some prewashed beige cotton twill – both will get made into pants when I get back from Toronto (going to my niece’s wedding coming weekend). I also found a prewashed length of French navy blue light weight cotton/linen blend to use for a loose shirt. Once those garments are done, the pants with the stretched out spandex will go.

Tomorrow, I intend to interface the silk dupion I’ve had waiting to be made into a quilt. I’ll get that project started next.

Pink Pants

These pants were cut based on the modifications I made to my basic pattern in San Francisco – a small addition to the centre front crotch area, a 3/4″ drop in the front waist, and 1/4″ addition to the side seams because the fabric had no spandex.

This is a jeans pattern but I thought this wool/polyester fabric was a bit too “dressy” to turn into jeans so I left out all the top stitching, omitted the back pockets, and used a single seam for a neat hem.

Have to say they turned out pretty well – although everything that could go wrong did! I started by putting the zipper on the wrong side of the fly front, had to redo it, pockets went in fine as did the side seams, but I screwed up threading the embroidery machine and I had to take out a stitched (not yet cut, fortunately) buttonhole not once but twice. After rethreading the machine and doing a practice buttonhole (which I should have done in the first place) the third try was fine. Only then did I cut it open.

I’ve just finished cutting pants out of a beige fabric which I will sew tomorrow. The beige fabric I used for pants in San Francisco turned out to be dreadful – it’s a stretch twill and it now has a permanent stretch across the front where the spandex has failed – very visible. So once these new beige pants (with almost no stretch) are done, the SF pants will get tossed. 

That’s the same fabric I used for the light and dark blue pants I made earlier in the spring – they’re starting to show the same permanent stress marks across the front so they’ll have to be replaced. This time, I’ll use a cotton twill with no spandex in it. The original fabric wasn’t a cheap fabric, either. 

So lesson learned – stay away from fabrics with any amount of spandex – they may be intended to provide a comfortable fit with some give but the quality and durability is variable and pants take a good 5-6 hours of work. Too much time for such a limited result!

San Francisco 6

The sewing retreat ended around noon today. People who live closer to the west coast have already departed the city. I couldn’t make connections all the way to the Canadian east coast work so I don’t leave till 8:10 tomorrow morning. 

Had lunch with another gal who has to spend the night here, then we went fabric shopping. Linda wanted to purchase some, I was happy to tag along. 


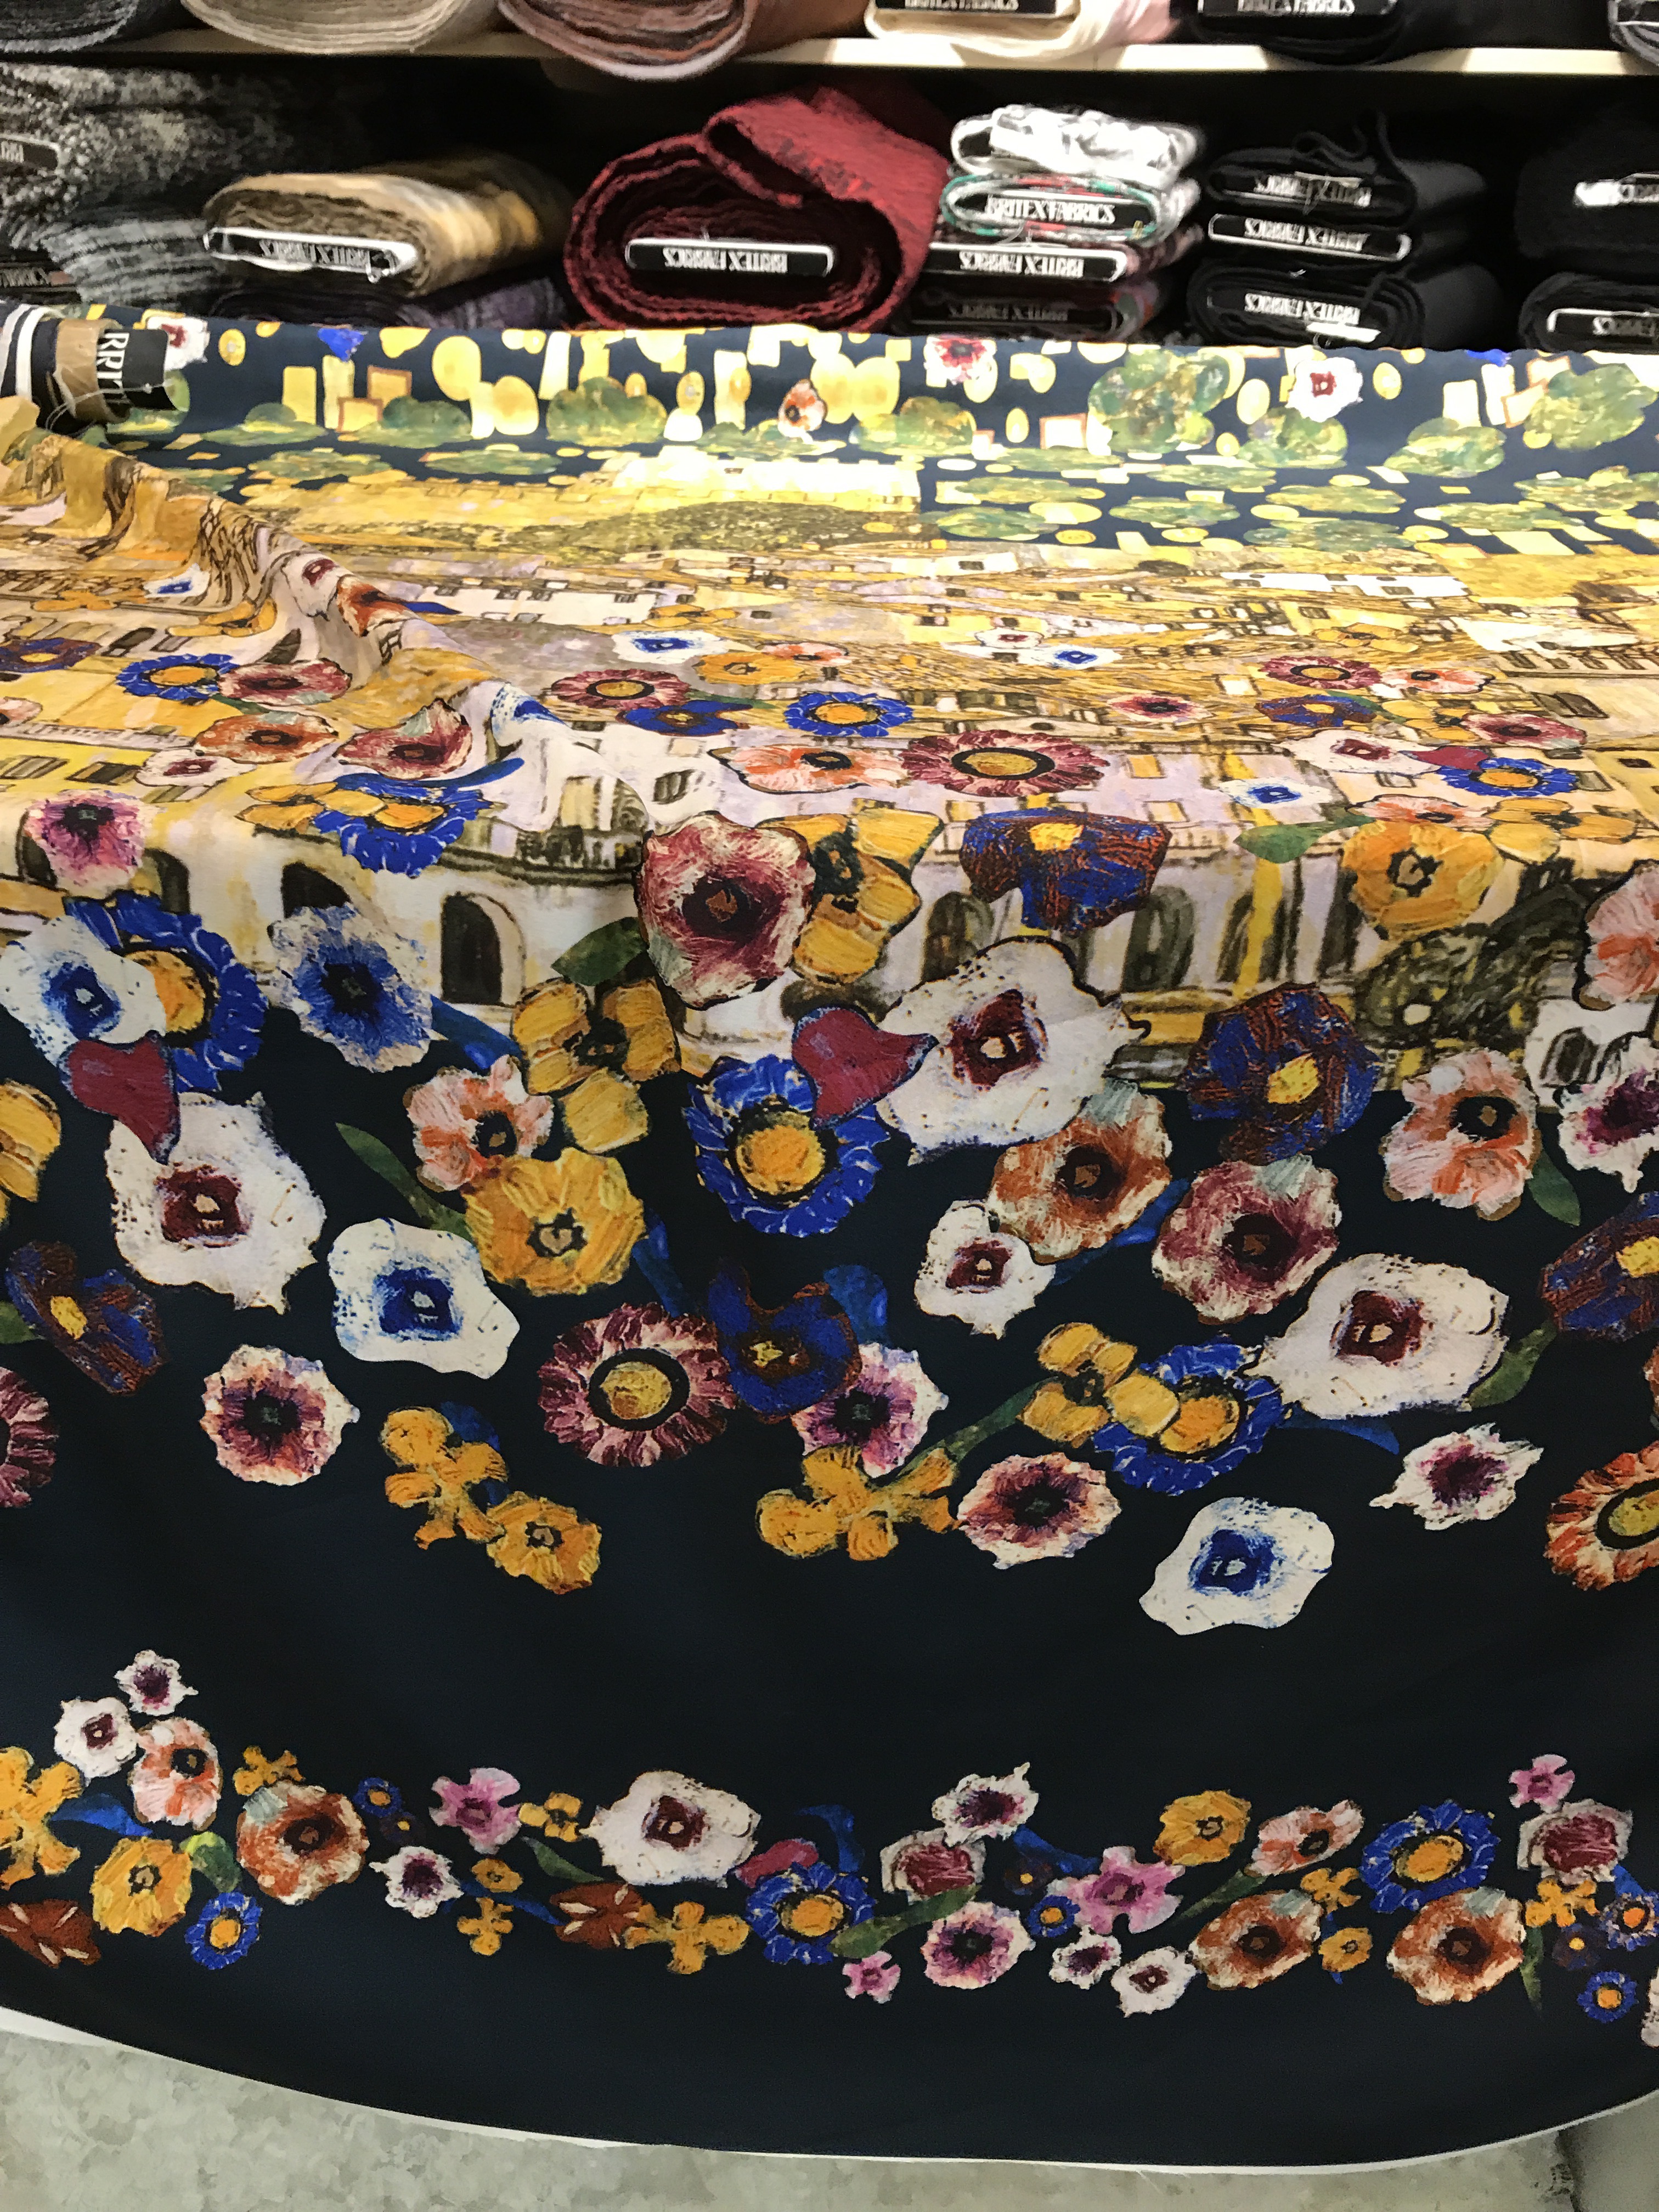
Britex does have some lovely if expensive fabric. A week ago I saw this silk panel that reminded me of the paintings of Gustav Klimpt – the colors and detail are simply gorgeous. Each 60″x60″ panel was priced at $125. I thought it stunning but couldn’t think what I’d make with it – my present life style is more LandsEnd than Tiffany. So I walked away. I was hoping when I returned today it might have sold – nope, it was still there. Again, I looked at it but in the end I walked away – I had no idea what I would want to add to my wardrobe.

I stopped on the third floor to look at the petersham (a softer, more pliable version of grosgrain). I was expecting a few colours – I thought I’d pick up a yard of a couple – forget that! The adjacent shelves held rows of shades from white through grey and beige to black. With no specific project in mind it was impossible to choose any.  I left Britex empty handed this time which is just as well since there is no room in my suitcase for one more item.

I love this window display. It caught my attention two years ago. It’s still there. It’s a clothing store next door to Britex. There are garments in a window further along but three of the windows are filled floor to ceiling with these antique machines. Wonder where they’ve found so many.

I can’t imagine walking in anything like these shoes;

Or these.


The Apple Store is wide open to the street on this sunny afternoon. The Apple people in their green jerseys are just waiting there to help you. I had no questions or concerns today so we walked on by. I wonder whether there are any other Apple stores so easily accessible.

I have had a great week, the women were all experienced sewers, all were deeply involved in learning more about fitting and sewing technique. Sandra Betzina is a whiz at fitting. I followed her most of the morning just watching as she spotted adjustments that people could make to their garment muslins then grab a pen and make the corresponding changes to the paper patterns – 3/8″ here, 1/2″ there, opening it out, taking it in. Several modifications to each pattern. At this point in the week those muslins were fitting pretty well.

An early night tonight. I have to be ready for the Airport Shuttle which is picking me up at 5:45 in the morning. I haven’t looked at Halifax weather all week. Hope it’s not snowing when I get back!

Pants #4

I spent all weekend working on Pants #3 and #4 using what I’d learned from the two failures from last week. Same two fabrics – a 20% stretch cotton/polyester denim/twill in a mid-blue and a navy.

This time I constructed the pants front first and made sure I put the front waistband on when I’d finished the fly and pockets! So the side seams lined up as they should have.

Pants #4 – Front

I made the pockets smaller (shorter) and positioned them higher – closer to the yoke seam. I didn’t bother decorating the pockets, just topstitched the top hem. They’re now a better size for my bum and sitting  better.

Pants #4 – Back

The side seams (and inseams) are straight.

Pants #4 – Side

This fabric is actually quite difficult to work with. Because of the amount of stretch I needed the pants to be close fitting – so there is no escaping some wrinkles. However, I’ve had them on since early this morning and they are snug but very comfortable – the back waist stays in place when I sit (a huge plus – my renovated jeans all pull down in back) so the back crotch must be long enough and whatever curvature I left on the side seams at the top of the back seems to hold the pants up over my hips.

I’d prewashed the fabric in warm water (which is what I use for all my washing) and it “shrunk”a bit when I steam pressed it. However, it loosens as I’m wearing the pants. Pants #3 needed washing after two days – I’m hoping they’ll tighten up after they’re laundered. Also, I have no idea whether the fabric will shrink in length (no stretch along the length) so although the pants look a wee bit long I made them my standard 27 1/2” inseam.

That’s it for pants right now. I have pant lengths of khaki and white fabric which are in my take to San Francisco pile – I’ll make up both pairs during the sewing retreat there consulting with Sandra Betzina about refinements with fitting. What these two pair (#3 and #4) have accomplished is a reshaping of the crotch and legs by removing excess fabric from the side and inseams rather than using the mid-back dart and they’ve turned out reasonably well.

And as I’ve said, they’re comfortable.

Pants #3 – Back

Pants #3 – Front

Pants #3 – Side