
Face
Just received this photo this afternoon. Taken off the coast of Newfoundland somewhere around St. John’s.
You can almost imagine the berg cruising purposefully straight ahead!
Face
Just received this photo this afternoon. Taken off the coast of Newfoundland somewhere around St. John’s.
You can almost imagine the berg cruising purposefully straight ahead!
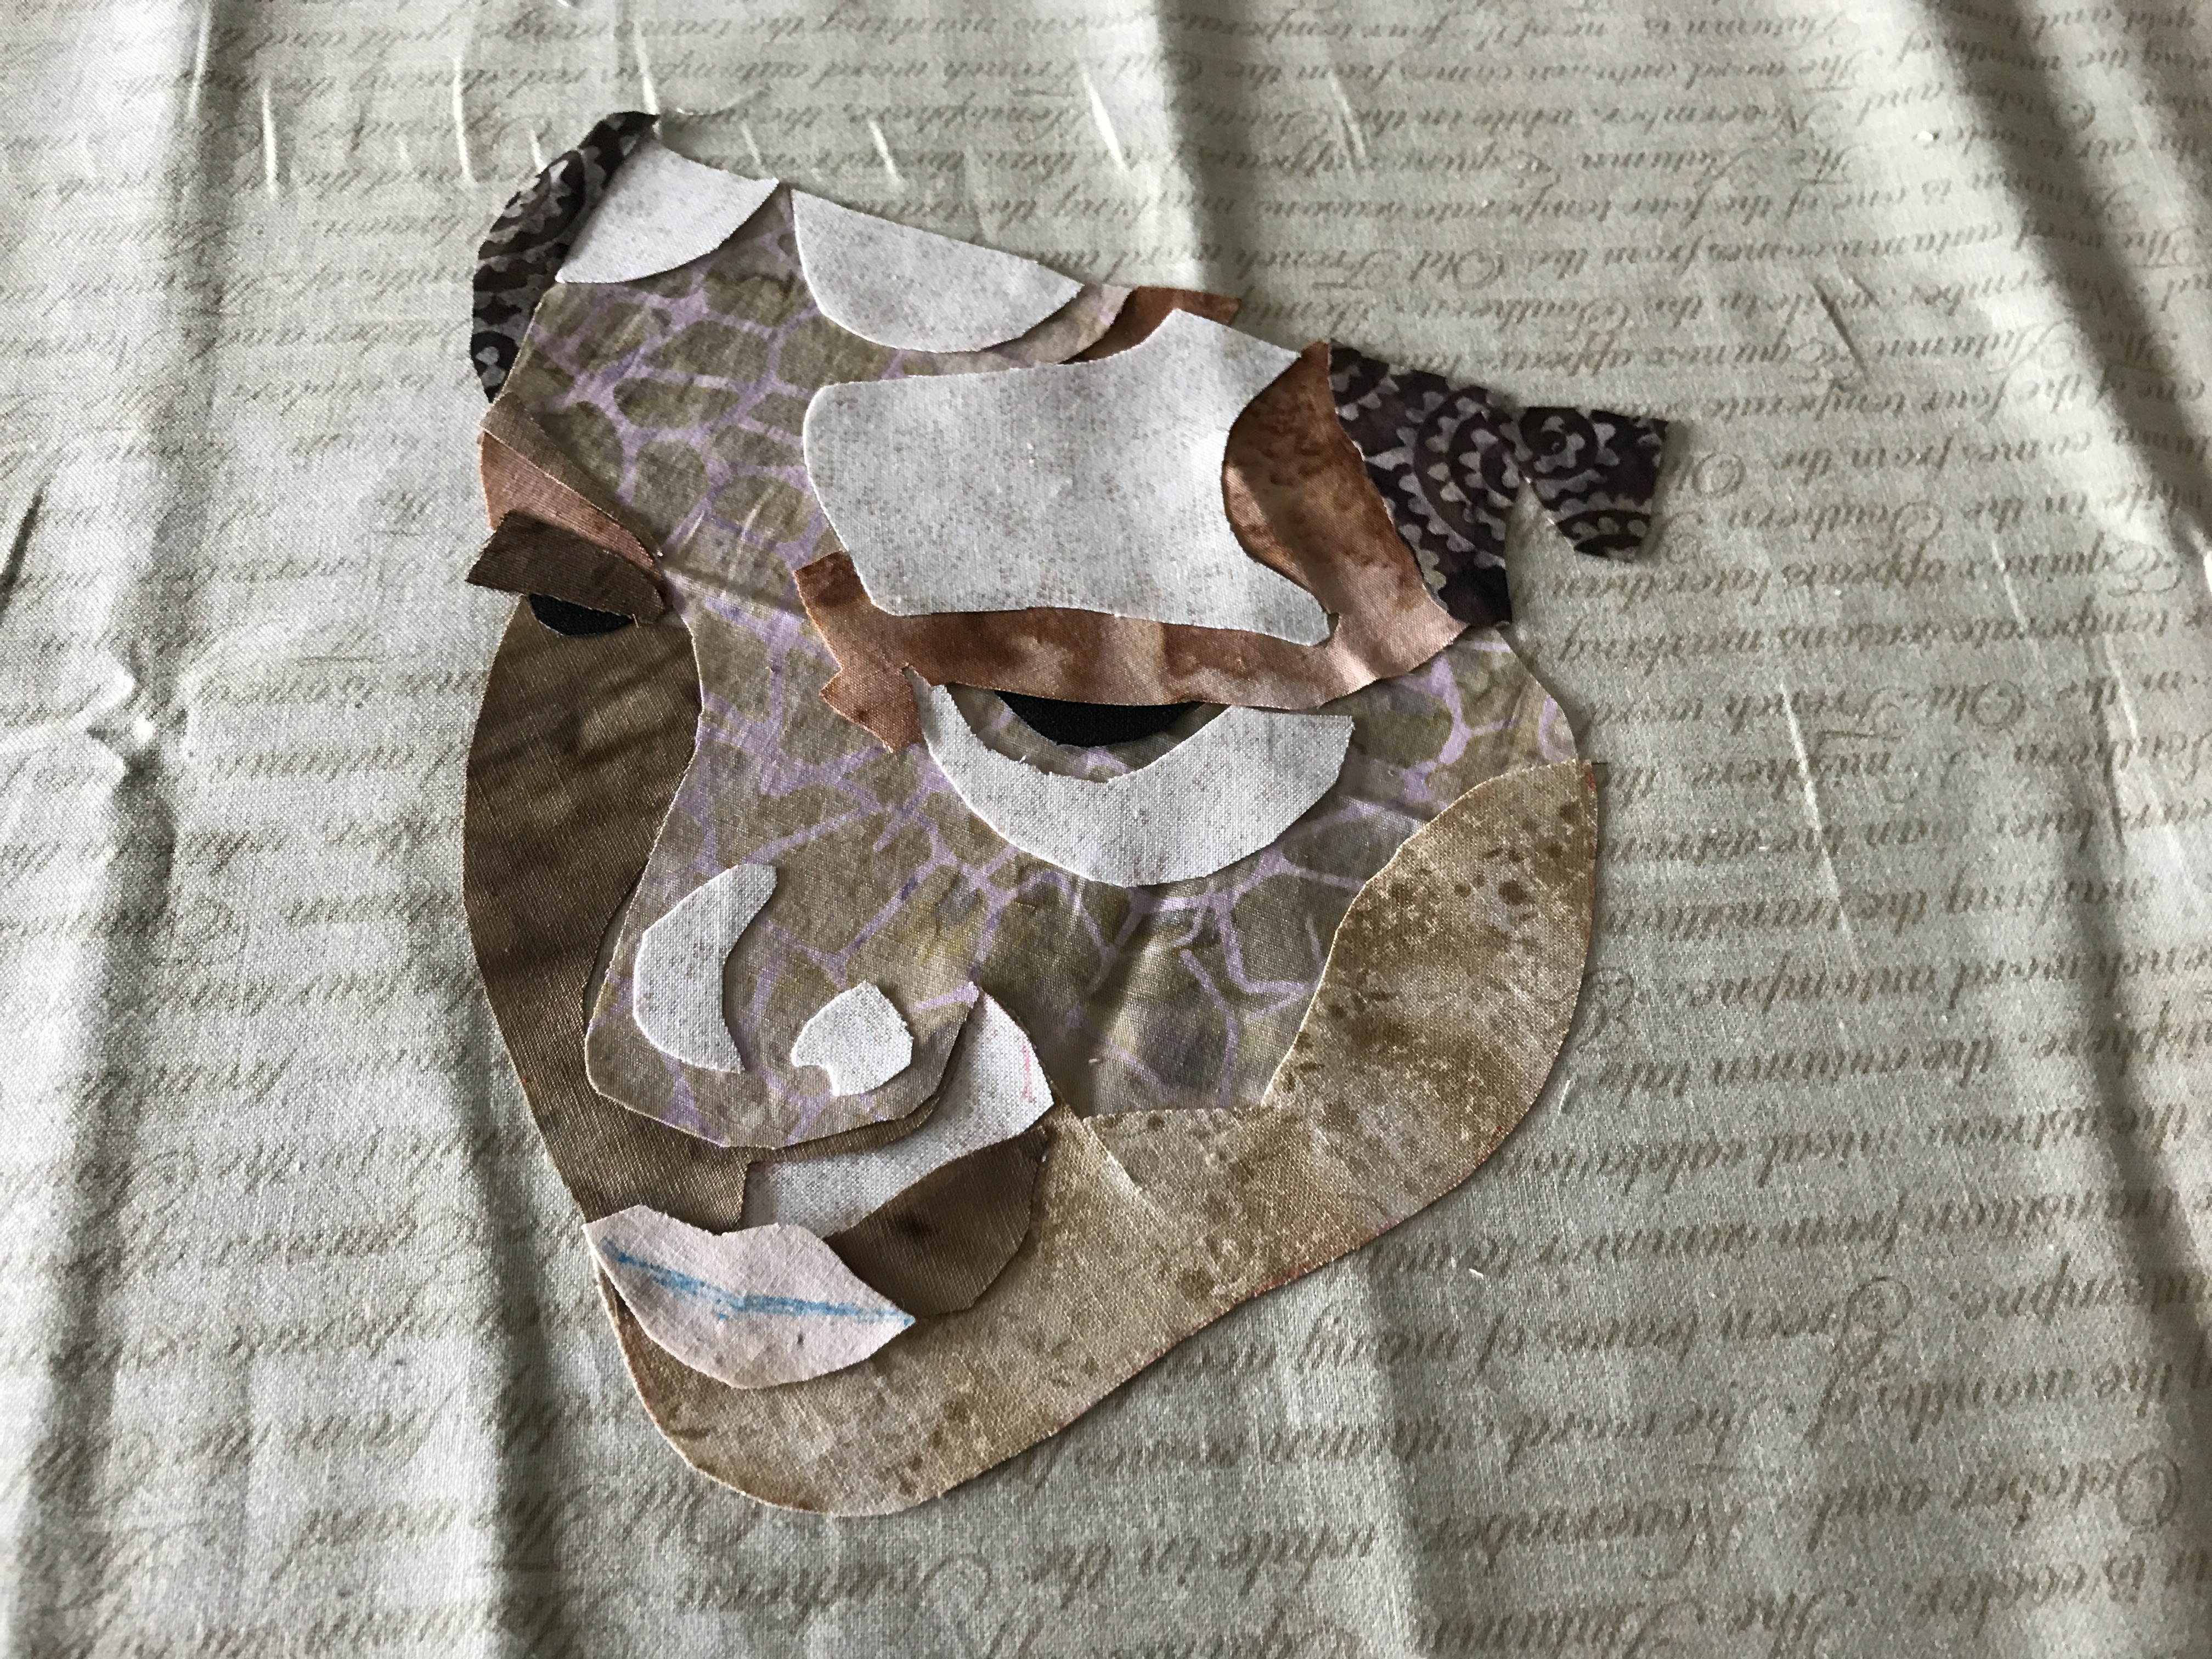
Another demonstration: a pieced portrait.
I started with an image of a face, printed it in black and white, outlined the colour boundaries, pulled all the beige tone fabrics from the stash I could find (large pieces and scraps), created templates for the large areas using baking parchment paper, cut them out, then created templates for the smaller areas, and cut those out.
What I didn’t do here, but should have, was to apply fusible web to the fabric before cutting it – instead, I’ll use a glue stick to adhere the cut out pieces to the background.
I was mainly playing around to see if what I ended up with resembled a face in any way and it does. Once I’ve glued the pieces down, I’ll probably do a bit of edge stitching to hold the thing together.
Fused textile 9″ x 12″, backed, unbound.
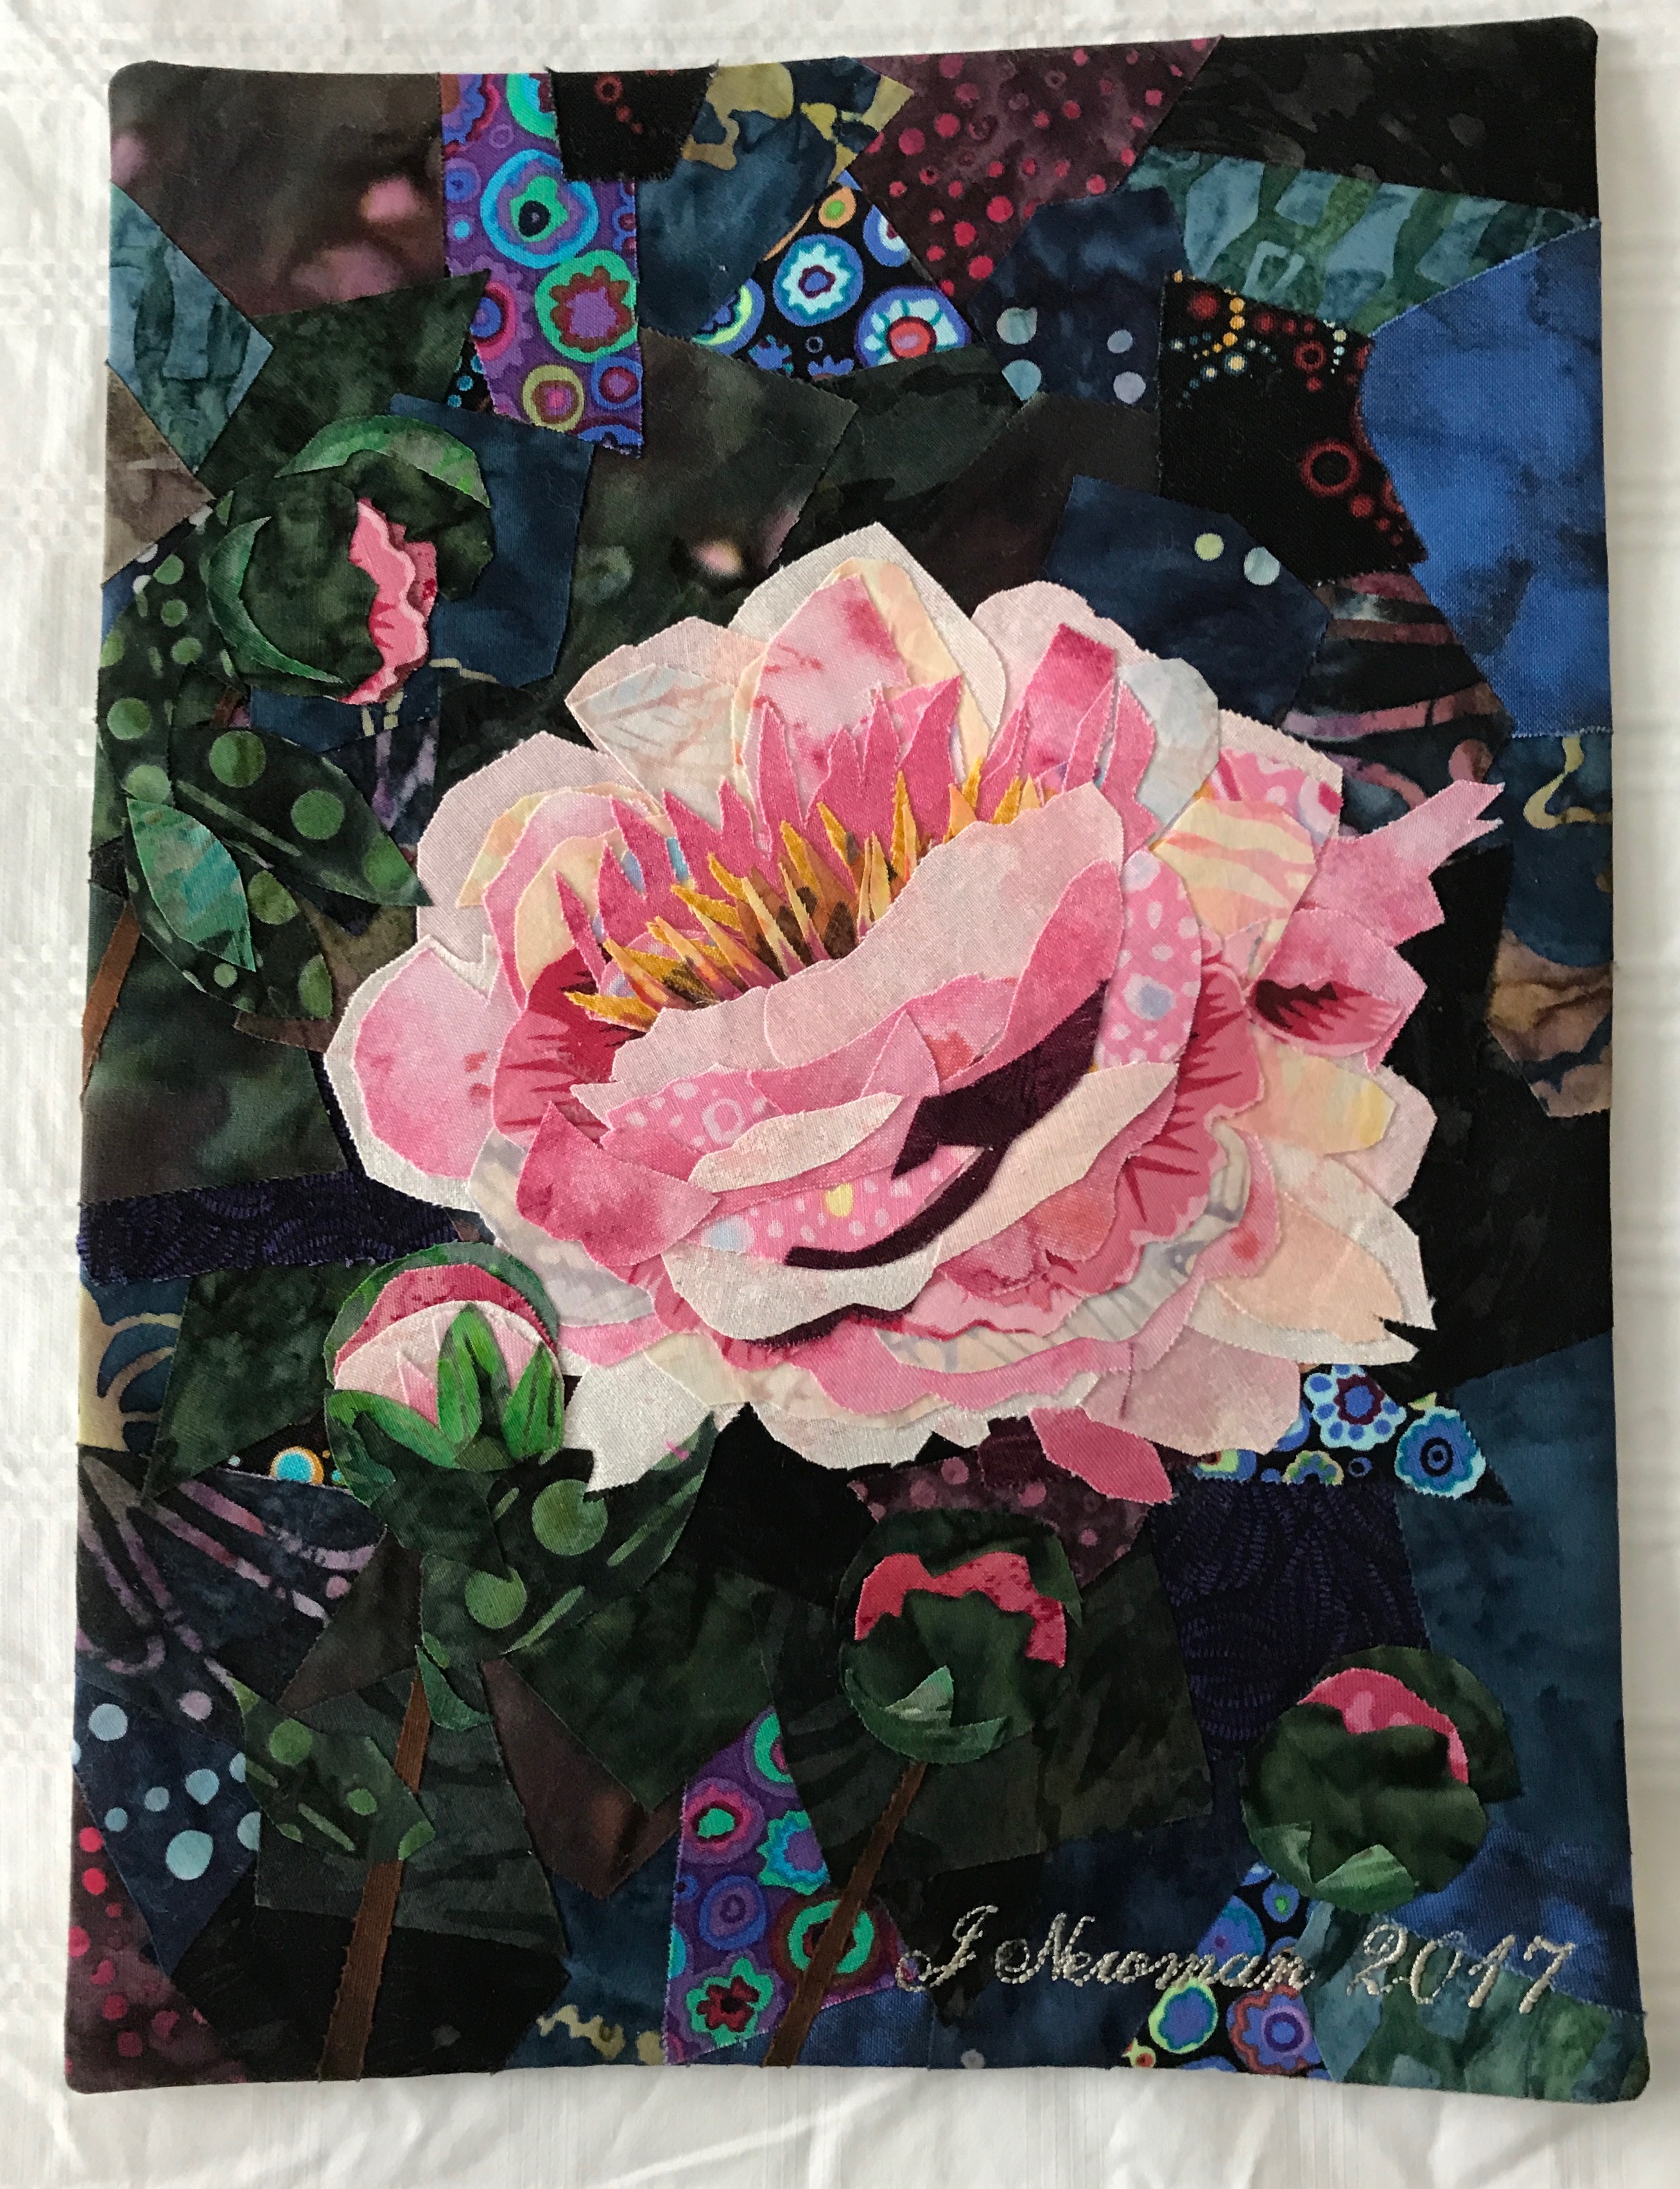
Peony
A piece this small is actually quite difficult to do because the elements I wanted to fuse were so small. Small bits of fabric this size on a finished piece twice as large would have seemed small in relation the overall size, but here they seem quite large. However, I’m pleased with the overall effect.
I might try this technique again on something larger but my purpose for doing this piece was to demonstrate fused appliqué for the class which is happening in just over a week. I certainly learned a lot in the process – about choices of fabric, about building up the layers, about simplification, about contrast, about not being too literal, about templates vs cutting freely.
Whereas in the previous piece I used a hidden binding, this time I did a “pillowcase turn” – cutting the backing piece to size, stitching it (1/4″ seam) right sides together (leaving an opening on the bottom so I could turn it right side out), pressing, then hand stitching my opening closed. Because the art piece itself is multi-layered, when the seams are turned to the inside, the back ends up a bit loose – I haven’t been able to figure out a way to get the back to lay flat other than to use a hidden binding to apply it. I will have to keep experimenting with this.
With the Peony, I’m playing around with Danny Amazonas’ fused appliqué technique – a collage of small pieces of fabric fused on top of one another to create depth and detail for both the background and the main subject.
I began by preparing 20″ x 26″ pieces of muslin and batting and sewing them together along the 9″ x 12″ dimensions in the center of the quilt – this marked my outside boundary. Then I pencilled in the approximate location for the focal element – the peony. That gives me an inner boundary for the background appliqué collage.

Backing Prepared
One of the things I’ve learned from looking carefully at Amazonas’ textile art is the background is livelier when there’s visible small pattern elements in the fabrics. The overall effect is a shaded dark support for the focus element which sets up the contrast for the finished art work.
I cut pieces from the fabrics I’d collected and auditioned them to see how I might establish a colour flow within the background.

Auditioning Fabrics For The Background
I applied “wonder-under,” a paperbacked fusible web to my complementary and contrasting pieces of background fabric. Then I cut small pieces from each and arranged them filling the space from outer to inner boundary.

Background Fused In Place
At this point, the background looks lighter in overall tone than it will once the light fabrics are added in the center to create the very pale pink flower. If the background still seems too light when the peony is added, I will apply a wash using acrylic paint to tone down the brighter colours.
As far as I can tell, Amazonas doesn’t sew on top of his constructions. My plan is to do the same in this demonstration piece. However, when it’s assembled I may feel it wants more detail and add some thread painting. I’ll have to see how it turns out.
That’s it for today.
I’ve been working away at the Rudebeckia piece all this week. Tons of decisions to make, this fabric or that, cut using a traced template or free cut, where to position the elements, how much detail to use in the background, what colour thread…. Every decision is a final one as well – there isn’t much that can be undone as the work grows. It’s how it is.
Here I’ve partially stitched “leaves” in the background (I’ll finish that stitching when I’ve done the thread painting on the flowers). The central flower is all assembled and fused in place as are the other two flowers.
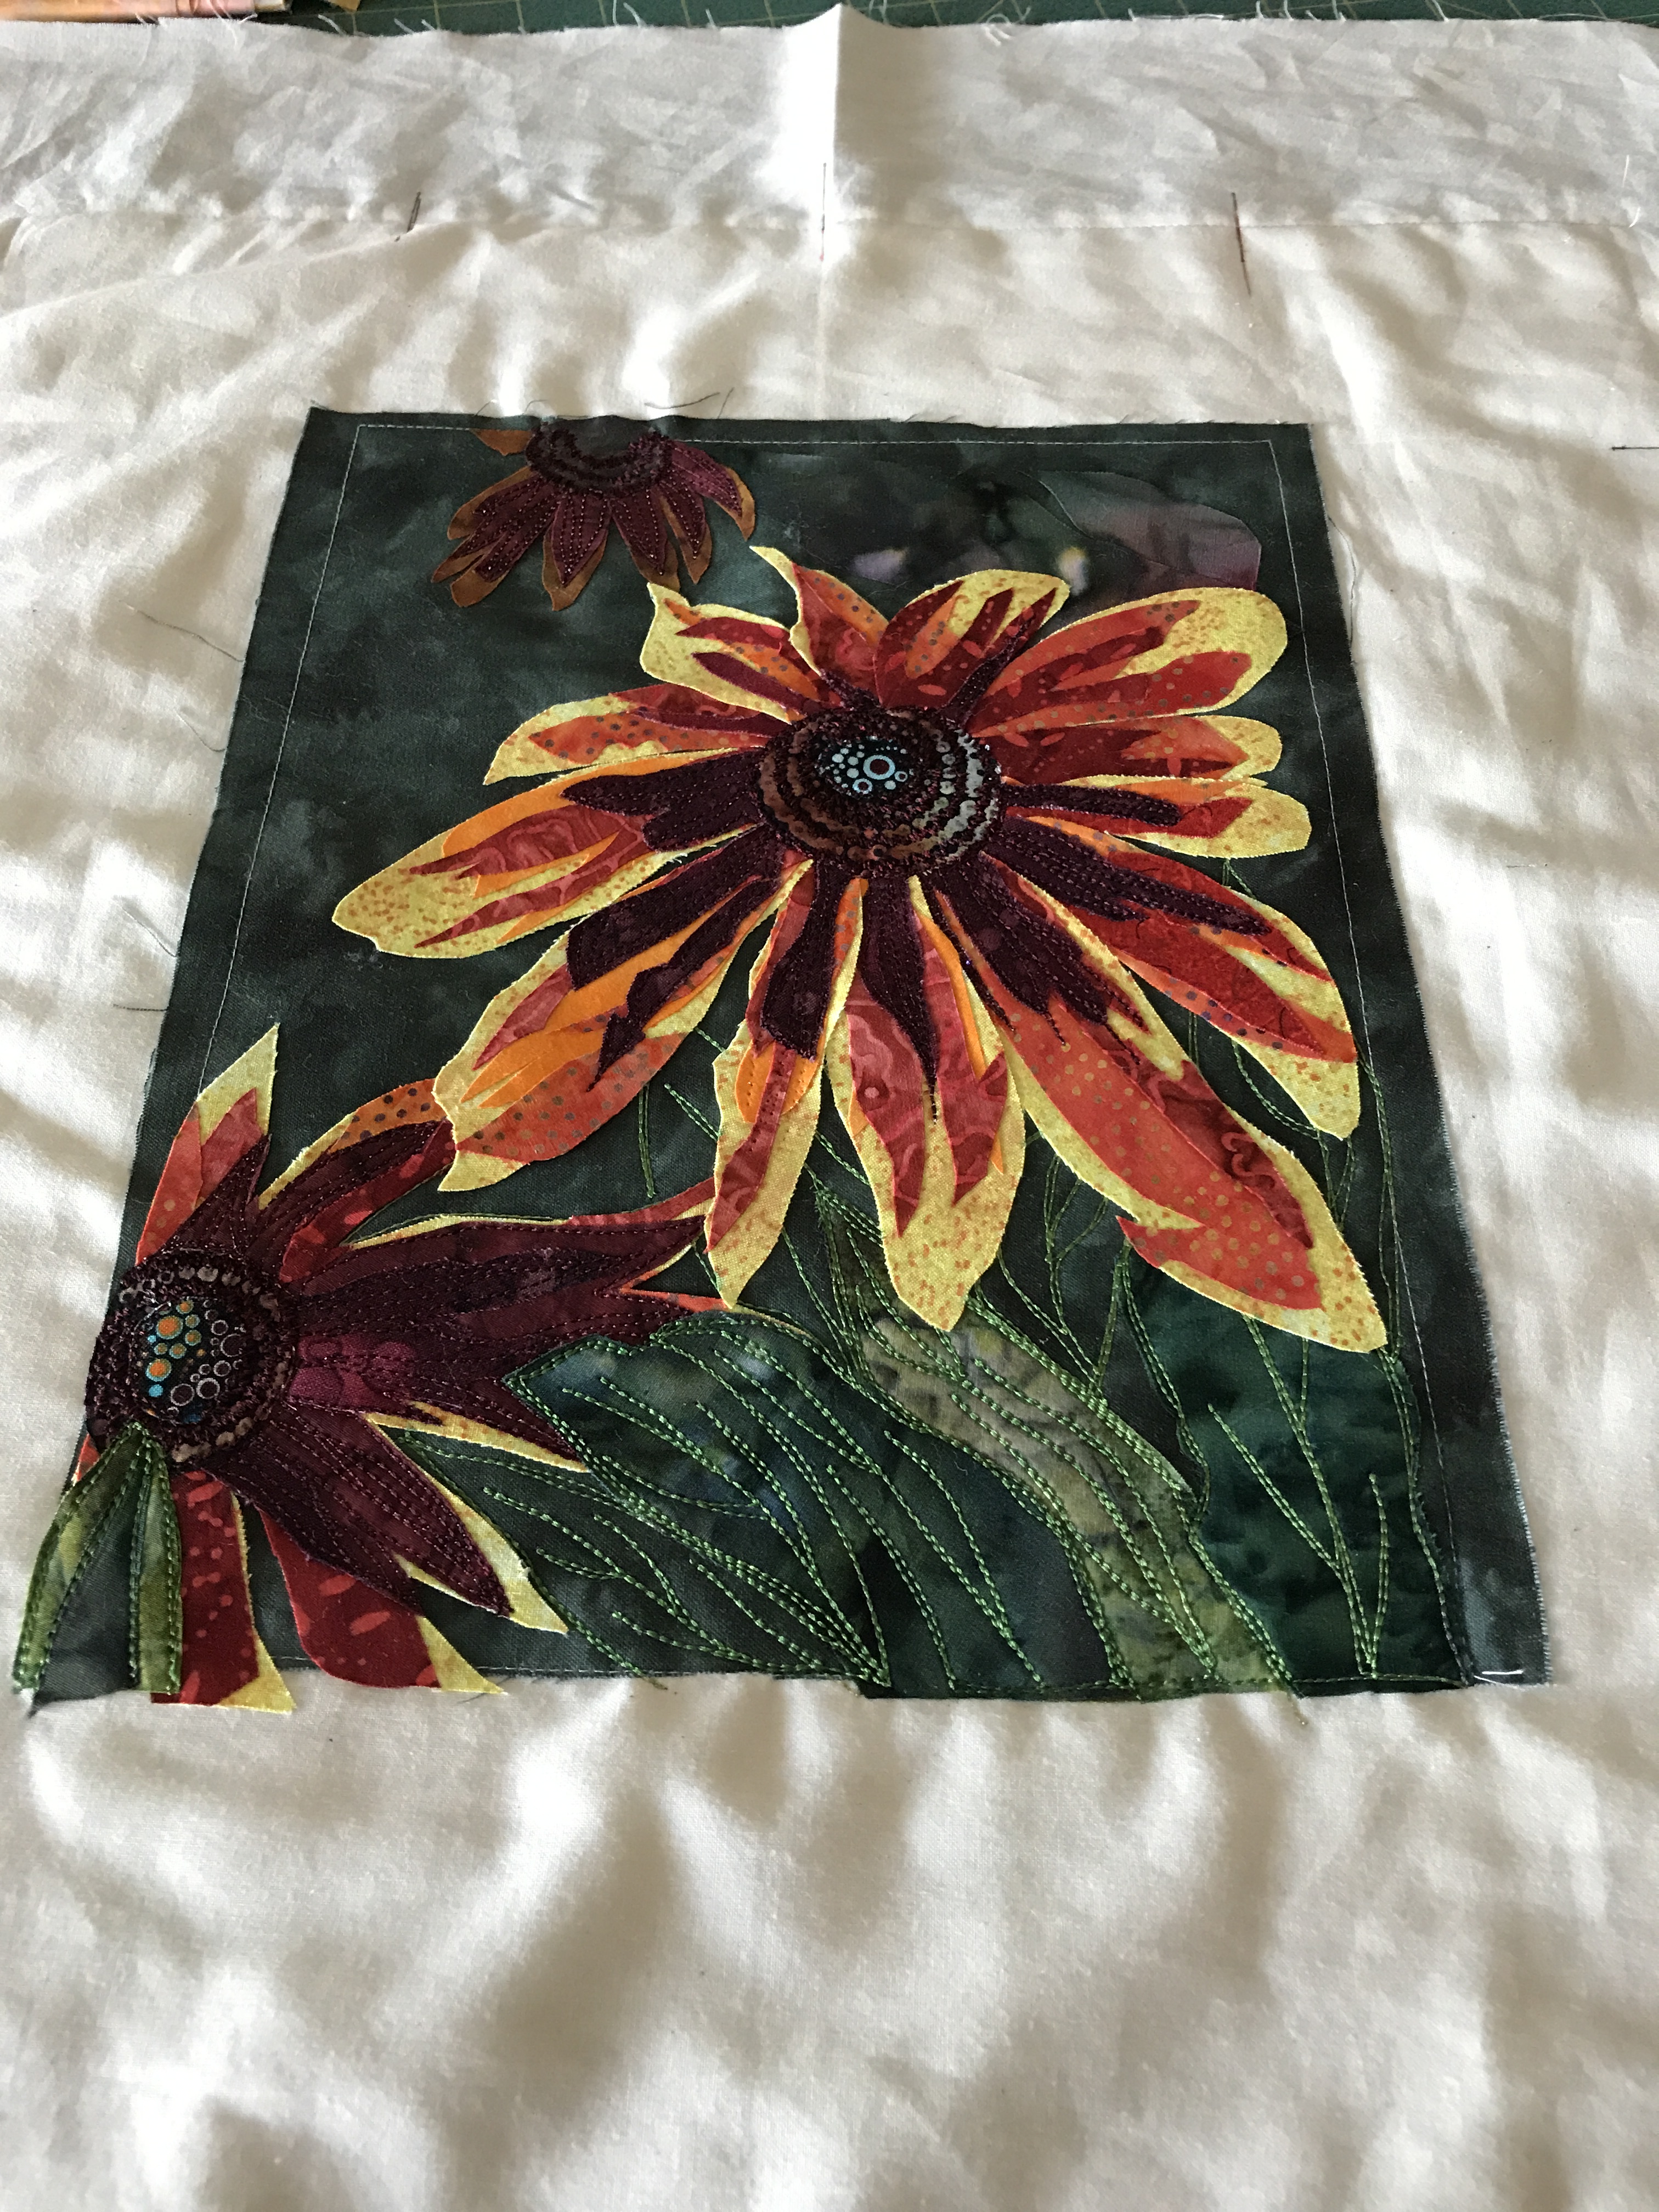
Applique Fused, Partially Stitched
And then the thread painting began. I started in the middle of the main flower and worked my way out from dark thread to the light. I worked at my machine for a couple of hours each day until I finished the detail stitching this afternoon.
Here is the back of finished piece – you can see how much stitching it required to complete the work.

Thread Painting From Back
Final decision – the piece is a work of art, it needs a signature and date. I set up an embroidery on my computer, transferred it to my embroidery machine and used my metal hoop (which uses magnets to hold the fabric in place). I carefully measured where I wanted my signature to go, then holding my breath hit the embroider button. It came out fine.
This is the finished piece (I still have to hand stitch the invisible binding in place which I’ll do this evening). Final dimensions: 9″ x 12″ – it’s a small piece but a lot of work.
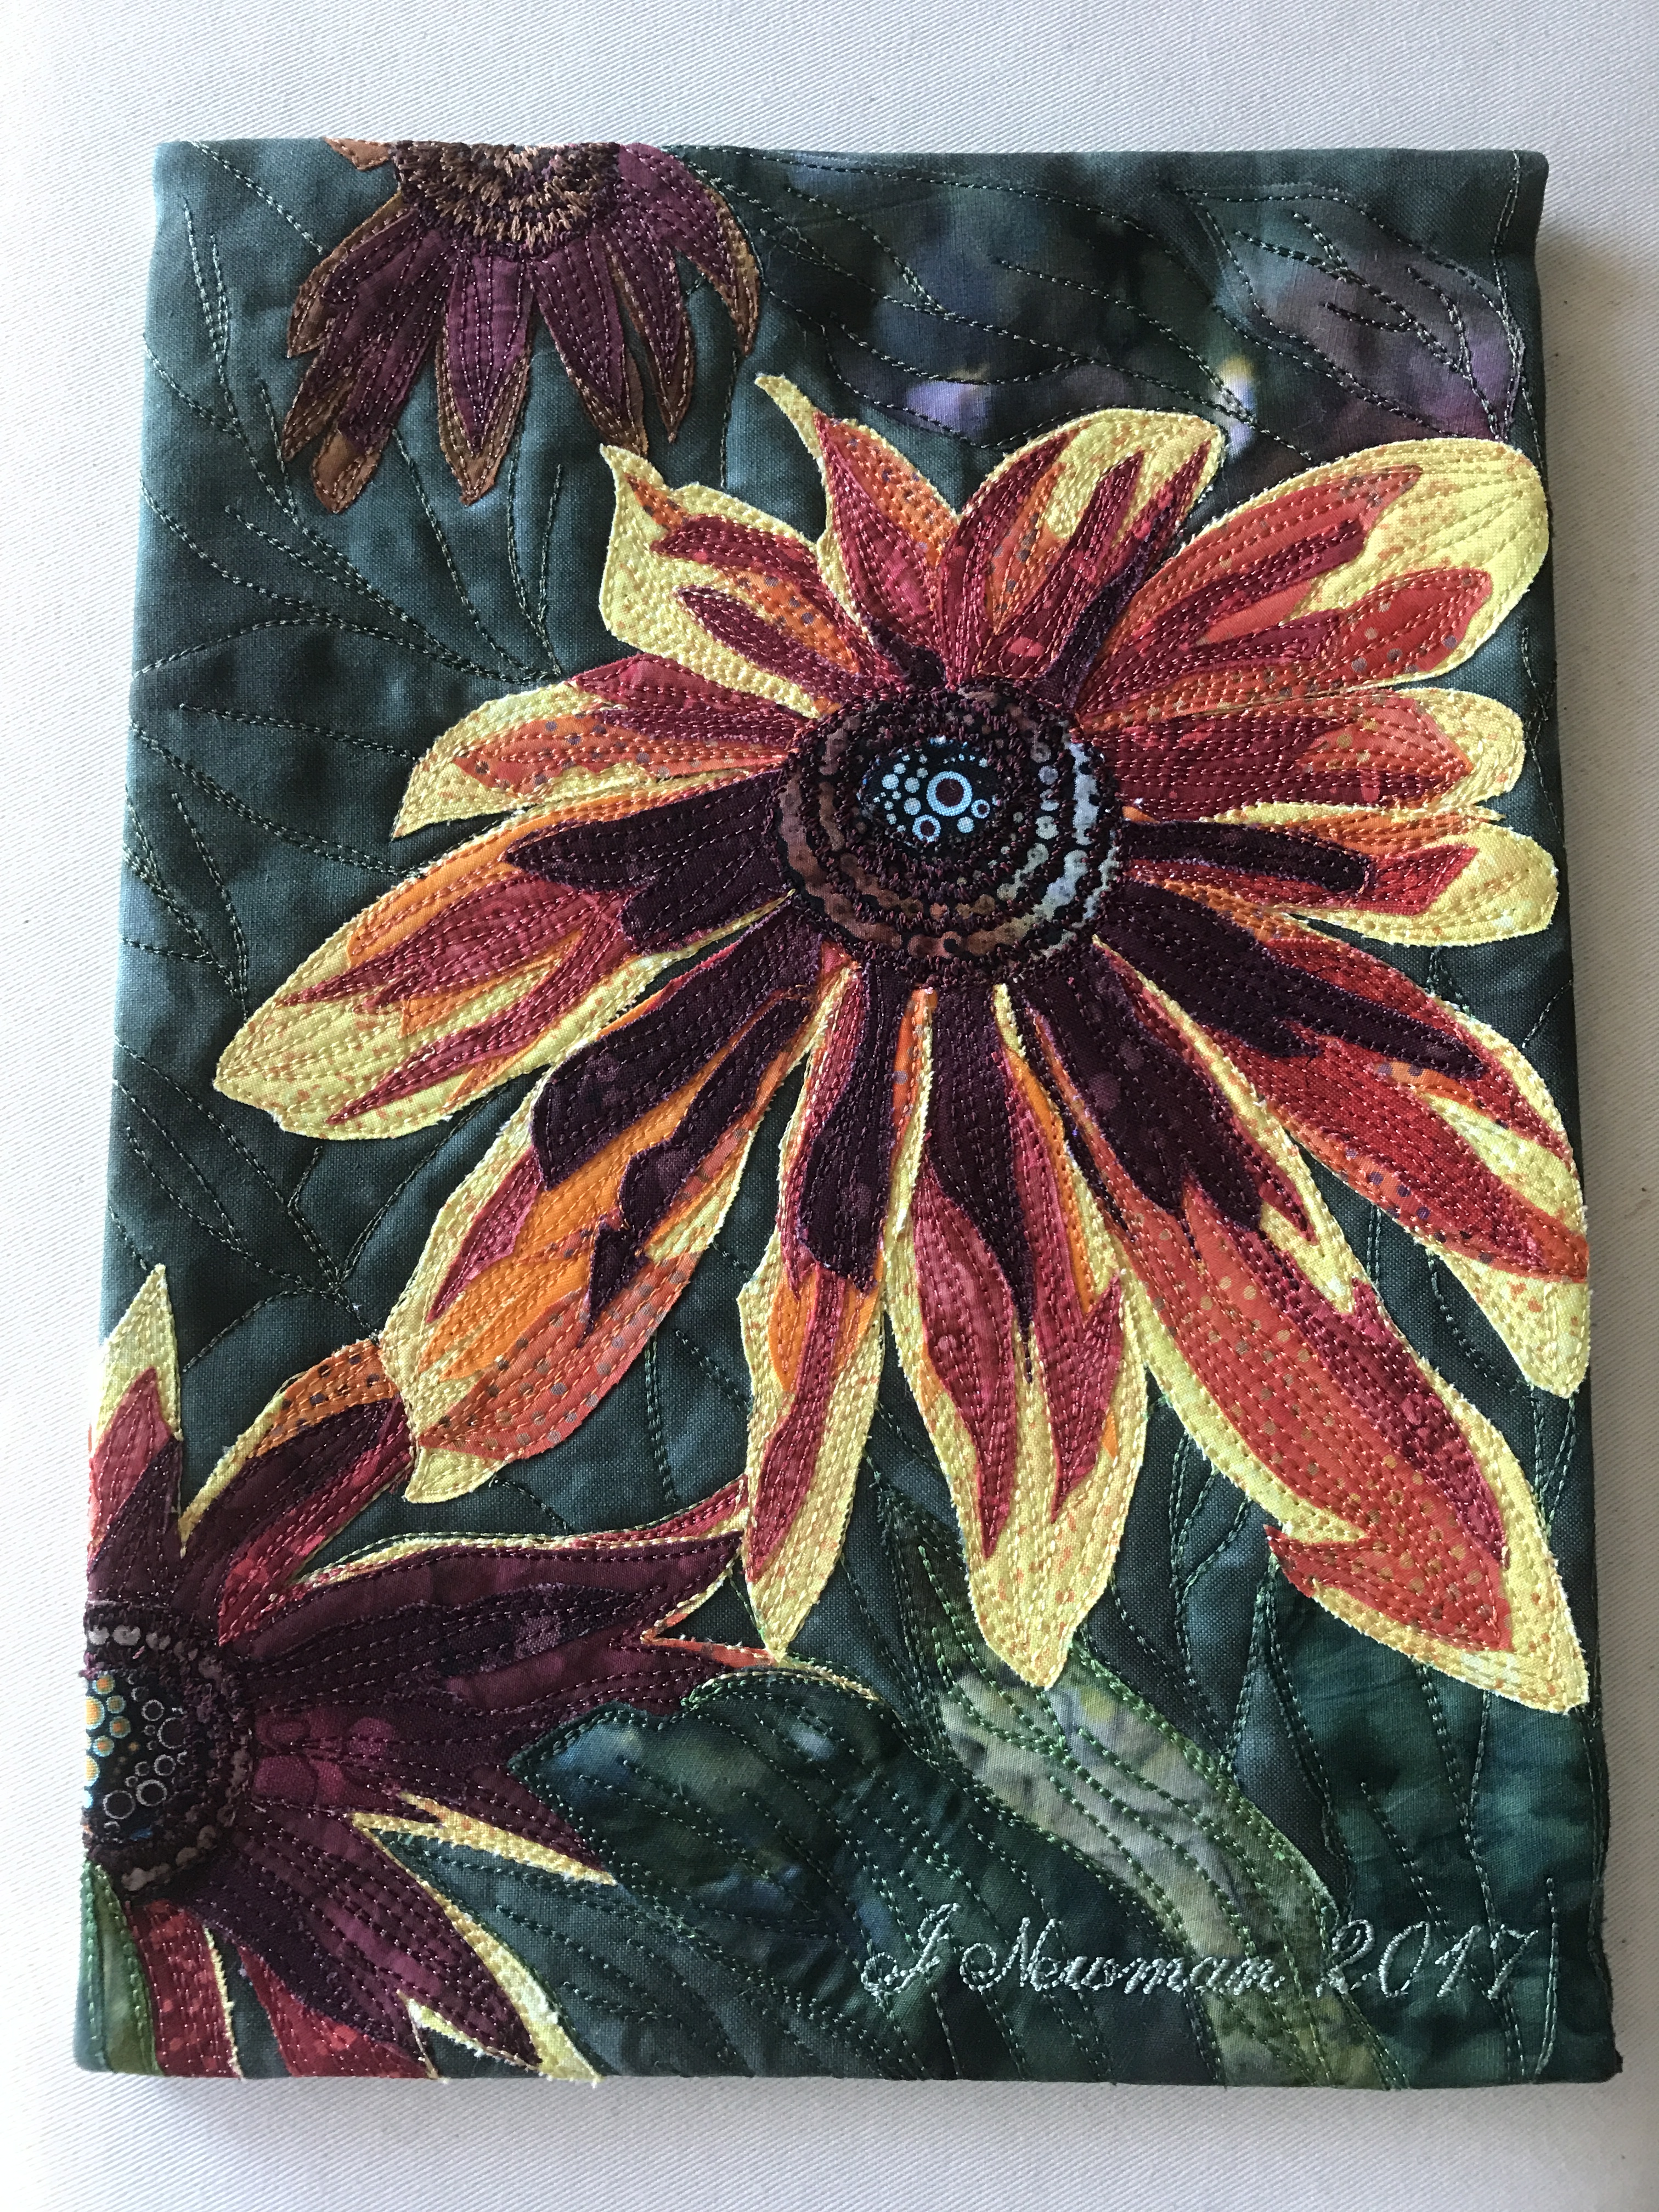
Rudebeckia Completed
That’s one piece completed and three more to go before June 6.

Rudebeckia
I’ve started this appliqué piece from a photo of a large textile art piece by Kate Themel. Mine is going to be small – finished size ~ 9″ 12″. I’m doing it as one of several examples of textile art for a class I’m teaching in June. I decided to use this image because it’s obvious where the colour demarkations are – they are often hard to see when you’re not used to looking at photos for that detail. To emphasize the colour layers I often print my photos (or enlarged photo elements) in black and white so I can distinguish contrasting tones. I will do that in another of the examples to illustrate how that is done.
Here, I began by tracing the main image areas thinking about the fabric layers I’d need. Then I pulled lots of scraps from my stash in the range of colours I wanted to use, making sure I had lots of contrast.

Rudebeckia 1
Next I set up my working background – a piece of muslin 20″ x 26″ (much larger than the finished art piece just in case I might want to add borders, binding…) backed with Warm ‘n Natural batting. I marked both the horizontal and vertical centres, then marked the dimensions for my finished piece, and stitched along those lines. Although the piece has to built from the background up, I focused on the main flower to begin with, cutting out the petals and the darkest accent from templates I created from the photo.

Rudebeckia 2
Next I added a dark background, fused and stitched it in place. I’ve done some dark leaf cutouts which will be fused in position later. At the moment I’m building up the layers of each petal of the main flower – four to go (I’ve kept each template pinned to the fabric so I know where the petals go later when it’s time to fuse the flower in place). I’ve also chosen fabrics for two background flowers which will be darker, less prominent, than the central one.
Before I can add the main flower, however, I have to thread paint the dark background to suggest foliage, then add the background flowers and thread paint them, add leaves and thread paint them, and finally the main black-eyed susan.
The next small example will be based on Peony by Danny Amazonas:
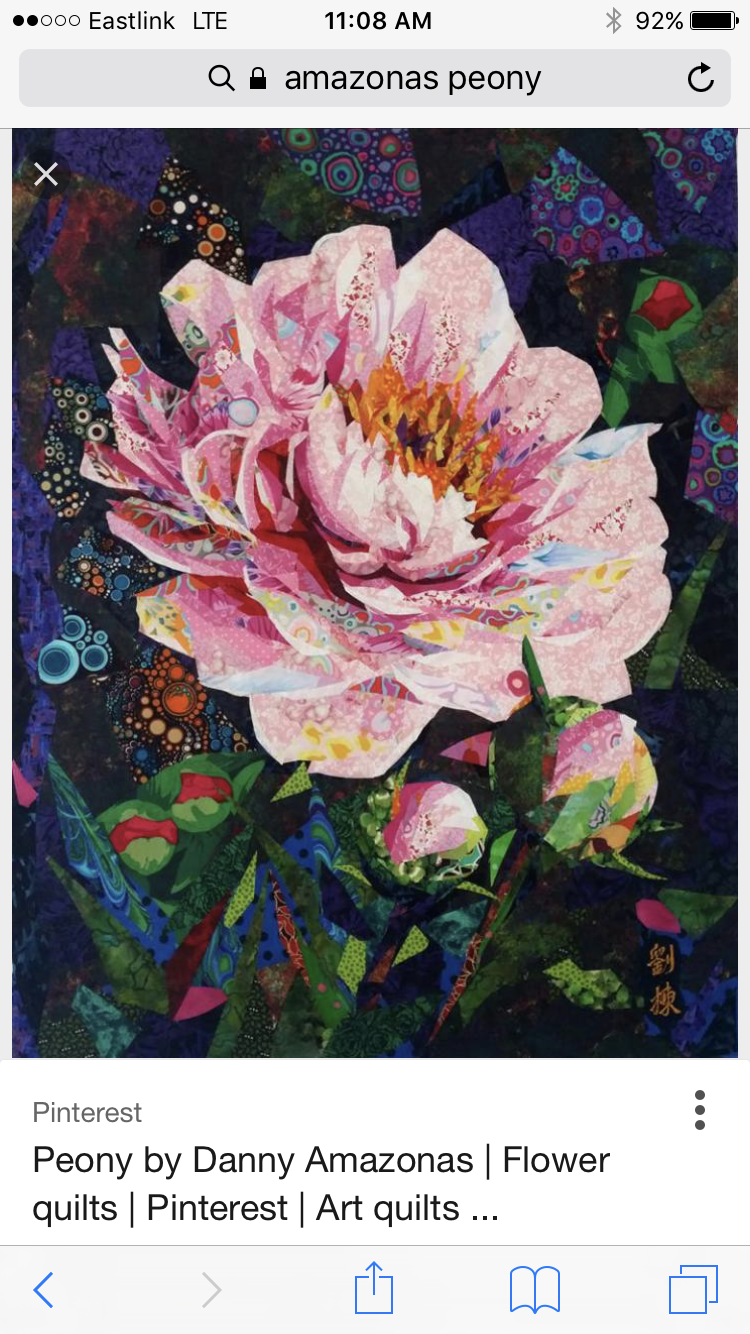
Peony
I’ve chosen this example to illustrate his fused appliqué without thread painting. Again, Amazonas’ piece is quite large, mine will end up a similar size to Rudebeckia – 9″ x 12″, so I won’t be able to include quite as much detail as Amazonas but I will be able to show the building up of the image from background to central focal point.
The example after that will be based on a photo I took a number of years ago:

Fence
This piece will illustrate how to create the effect of light by setting up extreme contrasts – the fence rails will be done using off-white fabric, heavily stitched with both blending and contrasting thread to suggest the shadows. Also I will construct the background at the top of the image using pale fabrics but cover it with one or more layers of pale grey silk organza to suggest the fog and the foreground will require a LOT of thread painting over carefully fussy-cut layers of fabric.

Watching the World
My fourth example may well be based on this photo (with boys positioned to the right rather than the left) to illustrate incorporating photo elements printed on fabric into a textile art piece.
I’ve got my work cut out for me for the next month!
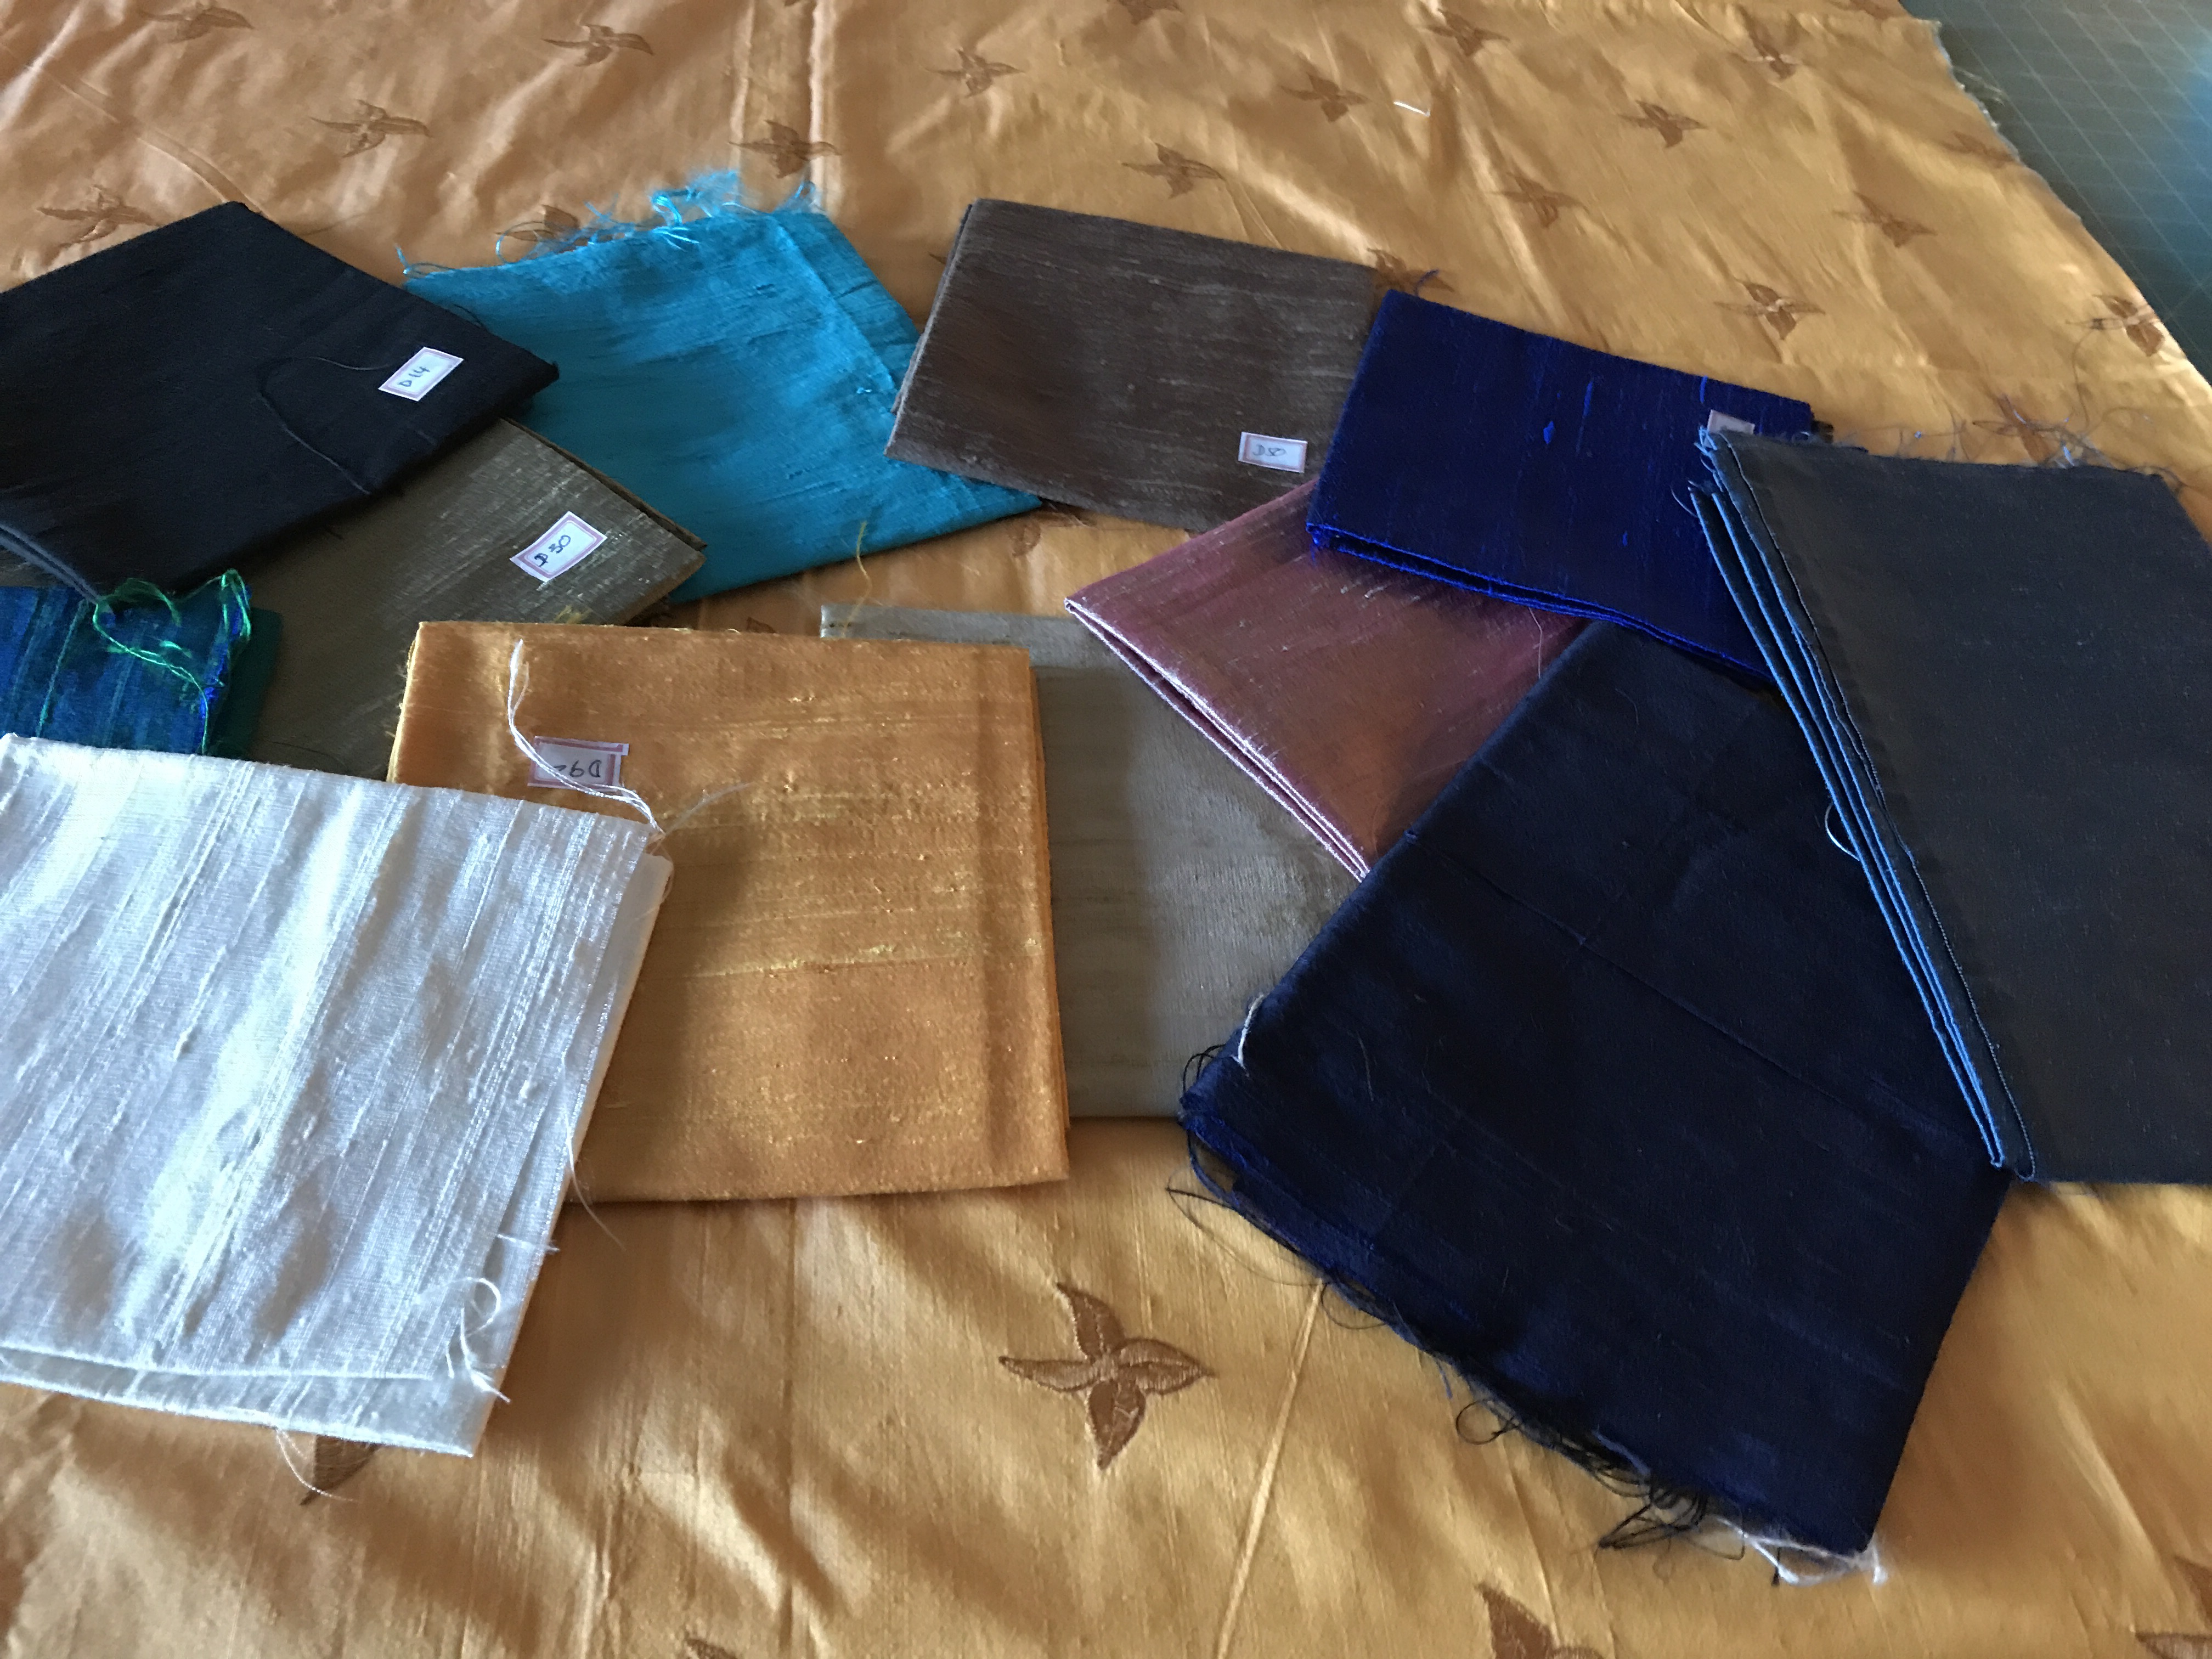 I’ve had this collection of silk dupion (Indian silk) for a while – 2 yd of the golden embroidered fabric and 12 fat quarters in various colors. I want to use it up and get it out of my stash!
I’ve started looking at pictures of quilts for inspiration – I want to end up with a modern, minimalist quilt using the embroidered fabric as background with either half square triangles or narrow strips (or both) for the coloured elements…
I also spent time today going through my personal photos for possible images for the small wall art quilts I need to work on. I still have to go slow – my hand tires easily and I have to listen to it!
Back to work, finally.
This is the quilt I’d been working on before my San Francisco trip. I’d got the piecing done both front and back, had pinned the quilt sandwich and had managed to quilt 24 of 36 embroidery repeats for the quilting. I had no time between returning from San Francisco and my wrist surgery so the unfinished quilt has been sitting on my cutting table taunting me.
This week I decided to see if I could manage to position the embroidery hoop on the quilt – I knew the actual sewing wouldn’t be a problem for my hand but applying the hoop mostly using my left hand I wasn’t so sure about. Turns out I was able to position and tighten the hoop fine so I did a couple of quilting embroideries – then then next day five more, and yesterday I finished up the remaining quilting.

Blues With Green – Front Of Quilt
This morning I created a label for the back and added the binding. So now the quilt is completed. The back is an improvisation – I created a strip of triangular (actually trapezoidal) pieces from the fabrics used to piece the front, done with sashing between the pieces and separating the strip from the backing fabric. I needed a 9″ strip for the backing to be wide enough for the quilt – this was the easiest way to do that. This insert creates a strong, bold contrast to the backing.

Blues With Green – Back of Quilt
My next project will have to be a couple of small art/landscape pieces – by small I mean 10″ x 12″ or so, for a class I’ll be teaching starting June 6. I need to get a couple of different pieces underway so I can demonstrate a variety of techniques people can use for creating textile art.
The plastic surgeon said: “If it hurts, stop doing it!” Good advice – listen to my wrist and judge what I can do by how it feels.
Still a bit of discomfort but not much pain to speak of. My hand remains a bright pink from the antiseptic – I haven’t been able to wash it with the dressing on (the dressing comes off tomorrow).

Progress…
I managed to shower again (more or less) with one hand – my right hand held high encased in a plastic bag with an elastic band around my wrist – not supposed to get the dressing wet until I take it off. Brushed my teeth, dressed myself, all with less struggle than yesterday.
One of my neighbours brought me stewed lamb for lunch (I love lamb) – I was actually able to pick up a fork in my right hand and eat – when I started feeling the strain I switched to my left hand but I can see I’ll be able to use my right for more tasks quite quickly – just NO lifting of anything more than 1/2 lb for a couple of weeks.
Another day and I might actually be able to drive my standard transmission car. I plan on visiting the vehicle in the garage tomorrow to see if using my fingers and arm lets me manoeuvre the gear shift without putting undue strain on my wrist – if I can pass that test, I’ll take the car out for errands. However, if there’s any pain, I will STOP doing it. I heard the surgeon loud and clear!

Post Surgery
No sewing or knitting for a while – had carpet tunnel surgery on my right hand (my dominant hand) yesterday morning. While I can move my fingers a bit, any movement of my wrist is uncomfortable, occasionally painful. All day yesterday and for the next two days I need to keep my hand elevated – as if I were doing a royal wave – to prevent swelling and reduce pain.
It’s astonishing how many tasks I can’t do – brushing my teeth with my left hand is a joke, pulling up my jeans and doing up the button on the top – a definite challenge. I start reaching to do something with my right hand, stop myself midway and change hands – but my left hand has very little fine motor control. And for the next few days I can’t drive my standard shift car. I’m hoping maybe by the weekend I’ll have more use of my right hand fingers so I can move the gear shift but for now I’m house bound or dependent on the generosity of friends to taxi me about.
The dressing comes off on Friday, the sutures come out ten days after that. By then, the discomfort should have subsided enough for me to function more normally. I’ve got my fingers crossed that now I might get back some function in my thumb – the numbness at my fingertips is definitely receded, if not yet completely gone, which bodes well for my return to reasonable function of my right hand.

