Floral Collage – Finished

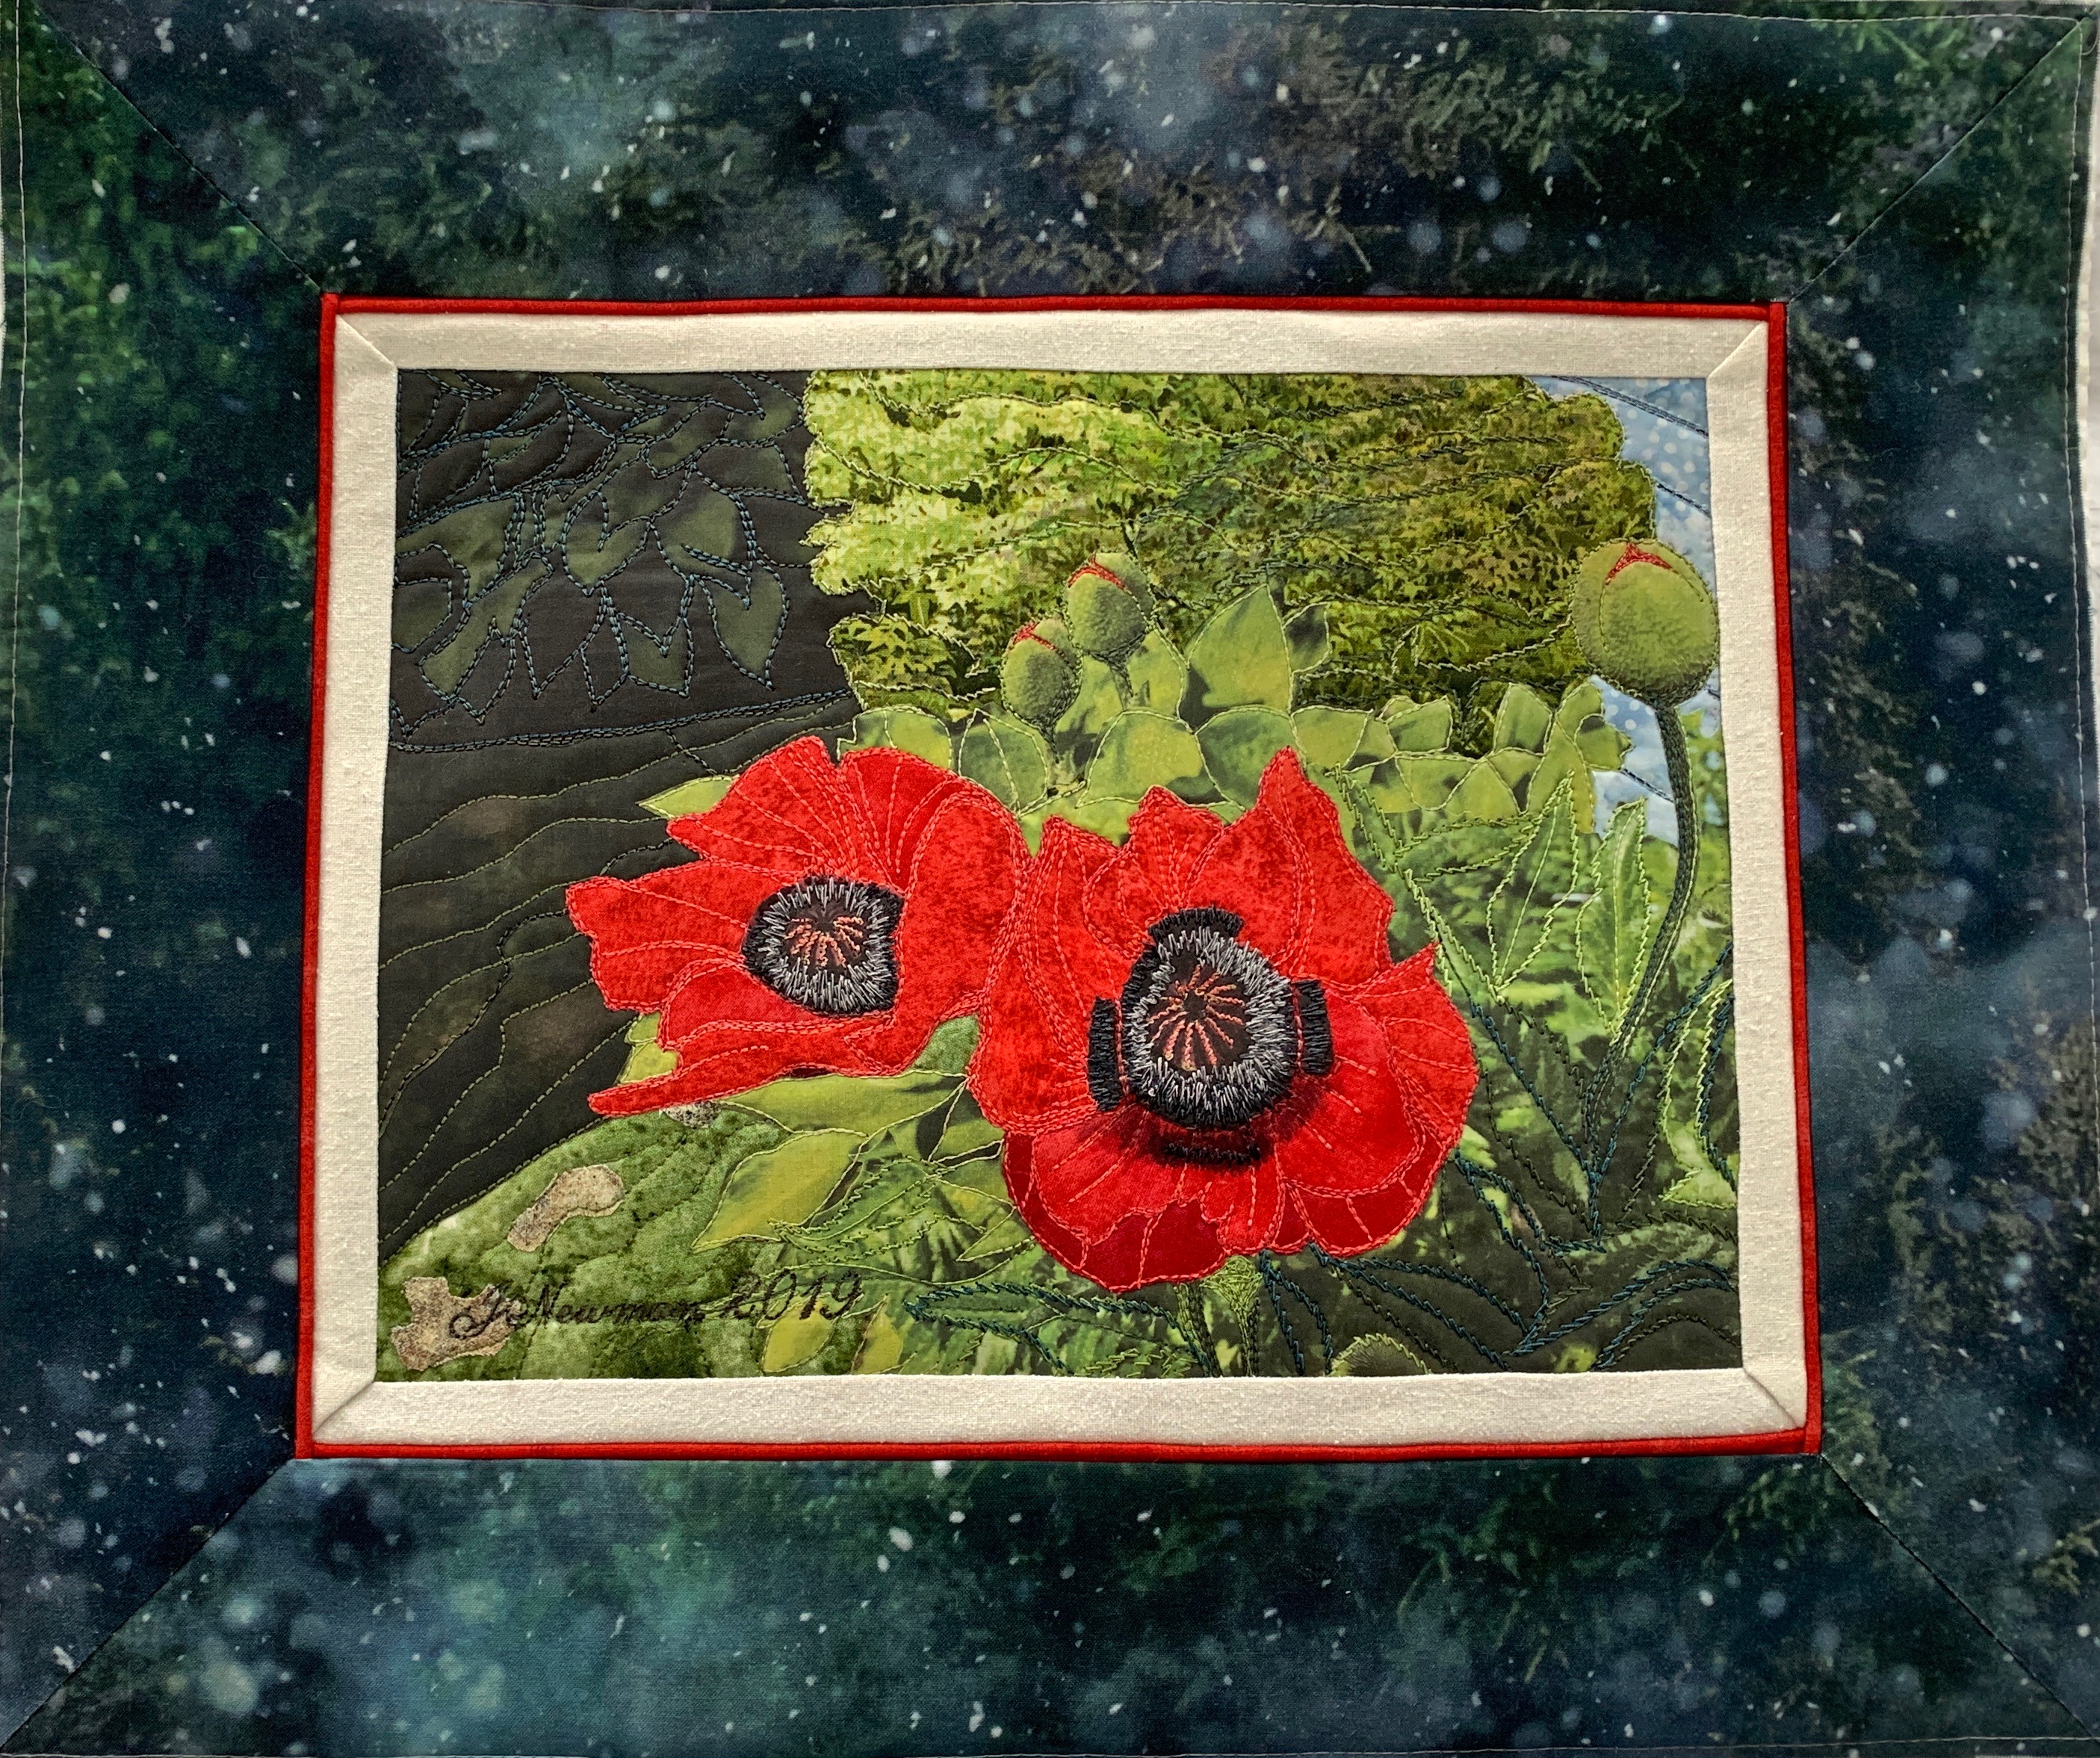
I also finished the floral collage this morning. I resumed thread painting when I got back from Toronto (visiting family) – adding stitching to the leaves, flower petals, and using an embroidery stitch I modified to provide a shaped satin stitch for the stamens. It’s not obvious, but I did quite a bit of stitching on this piece.

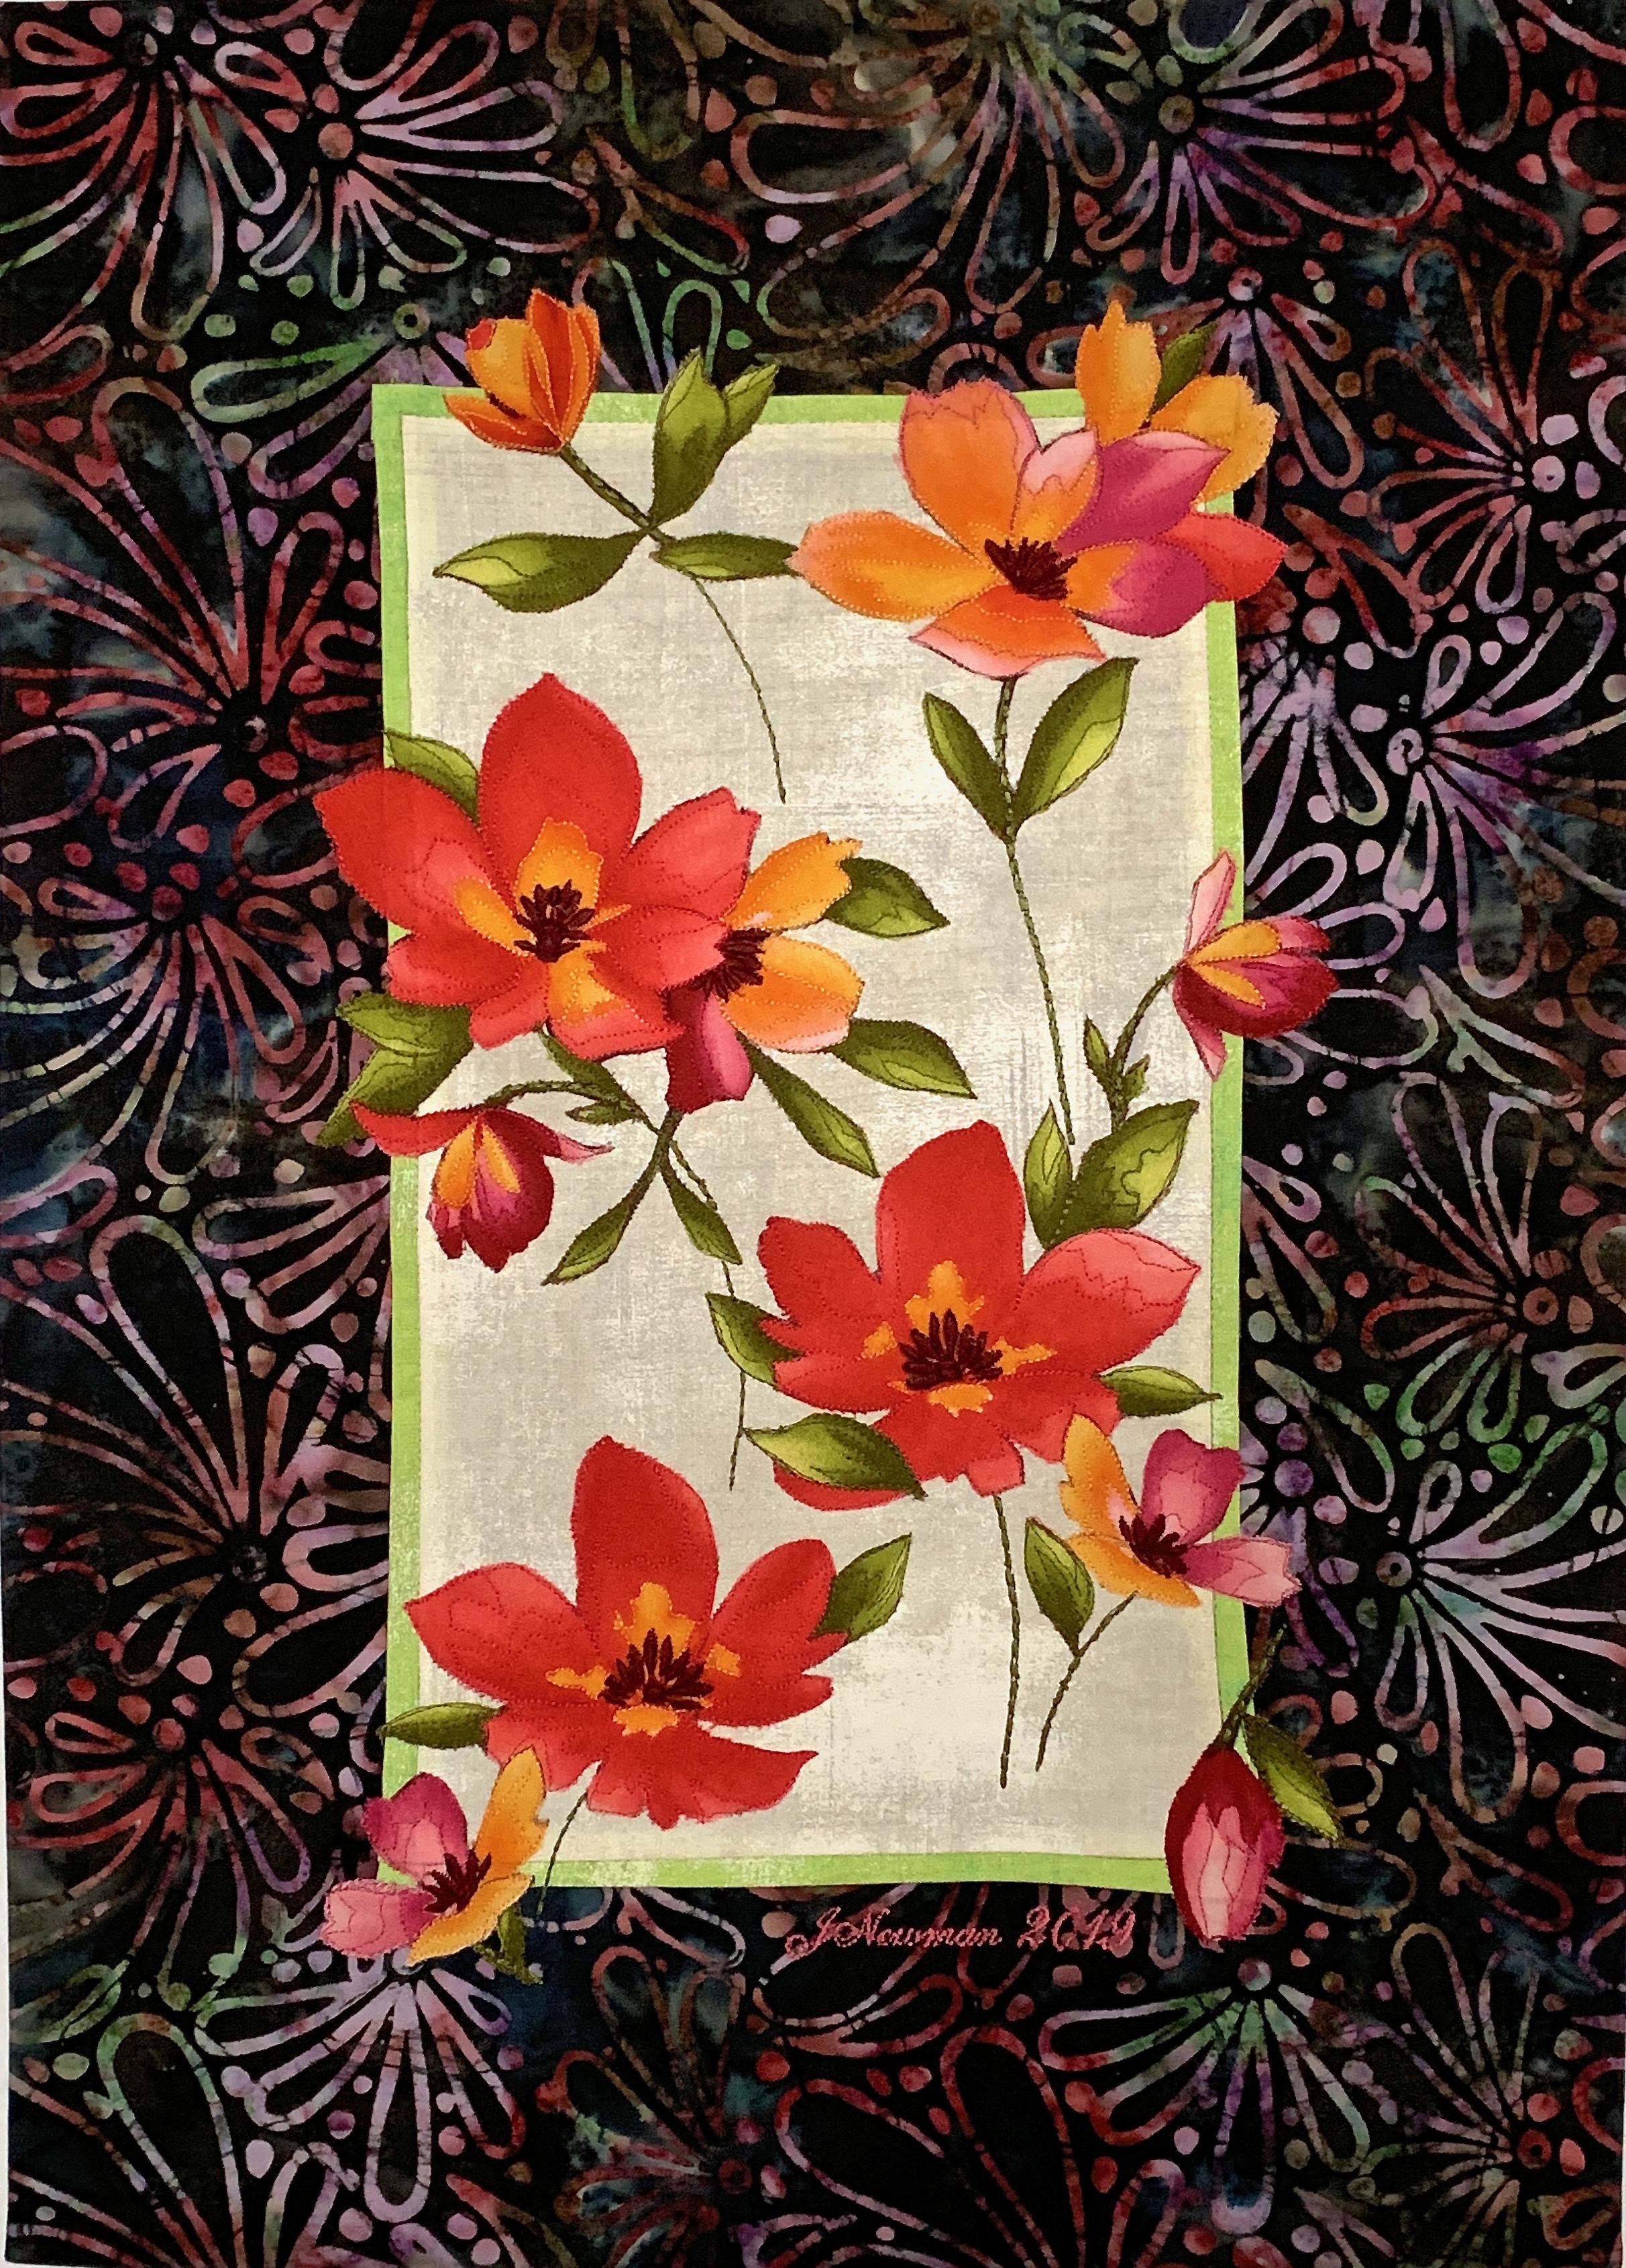
Floral Collage -m Finished

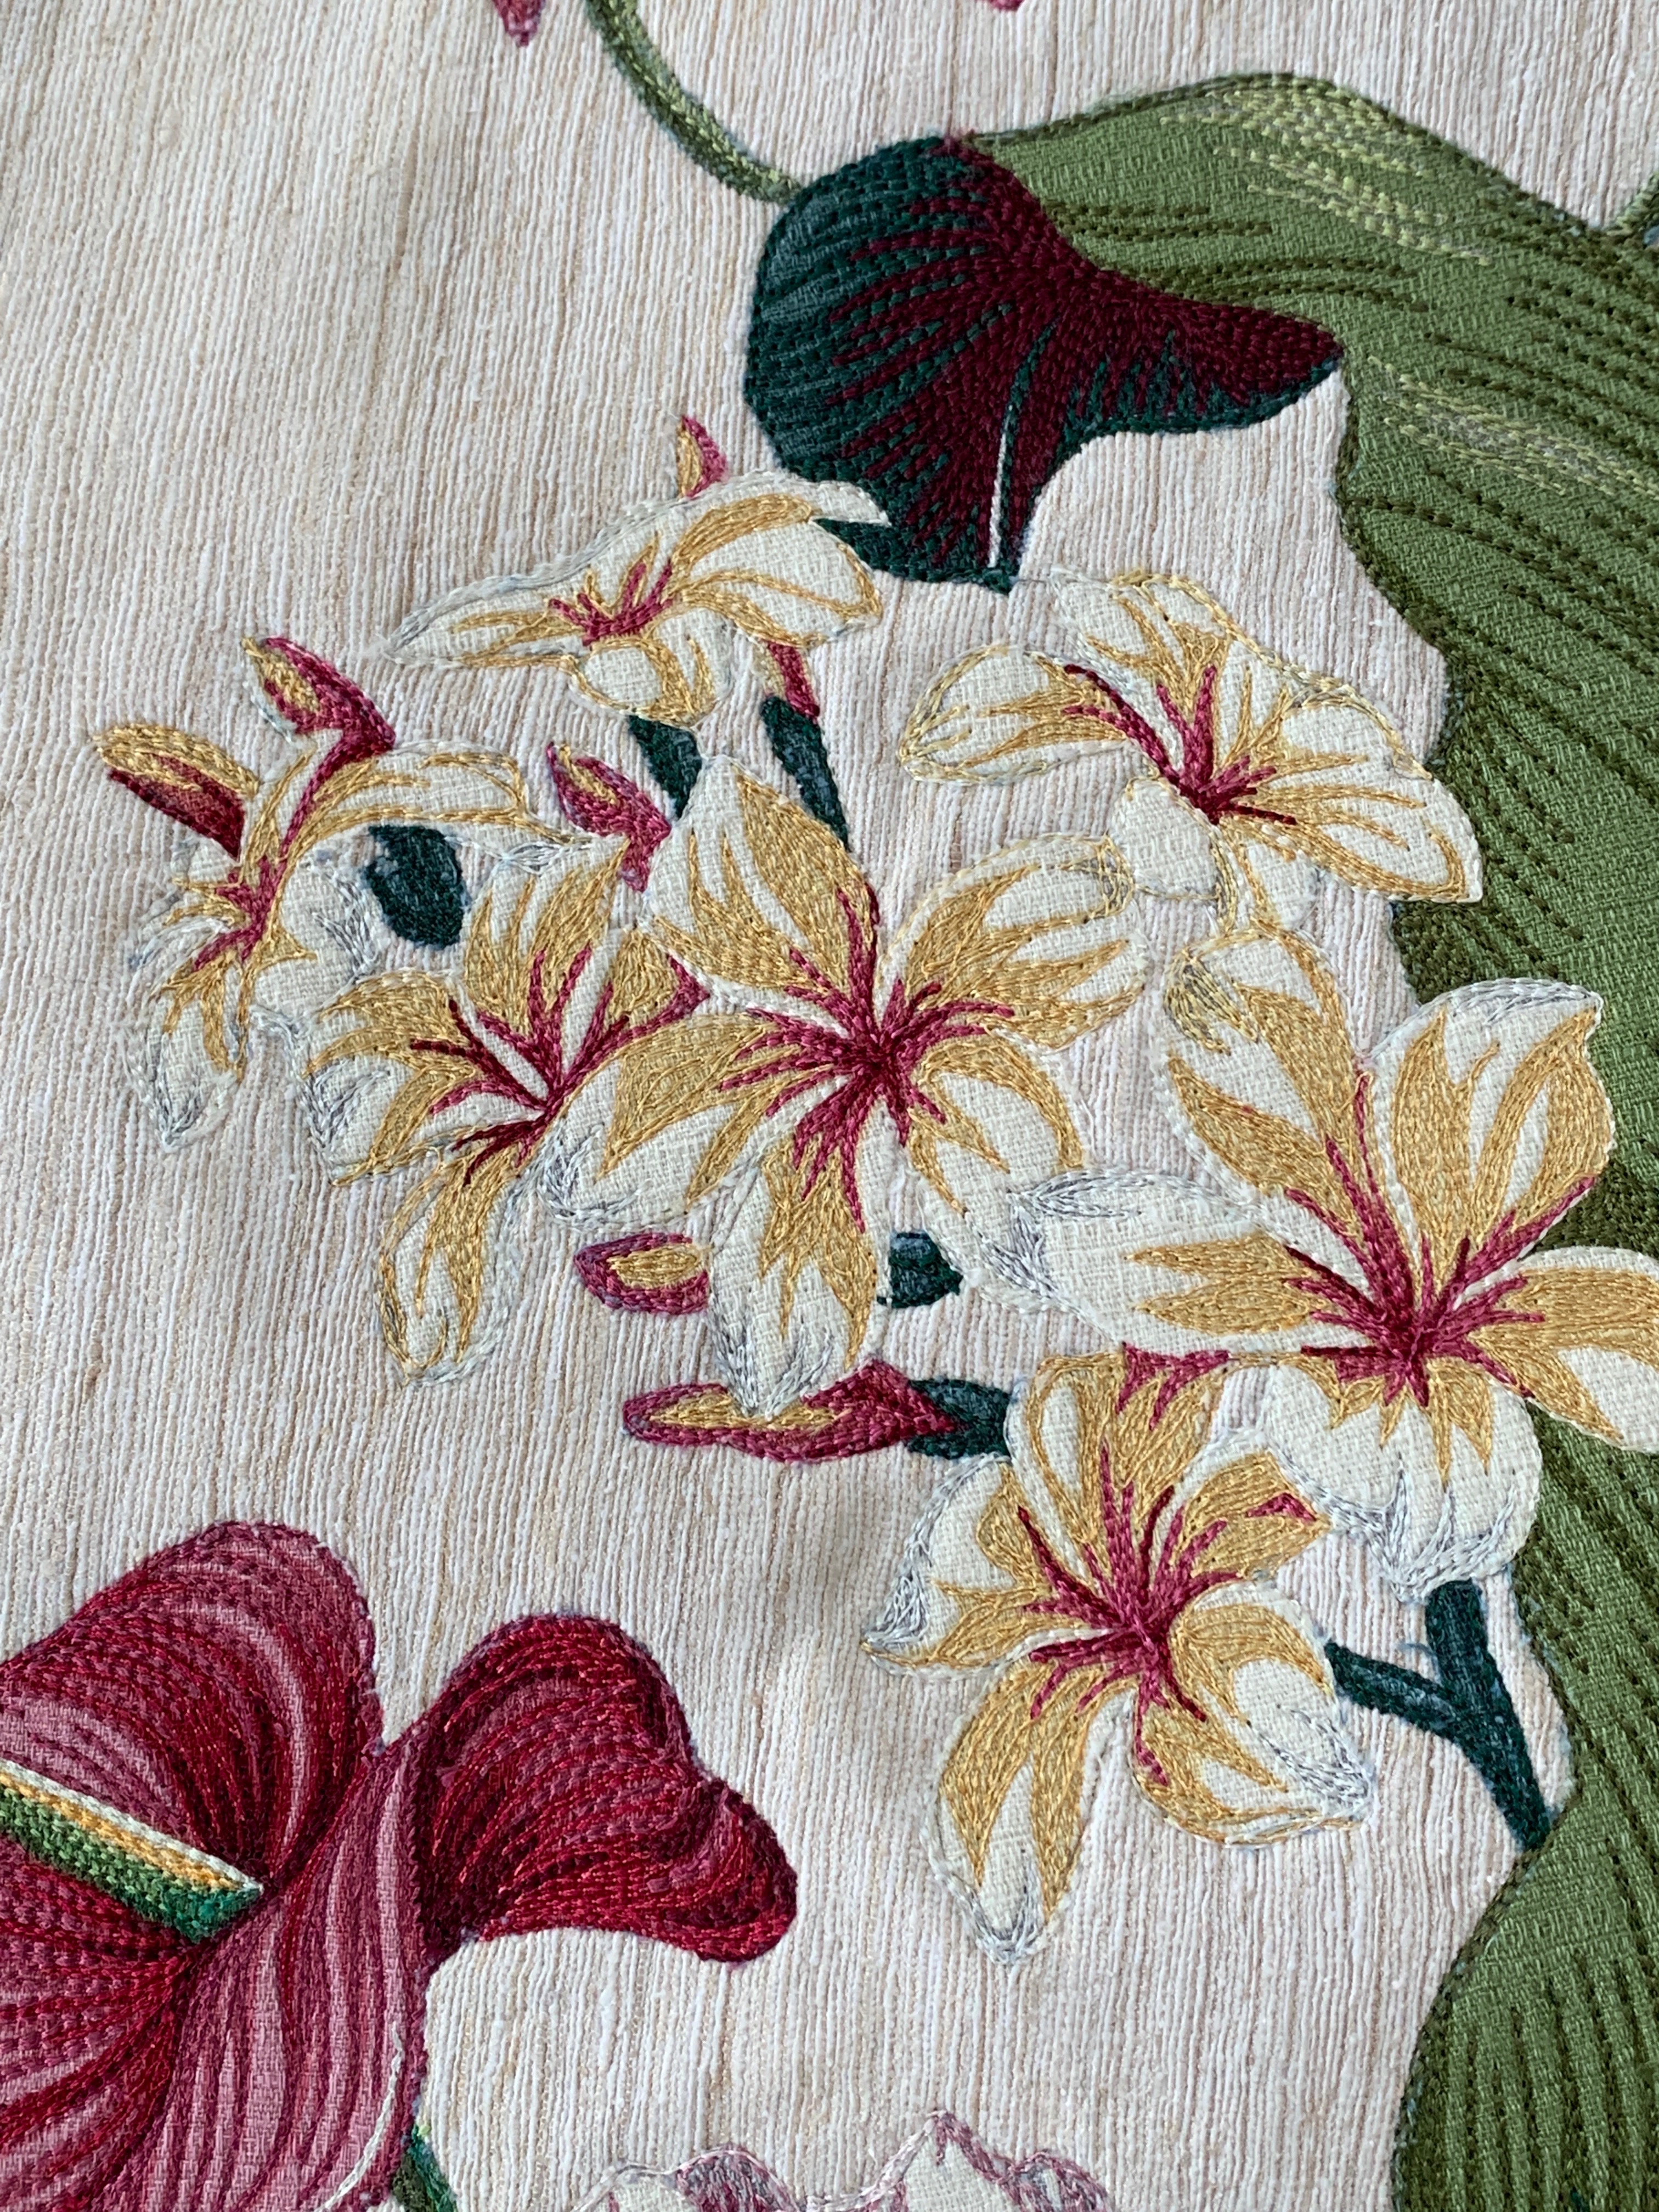
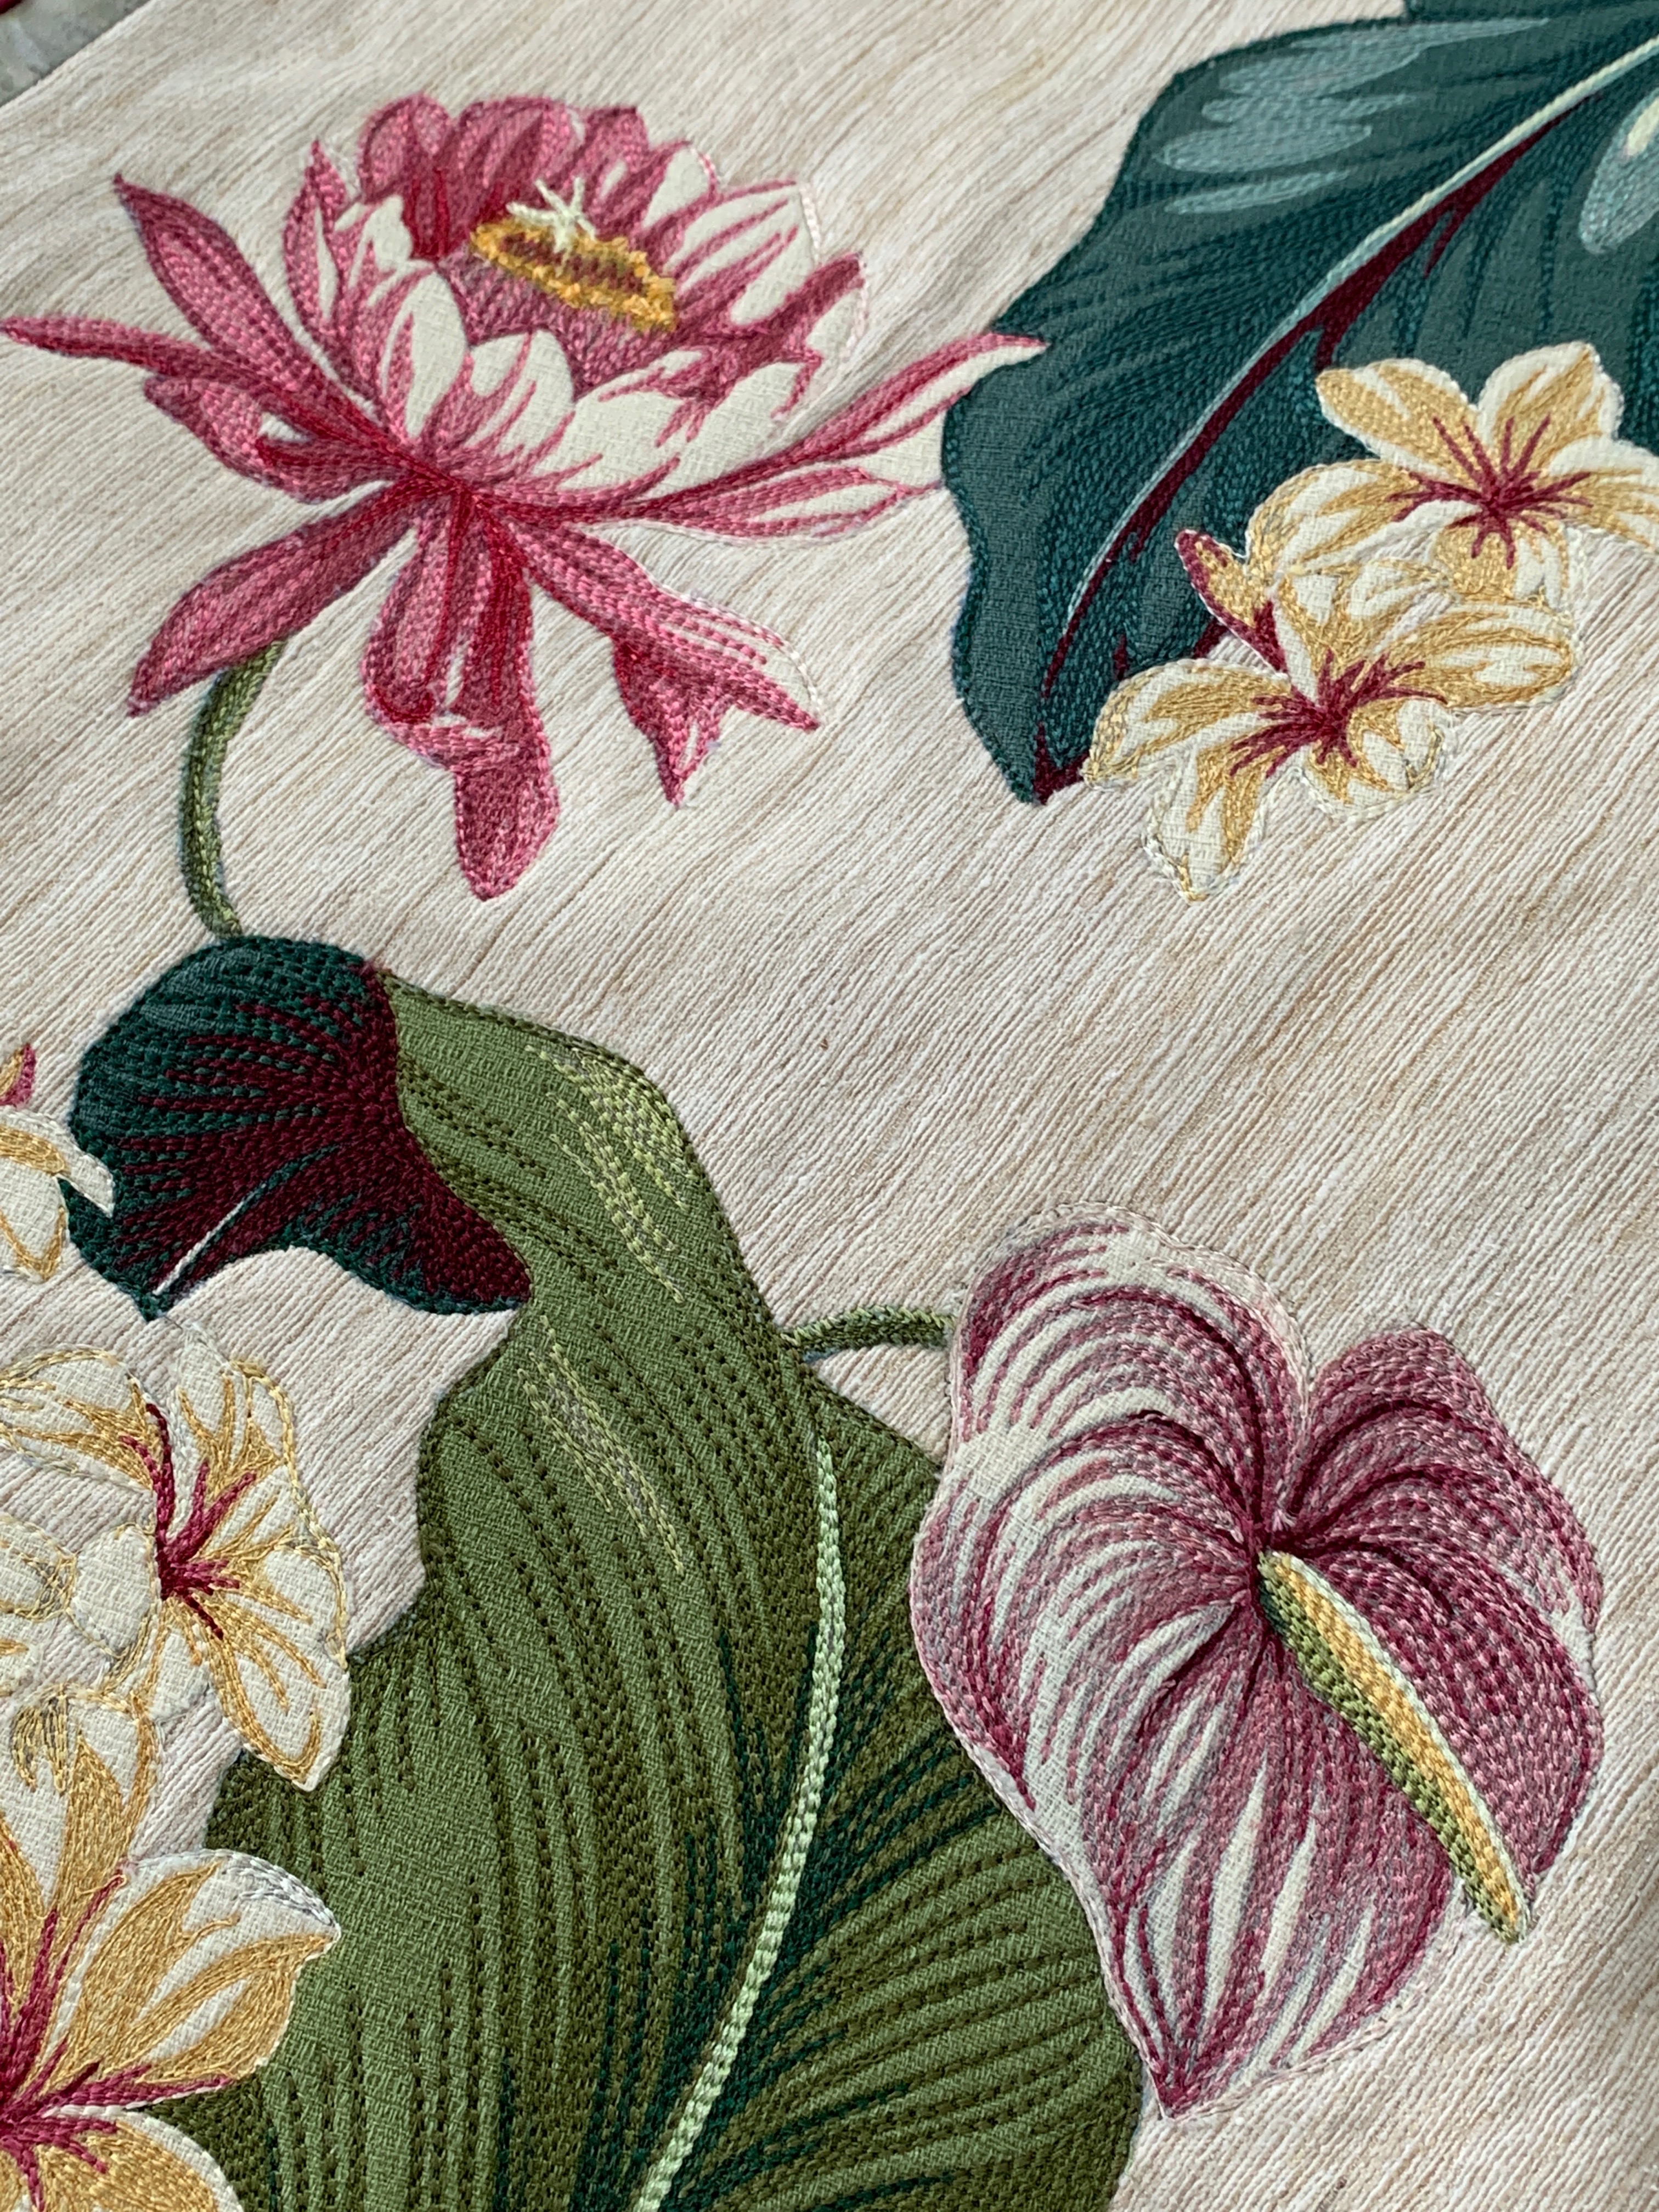
I wasn’t sure whether I liked the “raw edge” appliqué – I began by stitching the edge with a very narrow blanket stitch but didn’t like how it looked (it didn’t work with this fabric as well as it did with the printed bark cloth I used for Tropical Flowers); in the end I decided to do just a couple of rows of straight stitching (short stitch length, single embroidery thread) as close to the edge as I could get. Up close the raw edge seems to add to the delicacy of the  petals and leaves.

The lime green inner flange works well to tie the leaves and the greens in the bordering fabric together. While the batik is busy, the inner border separation keeps the flowers from being overwhelmed.

I’m pleased with the overall effect. In this piece I decided to have the flowers spill over into the border – this makes them stand out from the background.

The flowers look a bit like Cosmos, but the foliage is wrong. I’ve spent a bit of time trying to identify the blossoms but haven’t come up with anything definitive. The fabric designer may have just improvised.

The wall hanging is finished with a hidden binding. Final size: 14.5″ x 20.5″.

First Real Sign Of Spring


Harbinger Of Spring

First Coltsfoot of 2019

Saw these coltsfoot peeking through last fall’s leaves two days ago – a definite harbinger if spring arriving in NS. These were in a friend’s yard; no sign of any in their spot under the trees near my building. Next sign – forsythia in bloom – likely not for another 10 days.

Fall Day 2007

I’ve worked on this for the last four hours – first stitching in the tree trunks and branches on the left, adding foliage from tiny fabric scraps with fusible web on the back (applied to fabric before cutting it, then stitching branches on the trees on the right. Next, I added some definition to the landscape elements by outlining them. Last I added the figure, fused it in place, then outline stitched the figure and the shading on the clothing.

Fall Morning 2007

That’s as much as I can do for now. What I haven’t figured out how to do is stitch the foliage on the trees and on the ground. The fused scraps are very tiny so stitching around each outline doesn’t seem feasible but I don’t know what to do instead. I have to sleep on that.

And below is the image I started with – background and figure fused.

Fall Day 2007

Morning Conversation IV

I worked on the piece quite a bit filling in background – It’s just about there. I think I’ve decided I’m not going to use the fusible vinyl on the windows – it’s just too difficult to apply successfully and I think even though the vinyl I bought is “matte” the shine will detract from the two men.

Morning Conversation IV

I’m still debating whether to thread paint the background elements completely before adding the men – I will end up with stitching underneath that may show but the stop/starts of thread lines would be smoother because they’d be hidden beneath the final appliqué. I guess I can start on the left of the piece and get as far as I can there, then decide.

Morning Conversation I

To begin – yesterday I completed Poppies – backing, hidden binding – all done. When I stand back from the finished piece, I’m pleased with how it turned out. I wasn’t sure along the way that I wasn’t going to scrap the whole thing, but after finding a fabric I thought would work as an outer border and overstitching some of what I’d done with blue embroidery thread, I feel the whole piece ties together. I’m particularly happy with the poppy centres – the texture there worked well.

Poppies – Finished

Today I turned to the second project – two men enjoying a sunny morning in the public square in Cortona, Tuscany. What captivated me when I took the photo was the gesture of the gentleman in the blue shirt – an absolutely Italian way of signalling I’m saying something important (and if you look closely at his other hand you’ll see a cigarette!).

Morning Conversation

When I laid out the piece, I moved the men from the left to the right side – it’s a balance issue – I felt the focus on the speaker was cut off when the men are positioned on the left – on the right, he’s open to the rest of us.

Morning Conversation – Underway

That move has meant I needed to reposition shop windows. In removing all the other people I’ve had to emphasize the hanging plant on the wall behind the men, the sign and tree bordering the left edge. I still have to figure out how to make the windows (without the advertising) work I a believable way. All challenges to be resolved.

The next steps, having sketched in details so I have a sense of where things should go, will be to fill in the large background elements – the sunshine and shadows on the pavement, the stone wall, the windows and doors,…

As always, it’s a matter of working from far to near, building up layers of fabric so the overlaps work. The last piece to be added will be them men themselves.

I picked out fabrics from my stash that I think will emulate the colour combinations in the photo. I will likely use marker on the grey grunge fabric to suggest the stone structure as a basis for thread painting detail. I’ve cropped the top of the shop windows so I don’t have to worry about store names, although I plan on placing the awning on the shop to the left.

The photo has served as inspiration – I’m not copying it exactly but by rearranging the elements I’m creating an image that feels more focused and balanced and less frenetic.

Poppies – Getting There

Made quite a bit of progress today – having decided to use the blue/green fabric for the border, I chose some blue/teal embroidery thread and overstitched in the dark green areas and while it isn’t sharp in the photo the stitching does tie in the blue of the border.

Thread Painting and Borders Almost Completed

Then I began working on the poppies – finished the centres, did some thread painting on the petals (may still do a bit more), added a bit of red stitching to the opening flower buds. Then I added the wide outer border and blind stitched the mitred corners.

Now I need to cut a piece of muslin for the back, and a couple of strips from the outer border fabric to do a hidden binding.

Poppies – Original Photo

Above is the original photo that served as inspiration for the textile piece. I think I’ve come close to capturing the vibrance of the poppies at the peak of their beauty.

Now to finish the piece and move on to the next one.


Poppies – Conundrum

I have quite a bit of thread painting to do on the poppies – but I started thinking ahead to finishing the piece. I added the silk “matte” and a red piping to enclose the focus on the poppies themselves. I’ve spent quite a lot of time going through my stash, I’ve done it 3-4 times so far, looking for a bordering fabric that will tie the whole together and I’m coming up empty handed.

Conundrum – How To Border/Frame This Piece

I’ve laid a range of fabrics against the piece – black, dark grey, tan, light grey, blue, different shades of green, even shades red and peach – nothing looks quite right. Pale colours darken the poppies; dark colours make the whole seem brighter, but nothing I have seems to work to enhance the image. Everything seems to detract in some way.

Thursday a couple of friends and I made an excursion to Avonport Fabrics – an hour away from Halifax and there I found the Windham “Uncorked” fabrics in a variety of shades including this dark green. In the shop I thought I’d found “the right match” but when I got it home and cut strips I’m not so sure. The fabric blends the many shades of green in the image but it seems to overwhelm it. I’ve cut the fabric for a finished 3″ border/frame – perhaps it should be narrower – say just under 2 inches? That’s why I’ve got the black/tan/greenish fabric outstretched below – trying to see whether the darker fabric would liven up the image.

It’s a conundrum – I plan on thread painting the flowers with orange/peach shades to lighten the poppies and I may have to do more stitching within the greens, as well. Perhaps it’s just that green isn’t a favourite colour of mine and the contrast with the red of the poppies is too “Christmassy”.

At the moment I just don’t know what to do about framing this piece. Frustrating, because I want to get it done and move on to whatever is next….

Poppies II

I’ve been working on this piece for the past couple of days. First the dark green areas, then the various types of foliage. It’s been tricky because poppy leaves are long, thin, and fern-like so stitching them has required quite a bit of decision-making since it’s not possible to actually capture the precise detail – my goal has been to imply the structure using a number of different machine stitches to thread paint them.

Thread Painting – Under Way

This afternoon I started on the flowers themselves. I’ve begun working on the central pistil on the right-hand flower. I have finished the light areas. Tomorrow I’ll get to work on the stamens surrounding the centre – using some combination of greys/tans.

I’ve made progress faster than I thought I would – I expect to finish this piece over the weekend.

Tropical Flowers – I Can’t Believe It’s Finally Done

I finished thread painting yesterday afternoon. I added a muslin backing and hidden binding. This morning I hand stitched the hidden binding in place. After all this time (I actually started this raw-edge appliqué piece on May 17, 2018) I have it completed – absolute done!

Tropical Flowers – Finished!

The project sat around for months while I worked on other things. I started thread painting this piece on Jan 8, 2019 because I was teaching a class on thread painting and had to have something to work on myself. I got into the thread painting seriously after Jan 17 – when I completed the framing (I’d done that early in the process because I wanted the women in the thread painting class to see how I go about finishing my work). I spent time filling in leaves, then flowers. In the beginning, each leaf took a day or three to complete.

I was sure I’d taken on more than I’d expected when I started out. But as days went by I could see I was making headway. Jan 20 – one leaf finished; Jan 22 – a second leaf; Feb 11 – I got back to the piece (after working on some new quilts and planning two wall art pieces) and finished an Anthurium; Feb 12 – more progress; Feb 13, Feb 17, Feb 18, Feb 20 – I continued thread painting elements until yesterday when I stitched the last of the Plumaria!

People often ask – “How long did a particular piece take”? It’s not a simple question. As you can see, I started this piece on a whim back in May, it sat around for several months before I returned to it. The thread painting was slow going to start with but as I made progress I was able to stick with it for longer. When nearing the end I worked on and completed elements in a single sitting (although I felt tension in my neck and upper back).

You can’t see the thread painting in the upper photo – here are photos of the detailed work:

Epiphyllum – Detail


Plumaria – Detail


Anthurium – Detail

I feel a weight lifted having finally completed this work. The gals in the thread painting class are meeting again on March 5 – my piece is done. We’ll spend time that day working on framing and finishing, even if their thread painting isn’t completed. I want to create motivation for finishing their projects.

Tomorrow I’m going to return to Poppies which I began Feb 4. Time to get back to that and to Two Men in Cortona.


Colourful Quilts By Bisa Butler

A friend sent me a link to some wonderful textile art:

Bisa Butler – detail from – “Three Kings” (2018)

You must take a look at her work: “Artist Bisa Butler draws from an array of vibrant patterned fabrics to create portraits of everyday people. She eschews representational colors, favoring layered jewel-toned hues to form the skin of her Black subjects, and often groups figures together into strong silhouettes.”

Her pieces are breathtaking – wild bold fabrics done as raw edge appliqué  and quilted rather loosely following the contours of the elements of her figures. The pieces are large so you’d need huge wall spaces to hang any of them.

I must look through my photos to see if I have anything suitable to try a piece like this.

BTW – scroll down on the link to Butler’s work – you’ll see lots of other unusual textile/fibre art work.

Here’s a second link to more of Lisa Butler’s work: https://www.thisiscolossal.com/2019/09/quilted-portraits-of-black-figures-by-bisa-butler/

I’ve been looking closely at the photos – I think she may be creating shadows and texture using organza on top of the fabric she uses to create the shapes/space. I must try that.