The Quilt Challenge 1

Each year Craftsy offers a BOM (Block of the Month) quilt. I got an email letting me know the 2015 quilt was now available so I took a look at it.

Screen Shot 2015-01-15 at 1.41.44 PM

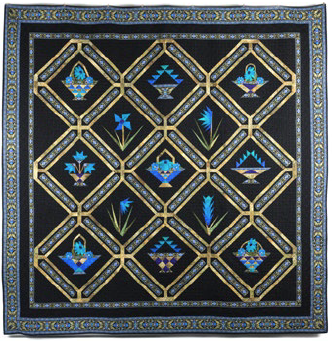
Can’t say I was particularly taken by the dark background but the block elements were interesting and I’m sure would present a challenge. In any case, I did register (it’s for free) and downloaded the January block but didn’t think I’d do anything with this – until yesterday.

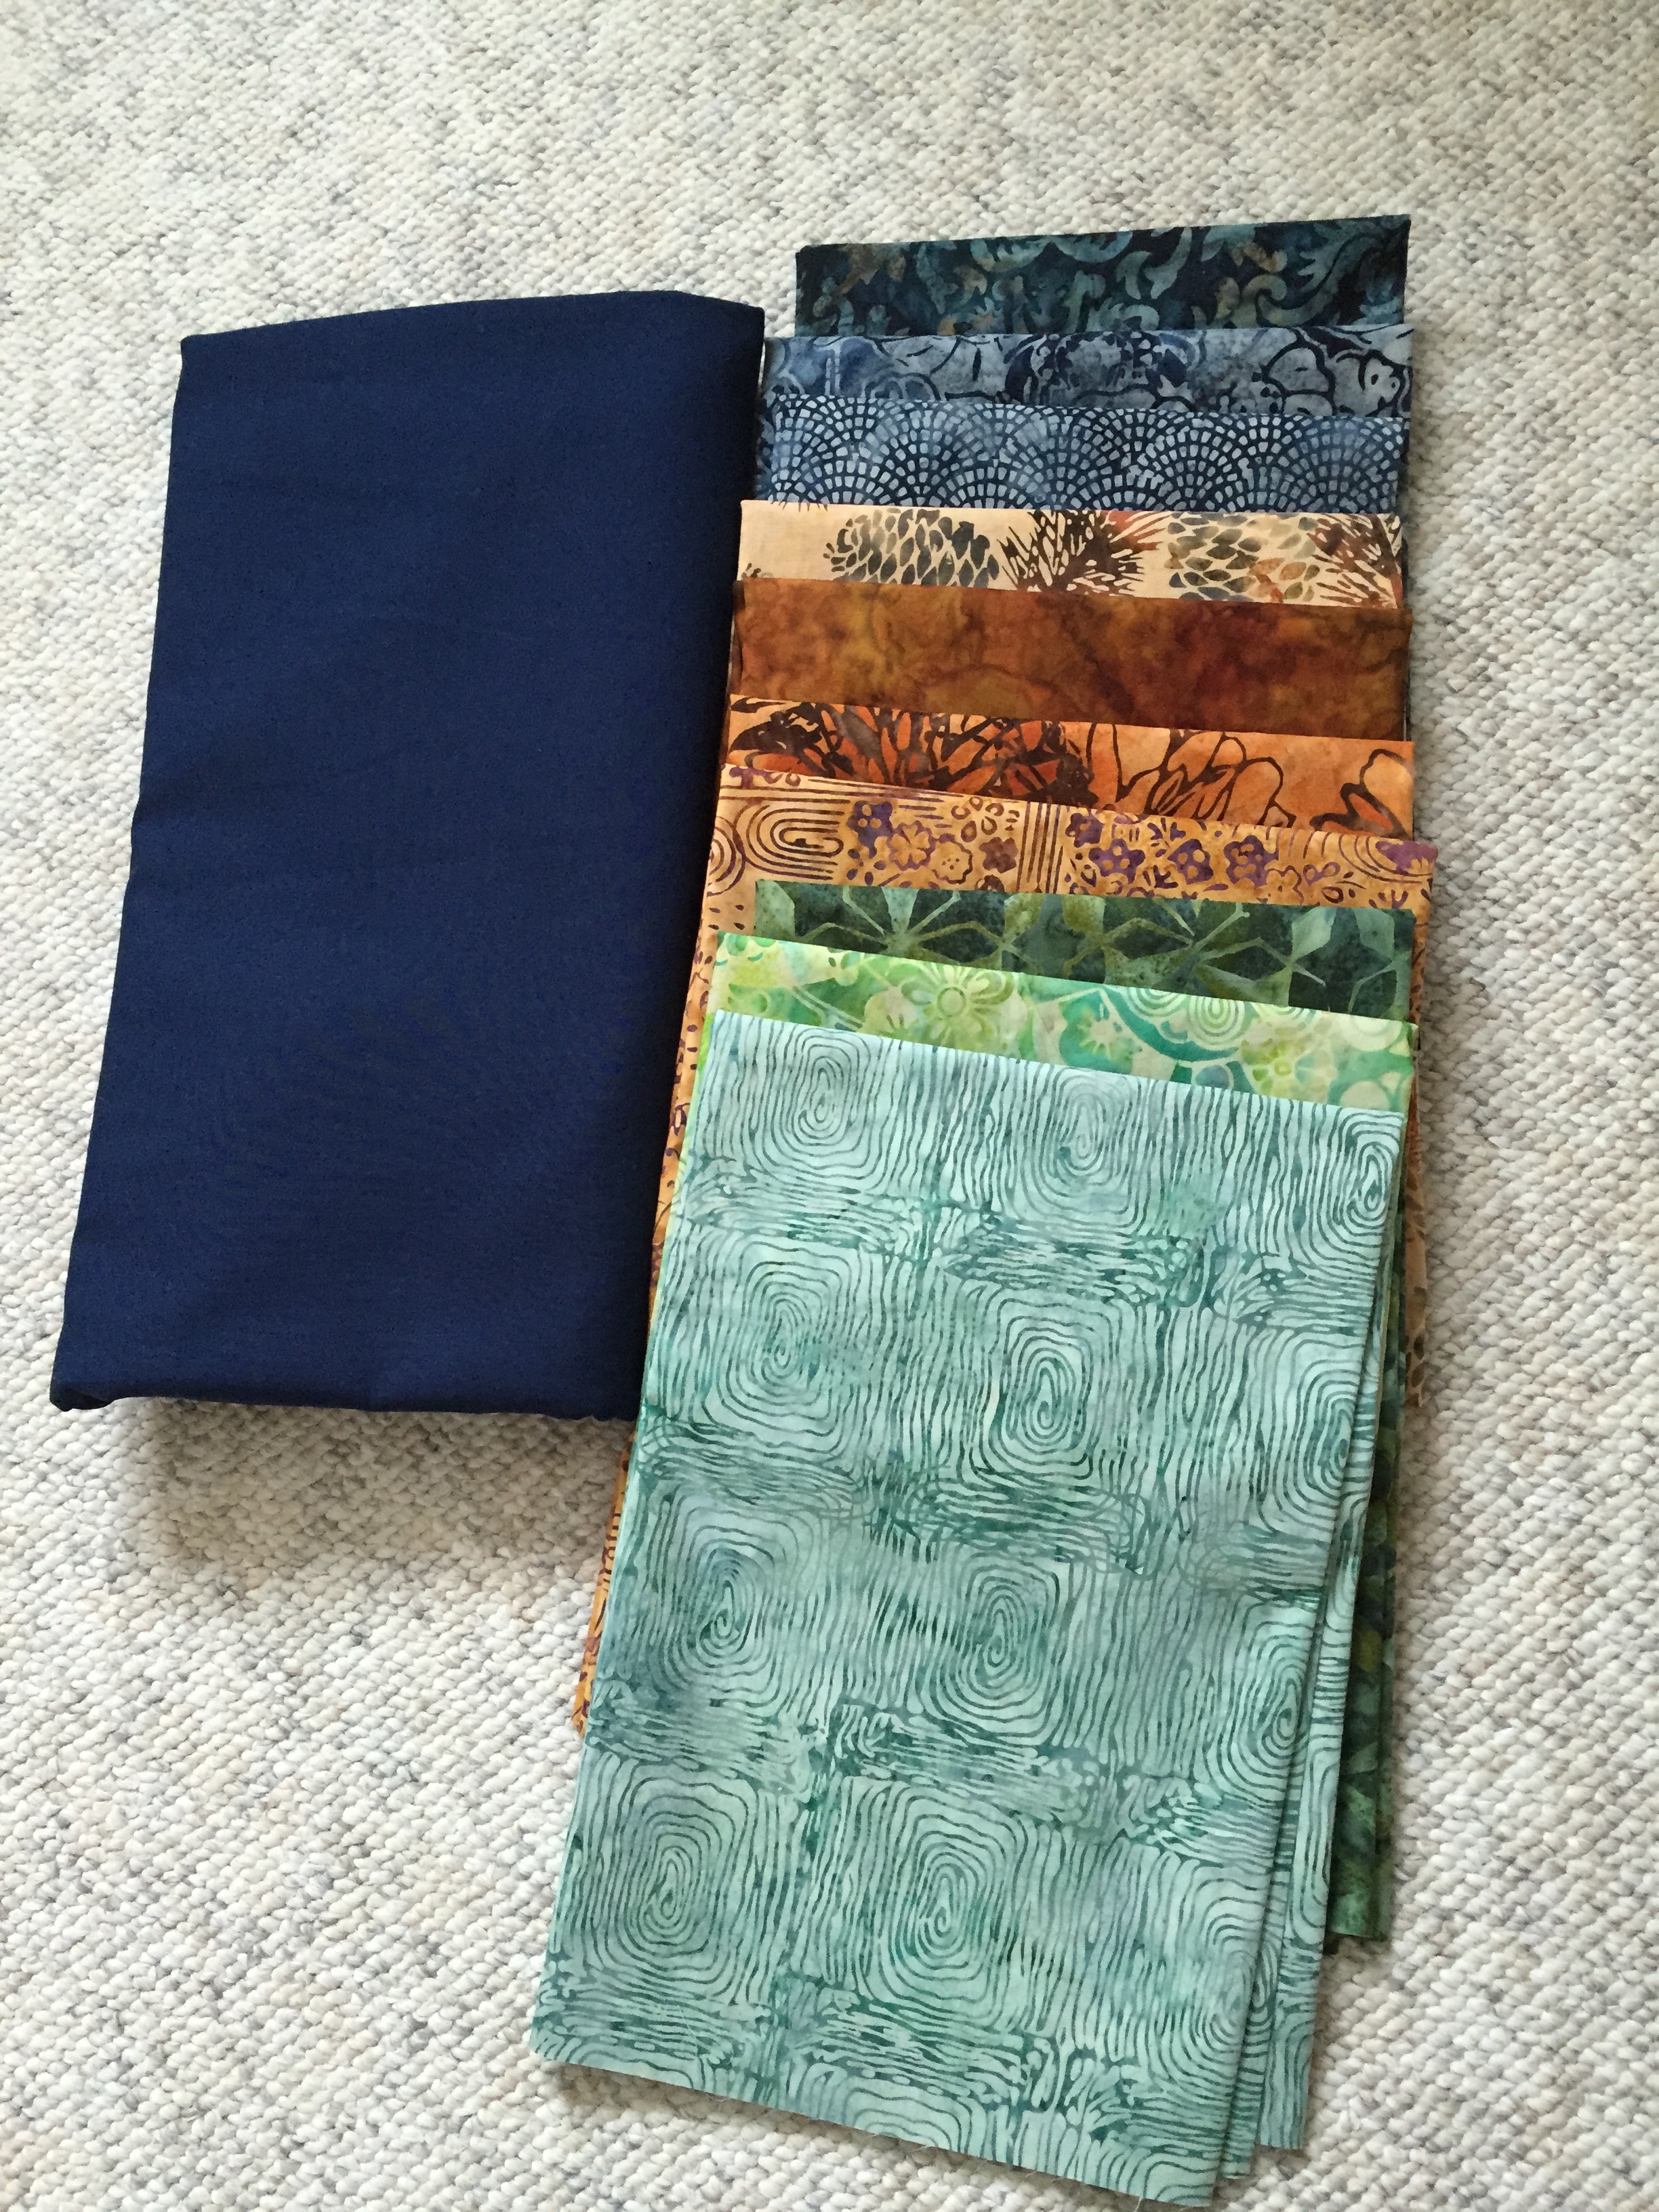
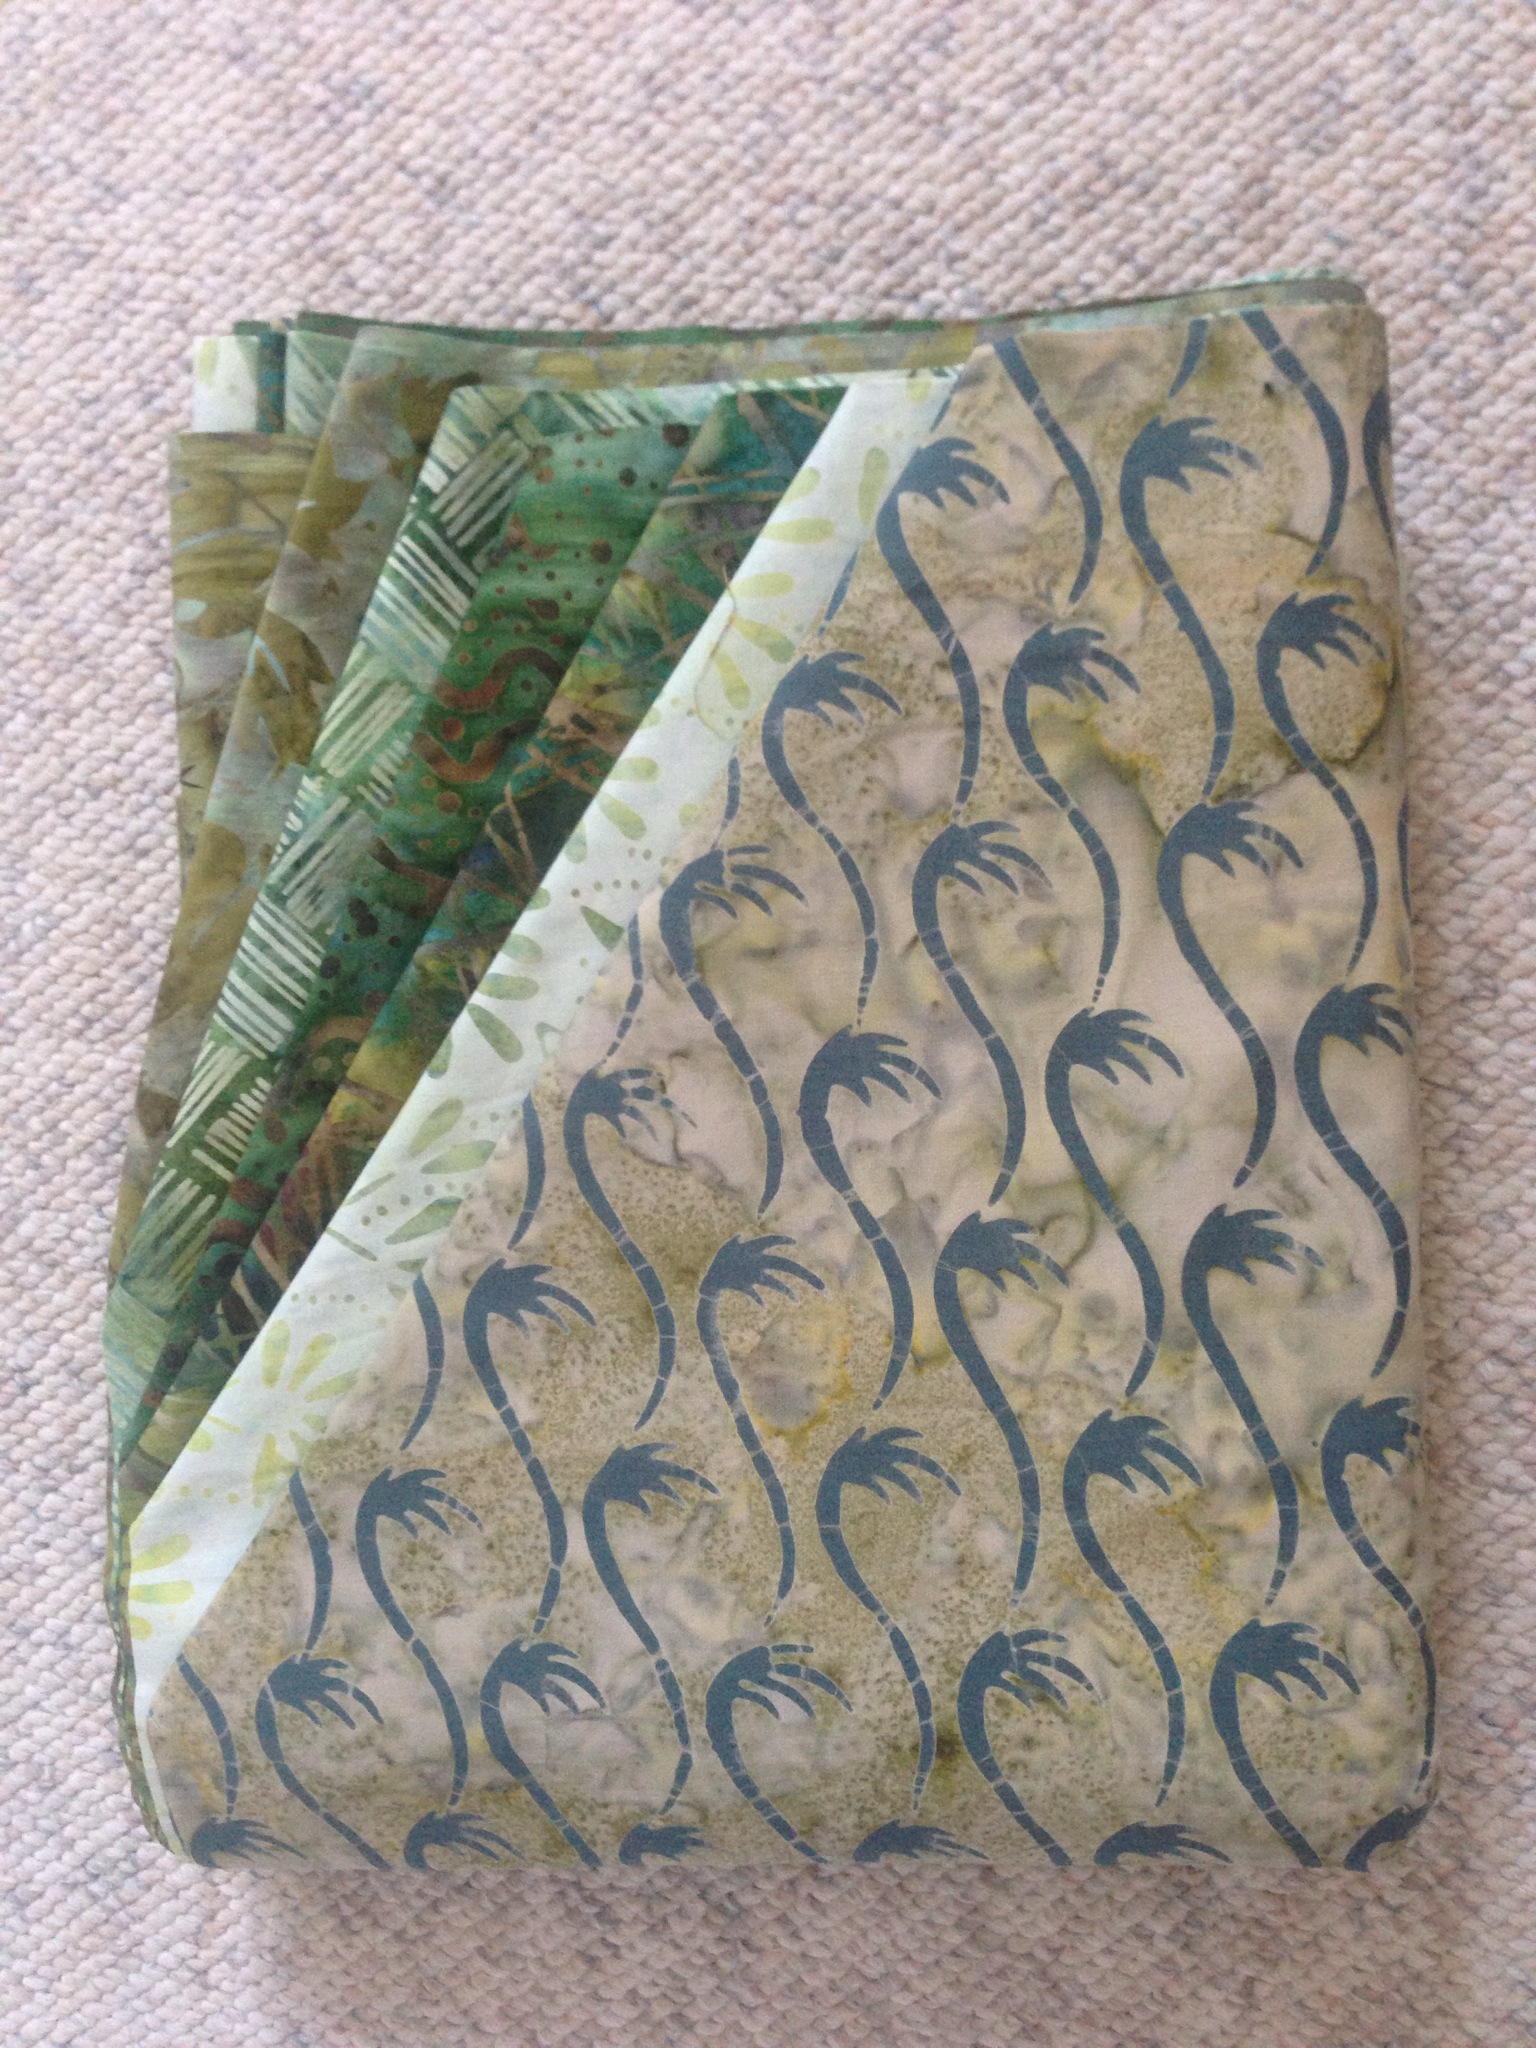
Yesterday, I was at Sew With Vision, doing an afternoon session about my trip to Bali with a surprisingly large group of women (to share a lunch of Balinese chicken curry on rice and to show off the fabrics I brought home). When I arrived Nancy, one of the gals who works at the shop asked me if I’d seen the 2015 BOM quilt – she had decided to try it, not using the quilt kit offered by Craftsy, but using her own chosen fabrics. She was picking fabric bolts from the shelves and I found myself involved in the selection process. When Nancy began cutting 1/2 m pieces I thought, what the hell, I’ll have a go at this, too, so I asked her to cut me a set of the same fabrics, which she did.

Today I went to Atlantic Fabrics to see if I could come up with a solid fabric (or something with a minimal pattern) to use as background. I started at the Kona cotton collection of solids, pulled out an egg-yolk yellow, then a dark blue/teal, then a slightly lighter blue/teal, then some turquoise. I took all 6 bolts to a cutting table, laid them in an array, then auditioned my batik fabrics on the selections.

IMG_4193

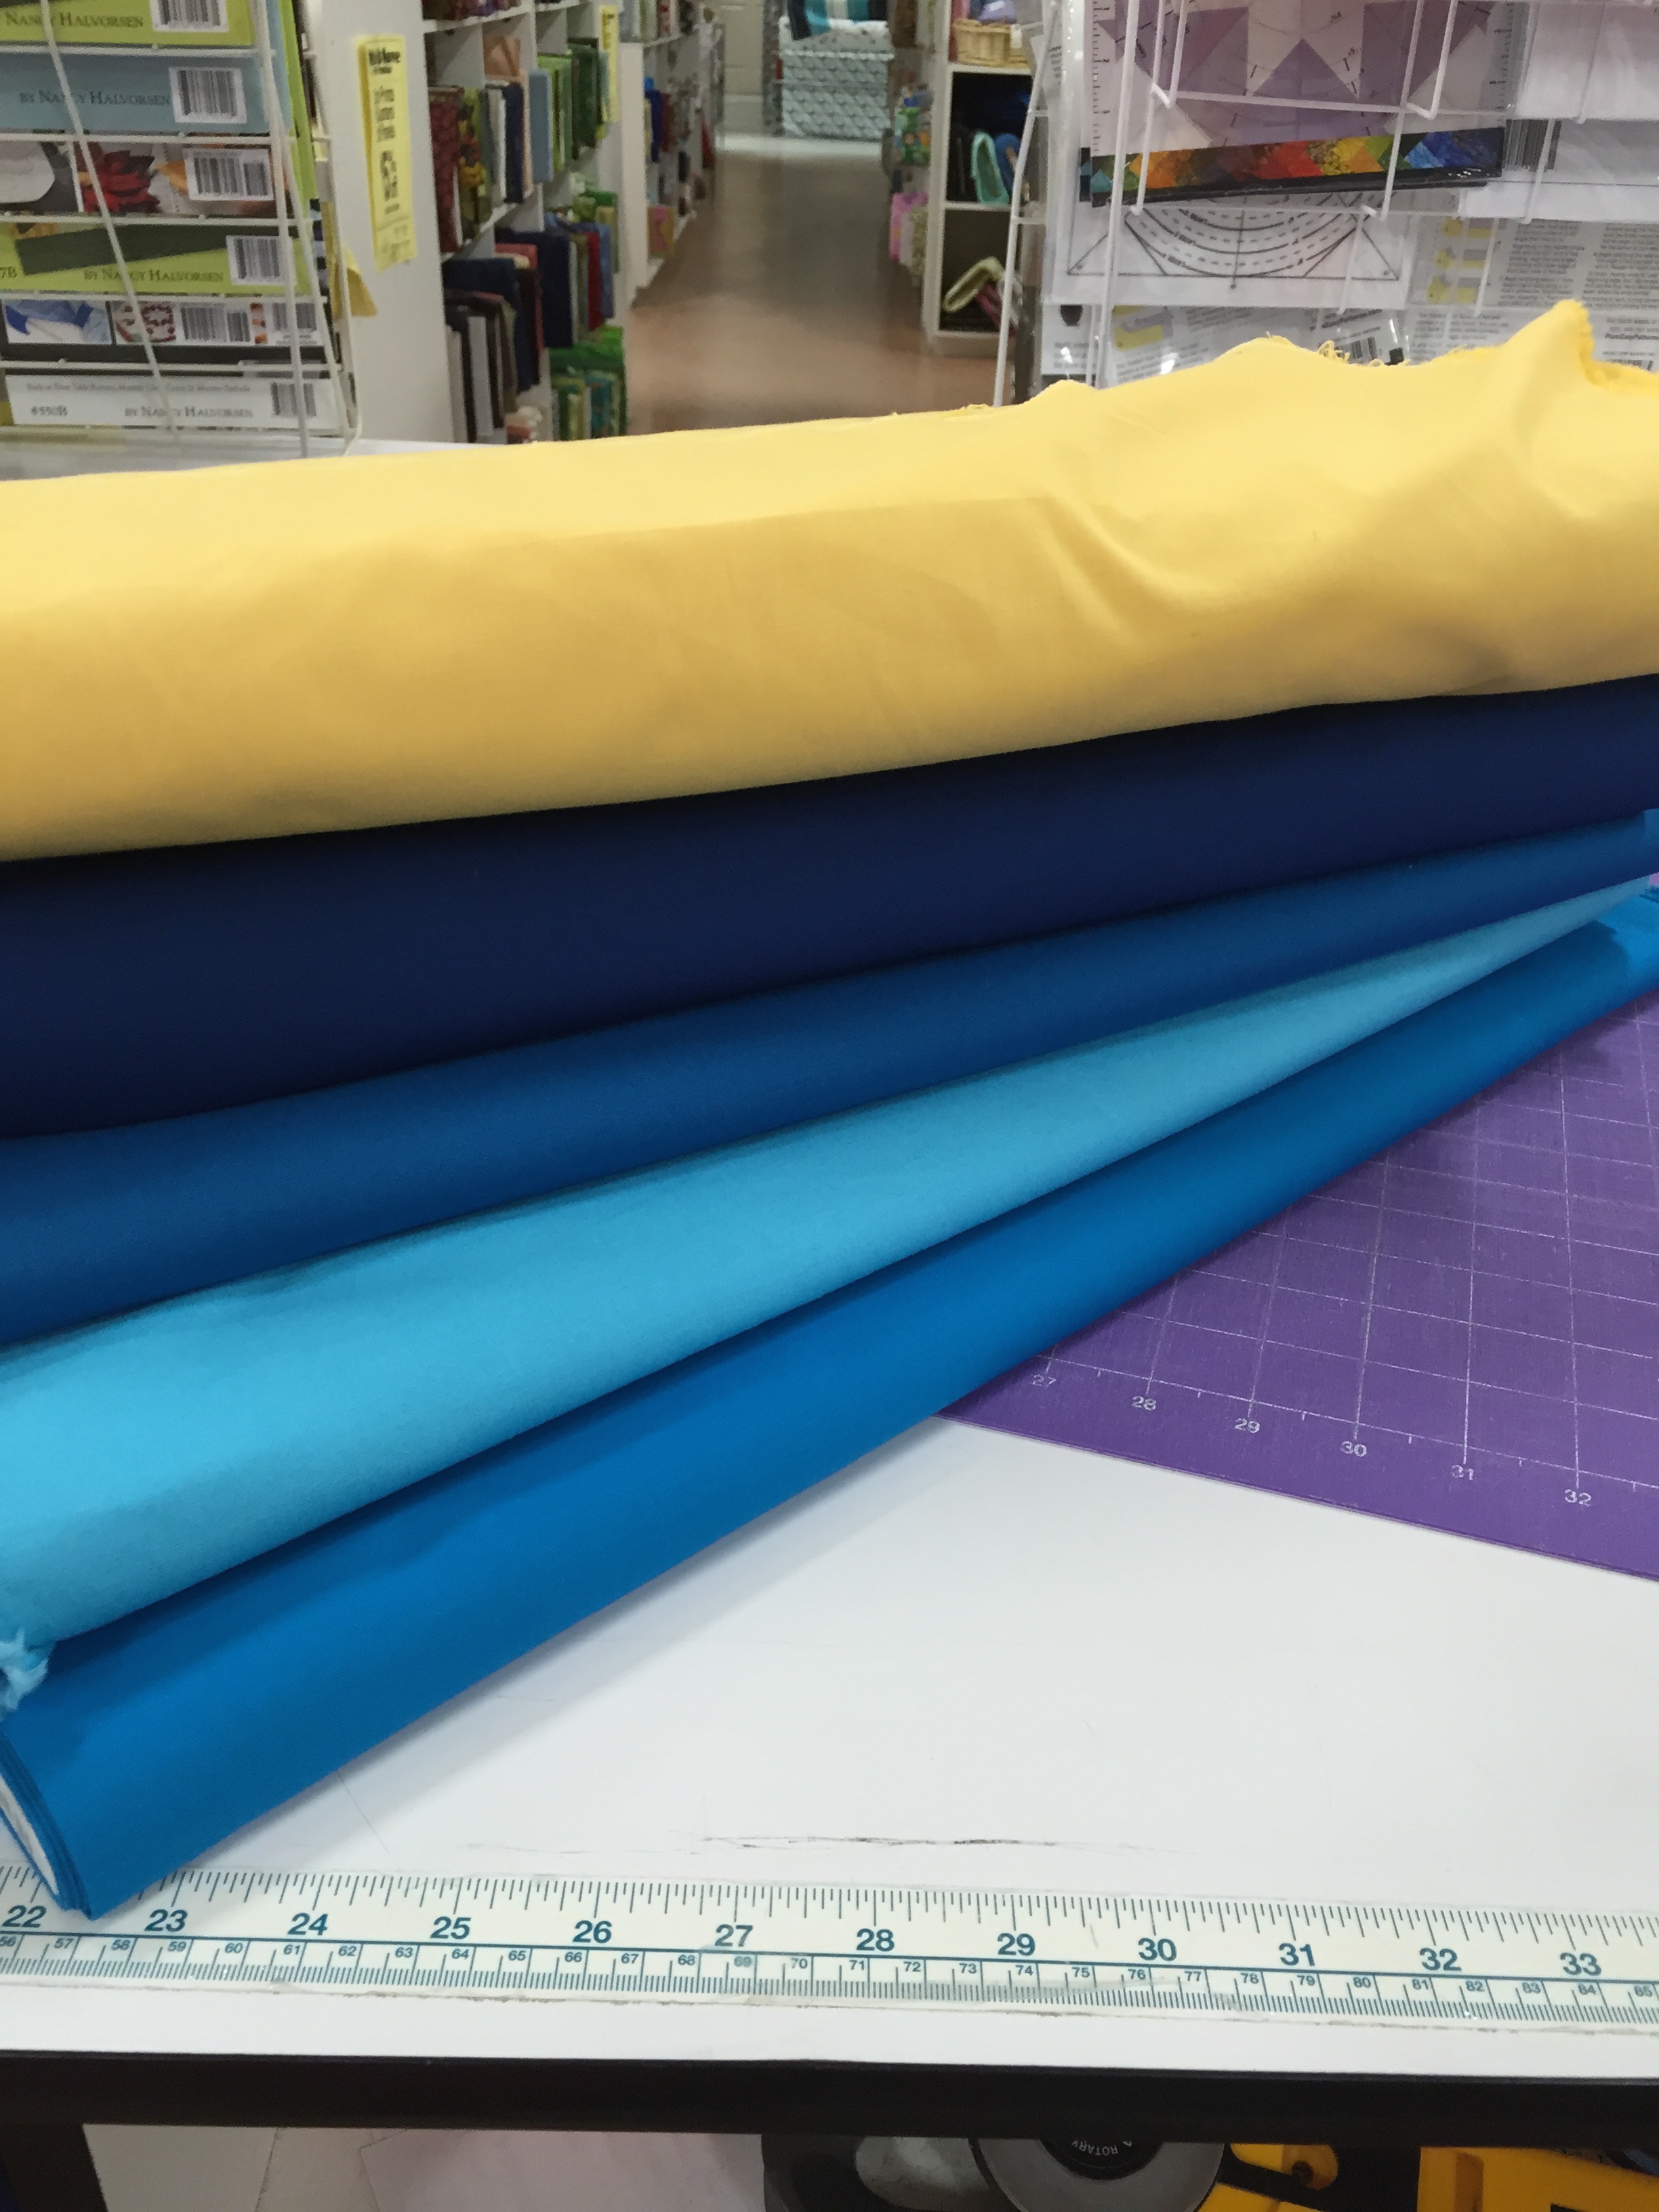
Wasn’t difficult to see that the darkest of the colours I’d chosen would work best with the batiks.

IMG_4198So now to watch the videos on the January block and get something under construction.

That’s the challenge – it’s a personal challenge between Nancy and me to create a quilt based on this 2015 BOM design. Right off the bat, I know I’m not going to make the 90″ x 90″ (queen size) quilt that’s intended. I’ll probably make something smaller like maybe a 60″ x 60″ lap quilt. That will mean adjusting all of the blocks down 1/3 in size. Or I might do a more conventional lap quilt size – 48″ x 64″ which will mean changing the layout of the quilt blocks as well. Not a big deal – I need to get out a pencil, ruler, graph paper (and calculator) and get to work. Once I’ve decided what kind of quilt I want to make, I’ll start drafting the January block and see how it turns out.


Kaffe Fassett/Philip Jacobs Quilt – Finished

2015/01/img_4167.jpg
Just finished the Kaffe Fassett/Philip Jacobs quilt this afternoon. Got the in-hoop quilting done yesterday, along with the border. Today I added binding and a label.

I’m pleased with how the quilt turned out. No name on it yet. For now it will live in the collection.

The back of the quilt includes a strip pieced from scraps – again to make the backing fabric wide enough so a single length would be enough. And I like the added detail on the backs – makes the quilts more interesting!
2015/01/img_4169.jpg

Tipsy Squares

Finally done. I’ve been working on this quilt for a couple of weeks now. It started out as an unequal 4-patch based on an idea for a charm pack (5 X 5 squares). I used the fabrics I bought at the Kaffe Fassett lecture in the spring.

I cut and sewed the 4-patch blocks but they were too small for a 5 x 7 quilt – I needed to add fabric so I added another layer on the edge. BUT I cut the strips too narrow – the blocks were still too small for the final dimensions I was after. So I decided, rather than just add sashing, to add triangles around each block which resulted in a “tilted” block. Seventeen blocks tilt in one direction, eighteen tilt in the other. So I had to lay out the blocks in the order I wanted them and add the correct triangles to each so that the layout I was after would be in the finished quilt top. Finally I added a 3″ border around the outside. The finished lap quilt will be 48″ x 65″.

IMG_4158I worked out the triangles by trial and error – I wanted the tilted block to end up 8.5″ wide – in the end that meant I needed a triangle cut on the diagonal of a 2 1/4″ x 9 3/5″ rectangle. Applying the triangles is tricky – can’t chain the sewing – each block has to be done individually – the first strip is partially sewn on, then the other three sides are added, and then the first side is stitched to the end – that’s necessary to get all the triangles sewn in place equally. In the end, it wasn’t applying the triangles that was difficult, it was sewing the blocks together – I didn’t quite manage to get all the points to align perfectly. But once the top is stitched in the ditch and quilted that isn’t going to show – only a very experienced quilter is going to notice that detail!

These are the blocks before triangles (just the block in the upper left has triangles added).

IMG_4148

Quilt for Noah – Finished

IMG_4136

I finished the quilt yesterday. After I got it back from being quilted I still had to add the binding and a label. Did both yesterday afternoon.

So here is the finished quilt, complete with two pillow cases in matching fabric – I didn’t make shams; I hate putting pillows into shams and figured pillow cases would be easier to use. The cases are pieced on the serger so the inside seams are all finished which will allow the pillow cases to be washed without fear of fraying. I also made two dark green pillow cases for Noah to use as actual pillow cases – the two pieced ones are decorative accessories – not to be slept on but to complete the look of the quilt.

IMG_4137The back doesn’t look bad – although I realized, after I’d taken the quilt to be quilted, that I could have offset the stripe by another 12″ had I cut 12″ from the slightly wider side and added it to the narrower side with a single dark stripe! Oh well, I don’t suppose this side of the quilt will ever be used on top. It doesn’t look bad this way, but the off-centre symmetry would have worked better had I offset that stripe more.


Quilt for Noah

I bought the fabrics for the quilt for Noah at Keepsake Quilting in New Hampshire on my way back from the trip to Toronto late August. Six fabrics in shades of green/teal that worked with the photos I’d taken of the paint in his bedroom.

IMG_3190

Next, I looked through my Pinterest collection of quilts but nothing stood out. In fact it seemed that given this was to be for a boy’s bed it ought to be simple without a lot of piecing. So I decided to base the quilt on the lap quilt I’d made for myself:IMG_4072

Noah’s is a double bed – I’d bought the fabrics planning to work with the width so I didn’t have enough length in each fabric to make strips the full width of the large quilt without some piecing.

IMG_4074

So I inserted strips mid way, and at each end to expand the centre area. I wanted the middle to be almost the width of the bed, so the two dark lengthwise strips would frame the edge of the bed. Then I added more wide strips matching the fabrics from the middle, finishing off with narrow strips around the entire edge. The finished top measures 86″ x 86″.

Now to set up the back – I have enough fabric for two pieces of fabric which will give me 86″ in width but in order to quilt the quilt, I need between 92″-94″ in both width and length in the back to mount it on the long arm quilter, so I’ve set up a 5 1/4″ wide strip pieced from 2 1/2″ pieces (made of leftovers from the edge of the front)- those I will insert to one side of the centre of the back – joining the centre back seam using a 1 1/2″ strip of dark green on on either side of the pieced strip. 

I plan to finish the ensemble with two pillow shams, the fronts of which will also be pieced. I’ll do those after I take the quilt to be quilted – I have no room to do this myself – I don’t have floor space to lay out the back and build the quilt sandwich, and even if I did, I don’t have a work space large enough to either free-motion or embroider the quilt! So this time I will have it done for me.

If I’d been planning better, I might have set up the quilt with blocks – then I’d have been able to quilt-as-I-go; but that wasn’t the case here. Perhaps on another quilt.


A Quilt for Noah

IMG_3190.JPG

This is the collection of fabrics I bought to make a double bed quilt for Noah. I took pictures of the painted walls in his bedroom so I had something to work with. The selection of green batiks at Keepsake Quilting was large – many times the number if bolts I’d have been able to choose from locally! Bought backing fabric as well. It’s going to be a simple strip quilt like the one Ben has in his room:

IMG_3180.JPG

I plan on starting it this week – shams and pillow cases, too.

My Visit To Keepsake Quilting

I stopped off at Keepsake Quilting in Center Harbor NH yesterday. I’ve purchased fabric online and from the catalogue and so I decided to return from my family visit to Toronto via NH.

I bought fabric for a double bed quilt my great nephew Noah and some fat quarters for me. But I had to stop at that.

Oh my! Heaven for a quilter!

IMG_3182.JPG

IMG_3187.JPG

IMG_3188.JPG

IMG_3184.JPG

Pick-up-sticks Quilt

I finished the quilt last evening. It got put aside for a while so I could work on the deck deciding what to keep and what to purge, and then deciding where to put the plants I retained and weeding them. They’d all been neglected for 6 weeks while the old deck was torn down and the new deck was built. They were all crowded into my neighbour’s yard (I was lucky she was willing to plant sit for such a long time).

A couple of days ago I got back to quilting the blocks, by yesterday I had just 7 double blocks to quilt. Got that done in the afternoon. Pressed the quilt to get rid of the markings (I use Frixion pens which disappear with heat – although the marks return if the fabric gets close to freezing, I’m told). Then I trimmed and bound it. Added the label last evening.

The front of the quilt consists of 63 (6 1/2″) blocks of fabric (which started out as 7 x 7 blocks), slashed either twice or three times, reassembled – while this looks like an easy quilt, turns out it was surprisingly difficult to do – each block had to be carefully crafted, the parts adjusted, pinned, and repinned until the underneath strip looked continuous! Three strips, if they crossed one another, was particularly challenging! However, I only made one block that in the end I discarded.
IMG_3151

The back of the quilt was inspired by an image of a white on red quilt (‘Lace”) by Weeks Ringle that I came across. I thought this would be the perfect quilt to try it on. Constructing the pieced strip took longer than I anticipated it would – although it was simpler to execute than the blocks on the front side.IMG_3152

Lattice Quilt – Kaffe Fassett IX

20140722-192048-69648435.jpg

20140722-192049-69649264.jpg
Yesterday I finished this Lattice Quilt using Kaffe Fassett / Philip Jacobs large pattern fabrics. (The back used a Philip Jacobs fabric with an inserted crazy quilted piece.)

Cutting and assembling this quilt wasn’t the challenge; figuring out how to quilt the “blocks” was. In the end I set up an 8×8 design – 20 blocks in all (leaving some of the sashing unquilted), thirteen 3×8 blocks, two 3×3 blocks and then a design for the border.

This quilt has turned out a wee bit larger than my usual lap quilts – the design forced that – had to use an even number of blocks to make the lattice symetrical.

Some new Kaffe Fassett fabrics

IMG_3039

Last evening I attended a lecture by Kaffe Fassett. Three of the local quilt guilds decided to work together and sponsor his visit to Nova Scotia. His talk was about “colour” – I’ve been following his work for years, beginning with his knitting books. His latest work has been quilts using fabrics he designs for Westminster Fabrics.

After the purge of my house last week, including the sewing room (I got rid of a lot of fat quarters and scraps I knew I was never going to use), I promised myself I was NOT going to buy any fabric — NO FABRIC, until I saw those luscious flowers in gold, pink, pale green, turquoise. And beside that bolt was the green dots, and then the pink houses… I added in the strong pink circles and a couple of others, bought a half meter of each. Then I came home and went through my Fossil Fern fat quarter collection (I still have about half of them unused) and picked out eight that I thought would work with the Kaffe Fassett prints.

These are more subtle than my usual quilt fabrics in shades I don’t usually gravitate toward, but last evening they called out to me.

I have no idea what kind of quilt I will make with this fabric collection. It might be several months before I think about using them but something interesting will get made.