Blue Flowers – Again

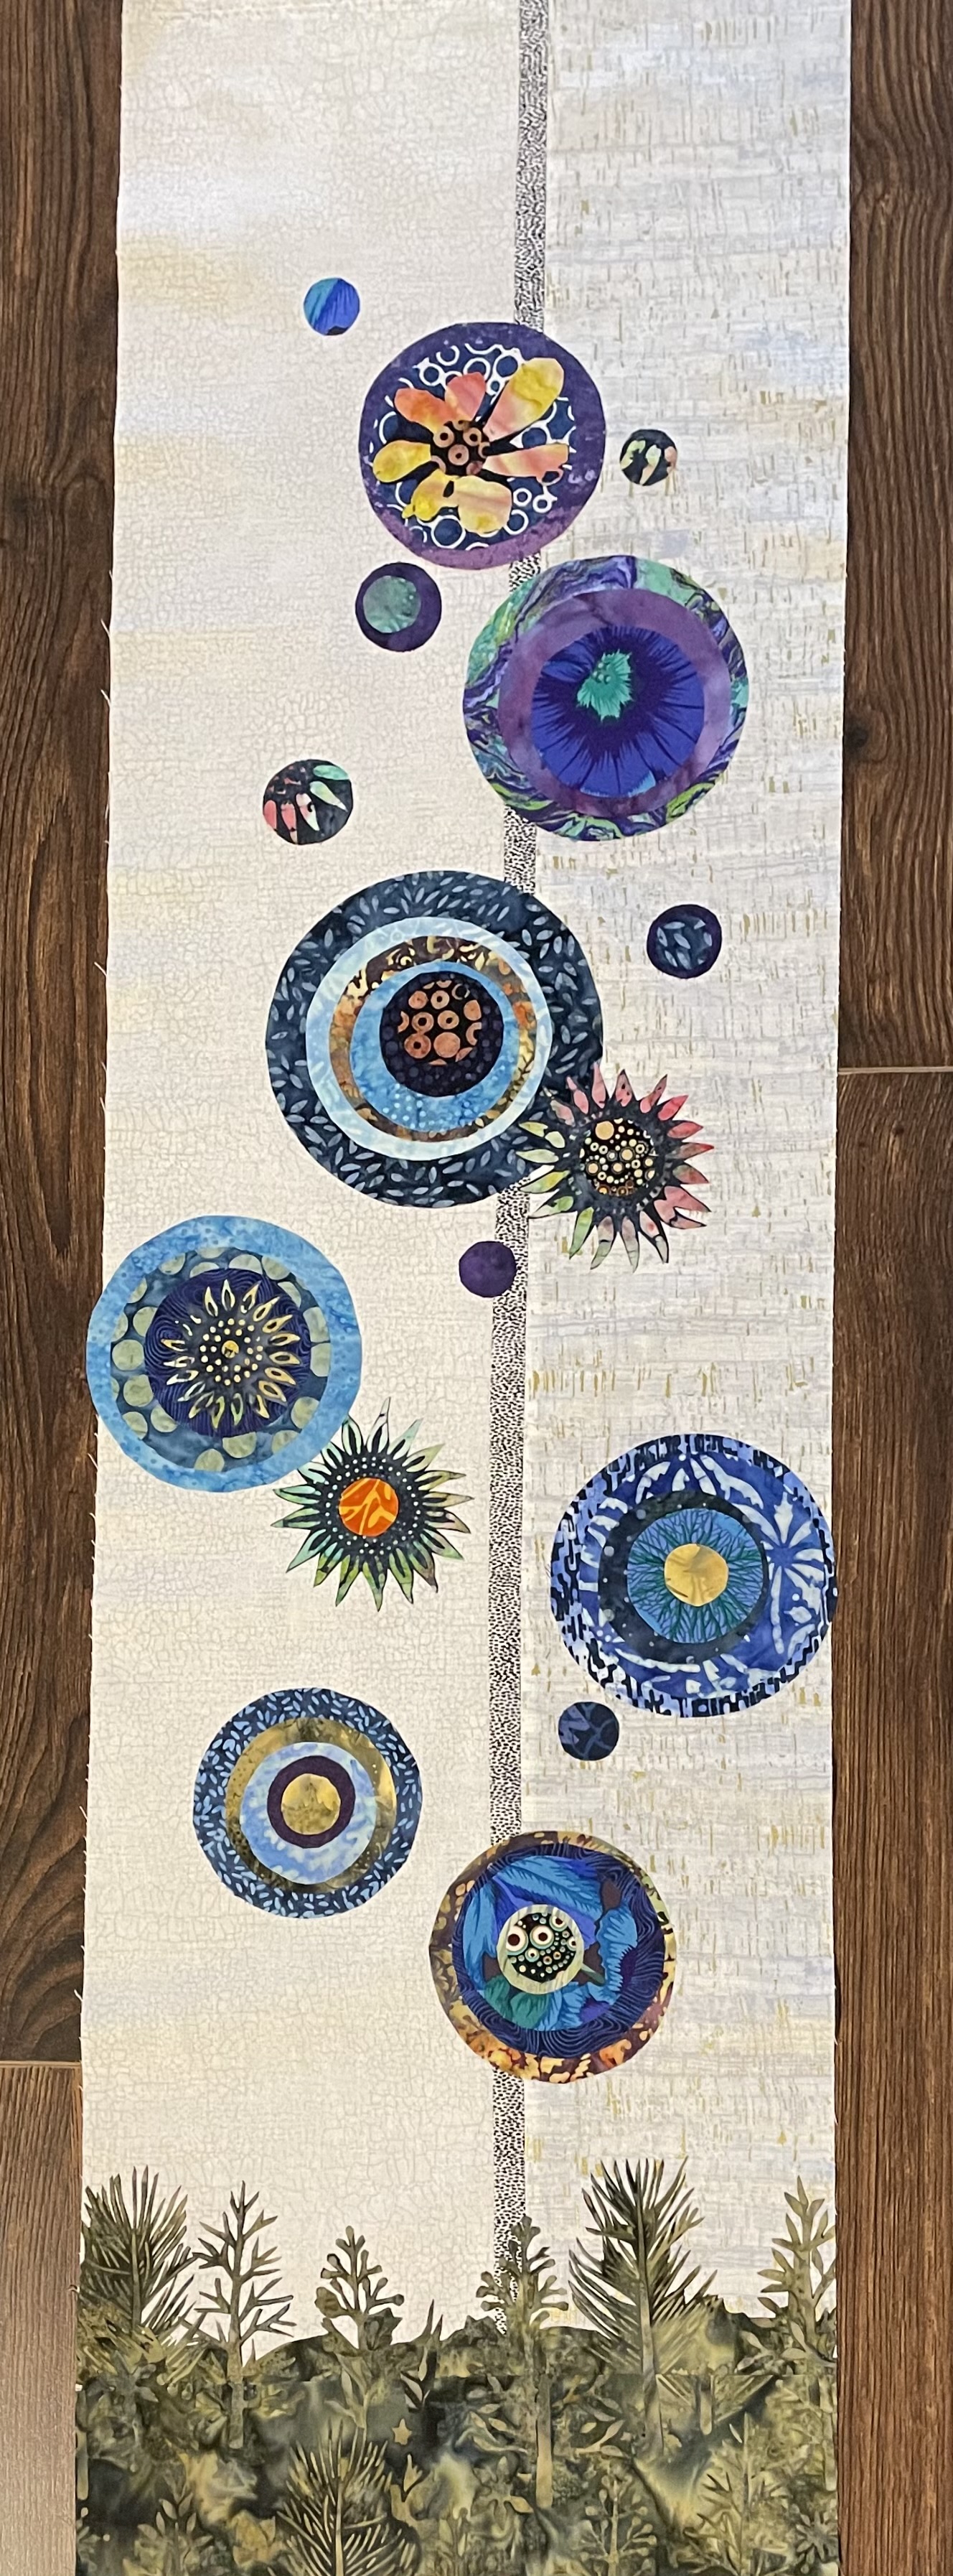
I started this textile wall art piece on Jan 23. I managed to get the basic appliqués in place and then I was stumped. Before I could embellish the raw edge shapes I had to figure out some way of stitching “stems” for the “flowers”. I thought about cutting narrow strips of various green fabrics, using yarn (yarn couching – using decorative stitches to tack the yarn in place), even stitching over very narrow ribbon. The issue was the colours I’d used in the vegetation at the bottom of the piece which limited my options. I spent time sporadically playing around with decorative stitches but nothing seemed to set up the effect I was after. I had no suitable green/brown yarn in my stash. And trying to force ribbon into gentle curves, even if I could come up with a suitable colour, wasn’t going to work, either.

After finishing a pair of black corduroy pants this morning (more about that in another post), I picked up my stitching sampler, played with a few more decorative stitches and then decided I’d just repeat rows of straight stitching! I practiced a bit. I matched thread colours with the fabric at the bottom of the hanging and started in.

Blue Flowers

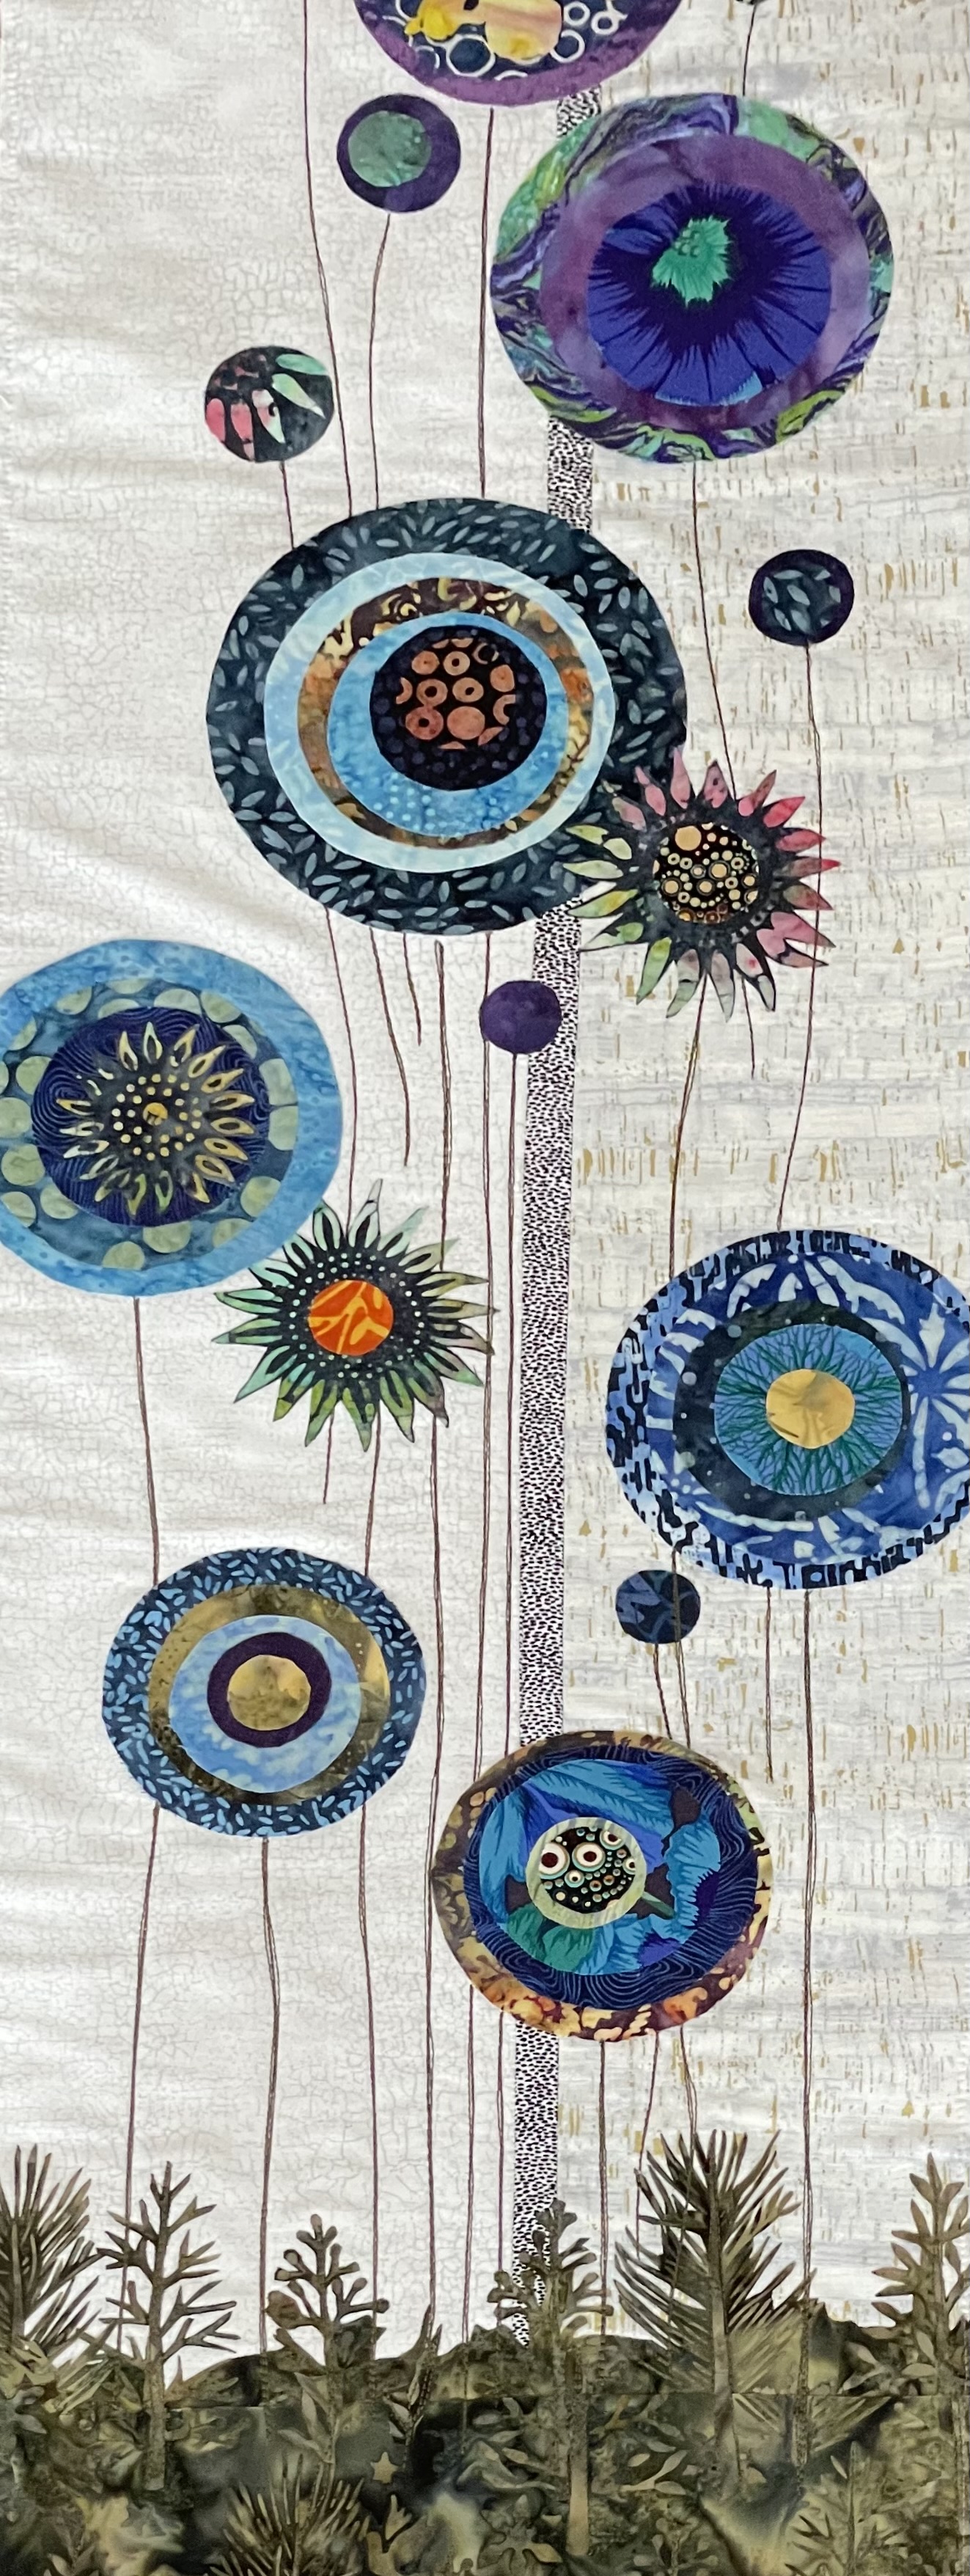
This is as far as I’ve got at the moment. Those stems need small leaves of some sort – I intend to work those in last. Next will be embellishing the raw edges of each layer of the flowers to permanently attach them to the backing.

You get the idea here. The vegetation at the bottom also needs a lot more embellishing but that, too will come after I’ve worked on the flowers and flower centres.

I thought it was the COVID-19 Rapid Test Kit building that had interfered with my working on this piece. It wasn’t. It was my not knowing how to do the stems/leaves that had me stopped. I feel like I’m being creative again. Finally!

A Stormy Day

It’s been blizzarding here all day – for much of the morning it was a white-out!

White-Out!

Didn’t matter – I was sewing. Last weekend I agreed to make sofa cushions for a friend – her designer had specified “piping” on several of the pillows. Creating the piping is no big deal, but applying it – that’s another matter. I trimmed the piping so I could align the outer edge with the outside of the pillow fabric but corners are tricky – I discovered it was a good idea to snip the corner and then 1/2″ on either side of that snip in order to bring the piping around the 90°. The second challenge involved joining the piping – I cheated on that on the two large square pillows, I just overlapped the piping and stitched it in place. Next came putting the zipper in against the piping edge on one side. Because the cushion will be sitting on that edge I did the best I could and have left it at that (I could hand stitch that opening closed but I’m guessing nobody but me will ever notice the zipper isn’t put in perfectly evenly).

Sofa Cushions

I’m happy with how the four pillows have turned out (the spotted pillow on the right belongs on my sofa!). They’ll look good on Heather’s new sofa.

She also has a hall bench that wanted a cushion – piped she decided, which makes construction quite a bit more difficult. It’s not just a matter of cutting out a top and bottom piece to fit the cushion form, but piping the top and bottom edges, along with inserting a zipper along the back side.

My bench is several inches shorter and wider but this cushion will fit Heather’s bench nicely and when it’s been sat on for a week, nobody will notice the imperfections that I can see. This time I took the time to butt the piping join – I did such a good job you can’t see where I joined the fabric/cord.

One pillow still to go. I don’t have the pillow form although I do have the fabric. This cushion needs to be done with a flange. There are several ways that can be done. I need to google for some instructions to make the job easier. I’ll make up the cushion cover – Heather will buy a queen size bed pillow and we’ll take it apart to make it fit the cover.

That last job I’m leaving for tomorrow.

Blue Flowers

Blue Flowers

A couple of days ago I started pulling together subsets of blue fabric scraps and piling the pieces into groupings for the flowers. Next I pressed fusible web (glue) to the back of each fabric piece, then cut out “flower” elements.

Circles? Almost Circles? Irregular circular shapes? In the end I opted for more or less circular shapes in graduated sizes, laid them on top of one another, offset somewhat. I removed the paper backing and pressed the layers for each flower together then played with placement on the background. I finished by pressing the flowers in place.

Before I start thread painting the flowers, I need to use a heat erasable pen to mark where the stem/leaf elements should go. I plan to stitch long thin stems with just a hint of leaf shapes – that may change when I get underway and decide to include some fabric cutout leaves.

This is as far as I have got today.

Simply Gorgeous

Meiko Mintz A-line Jacket

I love looking at these flowing Meiko Mintz Kantha jackets. Mintz, a New York designer, has been making these garments for a while now. I first came across them in San Francisco in 2015 at Gumps department store. They’re reversible – so you get two jackets for the price of one but nevertheless they’re expensive.

Sourced in Bangladesh, Mintz has a say in the fabric patterns and in the Kantha production. Sometimes the fabric is pieced, sometimes it’s printed. In either case the visual effect is striking.

I keep turning to them again and again for inspiration for garments I might make for myself. Mine keep turning out much less flowing – I seem to be a “tailored” kind of person, I guess. Still, I keep imagining myself in one of these graceful pieces.

A Few From The Latest Collection

They’re to drool over. Who wouldn’t look terrific in one of these.

New Face Masks For Christmas

I know, we’re supposed to give up fabric masks in favour of single use surgical or N95 masks but I hate the waste associated with those and besides my masks are made using a high grade quilting cotton with non-woven interfacing stitched into the middle; mine are three-layer masks.

More important those awful disposable blue surgical masks don’t fit me very well (I have to flip the elastic to fit over my ears to suppress my glasses fogging which makes the sides stand open), whereas my homemade masks do! And fit is more important than the materials used in construction, according to the experts I’ve read.

New Face Masks


With Omicron being rapidly transmitted throughout the community I decided everybody could use a new well-fitting face mask as a gift. I started making a batch ten days ago. I made a dozen which I gave away yesterday to the knitting ladies. I have another dozen cut out and ready to assemble – have to work on those today and get them made and washed so I can distribute them, too.

The pattern I’m using this time is the one from SeeKateSew. She provides a template for cutting out the masks. This mask is close fitting but because of the origami folds top and bottom it provides breathing space and I find it comfortable.

I don’t do the folded side in the instructions to enclose the elastic. Instead I insert the elastic into the seam as I construct the facemark which makes the sides a bit longer. I use 6″ – 7″ lengths of elastic depending on the face size of the person I’m making the mask for. When I use a longer elastic I add a silicon slide near the bottom of the mask so people can shorten the elastic if the mask fit is too loose.

Now back to sewing….

Bathrobe

I’ve been wearing a velour bathrobe I made at least 20 years ago. I started thinking about a new robe and kept an eye open for velour or terrycloth or fleece of some kind but didn’t come across anything I wanted to work with.

Then the purple corduroy (polyester) I’d ordered online arrived – I’d intended to use it for a pair of pants but I hadn’t realized I was ordering polyester instead of cotton, the colour wasn’t intense enough, the fabric too soft, and it was cut off grain so I was going to lose quite a bit of length at both ends. No pants.

Also, a few weeks back I placed an order with Spoonflower – they print any fabric design you choose from their collection of designer images, or that you create yourself, on a range of fabric types and you can order as much as you need for your project. They print not only fabric, but wall paper, and home decor items like pillowcases or duvet covers! I chose two designer images and ordered a single yard of each – one on lawn, the second on fleece.

I thought the prints were lovely when they arrived but can’t do a whole lot with a single yard so I decided to pair the fleece with the corduroy to make myself a new bathrobe.

I had enough length of the purple corduroy for the body (front and back) as well as the three yoke pieces. I cut the sleeves and yoke facings from the fleece.

The pattern is a very old one for a Hawaiian muu muu I bought in Honolulu a gazillion years ago and have used to make nightgowns and bathrobes for years.

I improvised with a size M (after I cut out the corduroy I suspected the garment was going to be too small – I carried on anyway to see how it might turn out). I split the front and inserted a medium length of zipper so I could step into the robe. I faced the front and back yoke pieces with fleece. Inserted the sleeves, serged the sleeve and side seams, finished off with a coverstitch on the sleeve edges and the bottom hem.

It’s not my best sewing – from the start I was sure this effort would be tossed out so I wasn’t as precise as I usually try to be when constructing a new garment. My neck edge isn’t perfectly matched. The top edge of the zipper should have been tucked under the facing, I tacked it down by hand instead. Small technical decisions I didn’t bother with because I was, after all, just sewing to see how the project would turn out before discarding it.

I was pleasantly surprised when I tried the bathrobe on over my nightgown – it actually fit – is the right length (just to my ankles) and rests comfortably on my shoulders. I thought about pockets but I don’t use the pockets in my old bathrobe so I left them out. If I decide I could use pockets I have a few scraps of corduroy leftover I could use to add patch pockets to the front.

The old velour housecoat is now in my trash bin.

Pink Boiled Wool Jacket

It’s been ten days since I posted anything but that doesn’t mean I haven’t been working away at stuff.

Here’s the pink boiled wool jacket.

Ruby expressed interest in having a boiled wool jacket when she saw mine. So we went shopping and I talked her into this pink poly/wool blend boiled wool fabric – heavier than the 100% wool I’d used but likely warmer.

The challenge was Ruby has a high waist measurement of 52″! How was I going to expand the pattern to cover her in the middle and still make it a flattering garment for her. The solution was to start with the XXL size in the pattern then pivot the centre fronts about 15° from the neckline. I left the back just about as it was so that it would hang flat.

I traced the adjusted pattern onto Swedish tracing paper (a sew-able light weight non-woven “fabric” for tracing patterns). I pin fit the pattern on her – initially it looked like I should drop the neckline both front and back; instead I raised the shoulder which enlarged the neckline. I made a few other adjustments then basted the parts together and tried the half-jacket on again. Much closer this time.

To control the bulk in the seams I sewed each 3/8″ seam, pressed using steam and a wood clapper, then top stitched 1/4″ from the seam using a stitch-in-the-ditch foot to ensure a 1/4″ seam; I pressed again on the right side using a press cloth. That gave me nice flat seams.

I finished the front and neck edges, sleeve hems and bottom hem with batik facings (I interfaced the front edge with a mid-weight woven fusible interfacing for a bit more body), edge stitching each facing so the turning would be flat.

I added patch pockets (raw edge on three sides, top edge interfaced and faced with the same batik) to the front. I left the collar with a raw edge, as well.

The jacket is a good length on her. I like how it drapes in the front and hangs straight in the back. The “boat-neck” sits solidly on her shoulders although it’s too open to wear without a scarf. I scoured my scarf collection and decided a navy print mobius scarf I made several years ago would fill in the neck nicely.

Ruby was happy with her new jacket. Me, too.

A Birthday Gift

I had enough bedspread fabric leftover from my kantha jacket to make one more – this one a birthday gift for a very long time friend.

A number of years ago I made her a quilted pieced jacket which still fits her and I discovered I still had the pattern. So I cut out a new jacket from the remaining bedspread pieces and quickly sewed it up.

Her birthday isn’t until the 27th but I took the jacket to her yesterday. I hope it gets to be worn and enjoyed. I know I’ve been getting lots of complements on mine.

I created double welt pockets and button loops from the very last leather scraps I had – that’s it for that kid skin I bought in New York many years ago. I used a dark batik to bind and face the seams and edges. I found some nice metal buttons to finish it off. I particularly like the fabrics that landed on the back! Wonderfully colourful.

I still have a few bedspread scraps left – they’ll likely become zippered bags when I get around to making another batch.

I continue to be inspired by the amazing kantha garments made by Meiko Mintz – her new website is worth a look even if you can’t afford (or aren’t willing to spend that much on) her gorgeous creations. I keep thinking about making large flowing jackets like hers but I know I’d not feel comfortable wearing them – which is why I stick to my more tailored jacket style.

Magenta Jacket Finished

I finished the jacket this morning. I’m very happy with it! The back fits nicely. The dropped shoulders are smooth. There’s a dart in the front shoulder area that works very well – I didn’t close it with a seam; instead, I butted the two sides together and use a decorative stitch to hold the dart closed – you can’t see it – however it flattens the front shoulder area and shapes toward the bust in a lovely way. I added 6″ to the length of the front and back pattern pieces – that was a good decision. I knew the sleeves would end up short (the pattern says “bracelet” length – I could always add a cuff to lengthen the sleeve but I’m leaving it as it is, for now.

I didn’t think I’d like the neck, but I’ve been wearing the jacket all afternoon and it’s comfortable buttoned. As an outdoor jacket it calls for a silk scarf. I’ll try that the next time I put it on.

There are a couple of interesting seams – the back was constructed from two pieces with a centre back seam. The shoulder seam drops quite a bit toward the front. The sleeves are made from two pieces – the seam aligns with the dropped shoulder seam. Were I to make this jacket again, I’d attach the front sleeve to the front arm opening, the back sleeve to the back arm opening and sew the shoulder and sleeve seam as a single seam. I made those details stand out by pressing the seam allowance open, and stitching 1/4″ away from the seam itself on each side.That makes the seams lay flat, takes the bulk from them.

The facings all work well, too. I bound the neck seam with a Hong Kong finish using the same batik I used for the facings. I created a front facing, sleeve facings, and a bottom edge facing – all 1 1/2″ finished width.

I started with five buttons/buttonholes but when I put the jacket on I thought it could use one more so I added the sixth. The front falls straighter with it added.

The patch pockets are unobtrusive but handy for carrying keys (or anything else that’s relatively small). They are also finished with a batik facing at the top.

For a “muslin,” this garment definitely turned out very well. Oh, and this is close to the real colour of the boiled wool.

Dark Magenta Jacket

I happened across some beautiful actual wool boiled-wool at Fabricville about ten days ago. Just couldn’t resist it and bought enough to make a second jacket – heavier than the purple jacket I just finished.

I had bought and downloaded a pattern from an Australian company, Mary Ann printed it on an industrial printer. I traced it and laid the pattern pieces on the fabric but I wasn’t sure about the loose fit of the jacket.

I knew the purple boiled wool jacket turned out particularly well so I was tempted to reuse that pattern and get on with the project but I was also still flirting with the possible Verona Jacket from Tessuti. I superimposed the purple jacket pattern on the Tessuti one and they were close – close enough to take a risk and try the pattern. There were differences – the back came over the shoulder to become part of the front neckline. It has a definite drop shoulder and a shorter sleeve. It is also a short/cropped jacket. I wanted it much longer.

In the end I cut out the Verona jacket and crossed my fingers – this, after all, is a “muslin” – I’ve not done a test run – so I’m hoping whatever adjustments need to be made, can be made as I put the jacket together. The pattern does not have facings, I’m adding them. The pattern uses overlapped edges to create the seams which look unfinished. I decided to sew the seams, steam press them flat (using the clapper to flatten them) and then edge stitch the seam allowance 1/4″ from the seam itself. I decided to bind the collar/neck seam with a batik and to use the same batik for facings – front, sleeve edges and jacket bottom. I also added raw edge patch pockets on the front where the Verona jacket had none. What kind of jacket doesn’t have pockets? Needs pockets.

I’ve been working all afternoon at the project. I’ve got the fronts, backs, sleeves all constructed – the sleeves are now pinned in. Tomorrow I’ll sew them and top stitch them, and stitch and top stitch the underarm/side seams. Then finish the sleeves and jacket bottom with batik facings.

It’s the buttons that are now the big decision:

Jacket Buttons

I had originally thought to use just three buttons but I have a hunch the front isn’t going to fall as straight as I want it to so I think I may want five buttons instead. I’d bought four of the flower buttons (second from the bottom) – not enough if I’m going to use five. I had two choices – buy another two buttons like the four I have, or to pick up two more different buttons and make all five buttons different. So I went through my button collection found two more the same size (7/8″), one left over from the purple jacket, and another in my button collection. Still needed two more buttons. It’s closing in on 4:30 – Fabricville closes at 5! I made a mad dash – got there in 15 minutes, picked out two more buttons. Here they are laid out on the jacket.

I think I like having five different buttons! I think that’s what I’ll use to finish the garment tomorrow!

BTW the pinkish/purplish colour of the jacket is just wrong. The boiled wool is a real deep wine/magenta colour! My camera insisted on using “night” settings and no amount of editing got me anywhere close to the actual jacket colour. That is going to have to wait for daylight tomorrow.

Here’s a link to a stunning Meiko Mintz A-line jacket. The price is US $$. Add 25% to that to convert to Canadian funds. But it is a gorgeous jacket. Love the balance between the inside and outside fabrics (her jackets are reversible). Wouldn’t it be lovely to wear.