Packing Done

I got the packing finished today. Everything. I had exactly the right number and sizes of boxes on hand and enough paper to get the job done. I had help – two friends came over and worked with me boxing all the kitchen stuff – dishes, cutlery, glassware, pots-pans, baking things, pantry, plastic containers… Took three hours.

The sewing room:

The office:
Every other room the same – boxes stacked everywhere.

Tomorrow, I’ll gather what I need for the three weeks I’m homeless. Then Tuesday morning the movers arrive to take it all to storage.

The next three weeks will go quickly – I’ve got knitting with me and several novels on my phone to help me pass the time. It’ll be August 3 before I know it and then it’s the whole process in reverse!

Three Faces

My neighbour’s birthday last week. Her kids brought a cupcake for her birthday cake. She was saving it under this inverted mug – “face” was what I saw. 

I have a friend travelling in Spain at the moment. This picture of a face arrived a couple of days ago – a fountain in the old Jewish quarter of Barcelona.

Then a couple of days later she sent another face: her tuna and asparagus salad was looking back at her! (Bet the chef had no idea what he’d/she’d inadvertently done.)

Improv #7 – Finished

IMG_7739

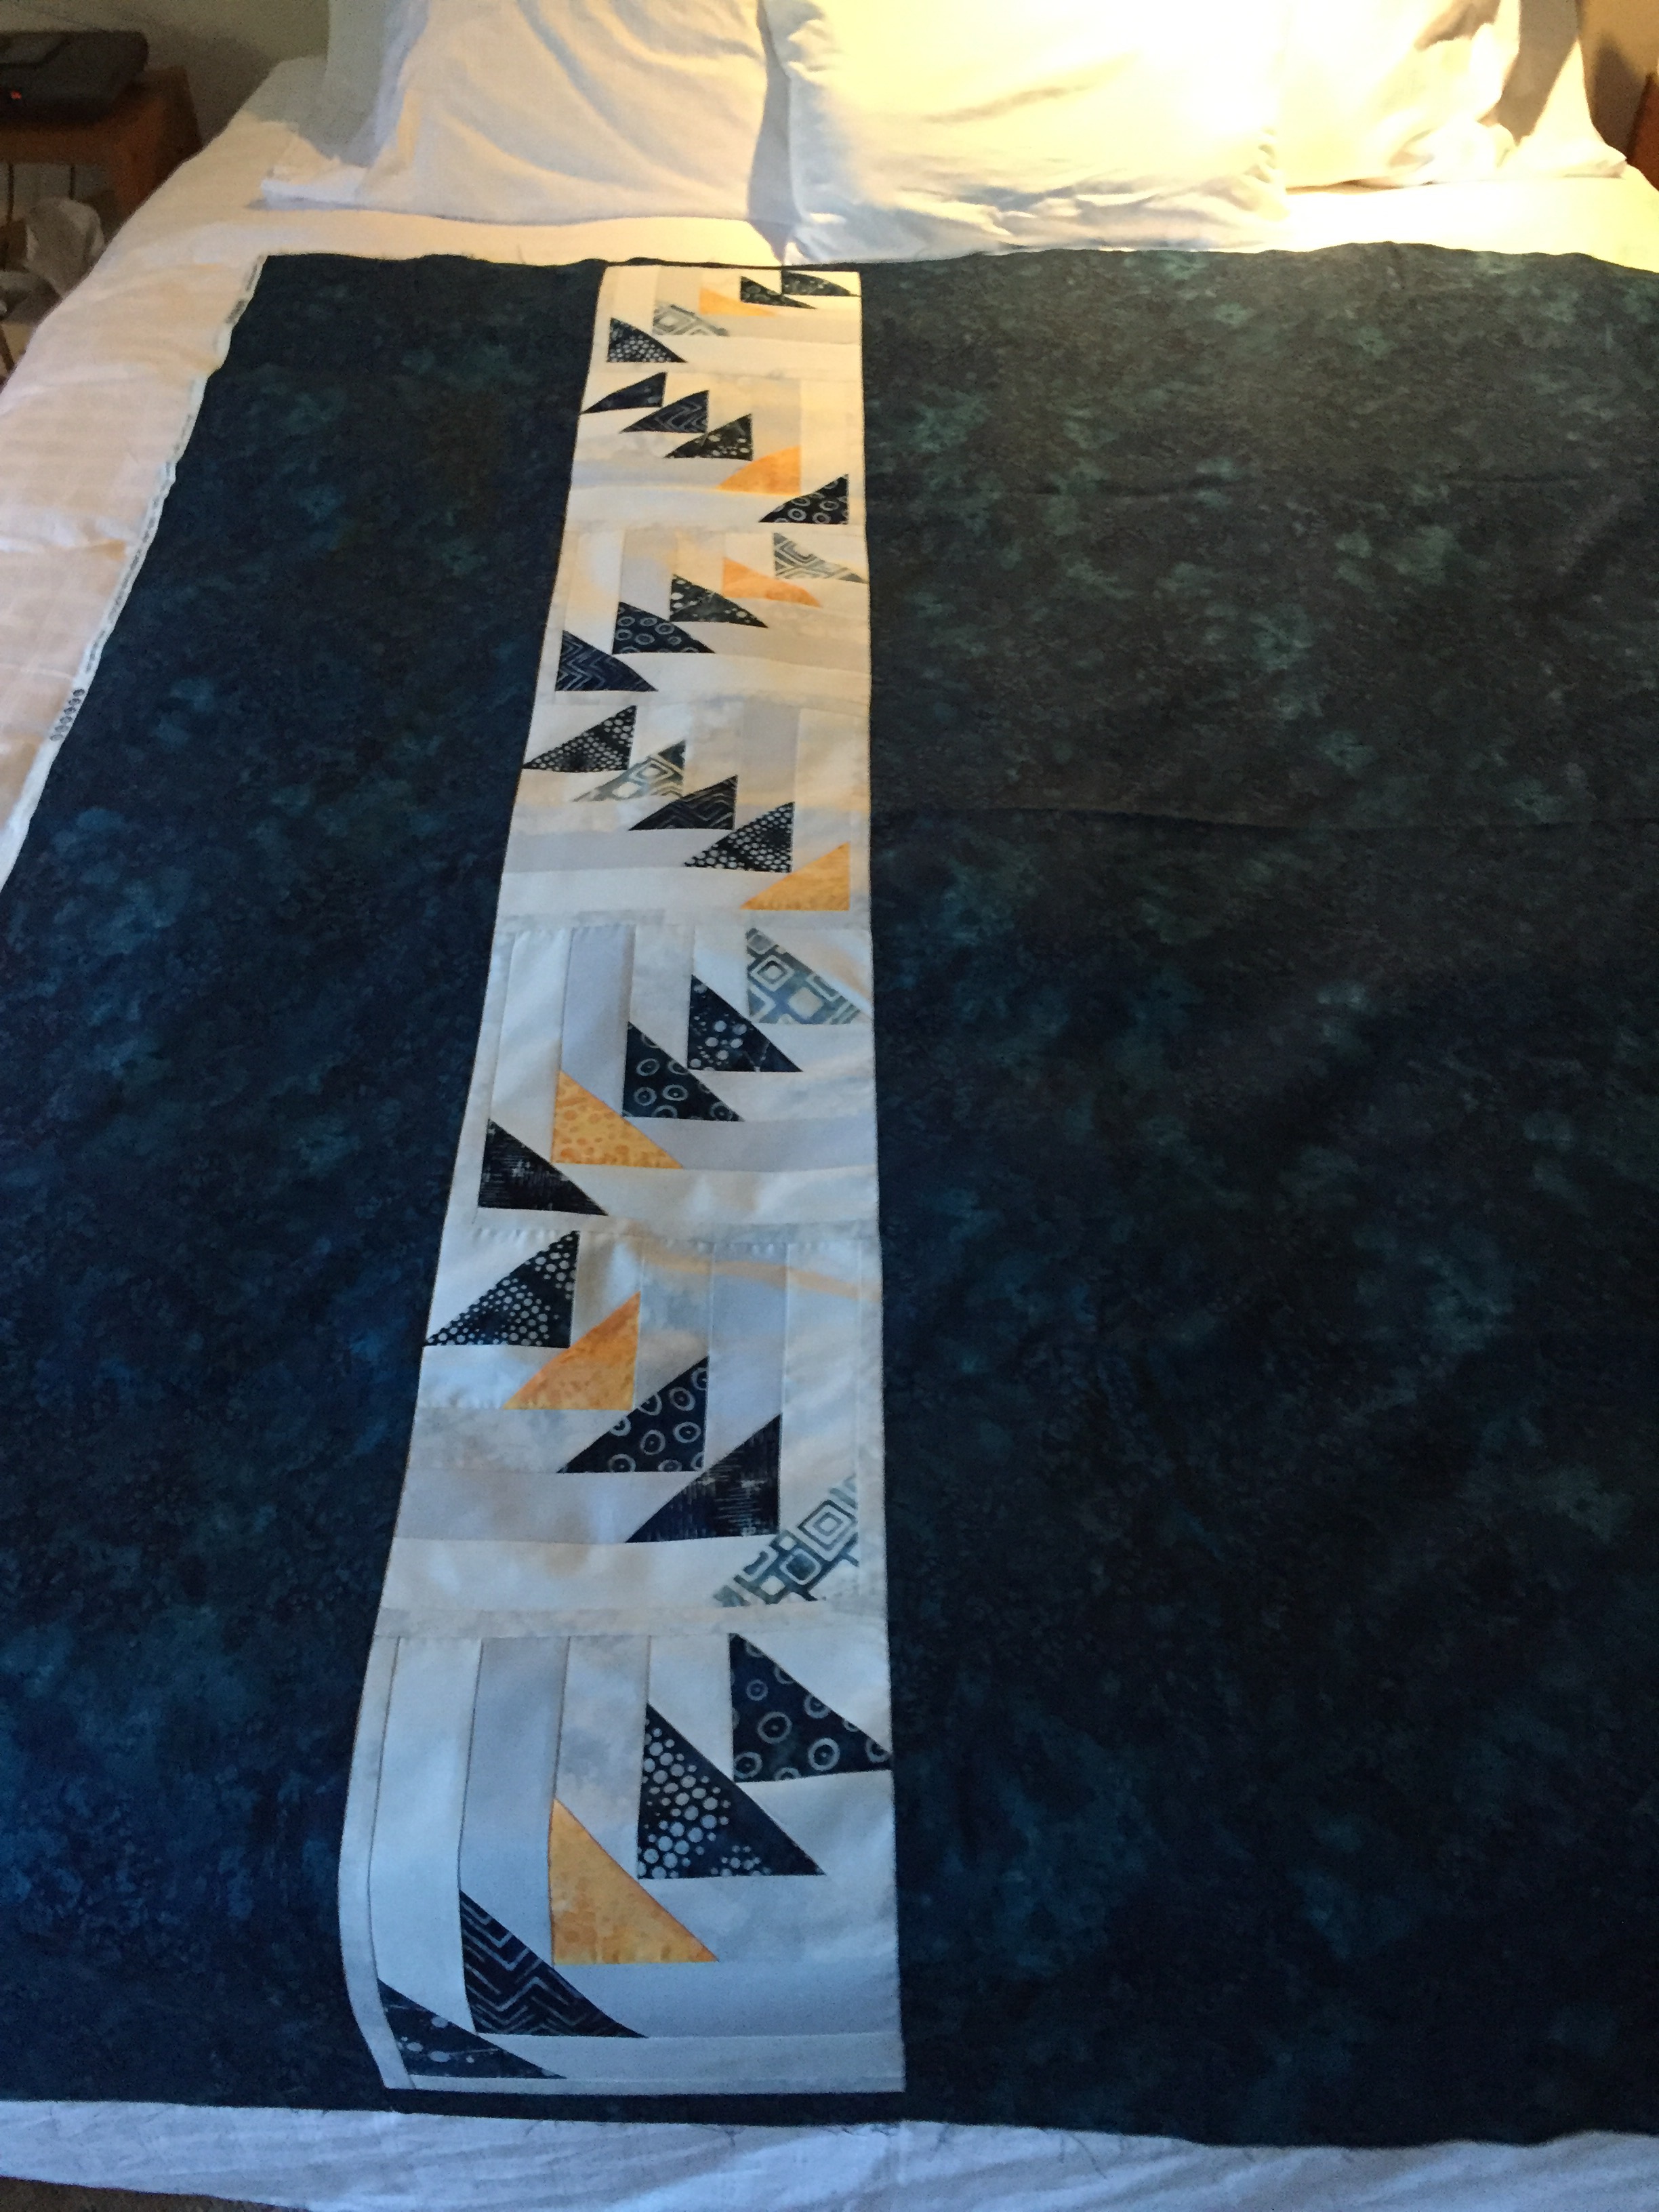
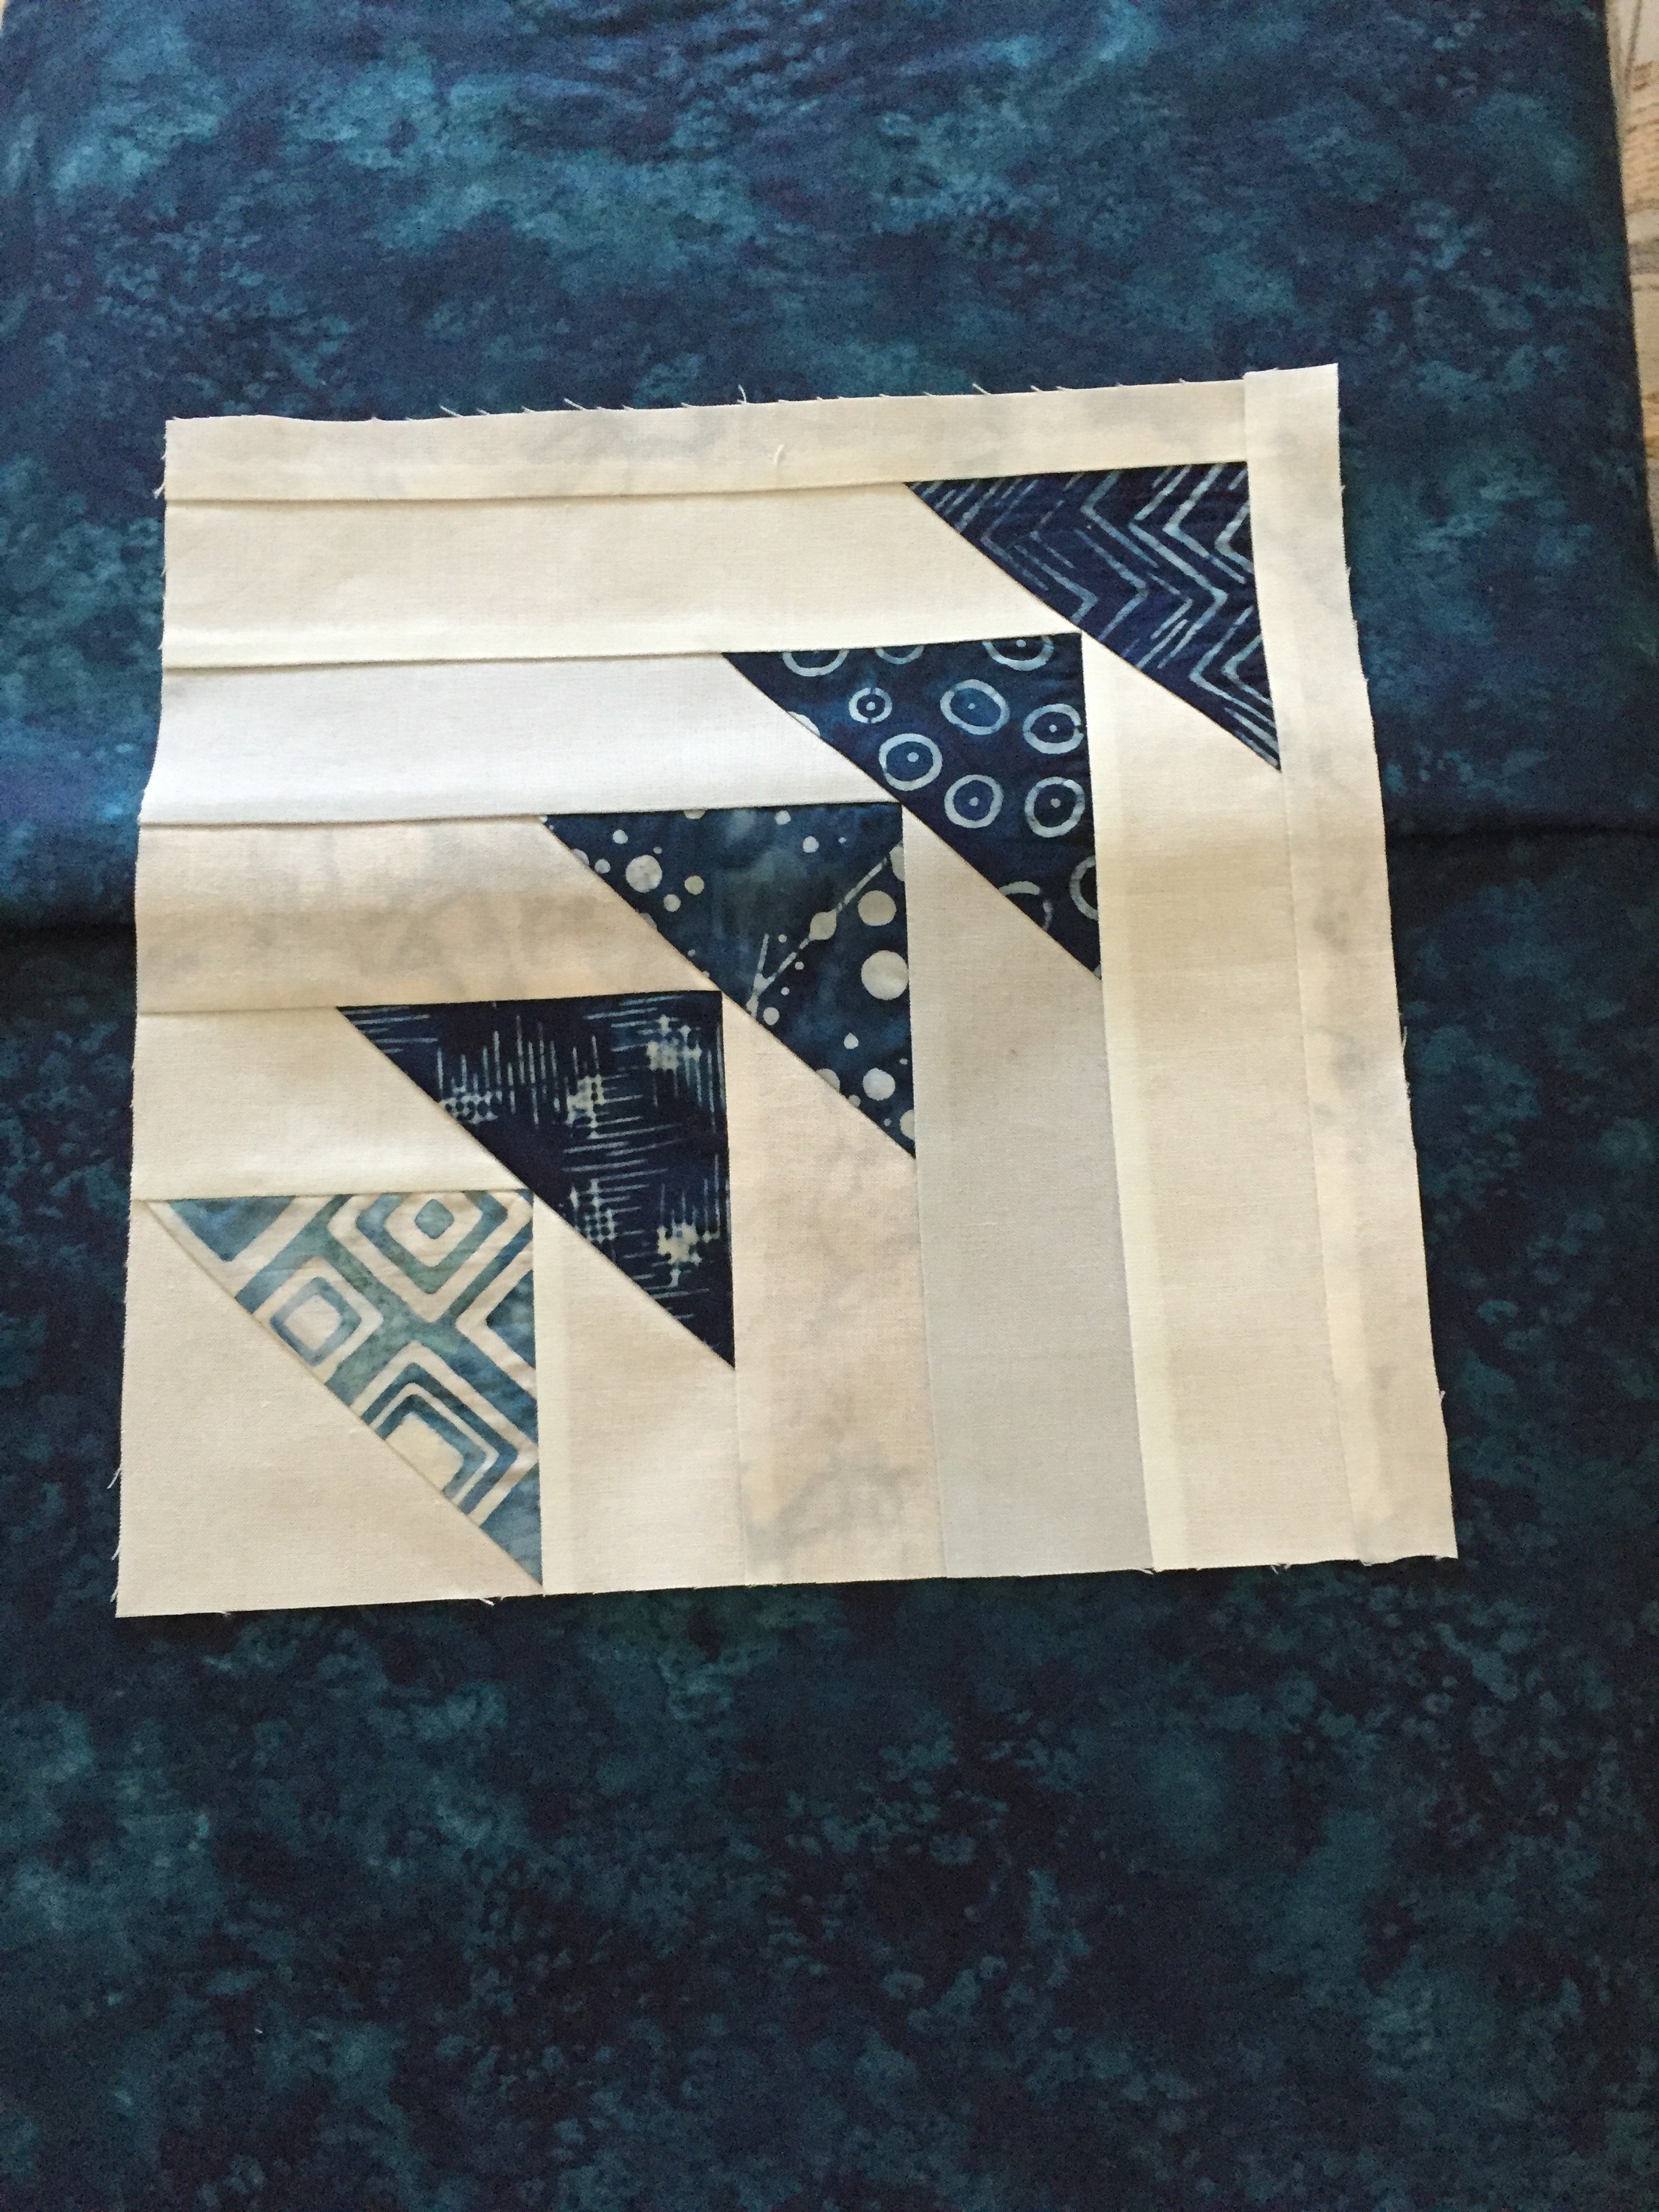
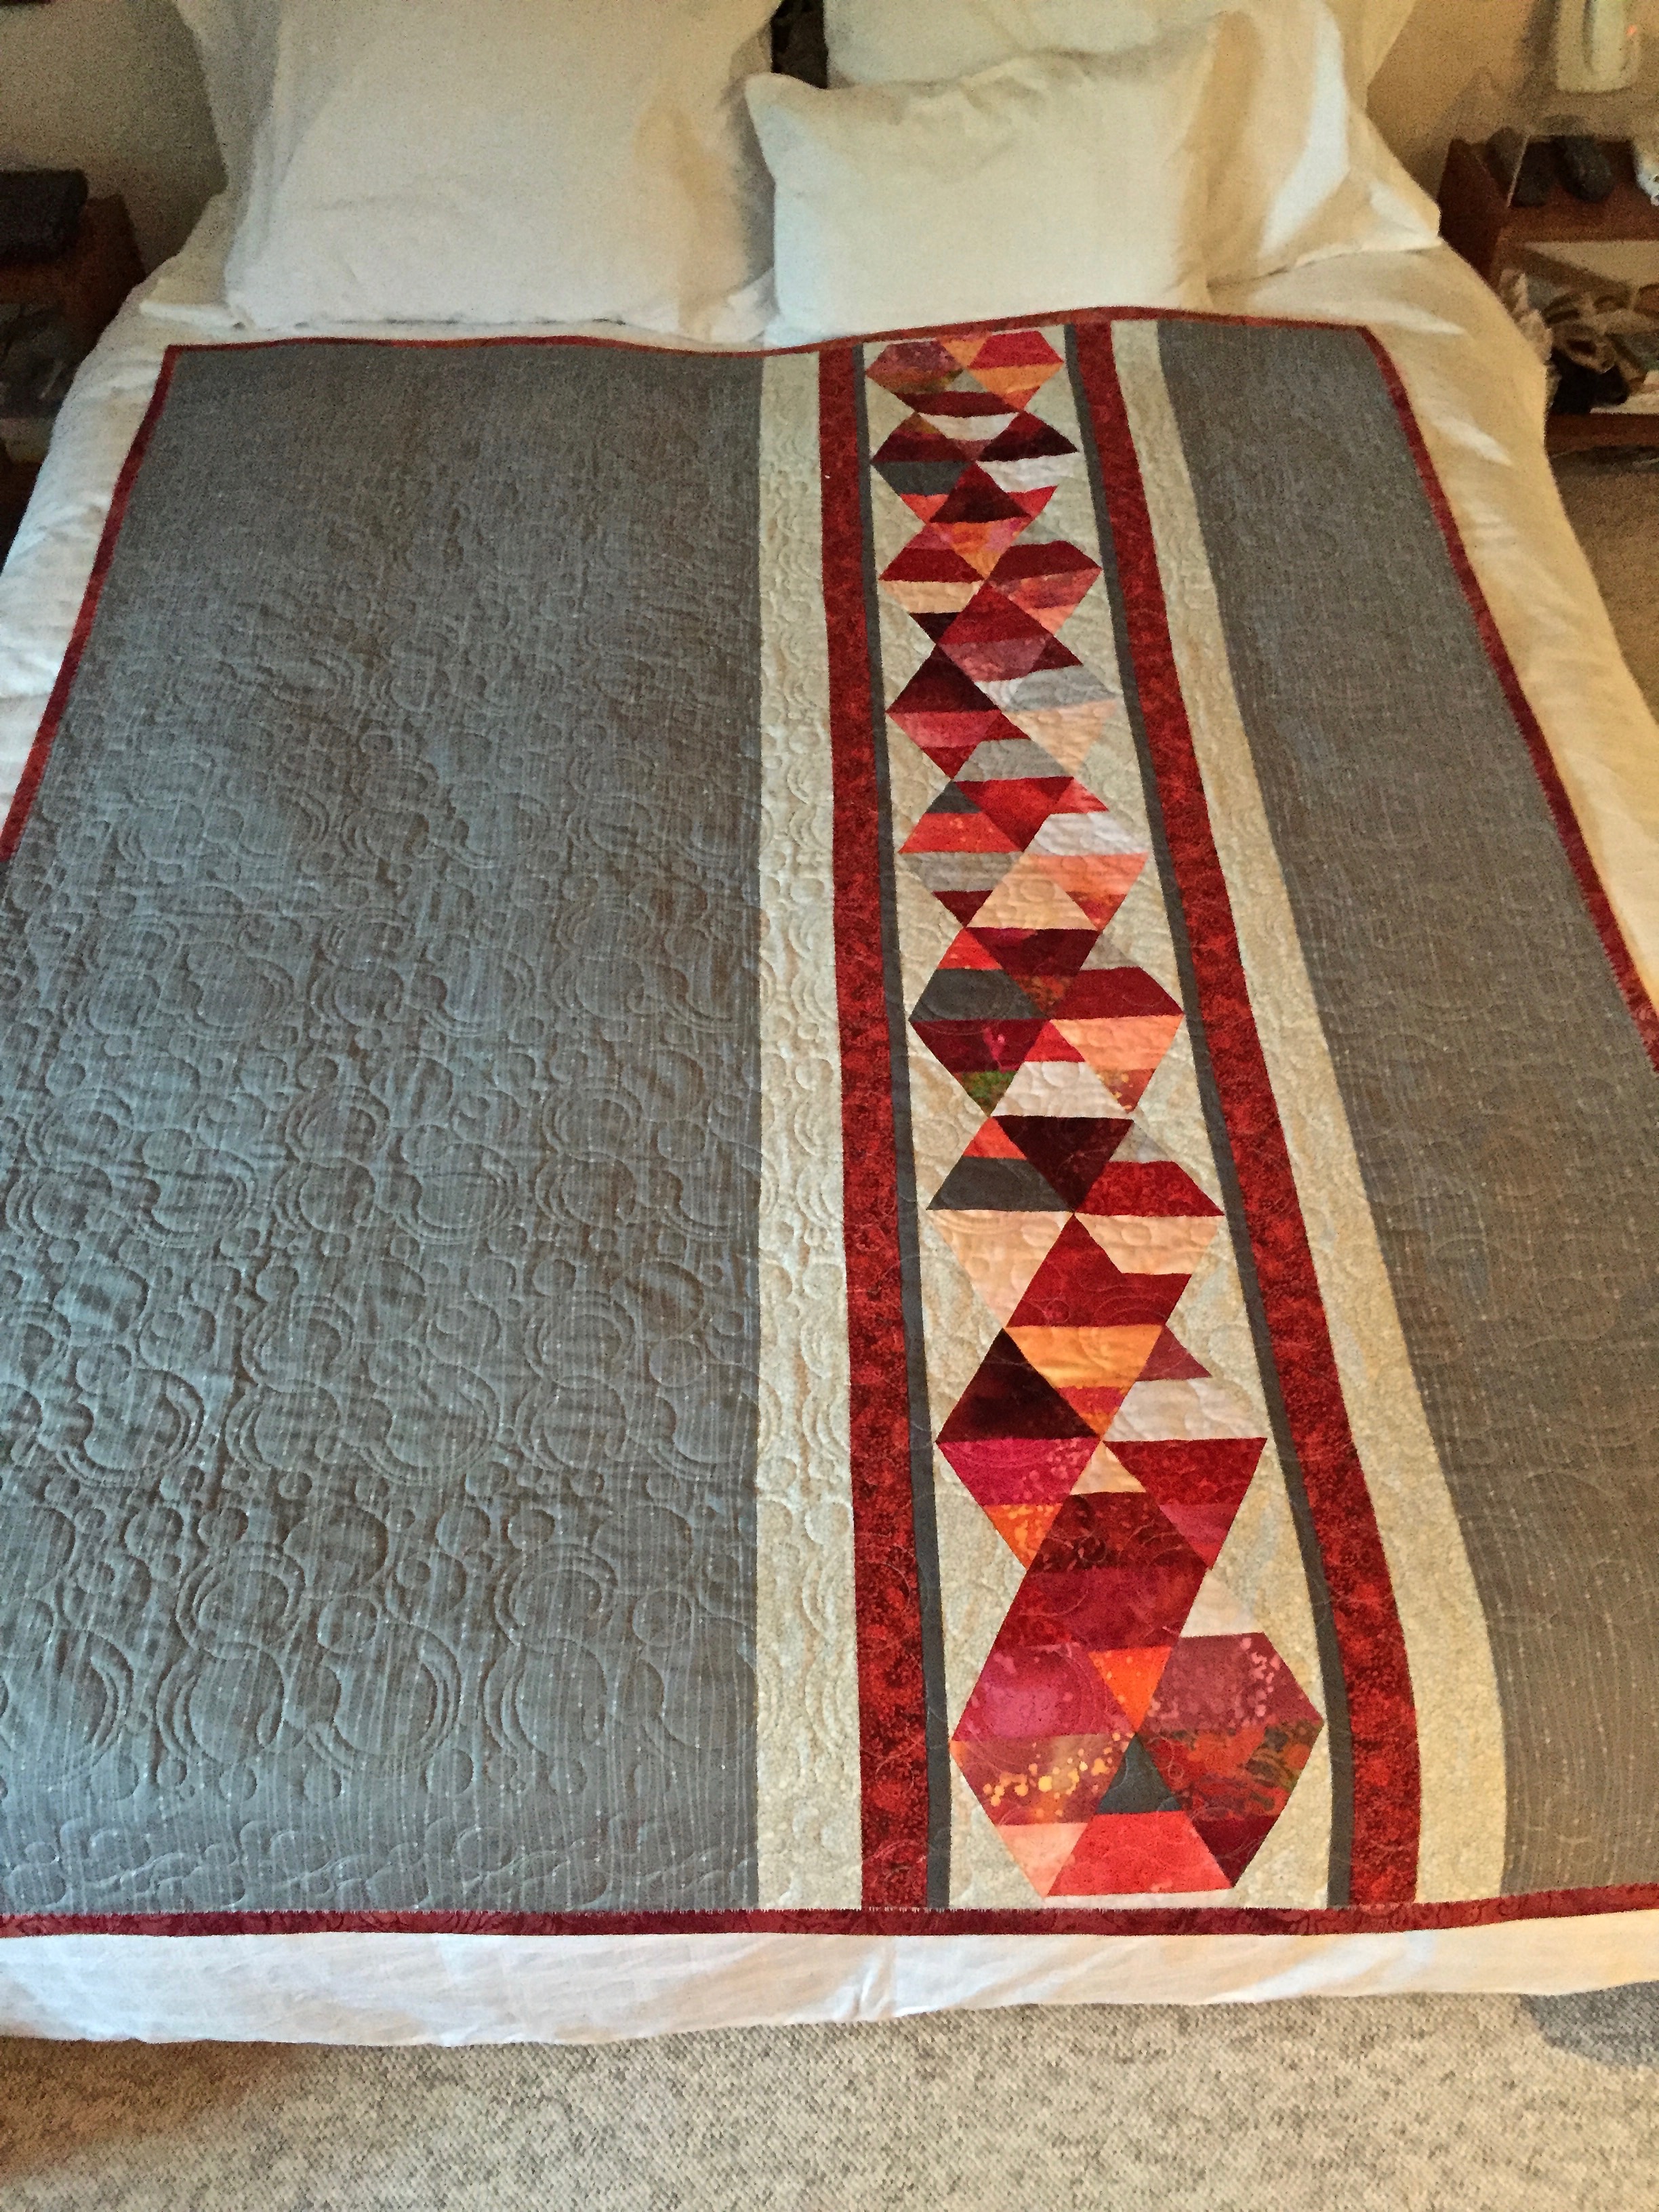
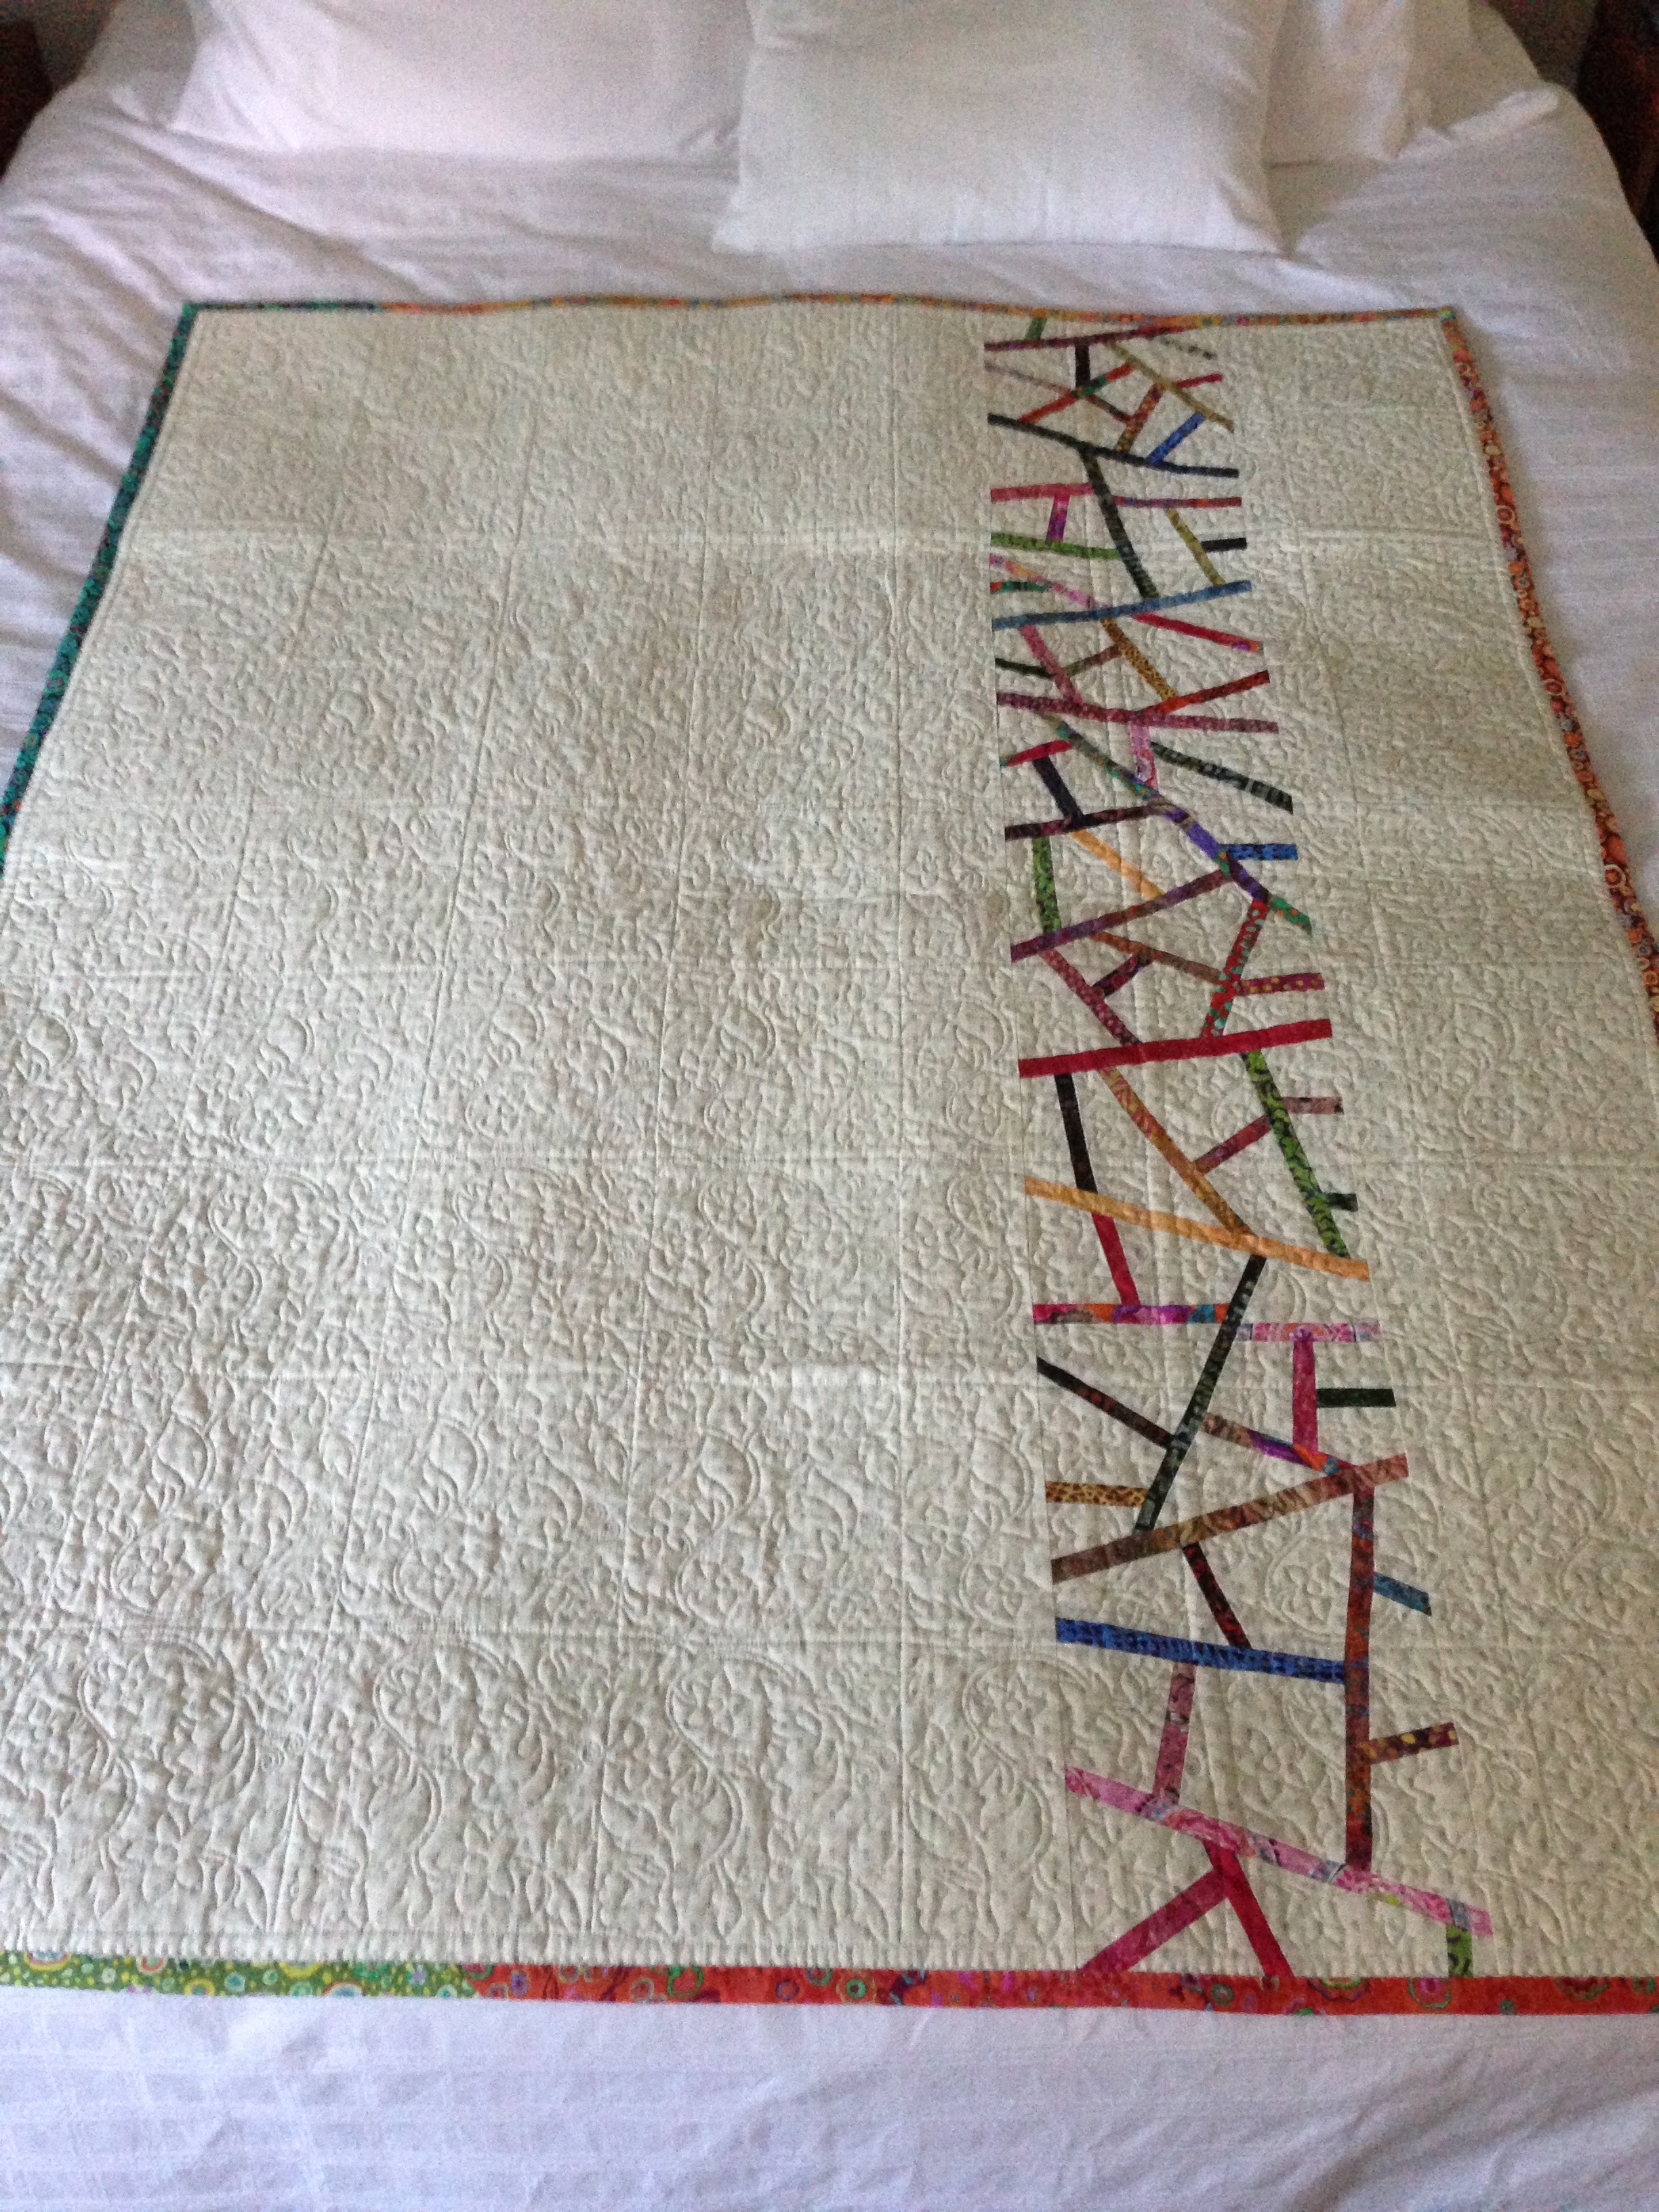
Quilt Top – Improvised Piecing

Another modern quilt completed. My goal was to complete ten quilts for the showing in Parrsboro in August. DONE! They’re all very different.

What constitutes a “modern” quilt – “Bold colors and prints, high contrast, graphic areas of solid color, improvisational piecing, minimalism, expansive negative space, and alternate grid work. (Modern Quilt Guild)”

More and more I’m being drawn to create simple but very bold quilts with strong colours and contrasts. I consider each new quilt an opportunity to extend my piecing and quilting skills. My boredom tolerance is low – I could never do the same quilt twice without pushing the design boundaries in some significant way.

In this quilt I was after a completely improvised top with a more traditionally pieced second side. In fact, in this quilt I’d be hard pressed to identify which side is “top” – in this quilt either side could be.

Quilt Back - Flying Geese

Quilt Back – Flying Geese

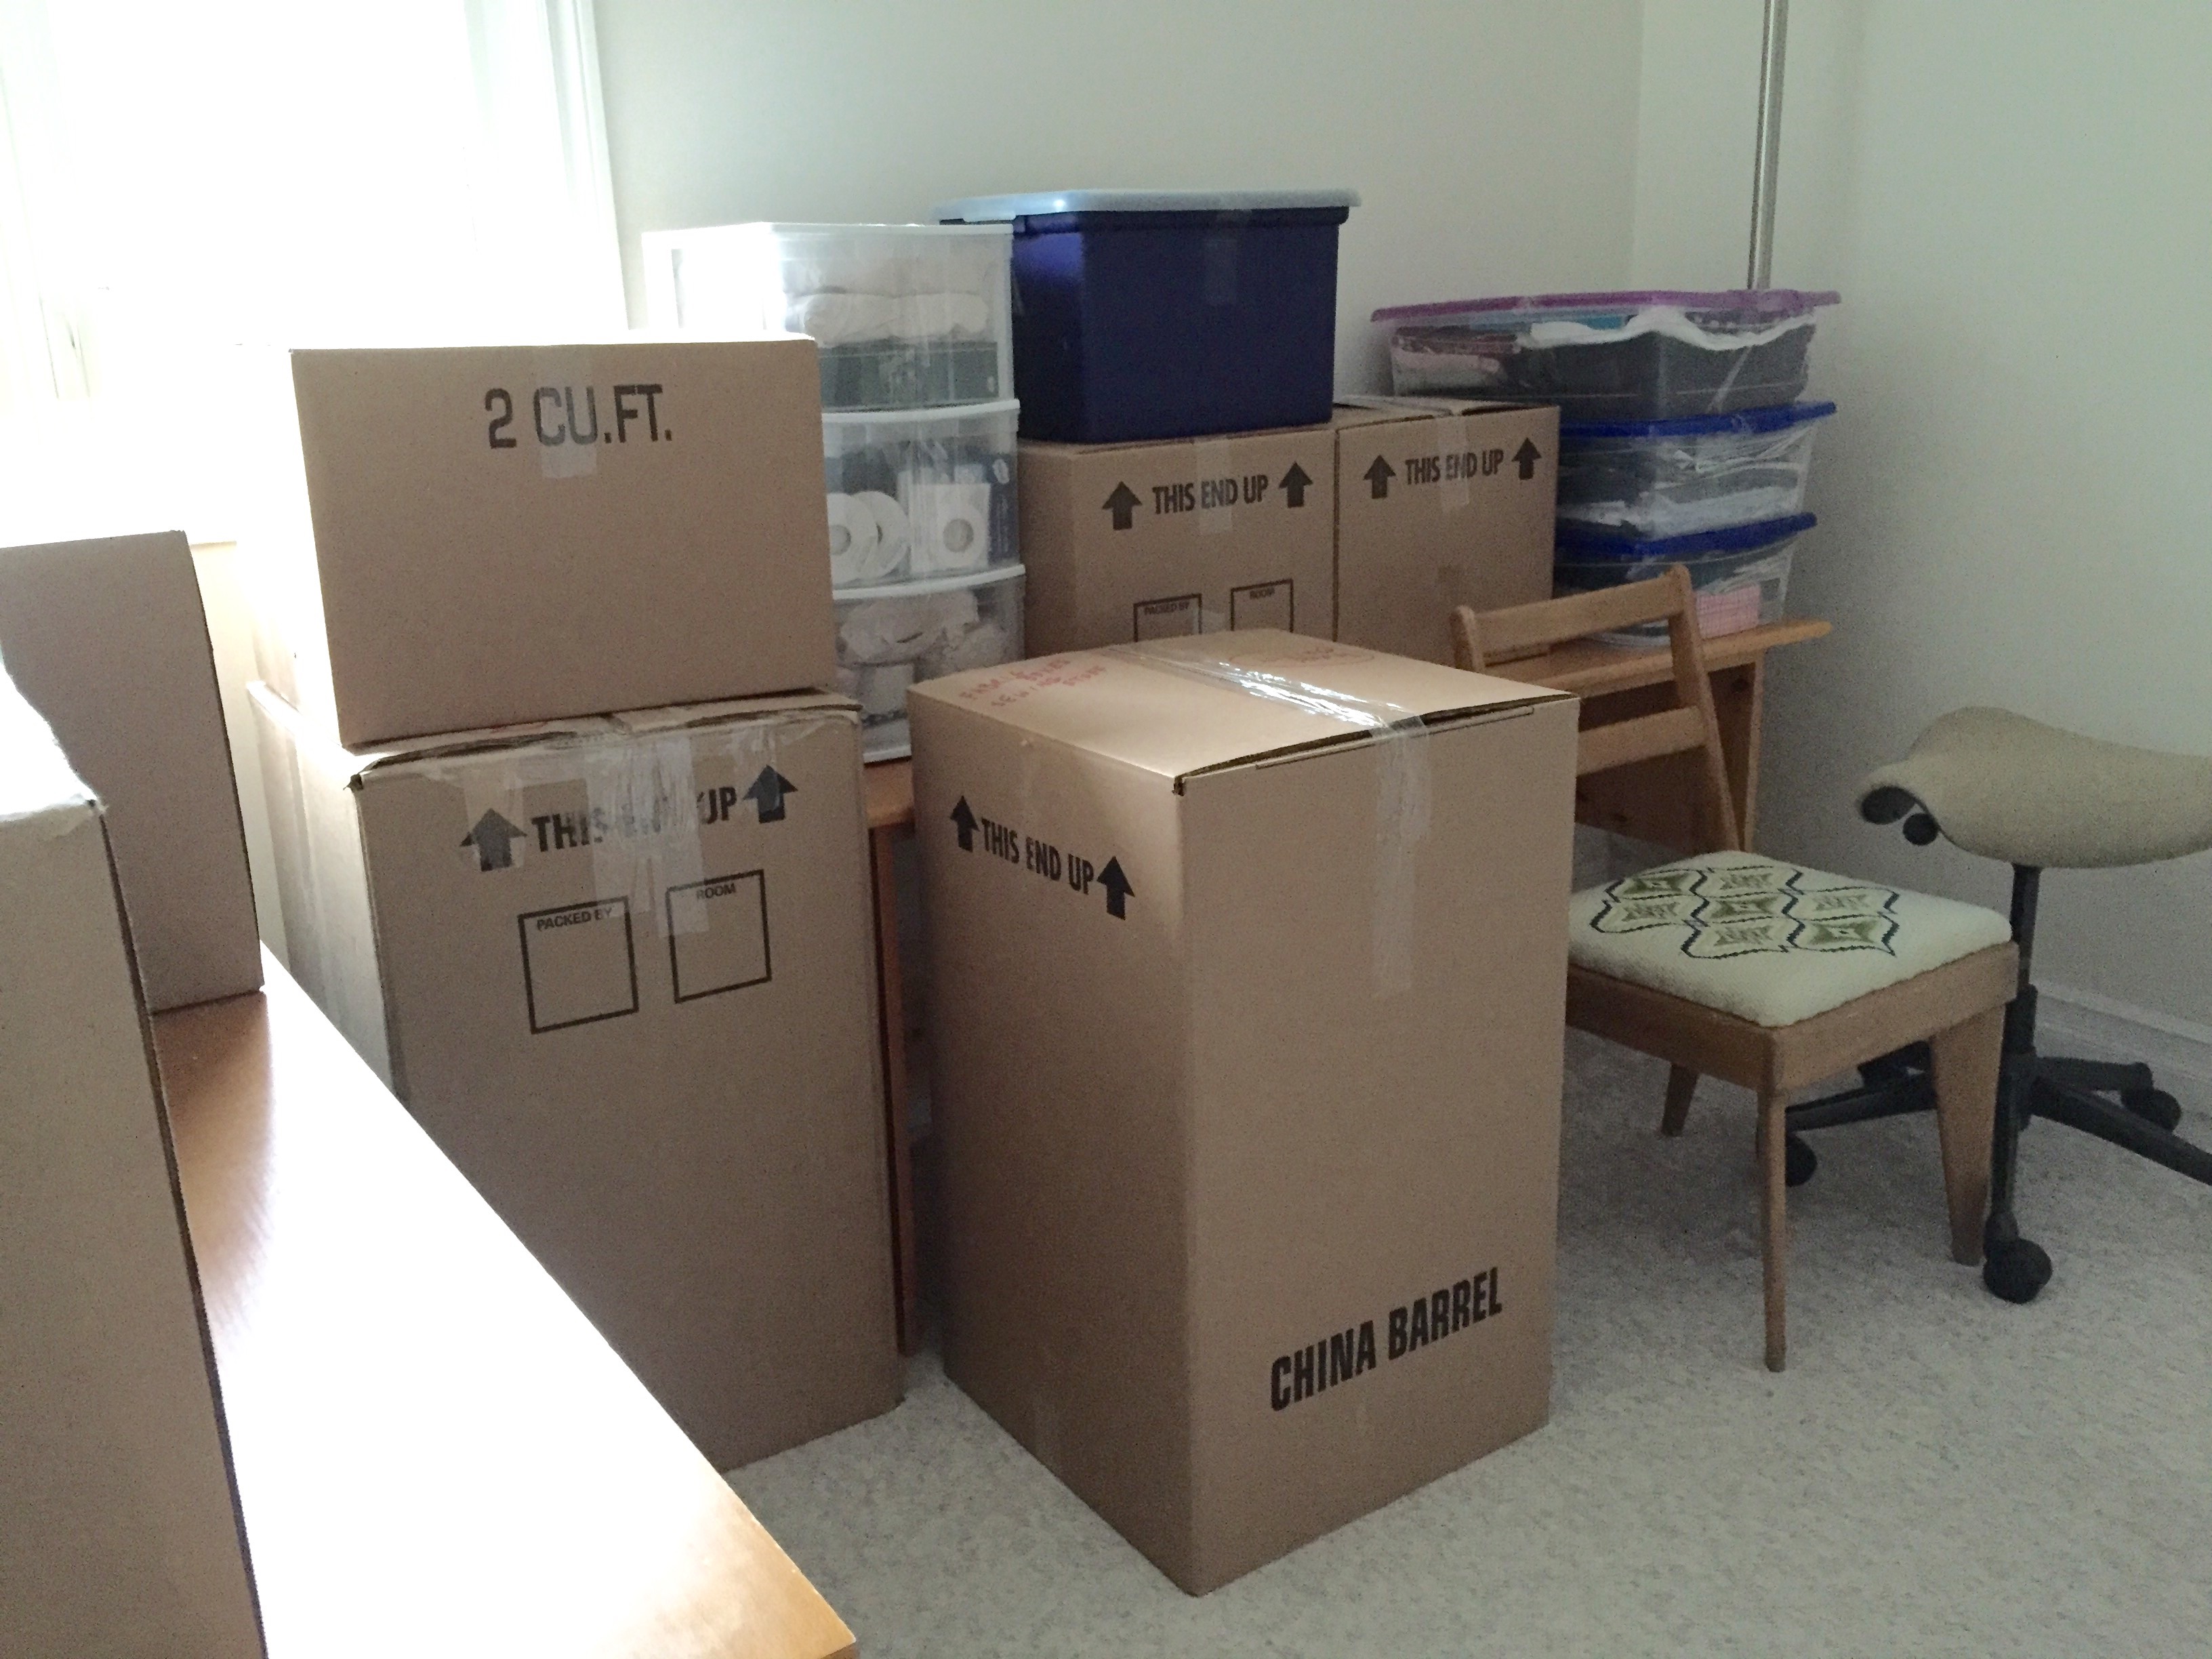
I felt under quite a bit of pressure to complete this quilt – tomorrow I have a friend coming to help me pack up my sewing room for the move and I really wanted to have this quilt finished. On Friday I could see an end might be in sight. I got just over half quilted on Saturday; finished the quilting yesterday, then bound it, last thing – added a label to the flying geese side.

With the quilt done, I was ready to move on. I spent the rest of the afternoon getting the packing of my sewing room under way. I carefully stowed each sewing machine (with its accessories) in its case. I packed each small tray/box of loose stuff in shoe boxes (saved for the purpose). Tomorrow I’ll get all the small boxes into a few large china barrels and move on to taking the shelving apart and breaking down the table assembled from Ikea parts – all ready for when the movers arrive in a week. The day bed is being picked up Thursday – it’s being recovered to be used in the sitting roomIMG_7675

My sofa is also being recovered for the sewing studio.IMG_7677

I’ve arranged for both pieces of furniture to be returned to the apartment. Looking at the fabric swatches I suddenly realize teal seems to be the colour I’m gravitating toward these days. Not hard to imagine this quilt draped over the back of either of these! Maybe that was unconsciously driving my colour selection for the quilt!

I don’t know how I’m going to occupy my time for the next month – I will have some knitting with me. It’ll be a time to read the unread books in the libraries on my phone. And there’s some travelling scheduled as well. I know the month will go quickly. I’m just impatient for the move to be over and to get myself settled into the new space.


Improv #7 – Quilt Back

Flying Geese – corner to corner

I made just eight blocks for the back (needed only seven) but I want to do a whole quilt top using fabric from my scrap box. I think I can arrange the triangles in some interesting random array.

You can see I did add a bit of golden yellow in the insert – I thought the teal hues alone were a bit drab given that the top used a limited colour palette.

I’ve now pinned the top, batting and back together and am ready to quilt the sandwich. I’ve set up an embroidery design for the 360 x 200 hoop – by my calculation it should take 35 (5 x 7 array) repeats to edge-edge quilt the whole thing.

Quilt Improv #7

Quilt Top


I was supposed to teach a class on how to take a piece of fabric (a ~7″ square, for example), slash it, insert a narrow strip, slash a second time, crossing the first insertion, and insert a second narrow strip. The first insertion is easy, the second takes a bit of adjusting. I called the quilt “pick-up-sticks”.

Rather than make another Pick-Up-Sticks quilt for myself, I decided to use the technique to create a wide panel the length of a quilt top and insert it into a length of background fabric for the top. Not difficult to do – I cut two 16″ WOF pieces, cut off a segment at a time, slashed the fabric (rotary cutter and ruler), laid out the pieces, then added insertions.

A slashed segment


The trick with this technique is to keep the pieces laid out in order so you can tell which bit gets joined to what! Also I was careful to mark the “top” edge of the uncut fabric, as well as the top edge of the growing  strip – that’s because I was cutting my large sections of fabric as irregular quadrilaterals, not as rectangles, so I needed to be able to align the bottom of a finished segment with the top edge of the subsequent one. 

I created the full panel with seven segments. The piecing went quite quickly. I used 1/2″ inserts (1″ strips) which made up for the seam allowances and maintained the original dimensions of each uncut segment.

Now for the second side (I hesitate to call it a back because there will be quite a bit of piecing involved).

Flying Geese Block


Flying geese blocks – they require precision in the cutting, in the stitching, and in the trimming. I finished one block when I realized I needed a narrow strip on two sides to provide contrast for the final triangle to show up against the background fabric! Now I’m thinking I want a wee bit of a golden yellow in there as well – maybe as strips to join these blocks into a panel to be inserted into the background fabric….

Red/Orange Socks

Another improvisation using variegated yarn. I broke the pattern using the teal colour insert.

IMG_7712

Red/Orange Socks

Because I had only one 50g ball of variegated yarn for two socks, I had to locate the mid-point of the ball – I realized that half-way through the first foot! So I stopped where I was, unravelled the ball of yarn until I located the matching starting point for the second sock, cut the yarn, then began working on the second sock. My plan was to knit until I ran out of yarn on the second sock and then unravel the first sock back to the same location in the pattern.

I was lucky, I’d stopped just about at the center and so I didn’t have to unravel anything on the first sock when I resumed knitting after finishing the second sock!

I’m happy with how they turned out.
So into the stash this pair goes.

I started a new pair last evening – this for Edouard whose feet are cold these days. Black/white variegated yarn with an orange-red accent yarn. I thought this red/orange pair were likely too bright for him to feel comfortable wearing them so I made this pair my standard women’s size.

“Victoria” Blue Salvia!

It turns out what I planted the other day isn’t Lavender but Victoria Blue Salvia.

IMG_7715

Blue Salvia

Some friends came up with suggestions such as Indigo but the leaves were all wrong for Indigo. I finally searched for “purple flower spikes” and found the plant. That explains the lack of scent. There are auxiliary shoots in the leaf axils which will also produce flowers ending up with lots of purple spikes as the season advances.

The plants are looking happy in their new container homes. So the plant was a good choice.

Shadow Quilt – Just Finished

IMG_7701

Quilt Top

Just finished! Label and all. Took the better part of three days to quilt all the blocks. What I like about this embroidery is that it fills the block completely. In fact, after I pin basted the layers, I didn’t stitch in the ditch to tie the top / batting / backing together. I left the pins in and simply embroidered each block – 48 blocks, plus the borders (24 repeats) and corners (4). I used a 200 x 200 quilting hoop for the blocks, the grand endless hoop for the borders – I love using the endless hoop because I don’t have to remove the hoop from the machine, just move the quilt edge along after each embroidery (once I figure out where I want to position it for the placement I’m after). The borders go very quickly.

IMG_7703

Quilt Back

The backing started out with 2 1/2″ strips – sewn together in pairs – had I thought about it a bit more I’d have been better off using 4 1/2″ WOF cuts and cut the triangles from those – the diamonds would have stood out better. Not that there’s anything wrong with what I’ve done. I will have to try another quilt using half diamonds from a single fabric to see what that will turn out like.

This is quilt #9 for the showing at the end of August. I have time to make one more before I pack up my sewing room. I bought fabric last week – IMG_7705

My plan is to cut two 16″ WOF strips from the dark print and 1″ strips from the soft, pale blue/grey (which will give me 1/2″ inserts). I will do an improvisational strip like one I used on the back of an earlier quilt – but this time the strip will be much wider and will be the top of the quilt.

IMG_3147

Quilt Back from Pick-up Sticks Quilt

I have been thinking about the back of the new quilt as well – I bought a couple of  sets of fat quarters in shades of teal (dark and light) when I visited Keepsake Quilting two years ago – one of the sets includes just 6 pieces of fabric – that will be enough to do something within an overall backing fabric – no idea yet what colour the backing should be – somewhere in the teal family, I’m guessing, to go with the top. Tomorrow I will cut the fabrics for the top and begin piecing and see what I end up with.

I love starting new projects – I never quite know what I’m going to get.

Lavender?


I haven’t put a lot of effort into my container garden this year because I’m moving out July 12 and leaving it for the new owners. So in the spring to fill the pots I dug up sprouting plants from nearby garden beds and stuck them in the containers which would normally hold showy annuals. 

Two pots held forget-me-nots which bloomed early, then they were attacked by mildew, so yesterday I pulled them out but wanted to replace them with something. I found some inexpensive New Guinea impatiens, four seedlings in a basket, and another which has purple flower on a stalk – looks like it might be lavender but I’m not detecting any lavender scent yet, maybe the flowers aren’t far enough along. In any case they fit the bill and look good in the pots.

The Siberian iris has started blooming – in another day or two there will be several fully open. The single small petunia seedlings I stuck in the hanging pots has filled out and looks great. Their purple colour complements the iris.

The rhododendron flowers are also now opening.


And the two hibiscus which I am taking with me look like they will have a couple of new flowers each day:


I am going to miss watching everything grow. However I will still have my indoor garden with me (most of it, anyway):


A house without plants just isn’t a home, as far as I’m concerned!