I’ve been pondering the quilt back for many days – I have the four long strips assembled from the 2 1/2″ batik pieces which I’d originally intended using on the front and I wanted to incorporate them in some way on the back. I picked up what could have been some batik backing fabric at Atlantic Fabrics on Friday – there wasn’t quite enough of it for a single length but I thought it brought out the colours in the small strips so I bought what was there. I also picked up this blue batik on Sunday at Heidi Wulffrat’s shop in Mahone Bay – just enough for a single strip. However this quilt (because it’s a square) needs ~60″ in width – close to 20″ needed to augment this strip I’ve assembled so far.
I’ve attached one of the long strips to the right side, the second is sitting on the floor beside it. I’m going to intersperse something between those two long strips and I intend using a third but I also want to integrate the fabric I bought on Friday which also needs to be broken up in some way.
I’ll just keep working at this. I’m thinking about this – if I get it more or less pieced in an interesting way – as possibly the front of the quilt! I have to see how it all turns out.
I also don’t have a name for this quilt, either! Maybe something will come to me when I get it completed.
I’ve just added a 1″ border to the panel using the sashing fabric. My intention was to add another 3″ border built from 2 1/2″ cuts of the panel fabrics. I have the assembled strips, I’ve added one to one end – don’t like it at all!
The backing fabric I ordered arrived – the same navy sparkle that I had – whew! – I could now cut a wider outer border from the dark sparkly fabric but I’m not sure that’s what I want, either! I might be fine with this narrow outer border and consider the panel done.
I know my local fabric shop down the street from me has no batik that would work as an outer border (I want something darker rather than lighter) so I guess it’s a trip to Atlantic Fabrics and hope I can find something there.
I ordered another silk kantha bedspread ten days ago – it arrived day before yesterday. It’s a dark, rainy afternoon and the overhead light floods the quilt with yellow light. It’s actually more off-white/light beige with red and purple accents. It has red and white quilt stitching. It’s going to be perfect for a colourful summer jacket – this time with more flow and more contrasting colour to bring out the red in the silk blocks.
I bought a 90″ x 108″ quilt – that’s a ton of fabric – more than enough for two jackets! I’ll do one for myself first, then who knows what I’ll do with what’s left. A friend sent me a Pinterest photo of a summer shirt yesterday – this might work nicely done with some of the kantha.
Summer Shirt Idea From Pinterest
She’s right about that – it wouldn’t take much kantha fabric to do half a front, half a back and one sleeve! I’d use red linen for the other half of the shirt. Simple to make – a facing on the front neckline, a small binding on the back. It’s hard to tell from the photo whether the bottom of the shirt is actually scooped or just tucked into the bottom. I’d make mine straight with side slits.
I have just finished assembling the 16 blocks with 1/2″ sashing. I decided to use a narrow sashing to tame the bias edges of the blocks – it has done that. The half inches and the intersections are pretty good – the imperfections won’t be noticeable when I’ve added the outer border and quilted the whole thing.
So here’s my dilemma – I have exactly 20″ of the sashing fabric to use for the outer border. I’d like to use 3″ cuts but here is the math:
Side length = 56″
Fabric (minus selvage) = 42″ + 14″ = 56″
Overlap needed to join fabric = 6″
Overlap for corner mitre = 3″ x 2 = 6″
Total fabric needed for one side = 56″ + 12″ = 68″
Fabric needed for 4 sides = 272″
20″ of fabric cut into 3″ strips yields 6 x 42″ = 252″!
If I cut six 3″ strips I’m going to be 20″ short of fabric – and I don’t have a scrap of this navy Speckled (Ruby Star Society) anywhere in my boxes of scraps. (If I hadn’t done the sashing, I’d have had enough fabric!)
Back to the beginning – what if I don’t mitre the border corners – I still need 56″ of border length for two sides, plus 6″ to create a mitre join, the two short lengths each need to be 62″. The two longer pieces each need to be 62″ + 6″ (double the width of the border) – 68″. Total border length: (62 x 2) + (68 x 2) = 260″! I’ve managed to save 12″ but I’m still short 8″. Butting the border pieces won’t work either.
OK, so I create 2 3/4″ strips (2 3/4″ x 7 = 19 1/4″) – that means I have enough fabric to make 7 cuts from the 20″ of fabric. 7 x 42″ = 294″. That gives me enough length for four border sides with mitred corners (leaving me 22″ to play with). Attached, (using a 1/4″ seam) gives me a 2 1/2″ border. I then lose at least another 1/4″ if I do a hidden binding, 1/2″ – 5/8″ if I decide to finish with a traditional quilt binding. In the end I will have just about a 2″ border. Not quite wide enough to tame the busyness of the 40 coloured strips in the panel.
I managed to find more navy Speckled fabric online – it’s on the way; but I have no guarantee that the colour will match what I used for the sashing. It looks like I better wait for the fabric I ordered to arrive. Just put this project aside and start another quilt. If the fabric I ordered is close I’m in business. If not, I will have to make a narrower navy border and then improvise with another fabric to make a wide second border.
Jon Foreman, a Welshman, does these amazing creations on a beach using stones or shells, or just a rake and some string.
It’s about the time it must take to collect the RIGHT stones – construct the array, take photos, then walk away. The next day the array is likely gone, washed away by the waves. He sets to work again.
Four days ago I shared my work on a new quilt – I had sewn together 3 panels of four strips each – I had 7 panels left to create.
4 Panels Sewn
I’ve worked away at the panels – finished sewing them yesterday.
40 Strips Sewn in 10 Groups of Four
Here’s where it got interesting. I made the decision to revamp the panels into 4 sets of 10 strips – I accomplished that by sewing two sets of 4 then splitting the next adjacent panel in half and joining the resulting 2 strip sets to the first 8 and the second 8. Repeated that with the remaining strips giving me 4 sets of 10.
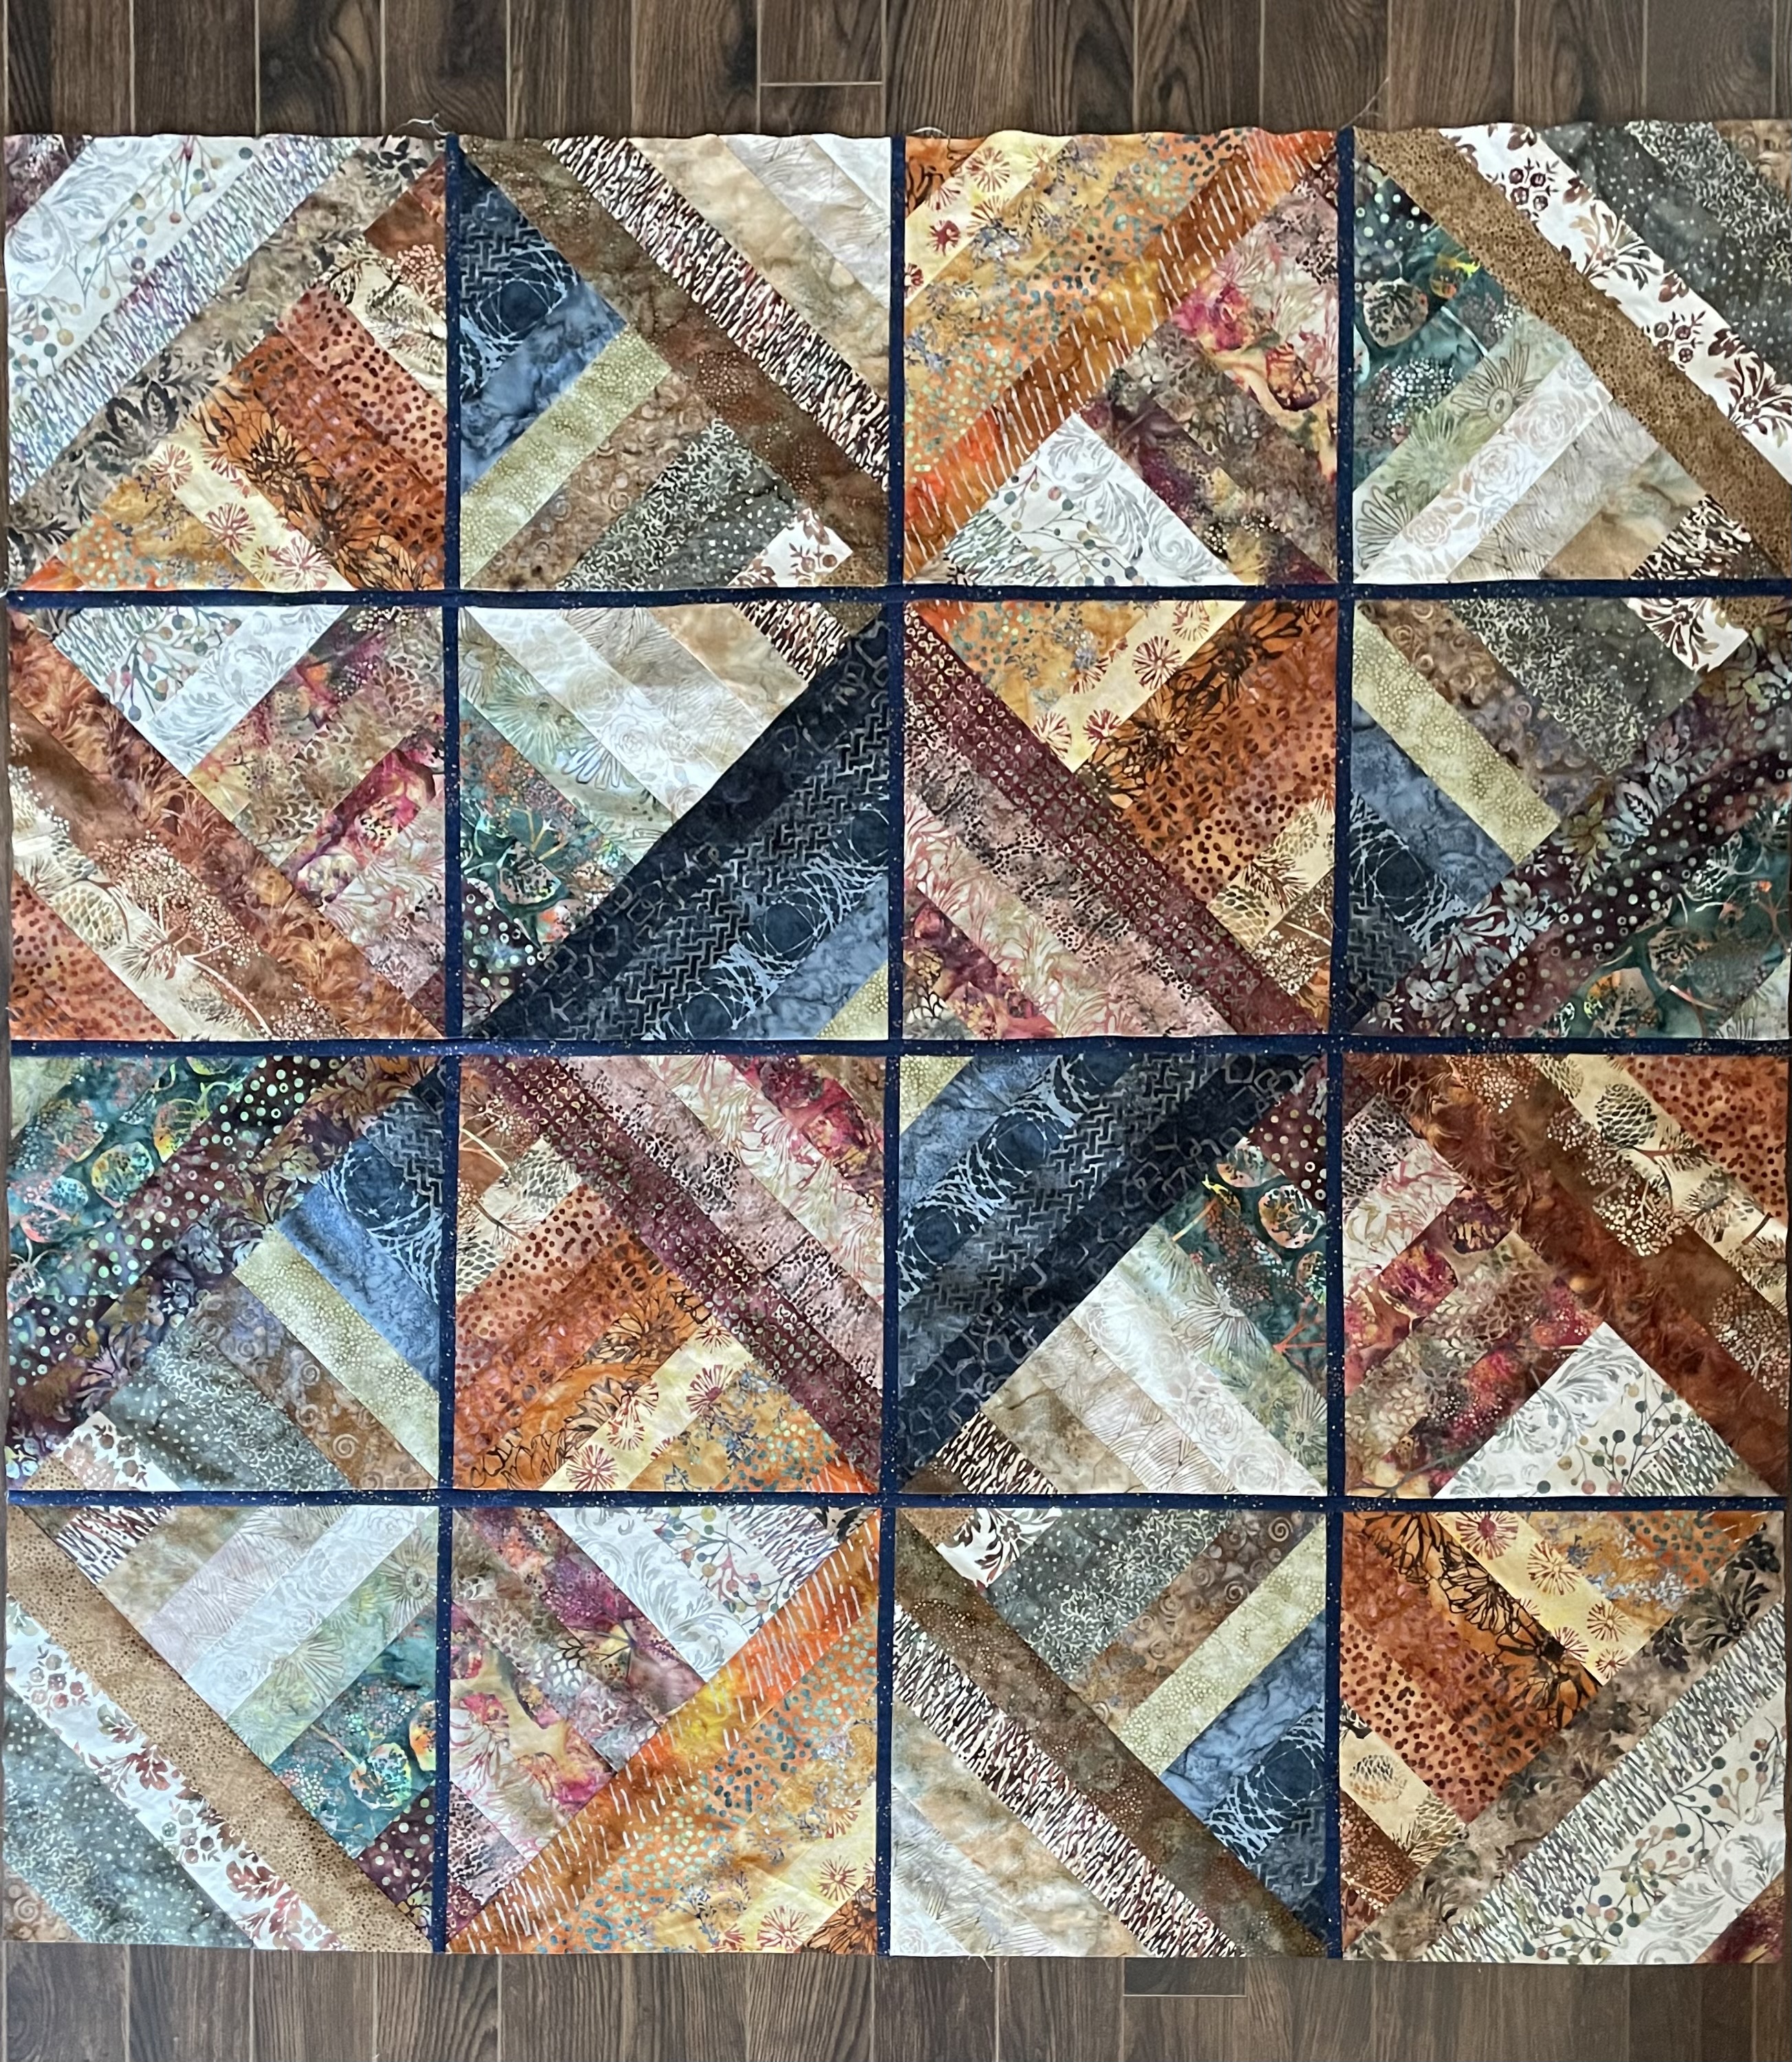
What I did next was create two 20.5″ squares from each 10 strip panel, matched up two non-identical panels, stitched around the outside, then cut along the diagonals. From my first two panels I got the following:
The first eight blocks laid out
Not a bad start – you get two large blocks with an encircled square. But my other eight blocks are very different in colour so how do I use them?
Layout #1Layout #2Layout #3Several Block Layouts
The first layout was a more or less random placing of the 16 blocks. The second layout set up a dark square in the centre and build more or less randomly on that centre. The third layout took the initial 8 blocks and added the second eight to the sides. At the moment I have no idea which to use. Each time I look at the photos I see new conflicts I want to resolve.
In addition, I’m planning on putting a navy speckled 1/2″ sashing between all the blocks which should actually bring the hodgepodge of colour together – fingers crossed on that. Furthermore, I really don’t want a square quilt! I want a rectangular one. I could get that, if after sewing the square together, I cut each of the two sides in half and place the cut pieces at the top and bottom! I have a hunch I may actually do that.
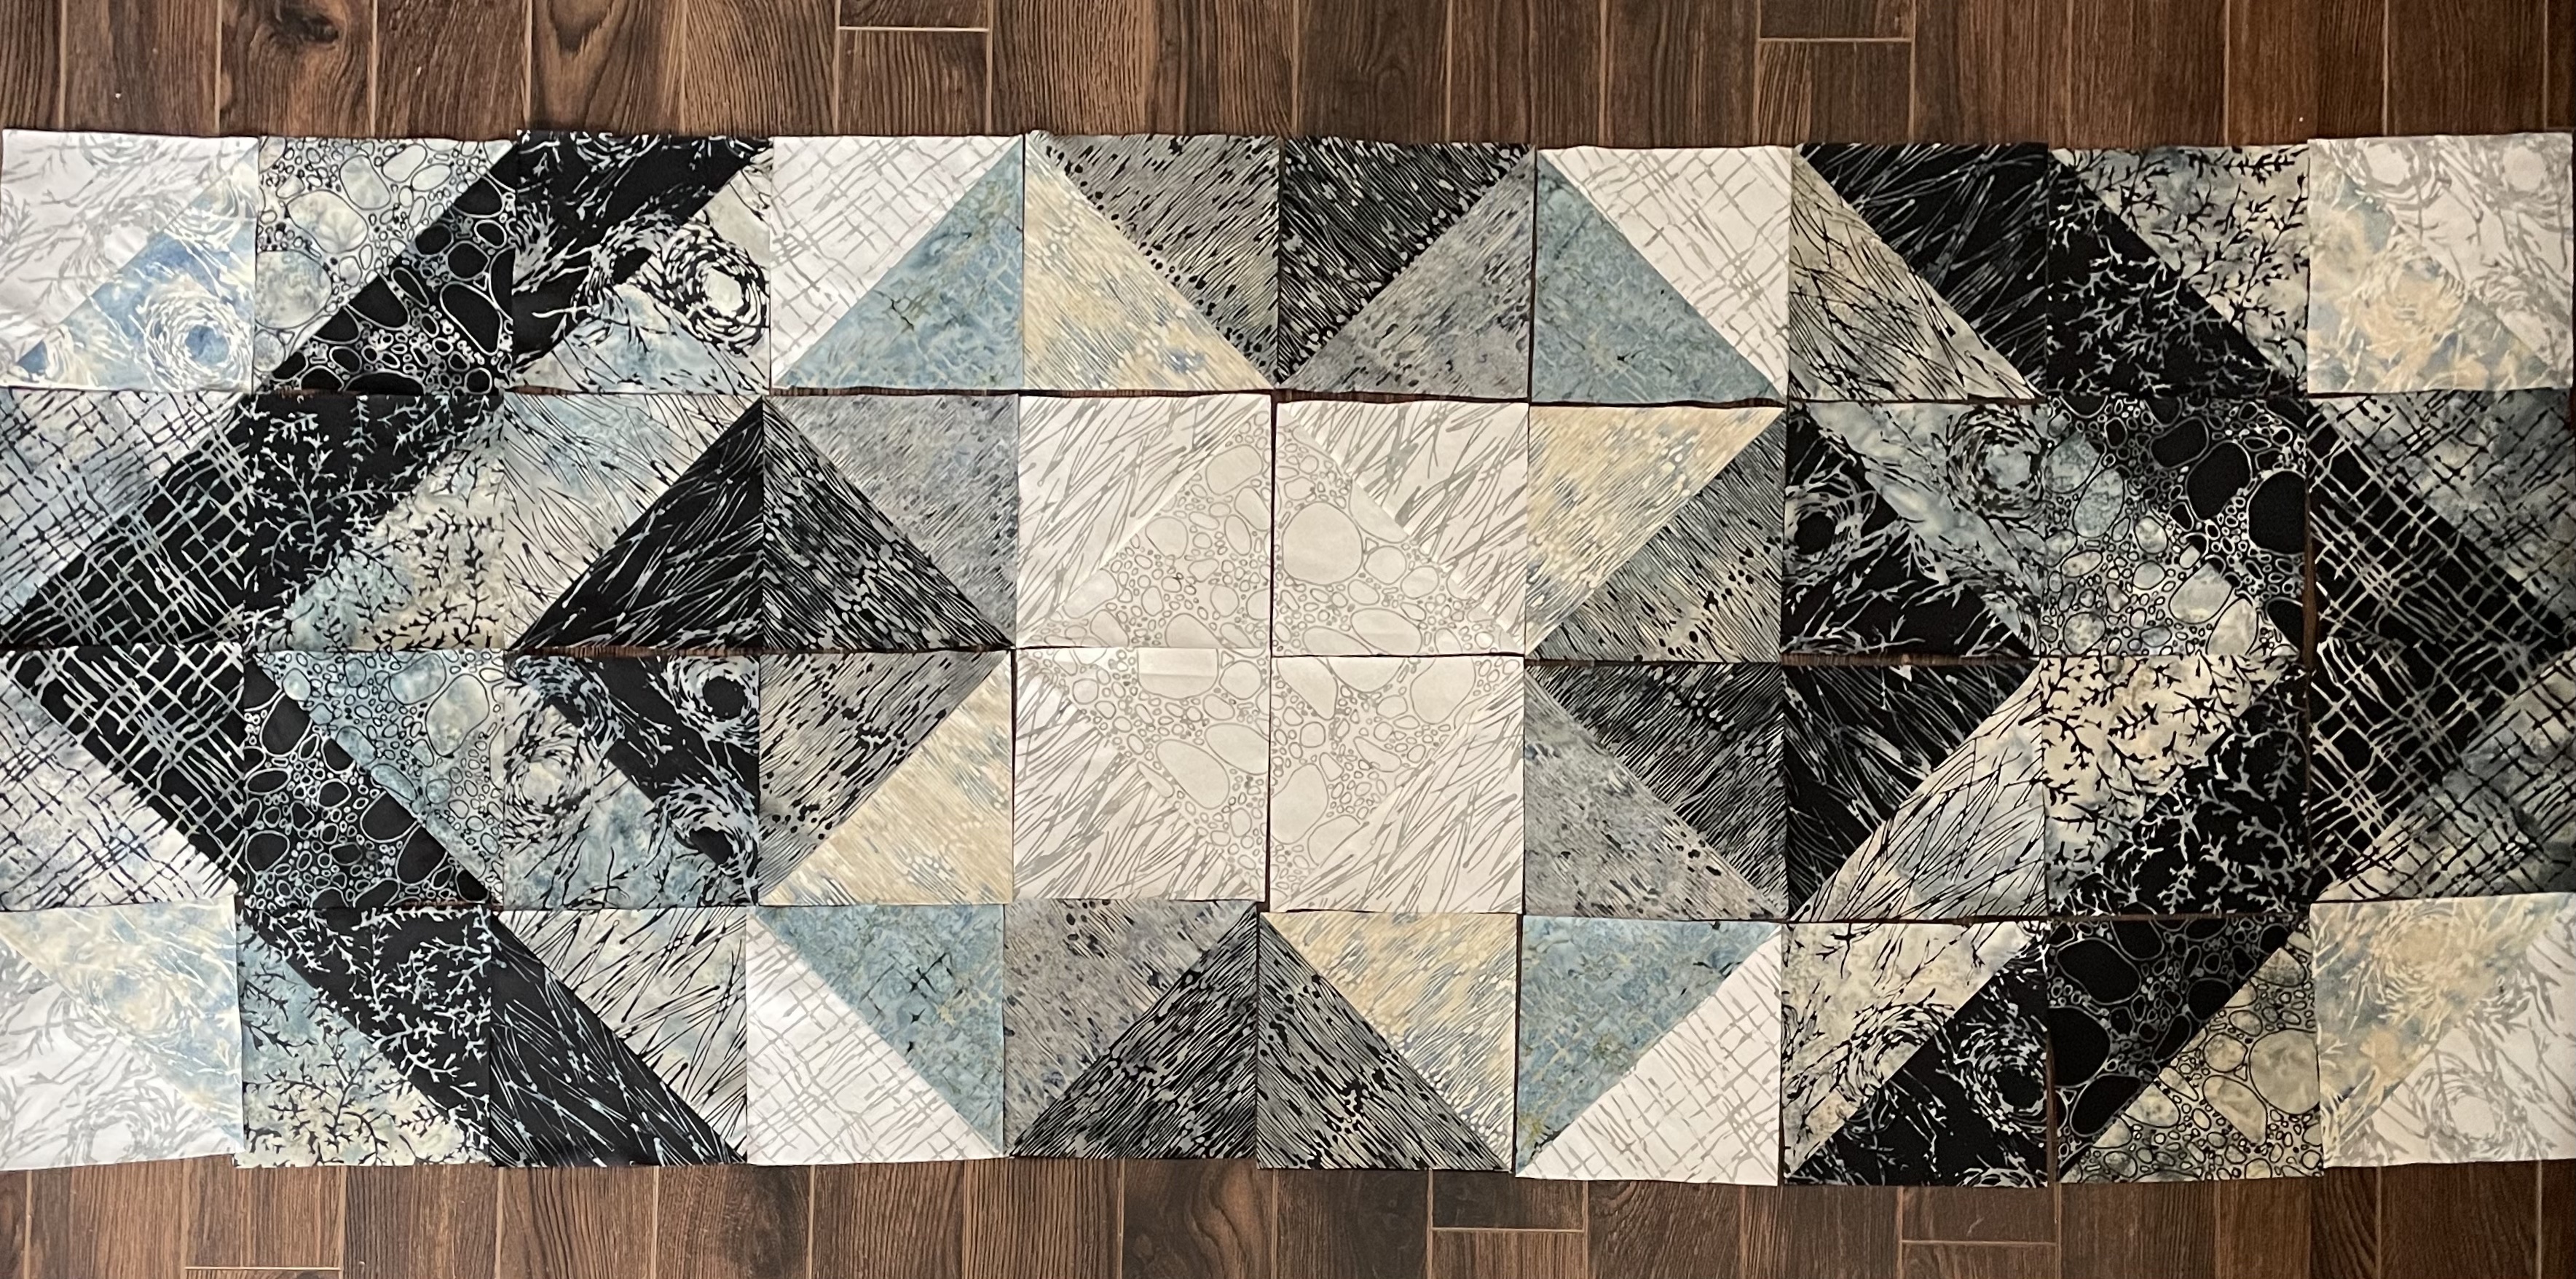
I worked on another half-square triangle project yesterday as well – the quilt is really a half-square triangle block (just built from 10 strips rather than a smaller number, usually 4).
Table Runner
I’m on the calendar to teach a quilting class Thursday on experimenting with HST. I had a layer cake – I matched up the fabrics – same batik pattern in two different colours, and made the blocks. This is the layout I will probably use. I can’t really sew the blocks together since I want to use them to show the many different ways these blocks can be assembled. In fact, it’s Sunday, tomorrow is a holiday, I won’t find out whether anybody actually signed up for the class till Tuesday – at which point I’ll have to scramble to contact the participants to notify them about what to bring to class on Thursday. Crazy! If nobody has signed up I’ll be able to work on the quilt!
Last week I pulled a jellyroll package from my stash (Hoffman Bali Poppy: Poppy Field #2: Hard Cider #662) – it held 20 strips – maybe enough for a lap quilt but there weren’t enough light contrasts so I dug through the drawers of batik and came up with another 20 fabrics that blended – I cut 20 more strips. I colour sorted them into groups of 4 to give me 10 groupings. I’ve begun sewing the 4-strip groups together. I have 6 groupings to go.
4-Strip Groupings
I have no idea yet what I’m going to do next. The obvious move is to cut the strips into 8 1/2″ blocks, overlap blocks (right sides together), stitch around the outside, then cut on the diagonals to create 4 HST blocks. But there may be other things I can do with these 8 1/2″ panels. I’m still thinking about it.
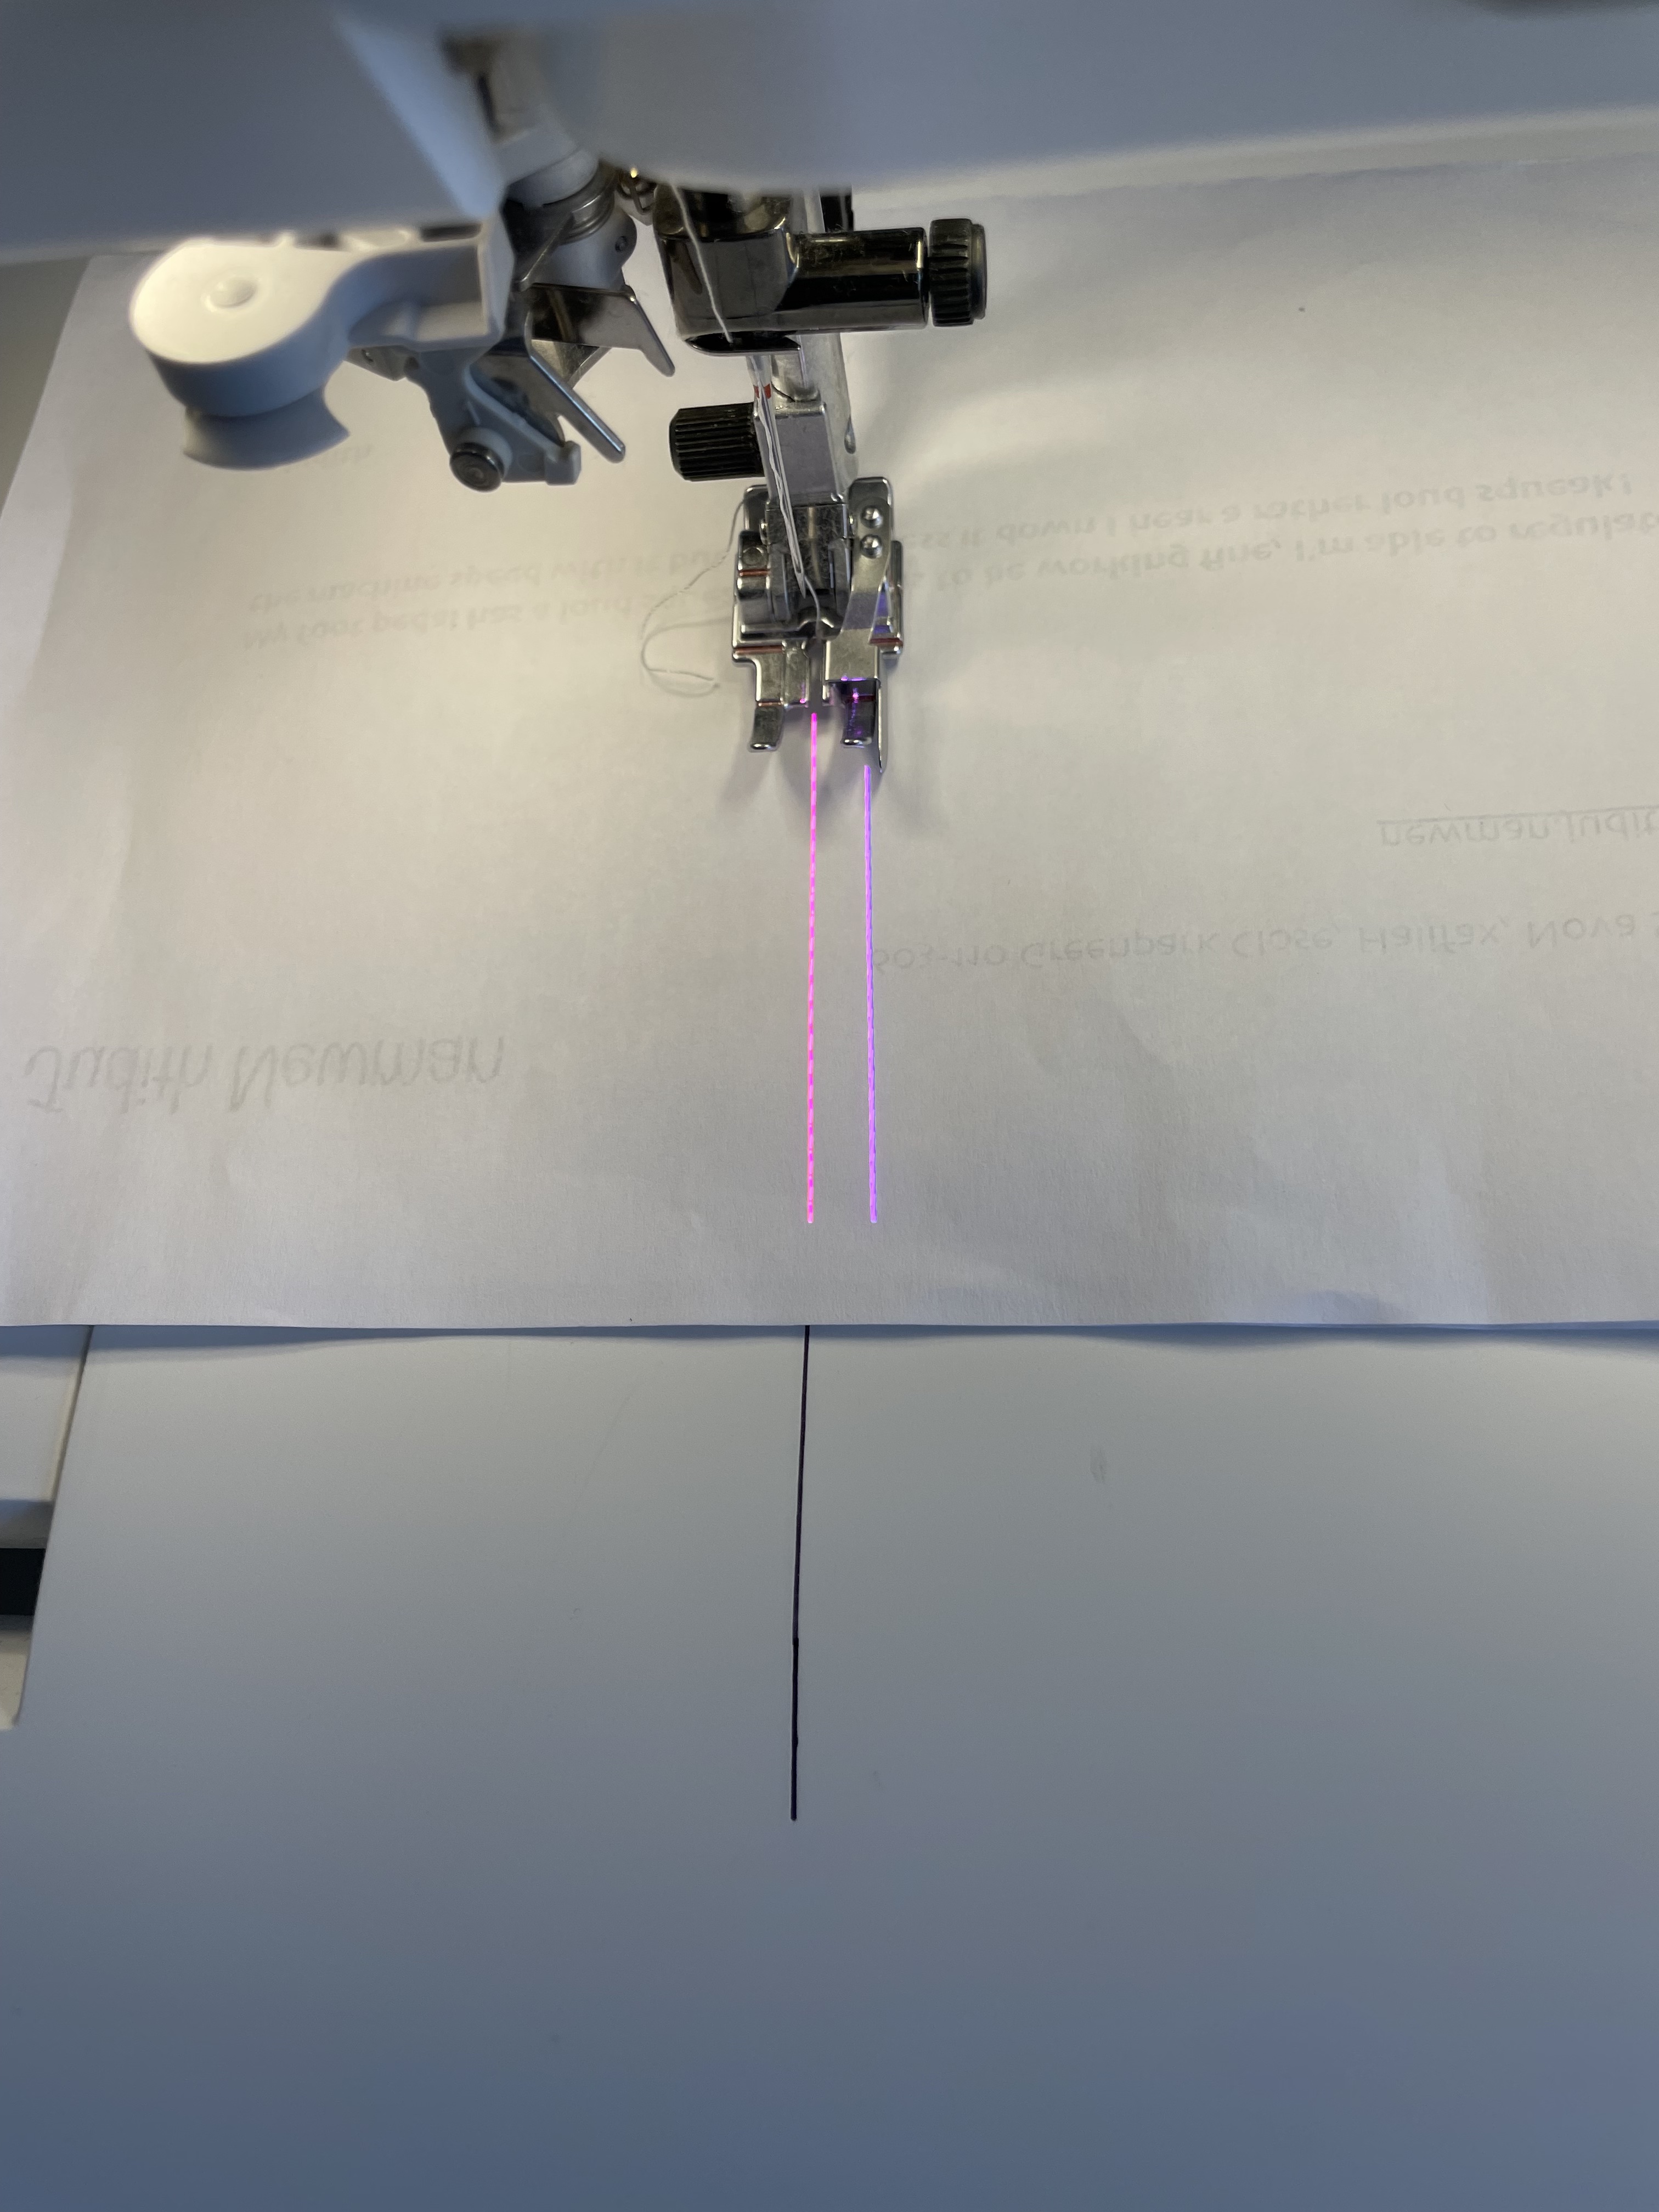
The thing is, I used the projection guidelines on the machine to set up a scant 1/4″ seam – I still used my 1/4″ quilting foot with right guide, but the laser guide was a scant bit to the left of the guide on the foot. It was actually quite easy to follow the laser guide and I did end up with a pretty accurate 8 1/2″ panel.
Laser Guides on Creative Icon 2
I’ve marked the needle position on the embroidery unit extension (and I’ll mark it on the tool box, too) in order to accurately stitch a 45° mitre when joining two 2 1/2″ strips. No other marking needed. The laser guide isn’t quite long enough to position the end point of the mitre.
I also played with more decorative stitches:
Decorative Stitches on Silk
I’m doing the “Experimenting With Your Machine’s Stitches” class a second time in couple of weeks – an opportunity to try out more off the stitches on this machine. Again, I used the laser grid system to align the stitching. I mirrored the stitches as well as the thread colour from the centre. [I did a simple grid quilted the back of the bag.]
Crazy Quilt Bag
I also pulled out a bag I made quite a while ago using scraps of fabric, where I used the “stitch/flip” technique to construct the fabric on which I then used decorative stitches to mark the seams. I want folks to see this other possible use for other machine stitches.
Finished, except for hand stitching the hidden binding to the back. It’s hard to tell from the image how much quilting I did. I decided to leave the narrow strip unquilted to act as a separation between the two pieced strips. That meant I had to free motion quilt the light elements stopping precisely at the separator and make sure I did a tie off at the back. The darker elements required a different technique – I created embroideries to fit the size of each of the dark elements and stitched them in the hoop as I would any embroidery. You can see the detail below:
Quilting Detail
I wanted a “wave” like flow to the “sea” elements so I set up a couple of different embroideries for each section. I used a “stippling” stitching in the embroidery on the hibiscus fabric. I created “grass” for the green/blue fabric, etc. I made sure each embroidery fit the dimensions of the bit of fabric I was quilting. In the end I was pleased with the outcome.
I added the gulls once I’d stitched the “sky” portion of the hanging – they are cut from black raw silk, fussy cut, fused, then edge stitched in place. My initial idea had been to print images of gulls on fabric but when I did that with the paper cutouts they didn’t show up well. In the end I thought silhouettes of the gulls worked better against the “Sky” background.
This evening I’ll do the hand stitching to finish off the piece.
I have the panel assembled – two pieces joined off-centre with a narrow strip. It was obvious the resulting panel needed something more – gulls! So I searched for silhouettes of gulls online. There are lots of them. I downloaded a bunch in various sizes and flight positions. I need both right-flying and left-flying birds.
What I have in place at the moment are paper cutouts so I could judge position and size. I need to make two of the birds smaller – the one in the centre needs to be a bit bigger. Otherwise, I think three is all I want or need. My plan is to print them on fabric, fussy cut them, then fuse them in place.
In the end I chose to join the fabric pieces with straight lines – I’m intending to do quite a bit of thread painting particularly through the “sand” and “sea” elements with gently curved lines (using doubled rayon thread for emphasis) which I’ll stitch over the seams to obscure them a bit.
I did another stitch sampler – this time horizontal rows of embroidery stitches (of which this machine has MANY – particularly when you consider you can modify both length and width of each of the 500+ stitches). No ribbon or lace – just the stitches themselves in rayon embroidery thread.
Then I turned the panel into a drawstring bag large enough to carry a pair of shoes, or my knitting, or whatever I need a bag for. Finished size: 10″ x 13″.
What’s different about this drawstring bag is the way the channels are formed. Many years ago I was given a Japanese drawstring bag made with such channels. It’s a more refined way of finishing a drawstring bag. So I’ve been making mine this way for a long time.