I started quilting yesterday – did 6 blocks; another 19 blocks today – 25 blocks done – 5 remain.
A Quilted Block
I’d set up a single-run embroidery (single-run = the design is stitched once) to fit the block within the sashing, coming close to the edges but leaving a small amount of space so when I do something with the sashing (either stitching-in-the-ditch or edge stitching beside the seams) I don’t run into the embroidery.
Tomorrow’s decision will be what to do with the sashing. I’ve thought of other options besides the two I’ve mentioned above like under stitching all the rows of shark’s teeth but I think that would push me past my boredom threshold! And I can’t see a decorative stitch down the middle of the sashing strips – would just clash with the fabric detail. So it’s either stitching-in-the-ditch or edge stitching. I might just try a bit of edge stitching to see what it looks like, being prepared to take it out if I don’t like it! That’s for tomorrow.
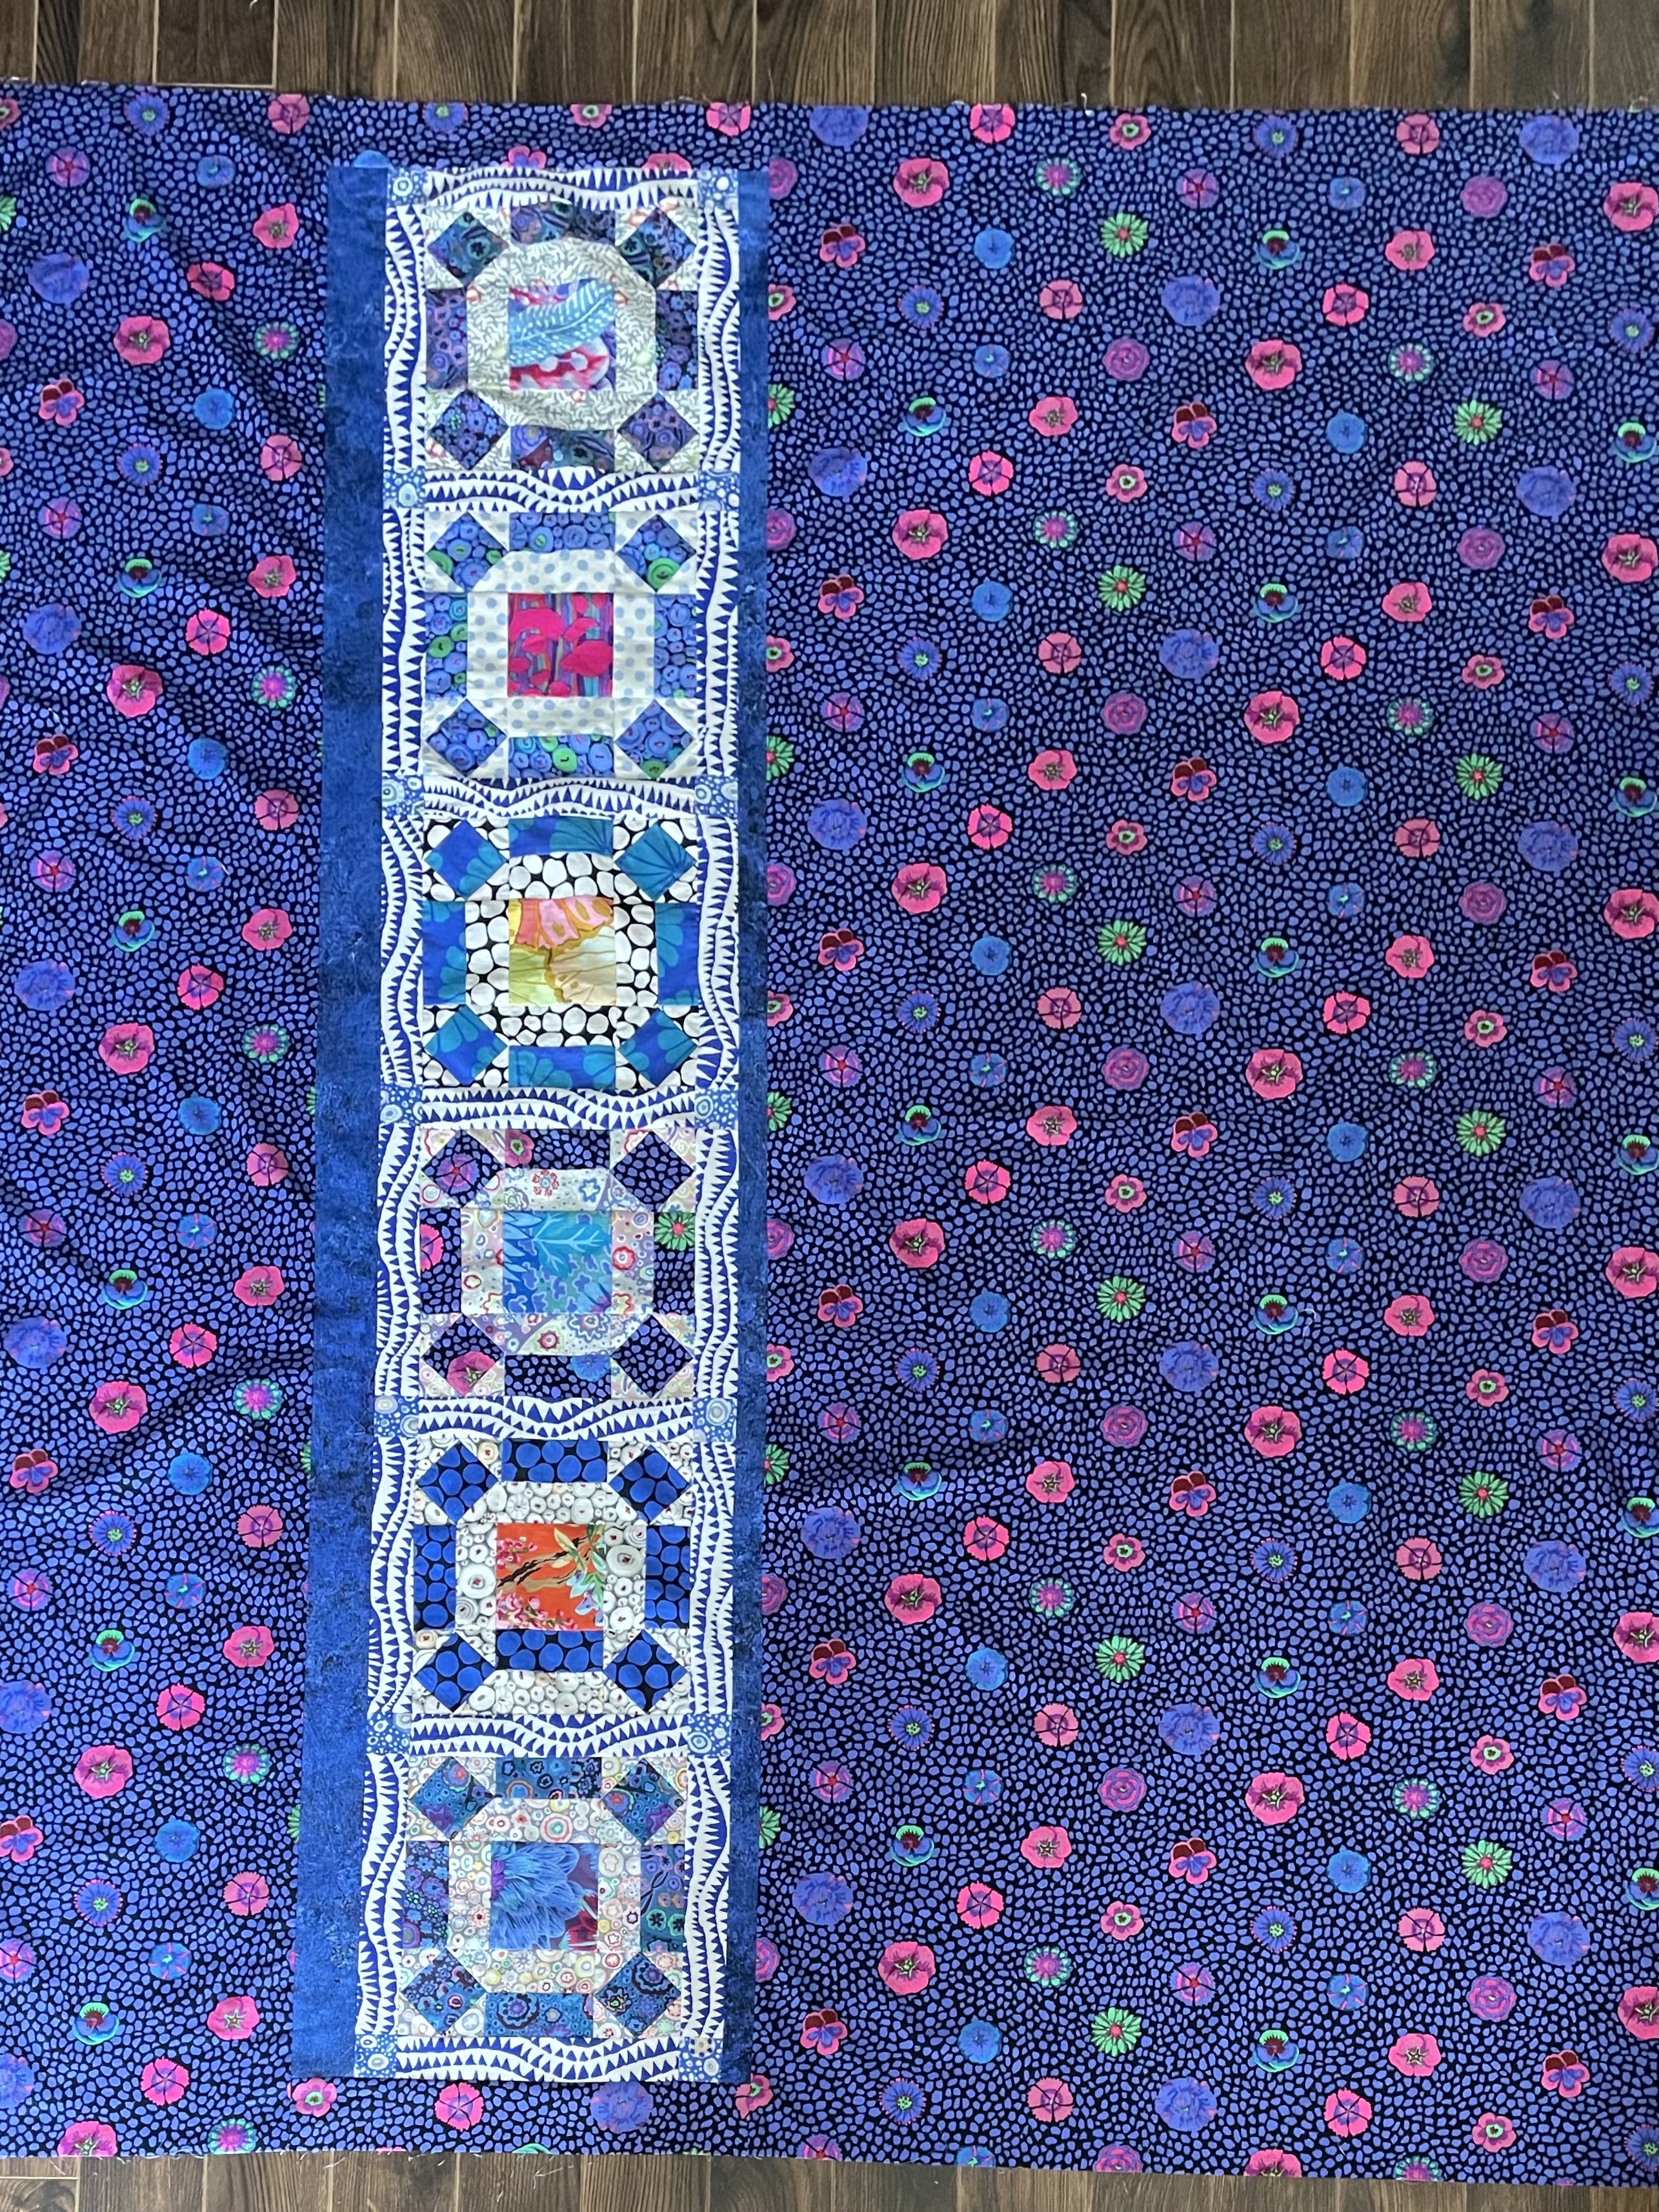
I finished piecing the quilt backing this morning. It needed a good pressing with some Best Press (a clear spray starch.
Would you believe it – I see a mistake! I’ll have to take the pinning partly apart so I can get to the spot where I have to rotate one of the rectangle blocks 180°! I didn’t pick up on that – not until just now as I’m looking at the photo.
Damn!
The quilt sandwich is pinned. I’ve been setting up embroidery designs for quilting the blocks – testing them out on scrap fabric to make sure they stitch out correctly. Still haven’t decided which to use. Guess I need to sleep on it a bit. I hope to have made up my mind by tomorrow!
There! The block is fixed – the joins not quite so perfect but nobody, except me, is going to notice.
Saturday, a lovely day in town, my friend Deb and I decided to head to Martinique Beach to fly kites. An hour away Martinique is a great location, usually with steady wind for flying large kites. I’d packed kites and reels and gloves and we set off only to encounter dense fog as we approached the beach and the beach road clogged with vehicles belonging to the throngs on the beach. We managed to find a spot to leave our car for a few minutes to take the boardwalk over the dune to the ocean but you couldn’t see much – dense fog and hordes of people. We stood for a few minutes then headed toward home.
Yesterday, I decided to fly closer to home. I drove to the Bedford waterfront and walked down the pier – another good flying spot with wind from a wide range of directions and open space to fly over the basin.
I have no pictures from yesterday because I was flying on my own. I had no trouble getting the kite up – but was the wind ever tricky – coming from different directions depending on altitude so the kite behaved erratically. I was glad I wasn’t trying to help a beginner keep their kite aloft. I flew for perhaps a half hour, controlling the kite was relatively easy as long as I was letting out line but although I reached 250′ in altitude I wasn’t finding steady air so I decided to reel the kite in – that’s when it decided it wanted to dive – let the line out a bit, steady the kite, then slowly pull in some slack. Took me a good 20 minutes to bring the kite back in – with more than 250′ of line now laid out all over the pier. It took another 15 minutes to wind up my line, roll up the kite, before I was ready to return to the car.
The last time I flew was on July 29 2019 with Mattie, my grandnephew at the Bedford waterfront. The day Mattie and I were flying we had a steady 20kph wind coming from the land behind us and Mattie had an easy time controlling the kite.
Mattie Flying
One time before that I was again flying at the Bedford waterfront with my large snowflake – don’t remember who took the picture.
Why heavy gloves you ask? Because if the line goes through your fingers at any speed – it burns! And there are times you just need to let the kite have control.
I must get out again soon. I understand why people love to go fishing – kite flying is very much the same – it takes some close attention but is very relaxing – can’t be thinking of much else when you’re flying a kite.
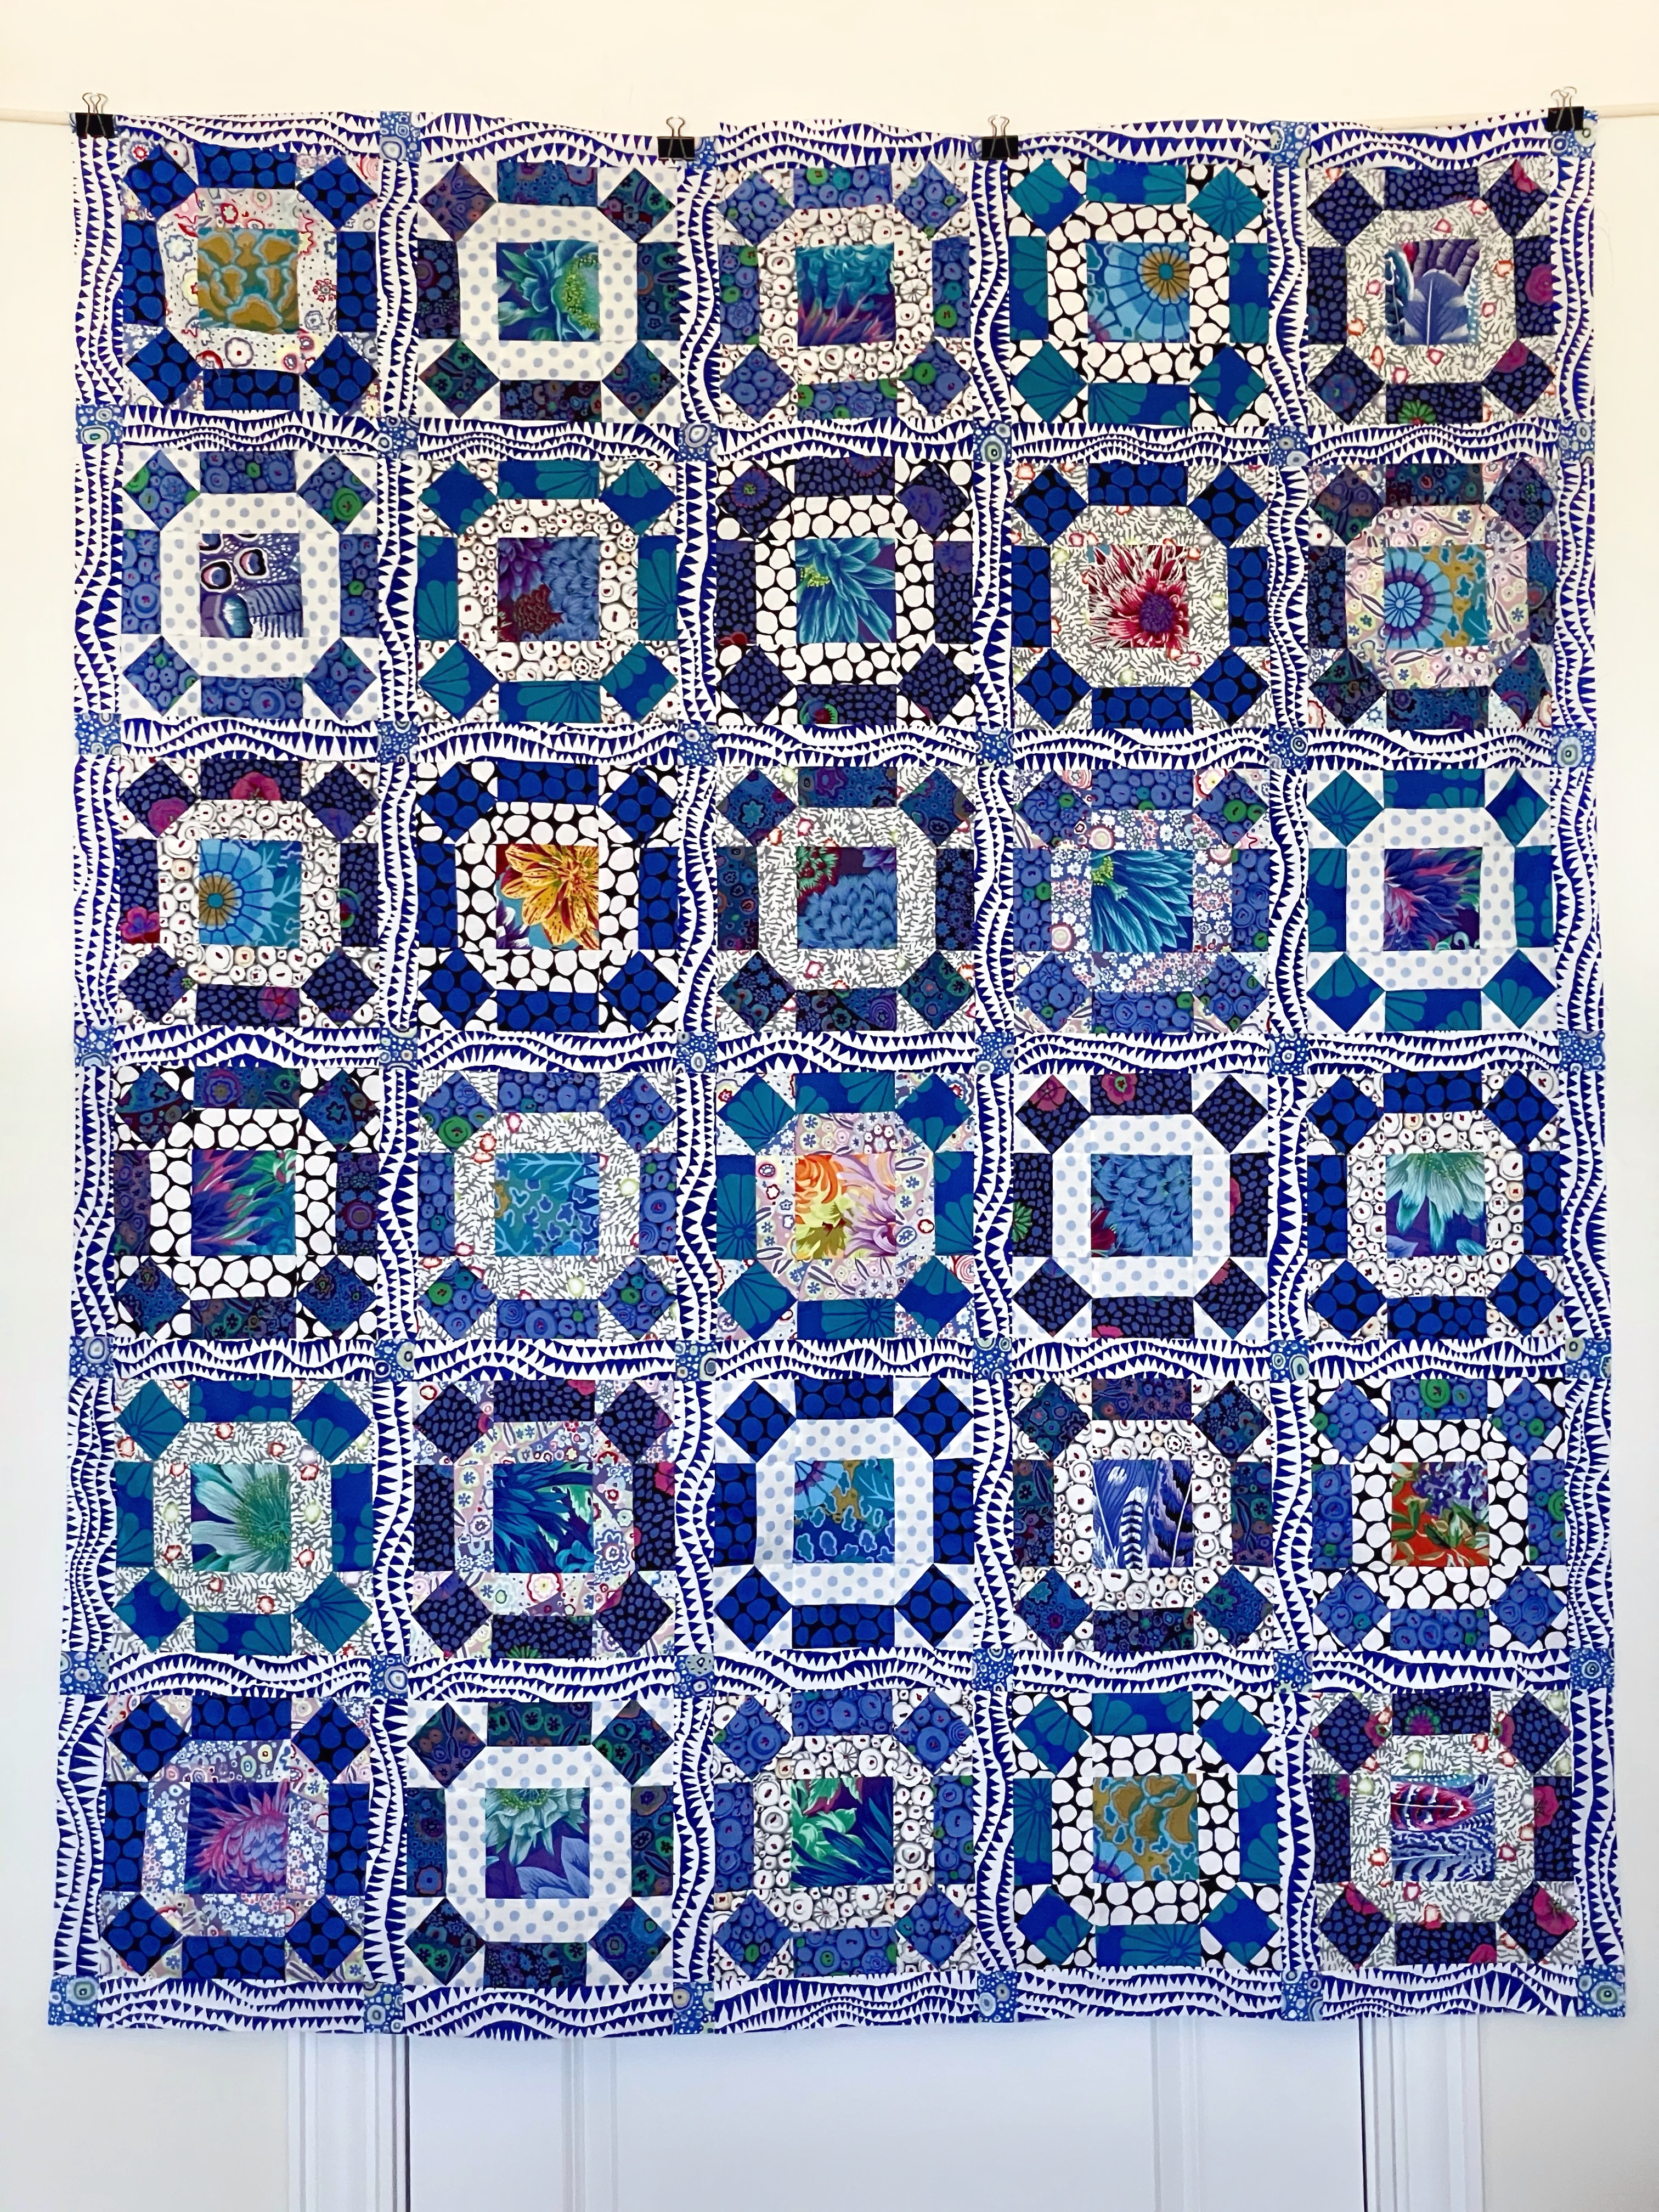
Here it is – the quilt top is finally assembled. All the shark’s teeth sashing is going in the same direction vertically and horizontally (that took a bit of correcting in the first couple of rows until I realized the top would look better with that fabric unidirectional rather than helterskelter. The four substituted square centres bring some life to the quilt and bring out the colour in the others.
Final quilt size is 52 1/2″ x 62 3/4″.
Next step is to create six more blocks for the back of the quilt. Past Friday I went to Mahone Bay to Woolworks and picked up one of the fabrics to use for backing the quilt. One length isn’t wide enough for a backing – I will splice it and insert a column of blocks with sashing.
It’s a lovely colourful quilt top – I like Kaffe Fassett’s sharks’ teeth fabric selection for the sashing – quite unlike the other fabrics, yet the right colour – it creates a very modern feel to what is a traditional block.
And I was right – the many imperfections in the blocks were amended when I added the sashing. I didn’t trim the blocks to a precise 9 1/2″ because I needed to keep the 1/4″ at each corner block point so I fudged the placement while adding sashing and the blocks have ended up as I wanted them.
I have just finished the 15th block for the Gathering No Moss (Kaffe Fassett) quilt. That’s half way. The block, by the way, is called a “rolling stone” – hence Fassett’s choice of name for the quilt.
Once people figured out the “quilt along” on Facebook (a “private” group for those who purchased the quilt kit) was mostly about us commenting on (and sharing photos of) our progress, the traffic has died down. I had decided to purchase the kit and join the quilt-along because I thought Fassett would discuss his decision-making regarding fabric design and choices for the quilt in some depth. Doesn’t appear to be the case. Had I realized that, I likely would have just deconstructed the quilt from the photo and done it in some colour set from fabrics I had in my stash and could pick up from The Woolworks in Mahone Bay. I wouldn’t have bought the kit.
Oh, well, I won’t do this another time. I have a greater sense of satisfaction when I’ve worked out how to construct a quilt from a photo and chosen my own fabrics, as I did with the Escher quilt. That was a real challenge and I was very pleased with the outcome. Here, although the quilt block is an easy one, it is fiddly – the four corners take time to construct – add one triangle, press, add the opposite triangle, press, add a side triangle, press, add final triangle, press – and hope you’re close enough to square that they will assemble with the rest of the block without too much distortion. But overall, there isn’t much challenge to the quilt once you figure out how to construct the block. In this case, I chose to change the block size, which required some testing out to make sure my pieces would match up, and I’ve changed some of the colour selections, but it’s still the “Gathering No Moss” quilt. Far less challenging than most of the quilting I’m used to doing.
Here is the panel at noon – with four rows now completed.
2/3 Finished
This time I worked on an entire row at the same time doing what’s called “chain piecing” – taking great pains to keep the elements in the order I’d planned on them having! At the bottom, second block from the right – not sure about this one. I want that centre where it is but the large blue and white dotted fabrics together are rather loud. Given the symmetry I set up, that pairing was bound to happen since I had five light and five dark fabrics.
This was a ball of yarn I bought from Hobbii in Denmark during the early summer. I couldn’t tell from the image of the ball of yarn what it would turn out like – what caught my eye was the glint of a “metallic” fibre – which I know from experience is some kind of “mylar” strip. You can’t see it in this photo, but if you click on the image, you can see in the enlargement a slight bronze glint which adds an interesting element to the sock.
The only problem is that there were constant breaks in the mylar which meant there were metallic thread ends sticking out both inside and out. I kept trimming them as I went along.
And then on the first sock I encountered a knot – always a sign to watch out for a pattern disruption! Turns out the second yellow stripe beyond the heel was missing – that’s on the first sock on the bottom. I made a mental note to remove the second yellow stripe when I knit the second sock but forgot about it until I was knitting the turquoise stripes and at that point I wasn’t going to unravel what I’d done, I was too far along, so I just kept knitting.
At a cursory glance the socks look like a pair – but just not quite. Fortunately, the mismatch is in the foot and therefore not visible when wearing the socks.
I haven’t taken a lot of photos for the past several weeks but there are a few new ones to share.
Malva
Came across this patch of Malva growing beside the ice cream store in downtown Halifax.
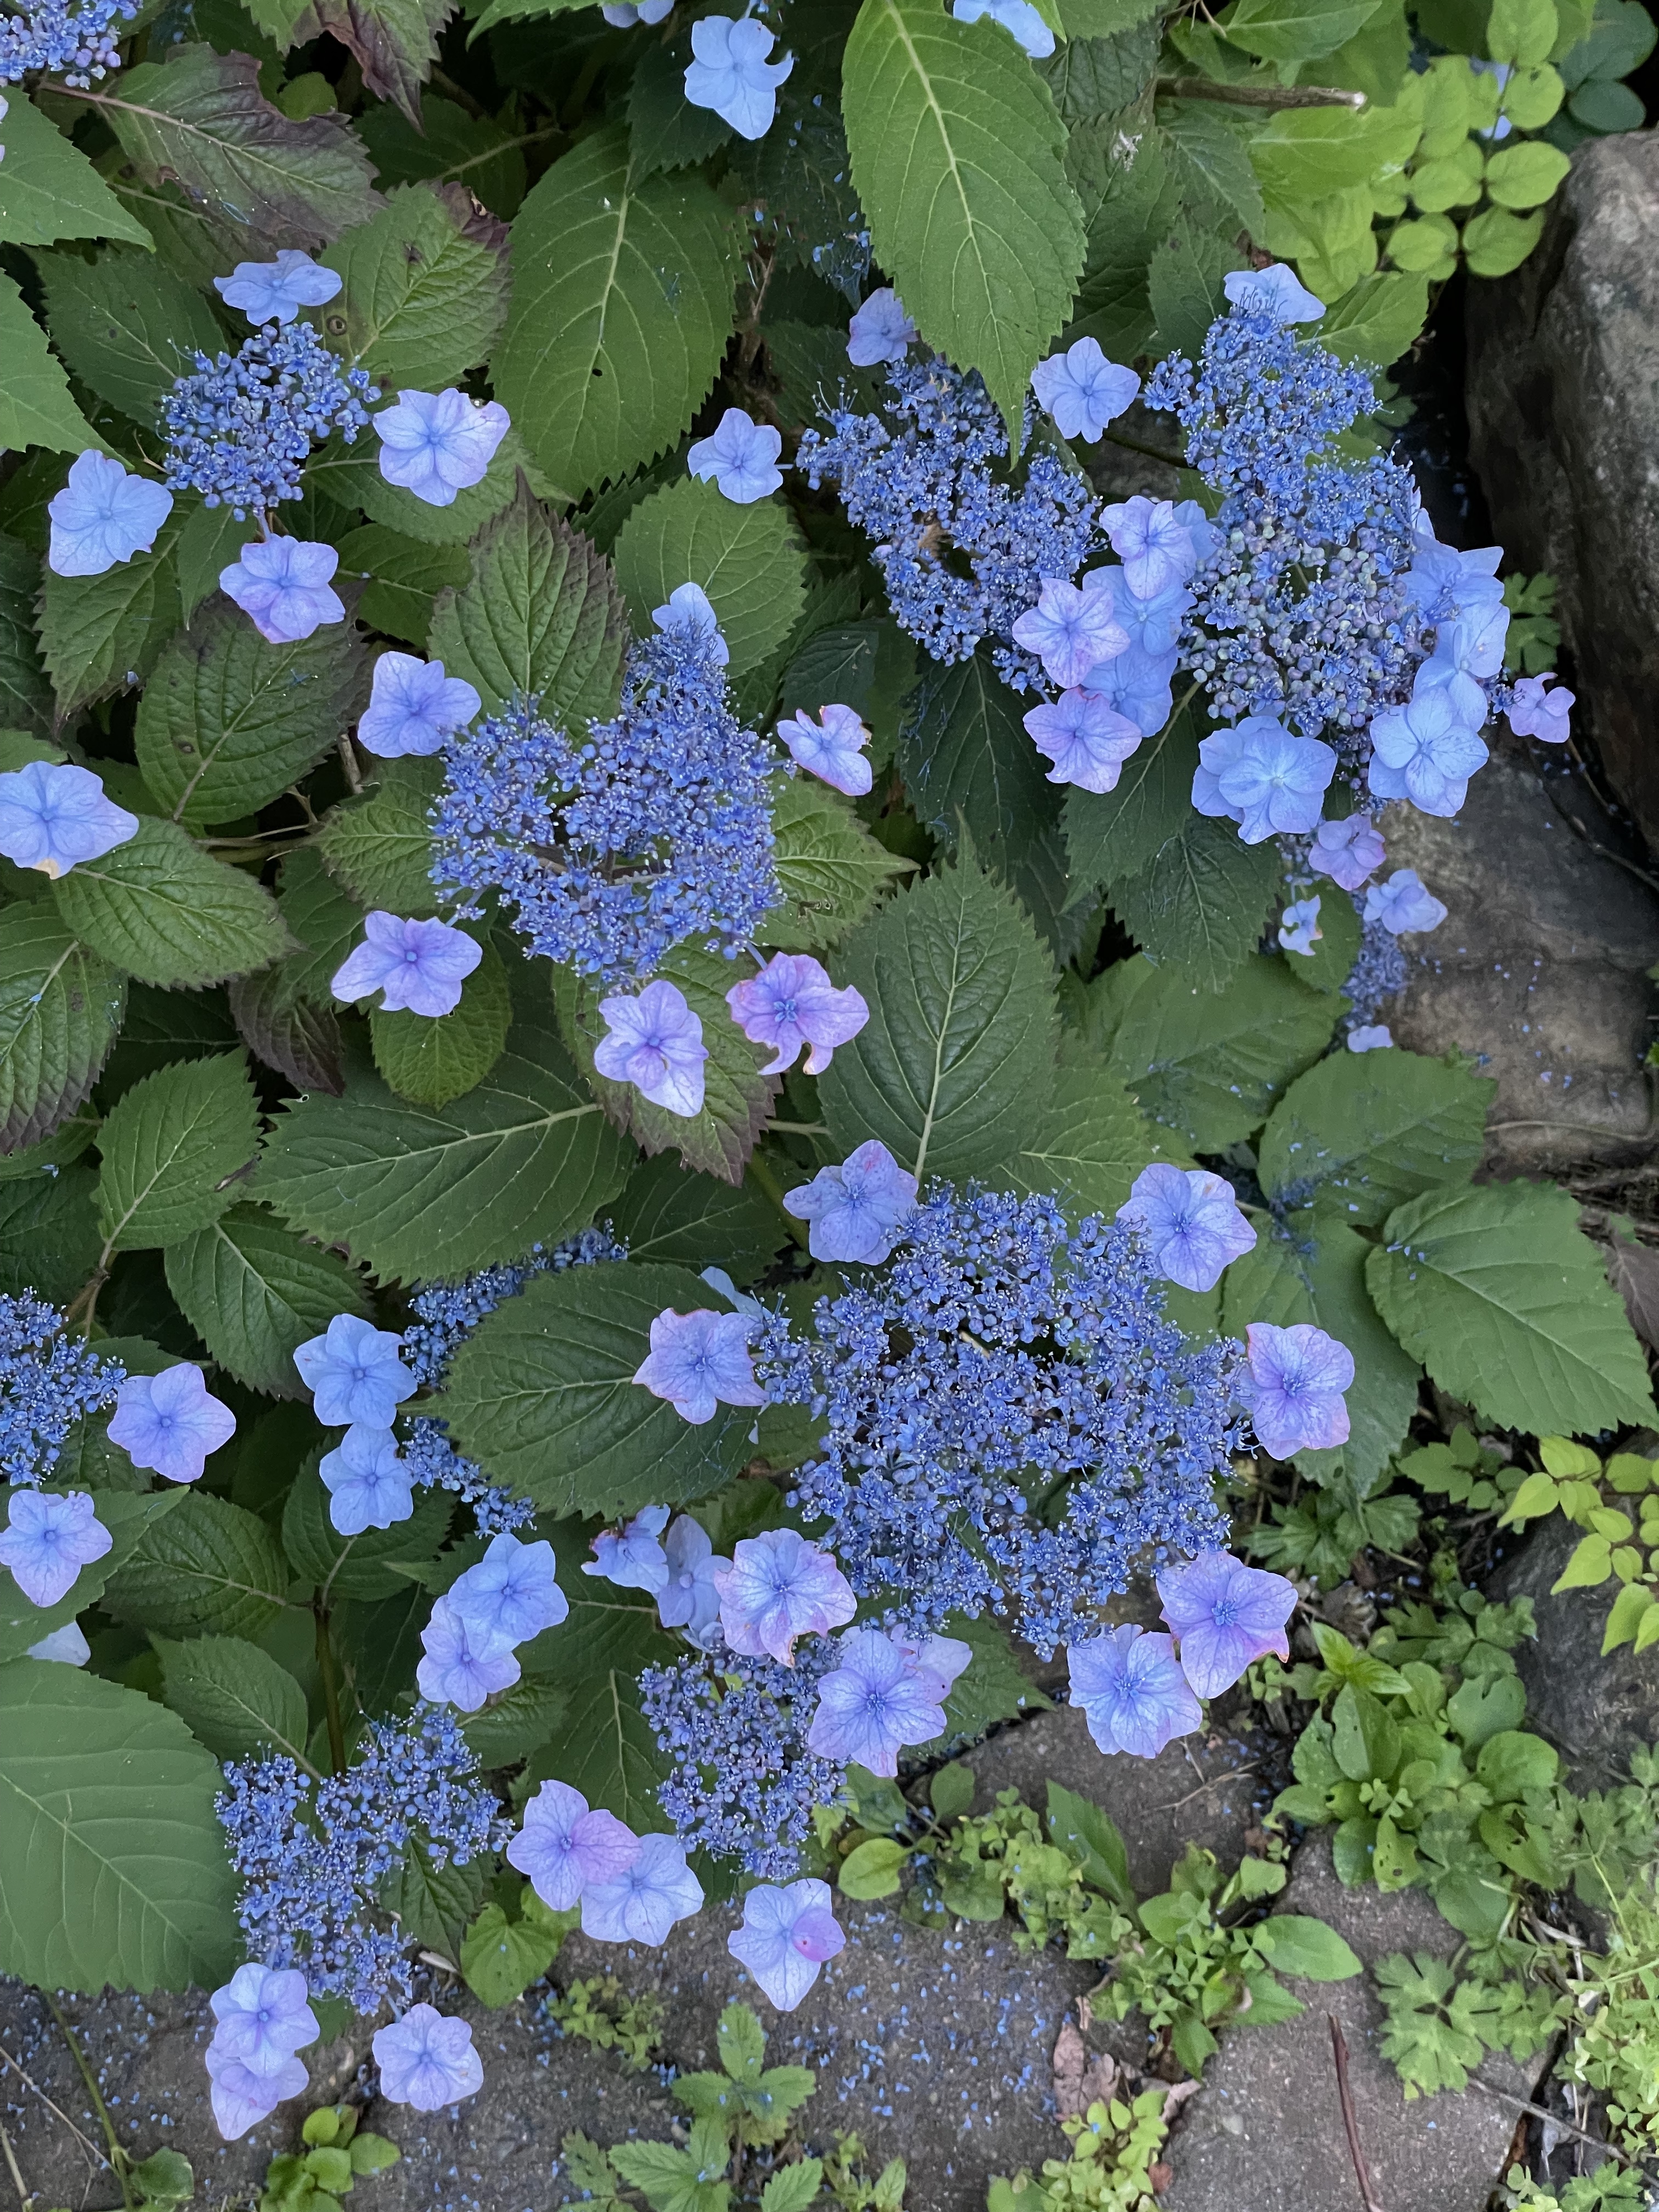
Hydrangea
This hydrangea grows beside MaryAnn’s front steps. I love the combination of large flowers and tiny florets.
Day Lily
The small front garden across the street from my chiropractor’s office was filled with blooming orange and yellow day lilies a couple of weeks ago.
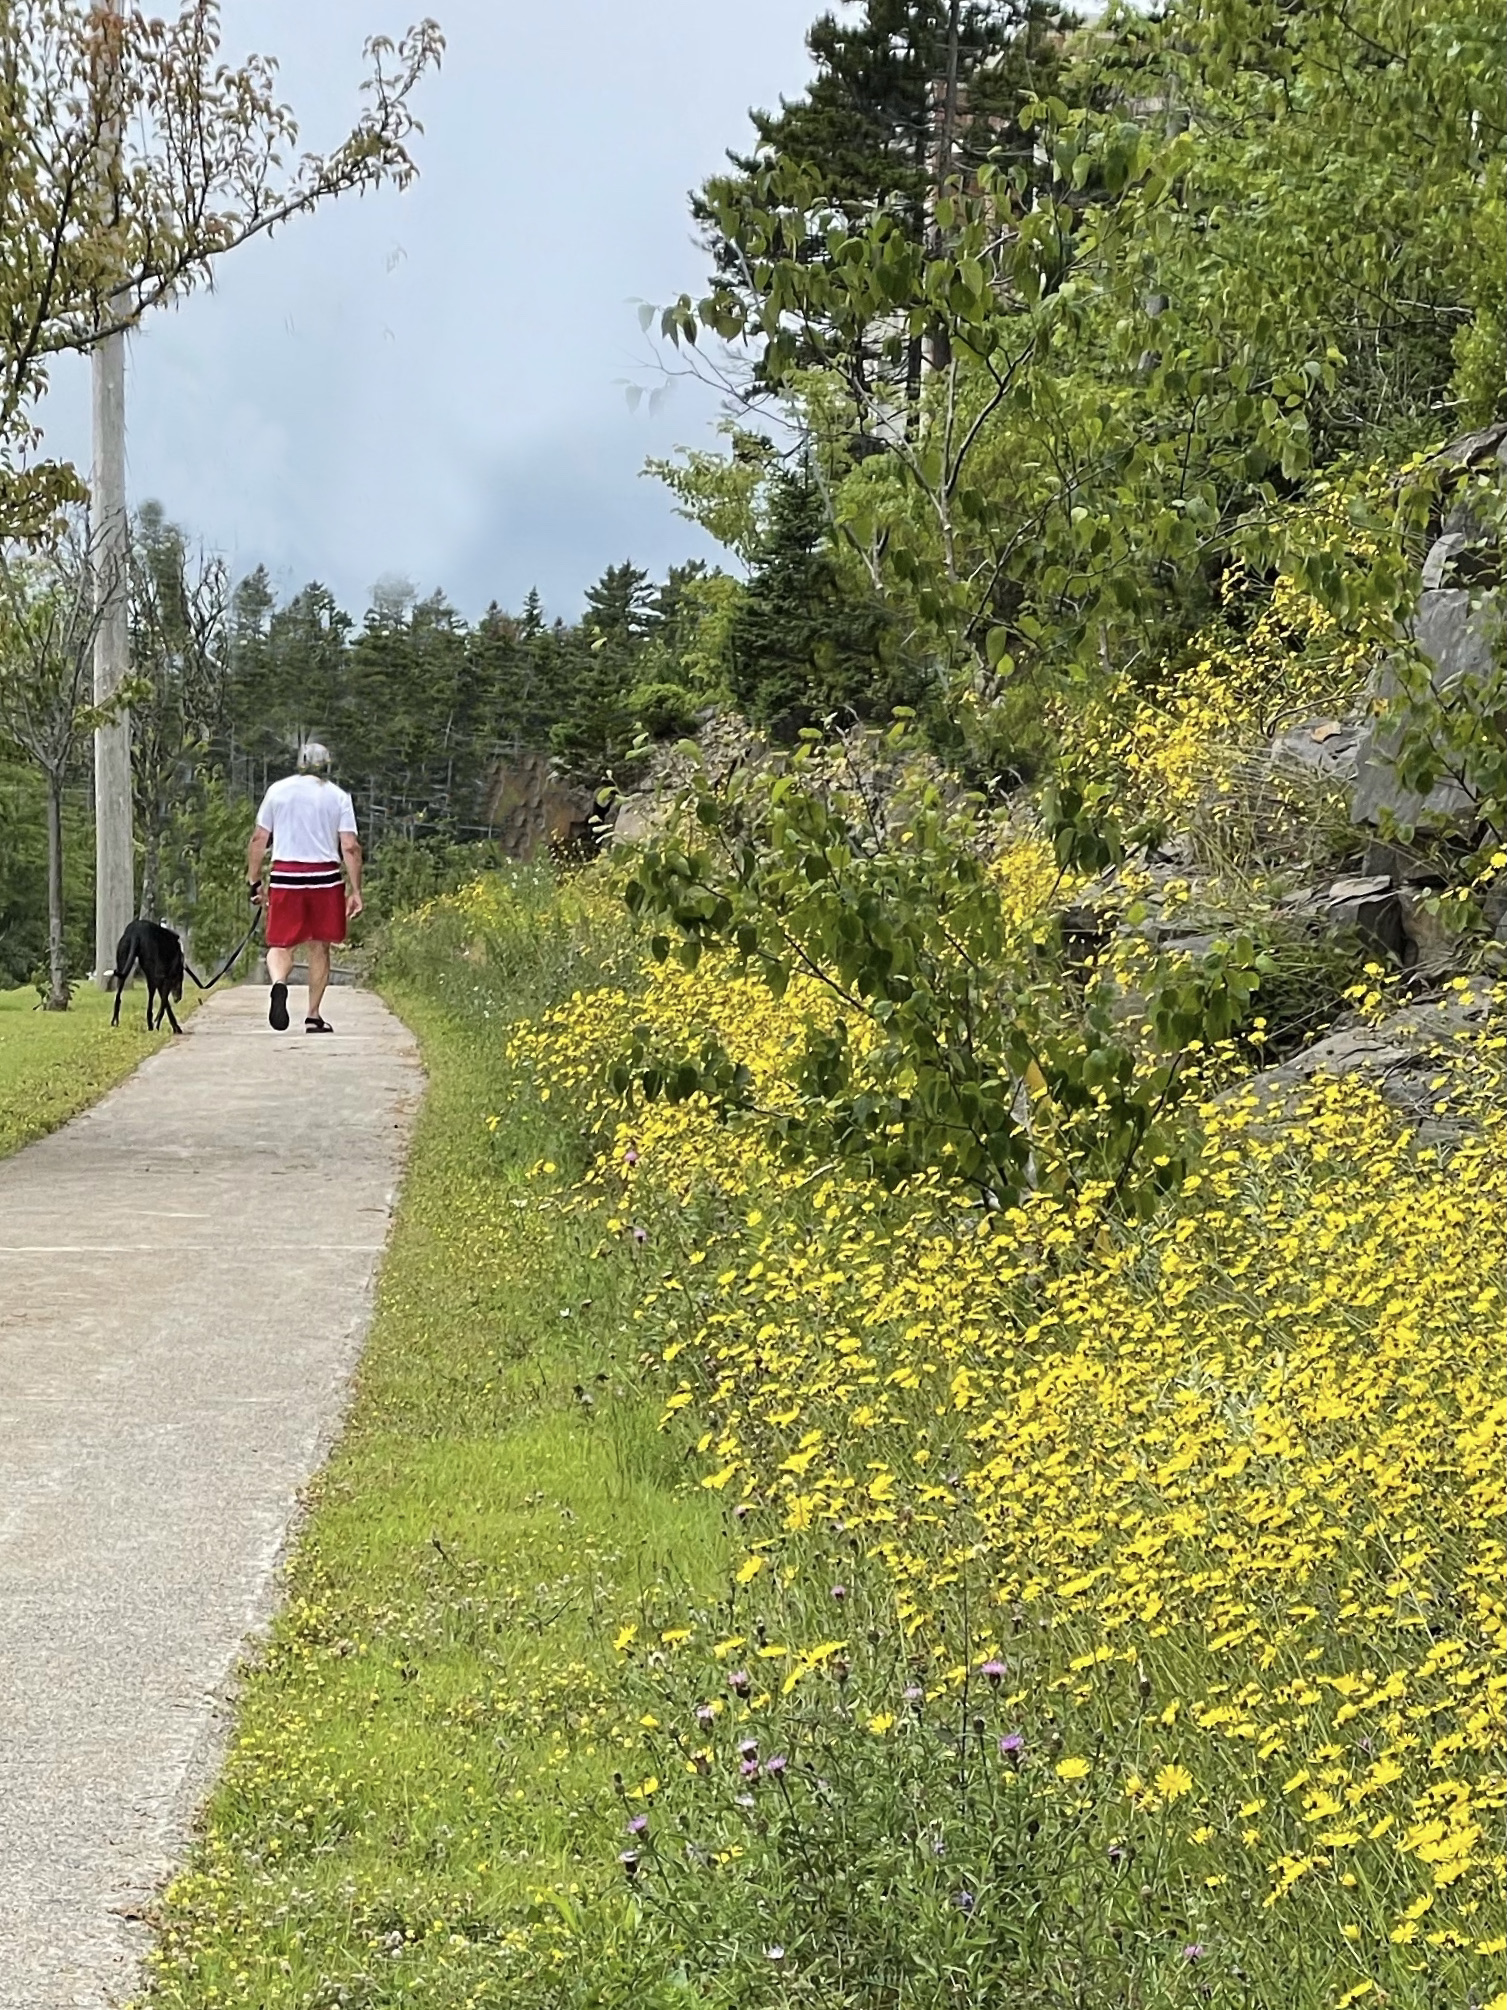
Walking The Dog
I’m fascinated by the natural rock wall on Regency Park around the corner from where I live. Last week the hawkweeds were spectacular with a bit of thistle thrown in. As I was taking pictures this man was walking his dog. I didn’t react fast enough to get a burst of photos as he walked down the street. I need to be more prepared for the unexpected. This could turn into a wall art piece. I edited the image using a couple of photo editors on my iPhone, removing a couple of extra poles and the wires holding them in place.
It’s raining and dark today – not a great day for photography. Maybe tomorrow will be better.
In January I did something I have never done – I signed up to do a quilt along – this one with Kaffe Fassett. He (and the rest of the collective) have created a quartet of queen size quilts – same pattern but available in four different colour combinations. The quilt block resembles a cog wheel hence the name of the quilt: Gathering No Moss.
The project began when I received an email from Hyggeligt Fabrics in St, Mary’s Ontario advertising the quilt along. Over the years I’ve collected Kaffe Fassett fabrics – my diamond quilts, the Escher quilt all used fabrics from Free Spirit which produces and sells the Kaffe Fassett Collective collections. In years past, I’ve attended a lecture or two of his which I found underwhelming, but I’ve also watched Fassett lead a weekend workshop several years ago on YouTube from which I learned a lot.
I liked the “Delft” fabric collection well enough that I decided to buy the Gathering No Moss fabrics and join the quilt along. The zoom lectures begin on Wednesday – Aug 4 – on Facebook (why there of all places – I try to stay off Facebook). In any case, my fabric bundle from Hyggeligt Fabrics arrived last week. It’s a lovely collection of fabrics. The instructions are for a 77″ x 92″ quilt – a 5 x 6 array of blocks. I decided to keep the array, but downsize the blocks.
The intended quilt block is a 13 1/2″ square:
The 13 1/2″ block / an 8 1/2″ adaptation
I did a mock-up of the intended block but I wanted to make a smaller throw size quilt so I downsized the blocks which turned into a block a bit smaller than I wanted. [ A finished 9″ block x 5 = 45″ plus 1.25″ x 6 for the sashing = 7.5″ will give me a finished width of 52 1/2″ – a largish throw quilt.]
A 9 1/2″ block
Once I’d figured out the block construction and had dimensions for the 9 1/2″ block I was going to make, I got to work on the Delft fabrics. I simplified the instructions – rather than work with the chart describing what to cut from which fabric, I sorted the fabrics into light/dark and medium. The centre blocks I cut from the small medium colour fabrics; then I cut rectangles and squares for the corner blocks from the darks; finally I cut rectangles and squares (which I cut into half-square triangles) from the lights. The cutting went reasonably quickly.
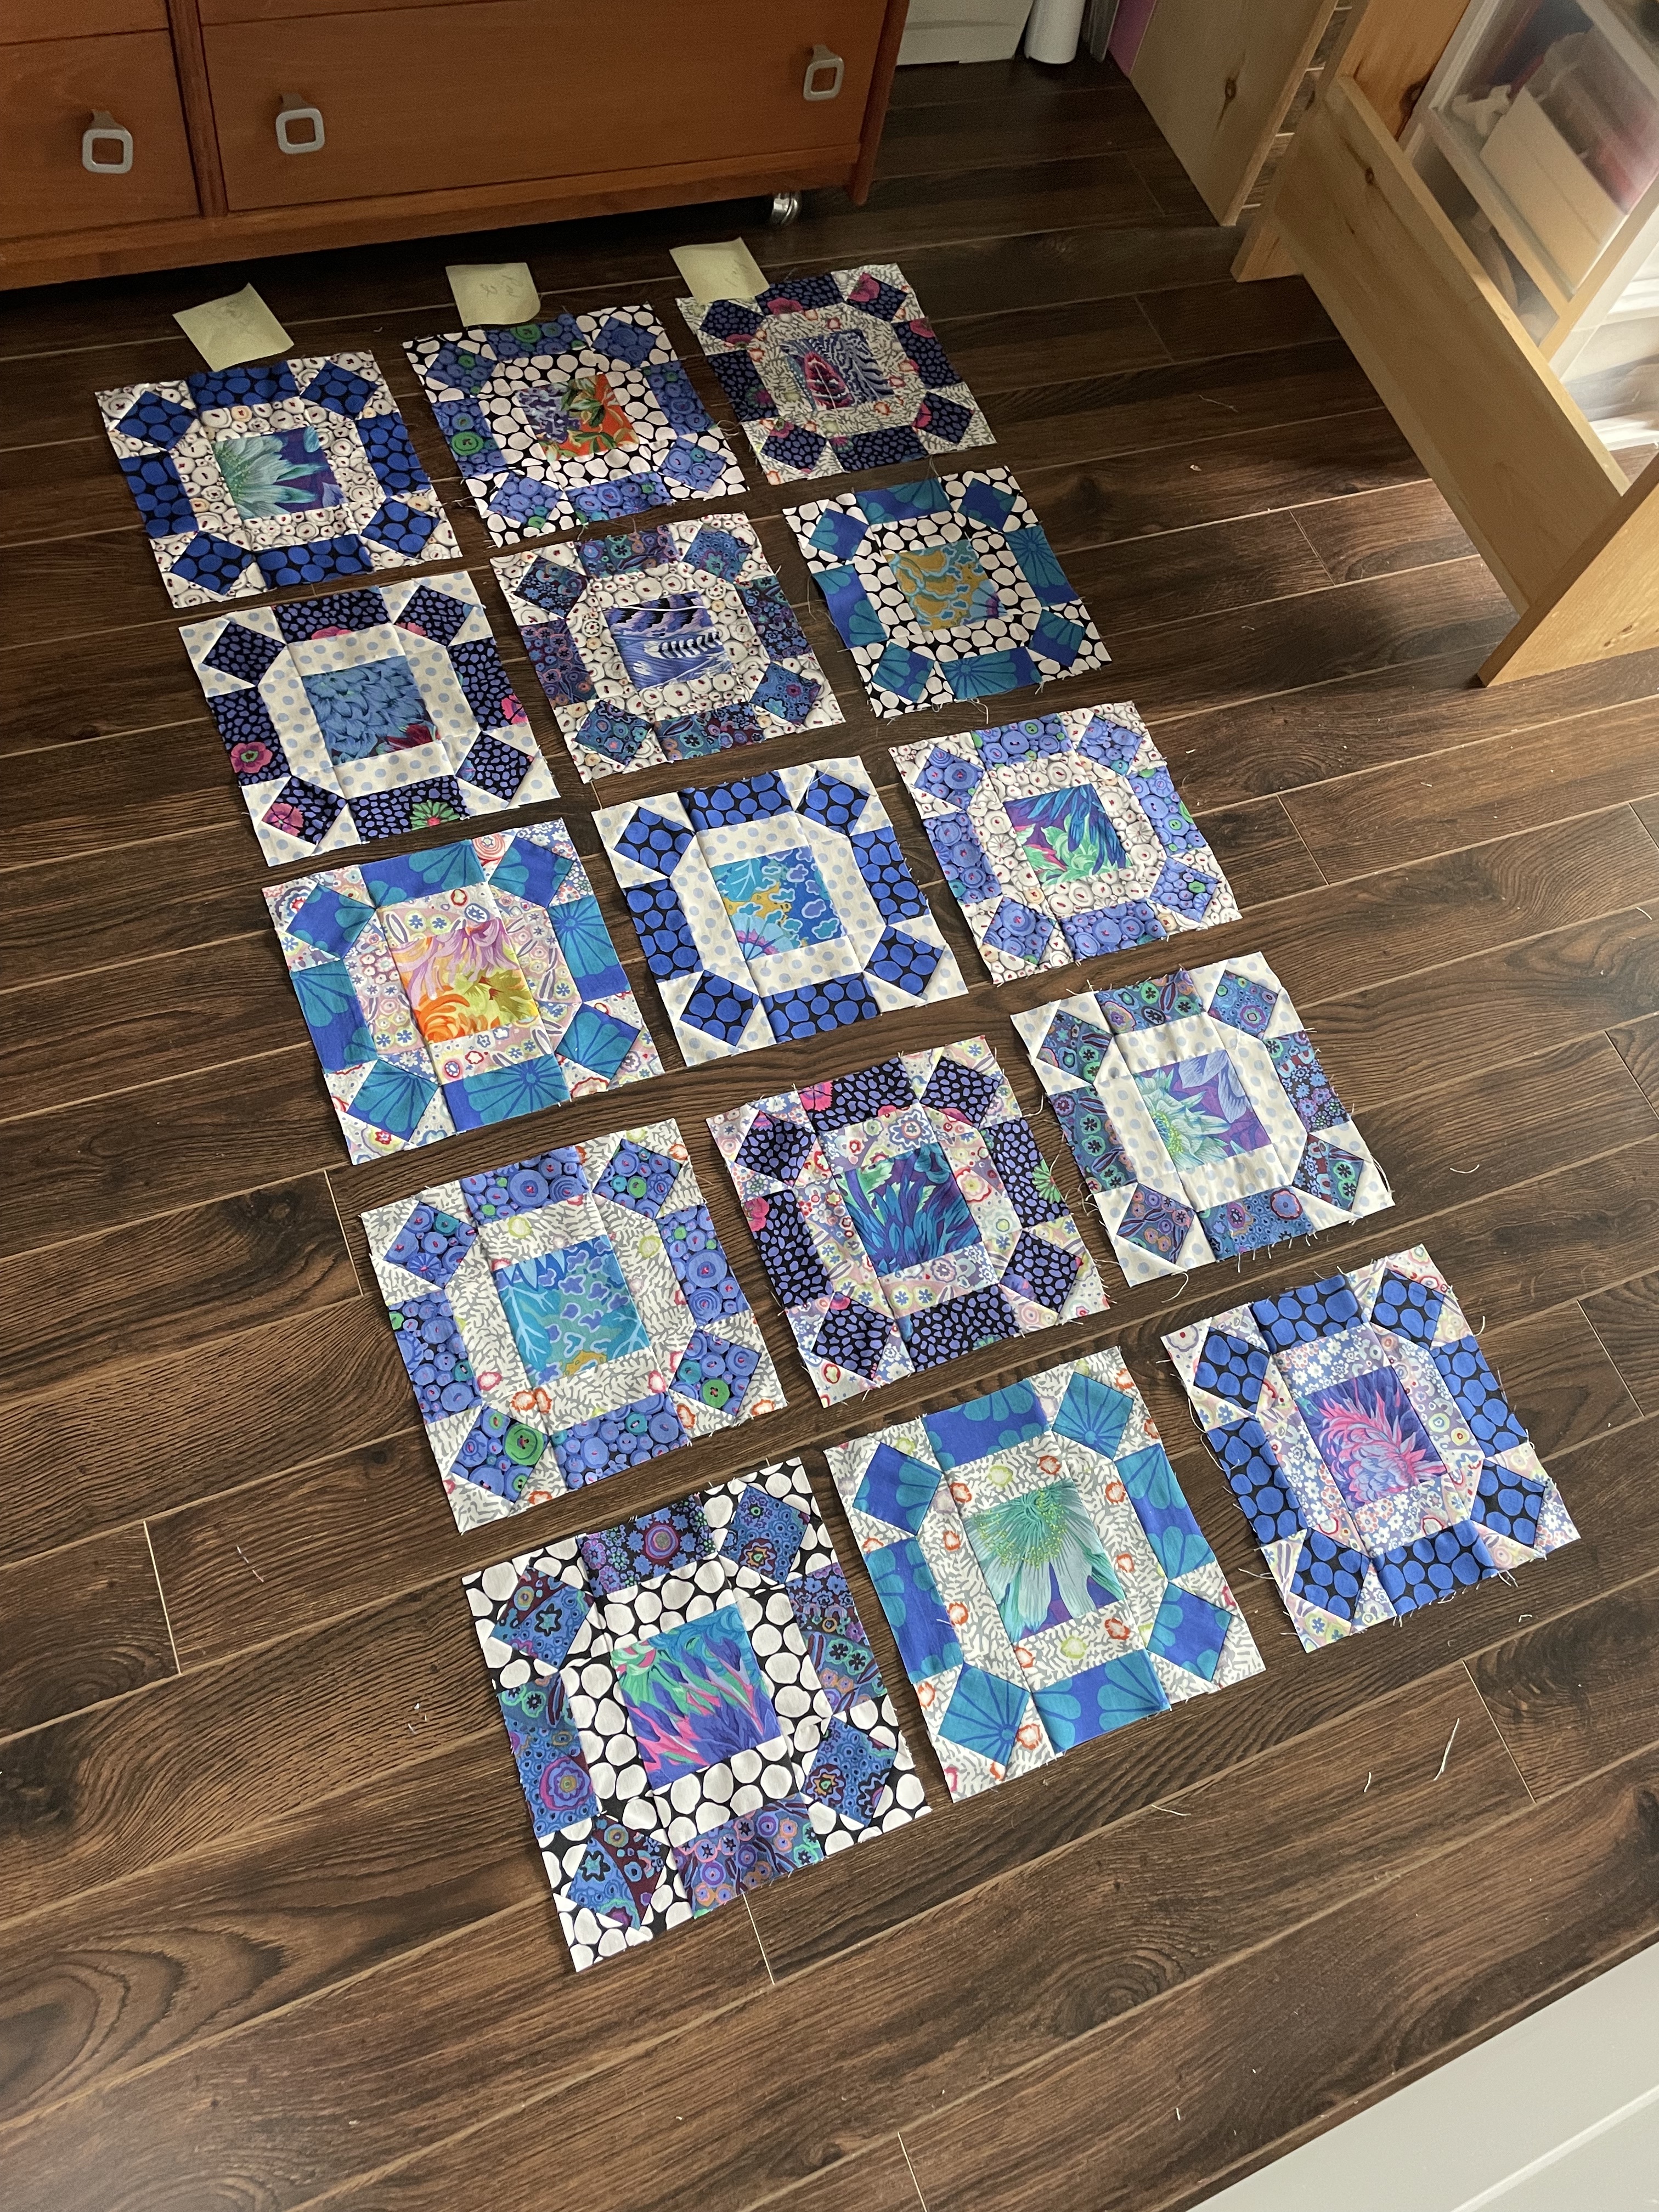
I carefully laid out the centre blocks in a numerical order – Row 1: 1,2,3,4,5; Row 2: 2,3,4,5,1, etc, until I had six rows of five blocks. While I liked the colour of the Delft fabrics I thought the quilt could use a bit of additional colour – I went through my stash of Kaffe Fassett fabrics picking six bright ones, cut a centre square from each which I then substituted into the array on my table – one in each row.
Next I laid out the pieces from the dark fabrics B,C,D,E,F and the light fabrics G,H,I,J,K in an array and began placing dark/light pairs on top of the centre squares – using a similar shifting pairing so that in the end each block will be unique.
Quilt Construction Begins
You can see the lovely blue and “white” fabrics in the collection. I have so far completed six blocks. The remaining 24 are laid out in position on my cutting table. It takes me about 20 minutes to construct a block so I will need to work on these for the next few days. There’s sashing to insert between the blocks which will tie the whole quilt together – I just haven’t decided what width to use – I’ll make that decision when I have all 30 blocks laid out.
I knew from the beginning I wasn’t likely to follow the instructions. I like the block, so I decided to use it instead of creating something else. Deconstructing the block from the images of the Gathering No Moss quilt was straightforward. I will tune in on Wednesday to see what Fassett has to say – I’m sure I can learn some interesting things from him about colour flow and placement. I’ll report back as I make progress on the project.
Friday I took eight quilts and 12 wall art pieces to Parrsboro to show at the Art Labs Gallery. I knew it was a shared exhibition with two women who do rug hooking – but I had been told most of their pieces would be stand-on-the-floor works – laundry baskets, chairs, stools… Well, they were, but several were “hung” which cut my showing space in half. I was able to hang 5 quilts and 4 wall art pieces. A disappointment because the wall art pieces I’d chosen showed the evolution of my “printed on fabric” appliqué technique – the pieces all had people in them which I wanted to showcase.
At Five Islands; Wind Waiting
The most recent piece with one of the earlier pieces. I’m still very fond of the mood of these three guys at Fox River wishing the wind would moderate so we could launch our paragliders.
Escher Quilt
This is the piece you see from the doorway – it’s straight ahead of you as you walk into the gallery space. At that distance you see the 3D illusion clearly.
Diamonds
This quilt also is striking when you see it hung. The shaded border, the asymmetry of the piece, the colour movement are all apparent.
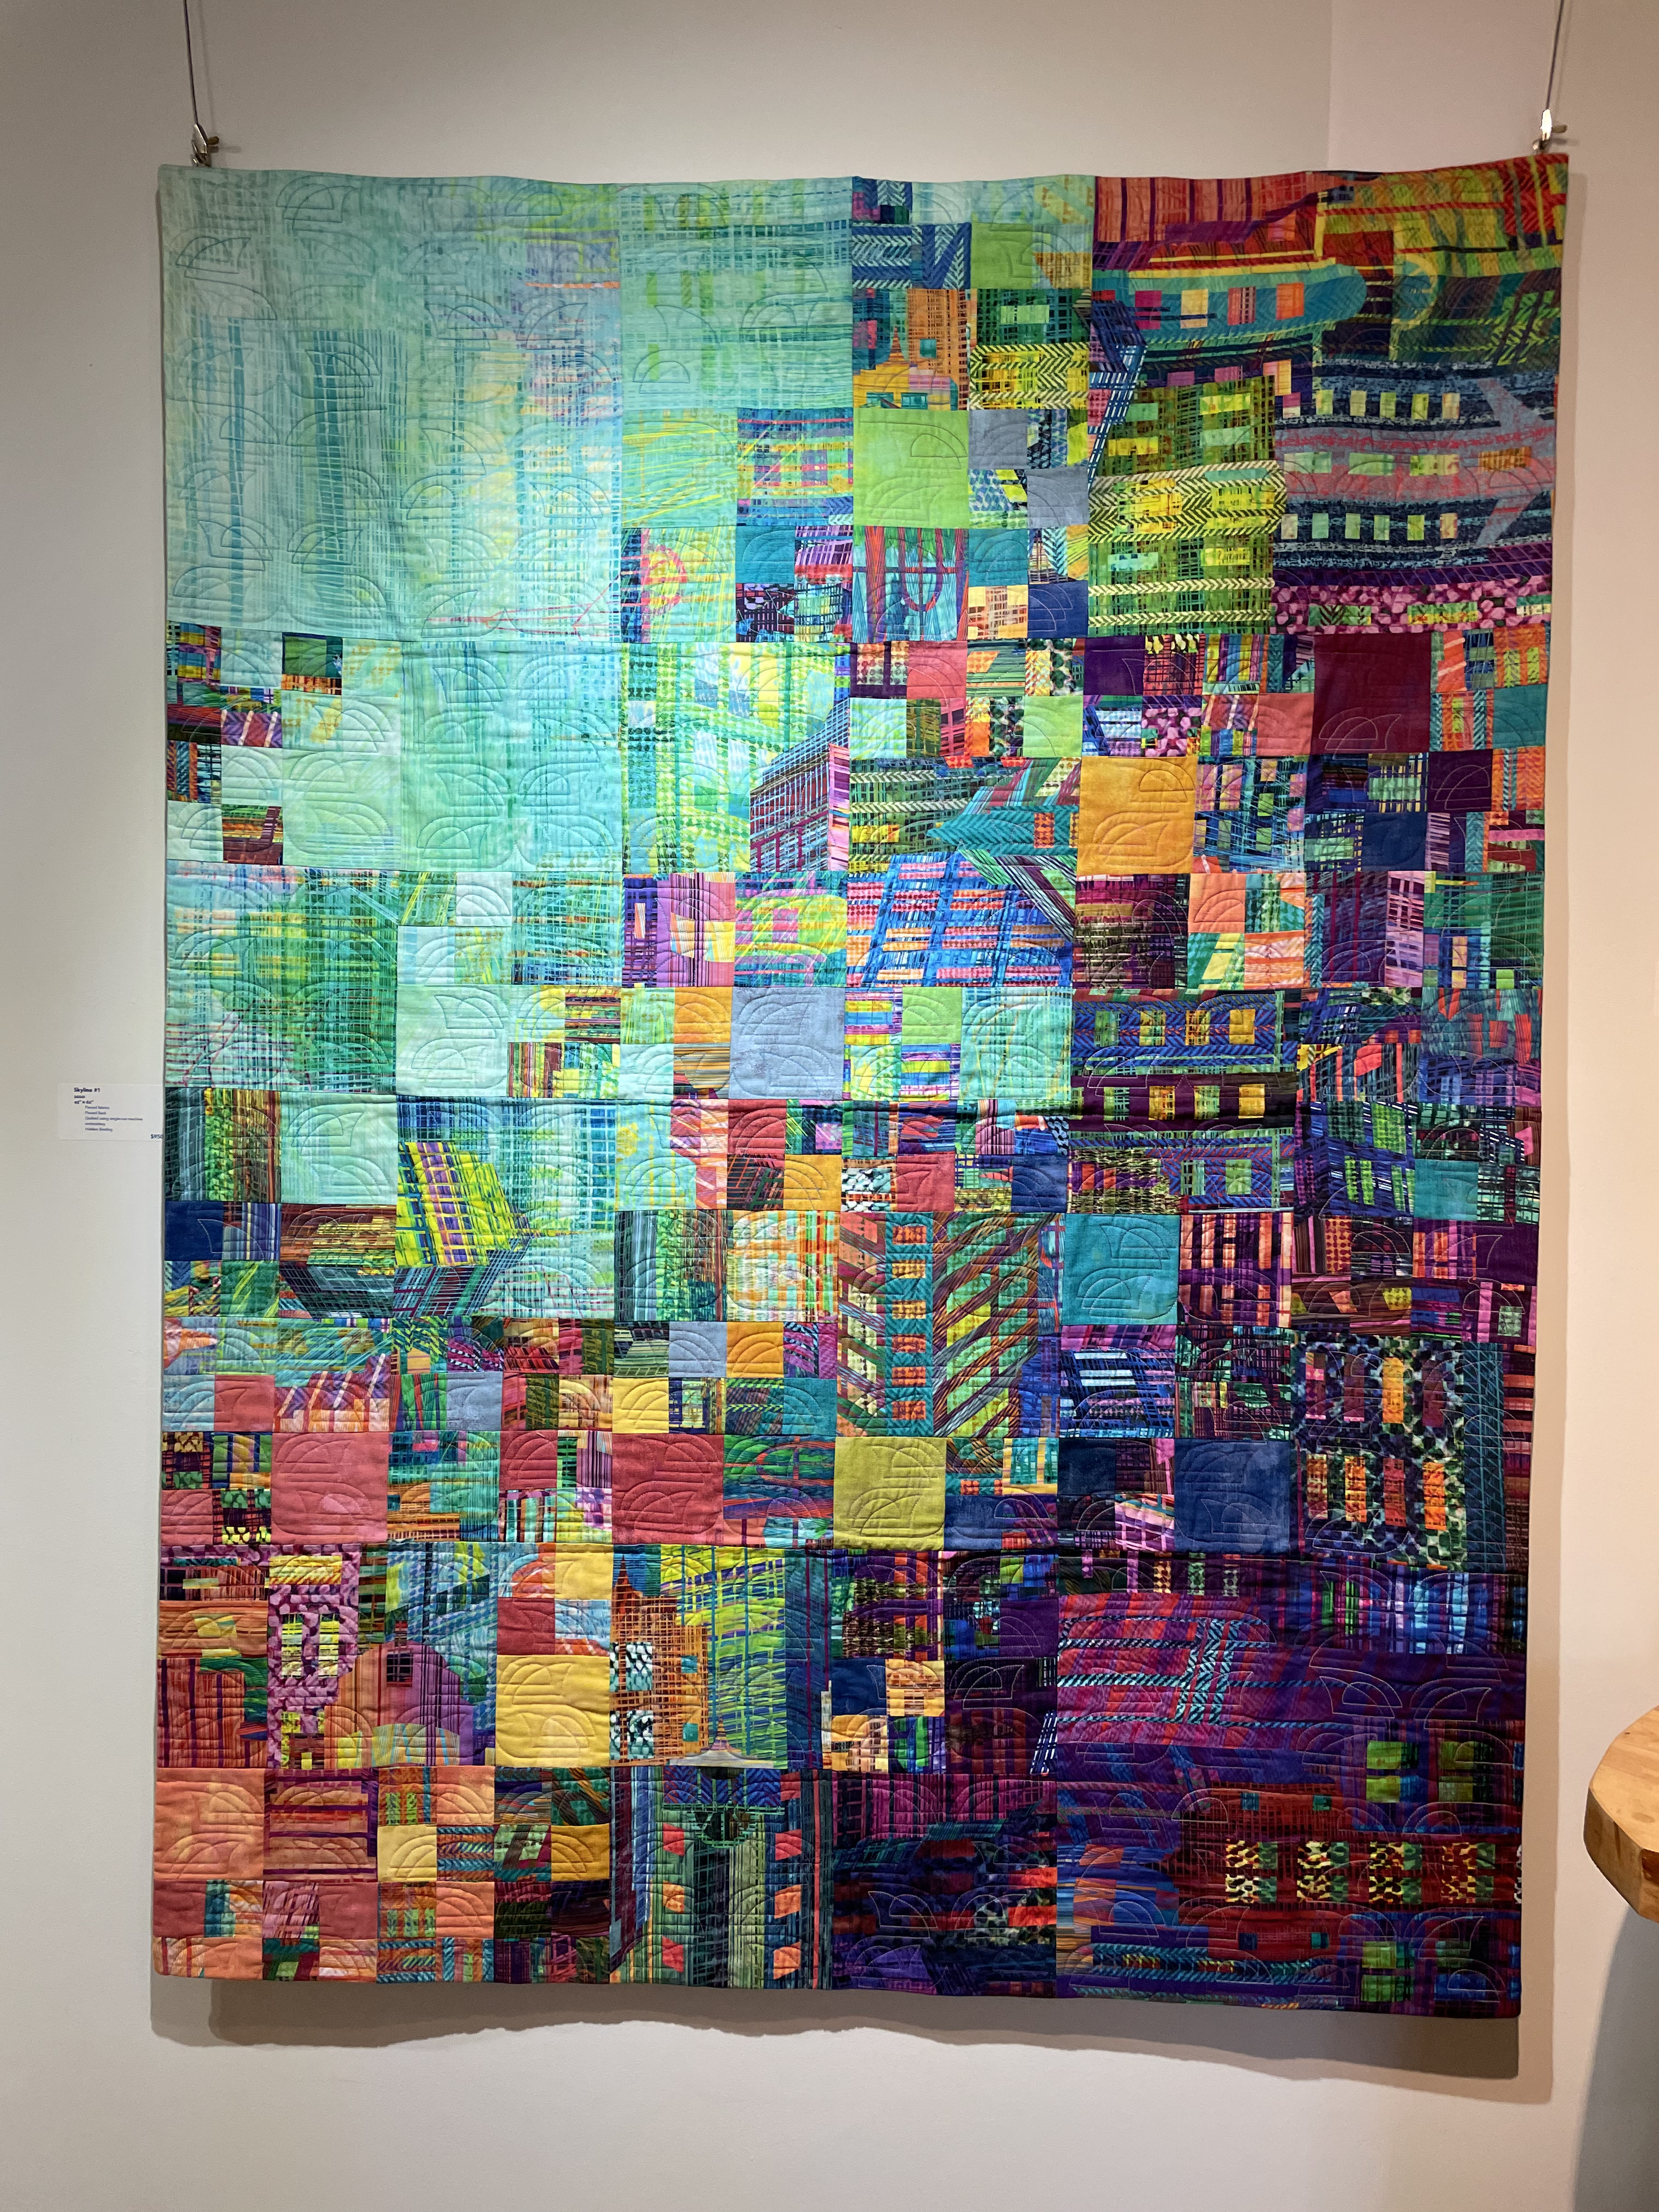
Skyline #1
Skyline #2
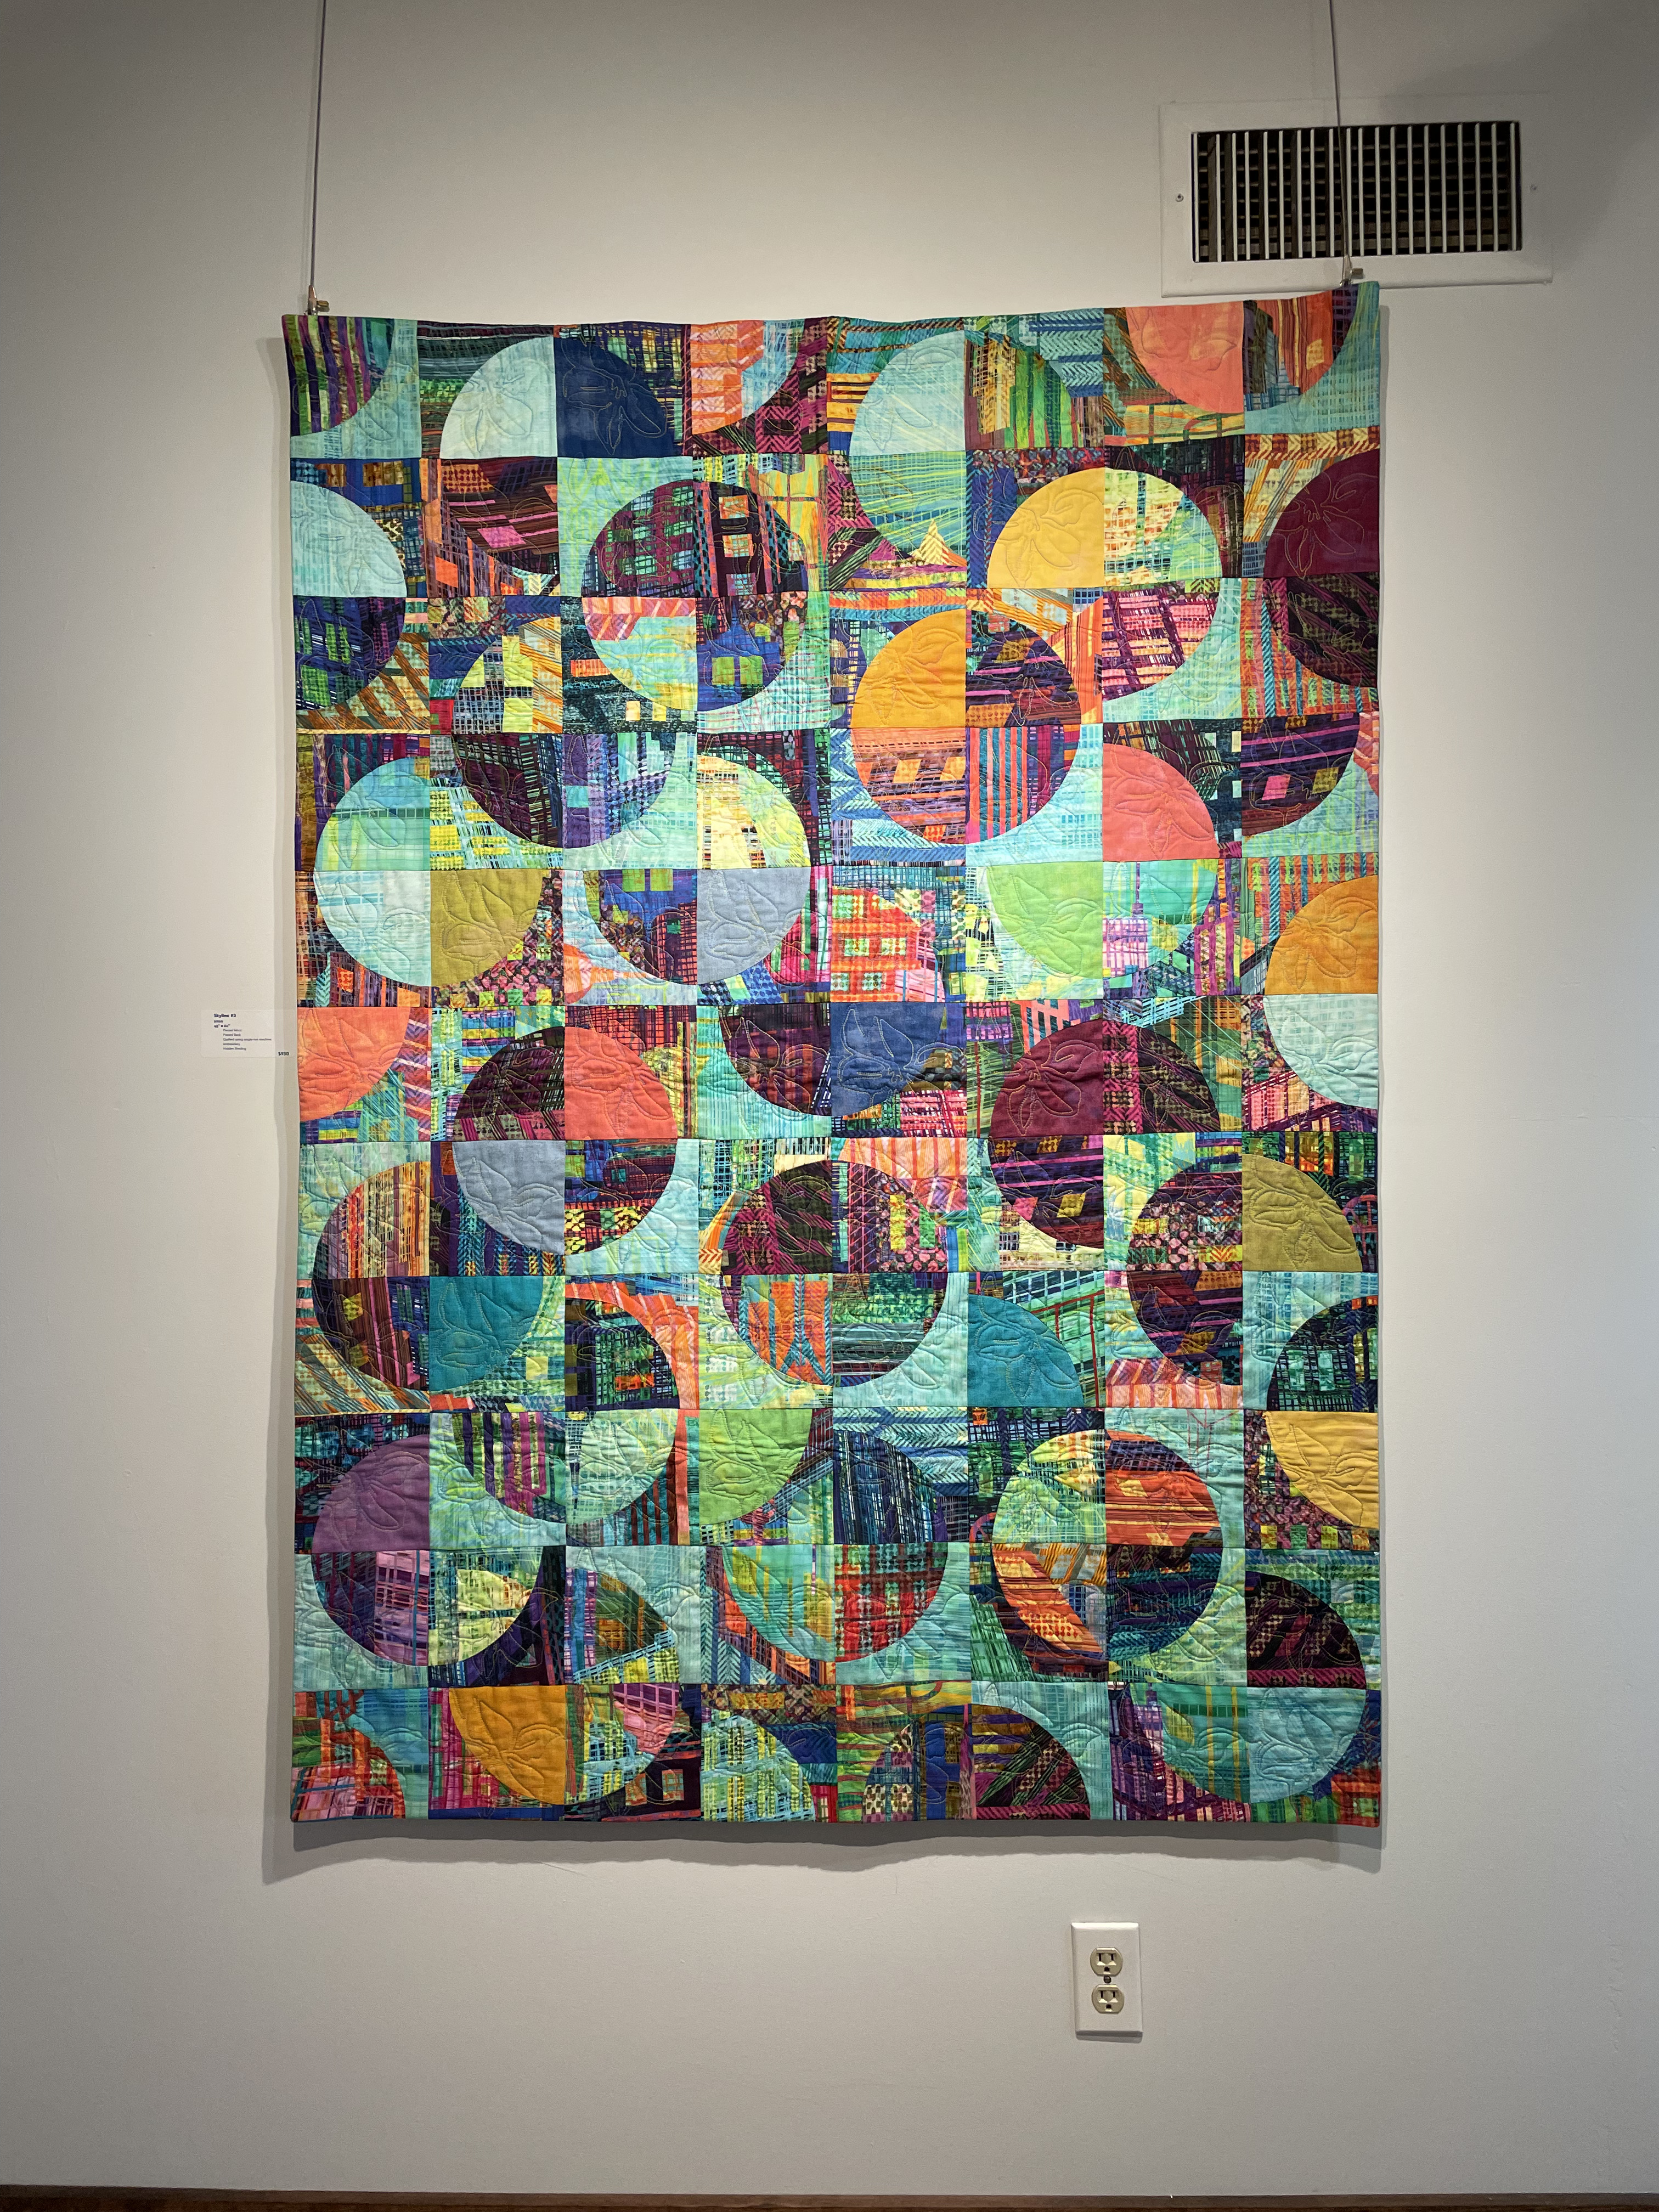
Skyline #3
I forgot to take a photo showing the three Skyline quilts hanging side by each on the wall. They make a strong triptych which was my intention when I created these pieces.
Into The Future
Not for sale, but it’s one of my stronger pieces using the fabric photo appliqué technique. I was so lucky that the sunlight on the children blended so well with the setting I put them in – on Spring Garden Road beside the Public Gardens – the photo of the children was taken at the Toronto Zoo!
On Deck
These were all the pieces I had room to hang. I returned home with three quilts and nine wall art pieces. I could have crammed in a few more small hangings but when I stood back I decided less was more.
The show is on until August 19 when I go back to Parrsboro to take down the show and return the art to my closet. I need an agent in Toronto or New York – anybody got connections to someone who might be interested in representing a textile artist in a market that would understand the art and the work required to create it?
The Japanese monpei are working pants constructed in such a way that there is no waste fabric – you cut triangles from the waist area which you use for the crotch. It works – with a few caveats!
This gives you an idea how the pants are constructed. Click here for a link to the original set of instructions. (I’ve added notes and some numbers to the instructions – click here for my additions.)
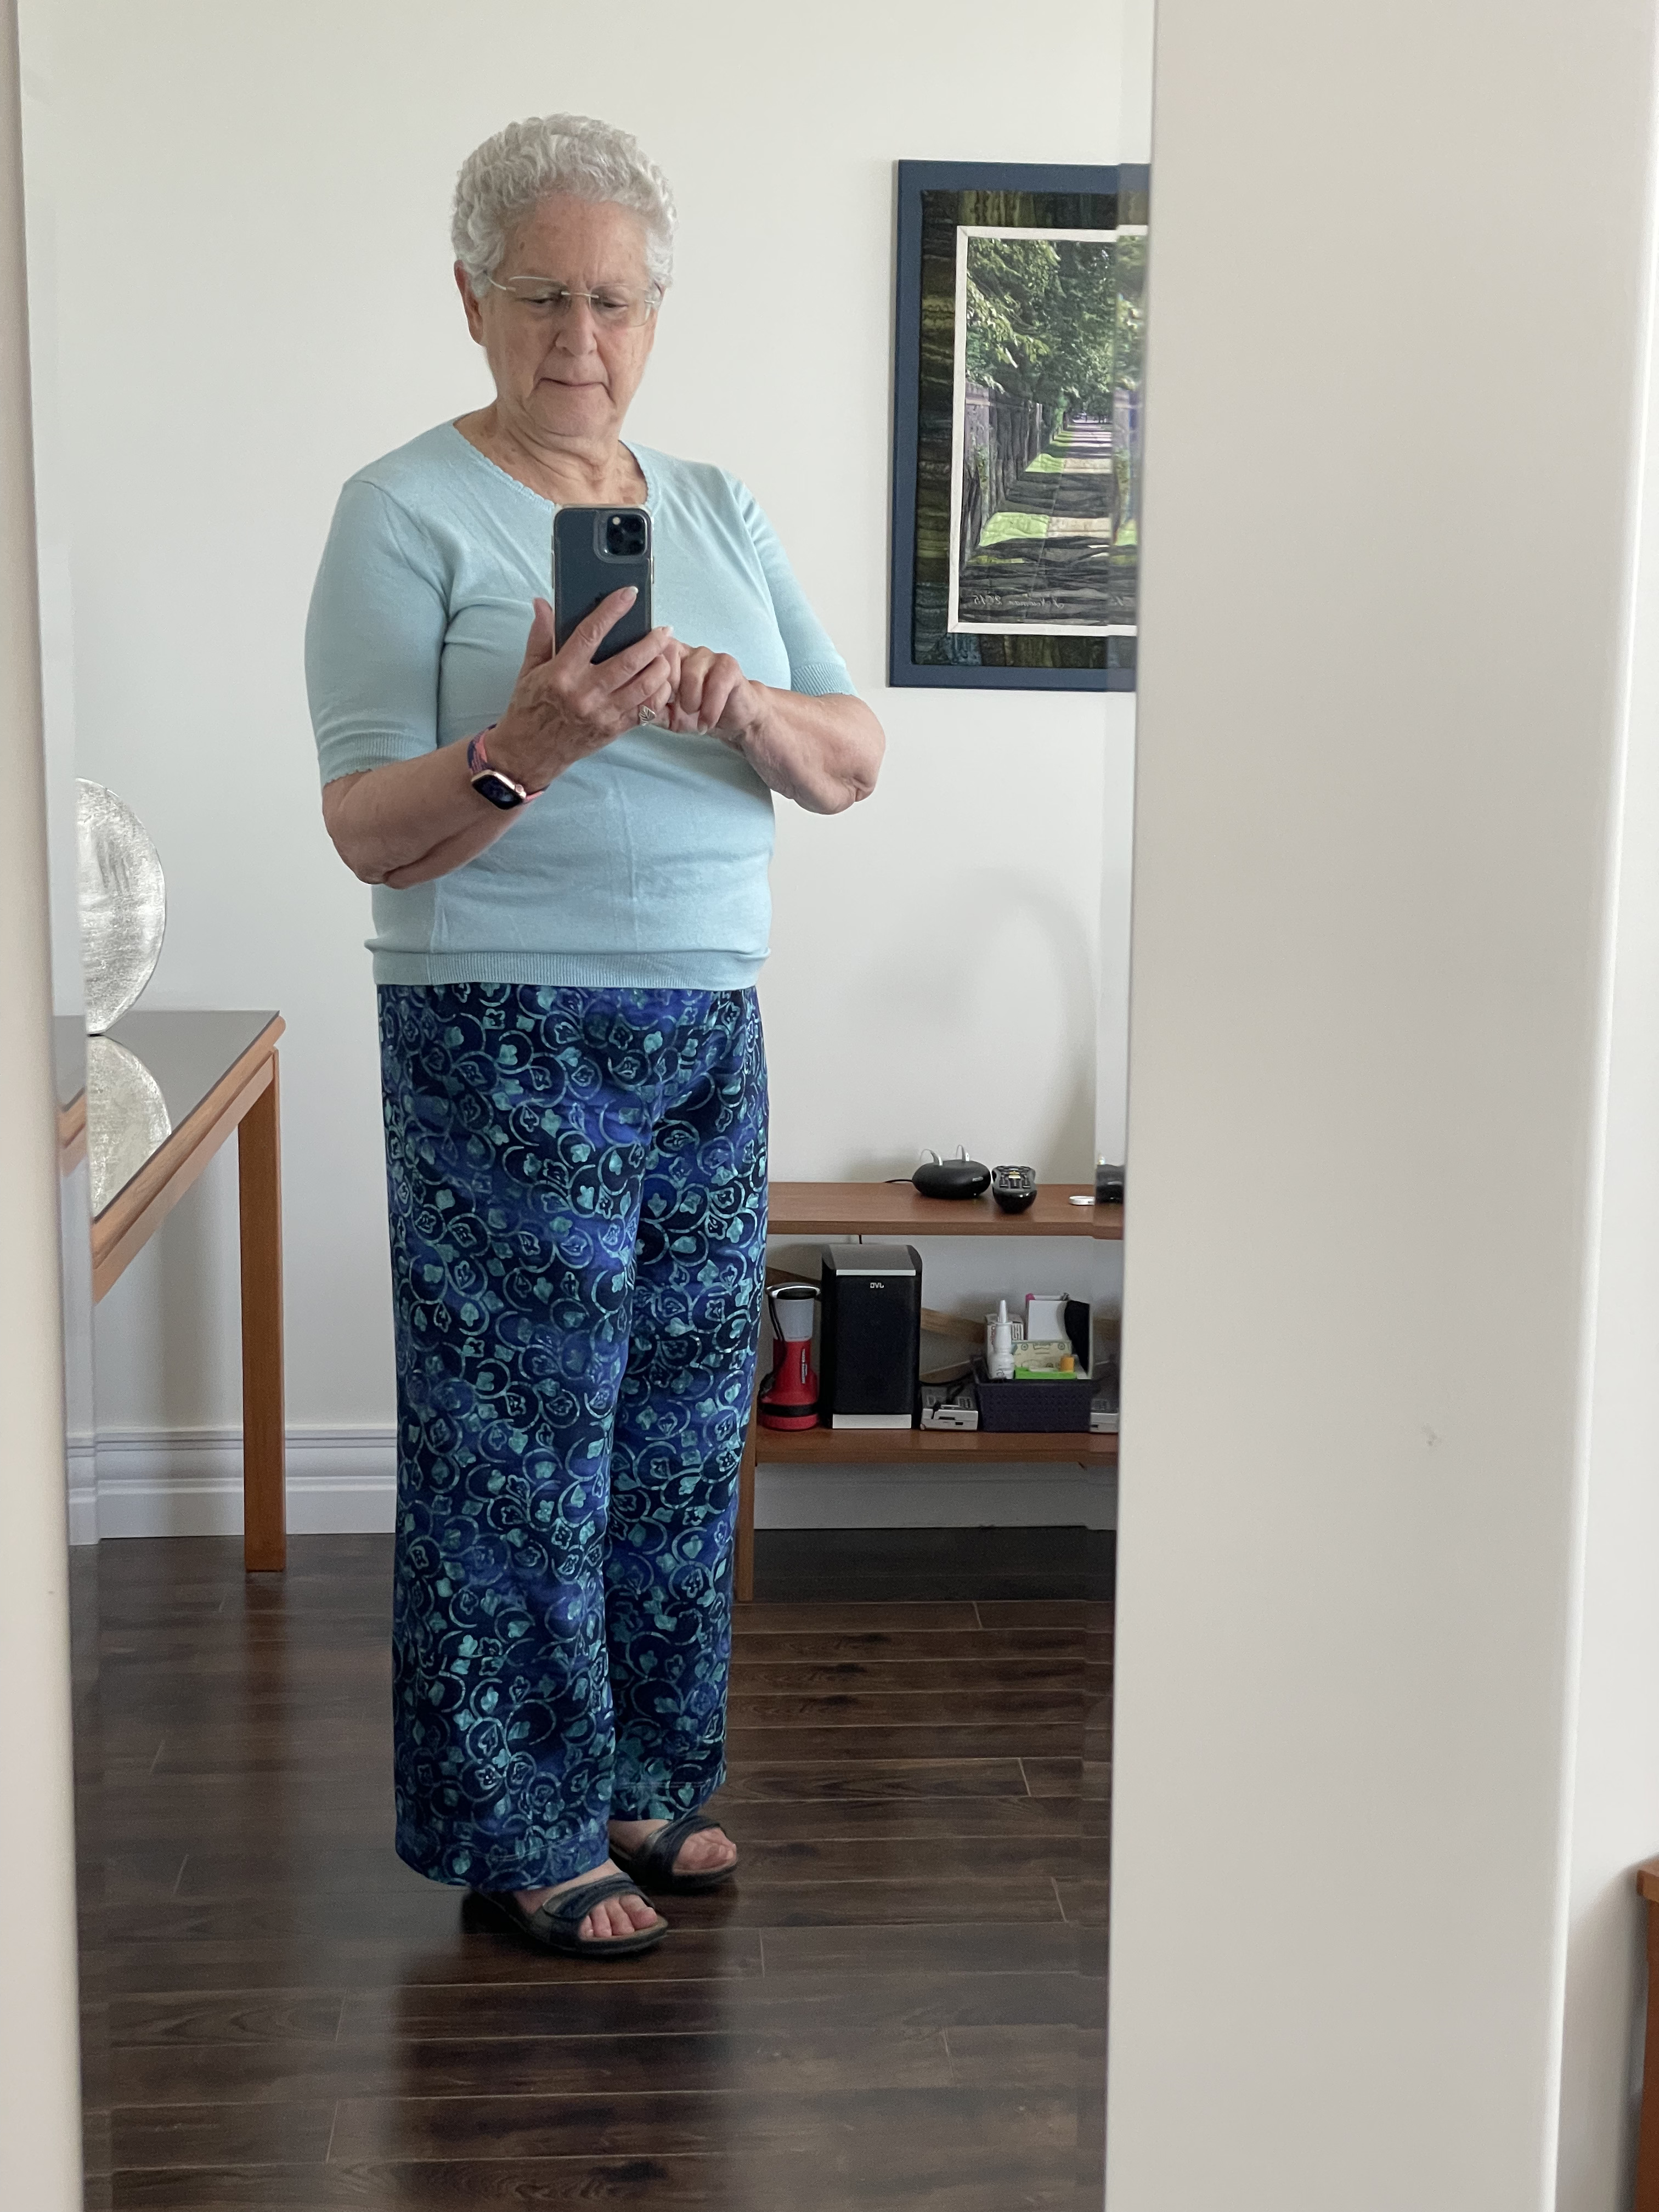
Here’s what they look like finished.
The Front
The Back
This is actually my second try – I followed the instructions for the first try – cutting triangles from the “top” of the rectangle panels (3 1/2″ for the back crotch gusset; 1 1/2″ for the front crotch gusset). Because the panels use your hip measurement to calculate the width the waist on my first try was WAAAAY too small.
Fortunately, I had enough fabric left that I was able to start over – this time working with the complete rectangle (because my waist is almost the same as my hips) and cutting a single gusset for each leg (constructed by making the front and back gusset pieces into a single gusset piece). However, I didn’t have quite enough fabric for the legs – I cut 12″ from the bottom of the first try and added them to the bottom of the legs on this second try to give me enough leg length. I was going to do some decorative stitching to make the seam appear to be intentional but in fact you don’t notice the leg lengthening seam so I’ve left well enough alone.
I used rayon fabric I bought in Bali in 2014 (where do the years go!). It’s a lovely weight and drapes nicely. I’d say the monpei turned out rather well. I have to look at some of the other rayon in my stash and see if there’s enough of another piece for a second pair of pants.
I didn’t quite follow the instructions – I didn’t cut fronts and backs of legs separately, I cut single panels for the front/back leg – no side seam. A next pair will have a side seam because I want to add front pockets and they’ll work best if they side of the pocket is incorporated into a side seam.