At Five Islands IV

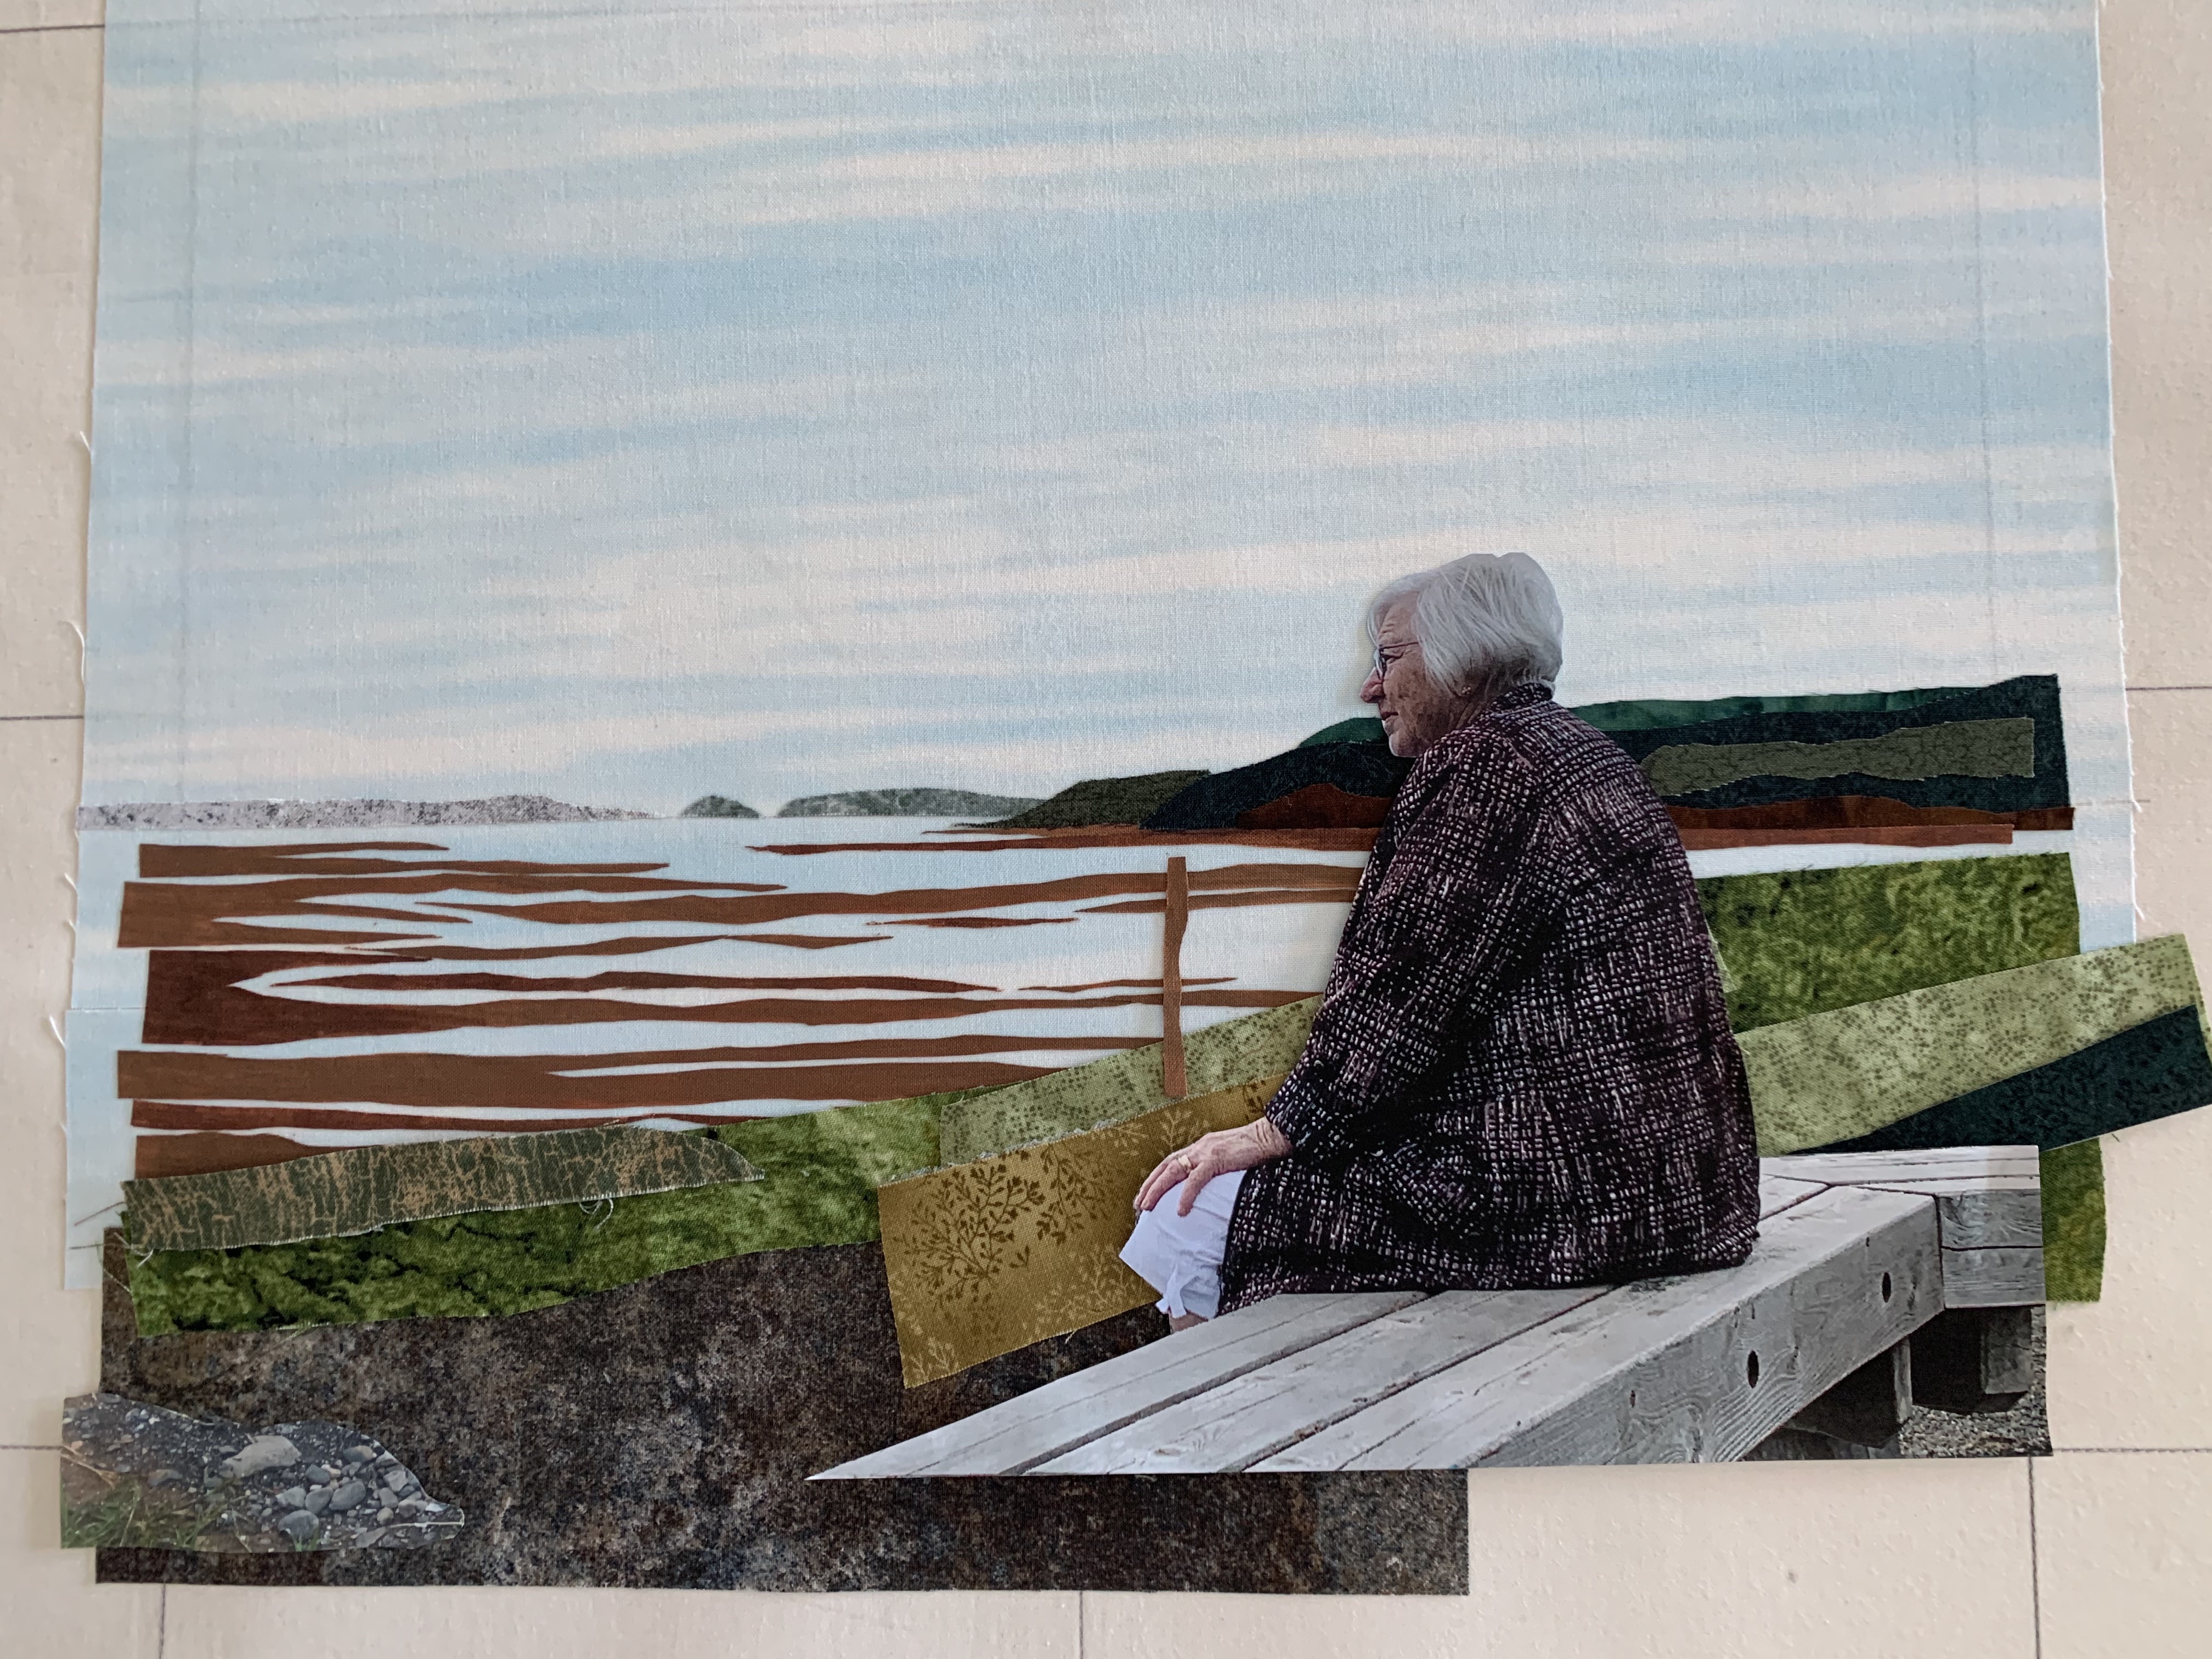
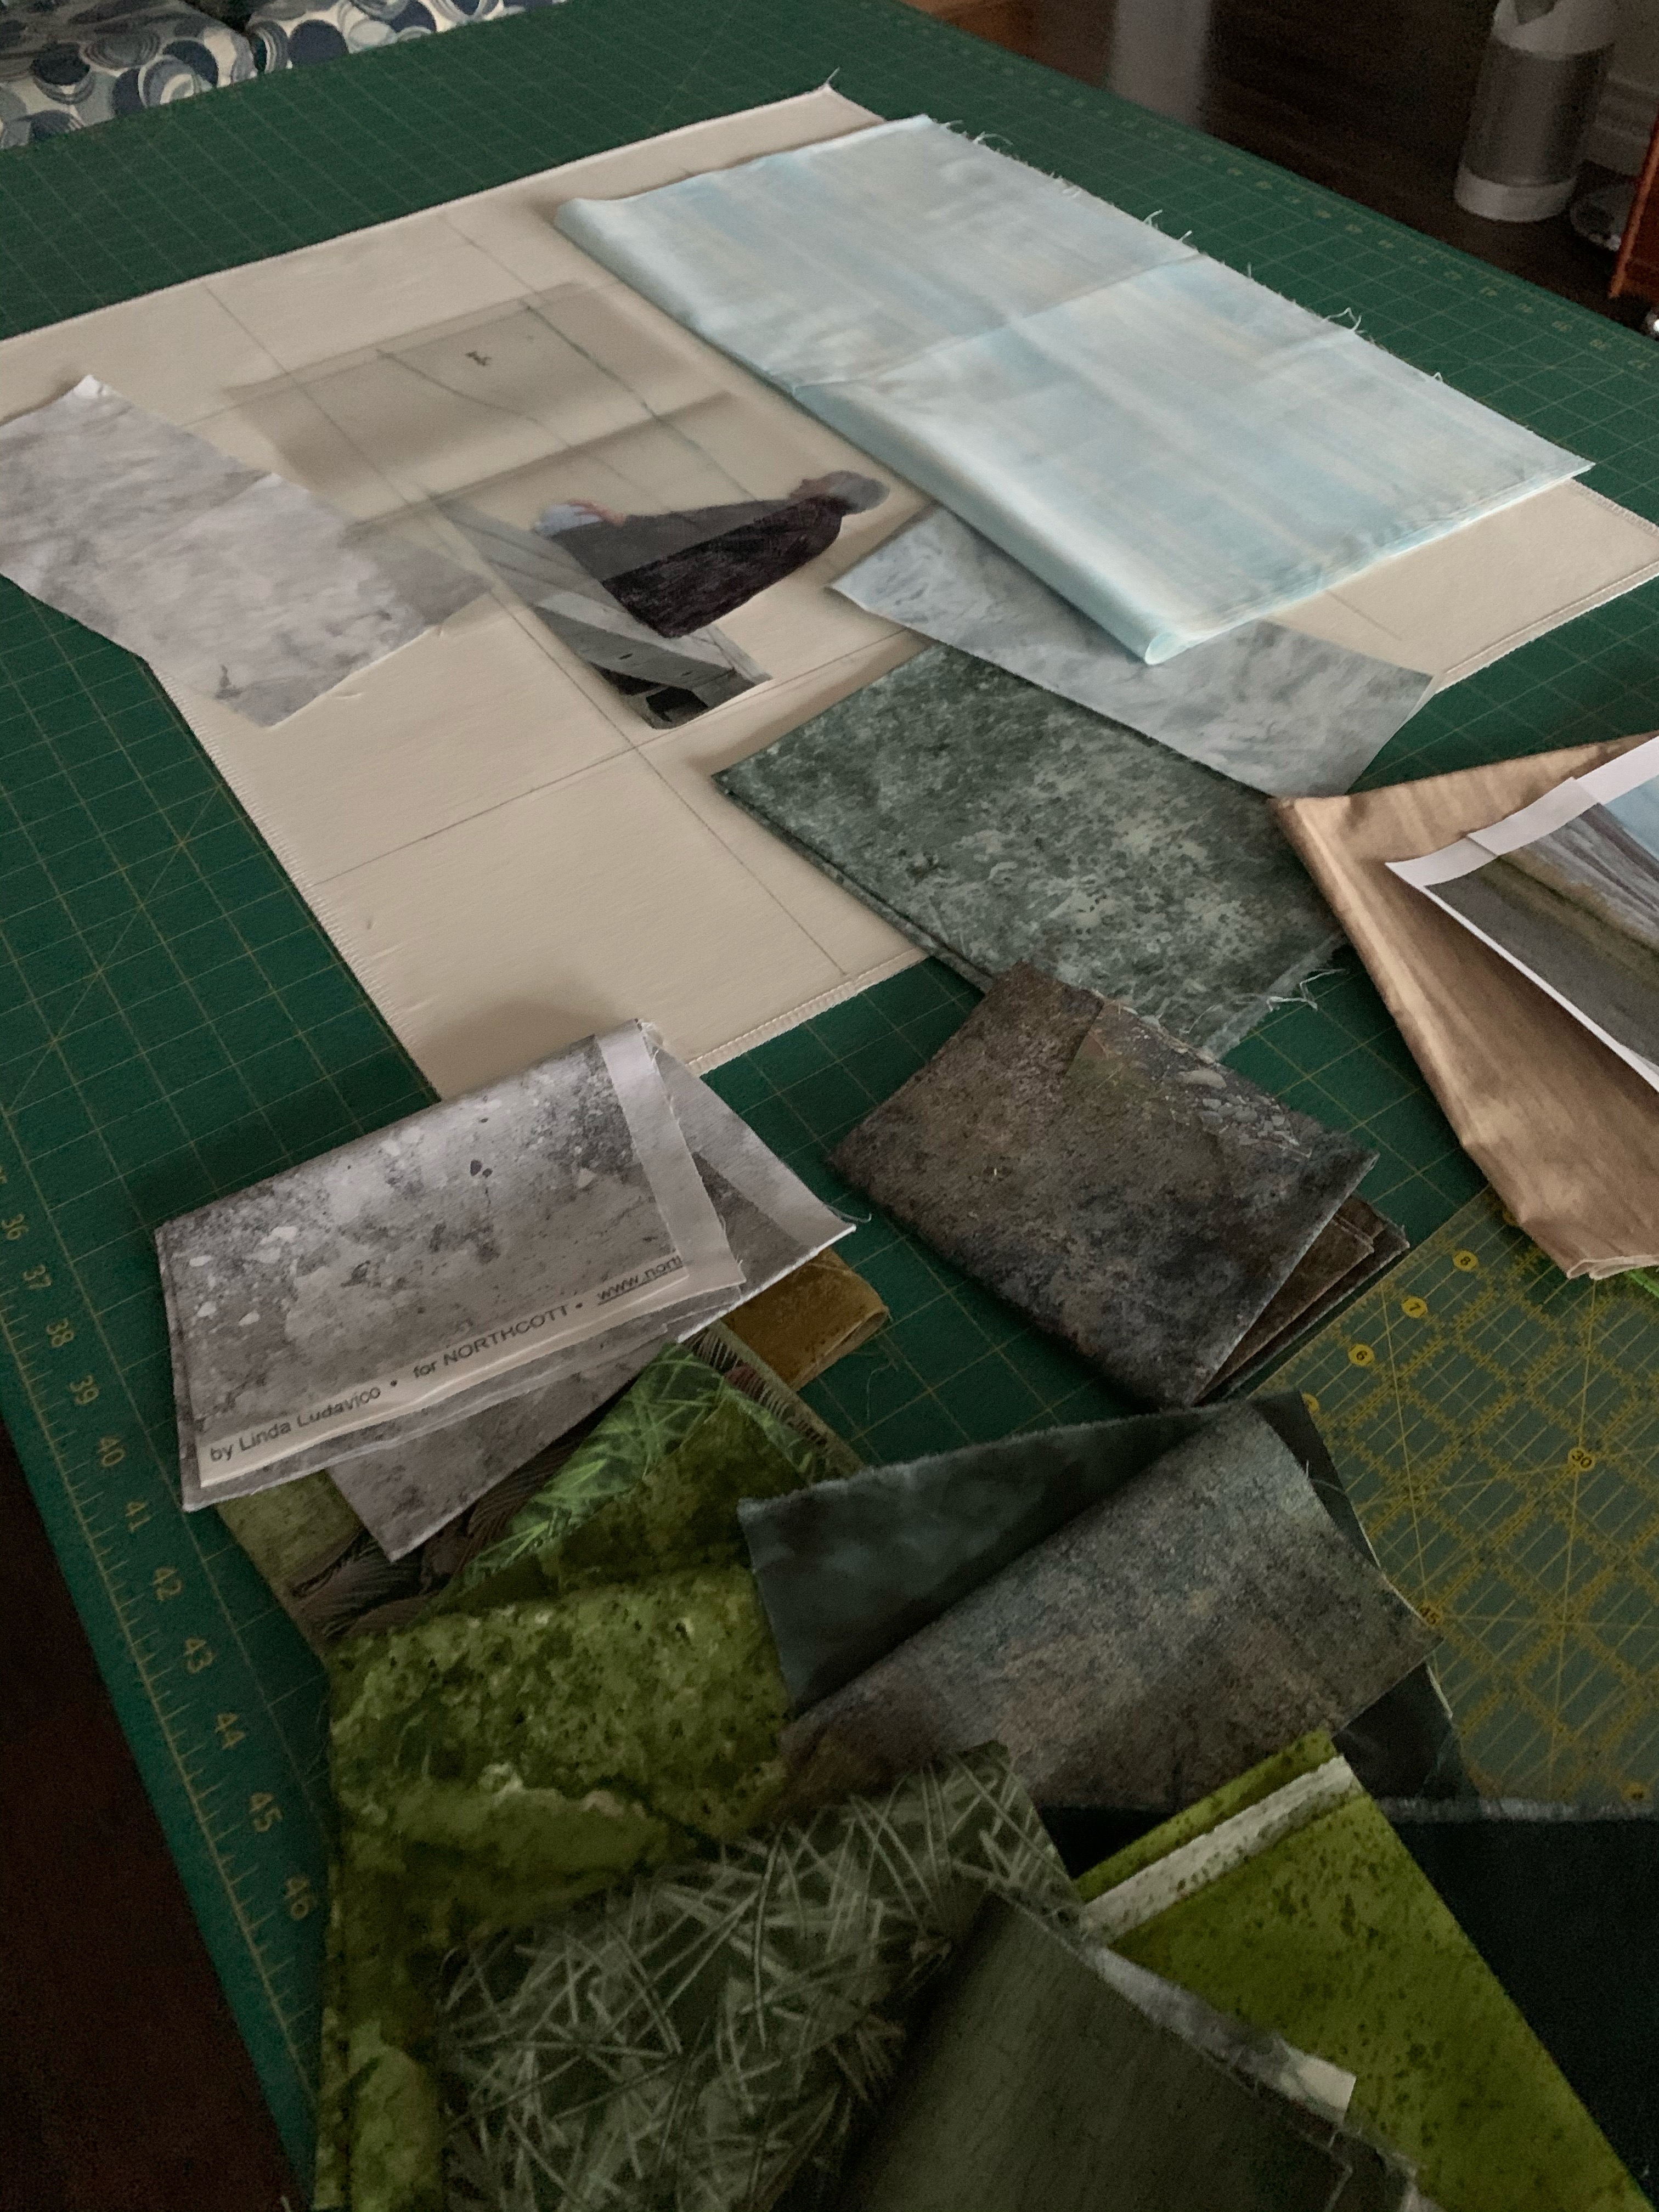
I wasn’t going to work on the Five Islands piece today but after lunch I found myself at the cutting table tidying up and before I knew it, I was picking up the small scraps of fabric and adding fusible web to each piece, then cutting them into shapes, next fusing them in place. And of course the next step was to peel the plastic backing from the photo printed on fabric, adding fusible web, fussy cutting out Ruby and the bench and pressing them into place.

Appliqué Assembled

I moved on to selecting thread to use for the thread painting. While I was at it, I added a tiny bit of darkening to the sky with fabric pastels and pressing it to set the colours into the fabric. I might add a bit more grey in the upper right corner of the sky but not until I’ve done a bit of stitching, first.

Selecting Thread

The next step is always the challenging moment – up to this point I can always remove a bit of fabric and try something else, but once I start stitching, the fabric selection is set. In addition, I really only get one go at the stitching because after I’ve picked out the thread there are needle holes (subtle but nevertheless visible). So, it’s take a deep breath and gently hit the foot pedal.

I want to do a lot of thread painting on the mud flats – browns into the blue fabric, blues/greys into the browns to obscure the fabric edges (If I can). Actually, I’ll start with the sky and work my way down to the bottom of the piece, including quite a bit on the bench and the gravel it’s sitting on to blend the two together a bit more.

The last element will be a signature in the bottom left corner in a soft blue/grey so it can be seen but doesn’t jump out – that addition always scares me because I can end up ruining the piece after I’ve put in a lot of work. So far I’ve had no disasters signing a piece but you just never know when the embroidery machine won’t quite cooperate!

Tomorrow I have a “Quilting In The Hoop” class at Sew With Vision (a Pfaff/Husqvarna dealership nearby) for most of the day. However, my calendar is completely free Thursday….

More iPhone Photography

It was actually a lovely snowy day today – snowing quite steadily but almost no wind. A perfect occasion to wear my Manitoba winter gear (which I’ve not parted with) and to take photos.

Our building superintendent was stoically shovelling (and reshovelling) the sidewalk in front of our building for much of the day. I just love his stylish snow-shovelling gear! I walked around him until I was able to see both feet not hidden by the shovel – I tried editing a bit, but in the end all I did was crop the image a little.

The Epitome Of Snow Shovelling Fashion

On the way back home I had my eye on hydrants as I passed them. This one seemed more sad than the others so I stopped to take it’s picture. Kind of reminds me of a toy soldier with his helmet pulled down around his ears.

Resolute But Sad

Several months ago I noticed this shelter built from fallen branches in the underbrush. I didn’t think a whole lot about it until today – it certainly wouldn’t afford a homeless person much protection! I wonder what the story is beind this construction….

An Untold Story

BTW – It annoys me to hear people complain about the weather – I learned many years ago in Manitoba that if I dressed appropriately for the day I could enjoy every day – rain, shine, snow. When I say I donned my Manitoba gear I mean it:

Wearing My Manitoba Winterwear (taken 2019)

A warm down parka faced with fur, a good scarf and warm boots and mitts – I’m ready for anything. In fact, I was too warmly dressed today so I unzipped the front of my coat a bit. I was snug at -30° C in Winnipeg mid-winter with this coat.

iPhone Photography

I’ve been sidetracked! A couple of weeks ago I signed up for an online iPhone photography course. To do the course justice, I have to be taking photos. The folks enrolled in the course around the world are taking terrific photos with their iPhones. I haven’t been out and about much for the last few weeks so I’m kind of limited to what I have here in the apartment.

I’ve been trying close-ups of the orchids and the amaryllis which is blooming again. I’m limited because my iPhone XR has a single camera (I don’t want to use the zoom, for technical reasons) unlike the latest iPhones which have either two or three cameras – one of which magnifies 2X. So I’m limited by how close I can get to my subject and still have the camera focus.

In this photo I was trying to keep the dots in the throat of the flower reasonably sharp. Then I edited the image trying to blur the background a bit and strengthen the veins in the petals and sepals.


I tried the same thing in this photo – not quite as sharp – I’ll have to try again on a brighter day. I was aiming to get the petals to be almost translucent

I was quite happy with this close-up of my amaryllis – I wanted to retain the pale green at the centre; I was also aiming to position the camera so the stamens were in focus. Here, your eye zooms in on the floral centre but then follows the stamens and the lines in the petals outward.
I’ve also tried a couple of portraits – using that mode it’s possible to blur the background in an interesting way. I need to take many more images before I’d say I can control of that function of the camera!

I now can intentionally take bursts of photos, use the “Live” function. On to the next module to learn more about what the iPhone camera will do.

And I have to get back to “At Five Islands” later today!

Close, But Not An Exact Match!

I’ve been working on this pair of socks for a couple of weeks. Black isn’t my favourite contrast colour but the socks are certainly wearable. This was another of the balls of yarn from my Denmark order and I’ve been trying to use them up because I’m not fond of several of the colour combinations – they’re less satisfying to work on when it’s like that.

Close but not an exact match

I finished the first sock, was half way through the leg of the second when I came upon a KNOT. I hate knots – because you have to go searching for the precise matching point somewhere along in the ball (hoping the  pattern will continue in sequence and not be reversed which has occasionally happened to me). The knot was in one of those spots where it was difficult to see the colour match precisely (where the rust turns to red) – I did the best I could but I resumed knitting 4-5 rows too soon so red section on the second sock leg turned out to be 4-5 rows longer than on the first sock. I didn’t see it until I’d knit more than I was willing to unravel to fix the match so I carried on. The mismatch isn’t so noticeable at the instep but when you get to the toes the difference definitely shows.

I’m hoping the recipient, my friend John, will overlook the discrepancy and enjoy wearing them. Maybe the mismatch will make him chuckle each time he puts them on. (This is the second time recently I’ve not been able to come up with an exact match – it’s partly the shading in this particular variegated yarn that makes it difficult to spot the changes, partly the fact that I’m willing to live with the mismatching.)

At Five Islands III – The Mess

In case you harbour any illusions that I work in a tidy way – I wish to share the chaos on my cutting table!

Creating a textile wall art piece is an exercise in mess! It may start out looking orderly, but it quickly degenerates into piles of tiny scraps of fabric scattered everywhere; some so small I need fine tweezers to pick them up and place them.

The Mess!

Step 1 is to guesstimate the size of the piece of fabric (leaving enough for me to trim my way to the shape I intend), then Step 2 is adding fusible web to the back. I use a silicon sheet when pressing to be sure I’m not sticking fusible web to my ironing board.

Step 3 – I cut out whatever small shape I need and carefully place it on the background (which is already fused to the muslin base). Sometimes to get a shape, I cut that element from the paper printout of the scene – that’s what I’ve done with Ruby – I’m using my paper cutout to help me position all the other elements. Ultimately, I’m going to print the Ruby enlargement (~115%) on an 8 1/2″ x 11″ piece of prepared fabric (for her to fit the size of this piece I’ve had to crop and enlarge various parts of the photo to get the overall magnification right).

After establishing a position for my horizon, I work from distant background to foreground – carefully layering the bits of fabric and pressing the cutouts into place, waiting for them to cool before adding the next bit. At this point, I’m also trying to visualize where I’ll be thread-painting to build texture and detail to the scene – in the case of the mud flat at low tide, the brown bits of fabric will be stitched with light blue thread, the water will be stitched with brown thread to blur the boundaries of water and mud.

I just thought you’d find the mess I work with interesting. I use both course and fine permanent markers to adjust colour, sometimes I’m even able to cut bits from previous projects printed on fabric sheets to provide a bit of added detail. I was looking at the rocky beach from a fabric print-out of Black Rock Beach but the pebbles are too large to be useful for the gravel path in front of the bench at Five Islands Park. I will use a bit of Stonehenge fabric and thread-paint it to get the effect I want.

Now to do more on this project….

At Five Islands II

I’ve just spent the morning working on the distant background – the NS mainland in the far distance, the islands closer to the Parrsboro shore and the nearby headland. Then I started on the mud flats – it’s fiddly and the bits of fabric may be too large but I won’t know that until I get the foreground developed. I can always remove some of the bits of brown and fill in with thread-painting.

Shaping & Fusing Elements

Looking at the photo, Ruby might be just a bit too close to the centre – I may want to position her a smidgen closer to the right edge. But now I’ve got the layout positioned so that her head is above the headland. I also like how the sky has turned out – it’s a piece of fabric I purchased quite a while ago. I will add in some more grey clouds on the right, probably using some organza, but this will thread-paint nicely.

Gotta go do other things now. Back at this tomorrow.

At Five Islands

Immediately after giving up on the Diamonds Quilt, I turned to a new wall art project: At Five Islands.

I’ve written about my visit to the Five Islands Park this past July. While at the park, I managed to capture a photo of my friend Ruby who had been on the trip with me:

At Five Islands

I knew I would turn the photo into a piece of fibre art. I started by enlarging the photo so I could make the panel 15″ x 12″ and have Ruby still be prominent. Next I dug out a bunch of fabrics and scraps from the stash trying to match colour.

At Five Islands – Picking Fabrics

Then I sketched in some features (using a Friction pen which will disappear when I fuse fabric elements in place).

At Five Islands – Sketching The Scene

This morning I started cutting small bits of fabric to “paint” the scene:

At Five Islands – Preliminary Layout

Nothing is fused in place yet. I’m still trying to get the feel of the layout. I can see I need to squash the vertical aspect quite a bit because I want Ruby’s head to be well above the landscape behind her.

The challenge with this piece is getting the feel of the wet mud flat of the Bay of Fundy at low tide. Yesterday I painted a piece of fabric using an acrylic wash but the colour is much too bright for the scene. I need something quite a bit darker; I also need to cut away much more.

St. Margaret’s Bay

I have been studying a couple of my watercolour paintings of the ocean – I’ve spent hours in front of them trying to understand how to set up the mud flat. Because the water reflects the sky it has to be the same colour – it’s the subtle shadowing of the “land” elements that make us read “water”. With watercolour, the water is painted first with the darker land elements added after the water has dried. I need to do the same with my piece – lay down the water fabric then add strips representing “mud” on top. The thread painting will fill in the flow of the remaining surface water on the mud.

Next step is to add fusible interfacing to each of the small fabric pieces, shape them, then fuse them in place.


Diamonds – Time To Quit!

We had a snow storm yesterday – a good day for sewing. I managed to get half of the diamond blocks assembled but then I faced reality – if I aligned the left side and the top square on my cutting board I had a seriously wobbly diagonal that can’t be repaired easily! I’ll explain….

Half Of The Top Panel Assembled

I worked hard at getting precise diamond points and I was successful to a great extent. Laid out on batting the slight irregularities in the diamonds would smooth out as the cotton adhered to the batting.

Closeup Of The Diamonds

However the diagonal edge is about 2 1/2″ – 3″ too long!

The Problem With The Diagonal

I could take the whole assembled panel apart and try shaving small amounts from each diamond but then aligning the points would be very difficult.

Wobbly Diagonal

Even with the “dart” the further diagonal edge is still wobbly.

Second Side Of Panel Started

You can see how the wobble is beginning here on the second side – the problem at this point seems limited to the edge triangles but I suspect were I to replace those elements and continue adding rows I’d find the problem with the diagonal developing as the diagonal gets longer.

This has not been my favourite project – it’s been a fight from the beginning. I think it’s time to call it quits. That means actually throwing out the whole thing, not keeping it around as a U(n) F(finished) O(object). Just forget it.

I was thinking about axing the project at 6:00 am after I’d rolled over to register online for an aquafit class next Wednesday and couldn’t fall back to sleep. I was thinking maybe I should just slice the quilt, cut out the fullness, sew a seam across the diamonds, trim the diagonal, then continue working on the second half, maybe do the same thing there if I needed to.

I have a name for the project – “At War With Itself” – I’m doing fine with regard to COVID-19, the mess in the US has had me transfixed for five years. I think this quilt has been a reflection of that angst – my inner harmony seems lost. Do I want to quickly finish the piece with all it’s ugliness? Or should I simply get rid of it and start afresh? I suppose if I’m going to throw it away I might have a go at the splice and see how awful it looks – maybe awful is OK?

Diamonds – Updating

I’d no sooner posted earlier this morning when my friend Deb texted me “Saw your post and have a few brighter fabrics if you want me to bring them up to audition? ”  “Sure, I said.” and within a few minutes Deb was at my door with a small pile of fabrics she thought might fit into my array.

I choose a couple, then went through my stash again, this time not worrying about “Dots” but just looking for fabrics in shades that might work with the diamonds in my layout.

Layout With Edges

I cut out a number of diamonds in bold colours and dropped them into the layout on my floor. Looking at my pile of unused diamonds it’s obvious I’ve removed most of the very pale diamonds and substituted much stronger colours.

While I was rummaging in the stash, I came across a “dots” fabric I thought would be dark enough to blend with the rest so I cut out half diamonds for the sides, top/bottom, and corners. The dots are much further apart but the pattern is soft enough that it isn’t distracting from the main panel, just framing it. I will need more borders but I’ll deal with that when I have this all assembled (I may have just enough of the dots left for a narrow border and I will add a narrow turquoise border I think; what else, I’m not sure yet).

My layout is complete. I can tell by looking at the photo I should still move a few diamonds but I’m now reasonably happy with what I have.

Assembly Beginning

I began assembling diamonds starting in what will become the bottom right corner (or upper left – I’ll see later which way I think the quilt will work best).

I’ll carry on with setting up the diagonal rows and attaching them to one another – painstaking work, because I want the points to align – that takes careful pinning at the joins before I sew. However, I’ve managed to align the points in these two rows reasonably well, hoping to be able to continue as I go along.

What I’ve realized is my decision to use the tiny dots jellyroll for this diamond project was a problem from the start – the strips were too narrow to make diamonds themselves and stitching them together set up conflicts I wasn’t able to resolve. That kept me stuck, not knowing how to move ahead. Stepping away from the lighter diamonds and deciding to use stronger colours freed me to explore my stash and consider other possibilities.

Diamonds – Laid Out

I finished sewing the strip pairs, then cut out the diamonds and when I laid them out this is what I had – definitely DULL!

First Layout

I do believe even if I had set up the strip pairs differently my outcome would have been the same – too many lights and darks and very few medium. The colour differences turned out to be much too subtle to allow me to do anything more with them.

Possible Substitutes

I felt I needed to add more colour – I grabbed some Grunge fabrics and some Fossil Fern to brighten the layout…

Definitely Brighter

I found myself removing the light diamonds and substituting the other fabrics – this is my layout for the moment. From here, I need to pick up the diagonal rows, and press all the pieces before sewing those rows together. I should also add another row to the bottom so that my row ends with full diamonds on the two bottom corners (at the moment I’m place holding with half diamonds – I have enough light diamonds that I pulled out to move pieces around and reinsert 10 diamonds. That will allow me half diamonds on all the edges with the corners being the ones belonging to the set.

The other question I’m pondering is whether to try finding another fabric in a very different colour for a central focus – I don’t have one at this point. I’d intended the turquoise to be my focal colour but with all the other colours now added that’s not happening. I could make one large turquoise diamond but I think it would overpower the rest, particularly since there aren’t clusters of very small diamonds in the array (which I really don’t want to do) to offset the ones I have.

I also ave no idea what fabric to use for the border half diamonds! Should it blend? Should it contrast? I have lots of turquoise Grunge – my original thoughts were to use that for the bordering, but now I’m not so sure. I may have to shop for a dark dots fabric that will blend with what I have; pretty sure I don’t want anything too bright.

I’ll simply carry on for now, pressing and assembling the diagonal rows….