Pink Flowers – Finished

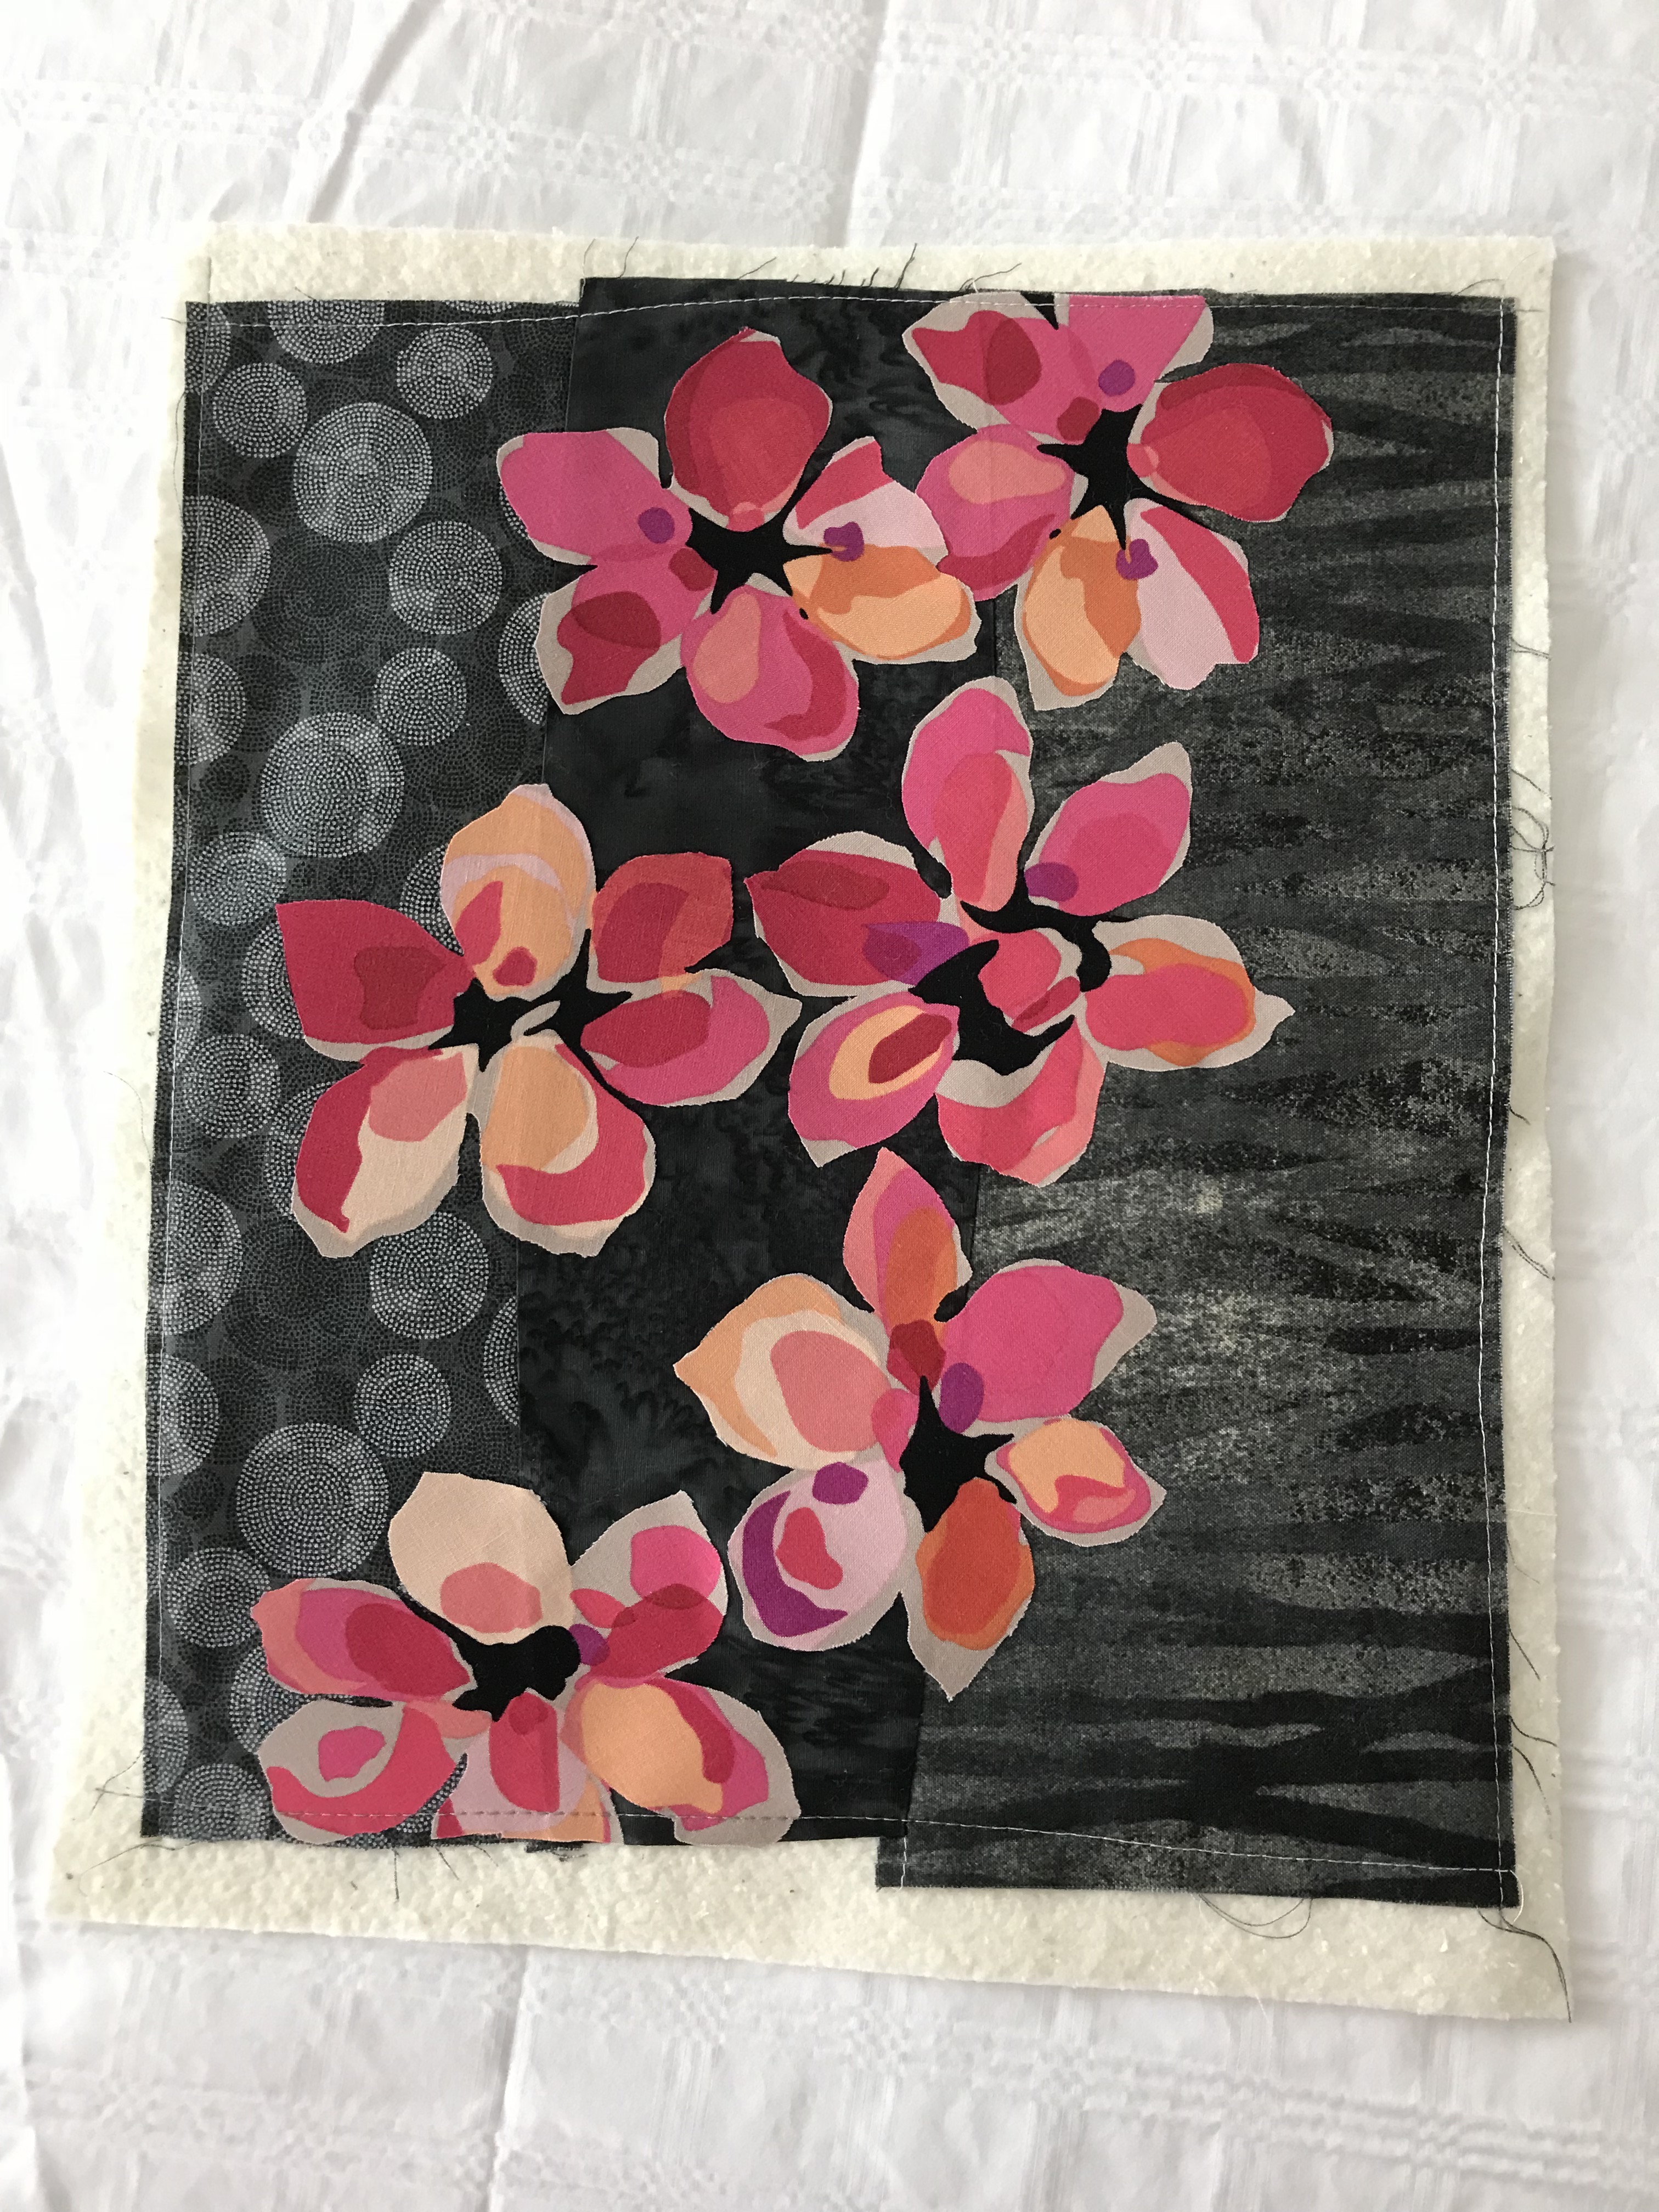
I just put the finishing touches on this wall art piece – Pink Flowers. In the photo it looks a bit out of kilter, but I that’s an artifact of where I was standing when I took the photo – the piece is 15.5″ wide x 18″ in height.
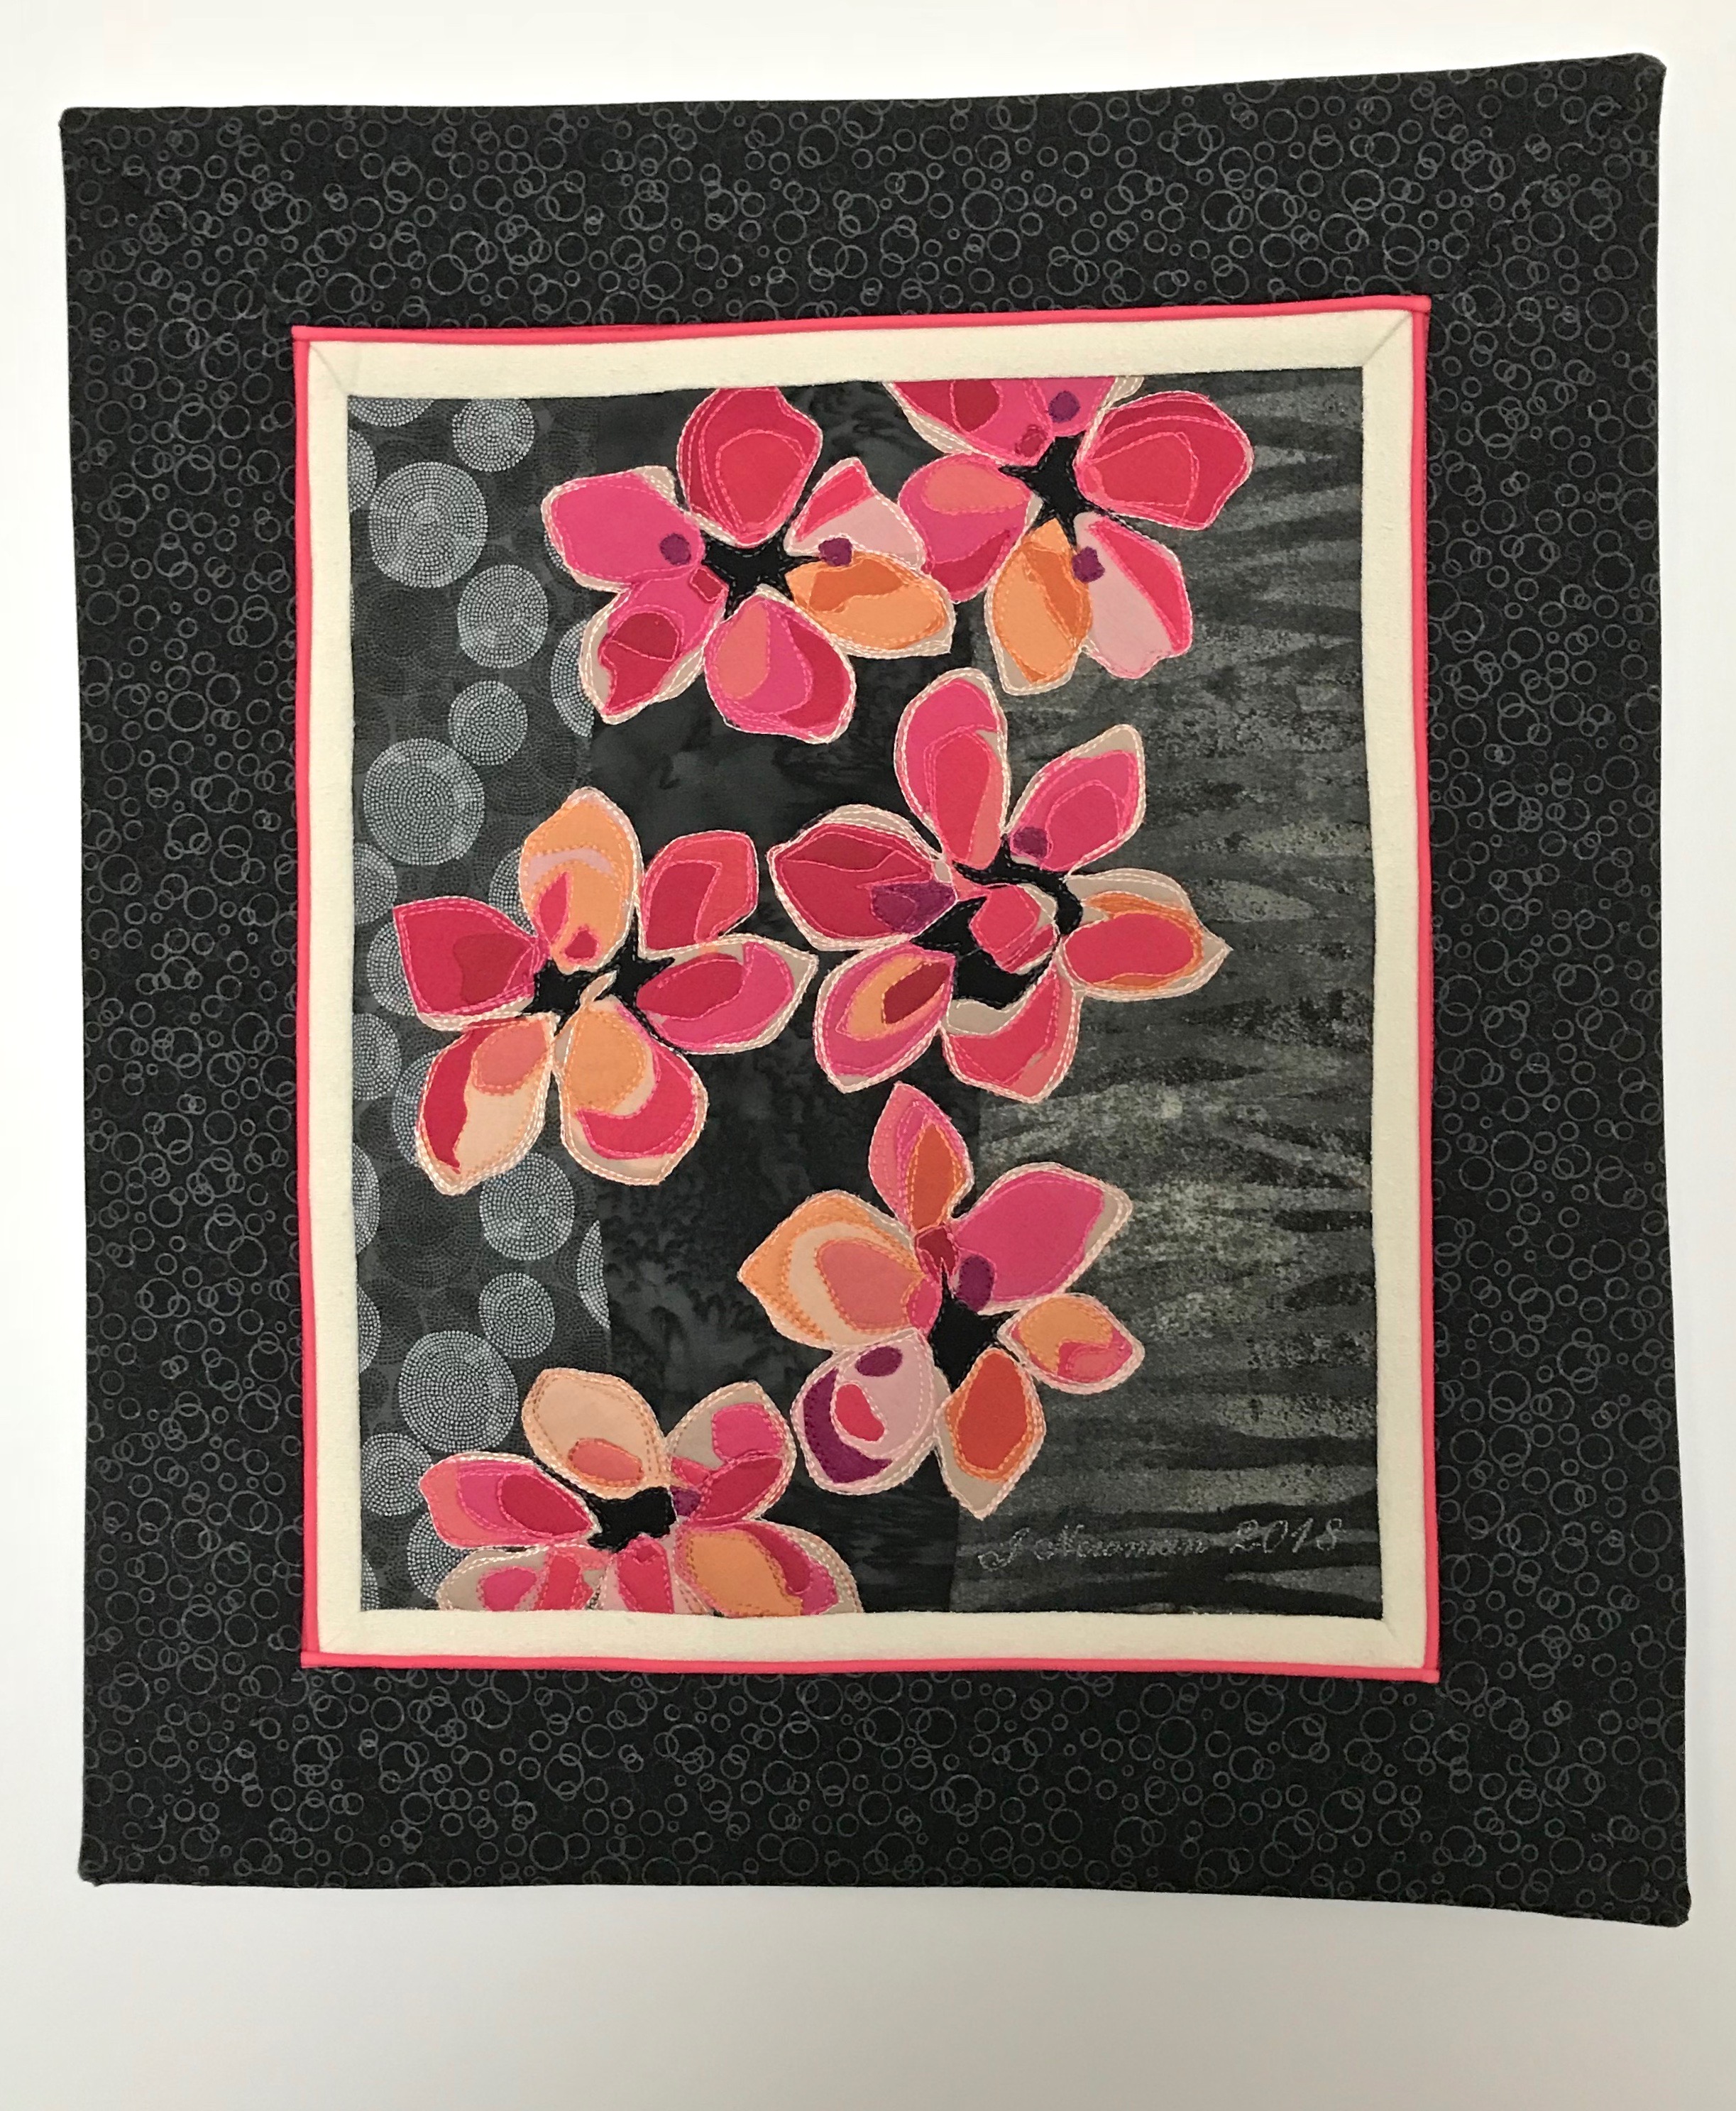
Pink Flowers

I did quite a lot of stitching using rayon embroidery thread – two colours at a time through the one eye of the machine needle which gives a tiny bit of depth to the colour of the stitches. I elected not to stitch in the background – mainly because I had no idea what sort of design would have augmented the piece rather than detract from the flowers. The piping is there to heighten the colours in the flowers, and the printed border/frame extends the “texture” of the background.
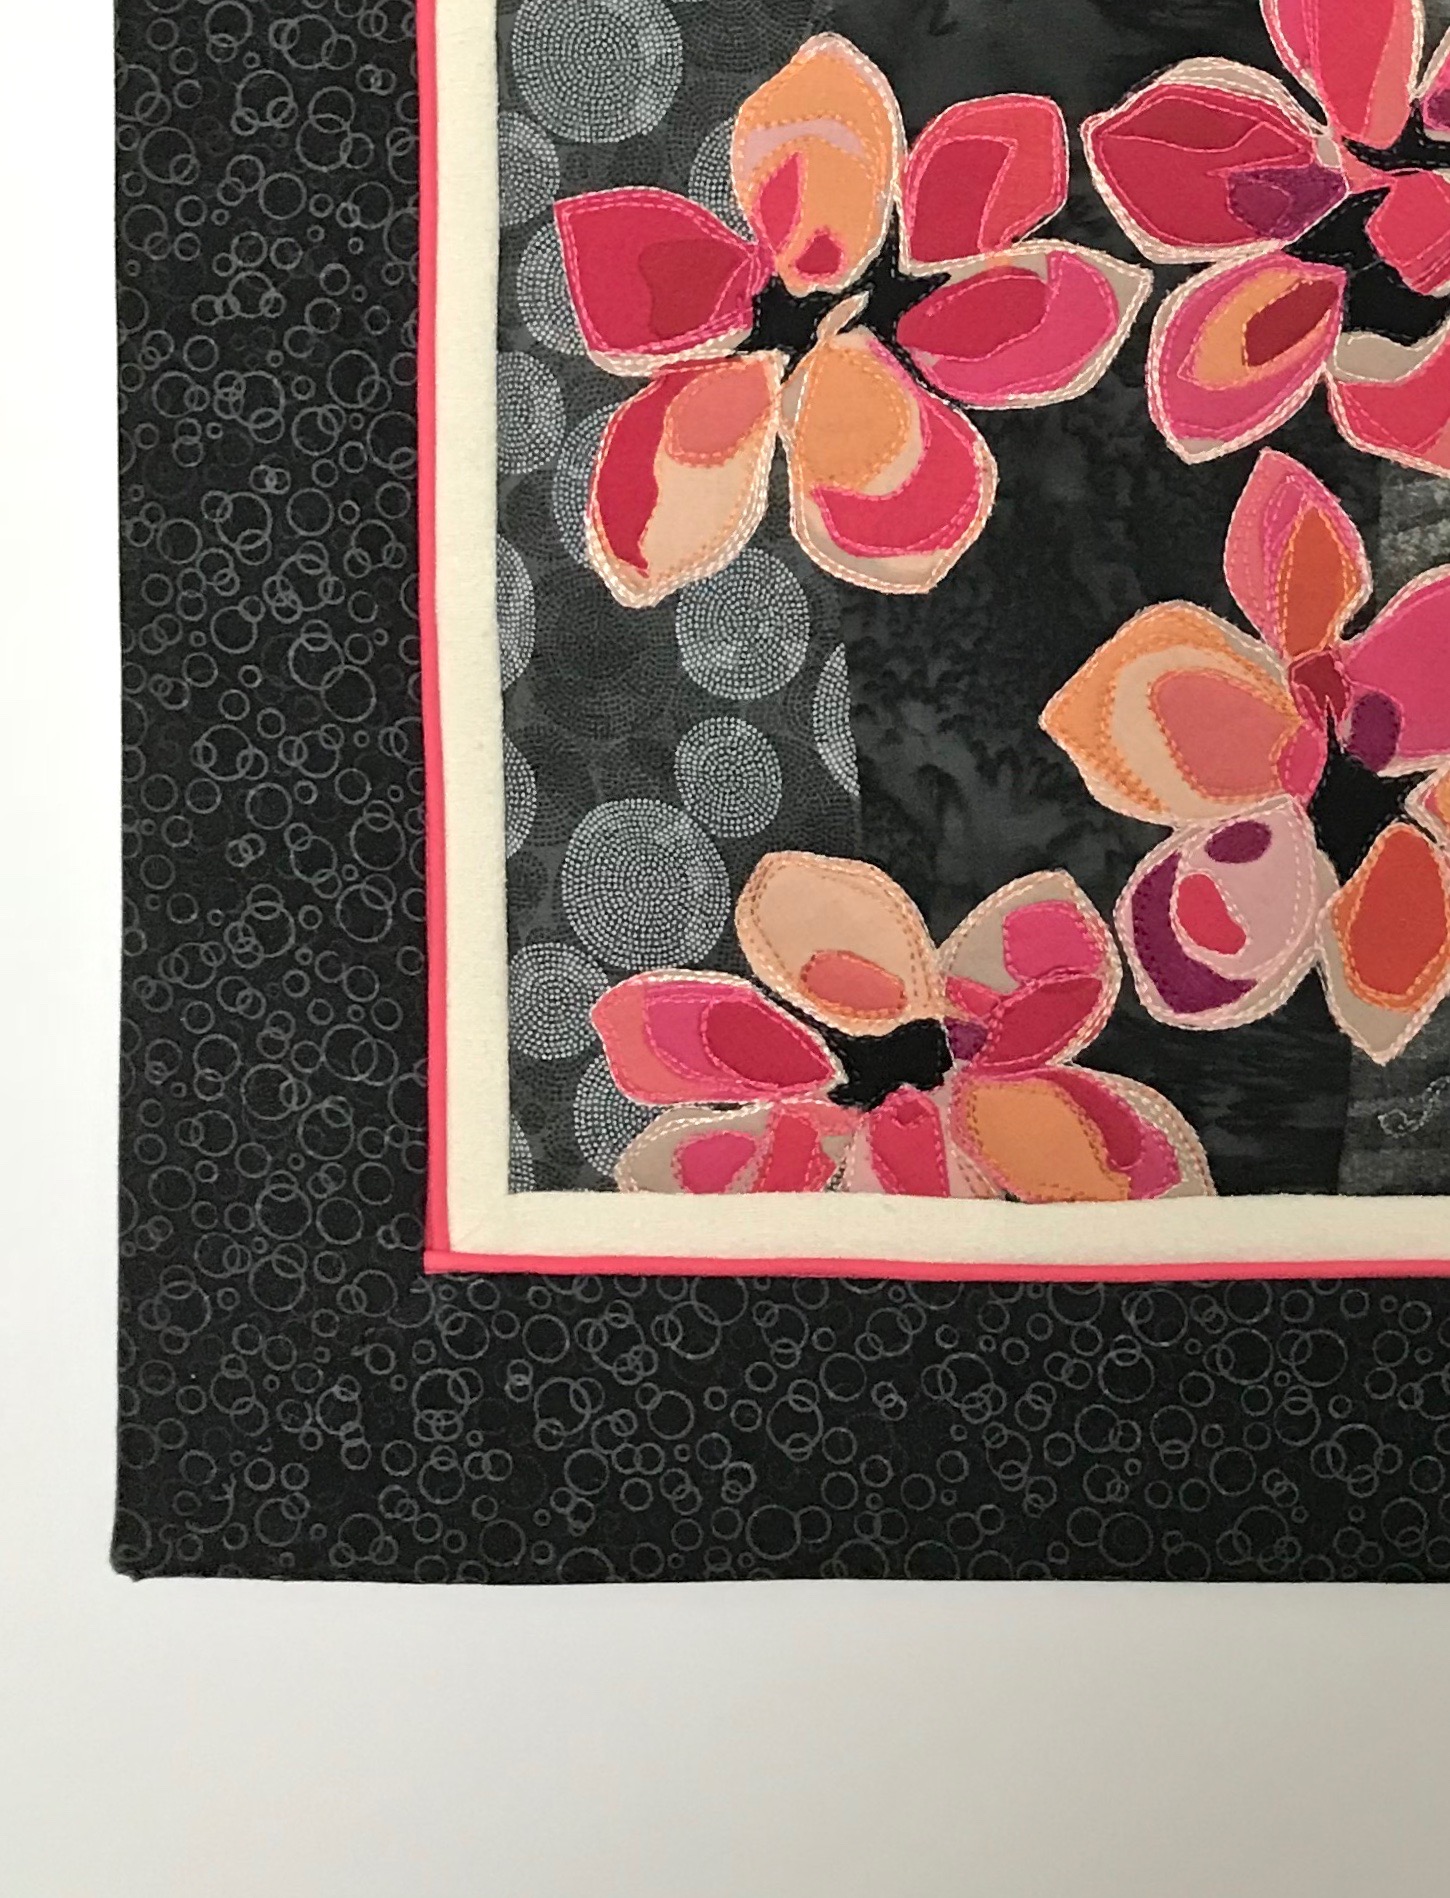
Stitching Detail

Now on the next one using the fussy-cut flowers from the bark cloth. The fabric colours are somewhat subdued – I’m planning on using strong bright shades of rayon embroidery thread for the thread painting.

New Wall Art Underway…

This morning I finally stopped procrastinating on the wall art – I found myself starting on two unexpected projects. Yesterday I was going through fabric in my stash looking for fabric for the Federer piece and came across some Hawaiian bark cloth with large floral patterns which I thought could be turned into an interesting raw-edge appliqué piece on a raw natural silk background fabric:

Raw Edge Appliqué using Hawaiian Bark Cloth Floral Cut-outs

I cut the fabric in thirds, isolating one repeat of the pattern, fused Heat ‘N Bond Featherlite fusible web to the back of the fabric, fussy cut the flower/leaves elements, then fused them to a panel of natural raw silk (backed with Warm ‘n Natural quilt batting).

Now I need to go through my embroidery threads and pick out colours to use for securing and thread painting the raw-edge fabric elements.

I also got a second piece underway – I had a small leftover scrap of a modern floral which I’d used years ago to make a wide-brimmed summer hat. I thought the cut out flowers, placed randomly on a pieced background, would be an interesting vehicle for thread painting – I started that this afternoon. This piece will finish around 10″ x 12″ – it’s a test run to see where this idea can take me.

Raw Edge Appliqué – Modern Flowers on Pieced Background

So I’ve got two pieces to work on and maybe I’ll make some progress by the end of the weekend!

Wide-brim Summer Hat

[Here are instructions for making this wide-brim hat, if you’re interested.]

Second Pair of Restored Socks

Finished restoring a second pair of socks yesterday. Same process as the first pair – because the heel flap was still unworn I just needed to replace the heel turning and to reinforce an area of the instep just in front of the heel.

2nd Pair of Restored Socks

I had some closely matching yarn in my stash so you can hardly tell where the reconstruction happened. I did use a slightly different colour for the reinforcing stitching – otherwise I can’t see where I’m stitching!

Close-up showing reinforcing of instep

Once this pair was done, I started work on a new pair of socks in shades of turquoise/grey/white.

One Pair Restored Socks

I completed the restoration of this pair of socks yesterday. The back of the heel – the heel flap – was intact (often there’s a lot of wear along that part of the heel but in this pair that wasn’t the case). The problem was with the bottom of the heel and the wear into the instep. Replacing just the heel wasn’t an option because I had nothing to graft onto in the instep. So I decided to redo just the bottom of the heel and to reinforce the weakened area of the instep so I could attach the heel to something solid.

Restored Socks

The restoration has turned out rather well. I had matching yarn so the reknitting of the heel bottom blends into the heel flap. I probably should have looked for scraps of yarn that blended with the instep a bit better but it’s under the foot and won’t show when the socks are being worn.

Worn heel bottom and instep

Here you can see the problem – the heel flap is solid (the sock in behind and below the needle) but the heel turning and the instep are both weakened and worn through. I could cut out the entire heel and reknit the instep but that’s more work than the restoration warrants so I’ll do what I did with the previous pair: I’ll reinforce the weakened spots in the instep by oversewing the existing instep stitches, then salvage the heel flap and reknit the heel turning. Otherwise these socks are in good shape; worth refurbishing and keeping in a sock drawer.

Cayce Zavaglia – Artist

My sister Donna has returned from a two week visit to NYC and she just sent me photos of some astounding embroidered portraits done by the artist Cayce Zavaglia.

Embroidered Portrait

Step back and you see the portrait. In the gallery, step close and you see the craft – a gazillion stitches using silk, cotton, yarn threads to create tone, depth, texture. I can’t imagine how long it takes to complete one of these portraits – perhaps months?

In any case, if you’re interested in learning more take a few moments to watch her at work:

Spectacular.

Blue/Green Socks

Finished these socks last evening. They were soothing to work on – enough gradual changed in the unfolding pattern to keep them interesting.

Blue/Green Socks

I should really now return to a couple of sock repairs – there are still five pairs of socks in the repair basket wanting attention. Maybe I’ll work on one before returning to new yarn.

Two New Faces

It’s those faces again – my friend Andrea has sent me two new ones – one yesterday and another today: a small seashell with a perfect face –

Sea Shell Face

And an upside down face on a log –

Face On Its Head

I haven’t been looking so closely myself – although I always see lots of different faces in my bathroom floor tiles and in the granite slabs on the wall at the elevators –  all kinds of animal faces and some “human” ones, too.

I’m sure I’ve mentioned seeing faces is called pareidolia. It’s quite a common phenomenon and gets easier when you actually start looking. If you have any you want to share, send them along!

An Aside – A Simple Lined Grab Bag

A couple of days ago I happened across mention of a smallish fabric grab bag. Not sure why I bothered to read the piece but I did. I downloaded the template, printed it, cut it out, and thought it might be worth a try. I’m on the lookout for something to make as a small Christmas gift for the gals in the knitting group – this bag was worth putting in my ideas collection.

Simple Lined Grab Bag

Since I try sewing/making something every day this was an easy/fast half-hour project. I hadn’t kept the instructions so actually constructing the double-layer bag took longer than it should have and this first (maybe only) bag is not as neatly finished as it might have been but I thought construction was obvious – it wasn’t quite, there are a couple of twists and turns, but in the end I rectified my mistakes and completed the bag.

So here is my grab bag. It’s a good size for carrying a small knitting or hand sewing project. The problem with it as a mass produced gift is that it’s on the expensive side – in it’s simplest version (just two layers of fabric) it uses half a metre of each fabric (with useable scraps left over). Unless you happen on a good fabric sale I’d be making a sizeable investment were I to make, say, twenty of them given the cost of good cotton fabric these days. However, if you’re looking for something quick to make to give as a small gift you might find this grab bag worth your attention.

BTW: I left out the batting and didn’t bother with the inner pockets – just the bare grab bag.

Bamboo Quilt – Finished!

I started this quilt at the beginning of March. I had no idea how long it would take or how many decisions I’d have to make as I assembled the blocks, fit them together, planned the back, figured out how to quilt it….

I finished it this morning (with two weeks away from the work while I was in Italy) so working time on the quilt – about five weeks.

Quilt Top

Standing back from it now, I think the decision to use the light turquoise Kona cotton narrow inner border was the right one – it brings out the blues of the inserts which create the stems and leaves of the bamboo. I also like the choice of the border fabric which makes the inner panel stand out and at the same time echoes the hues of the panel just a bit darker.

Quilt Top – Detail

My plan when I started thinking about the quilting was to create some kind of single run embroidery design to fit my 360 x 260 hoop – I set up a double design to run bottom to top on the right, then repeated top to bottom on the left. The design stitched out well but my spacing when doing the hooping wasn’t close enough and I was left with quite a few spaces that still needed quilting. The solution was to create three more designs, narrower and shorter, to drop into those spaces. I wasn’t sure I liked how the quilting was turning out but now it’s done the space is filled pretty evenly. The border quilting turned out as I wanted it to. I’m happier with the quilt than I thought I was going to be!

Quilt Back

The back strip is a wide (13″) strip more or less crazy quilt pieced using bits left over from the top fabrics. It carries over the colour feeling from the front.

Binding – dark blue solid Kona cotton.

Coltsfoot In Bloom

Yesterday it was gloriously sunny and the coltsfoot near the building just glowed. I forgot to photograph them – caught them today (which is overcast) so the flowers aren’t so bright.

Harbinger Of Spring

I saw forsythia in bloom yesterday as well – I imagine the first flowers actually appeared just after the middle of April but I just didn’t notice the new vegetation – but there they were yesterday, May 5 – in all their glory.

They’re shouting – “It’s Spring in Nova Scotia!” They make me feel like singing.

I saw coltsfoot on May 2 in 2015, last year I first noticed some April 15 2017. There’s no doubt the season is advancing each year – the fact that I didn’t notice the first flowers (besides the crocus in gardens which is earliest of all) is because we don’t have flower gardens here at the apartment building unlike at my townhouse where we had garden beds everywhere so we gardeners were primed to be poking around for signs of spring life!

I got back to quilting the quilt today – filling in the designs where I inadvertently left spaces that were just a bit too big. I’ve just finished creating three new embroideries so I can fill in some smaller spaces – tomorrow, I hope to get to those. Then the quilting of the border. Once I establish the size for the embroidery for the sides and top/bottom that will go quickly using an endless hoop which allows me to embroider and just move the fabric along. And binding – a couple of hours and that will be done.