Craving Cocolate!

I ate the last of the chocolate I had in the apartment three days ago (except for the chocolate chips which I have been saving to make some cookies – more later).

This afternoon I found myself craving chocolate. I remembered the sugar/dairy free chocolate which I haven’t made for a number of years – I had the ingredients, I hauled them out, and put a batch together.

Sugar/Dairy Free Chocolate

I more or less followed the recipe – I added ground cacao nibs, some finely chopped candied ginger and dried cranberries along with finely ground hazel nuts. This batch should last me a couple of weeks. A little satisfies.

Click here for the recipe and other commentary.

The chocolate was actually the second thing I made. I started with Peanut Butter Oatmeal Chocolate Chip Cookies (Flourless, No Butter). (I made a batch last week which are, of course, gone.)

Peanut Butter Oatmeal Chocolate Chip Cookies

Another recipe I didn’t follow precisely. I used both chunky and smooth peanut butter, but I also had a small amount of tahini I wanted to use up which I threw in. In addition to the oatmeal (called for in the recipe), I added 1/2c finely ground hazelnuts; forgot raisins or dried cranberries.

No flour in the recipe, no butter. What makes this very sticky dough is the nut butter/egg combination. The only way to get it onto the cookie sheet is to pick some up with a tablespoon and push it onto the cookie sheet using a teaspoon. You can’t handle it. The Silpat baking mat makes it easy to remove the cookies when baked and cooled. I store them in the refrigerator.

Says to bake for 9-12 minutes; I baked these for close to 15 before I thought they were firm enough to take out of the oven.

They are “right some good!”

[A recommendation from my friend Susan in Alberta:

I made the peanut butter cookie recipe you posted on your blog. Wow!They are great.David loves them.I broke up a dark chocolate bar. 90% cacao to add since I didn’t have dairy free chocolate chips. It will be a standard recipe now for us. April 11/2020]

The cooking/baking overcame me AFTER I finished up the face masks from yesterday, washed them and hung them to dry.

Today’s Batch Of Masks Hanging To Dry

I have to collect 20 of them, pack them up to courier to Toronto tomorrow. I have another batch of 40 sitting by machine ready to work on when I get up in the morning.

There’s now a huge controversy raging over whether there’s any value to these face masks or not. One of the local seniors’ homes has put out a call to the local sewing guilds to please make face masks for them. So whether public health considers them useful or not, clearly there is a demand in my community.

Fabric Face Masks – Production Begins

With table runners and other stuff completed, time to turn to fabric face mask production.

I started by pulling fabric from my stash. I have quite a number of “scrap bags” from Keepsake Quilting which just happen to contain 9″ (1/4 yd) coordinated fabric strips – fancy that – I need rectangles that are 9″ x 6″. I cut several strips into 6″ rectangles.

Next, I cut what non-woven fusible interfacing I had on hand into 8.5″ x 5.5″ rectangles and fused them to the back of the fabric. The 1/4″ seam allowances will be less bulky without the interfacing included and because the interfacing is fused to the fabric, it’s going nowhere. I was able to prep 56 pieces of cut fabric. Now I have to go looking for more non-woven fusible interfacing.

Fabric with non-woven fusible interfacing (as a third layer for added filtering)

A friend brought me a metre of unbleached flannel the other evening. I washed it, dried it, and cut it into 9″ x 6″ rectangles. Today I briefly stopped by her place to pick up 4 more metres (the rest of her supply). It’s been washed and is now drying. I also picked up a bunch of twist ties from her.

Flannel rectangles for inside of mask

I have been collecting twist ties from all my friends in the building and have ended up with, would you believe it, almost 140 to use at the top edge so the mask can be pinched to fit the nose.

All that’s left to do is cut the 1/8″ elastic. I need 13″ for each mask, I have nowhere enough at the moment. I ordered a roll via Amazon the other day but it’s not going to arrive quickly enough for this assembly line. I’m going to have to scrounge around the building and touch up some other sewing friends to see if I can come up with more. If all else fails I have the better part of a 100m roll of 3/8″ elastic I can use.

Elastic (as yet uncut), twist ties for fitting over nose, more cut fabric

I’m now ready to start production tomorrow and get as far as my materials will let me. I am aiming for 100 masks. That’s not going to be enough – I have requests for 20+ for family in Toronto; I have 25 friends in the building to outfit; other friends in the city. I haven’t yet contacted the hospital community to find out whether they have a shortage of face masks and could use some. If that turns out to be the case, then I will have to enlist a bunch of other sewing people to pitch in. However, I’m hoping I won’t have to turn this project into a large enterprise.

Tomorrow, I will have to set up a batch of 10 and see how I can organize production so I can arrive at a finished product with the fewest steps. I’ll report on my process.

Fabric Face Masks

Last evening, Rachael Maddow had an item on the surgical face mask crisis in the US and talked about Deaconess Health Centre’s call for crafters in the community to help build a supply of masks.

I’ve been looking for a way I could do more than self-isolate as a way of pitching in during this pandemic. I can’t do much because I’m “over 65”, with a preexisting cough that makes it difficult for me to be out in public at this particular time, but this was something I could do.

I found the link: https://www.deaconess.com/How-to-make-a-Face-Mask and this morning I printed out the instructions from the Turban Project Face Mask and gave it a try.

First, the instructions recommend using flannel for the inside layer. I have a relatively large fabric stash but no flannel – I did, however, have some densely woven muslin which I thought would work reasonably well. I also wanted to improve the impermeability so I added a layer of thin fusible batting to one sample, and a non-woven fusible interfacing to the second. The instructions also called for either “rope” elastic or 1/8″ elastic – neither of which I had on hand – remember I can’t go shopping and local fabric stores are closed anyway – so I improvised using some metallic-wrapped Christmas elastic I had in a drawer which was fine for a sample.


Then I sat down to sew. I quickly sewed the two layers together (elastic included in the side seams), turned the mask right side out. The rest should have been easy but trying to position the pleats and stitch them in place was a bit awkward. In my first attempt I made the pleats too narrow so the side of the mask was too long and the whole thing wouldn’t sit well over my face. I need to make a template marking the pleat position if I’m going to make a batch.

I then decided I needed a small bit of wire over the nose (like one of the commercial masks I found in a drawer in my bathroom – heaven knows where I got it). I dug around the apartment and came up with a set of twist ties in a box of garbage bags – I took two and stitched them to the top edge of the mask. This allowed me to pinch the mask to my nose! But the mask still gaped on the sides so I took the pleats apart and made them a bit bigger – turns out a good fit needs to reduce the side measurement by about a half. To finish off,  I added two small pleats to the bottom edge which made the mask fit snugly beneath my chin.

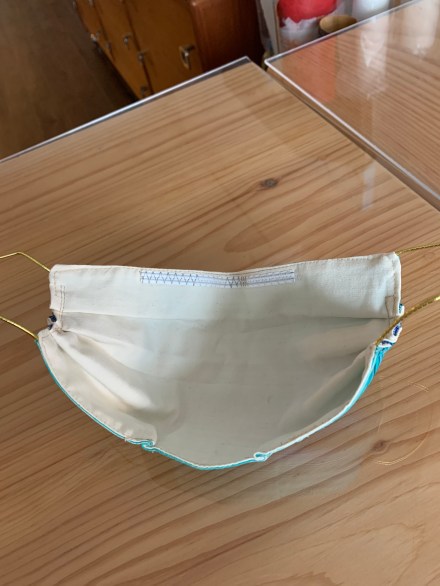
Inside of mask showing wire at top edge

I still don’t have the elastic length right – the pattern calls for 7″. Because they recommended tying a knot in the end (to prevent pulling it out from the seam) I cut the elastic a bit longer – turns out on the first (mauve) mask the ties are a bit too long.

With the second mask I cut the elastic to 6″ – too short!  6 3/4″ would be about right to allow me to tie knots and stitch the pieces into the side seam.

So my masks are actually three layers, not two – a firmly woven print (a batik would be even better), a fusible non-woven interfacing, and a closely woven muslin with a slightly brushed side for softness. The point of the mask isn’t to stop virus particles from coming in to me but to stop my coughing and sneezing droplets from getting out – in other words to protect other people.

I plan on making one for each of the gals in the Friday afternoon knitting group here in the building – the recommendation from health professionals is not to wear a mask if you’re not coughing/sneezing but it can’t hurt to have one one hand, in case. And for the ears I will cut lengths from my roll of 1/4″ elastic (of which I have quite a lot!).

The caveat, of course, is this face mask is not meant to replace a surgical face mask; it is a contingency plan for those who haven’t been able to find any surgical masks in the stores. And it’s washable – it can be cleaned repeatedly after every use.