50 Blocks

50 Blocks Assembled

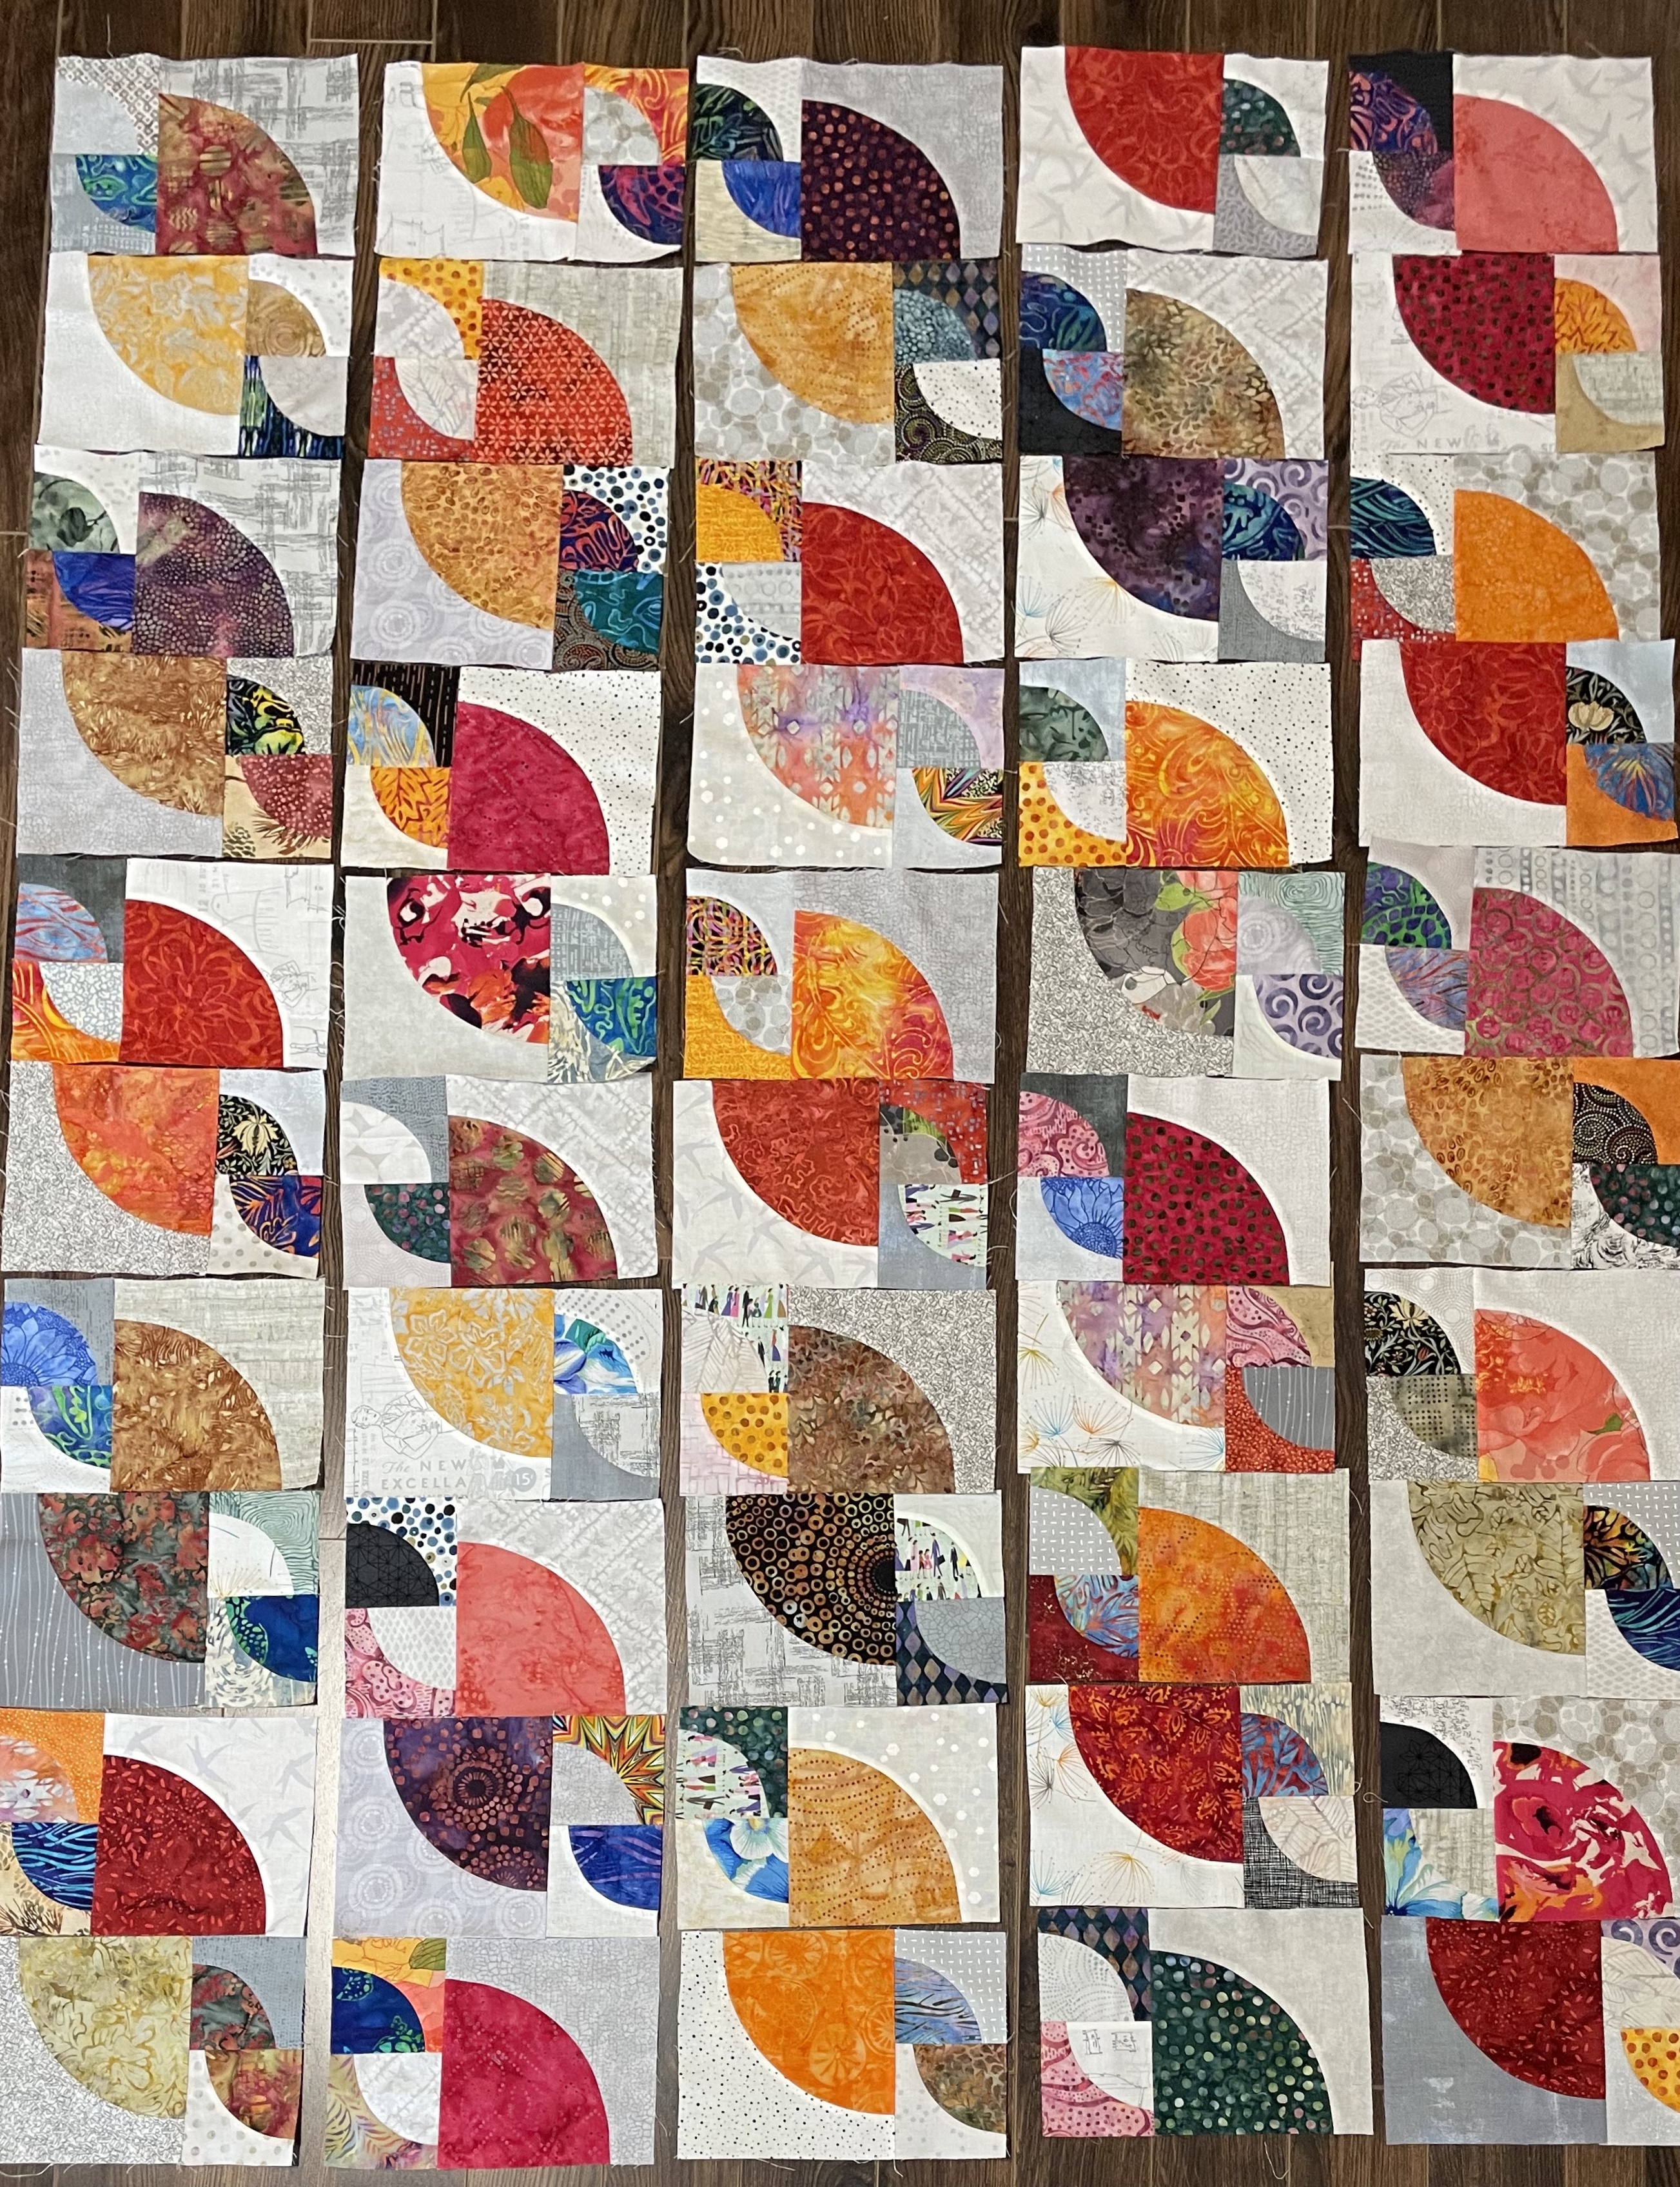
I’ve just finished sewing and trimming the last of the small blocks, attaching them to the larger blocks, trimming the resulting blocks and auditioning them on the floor. (I don’t have a flannel hanging wall in my apartment – there isn’t a spare wall to set one – so I use the floor space beside my cutting table for laying out quilt blocks. Good thing I can still get down on my knees and back up again!)

Before I laid out the last column, I removed the palest yellow blocks – they stood out as weak. I had enough large blocks assembled that I could draw in stronger ones. Having arranged all fifty, I began moving them around. I’m trying to avoid duplication in both columns and rows.

here are two diagonals happening here – completely unanticipated when I started out. There are the “top left – bottom right” diagonals – I’m also trying to avoid duplication along those rows. The large pie shapes on the “top right-bottom left” diagonals also stand out – not as obviously as the other diagonals but they’re visible, so I have to take time tomorrow to examine the array closely for duplication and colour flow.

I’d say, I’m about on schedule for this quilt. Once I’m happy with the layout, assembling the top won’t take long – sew the columns, add sashing between the columns – 3-4 hours.

I’m already thinking about the back panel. The temptation would be to add a bordered strip of Drunkard’s Path blocks (which I did in the previous quilt), but I want to come up with something different, yet complementary. I’ll sleep on that. It shouldn’t take more than a day or two to get the backing done.

I expect quilting the quilt sandwich (once it’s set up) should take about a week. I have 2 weeks before the Parrsboro exhibit. I’ll be cutting it fine, but I should be able to finish this quilt so I can include it in the collection.

Getting Somewhere

Auditioning 4 Rows and Sashing/Binding Fabric

At the moment I have four rows of 9 blocks (I’ll probably make it 10; that was what I planned initially). I’ve finished 40 of 60 half-blocks. Now that I have evolved a technique for sewing the small Drunkard’s Path blocks I’m going more quickly.

The array is, at the moment, an audition. I won’t do much moving around until I finish the remaining 24 semi-blocks. Then I will be able to decide what to put where.

With this much laid out, I started thinking about sashing and borders. These three fabrics were in my “backing” collection. I tried several grey printed fabrics for the sashing/inner border but the dense black dots on white will be neutral, yet strong enough, to make the colours stand out. I have a hunch the white with fewer dots might be best as my wide outer border.

Just thinkin’ about it all as a rest from sewing those small blocks!

The New Quilt

How The Finished Block Will Look

I have all 60 large blocks sewn together. I’ve begun working on the small quarter size ones. So far I have stitched thirty – leaving me ninety small blocks to go.

The 6 1/2″ Drunkard’s Path block is relatively easy to sew – with the “L” piece on top, three pins, one on each end, one in the middle, the fabric spreads itself out so the opposing curved edges more or less align themselves. Sewing slowly, I get a nice 1/4″ seam on the curve.

The 3 1/2″ block is DIFFICULT! Because it’s small it’s hard to put in three pins to hold the centre and the ends. I think I’ve figured out how to sew them more efficiently. Again, with the “L” piece on top, I just use two pins, one on each end, then sewing slowly, using my fine point tweezers, (with lots of stopping to realign the opposing curved edges), I adjust top and bottom as I go. I’ve just finished a dozen this way – it took me about 12 minutes to sew the batch.

The 3 1/2″ Blocks

Each large block is sewn to two small ones to set up a half-block element. Two half-block elements go together to make a block. I intend to assemble 5 blocks into a strip. The strip width will finish at 9″. For the moment, I think I want five strips (5 x 9″ = 45″), with 1″ sashing I’ll end up with 49″ width; add 2 1/2″ border I finish at 55″. Finished length I will worry about once I have the strips sewn.

Movin’ along here.

Movin’ On – Next Quilt

Drunkard’s Path Blocks for New Quilt – Large & Small

It’s taken two days to get the cutting done. I decided I to use scraps which meant scouring through my many boxes of small fabric pieces. I decided to stick with “red” as my colour focus for the large blocks (using up the grey 6 1/2″ strips, leftover from my previous quilt, for the backgrounds). I have enough quarter circles and backgrounds for 60 blocks – the quilt I’m imagining will use 50 – the extras will let me to make choices when I lay things out.

Actually, I began yesterday collecting and cutting smaller scraps for the small 3 1/2″ blocks – using up a bunch of 5″ charm pieces I had from a couple of collections. I find 5″ squares are not all that useful. I have incorporated them in a couple of quilts but I prefer cutting what I need from larger fabric pieces; I’m trying to clear out the 5″ squares I have left in my stash – getting close. I ended up with a wide variety of colours both for the quarter circles and the backgrounds (the two piles at the top right in the photo) – I have enough for 120 blocks, plus 24 more light backgrounds (in case I need them to balance out lights and darks when I start sewing blocks).

My plan is to begin with the large blocks which I find easier to sew. I should get those done in a few days. Lord knows how long it will take to assemble the 120 small blocks.

This quilt is an improvisation – I will randomly select a quarter circle and pair it with a grey background – I will do that for all of the pieces and hope the result will be interesting! When I constructed the strip for the back of my last quilt that’s what I did and the effect was more than pleasing. I’m aiming to make five strips which I will join using sashing of some sort or other – that decision I will make when I get there. Right now, my focus is on the blocks – both large and small. I’m expecting the blending of lights and darks (both with the large blocks and the small ones) will create an interesting colour flow!

Back of Planets And Moons

Just need to get started – not today, though. It’s time to stop for lunch and then get out to enjoy the lovely warmish sunny day!

Iris

Iris

Yesterday when I stopped working on the Iris it didn’t feel done to me. There wasn’t enough detail on the leaves. I wasn’t sure whether I wanted to colour them a bit more or just add a bit of stitching – in the end I did both. I shaded both the cluster of leaves on the left as well as the leaves beside the stem. Then I thread-painted the shading. Because the leaves are darker they blend into the whole, not drawing attention to themselves. I’m much happier with this piece now.

Hibiscus

Hibiscus

I thought this piece would be easy and straightforward – not so. The first thing I had to do was tone down the reflection both in the flower and on the leaves – I used Derwent Intense watercolour pencils to shade away the white. That gave me better overall colour to work with.

I started thread painting by outlining the leaves and leaf veins. Then onto the flower. Using a strong yellow I stitched the highlights on the petals. Next came the dark red at the throat, then the brighter red of the centre. I wasn’t intending to fill the entire centre area but an edge stitching at the red/pink boundary was jarring and left the red centre very dull so I took it out and reworked the area – filling it in. After that, I added the pink, and stitched the pistil. I needed to create a stitch for the stigma (of the pistil), and another for the stamens, I filled in the style of the pistil in a darker red.

Up close there is more stitching than I’d prefer, but when the piece sits next to the other 7 completed pieces, the flower shading stands out and the piece fits in with the others.

Peony

Peony

I finished this piece a few days ago, just forgot to post the image. I decided to represent a simple peony rather than a many-petaled double flower. With this one I had relatively few petals to deal with and the centre of the flower is better exposed.

The question is always, how much stitching, how little? Whether to create a new stitch or can I adapt something already on the machine. In this case, I took one of the “flower” machine stitches, and edited it so that all I had were six small overstitched dots. I used and reused the stitch, filling in the stamens. I then created a second stitch for the multitude of stamen filaments, stitching that in dark rose thread. Finally I used a machine stitch for the stigma, which stands out from the stamens.

The finished, mounted piece has the illusion of depth I was after.

Then I went on to the Iris.

Iris

I haven’t mounted this piece yet – I think the flower has enough thread painting, but I’m not sure about the leaves on the left. I have to do one of two things there – either more stitching, or I have to create more texture with permanent markers or coloured pencils. I’m still thinking about it – I don’t want to do too much to those leaves – I don’t want to draw attention to them but they need something more. So Iris isn’t quite done.

Today I intend to work on Hibiscus.

Hibiscus

I’m going to soften the “white” highlights to make them less prominent, I will embellish the stamens along the side of the pistil, I will emphasize the pistil head – just not sure what I’m going to do with the leaves. The white highlights there also have to be toned down – I likely will do that with markers.

First, lunch, then some sewing!

Clematis

Clematis

Last summer I stayed at The Maple Inn in Parrsboro while I was doing the Cyanotype workshop. Their garden was lovely – lots of different flowers in bloom, among them this Clematis climbing the side of a small out building. I took a couple of shots of it. I was taken by the magenta of the flower (here we see mostly purple Clematis), and the rich detail of the flower centre. I decided to include it in this collection.

I thread painted the markings on the petals, the stamens and pistil, and outlined the leaves and the veins. The first attempt had three fewer leaves – the outcome looked unfinished, so I added three more leaves. I’m happy with this flower rendition; #4 so far for the 6″ x 6″ collection.

“6 x 6” – Revisited

I’ve had a couple of ideas rattling around in my head for a new series of ten 6″ x 6″ pieces. I can use them at the summer showing at the NovelTea Cafe in July/August and whatever doesn’t sell there (I’m not expecting much will) will be ready for the 2023 Christmas show in Tatamagouche at the Ice House Gallery (I know Brandt is planning on doing 6 x 6 for a second year – last year’s show looked terrific!).

I have an interesting collection of seascape photos I’ve taken over the years. I have pulled them from my digital photo collections and stuck them in a folder on my desktop. The idea would be to crop each photo to 6.4″ x 6.4″ (that would allow the print to just come sightly over the edges of a 6 x 6 canvas), print each photo on fabric, back it will fusible interfacing to stabilize it so I can thread paint the image. I haven’t tried that yet – but it’s on my to-do list.

Green Bay, NS

I also have a collection of interesting flower photos. At first I thought I’d try printing those on fabric as well, but the paper print I did the other day wasn’t vibrant enough to stand as a background for thread painting. Instead, I decided to try a single flower image, cropped, from which I could piece a flower on a pale background.

Today I cut a 9″ square from some pale linen I had in my stash. I used a heat erasable pen to mark a 6″ square at the centre. I selected some fabrics, then started cutting. I arranged the pieces of fabric, pinned them in place and began thread painting.

Rudbeckia Flower

This piece took me about five hours to make. I took a couple of shortcuts since I was just playing around. I didn’t bother putting fusible web behind the fabric before cutting it out – a big mistake! I’ve ended up with fraying edges because there is no glue to secure the layers to one another. Next, the leaf at the bottom is in a bad location – I must remember to keep enough space free on the background for a signature. Also, the beige linen background is too “flat,” too “dull.” I definitely want to use to what I have left of the light coloured raw silk I used for the previous 6 x 6 works.

I also want to expand the flower to 7″ – a half inch more on each side so the petals and leaves wrap around the sides of the canvas. In this prototype I cropped the flower and leaves at 6″ – which makes it difficult to get a clean line at the canvas edge. I also need to think about embroideries specific for each flower centre. By the time I got to adding an embroidery here I knew I was just trying out the overall idea and didn’t worry too much about placement. I am going to have to be more precise with whatever I do at the centre of each flower.

I mounted the finished flower on a 6 x 6 canvas, then took the finished piece to show my friend Deb. She thought the idea was definitely worth pursuing. Because I like Rudbeckia flowers I will do another one for the collection.

Nothing on for tomorrow – I intend to do a second prototype taking into account what I learned today.

Second Fidget Quilt

Second Fidget Quilt

It took a couple of hours yesterday to set up the 12 blocks. This morning I laid them out on a piece of batting, added some stiff interfacing and stitched down the grosgrain ribbon to cover the joins (I didn’t sew the blocks together because I wanted the finished project to be larger rather than smaller – I gained 1 1/2″ on the width and 1″ on height by doing that).

Next, I embroidered my signature on the backing:

Back of Fidget Quilt

After embroidering a signature, I aligned the backing on the other layers, sewed the binding to the back of the project, folded it over the front and decorative stitched it in place.

I discovered when I was finished, that I’d put the backing on upside down! My signature is at the top left on the back of the quilt., instead of bottom right which I’d intended. Wouldn’t have happened had I done what I always do and hand stitched a label in place. Oh well. Lesson learned. Check backing twice before adding the binding (just hope I remember to do that checking!).

This time I focused more on texture with some velvet (which came from some pillow covers I made for my sister 25 years ago). I added a small circle of ripstop which has a crinkle sound when you scrunch it, but stitched flat it just feels “shiny” and makes little noise. I included a square of PUL fabric – that makes a sound when you rub your fingers over it.

I added a velcro fastening; a snap which is tight at the moment, and various beads and loops which move on ribbon or elastic. There is a small zippered pocket (which has a hidden object attached on the inside). The zipper with three pulls has no opening.

I made this second quilt as a prototype. I took the original quilt into my local sewing shop on Friday afternoon and the gals thought it would make a great class. Tomorrow this quilt will go to the shop to be displayed. All I have to do is prepare a description of the project and send that along with photos so the class can be advertised.

Now I need to do some actual experimenting with ideas for some 6×6 pieces. I also want to create a quilt based on the motif of the back of the last Drunkard’s Path quilt – Planets With Moons – a combination of large and small drunkard’s path blocks. I think 5 columns separated by a bit of sashing would be interesting.

Back of Planets And Moons

I’ll start on one of those projects tomorrow.