I just finished the decorative edge stitching on all the small circle appliqués. Slowly and carefully – using 50wt rayon embroidery thread (top and bottom).
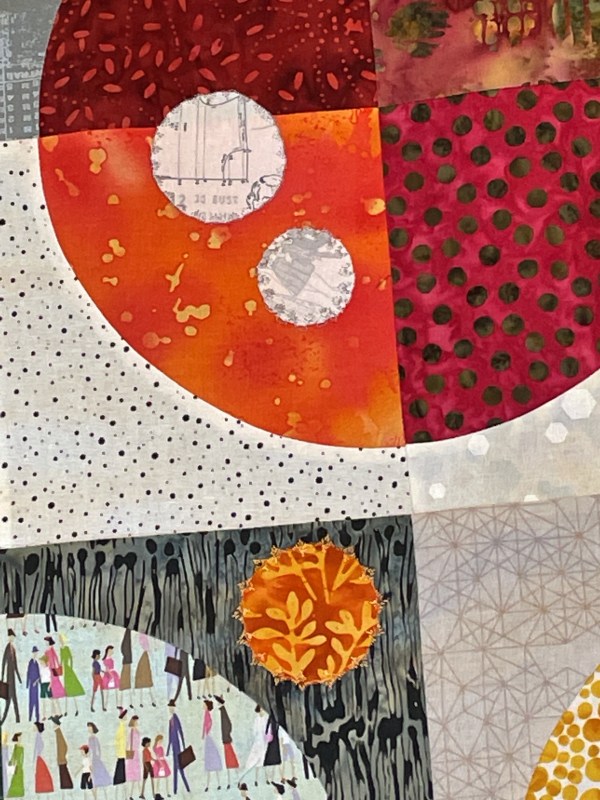
Detailed Views
In these detail photos you get a sense of the decorative stitching done along the circumference of each small circle. I used a silver grey thread for all the grey circles, and blended in a complementary thread for each coloured block.
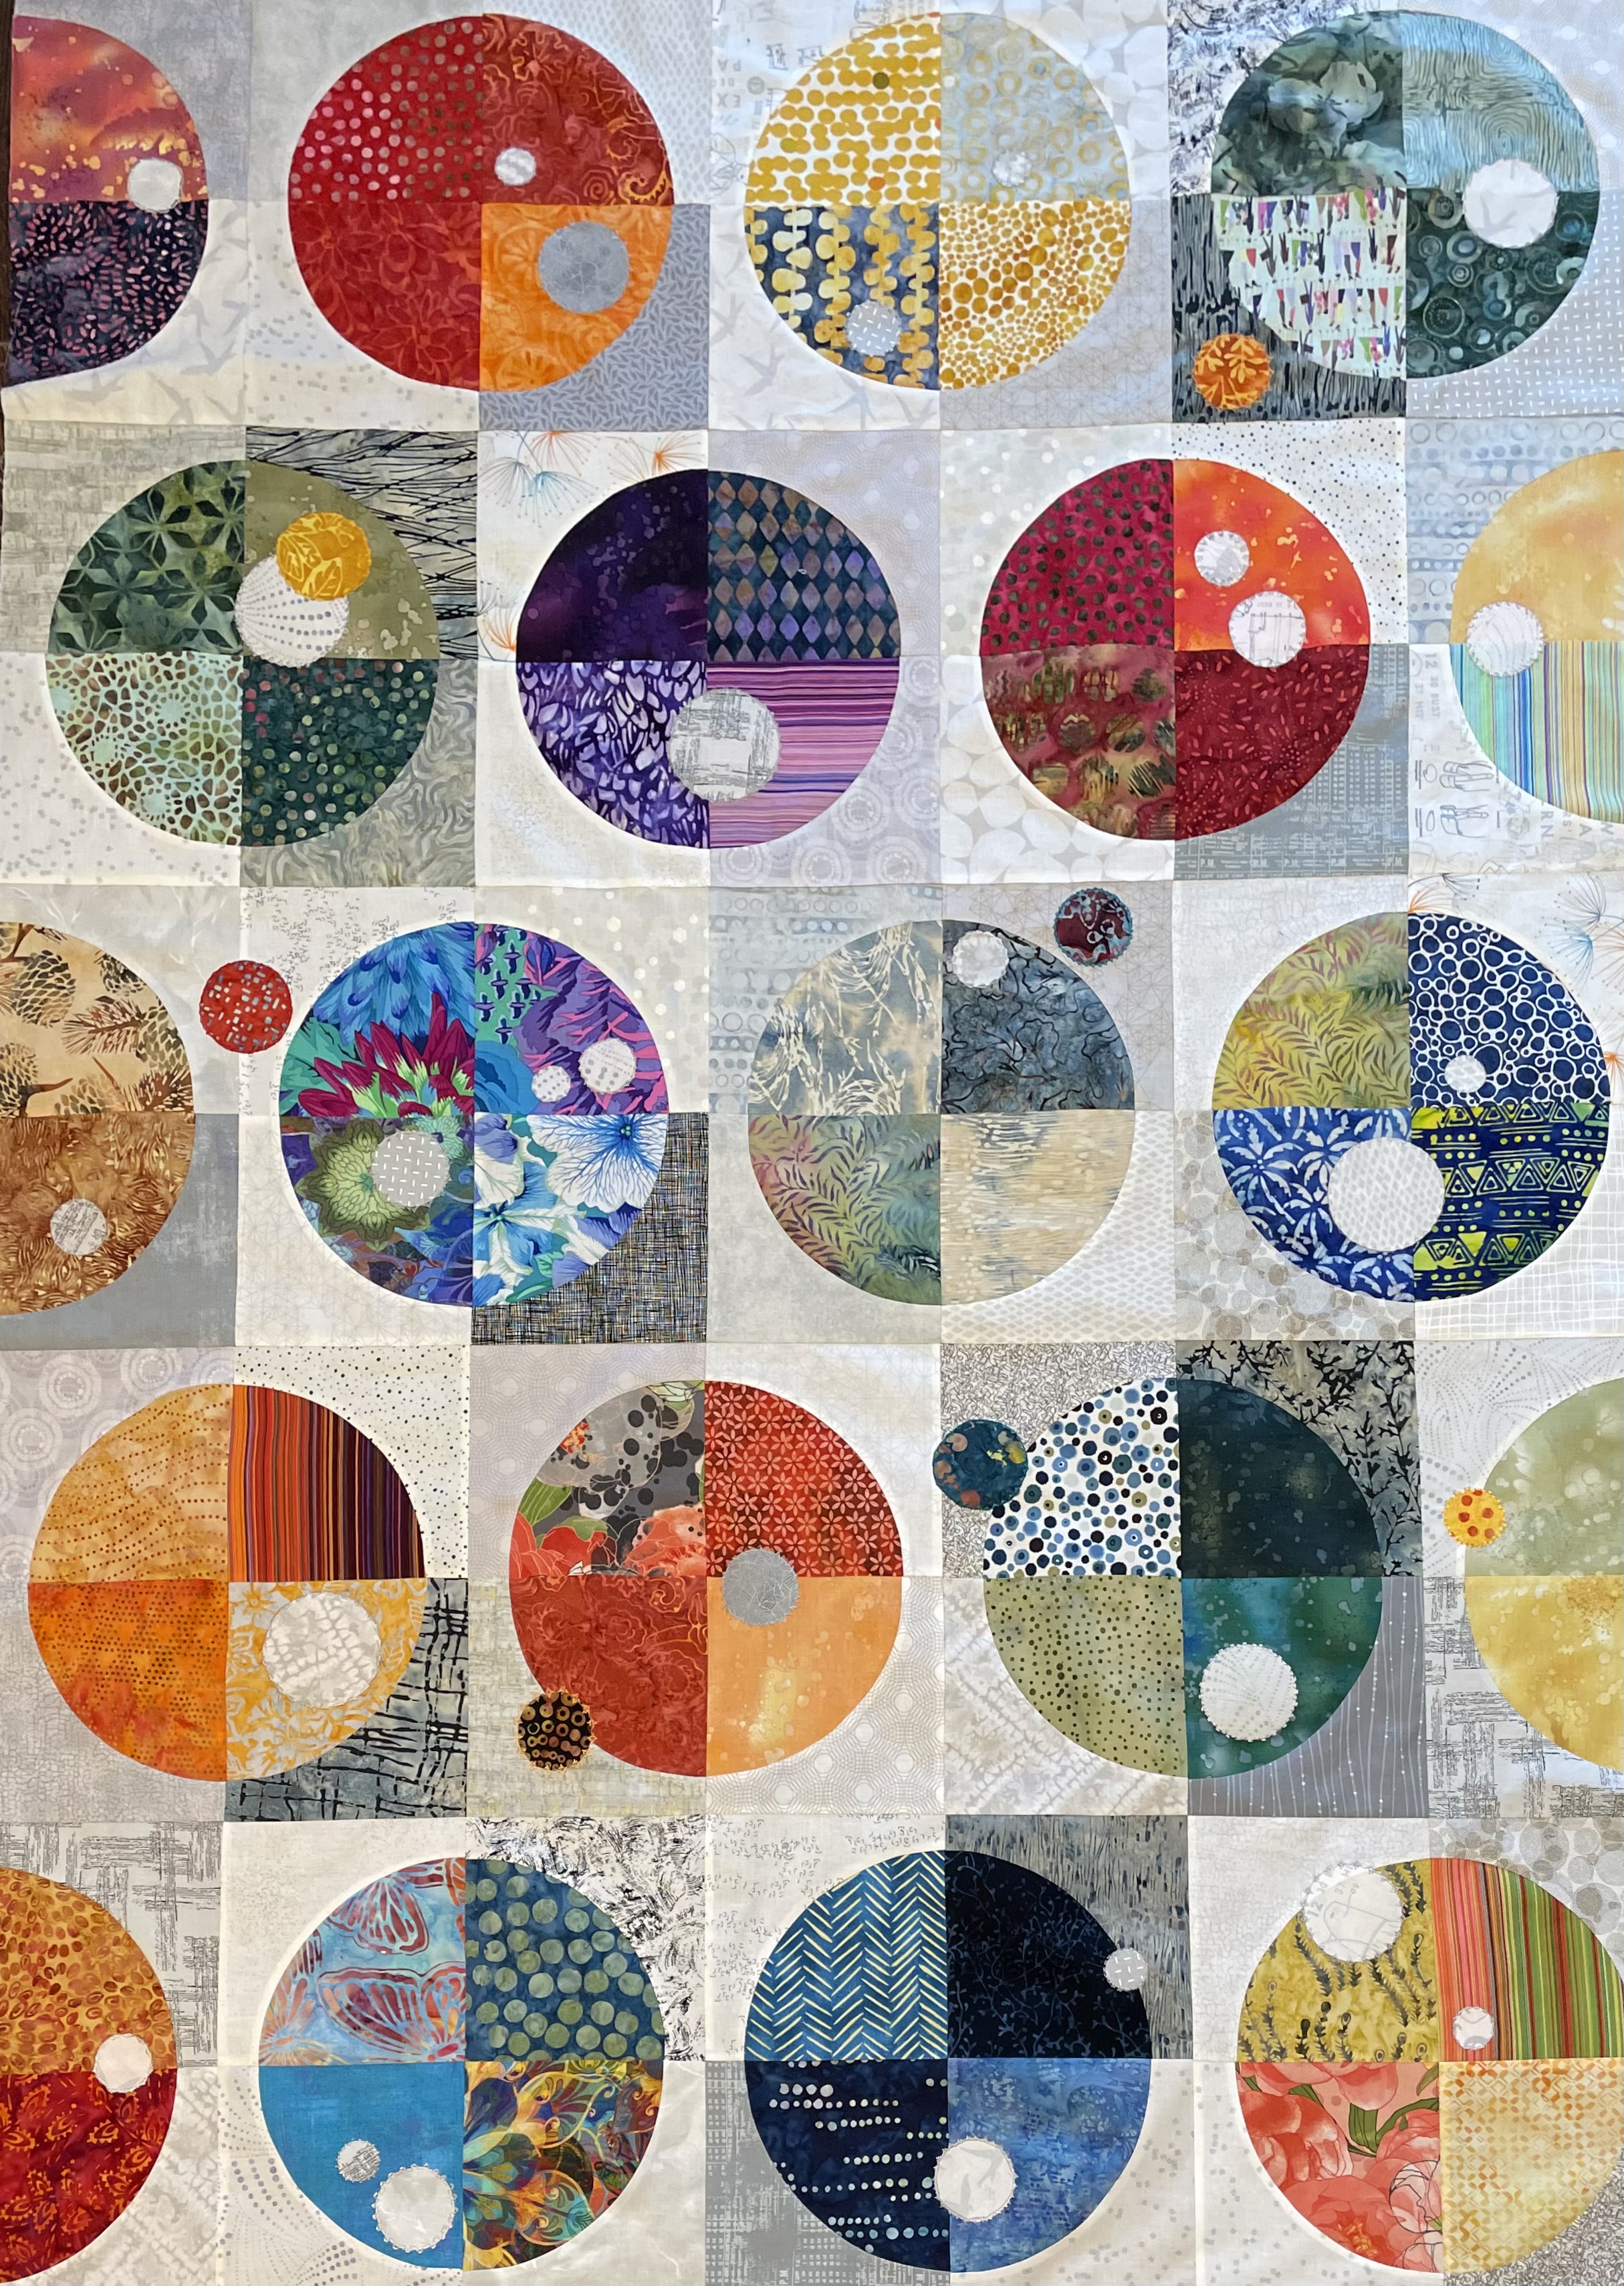
Last night I added fusible web to the back of 9 grey fabric strips, then cut out circles of varying sizes from each. I placed them on the panel, then decided I did need a wee bit of colour against the grey so I added just a few coloured circles in the background. I’ve pinned the circles in place; next I need to press them, then edge stitch using decorative stitches with contrasting thread.
The addition of the small circles pushes the large circles back, foregrounding the small circles. I’m hoping the addition of the bright narrow inner border with a wider outside medium grey will stabilize the whole panel. I’m also thinking I might add just one or two small circles through the borders as well – we’ll see.
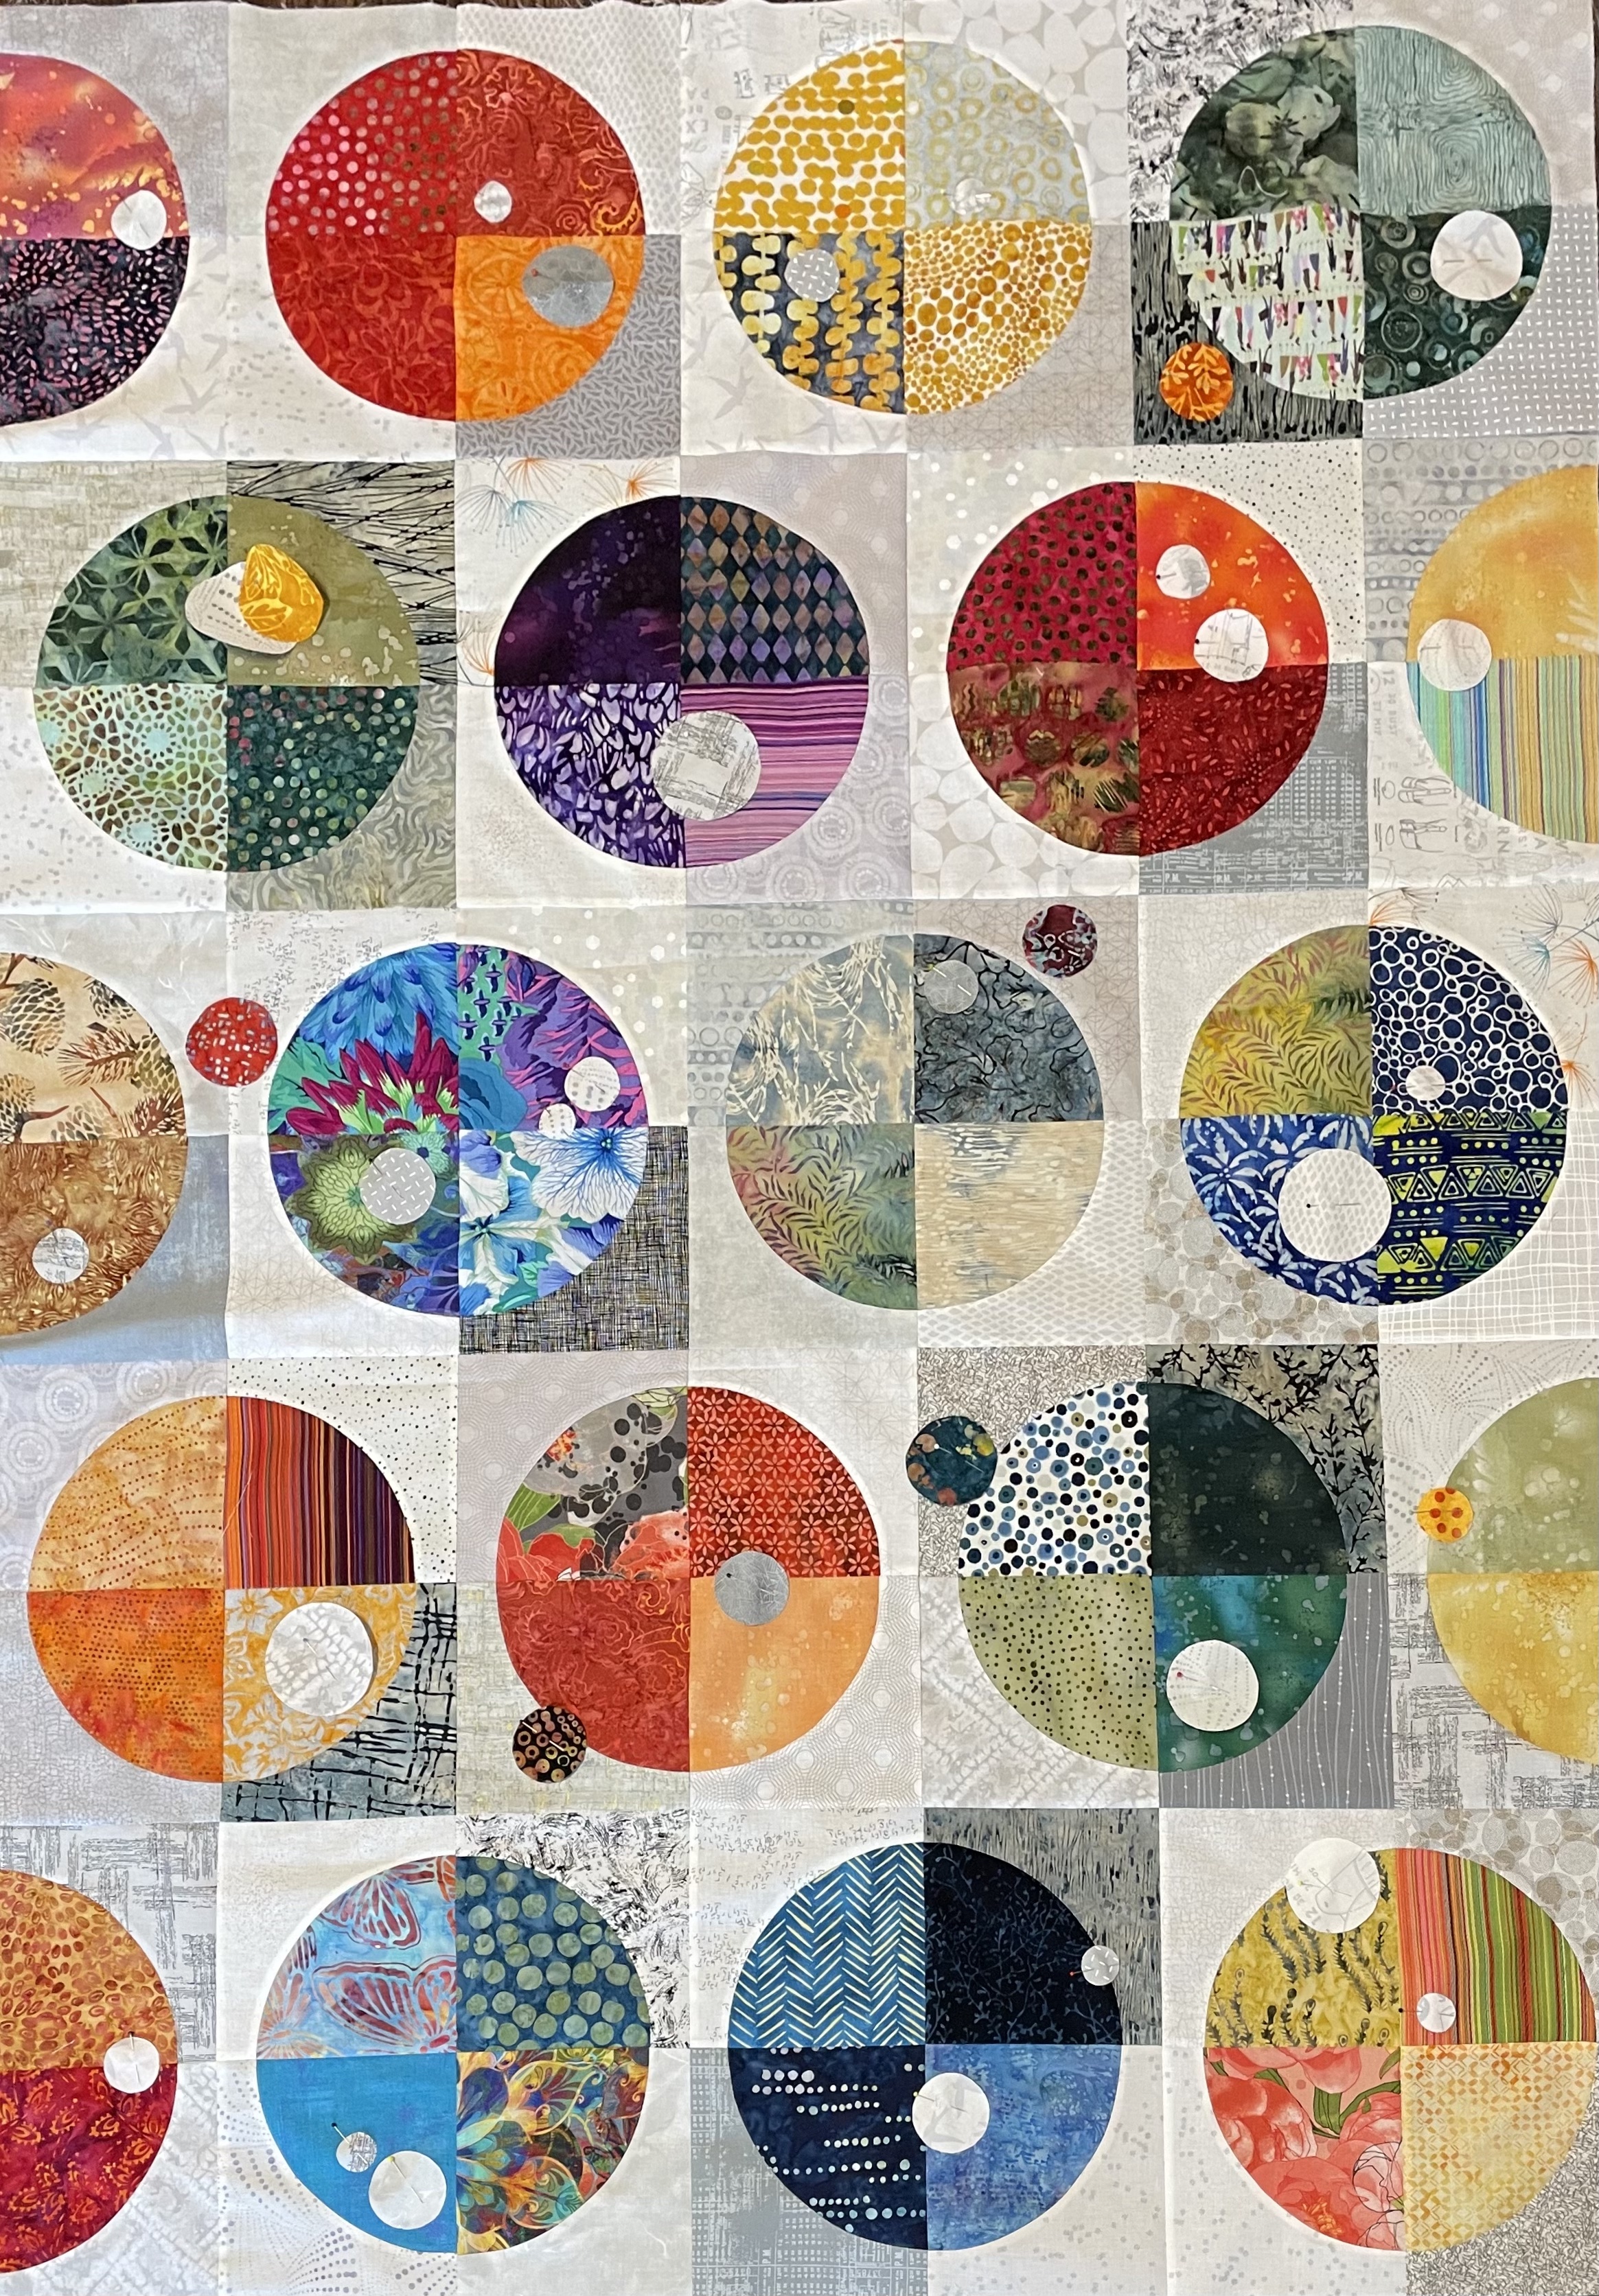
With a healthy amount of rearranging of blocks I finally settled on this array and sewed the panel together. It always surprises me how different everything looks when it’s all sewn together. The joins are not perfect but they’re more than passable – always an accomplishment when sewing curves that have to join on the circumference. I’m also happy with the distribution of the grey background colour flow.
My next idea is to appliqué smaller grey circles (in three different sizes) randomly on top of these circles to break up the regularity of it all. I’ve selected 10 of the greys I used in the background, I cut 4″ x 15″ strips, now I have to apply fusible web (Pellon 805) to the back each, then cut out circles. My plan is to use bright threads to edge stitch these small circles in place.
I’ve also picked out a bright batik that echoes the range of colour in the panel to use for a narrow inner border, then add a medium dark grey wider outer border.
When I decided I wasn’t going to make a sewn project for the Knitting Group gals, I decided instead to put together jars of candied fruit in dark rum.
It’s the same concoction I use to make the fruit cake: candied fruit (the less expensive variety at Bulk Barn), raisins, dried cranberries, chopped up dates all drenched with half a 750 ml bottle of DARK rum.
I didn’t measure the ingredients, I just added them to my 27 quart Tupperware bowl with a lid – it ended up slightly more than 3/4 full. I did what I do with the Christmas cake fruit – I flip the bowl twice a day so the rum has a chance to drain through the fruit until there’s none left in the bottom of the bowl – between 5-7 days.
I bought a lot of fruit – I don’t know the quantity by weight – it was four of the Bulk Barn large plastic containers full, plus a small one I already had a home which I was going to use to make a sheet of Christmas Bars (recipe available if you click on the link). I ended up with 18 Mason jars full of candied fruit (my friend Ruby gave me her supply of Mason jars, I didn’t have to buy any).
Once I’d filled the jars with fruit, I divided the remaining half bottle of rum among the 18 jars (I only use Rum to make the Christmas cake, no point in it sitting around. I’ll buy another bottle next year.)
To be honest, I’m not going to bake the Christmas Bars – they’re lovely but none of us needs the added sweet. So instead my gift this year is this jar of candied fruit in rum.
A teaspoonful is WONDERFUL on a small scoop of vanilla ice cream! You could put a slice of pound cake beneath the ice cream and you’d have fancy dessert. These jars are small but I know there are many teaspoons full of pleasure in each.
Now I need to decorate the tops of the jars and label them. They’re just going to people who really like rum. I don’t plan on handing out any to someone who’s just going to put it in the fridge and forget about it – it’s just too good to be ignored.
BTW – I finished both aprons and the microwave potato bags today. That leaves the Kantha jacket to remake.
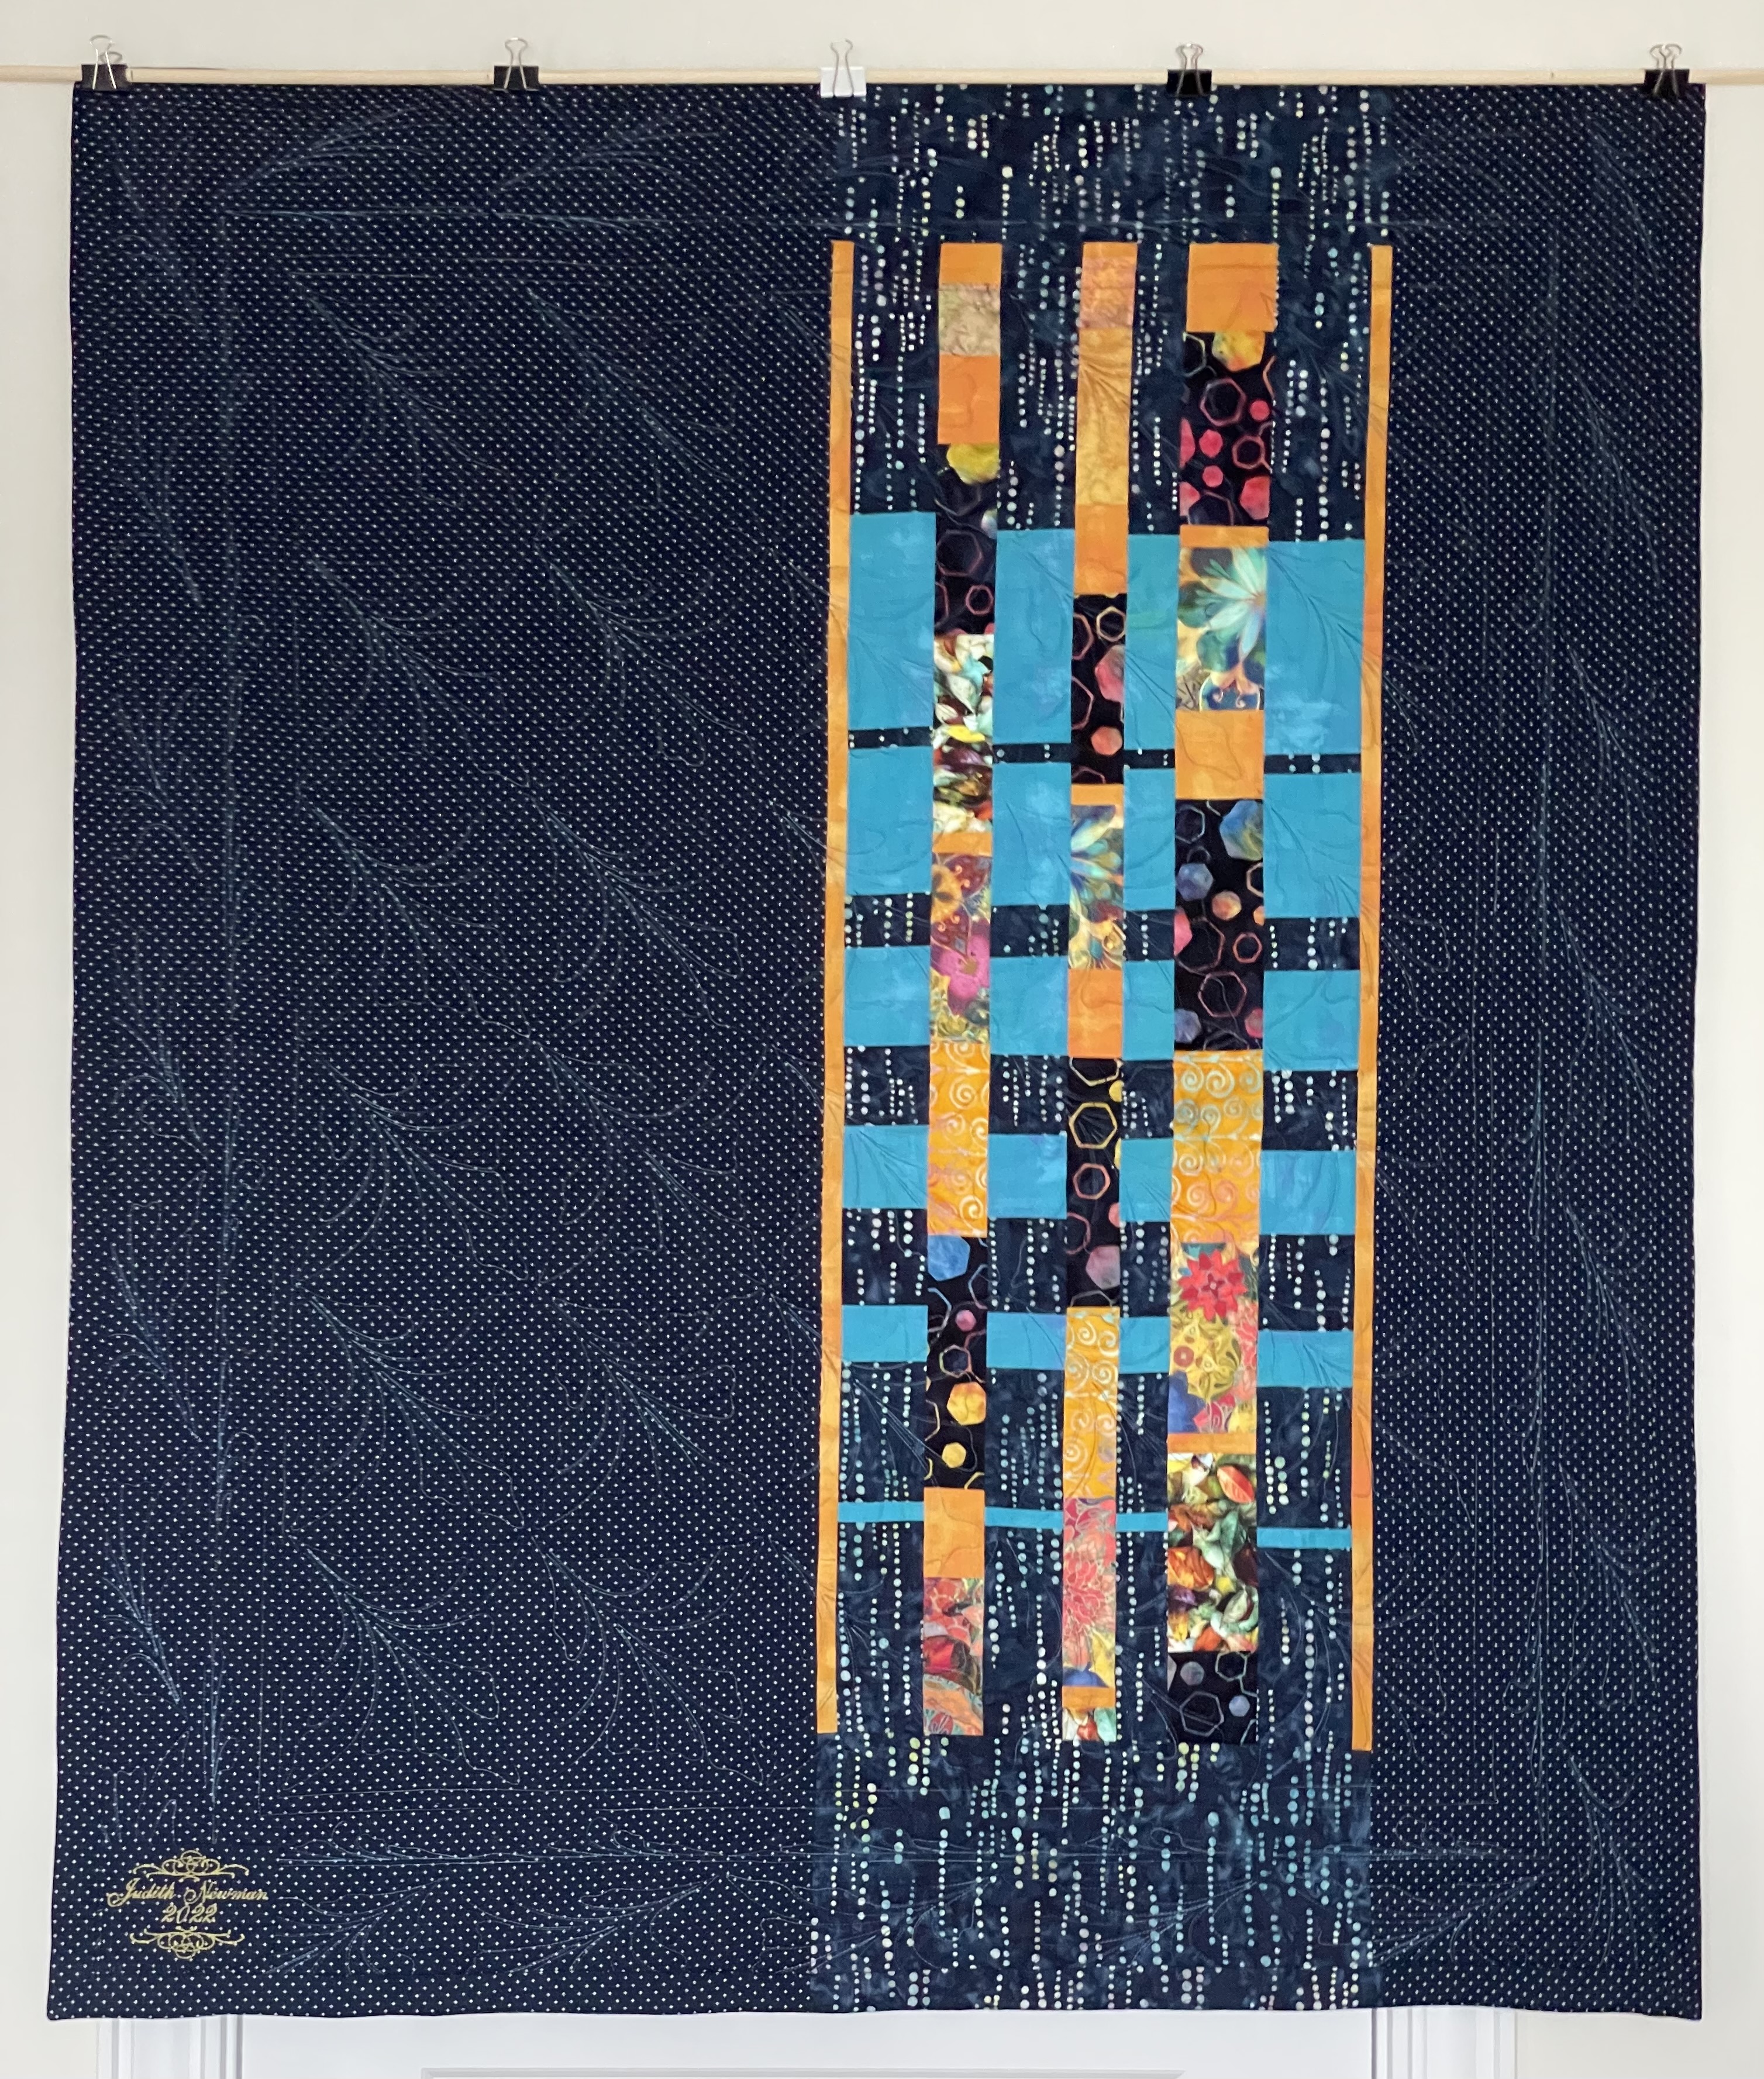
I finally finished the quilt yesterday. It’s taken days to decide what to do within the narrow turquoise border. It was just a tad too wide to leave unquilted but too narrow to mirror the quilt block embroidery. I finally set up a half block I thought would work and got it done. Adding the hidden binding took little time (including the mitred corners). I hand stitched it down last night.
With the two previous Convergence quilts in my collection I will have three possible quilts to show together next summer. I may not use all of them, that depends on what I manage to create between now and then.
I’m happy with the appliqué work – the edge stitching is barely noticeable, you have to look very closely to see it. I like how it extends the bright colours to the the bottom right of the quilt without hitting you in the face, leaving the upper right corner the unadorned turquoise.
Appliqué Detail
I’m also pleased that my extending the square into a rectangle worked. I might play with that again sometime.
Now onto a bunch of unfinished projects sitting in my studio needing attention. First the fleece pants for my friend Joan; next the Kantha jacket remodelling for my friend Marlene, third the stack of six unfinished zippered bags from nearly a year ago – I did two last week, I’ll finish the rest up in a few days. There’s an Heirloom sewing workshop on my calendar but I don’t think enough people have signed up for that – I still want to use the panel I made a month or so ago to complete a nightgown, so that’s also on my ToDo list.
When those projects are completed I want to move on to some new wall art – I’ve just lined up a second summer showing – this one in Truro – I’ll need six or so pieces to display. They won’t be hung, they have to be attached to something firm in order to “stand” on a wide shelf – either some foamcore board or thin plywood. I have no idea how I’ll do that yet, but I’ll figure something out.
Just finished the borders (with mitred corners) and I’m happy with the colour flow they provide. The hexagons bring out the hexagon blocks / the dropping dots showcase the dots within the panel – and the many fabric joins don’t show and when the borders are quilted they won’t catch the eye.
Next step: edge stitch the appliqué – I’m going to use a pale grey Invisifil thread which should disappear into the fabric. I wish I had a golden shade but I don’t and it doesn’t make sense to order one online (even on Amazon.ca the cost is prohibitive!). So, the pale grey it is with a 60 universal needle – very fine (which I have in my needle collection).
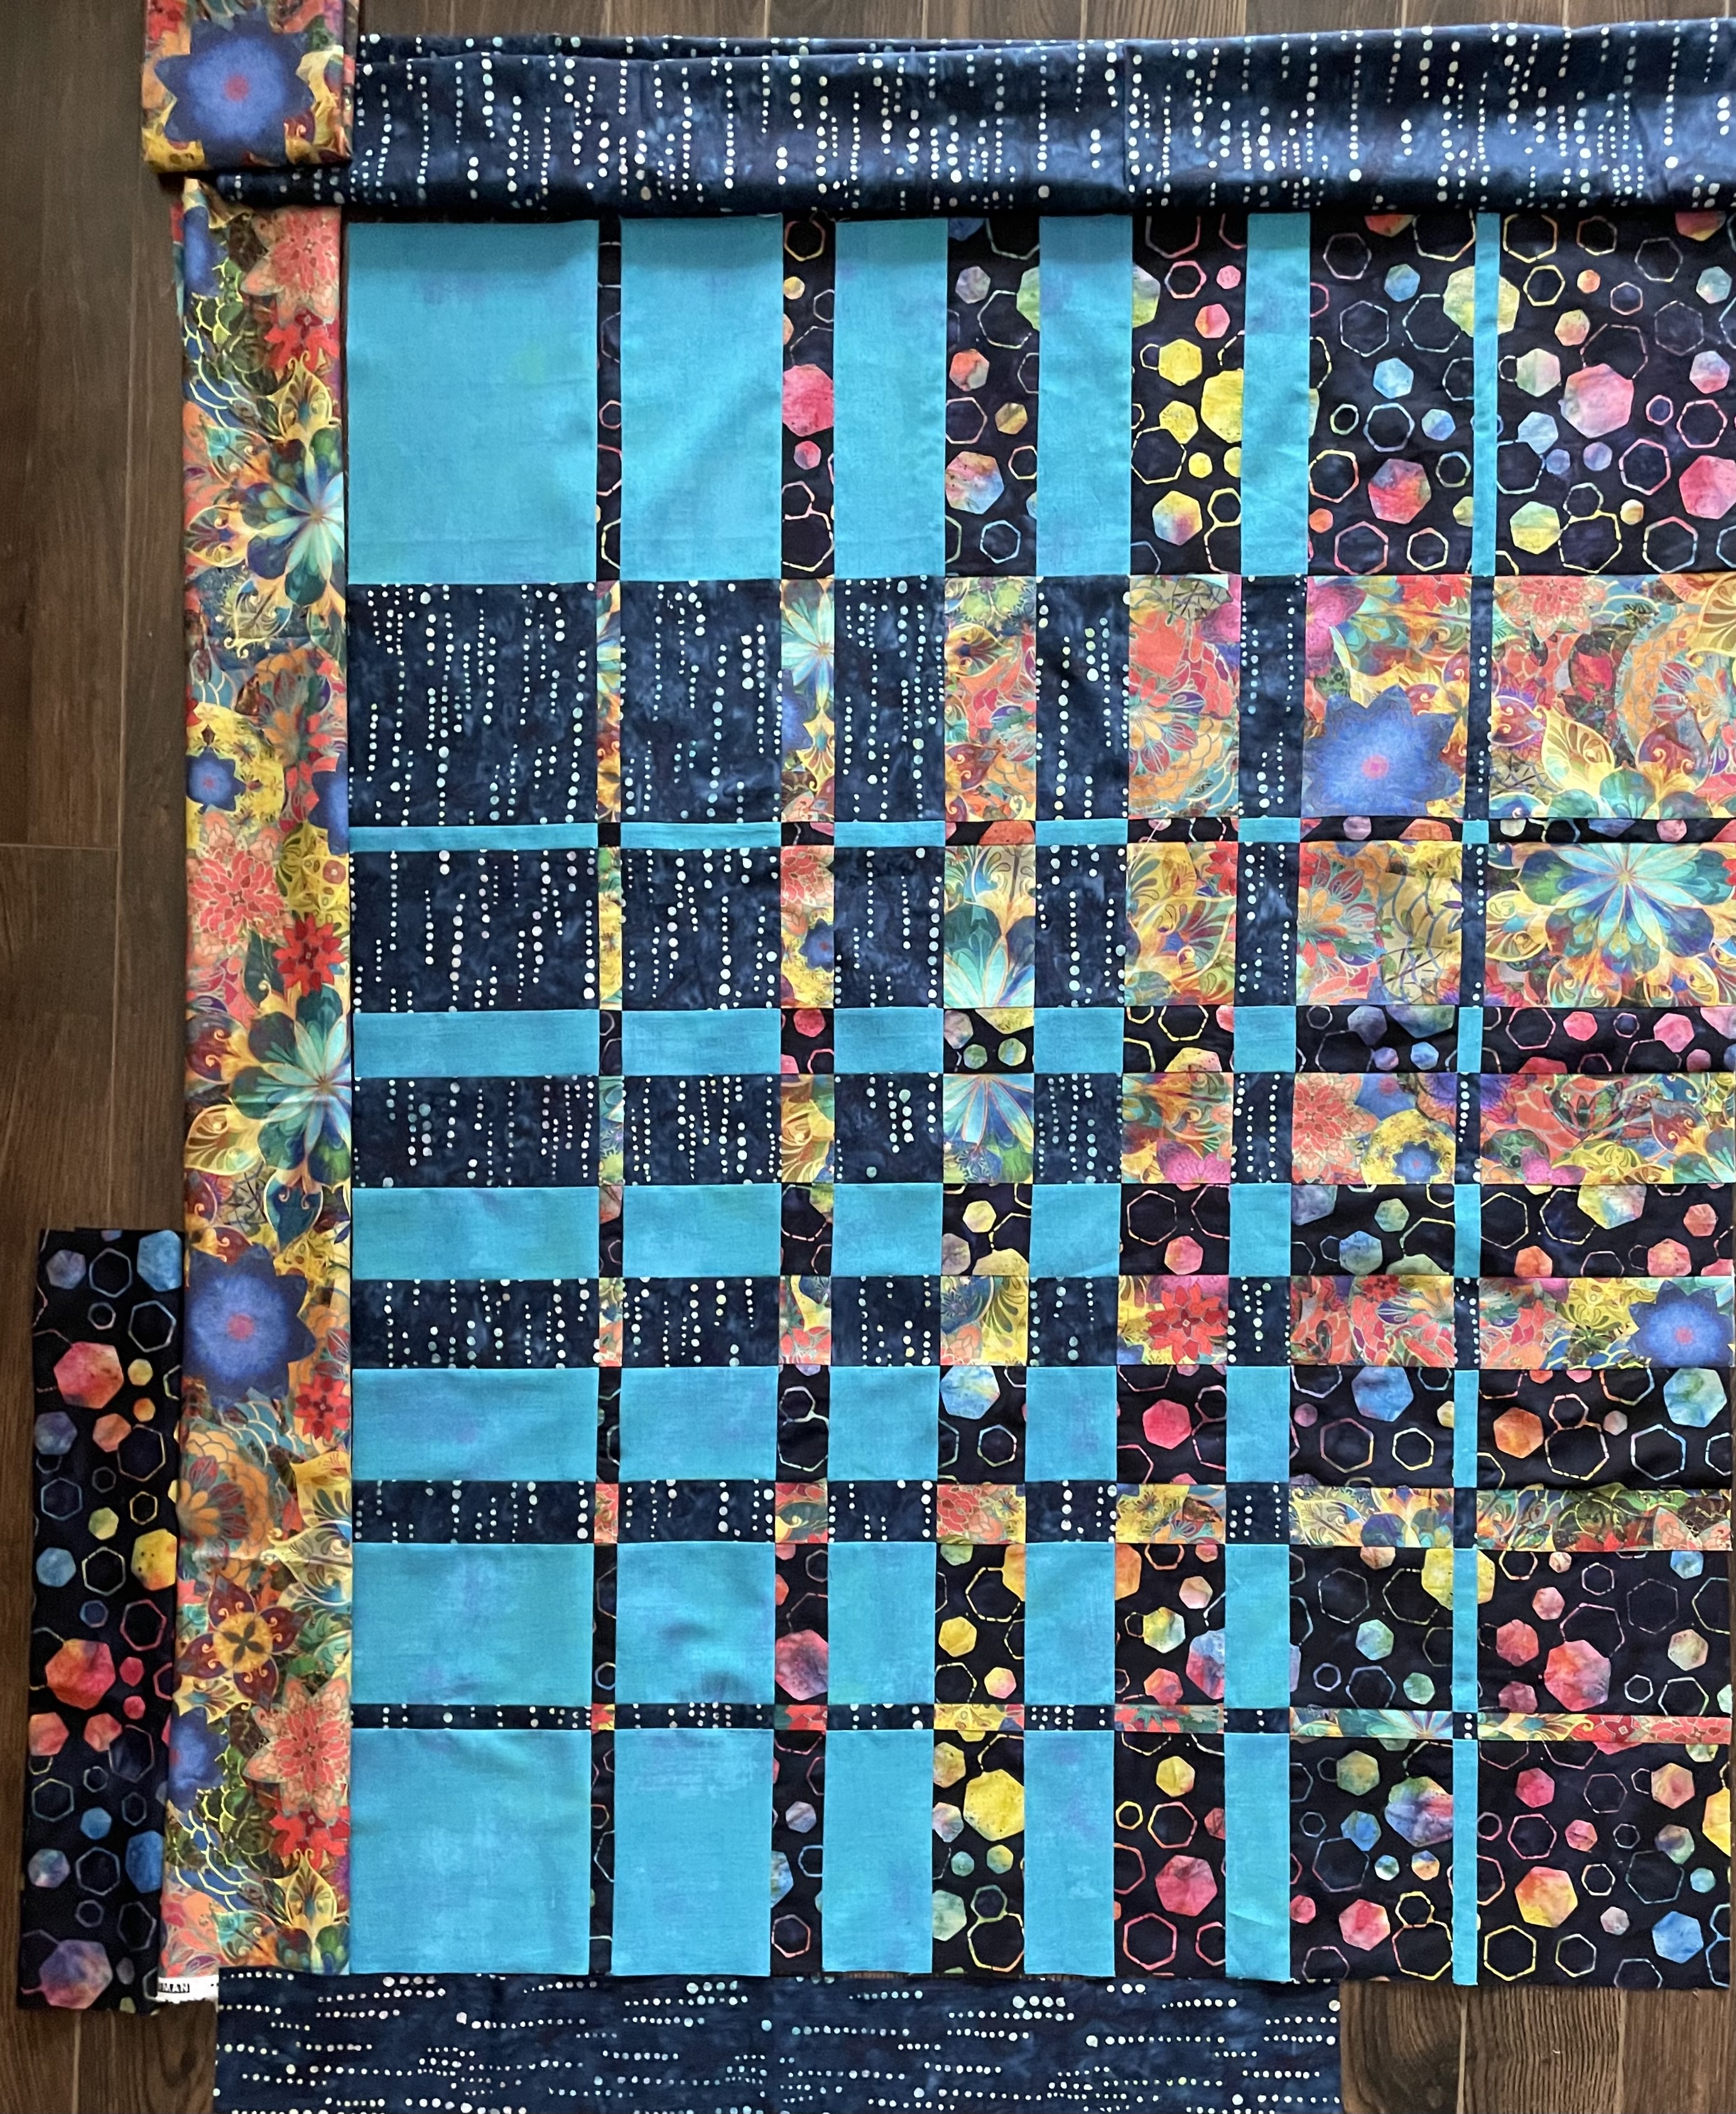
Yesterday, I added the gold and turquoise borders to the panel. Today, I spent a lot of time avoiding the next step because if I wanted the dots fabric to go in the right direction I was going to have to waste a lot of it and I didn’t have a whole lot to work with. I really wanted to border the whole panel with the dots – but I barely had enough to complete two sides and even then I had to do a lot of piecing to get enough length! That fabric is now attached with the mitred corner in the bottom left.
I’ve cut two strips of the hexagon fabric for the other two sides – I need one more to finish the corner. I have plenty of that fabric – not a problem.
I still have to decide at what point to edge stitch (and embellish) the appliqué – I could do it as soon as the borders are complete; I could do it after assembling the quilt sandwich – when I do it depends on how I think about quilting the whole project. The previous convergence quilts I’ve done were quilted overall in the hoop on the embroidery machine. I’m not sure how that will look with the appliqué, however. Stitching-in-the-ditch won’t do it, though because that leaves the larger blocks unquilted space. So I will probably choose to quilt in the hoop which means I should edge stitch the appliqué before assembling the back with what leftover bits of fabric I have.
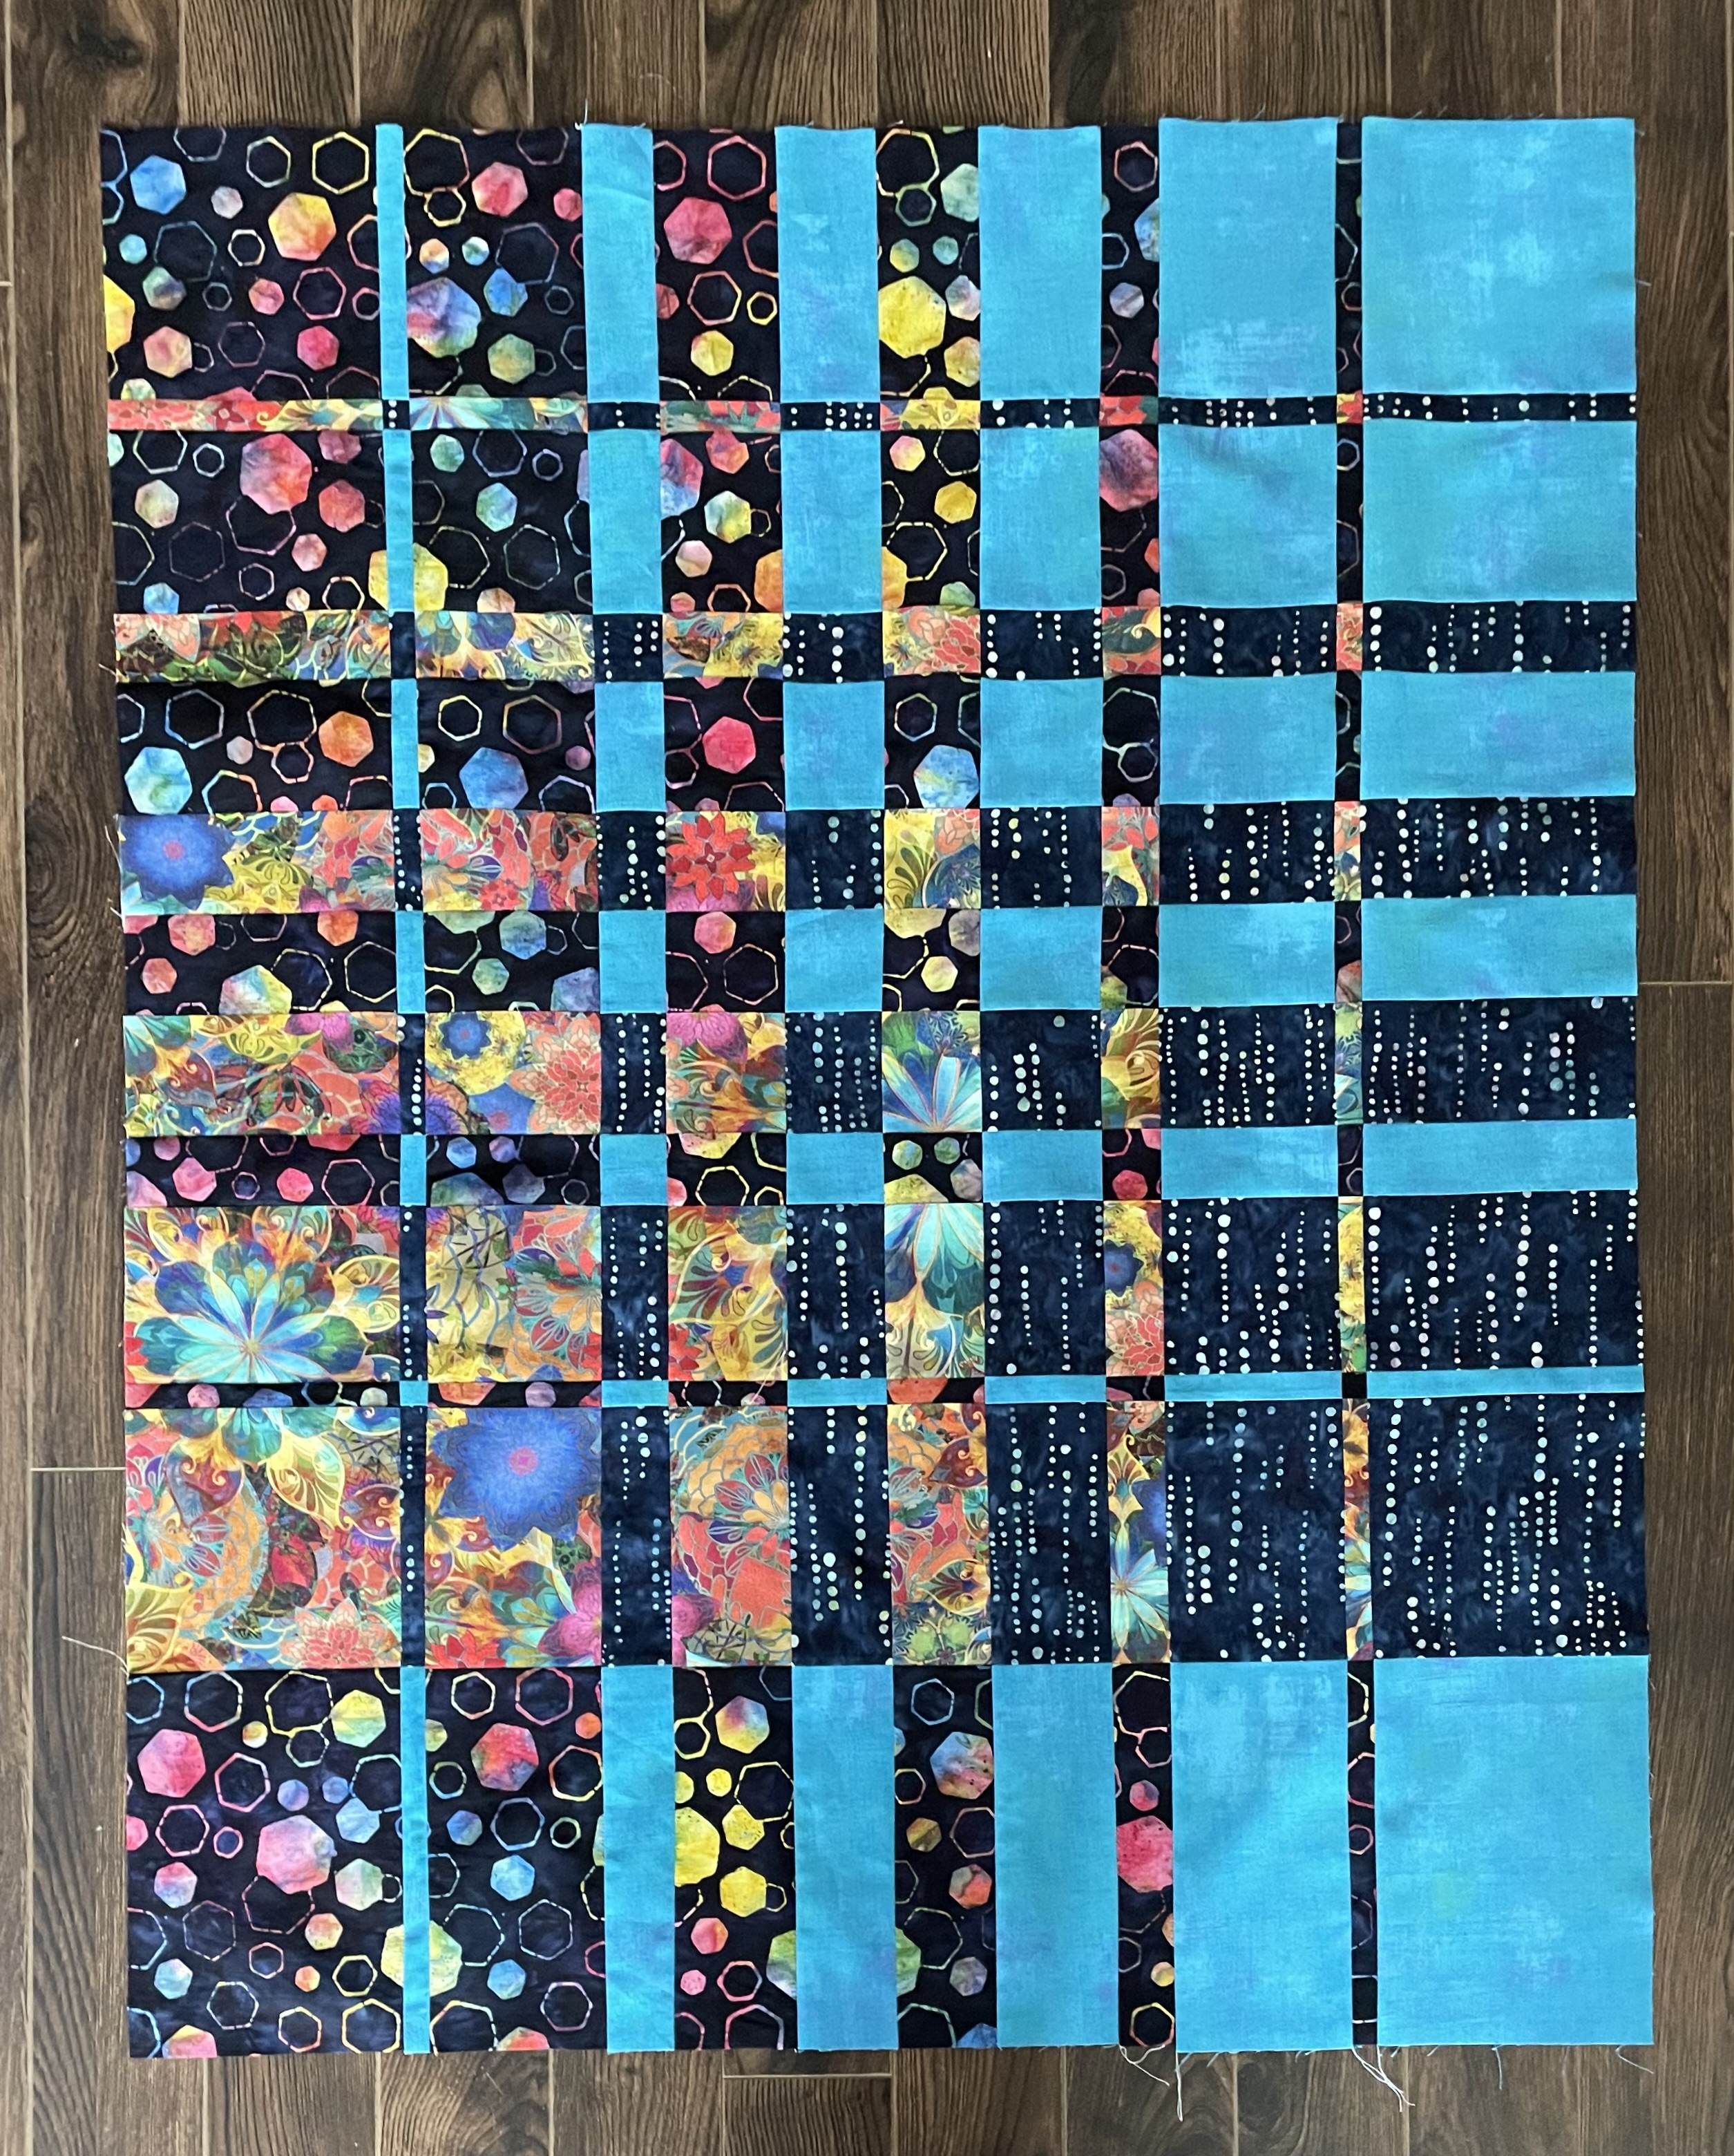
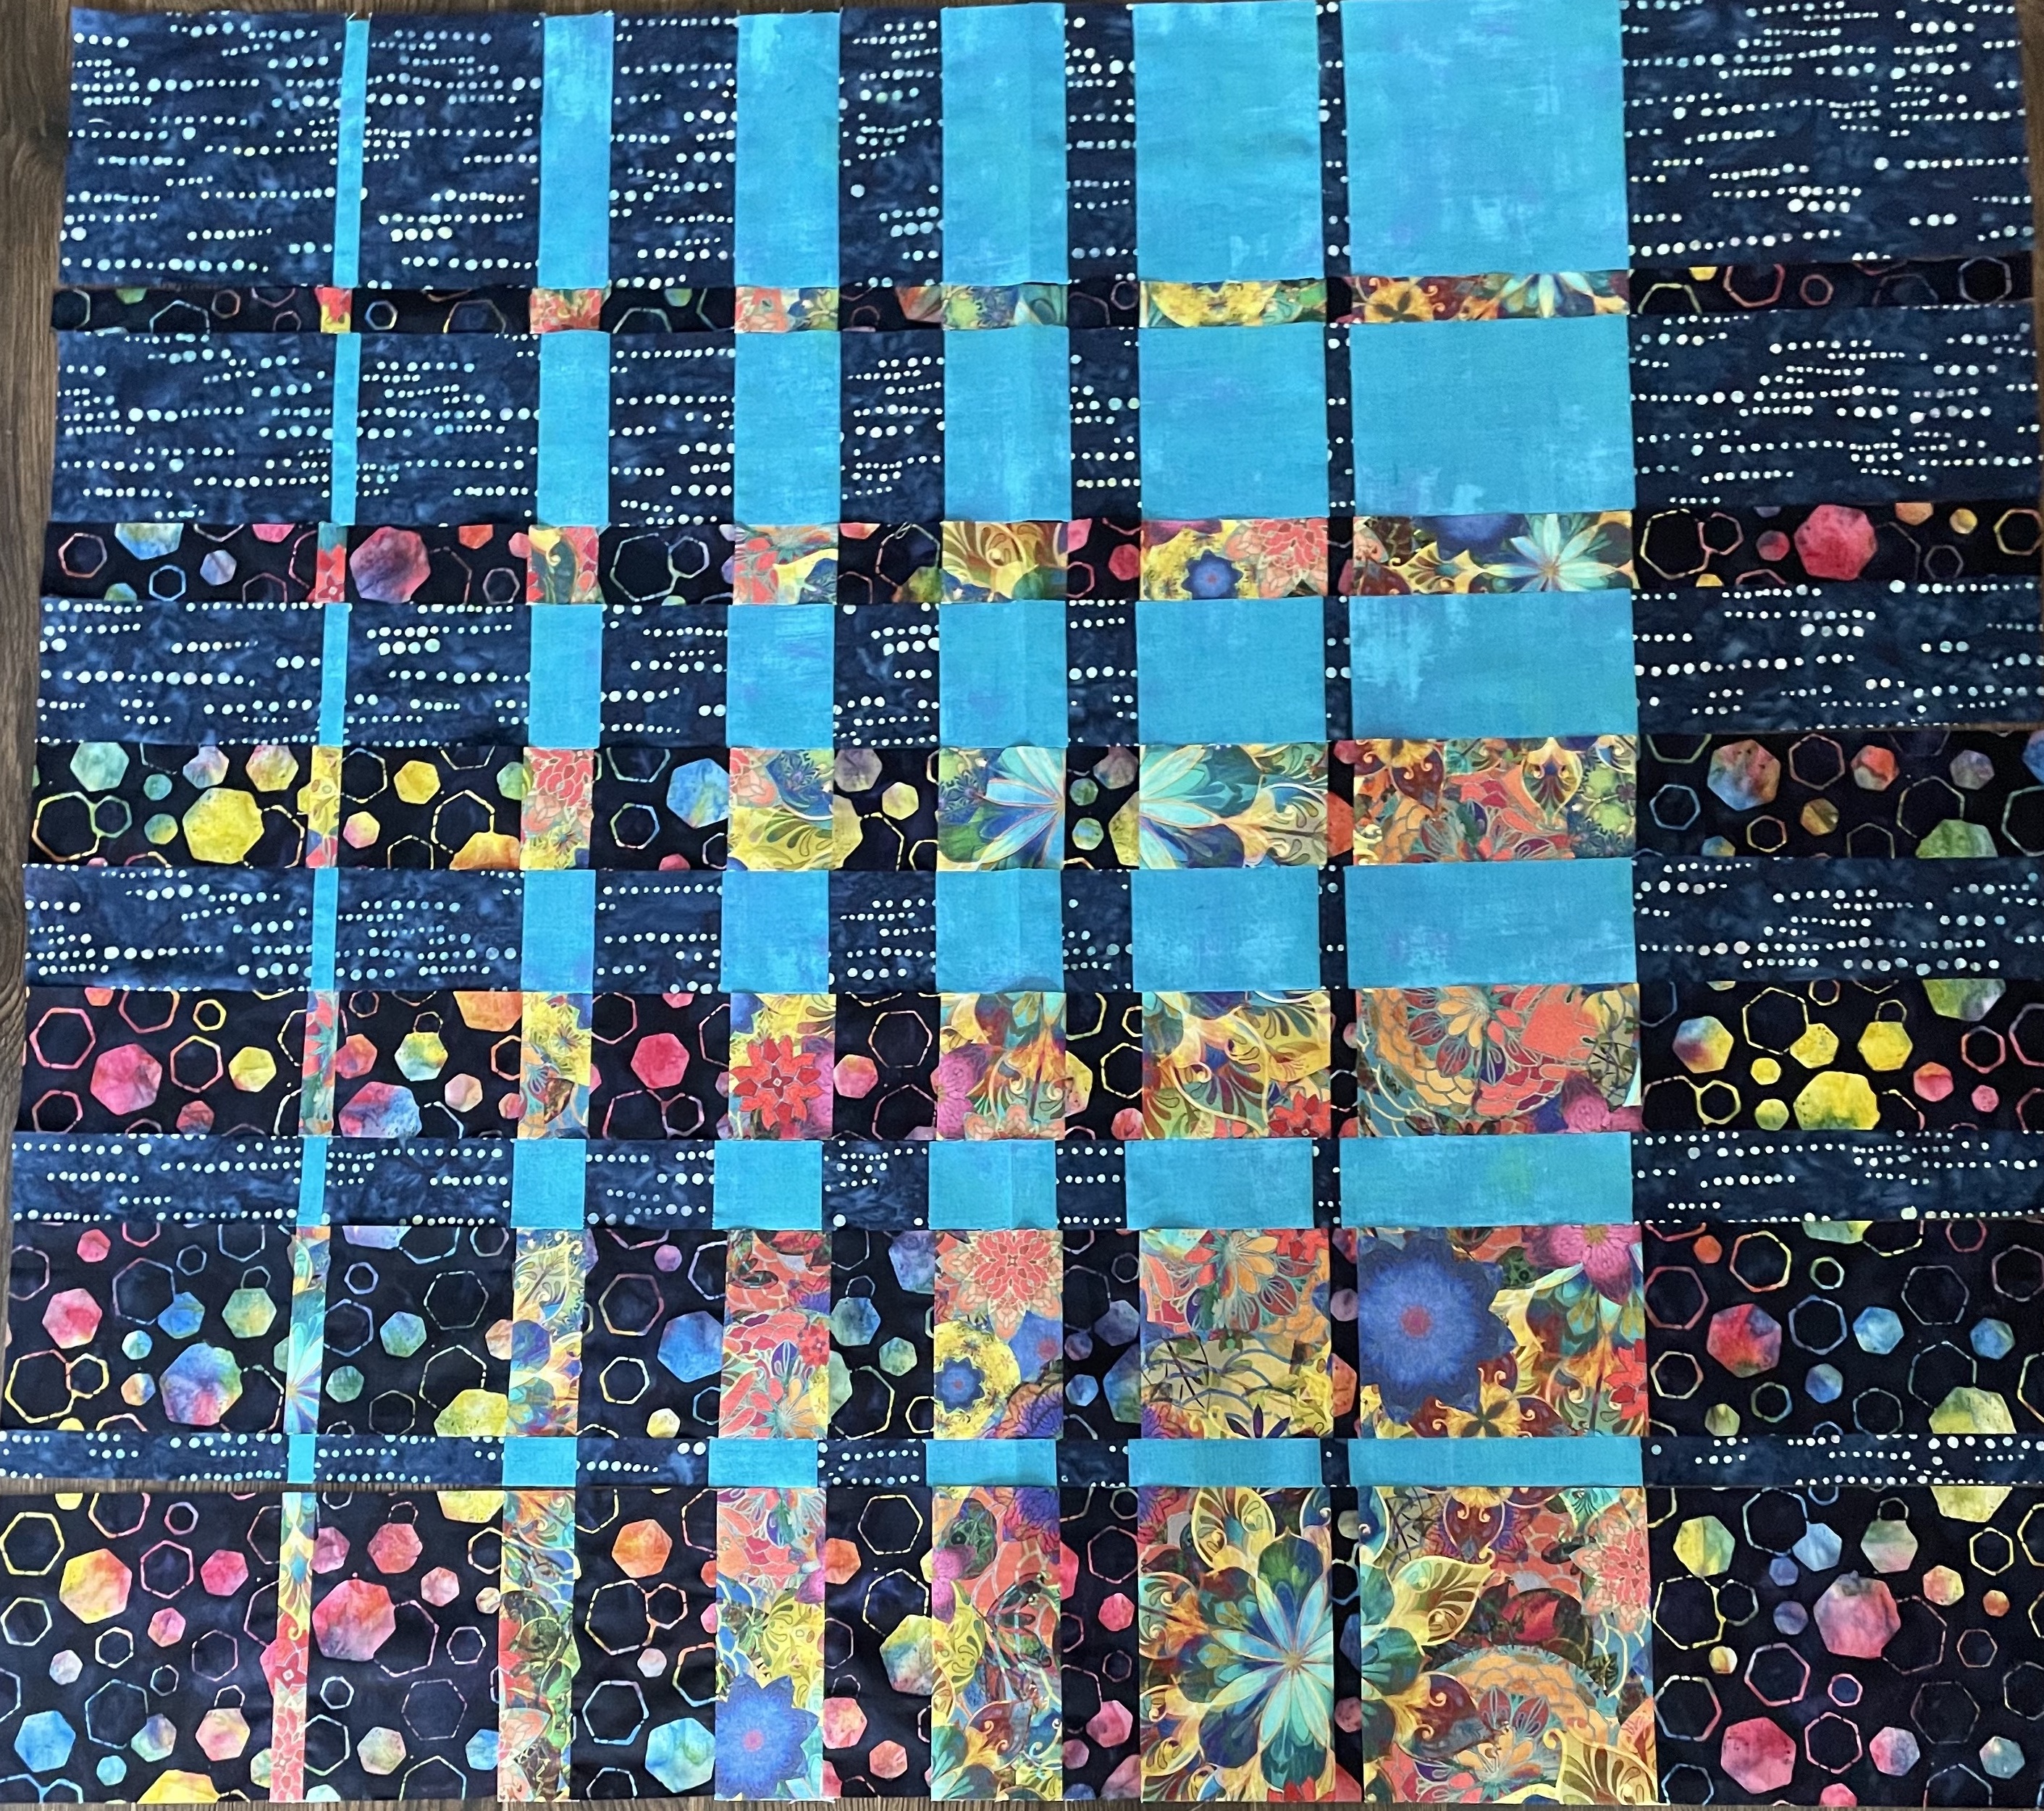
First thing I did today was to recreate the dots/turquoise pairing strips setting them up so when interleaved with the flowers/hexagons the dark fabrics would be opposite one another, not adjacent. My goal was to end up with a rectangular rather than a square panel. I accomplished that by adding a final 9″ row of the dots/turquoise pairing to one end to make the block longer.
I have just finished assembling the panel – 35 x 44 – not quite large enough for a lap quilt. I want to end up with something closer to 48 x 60. I can can obviously add borders – 7″ all around would give me a finished size of 49 x 58. If the borders were a bit asymmetrical I could fudge the final size closer to 60″ in length.
However, first I need to sort out a narrow framing border around the panel to set it off from the borders which I can then assemble by piecing the original four fabrics. So back to the stash to see what I have that might close off the panel in an interesting way.
I’m also going to appliqué some flowers from the yellow fabric over the turquoise blocks at the bottom to bring that colour to that bottom right corner (in the photo on the left – I must have stood on the opposite side of the panel when I took the second photo!).
Afternoon Update
Panel With Fused Appliqué
I couldn’t leave the panel as it was – I applied some fusible web to the back of floral fabric, fussy cut a bunch of elements, then fused them in place. Now I need to edge-stitch and embellish them before I can go further. I’m definitely happier with those turquoise segments at the bottom partially covered – the appliqués extend the bright colours beyond their quadrant.
OK, I’ve played with Ricky Tims’ convergence quilt idea before. There are a bunch of subtleties to consider and I don’t always see them until I’ve sewn the strips together.
In Convergence #1, I didn’t realize how small the constructed block would be, so to make a decent size lap quilt, I used it on-point, filling the corners with the corresponding fabrics and bordering with something compatible but different. While constructing Convergence #2, I misjudged how the two light colours would go together, cut them the wrong way; but fortunately, I had enough of both fabrics to redo the panel and salvage the quilt. I used the miscut strips from Convergence #2 to construct Convergence #3 by interspersing them with a multi-fabric panel, cut in strips and interleaved with the greys. I lengthened the panel in one dimension to make the resulting quilt a rectangle.
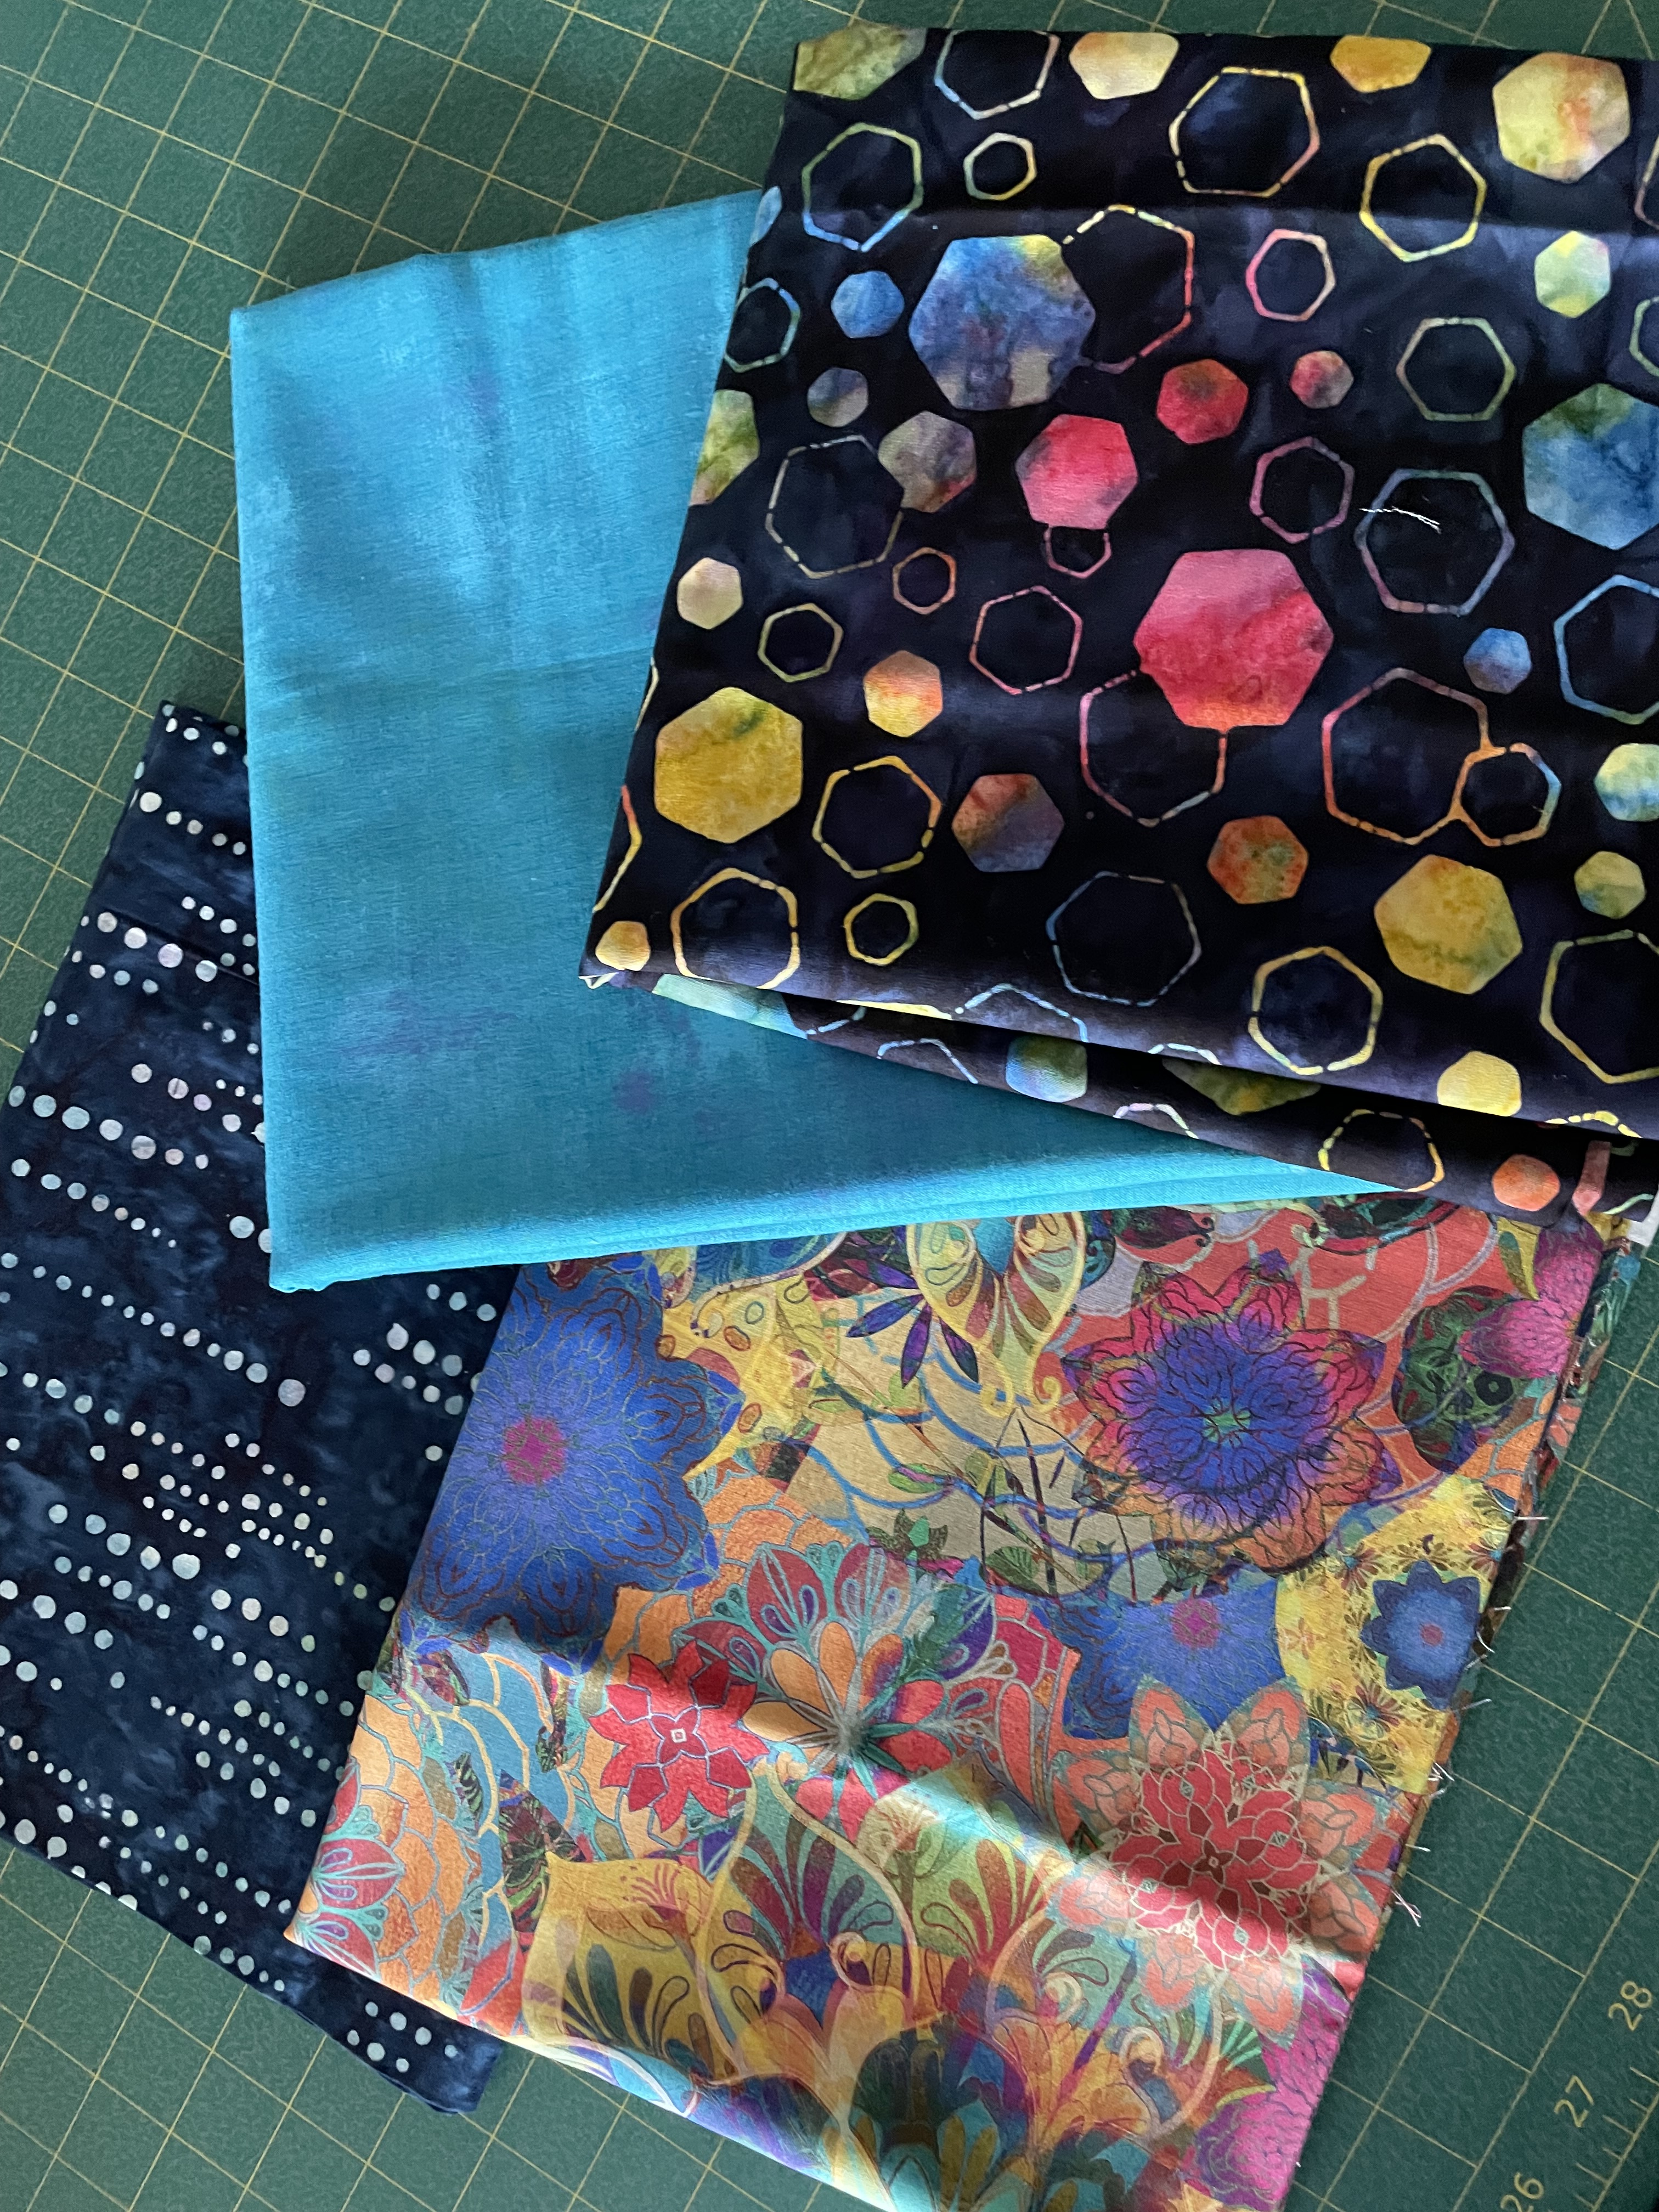
In thinking about another convergence quilt panel I chose four fabrics I thought worked well together (two batiks/two prints):
I thought the convergence array would make a bright panel.
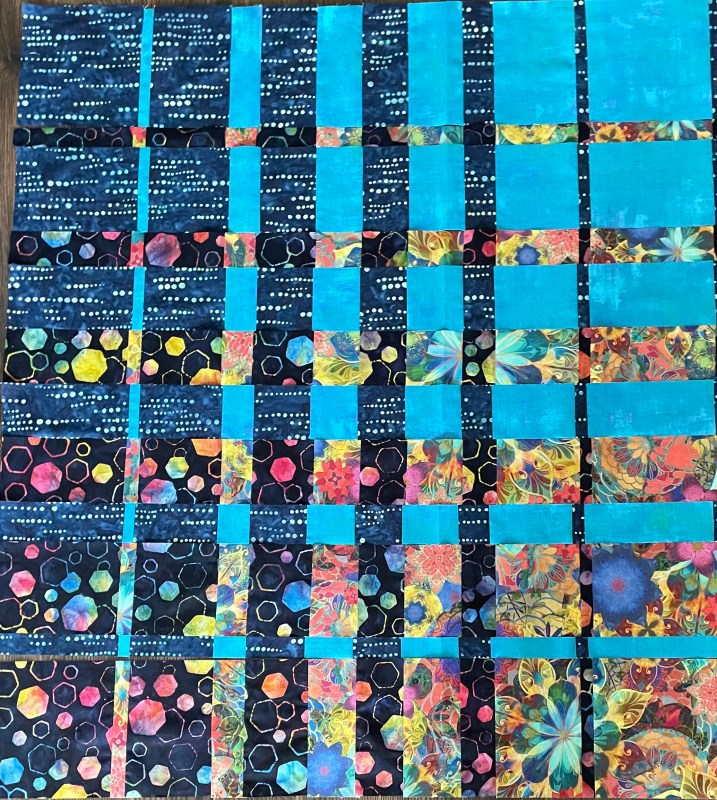
A Square Convergence – Laid Out
A square block works as you’d expect it to. However, I wanted a rectangular panel so I had added another dark 9″ strip to the contrasting end of each pairing:
Extended Panel – Laid Out
Here’s where I didn’t anticipate the fabric placement – instead of cutting the blue dots/turquoise grunge as I did, I should have reverse the fabrics. I’m going to redo that fabric pairing to see whether the overall panel doesn’t work better. Fortunately I have enough fabric to do that and I’ll set aside the strips I currently have and use them in another quilt top (as I did with Convergence #2 and #3).
I suspect this arrangement could be salvaged were I to choose a good contrasting narrow sashing fabric. I’d intended using the dark hexagonal batik for the outer border but I’m not sure that will work well with this array.
Next task – redo the blue dots/turquoise grunge strips and see what that looks like. Tomorrow!
This morning’s project was to complete Block #4. I’m getting more efficient at embellishing the raw edge appliqué, applying stems and leaves, and signature. A bit less than three hours. I’ve built up a library of “edge” stitches, and “leaf” shapes so I’m not spending time browsing and modifying my machine’s stitches to find something to use.
Block #5 tomorrow.
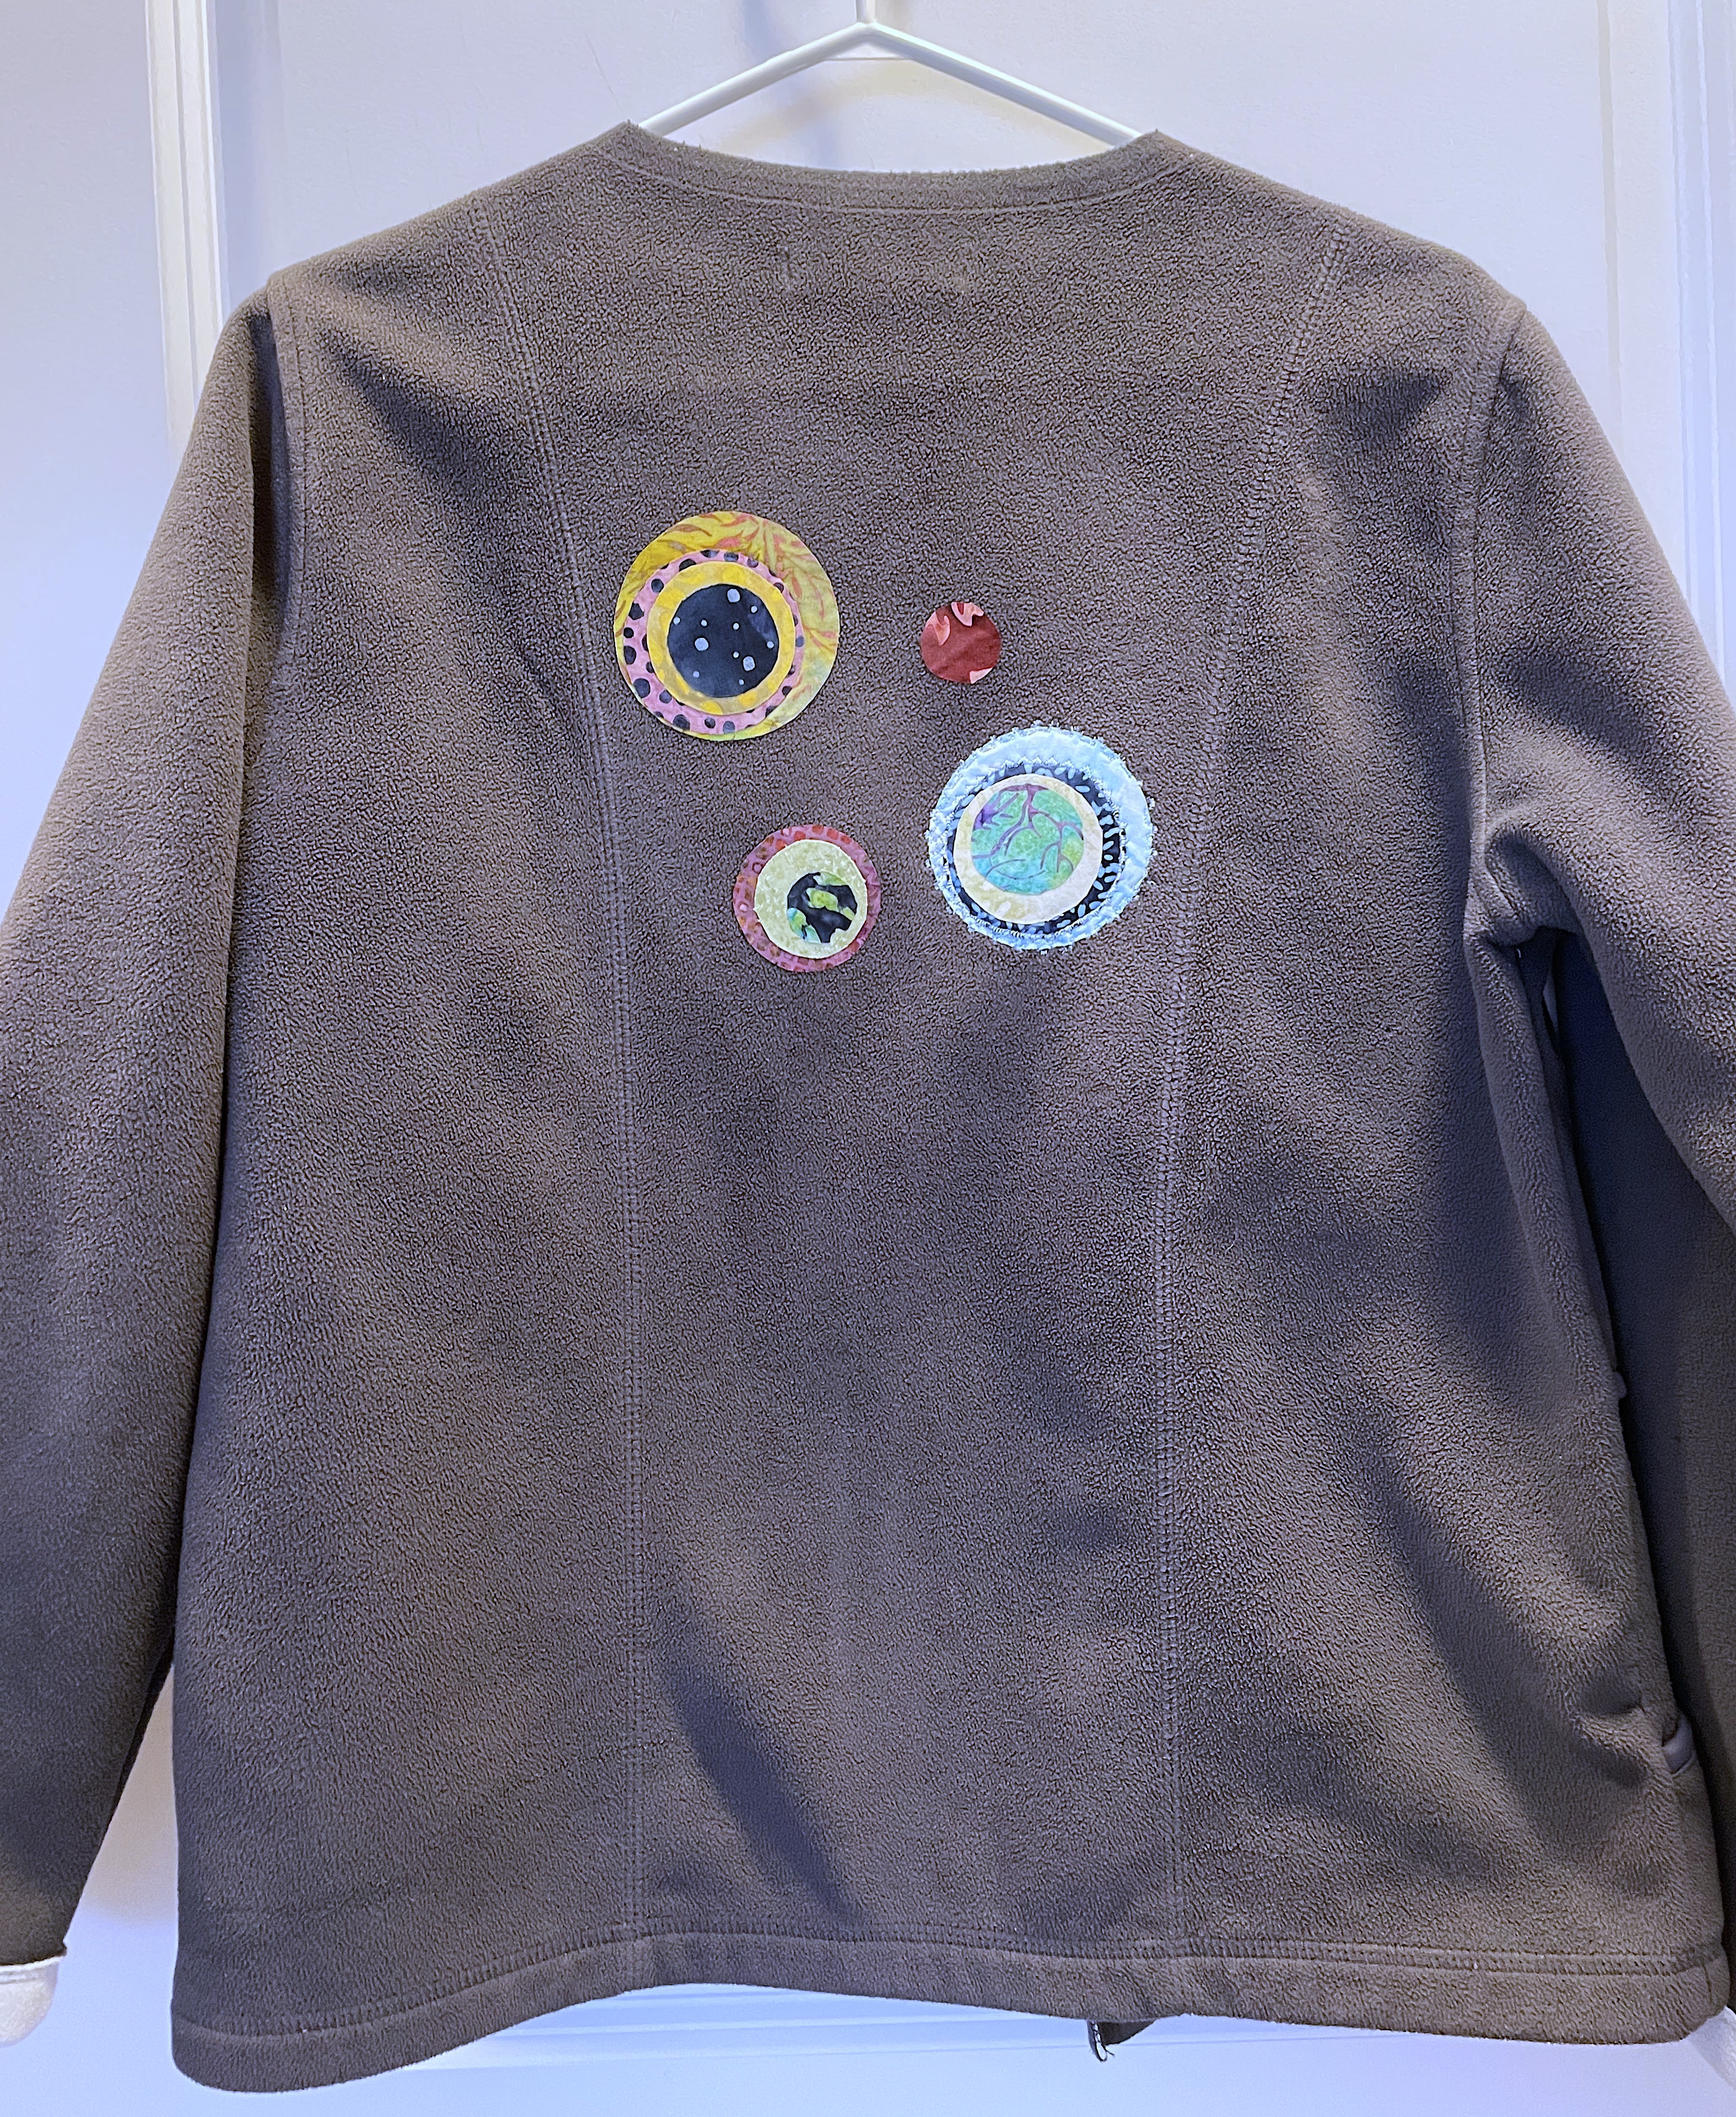
Sweatshirt Makeover
Jacket FrontJacket BackSweatshirt Makeover – In Progress
In just under two weeks I’m teaching a class “Sweatshirt Makeover” – intended to explore remaking and/or embellishing an old sweater, plain jacket, or sweatshirt to give it new life.
I did a couple many years ago:
Iris Appliqué on Sweatshirt BackFramed Mola on Sweatshirt FrontSweatshirt Makeovers
The “Iris Appliqué” was my very first attempt at raw edge appliqué! I added irises to both front and back of the shirt. Several years later my sister brought me two molas from Costa Rica – I fused this bird mola to the front of a black sweatshirt and framed the edges; I still have the fish packed away in a drawer.
There are two aspects to a sweatshirt makeover – you can embellish it (taking particular care to fuse fabric over old stains or holes you want to hide); or you can remodel it – turn a pullover sweatshirt into a jacket with buttons or zipper or snaps. You can remove cuffs from sleeves or hem. Change the neckline. Lots of possibilities.
I didn’t have another old sweatshirt on hand so I went to Mission Mart (a local used clothing depot) to see what I could find. I came across a grey zippered fleece jacket (which was on the small side). So I decided to take out the zipper, remove the collar, shorten the sleeves, reshape the front edges so they’d hang better when I added two centre panels which I intend closing with buttons.
The next decision was how to embellish it. I decided simply to use the “modern flowers” theme I’ve been working on for the 6×6 wall art. I selected a bunch of batik circles, fused them onto the back and fronts of the jacket. Today I started edge stitching the circles and I added stems and leaves to finish the left front.
At the moment, I don’t know what to use to widen the front of the jacket (I need about 5″ in total for the jacket to fall loosely). I have a couple half-yards of wool fabric which might work with the fleece – I have to make a trip to Fabricville to see if I can find a double sided grey fleece (or some other colour) that might work with the jacket.
Or I may never do any more on this project – I’ve done enough to illustrate how you might think about doing a makeover and take this project as is to the shop to put on display to advertise the class.