Asparagus Field – 1


20130911-211741.jpg

Asparagus Field (North Canning, NS) – Photograph (by Judith Newman)


OK, I started “the piece” yesterday – cut the batting and stabelizer to size, prepared a piece of fabric for the sky, started to create a tall evergreen using free motion stitching on hooped organza.

I finished the tree this morning – Laurie in the meantime trying to push me to “get the batting covered.” By that, she meant start placing the fabric for the sky, put in fabric for the trees, lay out the pieces for the asparagus field… I traced the shapes for the main spaces, used the tracings as templates for cutting the fabric.

Next step – I stitched these elements in place, then filled each element with some widely spaced free motion work. ( The asparagus field in the foreground can’t be positioned and stitched in place until everything behind it is in place – the house, trees, shrubs…)

I next started on the house – the focal feature of the piece. More difficult than it first appears because I was using some raw silk for the building – it frays terribly so I had to back it with “steam a seam” (a paper backed iron-on glue) to stabilize it. Whereas the house made yesterday was constructed by cutting out windows and using fabric behind the openings, this building will have to be done with appliquéd windows and doors, each small feature created separately. I was able to construct the main elements of the house this afternoon – the details will come tomorrow.
20130911-211436.jpg

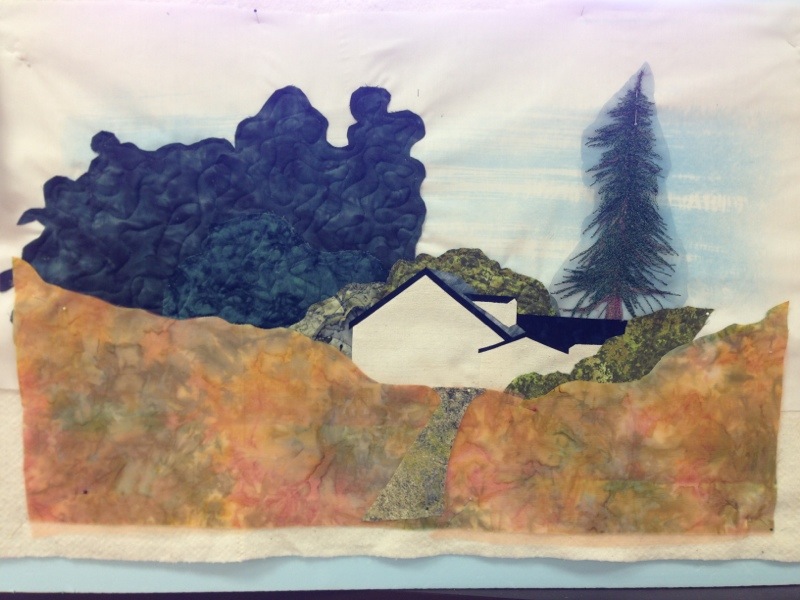
The right hand side of the piece needs to be filled with leafless deciduous trees – I still have no idea how to go about that.


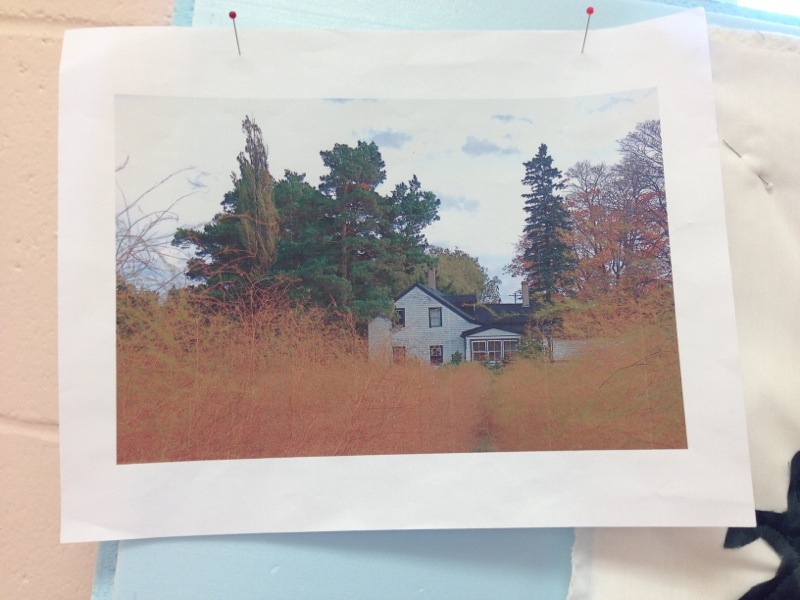
And a few more pictures of Lunenburg:

20130911-212049.jpg

20130911-212102.jpg

20130911-212123.jpg

Sample #1

This is all kind of like “Karate Kid” the original version where Mr. Miagi is teaching Daniel karate by having him do a variety of tasks – the whole results from assembling the parts. Creating a landscape quilt is like that – many small techniques that get incorporated into a larger whole.

We worked on “cobweb lace” – you cut fabric into rather small pieces (using a pinking rotary cutter blade), lay them on a piece of cling wrap, place a piece of cling wrap over them, hoop the three layers, and free motion stitch on top of that. You remove the cling wrap by placing the piece you’ve just created between two pieces of paper and press with a hot iron.
20130909-172143.jpg
What you have is a potential tree. Place one or more of these together you could have a denser tree or a shrub.
20130909-172159.jpg
Second technique: zigzag free motion – that gives you a longer stitch because the needle is moving as well as the fabric – great for grass, or tree trunks. My problem is that the sewing machine I brought is a quilting machine and it only does a straight stitch! So I tried it out on one of the other gal’s machines.

Third technique: paint fabric dye on paper, let it dry, then press (paint side down) on a poly-cotton blend fabric – a sky.

So with these three techniques I made my first sample thread painting:
20130909-170151.jpg
Not perfect, but pretty good for a first go.


It was a gorgeous Nova Scotia September day, today. I took a few moments after class this afternoon to capture a couple of images of Lunenburg:
20130909-171927.jpg

20130909-171950.jpg

Winter Jacket

IMG_2159

I have finally cut out the winter jacket. The fabric has been sitting in my dining room (I use the dining room table as my cutting table – with a protective cover, of course) for at least six months! Sunday, I finally cut the pieces for the jacket.

I’m making it in a deep wine corduory with the back panel in a tapestry fabric I’ve had for some time, using that fabric for piping on the front of the jacket. For warmth, I’m using Insul-Bright batting – a polyester heat reflective batting – needle punched mylar on one side – to keep rain out, and heat in. I am in the process of adding the batting to the wrong side of each lining piece. I’ll then assemble the lining and attach it to the assembled outer jacket.

I’m making the long version with the banded bottom, to keep my bum warm in winter! The reason for this particular jacket is that it has a total of 10 pockets – outside and inside, with zippers and without. Using the pockets effectively means I don’t have to carry a purse when I wear the jacket.

The Final t-Shirt

IMG_2158

This is the last of the t-Shirts, made from recutting a man’s XL shirt I picked up at Value Village. I constructed it using my serger, but I hadn’t used ball-point needles, just regular universal sharps. On all the other t-Shirts that wasn’t a problem, but it turned out to be on this one! The universal needle, instead of pushing aside the knit stitches of the fabric, cut the cotton fibre – you could see the beginnings of holes along the seams. I had to resew all the seams (less than 1/8th away from the serged seam) on my regular sewing machine using a ball-point needle. The difference in the appearance of the seam is dramatic.

Now the question is, do I want to add embroidered embellishment to some of these t-Shirts?

Heirloom Embroidery

A number of years ago I learned how to do heirloom embroidery – it uses many different decorative stitches on a fine, light-weight fabric, a voile or batiste. The technique is used to decorate night gowns, fancy dresses for little girls, blouses. It involves inserting lace elements, using pin tucks and tucks, cutwork, and other decorative techniques. There are lots of books written about the technique and you can find many videos on YouTube.

Here is my first sample piece – a lace insert joined down the centre with entredeux, then rows of pin tucks, then rows of scallops and other decorative stitching.
Heirloom sample 1

Sample 2: Ribbon inserts, again joined with entredeux, then hemstitching, tucks, more hemstitching, pin tucks, some decorative stitches and a final row of hemstitching.
DSCF1116

Sample 3: This sample is done as three separate pieces. Again using hemstitching, lace insert, decorative stitches and tucks with some entredeux.
IMG_2153

I intend using all three of these as yokes for nightgowns. My current supply of nightgowns is dwindling (made from a delicate cotton, they do wear out). I need to put nightgowns on my “to do” list.

I created these three samples for a class on heirloom embroidery I taught – I had the women create heirloom samplers like these to use in whatever way they wished.

t-Shirt Makeover II

20130815-163752.jpg
I’ve stepped up the t-shirt makeover a notch. I have been buying men’s t-shirts so I can have longer sleeves than women’s shirts have, but I don’t like the crew neck. So I decided to try renovating a couple of the men’s shirts I bought last year. I cut off the ribbing around the neck and since I didn’t have any knit fabric to use for the neck edge I took a couple of fat quarters from my quilting stash and decided to try a bias strip. It worked! The complementary neck edge looks just fine, and it lays flat. After I tried the shirts on I thought it would also be a good idea to put some shape in the sides – they look better slightly fitted. So these two t-shirts have become keepers.

t-Shirt Makeover

20130814-130813.jpg
It’s hard finding t-shirt fabric here in Halifax. The color choices are very limited and what’s available is often the wrong weight. So, the other day when I took three large bags of clothing to Value Village (I’d gone through closets and drawers) I took a look at the men’s large t-shirts they had – I found three in solids (red, black, blue). I cut the shirts apart – there was enough fabric there for a t-shirt for me! This is one of them. Final cost – $4. I can’t buy fabric at that price!

Swimsuits

IMG_2131 IMG_2132

I have made my own swimsuits for a long time. I do it to get the fit I want, not because it costs me quite a bit less than buying them. I attend aquafit classes three mornings a week and the chlorine in the pool simply eats suits – doesn’t matter whether I’ve made them or bought them. So I continue making suits – the challenge is finding interesting swimsuit fabric. This fabric I bought at Mill Ends in Portland OR during my trip there in June. I have one other fabric from that trip as well as the two new pieces from Spandex House in NYC which I’ve posted about a couple of weeks ago.

Making a swimsuit is easy – I have a pattern I’ve used for years (still fits), I cut out a couple of suits when I’m making them. It takes very little time to sew them together on the serger – the more time consuming part is putting in the elastic around the legs and the neckline. This time I tried something new – I took my pattern and created a bottom from it, then created a top – a tankini two piece suit – I found I had to put elastic around the bottom of the top portion, or the top had a tendency to ride up in the pool. The elastic around the bottom of the suit top solved that problem.

I have another two piece in the works. I’ll post a photo when I get it done this weekend.

Kimono Silk II

The third bolt of kimono silk arrived this morning – it is just like the picture I saw online. It will definitely work well with the pale fabric.

20130719-124850.jpg

I just have to finish a second swimsuit, complete the quilt (made with the Kaffe Fassett fabrics), cut out the winter jacket that’s been sitting ony dining room table for four months, then I can begin making something from the kimono silk!

Kimono Silk I

20130718-171344.jpg

Two of the three “bolts” of kimono silk I ordered from Ichiroya in Japan arrived this morning. Now I’m just going to have to look at them for a while before I have any idea what to make from the silk. I ordered the silk after the visit to Ann Williamson’s studio in Portland. I will make some kind of pieced jacket like one of Ann’s. The bolt still to come is in navy which should go with either the brick or the pale blue.