Wind Waiting II

IMG_1685.JPG

Wind Waiting – Foreground, Sea, Sky…

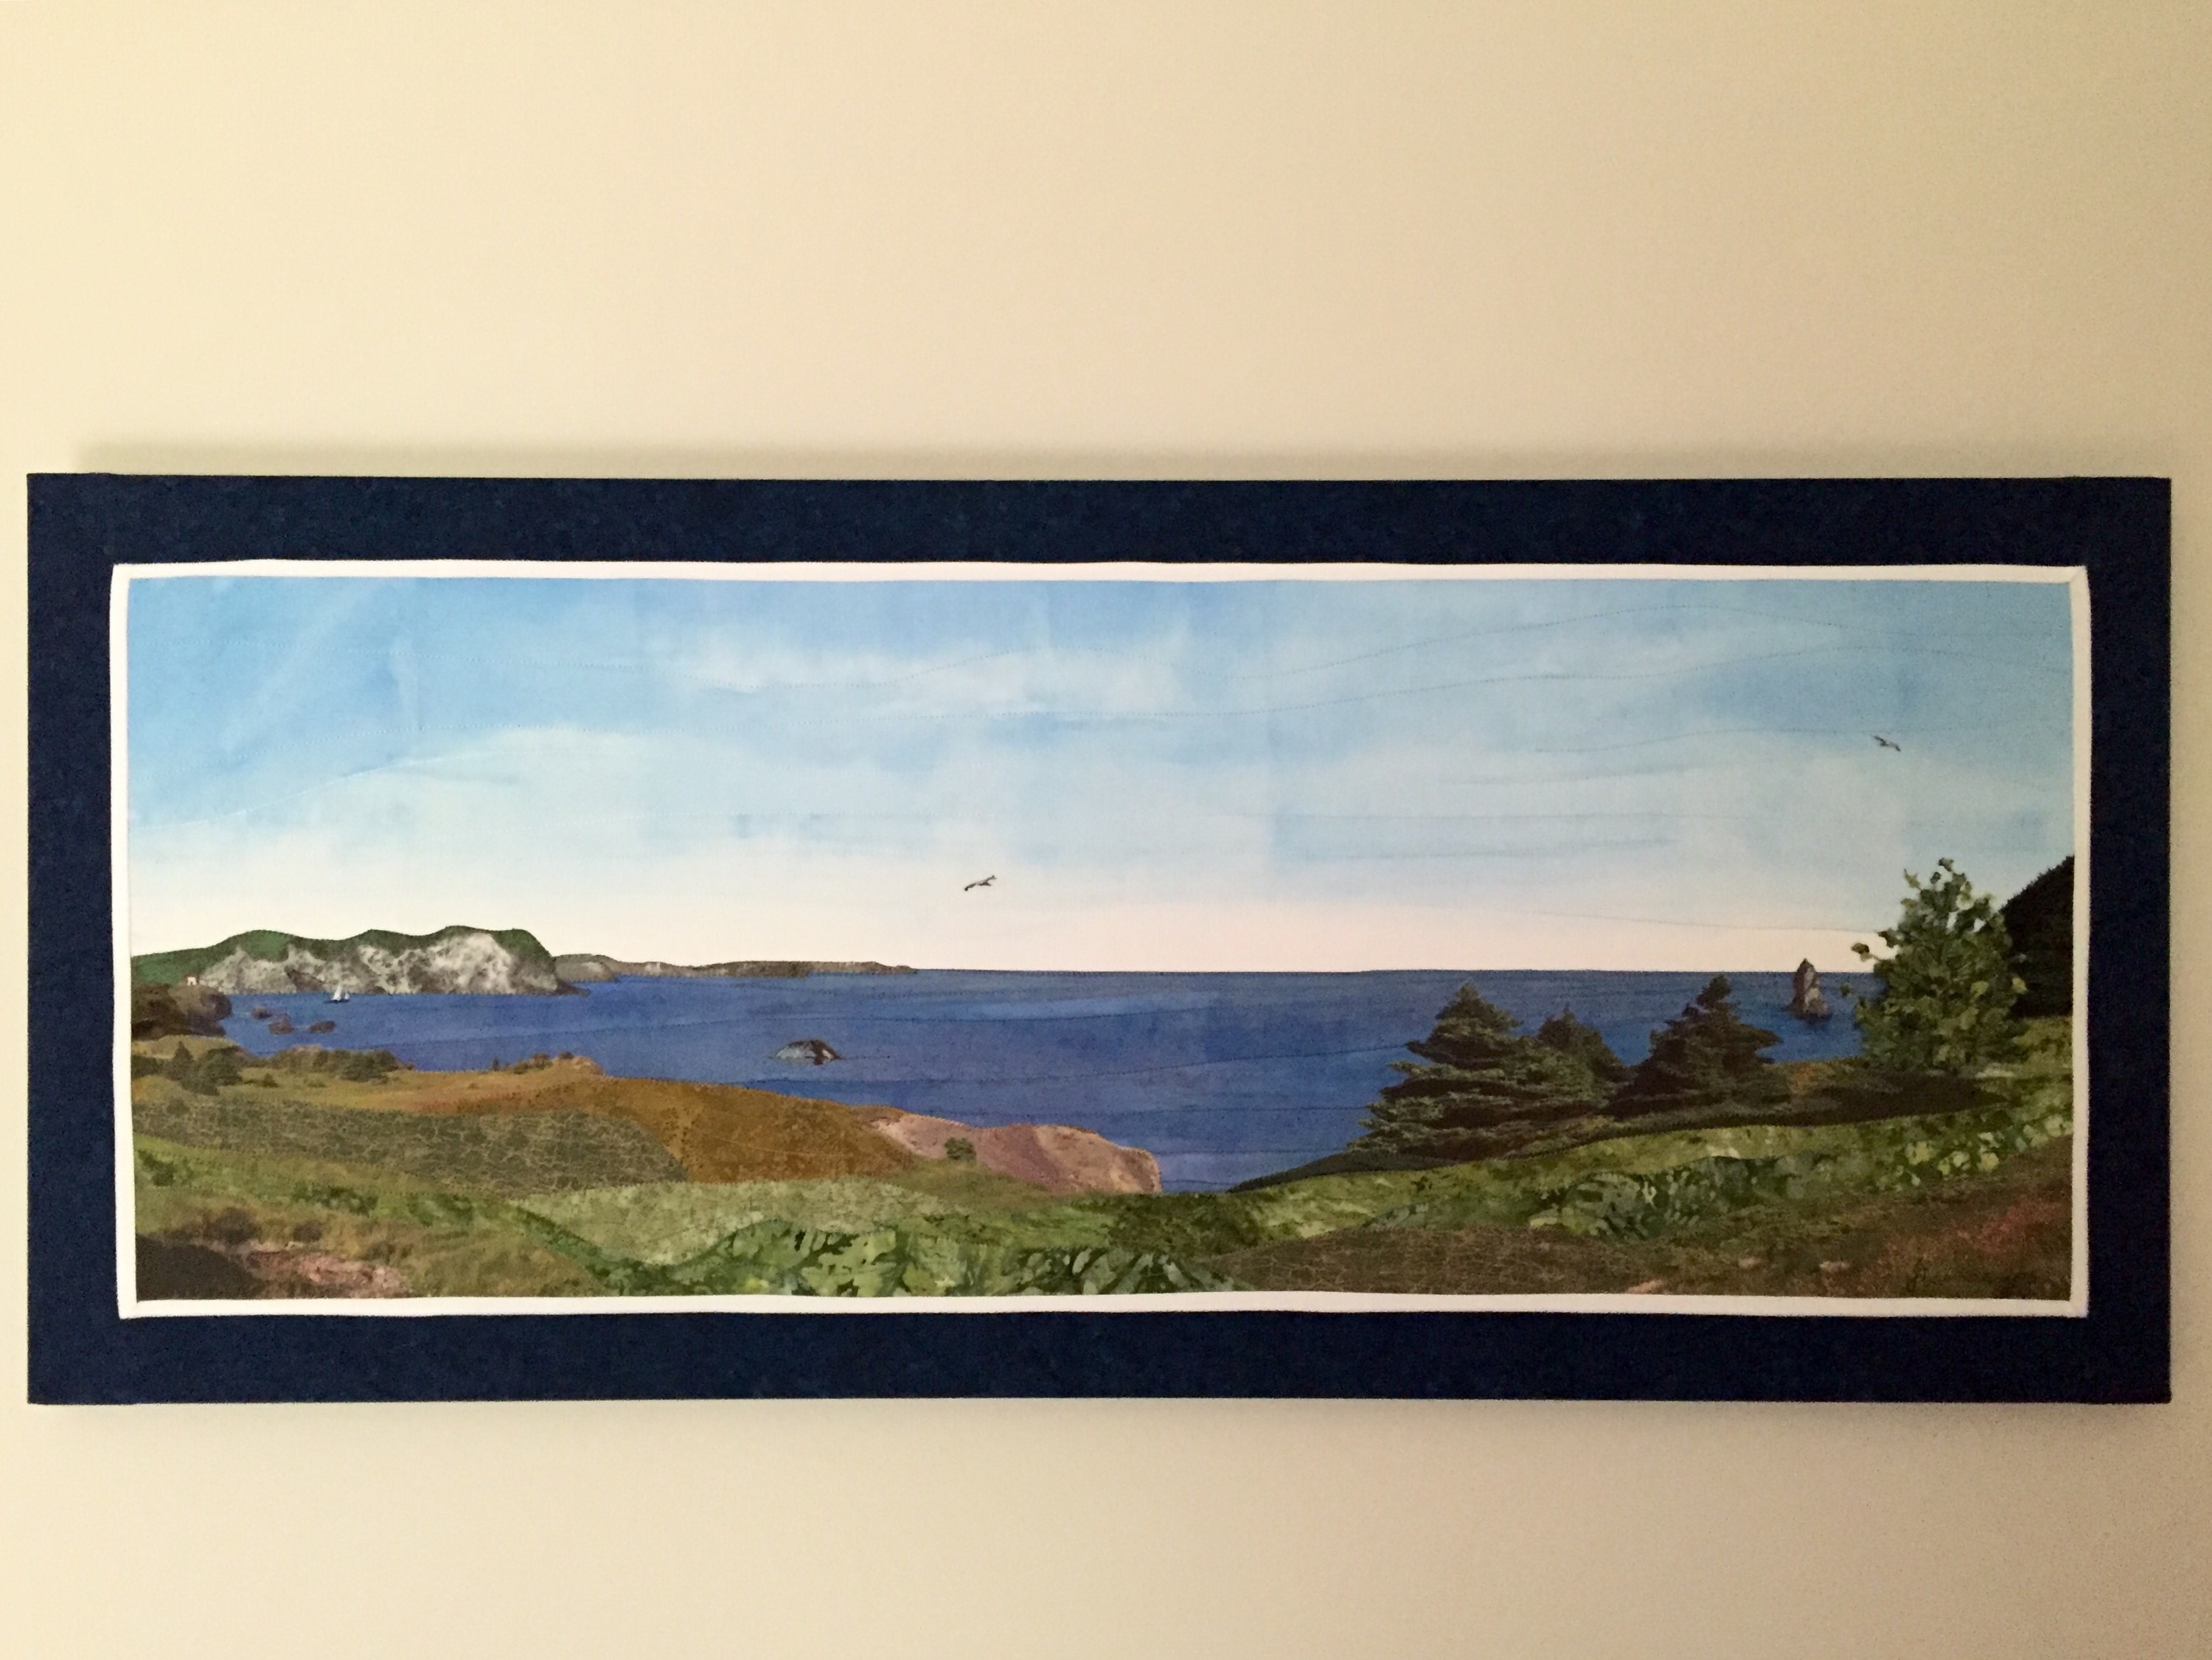
This morning I painted the fabric for sea, land across the bay and sky. I will accentuate the grey tone using a pale grey thread for the thread painting. The sky has come out a hazy, cloudy day. The sea is also greyish. The foreground is likely too wide, will have to try masking an inch or two to see how that looks. It will get thread painted with golden, brown threads in short vertical stitching to simulate the grass at the top of the bank.

Still using my paper cutouts of the three men.

Next step is to set a fusible stabilizer to the four background pieces and fuse them in turn on the muslin. Once that is done, I will work at the thread painting – it will take a couple of days, I’m sure.

To paint the fabric I used a mixture of a small amount of medium blue, pale yellow and strong red acrylic paint to create a muddy grey, added white to lighten it, then a bit of a darker blue to bring the mixture to a bluer grey. I wet the turquoise/white fabric for the sea then spread the paint on it using horizontal strokes with a wide sponge brush. Next I wet the solid white fabric and applied a very diluted wash of the same paint I used for the sea. The coast across the bay is a thin strip of grey fabric with a subtle print (crackle) – I used a bit of the same wash as the sea to end up with subtle hint of blue to help it blend with the sea and sky.

I laid the wet pieces of fabric on a layer of newsprint topped with paper towel to get rid of the excess paint, then hung them to dry using pants hangers in my laundry room. Turned on the fan I keep in that room and the painted fabric was dried within a short while. I press it and then laid each piece on the muslin. I’ve played with proportions trying to keep the horizon off the center line and have moved the men around so the central figure will also be slightly off the vertical midline. In my original photo the men are standing equidistant but I’m going to position the two figures on the right a bit closer together with the one on the left just a bit further to the left – that will affect the vertical positioning and draw the eye away from the center line.

So on to the next step – fusing the background fabrics to the muslin. Actually, I will first have to fuse the muslin to a stiff, heavyish stabilizer just so I have some heft to work with when I go to thread paint.

img_7264

Background Fabrics Fused in Place

Now to the thread painting.

Wind Waiting

I’ve started:

I cut out a piece of muslin as my base – 34″ x 30″ to give me lots of potential border space. Marked out the actual dimensions 20″ x 30″; have marked the horizon (the shore across the bay) and an indication of the land. For the moment I have laid a strip of green fabric to show the bank the guys are standing on (it’s autumn, so the immediate foreground will likely be a more brown colour).

For the moment, the paragliding pilots are paper cutouts 11″ tall just to give me an indication of how the overall composition might turn out. I can tell I will likely foreshorten the sky since I think the pilots appear just a bit too small for the scene – but those dimensions will easily be adjusted once I’ve got water, land, and sky applied and thread painted in place.

So now to paint water and sky – it’s a windy dark day so both will be shades of grey-blue.

Wickedly Difficult…

I’ve begun edge stitching around the circles. Today I managed to get 15 or so done (plus some semi-circles at the edges).

Stitching Around The Circles


What’s making the process so difficult is the amount of bulk I’m having to contend with and the fact that the fused circles are lifting from the quilt surface as I bunch and twist the pinned top and batting in order to get all the way around each circle.

Stitching Detail

If I go slowly enough I can keep on the edge more or less but it’s a tedious task (and it’s tricky stitching where a circle has lifted since the fabric has a tendency to slip). I stopped after 15 circles this afternoon because of the tension building in my shoulders.

Actually it will get easier as more and more circles are stitched because once they’re in place I won’t be having to contend with as much fabric lifting. But oh, there are a lot of circles still to do! 

It is going to take days and then I have to figure out a back and actually quilting all three layers together. What I’m doing right now is just stabilizing the circles.

Who’d Have Thought…

Yesterday I pieced and attached the border for the circles panel. I had originally intended bordering the top using an almost black and an off white printed fabric. But when I opened out the border fabrics and laid out the panel on them, it looked all wrong. So I decided to try a border of graduated colours.

I auditioned the fabrics and thought it could work. Next I cut 3 1/2″ strips and placed them adjacent the panel. I cut pieces, mitred them together (including the corners) and attached the border to the quilt panel. But something didn’t feel quite right. I took some photographs. And when I looked at them I could see my problem: the bottom border had the mitres going in the wrong direction – your eye is pulled immediately to the yellow bottom left corner:

img_8096

First Bottom Border

I was going to live with it, but this morning when I got up I decided to fix that border. I knew I couldn’t just realign the joins – my border would be too short. So I started from scratch, cut new strips (or used what I had leftover from the first border), sewed them together and attached the border to the quilt,

img_8099

Second Bottom Border

It’s really quite interesting how that mitre direction makes such a difference. Now the colour story flows from top left to bottom right and the eye moves around, sees the shades of pale greys fading into the medium greys, into the darker greys/black at the same time the yellow blends with the oranges and reds rather than standing out.

Wouldn’t have thought it would make such a difference.

I have my embroidery machine set up with rayon thread (I have selected several shades of red), a new embroidery needle (an embroidery 75), my sewing star foot (which has an open toe), and a narrow blanket stitch. The quilt top has been pinned to batting and I’m now ready to stitch around all the raw appliqué edges. I won’t get to that until Thursday – tomorrow I have to return to Parrsboro to pick up the two quilts I left behind for the art exhibit featuring all the artists who had shown during the season.

Wind Waiting

I’ve begun my next project – this is a photo I took at least a dozen years ago when I was still paragliding. Retired, I had time to spend in Parrsboro (a two hour drive from Halifax) hanging out wind watching with these three paragliding pilots.

On this particular fall day we’re at Fox River (I think it was) on the Bay of Fundy across from the Valley Coast (able to see from Blomidon to Cape Split) feeling the strong wind whipping up the waves and inflating our jackets. It wasn’t a flying day! Wind much too strong.

Paragliding pilots are patient people – we spend a lot of time chasing wind which is either too light or too blustery. We hung around this location for quite a while before deciding to try further down the shore where we might find conditions a bit calmer.

What I love about this image is the three guys on the edge of the bank (about 100′ above the beach which is where we’d have landed had we been able to launch), patiently and calmly contemplating the weather. They’ve been here before with weather like this. Brian, the one on the left hasn’t even bothered to take out his wind gauge to check windspeed.

pilots1-2

Wind Watching

So this fabric wall art piece will consist of the background of white-capped waves with the bank in the foreground extended downward a bit further than it is in the photo. And then there are the guys. A week or so ago, I isolated each pilot and enlarged him. Last evening, I converted each image to black/white so I could see the contrasts more clearly. Last evening I outlined each photo so I could get an idea of how many different fabrics I might be looking for to construct this image – a lot of bits of closely related colours are going to be needed. This will necessitate a careful going through my scrap boxes and pulling out everything I think might work.

pilots-detail

Pilots rendered in black/white and outlined

I will have to print these images and outline them a second time – to give myself a copy I can cut apart, using the bits as templates for fabric pieces. The men are close to 11″ tall – they’re going to be quite large. I’m going to have to use that height to calculate the dimensions of the finished piece – I haven’t done that yet.

I’ve had the original printed photo at the right side of my desk for the past two months. I’m beginning to actually work on it. Next choosing fabrics, then bringing out my half sheet of styrofoam insulation to use as a pinning board.

This project is definitely underway. I expect it will take a couple of months to complete.

“Whale Watching” Now Hung

Having the piece stretched on a wooden frame was a good idea. The framers were able to pull it flat – the “bubbling” disappeared. When I got the piece home I added a muslin backing with a label. Then I walked around the house looking for a place to hang it. It ended in my living room replacing “Asparagus Field” which now hangs in the spare room. 

I’m pleased with how the finished piece turned out.

Ideas – Next Art Quilt

I’ve been wanting to do a floral piece for a while now. The Cana lilies on my back deck are gorgeous again this year and against a dark foliage background would be striking.

Or a rendering of a phalanopsis also against a dark background would be eye catching.

And my Echineacia have been wonderful again this year (even if I can’t get them to return in the pot). And this one has an insect visitor!

I took this photo of the three pilots “wind waiting” many years ago and it’s an art quilt asking to be made.

And I’ve have this dark image of the cloud funnel we saw from Kirk Hill in Parrsboro with Blomidon across the bay and the glider in a heap on the ground barely visible – it would also make an interesting piece.

I have a lot of great photos that would lend themselves to textile art pieces – choising which to work on next is the challenge!

Whale Watching II

Over the weekend I managed to do a lot on this art quilt – last week I had completed the piecing of the foreground, but there remained all the stitching to be done. I worked at a bit on Saturday and again on Sunday keeping in mind that “less is more”! Then I applied the narrow inner white border topped by the dark blue wide outer border – the mitres at the corners were as close to perfect as I could get them. However, as carefully as I was attempting to keep everything flat, I ended up with a bit of a buckle in the piece itself.

Before taking both borders off and starting over, I decided to take the piece to the framing shop for their thoughts on how I might deal with the problem. They suggested I could stretch it on a frame which would definitely help smooth the piece out – so that’s what I’ve decided to do. When I get the piece back from the framers, I’ll add a backing and a label (by hand, of course). I can’t put an embroidered signature on the front of the work because the piecing is too dense for the close stitching of a machine embroidery (I broke two needles applying the borders at the corners) – so a label on the back it will have to be!
I should have the art piece back in two weeks.

Now on to something new.